1
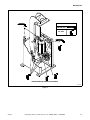
Operation/Maintenance
Mighty Mite and
Super Laundry
Presses
Refer to Page 3 for Model Numbers
SCR1529C
SCR1529C
Keep These Instructions for Future Reference.
(If this machine changes ownership, this manual must accompany machine.)
An LSG Company
831 South First Street, P.O. Box 32270
Louisville, KY 40232-2270
Phone: (502) 587-1292
Sales Fax: (502) 585-3625
Service/Parts Fax: (502) 681-1275
www.cissellmfg.com
Part No. AJ1032
February 2005
Table of
Contents
Model Identification ...........................................................................
3
Safety Information..............................................................................
Explanation of Safety Messages...........................................................
Important Safety Instructions ...............................................................
5
5
5
Introduction.........................................................................................
Nameplate Location..............................................................................
Parts Ordering Information...................................................................
General Description ..............................................................................
Optional Equipment..............................................................................
7
7
7
7
7
Operation.............................................................................................
Operating Controls................................................................................
Pre-Operating Services .........................................................................
Press Operation .....................................................................................
Presses WITHOUT Timers or Presses WITH Timer Set to OFF
Position ...........................................................................................
Presses With Timers ONLY ............................................................
Post-Operating Services........................................................................
9
9
10
10
10
10
11
Maintenance ........................................................................................
Periodic Inspections..............................................................................
Cleaning Press Head ........................................................................
Cleaning Air Filter ...........................................................................
Cleaning Steam Strainer ..................................................................
Cleaning Customer-Furnished Steam Traps ....................................
Lubrication............................................................................................
Adjusting Air Line Lubricator Flow Rate........................................
Filling Air Line Lubricator ..............................................................
Quality Troubleshooting.......................................................................
13
13
14
15
15
15
16
18
18
19
© Copyright 2005, Alliance Laundry Systems LLC
All rights reserved. No part of the contents of this book may be reproduced or transmitted in any form or by any
means without the expressed written consent of the publisher.
AJ1032
© Copyright, Alliance Laundry Systems LLC – DO NOT COPY or TRANSMIT
1
Notes
2
© Copyright, Alliance Laundry Systems LLC – DO NOT COPY or TRANSMIT
AJ1032
Model Identification
Information in this manual is applicable to the
following models:
LDBB (CMMBB)
LDCC (CMMCCY)
AJ1032
© Copyright, Alliance Laundry Systems LLC – DO NOT COPY or TRANSMIT
3
Notes
4
© Copyright, Alliance Laundry Systems LLC – DO NOT COPY or TRANSMIT
AJ1032
Safety Information
Explanation of Safety Messages
Important Safety Instructions
Precautionary statements (“DANGER,” “WARNING,”
and “CAUTION”), followed by specific instructions,
are found in this manual and on machine decals. These
precautions are intended for the personal safety of the
operator, user, servicer, and those maintaining the
machine.
Save These Instructions
DANGER
Indicates an imminently hazardous
situation that, if not avoided, will cause
severe personal injury or death.
WARNING
WARNING indicates the presence of a
hazard that can cause severe personal
injury, death, or substantial property
damage if the warning is ignored.
WARNING
To reduce the risk of fire, electric shock,
serious injury or death to persons when
using your press, follow these basic
precautions:
W372
1. Read all instructions before using the press.
2. Refer to the GROUNDING INSTRUCTIONS in
the INSTALLATION manual for the proper
grounding of the press.
3. Do not allow children to play on or around the
press.
4. Do not reach into the press while the press is in
operation.
5. Do not install or store the press where it will be
exposed to water and/or weather.
6. Do not tamper with the controls.
CAUTION
CAUTION indicates the presence of a
hazard that will or can cause minor
personal injury or property damage if the
caution is ignored.
Additional precautionary statements (“IMPORTANT”
and “NOTE”) are followed by specific instructions.
IMPORTANT: The word “IMPORTANT” is used
to inform the reader of specific procedures where
minor machine damage will occur if the procedure
is not followed.
NOTE: The word “NOTE” is used to communicate
installation, operation, maintenance or servicing
information that is important but not hazard
related.
AJ1032
7. Do not repair or replace any part of the press, or
attempt any servicing unless specifically
recommended in the user-maintenance
instructions or in published user-repair
instructions that the user understands and has the
skills to carry out.
8. To reduce the risk of an electric shock or fire, DO
NOT use an extension cord or an adapter to
connect the press to the electrical power source.
9. Use press only for its intended purpose, finishing
garments.
10. ALWAYS disconnect the press from electrical
supply before attempting any service. Disconnect
the power cord by grasping the plug, not the cord.
11. Install the press according to the
INSTALLATION INSTRUCTIONS. All
connections for steam, electrical power and
grounding must comply with local codes and be
made by licensed personnel when required.
© Copyright, Alliance Laundry Systems LLC – DO NOT COPY or TRANSMIT
5
Safety Information
Safety signs and labels are also placed on the press.
Those signs and labels are limited messages. Where
needed, further explanations are provided in the
manual. These signs are to be inspected for readability
and replaced when missing, damaged or unreadable.
Refer to Maintenance section of this manual for
inspections process. Refer to parts manual for ordering
information.
12. Replace worn power cords and/or loose plugs.
13. Never operate the press with any guards
and/or panels removed.
14. DO NOT operate the press with missing or
broken parts.
15. DO NOT bypass any safety devices.
16. Failure to install, maintain, and/or operate this
press according to the manufacturer’s
instructions may result in conditions which can
produce bodily injury and/or property damage.
NOTE: The WARNINGS and IMPORTANT
SAFETY INSTRUCTIONS appearing in this
manual are not meant to cover all possible
conditions and situations that may occur. Common
sense, caution and care must be exercised when
installing, maintaining, or operating the press.
DANGER
To avoid possible serious injury, ensure
that air and steam supply systems have
adequate RELIEF VALVE PROTECTION or
have the pressures sufficiently limited at
the sources for safe operating pressures
as specified for this equipment.
W333
Any problems or conditions not understood should be
reported to the dealer, distributor, service agent or the
manufacturer.
When using your press (garment finishing appliance),
basic precautions should always be followed,
including the following:
1. Read all instructions.
2. Use appliance only for its intended use.
3. Close supervision is necessary for any appliances
being used by or near children. Do not leave
appliance unattended while connected.
WARNING
To AVOID possible serious injury, BEFORE
performing maintenance or repair tasks:
• Shut off and lock out ALL electric power
to the press.
• Shut off and lock out ALL air service to
the press.
• Shut off and lock out ALL steam service
to the press.
• Allow heated surfaces to cool.
4. To reduce the likelihood of circuit overload, do
not operate another high wattage appliance on the
same circuit.
W358
WARNING
• Failure to install, maintain, and/or operate this machine according to the manufacturer’s
instructions may result in conditions which can produce serious injury, death, and/or
property damage.
• Do not repair or replace any part of the machine or attempt any servicing unless specifically
recommended or published in the service manual and that you understand and have the
skills to carry out.
• Whenever ground wires are removed during servicing, these ground wires must be
reconnected to ensure that the machine is properly grounded and to reduce the risk of fire,
electric shock, serious injury, or death.
W335
6
© Copyright, Alliance Laundry Systems LLC – DO NOT COPY or TRANSMIT
AJ1032
Introduction
Nameplate Location
Parts Ordering Information
The nameplate is located at the right side of the unit.
Always provide the machine’s serial number and
model number when ordering parts or when seeking
technical assistance.
If literature or replacement parts are required, contact
the source from which the machine was purchased or
contact Cissell at (502) 587-1292 for the name and
address of the nearest authorized parts distributor.
General Description
Press is an air operated, steam heated garment press.
Press is designed for pressing of damp garments.
Major press components are:
• Steam heated head and buck.
• One air cylinder dedicated to closing head AND
automatically apply pressing pressure once head
is closed.
• An adjustable muffler that cushions head
opening.
• Head opening springs which extend as head
closes. Springs contract to open head.
• A timer control (optional on some presses) which
automatically opens press head at a set time.
Timer can be turned off for manual operation.
• A two hand, anti-tie down synchronous control
which controls closing of press head.
1
SCR1529C
1
• A filter, regulator, lubricator and lockout
downstream air relieving shut-off and lockout
valve at air inlet.
Optional Equipment
Optional equipment available for press includes:
Nameplate
• Manual water spray for hookup of city water
Figure 1
AJ1032
• Manual water spray with copper water reservoir
© Copyright, Alliance Laundry Systems LLC – DO NOT COPY or TRANSMIT
7
Notes
8
© Copyright, Alliance Laundry Systems LLC – DO NOT COPY or TRANSMIT
AJ1032
Operation
Operating Controls
WARNING
WARNING
To avoid possible serious injury, BEFORE
operating press, ALL personnel MUST be
trained on safe operation.
To avoid possible serious injury, ALWAYS
read and become familiar with operating
instructions before operating press.
W338
W339
6
1
2
3
5
4
SCR95N
Figure 2
Control
1. Right CLOSE pushbutton
2. Pressing TIME selector knob
3. Air Inlet Assembly including
regulator, gauge, lubricator and
downstream air relieving
shut-off and lockout valve
4. Timer ON/OFF switch
5. OPEN pushbutton
6. Left CLOSE pushbutton
Function
When pressed simultaneously with left CLOSE
pushbutton (Item 6), closes press head. Must be
held until head is fully closed.
Determines amount of time head remains
closed when timer switch (Item 4) is ON.
REGULATOR: Reduces supply air pressure to
operating air pressure (80 psi).
DOWNSTREAM AIR RELIEVING
SHUT-OFF AND LOCKOUT VALVE: Turns
air supply to press on and off. Exhausts air
from press when in the off position. Capable of
being locked in off position.
Turns timer ON or OFF.
Opens pressing head. Overrides both CLOSE
pushbuttons and electric timer.
When pressed simultaneously with right
CLOSE pushbutton (Item 1), closes press head.
Must be held until head is fully closed.
Description
Press to actuate.
Set to desired time.
Adjust air pressure regulator so operating
air pressure is 80 ± 5 psi.
Turn knob to on position to supply air to
press. Turn knob to off position to shut
off air supply to press and simultaneously
exhaust air from machine.
Set to desired position.
Press to actuate.
Press to actuate.
NOTE: If EITHER CLOSE pushbutton is released BEFORE head is fully closed and pressing pressure is
applied, head will return to a fully open position.
Table 1
AJ1032
© Copyright, Alliance Laundry Systems LLC – DO NOT COPY or TRANSMIT
9
Operation
NOTE: The following instructions will OPTIMIZE
garment quality and prolong padding life.
Pre-Operating Services
9. If pushbuttons do NOT perform as described in
steps 3 through 8, do NOT operate press. Call a
qualified service technician.
10. Slowly open steam supply and return shut-off
valves to prevent water hammer in steam pipes.
Allow 15 to 20 minutes for press to heat.
Perform the following services daily before using
press:
1. Check condition of buck padding. Padding
should be replaced if:
Press Operation
One complete pressing operation is described in the
following steps.
• Cover is scorched or torn.
• Cover is hard, brittle or not springy.
Presses WITHOUT Timers or Presses
WITH Timer Set to OFF Position
WARNING
1. Perform pre-operating services.
To avoid possible serious injury when
cleaning or repairing traps or strainers:
• Shut off AND lock out ALL steam service
to press.
• Let heated surface cool.
W340
2. Open air supply line and downstream relief shutoff valves. If press is equipped with a timer, close
electrical disconnect switch or circuit breakers.
3. Simultaneously push and hold both CLOSE
pushbuttons (Items 1 and 6, Figure 2) until head
is closed against buck.
2. If press is equipped with a timer, place switch
(Item 4, Figure 2) in OFF position.
3. Dress garment on buck.
4. Simultaneously push and hold both CLOSE
pushbuttons (Items 1 and 6, Figure 2) until head
closes and pressing pressure is applied. Release
both pushbuttons.
NOTE: If either pushbutton is released BEFORE
pressing pressure is applied, head will return to a
fully OPEN position.
4. Release CLOSE pushbuttons. Head should
remain closed.
5. Once garment is sufficiently pressed, press
OPEN pushbutton (Item 5, Figure 2) to open
press.
5. Push OPEN pushbutton (Item 5, Figure 2). Head
should open.
6. Hang or fold pressed article as soon as possible to
preserve finish.
6. Simultaneously push both CLOSE pushbuttons.
As head travels downward, release left
pushbutton. Head should return open.
7. Simultaneously push both CLOSE pushbuttons.
As head travels downward, release right
pushbutton. Head should return open.
8. Simultaneously push both CLOSE pushbuttons.
Have a second person press the OPEN
pushbutton as you continue pressing the CLOSE
pushbuttons. Head should open.
WARNING
To avoid possible serious injury:
• Perform steps 3 through 8 daily before
using press.
• Do NOT use press if ANY step is not
performing properly.
Presses With Timers ONLY
1. Perform pre-operating services.
2. Place timer switch (Item 4, Figure 2) in the ON
position.
3. Set time selector knob (Item 2, Figure 2) to
desired time.
NOTE: Proper time required for pressing varies
with garment material and moisture retention. Set
timer so pressing pressure is applied long enough to
set a press. Proper time is best determined by
experience.
4. Dress garment on buck.
5. Simultaneously push and hold both CLOSE
pushbuttons (Items 1 and 6, Figure 2) until head
closes and pressing pressure is applied. Release
both pushbuttons.
W341
10
© Copyright, Alliance Laundry Systems LLC – DO NOT COPY or TRANSMIT
AJ1032
Operation
NOTE: If either pushbutton is released BEFORE
pressing pressure is applied, head will return to a
fully OPEN position.
Pressing pressure will be applied for period of time
set. When timer times out, head will automatically
open.
NOTE: Head can be opened at any time during
timer controlled pressing by pressing OPEN
pushbutton (Item 5, Figure 2).
6. Hang or fold pressed article as soon as possible to
preserve finish.
AJ1032
Post-Operating Services
Perform the following services after final operation of
day or anytime press is not going to be used for an
extended period of time.
1. Close steam supply shut-off valve.
2. Close downstream relieving shut-off valve at air
inlet.
3. Close steam return shut-off valve.
4. Clean press head if required. Refer to
Maintenance section.
© Copyright, Alliance Laundry Systems LLC – DO NOT COPY or TRANSMIT
11
Notes
12
© Copyright, Alliance Laundry Systems LLC – DO NOT COPY or TRANSMIT
AJ1032
Maintenance
NOTE: SHUTDOWNS due to unscheduled
maintenance can be AVOIDED OR MINIMIZED
by:
• Performing periodic inspections as described,
AND
• Performing lubrication services at the time
intervals specified in these instructions.
WARNING
To avoid possible serious injury:
• ALWAYS close air supply line shut-off
valve AND lock out air service BEFORE:
- opening filter drain cock
- removing filter bowl
Following are recommended precautions that
personnel must understand and apply when
performing general periodic maintenance tasks.
- filling oil bowl
W346
Periodic Inspections
WARNING
To avoid possible serious injury:
• ALWAYS shut off services to press
BEFORE doing ANY maintenance,
service, setup, adjustments or repair
tasks.
• Shut off AND lock out ALL electric power
to press.
• Shut off AND lock out ALL air service to
press.
• Shut off AND lock out ALL steam service
to press.
• Let heated surfaces cool.
• BE SURE moving parts are at a
standstill.
• ALWAYS be careful to AVOID springloaded components when working inside
press.
• ALL maintenance, service, etc., MUST be
performed ONLY by qualified service
personnel.
Frequency at which inspections should be performed,
inspection procedures to be followed, and corrective
actions to be taken are listed in Table 2.
W345
AJ1032
© Copyright, Alliance Laundry Systems LLC – DO NOT COPY or TRANSMIT
13
Maintenance
Time Intervals
Daily or as required
Operation or Inspection
Corrective Action
Visually inspect sight glass in air line filter at
inlet. (Refer to Item 4, Figure 4.)
If moisture and oil are collecting in bowl, autodrain is not working. Clean, repair or replace
auto-drain.
Check buck padding.
Clean padding. Replace padding if it is torn or
brittle or has burn spots.
Visually inspect press head for discoloration or Clean press head with a head surface cleaner as
stickiness.
needed.
Weekly
Inspect air line filter for sediment.
Clean air filter if dirt is present.
Inspect all safety labels. Refer to Parts Manual Replace labels which are damaged, missing or
for location and description of labels.
unreadable.
Every two weeks
Inspect steam strainers in steam inlet and outlet Clean steam strainer if dirt is present.
lines and in traps.
Monthly
Inspect customer-furnished steam traps per
instructions provided with traps.
Clean customer-furnished steam traps if dirt is
present.
Check all steam and air connections for visual
signs of leakage.
Tighten any loose connections. Replace lines
where necessary.
Check condition of the flexible steam hoses.
Replace steam hoses with broken braids.
Remove all covers and check cap screws,
fittings and cylinders for security of
attachment.
Tighten as required.
Every six months
Table 2
WARNING
Cleaning Press Head
Cleaning press head is periodically required. Press
head requires cleaning if discoloration transfers from
head to garments or garments stick to head as it opens.
WARNING
If using a surface cleaner which requires
heat to the press, use industry approved
heat protective mitt or other heat protective
device as press heads are cooling down.
W344
Once precautions in above WARNINGS have been
met, follow directions provided with surface cleaner.
To avoid possible serious injury, heads
should be cleaned ONLY by properly
trained personnel.
W342
WARNING
To avoid possible serious injury, ALWAYS
shut off services to press BEFORE
cleaning press heads:
• Shut off AND lock out ALL electric power
to press.
• Shut off AND lock out ALL air pressure to
press using relieving shut-off valve at air
supply inlet.
• Reduce to zero AND lock out ALL steam
pressure to press.
• Let heated surfaces cool.
W343
14
© Copyright, Alliance Laundry Systems LLC – DO NOT COPY or TRANSMIT
AJ1032
Maintenance
Cleaning Air Filter
Cleaning Steam Strainer
Air filter removes foreign matter and condensate from
supply air as it passes through filter. Frequency at
which the filter baffle plate and filter element should
be cleaned depends upon amount of condensate and
foreign matter in supply air. Condensate level should
not rise above baffle. This is the sign of a faulty autodrain which would need to be cleaned, replaced or
repaired.
Strainer removes foreign matter from steam.
Frequency at which strainer must be cleaned is
dependent upon amount of foreign matter suspended
in steam. Removing and checking strainer screen for
cleanliness after two weeks or after 80 hours of
operation is recommended. If little or no foreign
matter has collected on screen, time between
inspections can be increased accordingly.
Erratic regulator operation or loss of regulation is
almost always due to dirt.
Cleaning Customer-Furnished Steam
Traps
The following steps outline the procedure for cleaning
air filter.
1. Close and lock air supply line shut-off valve.
2. Remove filter bowl. Use a strap wrench if
required. Disassemble regulator, making notes as
a guide for reassembly.
3. Clean parts with household soap (Dawn™,
Ivory™, etc.) and blow out body with
compressed air.
NOTE: DO NOT use cleansing agents such as
acetone, benzene, carbon tetrachloride, gasoline, or
toluene, which are damaging to plastic sight glass.
Some steam traps are provided with internal steam
strainers. These strainers should be cleaned. Refer to
Cleaning Steam Strainer.
All repairable traps should be opened at least once a
year to visually check operating mechanisms.
Remove sediment and dirt from trap body. Mechanism
may require cleaning by immersing in appropriate
cleaning fluid.
NOTE: Check instructions provided with trap or
with trap manufacturer for appropriate cleaning
fluids.
4. Reassemble per notes from step 2. Ensure o-ring
is in position on filter bowl. Tighten bowl to filter
body. Tighten slightly more than hand tight.
5. Open air service shut-off valve.
6. Check for leaks and adjust as necessary.
AJ1032
© Copyright, Alliance Laundry Systems LLC – DO NOT COPY or TRANSMIT
15
Maintenance
Lubrication
WARNING
Lubrication points are illustrated in Figure 3.
Lubrication points, time intervals, types and services
are listed in Table 3.
To avoid possible serious injury, ALWAYS
close air supply line shut-off valve AND
lock out air service BEFORE performing
lubrication services.
If complete details for lubrication services are not
listed in Table 3, get detailed instructions from
referenced paragraph.
Lubrication Point
W347
Time Interval
Type of Lubricant
Lubrication Service
NOTE: FAILURE to use correct lubricants can result in DAMAGE to machine mechanical components as well as air
system cylinders and valves.
(A) Pressure arm shaft
bearing and cylinder head
bearing
Every three months
Use a premium high
temperature EP2 grease.
Lubricate with one shot of
grease from a low pressure
grease gun. If rod end fittings
do not have grease fittings,
squirt a few drops of oil on
rod ends.
(B) Pivot pins, rod ends and
cylinder shaft
Every three months
ISO VG 32 grade oil.
Squirt a few drops of oil
around circumference of each
shaft.
(C) Air line lubricator
As required
ISO VG 32 grade oil.
Fill bowl to 3/4 full when
level drops below 1/4 full.
Refer to Adjusting Air Line
Lubricator Flow Rate.
(D) Air cylinder
Every month
ISO VG 32 grade oil.
Remove air line at bottom of
cylinder. Prime oil can and
give one complete squeeze
into air line.
NOTE: Buna-N seals are used extensively throughout the valves and cylinders in the air circuit downstream
from the inline oiler. Oils containing graphite fillers, detergent, etc., and fire resistant and synthetic oils are
NOT COMPATIBLE with Buna-N seals. Seal swelling and valve malfunctioning will result with use of
IMPROPER OILS.
Table 3
16
© Copyright, Alliance Laundry Systems LLC – DO NOT COPY or TRANSMIT
AJ1032
Maintenance
SYMBOLS
A
GREASE GUN
OIL CAN
A
C
B
D
B0159
INSPECTION AND LUBRICATION POINTS
SCR102N
Figure 3
AJ1032
© Copyright, Alliance Laundry Systems LLC – DO NOT COPY or TRANSMIT
17
Maintenance
Adjusting Air Line Lubricator Flow Rate
Filling Air Line Lubricator
Air system oil lubricator should be adjusted so
approximately one drop of oil every 20 machine cycles
is metered into air system. The following steps outline
the procedure for adjusting air system oil lubricator:
When oil level falls below 1/4 full, refill bowl to
3/4 full (oil level approximately 1/2 inch [12.7 mm]
from top) with ISO VG 32 grade oil. Refer to Table 3.
NOTE: Do NOT overfill bowl. Damage to filter,
regulator, valves and cylinders WILL result and
void warranty.
IMPORTANT: To avoid o-ring leaks at top of the
bowl, do NOT remove bowl. Fill through plug.
1. To initially adjust flow rate, turn on air, cycle
press and set screw to obtain desired flow rate.
After system reaches normal operating
temperature, check drip rate again and adjust as
required.
WARNING
To avoid possible serious injury, ALWAYS
close air supply line shut-off valve AND
lock out air service BEFORE filling oil
bowl.
2. To decrease flow rate, turn adjusting screw
clockwise. Likewise, turn counterclockwise to
increase oil flow.
W348
3. Use ISO VG 32 grade oil (refer to Table 3). Refer
to Filling Air Line Lubricator for filling
instructions.
1
2
7
3
6
4
5
1631605B
SCR103N
1
2
3
4
Oil Flow Rate Adjusting Screw
Regulator
Air Line Lubricator
Sight Glass
5
6
7
Air Filter
Oil Fill Hole
Downstream Relieving Shut-Off Valve
Figure 4
18
© Copyright, Alliance Laundry Systems LLC – DO NOT COPY or TRANSMIT
AJ1032
Maintenance
Quality Troubleshooting
Problem
“Crow’s feet” and
wrinkles close to buttons,
seams or folds
Cause
Solution
Old or hard padding
Check by placing a piece of cotton flannel on buck and pressing
garment again. If quality improves, replace padding.
Clogged air filter causing
low air pressure
Clean air filter.
Low incoming air pressure
Check the air pressure gauge at air inlet. It should be a constant
80 psi. Turn regulator knob to adjust if required.
Low pressing pressure due
to blow by in pressing
pressure air cylinder
When press head is closed and pressing pressure is applied,
check oil holes of pressing pressure air cylinder with a soap and
water solution for leaks. Air leaking out oil holes would indicate
blow by. Replace cylinder cup and seals.
Damp patches on padding Low head or buck
temperature
Check head surface temperature with a pyrometer or comparable
measuring device. Head temperature should be 325° to 340°F. If
temperature is below recommended range, review possible
causes below.
Clogged steam strainer*
Clean steam strainer.
Low steam pressure
Check pressure at steam connection. It should be a constant
100 psi minimum (115 psi is recommended). Make corrective
action to steam system as required.
Faulty steam trap or check
valve*
Check steam traps and check valves in steam outlet line for
proper operation. Clean or replace traps as necessary.
Accumulation of burnt
starch or dirt on padding
Replace padding.
Chemical residue in
garment from washer
Test pH of final rinse water from washer. It should be 7.
Rough finish on garment
Garment pressed while too
dry
Before pressing, garments should be extracted or conditioned to
approximately 40% – 50% moisture retention. Garments should
be stored in plastic until time for pressing.
“Leave off” marks occur
where a portion of the
garment protrudes from
the buck
Improper head pressure
and/or alignment
Adjust head pressure and alignment.
Brown stain on finished
garment
* Customer-furnished
Table 4
AJ1032
© Copyright, Alliance Laundry Systems LLC – DO NOT COPY or TRANSMIT
19