1
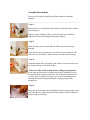
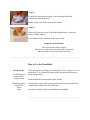
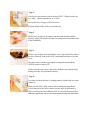
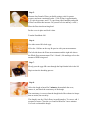
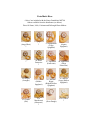
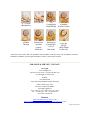
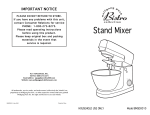
Simac PastaMatic MX700
Contents:
Assembly Instructions
How to Use the PastaMatic
Troubleshooting Tips
Extruding Discs
Parts & Service
Manuals
The Simac PastaMatic MX700 electric pasta maker makes approximately 1-1½ Lbs of pasta. It
comes with 6 extruding discs, a specially sized and marked liquid measuring cup, and a special
wrench for changing discs.
To get good results, it is important to follow all the instructions and measure ingredients
accurately. The dough will seem different from that which is kneaded by hand, and it is essential
to know this difference.
For basic pasta, you will need flour, plus water or whole eggs. Start with bleached, all purpose
flour. Humidity can affect its volume, so use a scale to measure the flour accurately. With some
practice, you can experiment with other types of flour after you become familiar with how the
dough should feel when it is ready to be extruded. You will also need a flour sifter, timer, and
possibly measuring spoons.
For other types of flour, the right consistency of the dough is crucial for proper extrusion and to
avoid damaging the machine. This consistency differs from that used with manual pasta makers,
so we recommend that you start with the basic pasta recipe indicated below, using all purpose
flour. You can then use the desired flour and adjust its consistency accordingly during kneading.
For a full recipe, plan on using a 10 qt stock pot, filled with 8 qts of water. Add 2 tablespoons
of salt when boiling and before adding pasta. You can also add a tablespoon of oil, if you wish,
to keep pasta strands from sticking to each other. Add the pasta to the boiling water and start
checking for doneness after 30 seconds. Tubular and thicker pasta takes longer.
Use it freshly made, for best taste. For use within a few hours, flour and wrap it airtight in plastic
wrap and store in the refrigerator. To store it for later use, place it in an airtight container,
flouring generously and layering to prevent sticking, and put it in the freezer. It will take longer
to cook pasta that is stored.
Specifications:
UL Listed, 120 VoltsAC, 60 Hz, 2.3 Amps, Max 230 Watts
Limited continued use: 20 minutes
Equipped with automatic safety device with off switch
Weighs 15.6 Lbs
9.75" x 9.75" x 10.25" high
11" deep with Ring Nut in place
Made in Italy
Simac and PastaMatic are Registered Trademarks
Warranty:
The PastaMatic MX700 is covered by a one year Limited Warranty covering defects in materials or workmanship. Within the warranty period,
DeLonghi will repair or replace such defectives at no other cost than shipping it to a service center. Complete details are on the warranty card
included with the machine.
Assembly Instructions
Here you will learn to assemble (and disassemble) the machine
properly.
· Step 1.
Place the base on a clean, dry surface near an electrical outlet, with the
logo facing you.
Slide the rotary housing all the way into the open side of the base,
ridged side down and rectangular opening facing up.
· Step 2.
Insert the rotary screw, metal end first, all the way into the rotary
housing.
It will be necessary to rotate the screw for it to fit in completely. The
end of the screw should be flush with the end of the rotary housing.
· Step 3.
Grasp the shutter slide, and firmly push it all the way into the slot over
the rotary housing. It will click in place.
· Make sure slide is fully in place before adding any ingredients.
Look down inside the bowl to make sure the slide completely covers
the opening in the bottom of the bowl. The slide must remain closed
securely in place during the mixing cycle to avoid ingredients from
entering the rotary housing prematurely, clogging and possibly
damaging it.
· Step 4.
Insert the bowl onto the base, matching the notch on the top edge of the
bowl with the tab of the opening located towards the front of the base,
and pressing down firmly.
· Step 5.
Fit the blade, kneading foot down, over the central metal shaft
extending up through the bowl.
Rotate it until it sits firmly down on the bottom.
· Step 6.
Place the locking nut on top of the blade shaft and turn it clockwise
until it is firmly in place.
Your machine is now assembled and ready to work.
To operate the Pastamatic:
· The bowl must be firmly in place;
· The bowl cover lip must be inserted in the slot in back;
· The latch must be securely locked in the front.
How to Use the PastaMatic
Recipe Needs:
1 lb bleached all
purpose flour
4 eggs or water
Measuring spoons
Flour sifter
Timer
Scale
These instructions will help you to make about 1½ Lb of pasta. You can
make about ¾ Lb of pasta by using half the ingredients and measures
on the cup provided.
Read through all the instructions before starting.
Extruder discs, liquid measuring cup and electric cord are stored in the
compartment located at the rear of the unit.
See above for more details on assembling the PastaMatic.
· Step 1.
Check to be sure the main switch is turned "OFF." (When it sticks out,
it is "OFF;" when it is pushed in, it is "ON.")
Be sure the bowl is empty of all accessories.
Push the Shutter Slide all the way into the slot.
· Step 2.
Put the bowl in place by inserting it into the main housing with the
Bowl's Locking Tab fitted to the Bowl Locking Notch, toward the front
of the PastaMatic.
· Step 3.
Put the cover in place by first fitting the Cover Lip into the Slot toward
the rear of the top. Push in the Cover Latch and press down to lock the
cover.
Plug the electric cord into a grounded 3-prong outlet and push the
ON/OFF switch to turn it ON.
If it does not turn on, remove and replace both the cover and the bowl,
making sure they are positioned correctly.
· Step 4.
Now that you know the unit is working properly, unlatch the cover and
remove it.
Make sure the slide is fully in place before adding any ingredients.
Check from above the bowl to make sure the space at the bottom is
fully covered by the closed Shutter Slide. If it is not fully closed, flour
and other ingredients can clog and permanently damage the PastaMatic.
· Step 5.
Measure One Pound of flour, preferably using a scale for greater
accuracy and more consistent results. (1 Lb of flour is approximately
3.25 cups dry measure, and 3.75 cups when sifted; humidity and grade
of flour can affect this measure. Do yourself a favor and buy a scale.)
Place the flour into the mixing bowl.
Put the cover in place and lock it shut.
Turn the PastaMatic ON.
· Step 6.
Use either water OR whole eggs.
Fill to the 1 Lb line on the cup. Be precise with your measurements.
The left side shows the Water measurements and the right side shows
the Whole Eggs measurement. The 1 Lb and ½ Lb markings refer to the
amount of flour being used.
· Step 7.
Slowly pour the eggs OR water through the liquid intake hole in the lid.
Begin to time the kneading process.
· Step 8.
Allow the dough to knead for 3 minutes, then unlatch the cover,
remove it, and check the consistency of the dough.
The consistency is correct when the dough looks like walnut-size lumps
that are moist, but not sticky.
The dough is too dry if feels floury in small granules. To correct, add 1
teaspoon of water. Close the cover and let knead for 3 more minutes.
You can't overknead the dough.
The dough is too wet when it feels sticky in large, smooth balls. To
correct, add 3 tablespoons of flour. Close the cover and let knead for 3
more minutes. You can't overknead the dough.
· Step 9.
Unlatch the cover, remove it, and check the consistency of the dough. If
it feels too wet or too dry, repeat Step 8 above.
You are ready to begin the extrusion process when the dough looks like
walnut-sized lumps that are moist, but not sticky.
Turn the PastaMatic OFF by pressing the ON/OFF switch so that the
button sticks out. Replace and lock the cover.
· Step 10.
Pull out the Slide, then turn the PastaMatic ON.
It will take about one minute for dough to start coming out of the open
end of the Rotary Housing.
Let the machine run until a couple of the larger sized lumps begin to
come out.
Turn the machine OFF by pressing the ON/OFF switch so that the
button sticks out.
Replace the lumps of dough into the Mixing Bowl, and replace and lock
the cover.
· Step 11.
Choose a disc, immerse it for a second in warm water and set it in place
on the end of the Rotary Housing.
Some discs have three tabs on the back, that must line up with the
notches on the Rotary Housing.
Screw the Ring Nut in place over the disc, for a fit snug.
· Step 12.
Turn the machine ON by pressing the ON/OFF button.
It will take about 2 minutes for extruded pasta to emerge from the disc.
Remove the first 2 or 3 inches of pasta and place it back into the
Mixing Bowl.
The pasta should now extrude smoothly.
Cut to the desired length.
· Step 13.
When all the dough is out of the Mixing Bowl and very little is
extruding, stop the machine.
Turn the PastaMatic OFF by pressing the ON/OFF switch so that the
button sticks out.
Remove the Ring Nut using the Wrench, and remove the disc.
Turn the PastaMatic ON by pressing the ON/OFF switch, and let the
remaining dough extrude from the open Rotary Housing. Keep hands
away from this area.
· Step 14.
Disassemble the machine, remove excess dough, and leave the parts to
dry completely. You can let them dry overnight.
Rap the disc sharply against the counter and the dough will fall right
out.
Wash the disc and other parts completely. All removable parts are toprack dishwasher safe.
Dry parts thoroughly, reassemble, and store.
WHAT TO DO IF...
Troubleshooting Hints
...pasta sticks together This may happen more likely if the strands are thin, but the real reason
as it comes out of the is because the dough was too wet before the extrusion.
machine
Lightly oil or flour your hands and run the pasta through to coat it as it
comes out of the machine.
Remember to check the dough next time, for proper consistency, before
you begin to extrude.
...strands aren't all
the same length
Hold strands out as they extrude, or the bottom strands will be shorter
than the upper strands.
...strands are raggedy This should improve somewhat as the dough extrudes and the disc gets
warmer.
along the edges
It will only affect the first 20 or so inches or pasta.
Cut the strands that are raggedy and put them back in the Mixing Bowl.
...dough revolves
around blade and
isn't pushed out by
kneading foot;
strands come out
gummy and stick to
each other
This dough is too wet.
Replace the Shutter Slide and remove the disc.
Add a little more flour and knead until proper consistency, for 3 to 5 or
more minutes more.
Then remove the Shutter Slide, attach the disc and continue the
extrusion process.
...cover pops open and Push the dough down into the Mixing Bowl, or remove some of the
dough so that it won't rise all the way up the bowl to the cover as it
stops the machine
kneads.
You can add the dough back later.
...dough is almost
used up and what
remains won't go
through
Stop the machine, remove the cover and break the remaining dough
into pieces small enough to fit into the hole at the bottom of the bowl.
Dough should now come through the disc.
This can happen if the dough was too wet before the extrusion.
Remember to check the dough the next time, for proper consistency,
before you begin to extrude.
...flour sprinkles out Don't pull the Shutter Slide out completely.
of shutter slide
opening while pasta is You can leave it in part way as long as it doesn't block the dough from
dropping into the Rotary Housing chamber.
extruding
Let the pasta dry after disassembling the housing and discs.
...you want a quick
way to clean the parts
Just tap each piece on a hard surface, and the dried pasta will fall right
after making the
off.
dough
...dough sticks in deep Put disc in freezer for 10 minutes, tap on a hard surface and clean up
with a nut pick, if necessary.
slots of some discs
and is hard to flake
The frozen dough should come off easily.
away to clean
...you don't want to
cook the pasta right
away
Wrap it airtight in plastic wrap and refrigerate if storing for only several
hours.
Or, the dough can be wrapped airtight in plastic wrap, aluminum foil or
airtight container, and frozen until you want to use it.
Re-read the directions, then contact the distributor, listed at the bottom
...these hints don't
answer your question of this page.
The model and serial numbers of your PastaMatic are on a label either
on the back or on the bottom of the unit.
PastaMatic Discs
6 discs* are included with the Simac PastaMatic MX700
Others available from the distributor (see below).
Discs fit Simac, Lello, Cuisinart and DeLonghi Pasta Makers.
#1 Capellini
(Angel Hair)
*
#2 Spaghetti
*
#5 Linguine
*
#6 Small
Fettuccine
*
#9 Sfoglie
(Lasagne)
#13 Penne
(Ziti)
#10 Bucatini
(Hollow
Spaghetti)
#14
Maccheroni
(Macaroni)
*
#3 Spaghettoni
(Large
Spaghetti)
#4 Chitarre
(Square
Spaghetti)
#7 Tagliatelle
(Fettuccine)
#8 Pappardelle
(Large
Fettuccine)
#12 Bucato
#11 Bucatini
(Large Hollow
Rigati
Spaghetti)
(Ridged Hollow
Spaghetti)
#15 Pizza
(Pizza Dough)
#16 Cookies
*
#17 Grissini
(Breadsticks)
#18 Gnocchi
#19
Conchigliette
(Small Shells)
#20 Pasta Del
Contadino
(Farmer's Pasta)
#21 Fili D'Oro
(Golden
Threads)
#22
Maccheroni
Quadrati
(Square
Macaroni)
#23
Maccheroni
Quadrifoglio
(Clover
Macaroni)
#24 Sfoglia
Larga per
Ravioli
(Wide Width
for Ravioli)
All the discs for the Simac (MX 700, PastaMatic 1000, PastaMatic 1400) also fit the Lello (PastaMaster 2200 and
PastaMaster 3000PRO), the DeLonghi (PastaMatic), and the Cuisinart pasta machines.
FOR PARTS & SERVICE, CONTACT:
De'Longhi
www.delonghi.com
800-865-6330 (8:30 am – 5:00 pm EST Mon -Fri)
www.delonghi-accessories.com
By Mail:
Fox International
23600 Aurora Rd., Bedford Heights, OH 44146
Simac-Vetrelli S.p.A., Italy
Divisione Commerciale SIMAC
De'Longhi Appliances
Via L. Seitz, No. 47, 31100 Treviso (TV) - Italy
Tel. + 39 0422 4131 Fax + 39 0422 41309
www.simac-vetrella.com
Manuals:
Simac PastaMatic Recipe Book (11.5MB)
Simac PastaMatic 1400, 1000, and 700 User Manual & Recipes (3.5MB)
Current as of 3/17/10