1
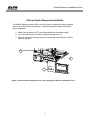
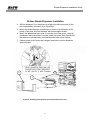
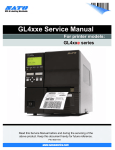
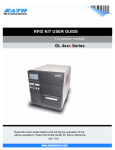
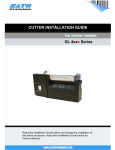
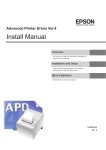
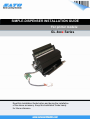
SIMPLE-DISPENSER INSTALLATION GUIDE
For printer models:
GL 4xxe Series
Read this Installation Guide before and during the installation
of the above accessory. Keep this Installation Guide handy
for future reference.
Simple-Dispenser Installation Guide
1
General
1.1 Important information
This quick guide provides important information on how to setup your new
SATO product.
Be sure to read this quick guide thoroughly before using this printer. It is
an integral part of the product and should be kept in the immediate vicinity
of the device and available to the operating staff.
1.2 Limitation of liability
All information in this manual have been compiled under due
consideration of federal standards and regulations.
The manufacturer will not be held liable for damage resulting from:
z Disregarding these instructions
z Unintended use of the printer
z Unauthorized technical modifications
z Use of unapproved spare parts
z Use of unapproved consumables
FCC WARNING
Changes or modifications not expressly approved by the party responsible for
compliance could void the user’s authority to operate the equipment.
NOTICE
This equipment has been tested and found to comply with the limits for a
Class B digital device, pursuant to part 15 of the FCC Rules. These limits
are designed to provide reasonable protection against harmful interference
in a residential installation.
This equipment generates, uses and can radiate radio frequency energy
and, if not installed and used in accordance with the instructions, may cause
harmful interference to radio communications. However, there is no
guarantee that interference will not occur in a particular installation.
2
Simple-Dispenser Installation Guide
1.3 Explanation of symbols
This instruction manual uses various warning icons to help you
understand the safe operation of your printer. Explanations of the icons
are below.
WARNING!
Indicates neglectful or erroneous use may cause
irreparable damage to the product, serious injury to the
operator, or worse.
CAUTION!
Indicates a specific point where caution should be used.
The graphic within the triangle will indicate the specific
issue, i.e.; the sign on the left indicates a caution for
potential electrical shock.
CAUTION!
Indicates a potentially hazardous situation which, if
not avoided, may result in damage to your product
or host equipment.
NOTE!
Emphasizes useful tips or recommendations for
efficient and smooth operation of your printer.
3
Simple-Dispenser Installation Guide
1.4
Contact and Document Information
Extensive contact information of worldwide SATO operations can be found on the Internet at
www.satoworldwide.com
Version: SI-GL4xxe-01rA-05-06-07-SSDIG © Copyright 1994 – 2007
All rights reserved. No part of this document may be reproduced or issued to third parties in
any form whatsoever without the express permission of SATO. The materials in this document
are provided for general information and are subject to change without notice. SATO assumes
no responsibilities for any errors that may appear.
4
Simple-Dispenser Installation Guide
GL4xxe Simple-Dispenser Installation
The Simple Dispenser comes with its own front cover to replace the factory-installed
front cover of the GL4xxe series printer. Follow the procedures below to install the
Simple Dispenser.
1. Make sure the printer is OFF and disconnected from the power supply.
2. Lift up the side cover to access the original housing cover (1).
3. Remove the original housing cover by unscrewing the thumbscrew (2) at the
side of the printer.
4
2
1
Figure 1. Removing the existing front cover and preparing to install the replacement cover.
5
Simple-Dispenser Installation Guide
GL4xxe Simple-Dispenser Installation
4. Affix the dispenser (3) to the printer by plugging the white connector (4) into
the complementary connector (4) on the printer.
5. Mount the simple dispenser by hooking it as shown in the illustration at the
bottom of the page. Affix the dispenser with three supplied screws.
6. Mount the replacement front cover (5) onto the front of the printer, using the
thumbscrew removed in Step 3 to screw it back into place. Note: Ensure that
the cable is not pinched when you install the label cutter cover in place.
7. Restore power to the Printer and configure the printer to use the dispenser
(see next page).
5
4
3
Figure 2. Installing the dispenser and replacement front cover
6
Simple-Dispenser Installation Guide
GL4XXE SIMPLE-DISPENSER CONFIGURATION
Dispenser setup via the LCD Menu
1. Turn the printer ON and wait for it to initialize and go into ONLINE mode.
OFFLINE
2. Press the Line Button to go to OFFLINE mode.
3. Press the Function Button to display the different menu icons
ADVANCED MODE
4. Select the Advanced Mode Menu and press the Enter Button.
5. Scroll to the Media Handling menu using the cursor buttons.
6. Once the simple dispenser has been installed correctly, this menu
allows you to select the Peel-Off option to activate the dispenser’s
functionality. A Remove Label message will display on the LCD
prompting label removal for each label that has been printed.
7. When done, go back to ONLINE mode after saving the new settings.
7
Peel-Off
Figure 3. Setting
the Media
Handling option
Simple-Dispenser Installation Guide
8