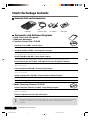
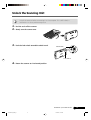
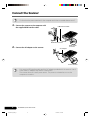
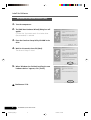
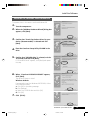
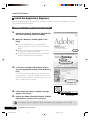
1
Overview
Setup and Scanning
Check the Package Contents
P. 4
Unlock the Scanning Unit
P. 5
Connect the Scanner
P. 6
Install the Software
Install the Scanner Driver
P. 7 - P. 9
Install the Application Programs
P. 10 - P. 11
Try Scanning
P. 12 - P. 13
Try the Additional Features
How to Use the Scanner’s Buttons
How to Scan Films
How to Use the Software
ScanGear CS-U (scanner driver)
ScanGear Toolbox (scanning utility)
P. 14
P. 15 - P. 18
P. 19 - P. 20
P. 21 - P. 22
Software Program Manuals ---------------- Read the electronic manuals (PDF files)
on the CD-ROMs
Operating Tips ---------------------------------- Read the “Troubleshooting” section of
the CanoScan Setup Utility CD-ROM
D1250U2F Quick Start Guide
*D1250U2F_QSG_E
1
11/24/01, 7:18 AM
1
Safety Precautions
Please read and take note of the following precautions before using the equipment.
WARNING
Warns about operations that may lead to death or injury to persons if not performed
correctly. In order to use the equipment safely, always pay attention to these warnings.
CAUTION
Cautions about operations that may lead to injury to persons or damage to property if not
performed correctly. In order to use the equipment safely, always pay attention to these
cautions.
About Locations
WARNING
• Do not place the equipment near flammable liquids such as alcohol or thinners. If the internal
electrical parts come in contact with flammable liquids, fire or electrical shock may result.
• Do not place the following objects on top of the equipment. If the internal electrical parts come
in contact with these objects, fire or electrical shock may result.
- metallic objects, such as necklaces
- containers with liquid, such as cups, vases or flower pots
If any of these objects or liquids enter the equipment, immediately unplug the AC adapter and
contact your retailer or Canon Customer Support Help Desk.
CAUTION
• Do not place the equipment in the following areas. Fire or electrical shock may result.
- Areas with high humidity
- Areas subject to direct sunlight
- Areas with high temperatures
- Areas near sources of flame
• Do not place the equipment on shaky stands, unstable surfaces or surfaces subject to frequent
vibrations. If the equipment falls, it may cause injuries.
• Do not place heavy objects on the equipment. Objects may fall and cause injuries.
About the Power Supply
WARNING
• Do not damage, mutilate or modify the AC adapter. Do not place heavy objects on, pull or
excessively bend the cord of the AC adapter. Damaged wires may cause fire or electrical shock.
• Do not plug in/unplug the AC adapter with wet hands. Fire or electrical shock may result.
• Do not connect excessive numbers of plugs into one electrical outlet. Fire or electrical shock may
result.
• Do not twist or tie the AC adapter together. Fire or electrical shock may result.
• Always plug the AC adapter in all the way. If it is not plugged in completely, fire or electrical
shock may result.
• Do not use AC adapters other than the one supplied. Fire or electrical shock may result.
• As a rule, do not use electrical extension cords. Fire or electrical shock may result. If the use of
an extension cord is necessary, do not use one longer than 5 m (15 feet). Make sure that the
extension cord is not twisted, and that the AC adapter is fully plugged into the extension cord.
Do not use multiple extension cords.
• Do not use extension cords in corridors or other high traffic areas where they can be stepped on
or tripped over. This could damage the cords and result in fire or electrical shock.
• Do not use the AC adapter outdoors or in exposed areas.
2
*D1250U2F_QSG_E
D1250U2F Quick Start Guide
2
11/24/01, 7:18 AM
Safety Precautions
CAUTION
• Do not plug the equipment into outlets with voltages other than the specified voltages.
Incorrect voltages may result in fire or electrical shock.
• When unplugging the AC adapter, always pull on the main body. Pulling on the cord may
damage the wires and lead to fire or electrical shock.
• Do not place objects around the AC adapter in case it needs to be unplugged during
emergencies.
• Unplug the AC adapter from the outlet at least once a year and clean the area around the base
of the AC adapter’s metal pins to ensure that all dust is removed. If dust accumulates in this
area, it may result in fire.
General Handling Precautions
WARNING
• Do not take apart or modify the equipment. Fire or electrical shock may result from improper
handling of its components.
• If you hear unusual noises, see smoke, feel excessive heat or smell anything unusual,
immediately unplug the AC adapter and contact your retailer or Canon Customer Support Help
Desk. Continued use of the equipment may result in fire or electrical shock.
• Do not use flammable sprays near this equipment. Also do not spill water, liquids, or flammable
liquids on the equipment. If these fluids enter this equipment and contact the electrical parts,
fire or electrical shock may result. If anything enters the equipment, immediately unplug the AC
adapter and contact your retailer or Canon Customer Support Help Desk.
• When cleaning the equipment, always unplug the AC adapter. Otherwise, fire or electrical shock
may result.
• When cleaning the equipment, use a water-moistened cloth that is well wrung out. Do not use
flammable liquids, such as alcohol, benzene or thinners. If a flammable liquid enters the inner
electrical parts, fire or electrical shock may result.
CAUTION
• Carefully close the document cover in order not to pinch your hands.
• Do not press heavily on the document glass or the document cover. The document glass may
break and injure you.
• Do not bump the document glass or drop heavy books or objects on it. The document glass may
break and injure you.
• When not in use for extended periods, such as long weekends, unplug the AC adapter for
safety.
• When transporting the equipment, be extremely careful. Dropping it could cause an injury.
• Wait until the equipment has cooled before placing a cover over it. Otherwise fire may result.
• Do not use the supplied CD-ROM in regular CD players. It produces excessively loud sound that
may cause hearing damage.
Setup and Operating Conditions
• Do not set up in areas where there are excessive fluctuations in temperature. Also do not move
the equipment from low-temperature areas to high-temperature areas. Condensation may
cause image errors. Leave the scanner enough time to gradually adapt to the new conditions
before use.
• Do not use the equipment in areas subject to direct sunlight or strong room light. It may cause
damage to the equipment or decrease image quality. If you have to use the scanner in direct
sunlight, make sure to use a thick curtain to block the light.
D1250U2F Quick Start Guide
*D1250U2F_QSG_E
3
11/24/01, 7:18 AM
3
Check the Package Contents
Scanner Unit and Accessories
D1250U2F
USB
Interface Cable
AC Adapter
Film Guide
Documents and Software Programs
• Quick Start Guide (this guide)
• Additional documents
• CanoScan Setup Utility CD-ROM
ScanGear CS-U (10 MB) - Scanner Driver
It allows you to scan and load images from the scanner. Also called TWAIN driver.
ScanGear Toolbox (10 MB) - Scanning Utility Program
It enables you to scan images and copy (print), attach images to e-mail messages or save images
with simple steps. It also works with scanner’s buttons.
ArcSoft PhotoBase (60 MB) - Photo Album Program
It can create and edit image albums, perform image searches and create slide shows.
ScanSoft OmniPage Pro (75 MB) - OCR (Optical Character Recognition) Program
It converts characters scanned from a book, magazine or newspaper into text data for editing or
digital transmission.
Canon PhotoRecord (60 MB) - Photo Printing Program
It cannot load images from the scanner, but can edit or decorate the images for printing or saving
as the photo album.
Adobe Acrobat Reader (24 MB) - Electronic Manual Viewer Program
Electronic (PDF) manuals for above software programs
Troubleshooting guide
• Adobe Photoshop Elements CD-ROM
Photoshop
Adobe Photoshop Elements (120 MB) - Image Editing Program
It can load images from the scanner and process them with editing, retouching, special effects
and enhancements.
Electronic (PDF) manual and other information
• Approximately 359 MB of hard disk space on your computer is required to install all the
programs. In addition, further free hard disk space will be required to operate the
program.
4
*D1250U2F_QSG_E
D1250U2F Quick Start Guide
4
11/26/01, 10:56 AM
Unlock the Scanning Unit
• Unlock the scanner before connecting it to the computer. If it is left locked, a
malfunction or other problem may occur.
1.
Peel the seals off the scanner.
2.
Gently turn the scanner over.
3.
Push the lock switch toward the unlock mark.
Unlock Mark
Lock Switch
4.
Return the scanner to a horizontal position.
D1250U2F Quick Start Guide
*D1250U2F_QSG_E
5
11/24/01, 7:18 AM
5
Connect the Scanner
• Confirm that the power switches for the computer and other connected devices are off.
1.
Connect the scanner to the computer with
the supplied USB interface cable.
USB Interface Cable
Wide Flat Connector
2.
Small Square
Connector
Connect the AC adapter to the scanner.
AC Adapter
Power Terminal
• Only use the USB interface cable and the AC adapter provided with the scanner. Use of
other cables or adapters may lead to a malfunction.
• The scanner does not have a power switch. The power is activated as soon as the
computer is turned on.
6
*D1250U2F_QSG_E
D1250U2F Quick Start Guide
6
11/24/01, 7:18 AM
Install the Software
Install the Scanner Driver
Install the scanner driver (ScanGear CS-U) with the following procedure.
Windows XP Professional / Home Edition users
Windows Millennium Edition (Me) users
Windows 98 / Windows 2000 Professional users
Read this page.
Go to P. 8.
Go to P. 9.
• With Windows XP and Windows 2000, you should log on with a user name set to an
administrator when you install or uninstall software programs.
Windows XP Professional / Home Edition
1.
Turn the computer on.
2.
“Welcome to the Found New Hardware Wizard”
will appear.
Confirm that “Install the software automatically
(Recommended)” is selected.
3.
Place the CanoScan Setup Utility CD-ROM in the
drive.
The driver will begin to install.
4.
When “Completing the Found New Hardware
Wizard” appears, click [Finish].
Continue on P. 10.
• Before you upgrade to Windows XP from Windows 98/Me/2000, you must uninstall
ScanGear CS-U and ScanGear Toolbox using the “Uninstall the Software” menu of the
CanoScan Setup Utility CD-ROM. If you upgrade to Windows XP with the software
remaining, the scanner may not work. For details, please read the Troubleshooting
section on the CanoScan Setup Utility CD-ROM.
D1250U2F Quick Start Guide
*D1250U2F_QSG_E
7
11/24/01, 7:18 AM
7
Install the Software
Windows Millennium Edition (Me)
1.
Turn the computer on.
2.
The [Add New Hardware Wizard] dialog box will
appear.
Confirm that “Automatic search for a better driver
(Recommended)” is selected.
3.
Place the CanoScan Setup Utility CD-ROM in the
drive.
4.
Wait for 10 seconds, then click [Next].
The driver will begin to install.
5.
When “Windows has finished installing the new
hardware device.” appears, click [Finish].
Continue on P. 10.
8
*D1250U2F_QSG_E
D1250U2F Quick Start Guide
8
11/24/01, 7:19 AM
Install the Software
Windows 98 / Windows 2000 Professional
The screen shots in this section are from Windows 98.
1.
Turn the computer on.
2.
When the [Add New Hardware Wizard] dialog box
appears, click [Next].
3.
Confirm that “Search for the best driver for your
device. (Recommended)” is selected and click
[Next].
4.
Place the CanoScan Setup Utility CD-ROM in the
drive.
5.
Confirm that “CD-ROM drive” is selected, wait for
10 seconds, and then click [Next].
If “Driver Not Found” appears, click [Back] and repeat
this step.
6.
When “CanoScan D1250U2/D1250U2F” appears,
click [Next].
The driver will begin to install.
Windows 98 Users
If prompted to insert the Windows 98 CD-ROM, follow
the instructions below.
a. Click [OK] to the dialog message.
b. Click [Browse].
c. Select the CD-ROM drive and click [OK].
d. Click [OK].
7.
Click [Finish].
D1250U2F Quick Start Guide
*D1250U2F_QSG_E
9
11/24/01, 7:19 AM
9
Install the Software
Install the Application Programs
After finished installing the scanner driver, continue to install the application programs. First start
with Adobe Photoshop Elements.
Installation of Adobe Photoshop Elements
1.
Replace the CanoScan Setup Utility CD-ROM with
the Adobe Photoshop Elements CD-ROM.
2.
When the “Welcome” window appears, click
[Next].
a. You will be asked where you purchased the
software. Select an option from the list and click
[Next].
b. Read the End User License Agreement and click
[Accept] if you agree to the terms.
c. Confirm that the [Installation] button is enabled,
and click [Adobe Photoshop Elements].
3.
In the series of dialogs and windows, select or
enter the appropriate settings, and click [Next] or
[Yes].
In the [User Information] dialog, you must enter the
“Serial Number”. The serial number is shown on the
Adobe Photoshop Elements CD-ROM case. Enter the 6
sets of 4 digits without hyphens.
4.
Finally, when the “Setup is complete” message
appears, click [Finish].
5.
Remove the Adobe Photoshop Elements CD-ROM
from the drive, and store it in a safe place.
Serial Number
• For details, see the “Read Me” file in the folder of your language on the CD-ROM.
10
*D1250U2F_QSG_E
D1250U2F Quick Start Guide
10
11/24/01, 7:19 AM
Install the Software
Continue to install the rest of application programs.
Installation of other application programs
1.
Place the CanoScan Setup Utility CD-ROM.
2.
The CanoScan Setup Utility main menu will
appear.
3.
Click [Install the Software].
Read the Software User License Agreement. Click [Yes]
if you accept the terms.
The Install window will display.
4.
Click [Start Installation].
You will install five application programs.
5.
The installation procedure will start.
Follow the on-screen message prompts and click [Yes]
or [Next] to continue the installation.
6.
When the installation is complete, click [Yes].
The computer will restart.
7.
After Windows restarts, remove the CD-ROM
from the drive and store it in a safe place.
D1250U2F Quick Start Guide
*D1250U2F_QSG_E
11
11/24/01, 7:19 AM
11
Try Scanning
The following steps explain how to scan with Adobe Photoshop Elements.
1.
Place a photo or a picture on the glass by aligning
its top edge with the alignment mark, and close
the document cover.
Top
Bottom
Alignment Mark
2.
Click the Windows [Start] menu and select
[Programs] or [All Programs], [Adobe], [Photoshop
Elements] and [Adobe Photoshop Elements].
Adobe Photoshop Elements will start.
3.
Click the [File] menu and select [Import] and
[CanoScan D1250U2/D1250U2F...].
ScanGear CS-U will start.
12
*D1250U2F_QSG_E
D1250U2F Quick Start Guide
12
11/24/01, 7:19 AM
Try Scanning
4.
Click [Preview].
The preview scan will start and gradually display the
image.
5.
Drag the mouse diagonally to select the area you
want to scan.
6.
Click [Scan].
The final scan will start.
7.
Click
(close box) in the ScanGear CS-U window
to close it.
The scanned image will appear in the Adobe Photoshop
Elements window.
8.
Save the scanned image.
Click the [File] menu and select [Save As]. Select the
folder where you wish to store the image file, enter a
file name and select a file type, and click [Save].
9.
Click
(close box) in the Adobe Photoshop
Elements window to close it.
D1250U2F Quick Start Guide
*D1250U2F_QSG_E
13
11/24/01, 7:19 AM
13
Using the Scanner Buttons
You can use the three convenient buttons on the front of the scanner to scan and perform related
tasks easily with a single touch of the button. Place an item on the scanner before pressing a button.
• To use these buttons, ScanGear CS-U, ScanGear Toolbox and ArcSoft PhotoBase should
be installed from the CanoScan Setup Utility CD-ROM.
SCAN Button
E-MAIL Button
To open the scanned image in the
PhotoBase window
To e-mail the scanned image as an
attached file
1. Press the [SCAN] button.
2. The scanner will scan the item.
3. The scanned image will appear in the
PhotoBase window.
1. Press the [E-MAIL] button.
2. The scanner will scan the item.
3. The [E-mail software selection] dialog
will appear. Select an option from the
list and click [OK].
• This step is required only for the first scan.
4. The e-mail software will start, and
the scanned image will be attached in
a new message window.
COPY Button
To print (copy) the scanned image with a
printer
1. Press the [COPY] button.
2. The scanner will scan the item.
3. The scanned image will print.
• The printer driver should be installed and the
printer should be on-line to use this function.
5. Enter the receiver’s address and title,
write a message, confirm the required
settings, and send the message.
• MAPI compliant e-mail software, such as
Outlook Express, Microsoft Outlook,
Eudora or Netscape Messenger should be
installed and enabled. With certain e-mail
software, you should set the MAPI
function on.
• While scanning, you can change the default settings for scanning by clicking the
[Cancel] button. For details on changing settings or arranging the scanner’s button-tofunction assignment, refer to the ScanGear Toolbox User’s Guide (electronic manual).
14
*D1250U2F_QSG_E
D1250U2F Quick Start Guide
14
11/24/01, 7:19 AM
Scanning Film
Preparation
Removing the Protective Sheet
The document cover is equipped with a protective sheet for the
light source. Make sure to remove this sheet before scanning
film.
Remove the protective sheet by sliding it in the direction of the
arrow.
Light Source
• Keep the protective sheet carefully not to be bent nor torn.
• Replace the protective sheet over the light source when not scanning film.
Positioning the Film
Load a film into the film guide as shown below and place the loaded guide onto the scanner’s
document glass.
1.
Insert a fingernail into the slot in the film guide
and lift up the flap.
Flap
2.
Place the film face down into the groove in the
film guide.
Position the target frame of the film in the middle of
the groove.
• Hold the film by the edges with your fingertips to avoid getting fingerprints or dirt on
the film surface.
• Any dust on the film, scanner document glass or light source will show in the scanned
images. Remove dust with a blower brush.
D1250U2F Quick Start Guide
*D1250U2F_QSG_E
15
11/24/01, 7:19 AM
15
Scanning Film
3.
Flap
Attach the flap by aligning with the slots in the
film guide and press it down.
To place the mounted 35mm film, remove the flap and
place the 35 mm slide mount in the middle of the film
guide.
4.
Place the loaded film guide in the correct position
on the document glass.
Calibration Slot
Align the film guide’s
mark
mark.
with the scanner’s
• Images will not scan correctly, or error messages will display, if the film guide is
positioned incorrectly. Take care to position it correctly.
• The film guide has a calibration slot used by the scanner to calculate the color balance.
The film cannot be scanned with the correct color balance if this slot is obstructed.
Keep it clear.
5.
Close the document cover.
16
*D1250U2F_QSG_E
D1250U2F Quick Start Guide
16
11/24/01, 7:19 AM
Scanning Film
How to Scan Film
Scanning Procedure
1.
Start one of the bundled application programs and start ScanGear CS-U from within it
(see P. 19).
2.
In the [Image Source] category, select [Film].
3.
In the [Film Type] category, select color or black and white, and negative or positive.
4.
Click the [Preview] button.
Select the Image Type or adjust color balance as
required. Higher than 600 dpi of resolution is
recommended when scanning film.
5.
Select the scan area (see P. 13).
• When scanning mounted film, stripes may appear at the upper or lower of the scanned
image. In this case, make sure to select the scan area avoiding stripes.
6.
Click the [Scan] button.
After closing ScanGear CS-U, edit, save or print the image using the application program.
D1250U2F Quick Start Guide
*D1250U2F_QSG_E
17
11/24/01, 7:19 AM
17
Using the PHOTO Button
PHOTO button equipped on the document cover is convenient to
scan a film and print the image to the printer. When you push
this button, the film is scanned and the image will be sent to the
photo printing program “PhotoRecord”. You can easily print the
image with this software.
1.
Place the loaded film guide on the scanner and
push the PHOTO button.
2.
3.
Scanning automatically starts.
4.
The PhotoRecord window opens in which the
scanned image appears.
5.
6.
Make the printer ready and click the [PRINT] button.
When scanning completes, [PhotoRecord Print
Modes] wizard starts.
Select Print Mode, Paper Size and so on in the dialogs.
In the print dialog, confirm the print settings and
click [Print].
• With some models of Canon Bubble Jet printer, you can perform perforated paper
printing.
When you want to scan photos (not films) from the PHOTO button, change the settings of ScanGear Toolbox.
1.
2.
3.
Start ScanGear Toolbox. (see P.21)
4.
Click [Apply] and close ScanGear Toolbox.
Click [Photo] button on the Toolbox toolbar.
Select [Color Photo], [Color (Auto crop)] or other
photo option in the [Original] item.
The steps of scanning are the same as above.
• The settings of ScanGear Toolbox are available until they are changed.
• Make sure to attach the protective sheet on the scanner document cover, when you
scan photos or documents.
18
*D1250U2F_QSG_E
D1250U2F Quick Start Guide
18
11/24/01, 7:19 AM
Guide to the Software
ScanGear CS-U
ScanGear CS-U is the specialized scanner driver (TWAIN driver) that allows you to scan and load
images from the scanner.
How to Start ScanGear CS-U
ScanGear CS-U is not a stand-alone program that can be started by itself. It is used as a TWAIN
driver. Start the application program first, then start ScanGear CS-U from the program. The
procedures for starting TWAIN driver varies between programs.
Adobe Photoshop Elements
1. Select [Start], [Programs] or [All Programs], [Adobe], [Photoshop Elements] and [Adobe
Photoshop Elements] to start Adobe Photoshop Elements.
2. Click the [File] menu and select [Import], then [CanoScan D1250U2/D1250U2F..]. (see P. 12)
ArcSoft PhotoBase
1. Select [Start], [Programs] or [All Programs], [ArcSoft
PhotoBase] and [PhotoBase] to start ArcSoft
PhotoBase.
2. Click
(Acquire icon) on the toolbar, or click the
[Edit] menu and select [Acquire]. In the Select Source
dialog, choose [CanoScan D1250U2/D1250U2F].
ScanSoft OmniPage Pro
1. Select [Start], [Programs] or [All Programs], [Caere Applications] and [OmniPage Pro 9.0]
to start ScanSoft OmniPage Pro.
2. Click
(Scan Image icon) on the toolbar, or open the [Process] menu and select
[Scan Image]. If the Scan Image icon on the toolbar displays as
(Load Image icon),
click the arrow and select [Scan Image]. Scanning will be done without displaying
ScanGear CS-U window.
ScanGear Toolbox
1. Select [Start], [Programs] or [All Programs], [Canon
ScanGear Toolbox 3.1] and [ScanGear Toolbox 3.1] to
start Canon ScanGear Toolbox.
2. Click one of the buttons on the toolbar, and select
[Use the scanner driver to make advanced settings.]
in the settings dialog.
• Canon PhotoRecord cannot scan images from the scanner. You can use this program to
edit or decorate the images and print them on a printer or save them in a photo album.
D1250U2F Quick Start Guide
*D1250U2F_QSG_E
19
11/24/01, 7:19 AM
19
Guide to the Software
How to Use ScanGear CS-U
ScanGear CS-U features two selectable modes. Simple Mode has easy-to-use functions, especially for
beginners. Advanced Mode provides various settings such as color balance or image quality adjustments.
Simple Mode
All you need to do is selecting Image Type to scan immediately at the optimal settings.
Image Type
Select from Color Screen, Color Photo or other items for
your purpose. Resolution is automatically set.
Toolbar
Adjust images easily with the zoom, rotate, auto
crop and other buttons.
Preview Button
Previews items and displays the results in the
preview area.
Preview Area
Displays the preview image. Use it to select a
scan area or adjust the image.
Multi Photo Mode
Scans several photos at once and opens them
individually in the application window.
Simple Mode/Advanced Mode Switching Button
Advanced Mode
Set the Color Mode and Output Resolution to scan. The image brightness, contrast and color
balance can also be fine-tuned.
• For details, please refer to the ScanGear CS-U User’s Guide (electronic manual).
20
*D1250U2F_QSG_E
D1250U2F Quick Start Guide
20
11/24/01, 7:19 AM
Guide to the Software
ScanGear Toolbox
ScanGear Toolbox is a convenient program which can copy (print) image, attach images to e-mail
messages, save images or send images to application programs with simple steps. It also works with
scanner’s button.
How to Start ScanGear Toolbox
Click the [Start] button on the Windows taskbar and select [Programs] or [All Programs], [Canon
ScanGear Toolbox 3.1] and [ScanGear Toolbox 3.1].
ScanGear Toolbox Toolbar
Copy Button
Scans and prints images on a printer.
Mail Button
Scans and attaches images to an e-mail message.
OCR Button
Scans newspapers, magazines or books for conversion into
editable text with an OCR program.
Save Button
Scans and saves images.
Scan (1-2) Buttons
Scan and send images to the linked application programs.
Photo Button
Scans films or photos and sends images to the linked application
program.
Settings Button
Sets the scanner buttons assignments.
• The OCR button, Scan 1-2 buttons and Photo button are automatically set to OmniPage,
PhotoBase, Photoshop Elements and PhotoRecord respectively, if all the application
programs are installed from the CD-ROMs according to the procedures on page 10 and 11.
• To use the copy (print) function, the printer must be connected and on-line and its
printer driver must be installed on the computer.
• To use the e-mail function, a MAPI-compliant (Messaging Application Programming
Interface) program, such as Microsoft Outlook, Outlook Express, Eudora or Netscape
Messenger, must be installed and enabled.
D1250U2F Quick Start Guide
*D1250U2F_QSG_E
21
11/24/01, 7:19 AM
21
Guide to the Software
How to Use ScanGear Toolbox
Example: Copy (Print)
1.
Click the [Copy] button.
2.
The Copy settings dialog will appear. Change the
settings as required.
Image type
Select an image type from the menu. If you
select [Color(Auto crop)], the scanning area is
automatically cropped with the size of the item.
Image quality
Select a scanning resolution from [Draft],
[Standard], [Good] and [Enlarged printing].
Paper size
Select the size of the document you will scan. If
you select [Custom], the paper size setting
window will appear to allow you to input an
accurate document size.
3.
Click the [Copy] button.
4.
Scanning automatically start, and the image will
be printed.
• For further settings and details, please refer to the ScanGear Toolbox User’s Guide
(electronic manual).
22
*D1250U2F_QSG_E
D1250U2F Quick Start Guide
22
11/24/01, 7:19 AM
Precautions for Scanning at High Resolutions
Please note that file sizes increase almost exponentially as the resolution is raised when scanning in
color mode. Scanning at high resolutions may require more time for scanning and image processing.
You are recommended to avoid raising the resolution beyond the minimum requirement to scan in
color mode.
File Size Estimates for Scanning an Letter/A4 Size Original in Color
-
75 dpi
100 dpi
150 dpi
300 dpi
600 dpi
1200 dpi
Letter
1.58 MB
2.8 MB
6.3 MB
25.2 MB
101 MB
404 MB
A4
1.6 MB
2.9 MB
6.5 MB
26.1 MB
104 MB
418 MB
418MB
104MB
A4 color image
26.1MB
6.5MB
1.6MB
2.9MB
1.6MB
75 dpi
100 dpi
150 dpi
300 dpi
600 dpi
1200 dpi
* These numbers are approximate and may differ from actual scan results.
Resolution Guidelines
• For uploading to a web site or viewing on a computer monitor, choose 75 dpi
• For scanning print photos and magazine clippings, choose 150 - 300 dpi
• For printing on a inkjet printer, choose a resolution approximately half the printer’s rating (180 dpi,
360 dpi, 600 dpi or 720 dpi)
A resolution higher than 600 dpi is effective for scanning relatively small originals that will be blown
up to larger sizes for printing.
12"(30cm)
Scanning at double
the resolution
6"(15cm)
8"(20cm)
4"(10cm)
Scanning at half
the resolution
3"(7.5cm)
2"(5cm)
• The maximum size of files scanned by the bundled PhotoBase program is limited by
Windows Me and Windows 98 to 256 MB.
D1250U2F Quick Start Guide
*D1250U2F_QSG_E
23
11/24/01, 7:19 AM
23
Before Transporting the Scanner
Always lock the scanning unit by pushing the lock switch toward the lock mark before moving or
transporting the scanner.
1.
Unplug the AC adapter from the electrical outlet
and detach the USB cable from the computer.
2.
Confirm the scanning unit is in the home position.
If it is not in the home position, connect the AC
adapter to the electrical outlet. After the scanning unit
has completely returned to the scanner’s home
position, disconnect the AC adapter.
Scanning Unit Home
position
3.
Lock the scanning unit by pushing the lock switch
toward the lock mark ( ).
Lock Switch
Locked
• Carrying or transporting the scanner without locking the scanning unit may damage it.
Be particularly careful to lock the scanning unit when transporting the scanner in a
vehicle.
24
*D1250U2F_QSG_E
D1250U2F Quick Start Guide
24
11/24/01, 7:19 AM
Care and Maintenance
Clean off the dirt and dust that adheres to the exterior, document glass and document cover of the
scanner during the course of ordinary operation using the following procedures.
1.
Unplug the AC adapter from the electrical outlet and detach the USB cable from the
computer.
2.
When cleaning the document cover or document glass, dampen a clean, soft cloth
with water and wring the cloth well. Use the well-wrung cloth to gently remove dirt
and dust. Then, thoroughly remove any moisture or water vapor with a soft, dry cloth.
Be particularly careful to remove any traces of dirt or liquid when wiping the
document glass.
• Moisture left on the document glass or cover may damage photographs and other
documents as well as produce poor results.
• Do not dampen the connectors, ports or other metallic components on the scanner’s back
panel. Immediately remove any moisture that contacts these components by wiping them
with a dry cloth.
• Do not use an excessively wet cloth or apply a liquid directly to any portion of the scanner.
Any moisture that enters the interior, the underside of the document glass or the sensors may
degrade image quality and lead to malfunctions.
• Never use substances containing alcohol, thinners or benzene on the equipment. Use of
these substances may deform, discolor or dissolve the casing.
Outer Casing
Document Cover
Document Glass
Light Source
Never use substances
containing alcohol,
thinners or benzene to
clean the equipment.
• Do not press heavily on the document glass when cleaning. The document glass may
break and injure you.
D1250U2F Quick Start Guide
*D1250U2F_QSG_E
25
11/24/01, 7:19 AM
25
Specifications
CanoScan D1250U2F
Scanner Type
Flatbed
Scanning Element
CCD 6-line color
Light Source
Cold cathode fluorescent lamp
Optical Resolution
1200 x 2400 dpi
Film Adapter Unit
Standard equipped
25 - 9600 dpi (ScanGear CS-U)
Selectable Resolution
Scanning Bit Depth
Color
16 bit input / 8 bit output for each color (RGB)
Grayscale, B&W
16 bit input / 8 bit output
Preview Speed*1
Approx. 8 sec (with A4 size photo / document)
USB2.0
4 msec / line (600 dpi), 8 msec / line (1200 dpi)
USB1.1
16 msec / line (600 dpi), 32 msec / line (1200 dpi)
USB2.0
4 msec / line (600 dpi), 8 msec / line (1200 dpi)
USB1.1
8 msec / line (600dpi, 1200 dpi)
Color
Scanning Speed*2
(Photo or Document)
Grayscale, B&W
Scanning Speed*2
Color, Grayscale,
USB2.0
(Film)
B&W
USB1.1
12.2 -170.8 msec / line
USB2.0 / USB1.1
Interface
Maximum Document Size
A4 / Letter:216 x 297mm (8.5 x 11.7 in.)
35mm Color Negatives / Positives
35mm B&W Negatives / Positives
Types of Film
SCAN, COPY, E-MAIL, PHOTO
Scanner Buttons
Temperature
Operating Range
Humidity
10º to 35º C (50º to 95º F)
10% to 90% RH, 20% to 80% RH when scanning film
(without condensation formation)
Power Requirements
AC adapter (100 / 120 / 230 / 240 V)*3
Power Consumption
In operation: 15 watts maximum Stand-by: 5 watts
(using supplied AC adapter)
Maximum Exterior Dimensions
Weight
257 x 460 x 71 mm (10.2 x 18.4 x 2.8 in.)
Approx. 2.5 kg (5.3 lbs.)
*1 Calibration processing time is not included.
*2 Transfer time to computer is not included.
*3 Type of AC adapter depends on the area where the scanner is purchased.
• Specifications are subject to change without notice.
26
*D1250U2F_QSG_E
D1250U2F Quick Start Guide
26
11/24/01, 7:19 AM
System Information
This form should be used to record the operating environment of the purchased scanner.
If any problems occur with the scanner, you will need this information when you contact our
Customer Support Help Desk. Be sure to record the information and store it in a safe location.
• This information is also required to request a repair under warranty. Make sure you record the
information and store it in a safe location.
• Guaranteed servicing for this equipment will expire five years after production ceases.
Date of Purchase:
Dealer:
Tel:
Dealer Address:
Scanner Model: CanoScan D1250U2F
Serial Number (on the back of the equipment):
• About the Computer Used
Manufacturer:
Model:
CPU:
Clock Speed:
MHz
Space Available:
MB
Monitor Type:
Monitor Size:
inches
Printer:
Manufacturer:
Type of Printer:
Printer Resolution:
Memory Capacity (RAM):
MB
Hard Disk Capacity:
MB
OS : Windows
❏ XP
❏ Me
❏ 2000
❏ 98
dpi
Installed Virus Protection Program:
Installed Compression Program:
On-Board Expansion Cards:
Attached Peripherals:
Name of Network Connected:
D1250U2F Quick Start Guide
*D1250U2F_QSG_E
27
11/24/01, 7:19 AM
27
As an ENERGY STAR Partner, Canon Inc. has determined that this model meets the
ENERGY STAR Program for energy efficiency.
The International ENERGY STAR Office Equipment Program is an international program that
promotes energy saving through the use of computers and other office equipment. The program
backs the development and dissemination of products with functions that effectively reduce
energy consumption. It is an open system in which business proprietors can participate
voluntarily. The targeted products are office equipment such as computers, displays, printers,
facsimiles, copiers, scanners and multifunction systems. Their standards and logos are uniform
among participating nations.
28
*D1250U2F_QSG_E
D1250U2F Quick Start Guide
28
11/24/01, 7:19 AM