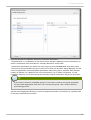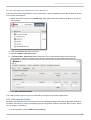
1
JBoss Operations Network 3.1
Deploying Applications and
Content
for provisioning applications and managing content streams
Edition 3.1.2
Landmann
JBoss Operations Network 3.1 Deploying Applications and Content
for provisioning applications and managing content streams
Edition 3.1.2
Landmann
[email protected] m
Legal Notice
Copyright © 2012 Red Hat, Inc..
T his document is licensed by Red Hat under the Creative Commons Attribution-ShareAlike 3.0 Unported
License. If you distribute this document, or a modified version of it, you must provide attribution to Red
Hat, Inc. and provide a link to the original. If the document is modified, all Red Hat trademarks must be
removed.
Red Hat, as the licensor of this document, waives the right to enforce, and agrees not to assert, Section
4d of CC-BY-SA to the fullest extent permitted by applicable law.
Red Hat, Red Hat Enterprise Linux, the Shadowman logo, JBoss, MetaMatrix, Fedora, the Infinity Logo,
and RHCE are trademarks of Red Hat, Inc., registered in the United States and other countries.
Linux ® is the registered trademark of Linus T orvalds in the United States and other countries.
Java ® is a registered trademark of Oracle and/or its affiliates.
XFS ® is a trademark of Silicon Graphics International Corp. or its subsidiaries in the United States
and/or other countries.
MySQL ® is a registered trademark of MySQL AB in the United States, the European Union and other
countries.
Node.js ® is an official trademark of Joyent. Red Hat Software Collections is not formally related to or
endorsed by the official Joyent Node.js open source or commercial project.
T he OpenStack ® Word Mark and OpenStack Logo are either registered trademarks/service marks or
trademarks/service marks of the OpenStack Foundation, in the United States and other countries and
are used with the OpenStack Foundation's permission. We are not affiliated with, endorsed or
sponsored by the OpenStack Foundation, or the OpenStack community.
All other trademarks are the property of their respective owners.
Abstract
JBoss Operations Network can control content for its resources in a number of different ways: deploying
and upgrading applications through provisioning; creating content repositories; and defining content
streams for resources, such as the JBoss Customer Service Portal. T his guide provides GUI-based
procedures to manage content that can be used by resources.
Table of Contents
Table of Contents
. . .Summary:
1.
. . . . . . . . . . Using
. . . . . . .JBoss
. . . . . . .ON
. . . to
. . .Deploy
. . . . . . . .Applications
. . . . . . . . . . . . .and
. . . . Update
. . . . . . . . Content
. . . . . . . . . . . . . . . . . . . . . . . . . .3. . . . . . . . . .
. . .An
2.
. . . Introduction
. . . . . . . . . . . . . to
. . .Provisioning
. . . . . . . . . . . . . Content
. . . . . . . . . Bundles
. . . . . . . . . . . . . . . . . . . . . . . . . . . . . . . . . . . . . . . . . . . . . . . .3. . . . . . . . . .
2.1. Bundles: Content and Recipes
4
2.2. Destinations (and Bundle Deployments)
5
2.3. File Handling During Provisioning
6
2.4. Requirements and Resource T ypes
8
2.5. Bundles and JBoss ON Servers and Agents
8
2.5.1. Resource Support and the Agent Resource Plug-in
8
2.5.2. Server-Side and Agent Plug-ins for Recipe T ypes
9
. . .Managing
3.
. . . . . . . . . . and
. . . . .Deploying
. . . . . . . . . . .Bundles
. . . . . . . . .with
. . . . the
. . . . JBoss
. . . . . . . ON
. . . .CLI
. . . . . . . . . . . . . . . . . . . . . . . . . . . . . . . . . . .9. . . . . . . . . .
. ...Extended
4
. . . . . . . . . . Example:
. . . . . . . . . . Common
. . . . . . . . . .Provisioning
. . . . . . . . . . . . .Use
. . . . Cases
. . . . . . . (and
. . . . . .How
....T
. .hey
. . . . Handle
. . . . . . . .Files)
. . . . . . . . . 10
............
4.1. Deploying A Full Application Server
10
4.2. Deploying A Web Application
11
4.3. Deploying Configuration Files
12
. . .Extended
5.
. . . . . . . . . . Example:
. . . . . . . . . . Provisioning
. . . . . . . . . . . . . Applications
. . . . . . . . . . . . . .to
..a
. . JBoss
. . . . . . . EAP
. . . . .Server
. . . . . . . (Planning)
. . . . . . . . . . . . . . . . . .13
...........
. . .T. he
6.
. . . Workflow
. . . . . . . . . . for
. . . .Creating
. . . . . . . . . and
. . . . .Deploying
. . . . . . . . . . .a. Bundle
. . . . . . . . . . . . . . . . . . . . . . . . . . . . . . . . . . . . . . . . . . . 15
............
. . .Creating
7.
. . . . . . . . . Ant
. . . . .Bundles
. . . . . . . . . . . . . . . . . . . . . . . . . . . . . . . . . . . . . . . . . . . . . . . . . . . . . . . . . . . . . . . . . . . . . . . . . 15
............
7.1. Supported Ant Versions
16
7.2. Additional Ant References
16
7.3. Breakdown of an Ant Recipe
16
7.4. Using Ant T asks
19
7.4.1. Supported Ant T asks
19
7.4.2. Using Default, Pre-Install, and Post-Install T argets
20
7.4.3. Calling Ant T argets
20
7.5. Using T emplatized Configuration Files
20
7.6. Limits and Considerations for Ant Recipes
23
7.6.1. Unsupported Ant T asks
24
7.6.2. Symlinks
24
7.6.3. WARNING: T he Managed (T arget) Directory and Overwriting or Saving Files
24
7.7. A Reference of JBoss ON Ant Recipe Elements
26
7.7.1. rhq:bundle
26
7.7.2. rhq:input-property
26
7.7.3. rhq:deployment-unit
28
7.7.4. rhq:archive
29
7.7.5. rhq:url-archive
30
7.7.6. rhq:file
31
7.7.7. rhq:url-file
32
7.7.8. rhq:audit
34
7.7.9. rhq:replace
35
7.7.10. rhq:ignore
35
7.7.11. rhq:fileset
36
7.7.12. rhq:system-service
36
. . .T. esting
8.
. . . . . . . Bundle
. . . . . . . . Packages
. . . . . . . . . . . . . . . . . . . . . . . . . . . . . . . . . . . . . . . . . . . . . . . . . . . . . . . . . . . . . . . . . . . . . . . .37
...........
8.1. Installing the Bundle Deployer T ool
37
8.2. Using the Bundle Deployer T ool
38
. . .Provisioning
9.
. . . . . . . . . . . . . Bundles
. . . . . . . . . . . . . . . . . . . . . . . . . . . . . . . . . . . . . . . . . . . . . . . . . . . . . . . . . . . . . . . . . . . . . . . . . . .39
...........
1
JBoss Operations Network 3.1 D eploying Applications and Content
. . .Provisioning
9.
. . . . . . . . . . . . . Bundles
. . . . . . . . . . . . . . . . . . . . . . . . . . . . . . . . . . . . . . . . . . . . . . . . . . . . . . . . . . . . . . . . . . . . . . . . . . .39
...........
9.1. Uploading Bundles to JBoss ON
39
9.2. Deploying Bundles to a Resource
42
9.3. Viewing the Bundle Deployment History
45
9.4. Reverting a Deployed Bundle
47
9.5. Deploying a Bundle to a Clean Destination
49
9.6. Purging a Bundle from a Resource
49
9.7. Upgrading Ant Bundles
50
9.8. Deleting a Bundle from the JBoss ON Server
51
.10.
. . . Managing
. . . . . . . . . . .Resource-Level
. . . . . . . . . . . . . . . . Content
. . . . . . . . . Updates
. . . . . . . . . . . . . . . . . . . . . . . . . . . . . . . . . . . . . . . . . . . . . . . . . . 52
............
10.1. About Content
52
10.1.1. What Content Is: Packages
52
10.1.2. Where Content Comes From: Providers and Repositories
53
10.1.3. Package Versions and History
53
10.1.4. Authorization to Repositories and Packages
55
10.2. Creating a Content Source
56
10.2.1. Creating a Content Source (General)
57
10.2.2. Enabling the Default JBoss Patch Content Source
58
10.2.3. Creating a Content Source (Local Disk)
60
10.3. Managing Repositories
63
10.3.1. Creating a Repository
63
10.3.2. Linking Content Sources to Repositories
64
10.3.2.1. Associating Content Sources with a Repository
65
10.3.2.2. Importing a Content Source into Repositories
66
10.3.3. Associating Resources with the Repository
67
10.3.3.1. Adding Resources to a Repository
67
10.3.3.2. Managing the Repositories for a Resource
69
10.4. Uploading Packages
69
10.5. Synchronizing Content Sources or Repositories
71
10.5.1. Scheduling Synchronization
71
10.5.2. Manually Synchronizing Content Sources or Resources
71
10.6. T racking Content Versions for a Resource
73
.11.
. . . Deploying
. . . . . . . . . . .Applications
. . . . . . . . . . . . . on
. . . Application
. . . . . . . . . . . . .Servers
. . . . . . . . . . . . . . . . . . . . . . . . . . . . . . . . . . . . . . . . . . . . . . .73
...........
11.1. Setting Permissions for Agent and Resource Users
74
11.2. Deploying EAR and WAR Files
74
11.3. Updating Applications
77
11.4. Deleting an Application
80
.12.
. . . Document
. . . . . . . . . . . Information
. . . . . . . . . . . . . . . . . . . . . . . . . . . . . . . . . . . . . . . . . . . . . . . . . . . . . . . . . . . . . . . . . . . . . . . . . . . 81
............
12.1. Giving Feedback
81
12.2. Document History
81
.Index
. . . . . . . . . . . . . . . . . . . . . . . . . . . . . . . . . . . . . . . . . . . . . . . . . . . . . . . . . . . . . . . . . . . . . . . . . . . . . . . . . . . . . . . . . 82
............
A
82
B
82
C
82
D
83
I
83
J
83
P
83
R
83
S
84
T
84
2
1. Summary: Using JBoss ON to D eploy Applications and Update Content
1. Summary: Using JBoss ON to Deploy Applications and Update
Content
One of the core management tools for JBoss Operations Network is to create, update, or remove content
from its managed resources. Content can be anything associated with a resource or configuration, such
as text files, binary files like JARs, EARs, and WARs, patches, and XML files. T hat content can be
deployed on a managed resource to update that resource's configuration, to create a child resource, or
to deploy an entirely new application.
T here are two ways to manage content for resources:
Resource-level content through the Content tabs
Provisioning applications through bundles
Resource-level content allows a specific managed resource, usually a JBoss application server or a web
server, to be associated with stored and versioned packages in named repositories. T hese packages
can be uploaded into JBoss ON (so JBoss ON is essentially the content repository), they can be pulled
from an external repository, or they can be discovered through agent plug-ins. In other words, there are
three actions that resource-level content management can perform:
It can deliver packages, updates, and patches to a resource.
It can deploy content to a resource and even create a new child resource. T his is particularly useful
with web and application servers which can have different contexts as children.
It can discover the current packages installed on a resource, creating a package digest that
administrators can use to manage that asset.
Resource-level content management is limited how far it can be used to create resources. T hat is why
JBoss ON has another system of deploying content, one that allows it to deploy full application servers
or to consistently apply content across multiple resources: provisioning through bundles.
Bundles are added to the JBoss ON server, so they are not restricted to a single resource. T hey are
deployed to compatible groups of resources, either platforms or JBoss servers (or other resource types
which define a bundle target in their plug-in descriptor). T his allows multiple resources to be updated at
once, using the same content.
Bundle provisioning also allows more flexible and complex deployment options:
Use Ant calls to perform operations before or after deploying the bundle
Allow user-defined values or edits to configuration at the time a bundle is provisioned
Have multiple versions of the same content bundle deployed and deployable to resources at the
same time
Revert to an earlier bundle version
2. An Introduction to Provisioning Content Bundles
Provisioning is a way that administrators can define and control applications, from development to
production. T he ultimate effect of the provisioning system is simplifying how applications are deployed.
Administrators can control which versions of the same application are deployed to different resources,
from different content sources, within the same application definition (the bundle definition). Resources
can be reverted to different versions or jump ahead in deployment.
Provisioning takes one set of files (a bundle) and then pushes it to a platform or an application server
3
JBoss Operations Network 3.1 D eploying Applications and Content
(the destination). T here are more complex ways of defining the content, the destinations, and the rules
for that deployment, but the core of the way that provisioning handles content is to take versioned
bundles and send it to the designated resource.
Provisioning works with compatible groups, not individual resources. Administrators can define groups
based on disparate environments and consistently apply application changes (upgrades, new
deployments, or reversions) across all group members, simultaneously.
And the type of content which can be deployed, itself, is flexible. A bundle can contain raw configuration
files, scripts, Z IP archives, JAR files, or full application servers — the definition of content is fairly loose.
T his is in contrast to the resource-level content management in JBoss ON. T he type of content is
relatively limited. Patches or configuration is applied per-resource. New applications can only be
deployed as children of existing resources and it has to be another resource type.
Provisioning focuses on application management, not purely resource management.
2.1. Bundles: Content and Recipes
A bundle is a set of content, packaged in an archive. In real life, a bundle is usually an application, but it
can also contain a set of configuration files, scripts, libraries, or any other content required to set up an
application or a resource.
T he purpose of a bundle is to take that defined set of content and allow JBoss ON to copy it onto a
remote resource. T he provisioning process basically builds the application on the targeted resource, so
in that sense, the bundle is an application distribution. Each bundle version has its own recipe which
tells JBoss ON what files exist in the bundle, any tokens which need to have real values supplied at
deployment, and how to handle the bundle and existing files on the remote machine.
T he recipe, configuration files, and content are all packaged together into the bundle. T his is usually a
Z IP file, which the agent unpacks during provisioning.
As with other content managed in JBoss ON, the bundle is versioned. Different versions can be
deployed to different resources, which is good for handling different application streams in different
environments (say, QA and production). Versioning bundles also allows JBoss ON to revert or upgrade
bundles easily.
T he bundle can contain almost any kind of content, but it has to follow a certain structure for it to be
properly deployed by JBoss ON. T he recipe is an Ant build file called deploy.xm l; this must always be
located in the top level of the bundle archive.
Past the placement of the recipe, the files and directories within the bundle can be located anywhere in
the archive. In fact, the files do not necessarily need to be included in the bundle file at all; when the
bundle is created, any or all files for the bundle can be pulled off a URL, which allows the content to be
taken from an SVN or GIT repository, FT P server, or website.
4
1. Summary: Using JBoss ON to D eploy Applications and Update Content
Figure 1. Bundle Layout
T he bundle archive can contain other archives, such as JAR, WAR, and Z IP files. Provisioning uses Ant
to build out bundles on the target machine, so any files which Ant can process can be processed as part
of the bundle. T he Ant provisioning system can process WAR, JAR, and Z IP archive files.
2.2. Destinations (and Bundle Deployments)
Uploading a bundle to JBoss ON does not push the bundle anywhere, so it is not automatically
associated with a resource or group. (Bundles, unlike content, is resource-independent. It exists as its
own definition in JBoss ON, apart from the inventory.) When the bundle is actually provisioned, then the
provisioning wizard prompts for the administrator to define the destination.
A destination is the place where bundles get deployed. T he destination is the combination of three
elements:
A compatible resource group (of either platforms or JBoss servers)
A base location, which is the root directory to use to deploy the bundle. Resource plug-ins define a
base location for that specific resource type in the <bundle-target> element. T his can be the root
directory or, for JBoss servers, common directories like the profile directory. T here may be multiple
available base locations.
T he deployment directory, which is a subdirectory beneath the base directory where the bundle
content is actually sent.
For example, an administrator wants to deploy a web application to a JBoss EAP 5 server, in the
deploy/m yApp/ directory. T he JBoss AS5 plug-in defines two possible base locations, one for the
installation directory and one for the profile directory. T he administrator chooses the profile directory,
since the application is an exploded JAR file. T he agent then derives the real, absolute path of the
application from those three elements:
JBoss AS group + {$PROFILE_DIR} + deploy/myApp/
If the PROFILE_DIR is /opt/jbossas/default/server/, then the destination is:
/opt/jbossas/default/server/deploy/myApp/
5
JBoss Operations Network 3.1 D eploying Applications and Content
If the same resource group contains a JBoss EAP instance running on a Windows server, with a
PROFILE_DIR of C:\jbossas\server\, then the path is derived slightly differently, appropriate for the
platform:
C:\jbossas\default\server\deploy\myApp
It is up to the agent, based on the platform and resource information for its inventory, to determine the
absolute path for the destination to which the bundle should be deployed.
Once a bundle is actually deployed to a destination, then that association — bundle version and
destination — is the bundle deployment.
Figure 2. Bundles, Versions, and Destinations
2.3. File Handling During Provisioning
Behavior at Deployment
Bundles and Subdirectories
Files Added After the Bundle Is Deployed
Behavior at Deployment
A bundle file contains a set of files and directories that should be pushed to a resource. However, the
provisioning process does not merely copy the files over to the deployment directory. Provisioning treats
a bundle as, essentially, a template that defines the entire content structure for the target (root)
directory.
6
1. Summary: Using JBoss ON to D eploy Applications and Update Content
For example, a bundle contains these files:
app.conf
lib/myapp.jar
If the root directory is deploy/m yApp/, then the final configuration is going to be:
deploy/myApp/app.conf
deploy/myApp/lib/myapp.jar
By default, if there are any files in deploy/m yApp/, then they will be removed before the bundle is
copied over, so that the deployment directory looks exactly the way the bundle is configured.
For an application-specific destination, like deploy/m yApp/, then that behavior is totally acceptable
because the defined application content should be the only content in that directory. However, bundles
can contain a variety of content and can be deployed almost anywhere on a platform or within a JBoss
server. In a lot of real life infrastructures, the directory where the bundle is deployed may have existing
data that should be preserved.
T he deployment directory is the root directory for the bundle. T he recipe for the bundle can define a
parameter that tells the provisioning process how to handle data in that root directory — specifically,
should it ignore (preserve) existing files and subdirectories in the root directory, or should it manage the
root directory and make it match the bundle structure.
T he manageRootDir option in the recipe tells the provisioning system whether to delete everything and
force the directory to match the bundle content. T he default is for that to be true, for the bundle to define
the content and structure of the root directory. If the data in that directory must be saved, the
m anageRootDir option can be set to false, which means that provisioning will copy over the bundle
and create the appropriate files and subdirectories, but it will not manage (remove) the existing content
in the directory.
WARNING
If you deploy a bundle to a high level directory like /etc on a platform or a critical directory like
deploy/ or conf/, then all of the existing files and subdirectories in that directory are deleted.
T his can cause performance problems or data loss.
Bundles and Subdirectories
Even if the m anageRootDir option is set to false, subdirectories and files contained in the bundle are
always managed by the bundle, even if they existed before the bundle was deployed.
For example, the deploy/ directory has this layout before any bundle is deployed:
deploy/
deploy/notes.txt
deploy/myApp1/
deploy/myApp2/
deploy/myApp2/first.txt
A bundle is created with this layout:
7
JBoss Operations Network 3.1 D eploying Applications and Content
myApp2/
myApp2/foo.txt
myApp2/bar.txt
If m anageRootDir is set to false, the existing files in the deploy/ remain untouched, except for what
is in the m yApp2/ subdirectory, because that directory is defined by the bundle. So, the final directory
layout is this:
deploy/ (ignored)
deploy/notes.txt (ignored)
deploy/myApp1/ (ignored)
deploy/myApp2/ (managed)
myApp2/foo.txt (managed)
myApp2/bar.txt (managed)
NOTE
Any existing content in the root directory is backed up before it is deleted, so it can be restored
later.
T he backup directory is /hom e/.rhqdeploym ents/resourceID/backup.
Files Added After the Bundle Is Deployed
After the initial deployment, there can be instances where files are added to the deployment directory,
such as log files or additional data.
Within the deployment directory, the provisioning process overwrites any bundle-associated files with
the latest version and removes any files that are not part of the bundle. Log files and other data — as
with the root directory — need to be preserved between upgrades. T hose known files and directories
can be called out in the recipe using the <rhq:ignore> element, which tells the provisioning process
to ignore those files within the deployment directory.
Setting these options in the recipe is described in Section 7.6.3, “WARNING: T he Managed (T arget)
Directory and Overwriting or Saving Files”.
2.4. Requirements and Resource Types
By default, three resource types support bundles:
Platforms, all types
JBoss EAP 6 (AS 7) standalone servers
[1]
JBoss EAP 5 and any server which uses the JBoss AS 5 plug-in
JBoss EAP 4 (deprecated)
Bundle support is defined in the plug-in descriptor, so custom plug-ins can be created that add bundle
support for those resource types. For examples of writing agent plug-ins with bundle support, see
"Writing Custom JBoss ON Plug-ins."
2.5. Bundles and JBoss ON Servers and Agents
2.5.1. Resource Support and the Agent Resource Plug-in
Whether provisioning is supported is defined in the resource type. For a resource type to allow
8
3. Managing and D eploying Bundles with the JBoss ON CLI
provisioning, the resource plug-in descriptor must defined a bundle target. T hat is the indication to the
agent the provisioning is supported.
T he <bundle-target> element simply defines allowed base directories for the resource which can be
used as base directories in the bundle definition.
<server name="JBossAS:JBossAS Server" ...>
<bundle-target>
<destination-base-dir name="Library Directory" description="Where the jar
libraries are">
<value-context>pluginConfiguration</value-context>
<value-name>lib.dir</value-name>
</destination-base-dir>
<destination-base-dir name="Deploy Directory" description="Where the
deployments are">
<value-context>pluginConfiguration</value-context>
<value-name>deploy.dir</value-name>
</destination-base-dir>
</bundle-target>
</server>
Every resource plug-in descriptor defines a base directory, the root for all deployments, apart from
provisioning configuration. For platforms, this is the root directory. For servers, it is usually the
installation directory. T he <bundle-target> can use the already-configured base directory or it can
set different directories to use. In the example, two directories — the deploy/ and lib/ directories —
are given as supported base directories. When a bundle definition is created, the wizard offers the
choice of which directory to use.
2.5.2. Server-Side and Agent Plug-ins for Recipe T ypes
By default, JBoss ON supports one type of recipe, an Ant build file. However, other types of recipes
could be supported because the recipe type is defined in a pair of plug-ins, one for the server and one
for the agent.
T he server-side plug-in tells the JBoss ON server how to manage bundles and destinations for that type
of recipe.
T he agent plug-in creates a child resource for the platform which is used to perform provisioning
operations on the platform or target resource. For example, Ant bundles are actually deployed by the
special JBoss ON resource, Ant Bundle Handler. T his resource is added automatically to platforms as a
child resource to enable Ant-based provisioning.
NOTE
Since recipe type support is implemented on the agent side through a special resource, that
resource must exist in the JBoss ON inventory for it to perform provisioning. For example, without
the Ant bundle handler in the inventory for a platform, JBoss ON cannot perform provisioning on
that platform.
Administrators do not have to interact directly with the Ant bundle handler resource, but that child
resource must be present in the platform's inventory for Ant provisioning to work.
3. Managing and Deploying Bundles with the JBoss ON CLI
Both uploading bundles to JBoss ON and deploying bundles to resources can be performed using the
9
JBoss Operations Network 3.1 D eploying Applications and Content
JBoss ON CLI.
T he ability to script bundle deployments is very powerful, because it allows content or configuration
updates, even new application servers, to be deployed automatically based on activity in other resources
across JBoss ON. T his is particularly useful with using JBoss ON CLI scripts in response to an alert:
A new JBoss application server can be deployed when an existing JBoss server experiences a
heavy load or decreased performance.
Configuration files for a selected snapshot image can be immediately deployed to a platform or
JBoss server to remedy configuration drift, in response to a drift alert.
A new web context can be deployed when another web is disabled within a m od_cluster domain.
Scripting also allows updates to be applied on schedule, such as having daily or weekly scheduled
updates to a QE environment — which is also useful because the bundle content can be pulled from a
GIT or SVN repository used by a build system first, and then deployed for testing.
T he bundles API is in the Javadocs at http://docs.redhat.com/docs/enUS/JBoss_Operations_Network/100/html/API_Guides/index.html.
4. Extended Example: Common Provisioning Use Cases (and How
They Handle Files)
Section 2, “An Introduction to Provisioning Content Bundles” describes the different elements in the
bundles and provisioning system — but what is provisioning really for? T here are a handful of common
use cases that illustrate how provisioning works in a real environment.
Deploying a full application server
Deploying a web application to an application server
Deploying configuration files
IMPORTANT
One thing to remember for all of this is that bundles take content from point A (JBoss ON) and
send it to point B (the destination). T his is not a simple copy operation (Section 2.3, “File Handling
During Provisioning”). T he provisioning system, by default, makes the destination, point B, match
exactly how the directory in the bundle is laid out. T his means adding or editing files, creating or
deleting subdirectories, and deleting any existing content from the destination.
T hat concept of managing the layout and content of the destination influences the ways and effects of
deploying content.
4.1. Deploying A Full Application Server
Bundle Details
T his is the core use for the provisioning system, deploying an entire application server. T his bundle
contains the complete configuration stack for a server like JBoss EAP (or T omcat or Apache). T he
bundle contains all of the files used by the application — the JAR and configuration files and scripts for
the EAP server, and all EAR or WAR web applications that are to be deployed on that EPA instance. All
of the application server and web app files and directories are zipped into an archive, with the
deploy.xm l which defines the Ant recipe.
10
4. Extended Example: Common Provisioning Use Cases (and How They Handle Files)
File Handling Details
Because this is a complete application server, it will be deployed into its own, new (or empty) directory,
such as /opt/m y-application. T hat directory will be dedicated to the application server, so it will be
entirely managed by the bundle.
T here is an attribute in the recipe called manageRootDir which tells the bundle system how to deploy
content. For deploying a full application server, the bundle system should have complete control over the
directory, so m anageRootDir is set to true. T his means:
Only files and subdirectories in the bundle distribution file will be in the root directory.
Any existing files or subdirectories will be deleted.
If files or subdirectories are added to the root directory, then they will be deleted when the bundle is
updated or redeployed, unless those files are explicitly ignored (a setting in the recipe).
4.2. Deploying A Web Application
Instead of deploying a full application server, it is possible to deploy a web application to the application
server. However, this takes an understanding of the directory layout of both the application server and
the web application.
For example, this is the deployment directory path for the application server:
/opt/my-application/deploy
T he goal is to deploy a new web app, m yApp1.war to the deploy/ directory.
/opt/my-application/deploy/myapp1.war/
Bundle Details
In this case, the bundle file contains only the WAR file itself and the deploy.xm l recipe.
File Handling Details
Unlike the application server, when deploying the web app, there are or could be other web apps also in
the deploy/ directory. T he bundle system, then, should not manage the root directory, meaning existing
or new files should be allowed within the root directory even if they are not included in the bundle.
The intent here is not to manage all of the content in the directory but to add to that content by deploying
the WAR file. So, the recipe should specify m anageRootDir=false, which tells the provisioning
system to leave alone any existing files in the directory that are outside the bundle.
NOTE
Setting m anageRootDir=false only preserves files outside the bundle deployment. If the
bundle directory is deploy/m yApp/, then any files in deploy/m yApp/ or subdirectories like
deploy/m yApp/WEB-INF/ will be overwritten or removed when the bundle is deployed. T he
subdirectories defined in the bundle distribution are still entirely managed by the bundle system.
One other consideration is that only one bundle can be deployed to a root directory. If there are multiple
web applications to be deployed to the same EAP server and all of them will be managed by the
provisioning system, then there are two options:
11
JBoss Operations Network 3.1 D eploying Applications and Content
Include all of the web applications in the same bundle distribution. For example, to deploy
m yApp1.war and m yApp2.war to the deploy/ directory, both WAR files can be included in the
same bundle and deployed to deploy/m yApp1.war/ and deploy/m yApp2.war/ simultaneously.
It may not be possible to roll all of the web apps into the same bundle. Instead of using deploy/ as
the root directory, there could be two different bundle distributions that use a subdirectory as the root
directory. For example, the first web app could use deploy/m yApp1/ so that the final deployment is
deploy/m yApp1/m yApp1.war/, while the second app uses deploy/m yApp2/, resulting in
deploy/m yApp2/m yApp2.war/.
T his allows the two web applications to be deployed, updated, and reverted independently of each
other.
4.3. Deploying Configuration Files
Another common scenario is deploying configuration files to an application server (or even another
resource, like a platform), using bundles.
T his is very similar to deploying a web application. If JBoss ON deploys a bundle to a given
directory, it expects to manage the content within that directory and all content within any
subdirectories defined in the bundle. With configuration files, it is critical that you understand and
include all of the configuration files in the bundle or critical files could be removed.
For example, an administrator creates a bundle to deploy two configuration files:
New login configuration, in server/default/conf/login-config/xm l
New JMX console users, in server/default/conf/props/jm x-console.properties
T he root directory is the conf/ directory for the application server.
Bundle Details
T he bundle must contain all of the files that are expected to be in the conf/login-config/ and
conf/props/ subdirectories, not just the two new files that the administrator wants to use. Additionally,
the m anageRootDir parameter in the recipe must be set to false so that all of the existing
configuration files in the root directory, conf/, are preserved.
File Handling Details
As with deploying a web app, the intent is to add new content, not to replace existing content.
Setting m anageRootDir=false only preserves files outside the bundle deployment. However,
because there are two subdirectories defined in the bundle, JBoss ON will manage all of the content in
those subdirectories. T his means:
T he recipe has to have m anageRootDir=false set for the bundle to preserve the other files in
the conf/ root directory.
Any files in the subdirectories of the bundle — conf/log-config/ and conf/props/ — will be
overwritten when the bundle is deployed. T he provisioning process can ignore files in the root
directory, but it always manages (meaning, updates, adds, or deletes) files in any subdirectories
identified in the bundle so that they match the content of the bundle.
Existing files in the conf/log-config/ and conf/props/ subdirectories must be included in the
bundle distribution.
12
5. Extended Example: Provisioning Applications to a JBoss EAP Server (Planning)
TIP
T here is an alternative to including all of the configuration files in the bundle distribution.
T he bundle, containing only the new files, could be deployed to a separate directory, like
/opt/bundle/. T hen, an Ant post-install task can be defined in the recipe that copies the
configuration files from the root directory into the application server's conf/ directory.
5. Extended Example: Provisioning Applications to a JBoss EAP
Server (Planning)
T he Setup
T im the IT Guy at Example Co. has to manage the full application lifecycle for Example Music's online
band management application, MusicApp. T here are two environments: one for QA and one for the live
site. Both environments contain a mix of Windows and Linux servers.
T im wants to deploy the latest development version weekly to the QA environment, based on the most
current build in their development GIT repo. He wants the most stable version of the application to be
deployed to the production environment, based on a static package.
What to Do
T he best plan for T im is to work backwards, starting with the way he wants his ideal QA and production
environments to be configured.
T im's first step is to identify his destinations, based on his environments. Because he has two separate
environments, he wants to create two separate groups, one for QA and one for production. MusicApp
runs on a JBoss server, so his compatible groups will be for the JBoss AS/EAP resources rather than
platforms.
Additionally, the needs for each of his environments is different:
T he QA environment needs ...
New builds directly from the GIT repository, every week.
A completely clean directory to begin from with every deployment.
T here is a separate QA environment for each of Example Co.'s web applications, so MusicApp is
the only application running on those specific servers.
T he production environment needs ...
A stable build that can be safely stored in JBoss ON.
T o save historic data. T he production environment has both log directories and user-supplied
data directories that need to be preserved between application upgrades.
A couple of different web applications run on the same production servers.
T he application itself is the same for both environments. Instance-specific configuration — port numbers,
the application name, the machine IP address — are based on tokens that are realized when the
application is deployed. T he JAR files contained in the bundle should be extracted at the time the
application is deployed, with the exception of one client which site members can either install or launch
locally.
T im decides to use different versions of the same bundle, labeling the QA versions as devel and the
13
JBoss Operations Network 3.1 D eploying Applications and Content
production versions as stable.
T here are some similarities between the devel and stable bundle recipes:
MusicApp should be deployed to the deploy/ directory, but because it is not the only application
that they run, it will have its own webapp context subdirectory. While this is not strictly necessary in
the devel environment (where MusicApp is the only application), this maintains consistency with the
final deployment destination.
Both recipes will configure the application JAR file, MusicApp.jar, to be exploded when it is
deployed.
T he client archive file, MyMusic.jar, will not be exploded (<rhq:file ...
exploded="false">).
T okens are defined in the raw configuration files and the recipe for the port numbers, IP addresses,
and application names.
And then there are differences in the recipes, related to how the devel and stable versions should
handle existing files.
T he QA environment always requires a pristine deployment. T his requires three settings:
T he m anageRootDir value is always true, so no existing files are preserved during the initial
deployment.
No <rhq:ignore> elements are set, so no generated files are preserved during an upgrade.
T he cleanDeploym ent option is always set in the JBoss ON CLI script that automates
deployments. T his removes all bundle-associated files in the directory before deploying the new
bundle.
T he production environment needs to preserve its existing data between upgrades, which requires
two settings:
T he m anageRootDir value is always false, which preserves existing files during the initial
deployment.
T wo <rhq:ignore> elements are set, one for the log directory and one for the data directory
containing the site member uploads.
T he last significant action comes when the bundles are actually uploaded to JBoss ON.
Version 1 of the application is already stable and complete, so T im creates the first bundle as a stable
version. He packages the deploy.xm l with the other application files in a Z IP file and uploads the
entire bundle directly to JBoss ON, so it is stored in the JBoss ON database.
Version 2 is a devel version. T he QA environment requires frequent updates based on the latest build in
GIT . T im uploads the deploy.xm l separately, but he points the provisioning wizard to the GIT URL for
all of the associated packages. When the bundle is deployed, JBoss ON takes the packages from the
repository.
T he Results
T im deployed version 1 of the bundle to the production environment, and he deployed version 2 to the
QA environment.
T his means that T im has deployed different versions of the same application, pulled from different
sources, to different resources. If he ever has a problem with the production server, he can simply revert
it to the last stable version.
Additionally, he can script bundle deployments to the QA environment, so his tests can be fully
14
6. The Workflow for Creating and D eploying a Bundle
automated.
6. The Workflow for Creating and Deploying a Bundle
1. Identify what files belong in the archive, such as an application server, an individual web
application, configuration files for drift management, or other things.
2. Determine how the location where the bundle will be deployed will be handled. Existing files and
directories can be overwritten or preserved, depending on the definitions in the recipe. T his is
covered in Section 2.3, “File Handling During Provisioning” and Section 7.6.3, “WARNING: T he
Managed (T arget) Directory and Overwriting or Saving Files”.
3. Identify what information will be deployment-specific, such as whether the deployed content will
require a port number, hostname, or other setting. Some of these values can use tokens in the
configuration file and the provisioning process can interactively prompt for the specific value at
deployment time.
T okens are covered in Section 7.5, “Using T emplatized Configuration Files”.
4. Create the content which will be deployed.
5. Create an Ant recipe, named deploy.xm l. T he recipe defines what content and configuration
files are part of the bundle and how that content should be deployed on the bundle destination.
Pre- and post-install targets are supported, so there can be additional processing on the local
system to configure or start services as required.
Ant recipes and tasks are covered in Section 7.3, “Breakdown of an Ant Recipe” and Section 7.4,
“Using Ant T asks”.
6. After the bundle content, configuration file, and recipe are created, compress all of those files into
a bundle archive. T his must have the deploy.xm l recipe file in the top level of the directory and
then the other files in the distribution, relative to that deploy.xm l file. T his is illustrated in
Section 2.1, “Bundles: Content and Recipes”.
NOTE
JBoss ON allows JAR and Z IP formats for the bundle archive.
7. Optionally, verify that the bundle is correctly formatted by running the bundle deployer tool. T his is
covered in Section 8, “T esting Bundle Packages”.
8. Create the groups of resources to which to deploy the bundle.
9. Upload the bundle to the JBoss ON server, as described in Section 9.1, “Uploading Bundles to
JBoss ON”.
10. Deploy the bundle to the target groups, as described in Section 9.2, “Deploying Bundles to a
Resource”.
7. Creating Ant Bundles
Bundles are archive files that is stored on the server and then downloaded by an agent to deploy to a
platform or resource. A bundle distribution is comprised of two elements:
An Ant recipe file named deploy.xm l
Any associated application files. T hese application files can be anything; commonly, they fall into two
categories:
Archive files (JAR or Z IP files)
Raw text configuration files, which can include tokens where users define the values when the
15
JBoss Operations Network 3.1 D eploying Applications and Content
Raw text configuration files, which can include tokens where users define the values when the
bundle is deployed
NOTE
T he process and guidelines for actually creating an Ant recipe are outside the scope of this
documentation. T his document outlines the options and requirements for using Ant recipes
specifically to work with the JBoss ON provisioning system.
For basic instructions, options, and tutorials for writing Ant tasks, see the Apache Ant
documentation at http://ant.apache.org/manual/index.html.
7.1. Supported Ant Versions
T able 1, “Ant Versions” lists the supported Ant and Ant T ask versions.
T able 1. Ant Versions
Software
Ant
Ant-Contrib
Version
1.8.0
1.0b3
7.2. Additional Ant References
Provisioning relies on Ant configuration and tasks, so a good understanding of the Ant build process is
beneficial. T here are several resources for additional Ant information:
Apache Ant documentation main page
Apache Ant documentation for the build file
Liquibase Database Schema T asks
Ant Contrib T asks
7.3. Breakdown of an Ant Recipe
T he Ant recipe for JBoss ON bundles is the same basic file as a standard Apache Ant file and is
processed by an integrated Ant build system in JBoss ON. T his Ant recipe file must be bundled in the
top directory of the distribution Z IP file and be named deploy.xm l.
T he JBoss ON Ant recipes allows all of the standard tasks that are available for Ant builds, which
provides flexibility in scripting a deployment for a complex application. T he JBoss ON Ant recipe must
also provide additional information about the deployment that will be used by the provisioning process;
this includes information about the destination and, essentially, metadata about the application itself.
16
6. The Workflow for Creating and D eploying a Bundle
Example 1. Simple Ant Recipe
For provisioning, the Ant recipe is more of a definition file than a true script file, although it can call Ant
targets and do pre- and post-provisioning operations. As with other Ant scripts, the JBoss ON Ant
recipe uses a standard XML file with a <project> root element and defined targets and tasks. T he
elements defined in the <rhq:bundle> area pass metadata to the JBoss ON provisioning system
when the project is built.
T he first part of the deploy.xm l file simply identifies the file as an an script and references the
provisioning Ant elements.
<?xml version="1.0"?>
<project name="test-bundle" default="main"
xmlns:rhq="antlib:org.rhq.bundle">
T he next element identifies the specific bundle file itself. T he provisioning system can manage and
deploy multiple versions of the same application; the <rhq:bundle> element contains information
about the specific version of the bundle (including, naturally enough, an optional version number).
<rhq:bundle name="Example App" version="2.4" description="an example
bundle">
All that is required for a recipe is the <rhq:bundle> element that defines the name of the
application. However, the bundle element contains all of the information about the application and,
importantly, how the provisioning system should handle content contained in the application.
T he first item to address is any templatized property that is used in a configuration file. T his is
covered in Section 7.5, “Using T emplatized Configuration Files”. Any token used in a configuration file
must be defined in the recipe for it to be realized (to have a value supplied) during provisioning. For
the port token defined in Section 7.5, “Using T emplatized Configuration Files”, the <rhq:inputproperty> element identifies it in the recipe. T he name argument is the input_field value in the token,
the description argument gives the field description used in the UI and the other arguments set
whether the value is required, what its allowed syntax is, and any default values to supply. (T his
doesn't list the files which use tokens, only the tokens themselves.)
<rhq:input-property
name="listener.port"
description="This is where the product will listen for incoming
messages"
required="true"
defaultValue="8080"
type="integer"/>
T here is a single element which identifies all of the content deployed by the bundle, the
<rhq:deploym ent-unit> element. T he entire application — its name, included Z IP or JAR files,
configuration files, Ant targets — are all defined in the <rhq:deploym ent-unit> parent element.
T he name and any Ant targets are defined as arguments on <rhq:deploym ent-unit> directly. In
this, the name is appserver, and one preinstall target and one postinstall target are set.
<rhq:deployment-unit name="appserver" preinstallTarget="preinstall"
postinstallTarget="postinstall" manageRootDir="false">
T here is one other critical element on the <rhq:deploym ent-unit> element: the
17
JBoss Operations Network 3.1 D eploying Applications and Content
m anageRootDir argument. Provisioning doesn't simply copy over files; as described in Section 2.3,
“File Handling During Provisioning”, it remakes the directory to match what is in the bundle. If there are
any existing files in the deployment directory when the bundle is first deployed, they are deleted by
default. Setting m anageRootDir to false means that the provisioning process does not manage the
deployment directory — meaning any existing files are left alone when the bundle is deployed.
Any existing content in the root directory is backed up before it is deleted, so it can be restored later.
T he backup directory is /hom e/.rhqdeploym ents/resourceID/backup.
Any configuration file is identified in an <rhq:file> element. T he name is the name of the
configuration file within the bundle, while the destinationFile is the relative (to the deployment
directory) path and filename of the file after it is deployed.
<rhq:file name="test-v2.properties" destinationFile="conf/test.properties"
replace="true"/>
Bundles can contain archive files, either Z IP or JAR files. Every archive file is identified in an
<rhq:archive> element within the deployment-unit. T he <rhq:archive> element does three
things:
Identify the archive file by name.
Define how to handle the archive. Simply put, it sets whether to copy the archive over to the
destination and then leave it as-is, still as an archive, or whether to extract the archive once it is
deployed. T his is called exploding the archive. If an archive is exploded, then a postinstall task can
be called to move or edit files, as necessary.
Identify any files within the archive which contain tokens that need to be realized. T his is a child
element, <rhq:fileset>. T his can use wildcards to include types of files or files within
subdirectories or it can explicitly state which files to process.
<rhq:archive name="MyApp.zip" exploded="true">
<rhq:replace>
<rhq:fileset>
<include name="**/*.properties"/>
</rhq:fileset>
</rhq:replace>
</rhq:archive>
Another possible child element sets how to handle any files within the deployment directory that are
not part of the bundle. For example, the application may generate log files or it may allow users to
upload content. By default, the provisioning process cleans out a directory from non-bundle content
every time a bundle is provisioned. However, logs, user-supplied data, and other types of files are
data that should remain intact after provisioning. Any files or subdirectories which should be ignored
by the provisioning process (and therefore preserved) are identified in the <rhq:ignore> element.
In this case, any * .log files within the logs/ directory are saved.
<rhq:ignore>
<rhq:fileset>
<include name="logs/*.log"/>
</rhq:fileset>
</rhq:ignore>
</rhq:deployment-unit>
</rhq:bundle>
T his only applies to upgrading a bundle, meaning after the initial deployment.
18
6. The Workflow for Creating and D eploying a Bundle
T he last elements set the Ant tasks to run before or after deploying the content, as identified initially
in the <rhq:deploym ent-unit> arguments. Most common Ant tasks are supported (as described
in Section 7.4, “Using Ant T asks”). T his uses a preinstall task to print which directory the bundle is
being deployed to and whether the operation was successful. T he postinstall task prints a message
when the deployment is complete.
<target name="main" />
<target name="preinstall">
<echo>Deploying Test Bundle v2.4 to ${rhq.deploy.dir}...</echo>
<property name="preinstallTargetExecuted" value="true"/>
<rhq:audit status="SUCCESS" action="Preinstall Notice" info="Preinstalling to
${rhq.deploy.dir}" message="Another optional message">
Some additional, optional details regarding
the deployment of ${rhq.deploy.dir}
</rhq:audit>
</target>
<target name="postinstall">
<echo>Done deploying Test Bundle v2.4 to ${rhq.deploy.dir}.</echo>
<property name="postinstallTargetExecuted" value="true"/>
</target>
</project>
Section 7.7, “A Reference of JBoss ON Ant Recipe Elements” lists the different JBoss ON elements in
the Ant recipe file. For information on standard Ant tasks, see the Apache Ant documentation.
7.4. Using Ant Tasks
An Ant bundle distribution file is just an Ant recipe and its associated files. As Example 1, “Simple Ant
Recipe” shows, the Ant recipe is the expected deploy.xm l file with some JBoss ON-specific elements.
An Ant bundle distribution file supports more complex Ant configuration, including Ant tasks and targets.
7.4 .1. Supported Ant T asks
Any standard Ant task can be run as part of the Ant bundle provisioning (with the exception of
<antcall> and <m acrodef>). T his includes common commands like echo, m kdir, and touch —
whatever is required to deploy the content fully.
IMPORTANT
T he <antcall> element cannot be used with the Ant recipe. <antcall> calls a target within
the deploy.xm l file, which loops back to the file, which calls the <antcall> task again, which
calls the deploy.xm l file again. T his creates an infinite loop.
T o perform the same operations that would be done with <antcall>, use the <ant> task to
reference a separate XML file which contains the custom Ant targets. T his is described in
Section 7.4.3, “Calling Ant T argets”.
IMPORTANT
T he m acrodef call, and therefore macro definitions, are not supported with Ant bundles.
19
JBoss Operations Network 3.1 D eploying Applications and Content
Along with the standard Ant tasks, Ant bundle recipes can use optional Ant tasks:
Liquibase Database Schema T asks
Ant Contrib T asks
7.4 .2. Using Default, Pre-Install, and Post-Install T argets
As with other Ant tasks, the <project> allows a default target, which is required by the provisioning
system. T his is a no-op because the Ant recipe mainly defines the metadata for and identifies files used
by the provisioning process. Other operations aren't necessary. T his target is required by Ant, even
though it is a no-op target. Use pre- and post-install targets to perform tasks with the bundle before and
after it is unpacked.
For example:
<target name="main" />
Additionally, JBoss ON provisioning tasks can define both pre- and post-install targets. T his allows
custom tasks, like simple progress messages or setting properties.
7.4 .3. Calling Ant T argets
As mentioned in Section 7.4.1, “Supported Ant T asks”, using <antcall> does not work in an Ant
bundle recipe; it self-referentially calls the <rhq:bundle> task in an infinite loop. However, it is
possible to process tasks that are outside the default target. T his can be done using pre- and post
install targets (Section 7.4.2, “Using Default, Pre-Install, and Post-Install T argets”).
1. In deploy.xm l for the Ant recipe, add a <rhq:deploym ent-unit> element which identifies
the Ant target.
<rhq:deployment-unit name="jar" postinstallTarget="myExampleCall">
2. T hen, define the target.
<target name="myExampleCall">
<ant antfile="another.xml" target="doSomething">
<property name="param1" value="111"></property>
</ant>
</target>
3. Create a separate another.xm l file in the same directory as the deploy.xm l file. T his file
contains the Ant task.
<?xml version="1.0"?>
<project name="another" default="main">
<target name="doSomething">
<echo>inside doSomething. param1=${param1}</echo>
</target>
</project>
7.5. Using Templatized Configuration Files
A bundle can contain configuration files for an application. T hese configuration files can use hard-coded
values or they can use tokens that are filled in (automatically or with user-supplied values) when the
bundle is actually deployed.
20
6. The Workflow for Creating and D eploying a Bundle
NOTE
For a user-defined token to be realized, it must be referenced in the recipe so that the bundle
deployment wizard will prompt for the value, using the <rhq:input-property> key in the Ant
recipe. For examples, see Section 7.7.2, “rhq:input-property” and Example 1, “Simple Ant Recipe”.
User-defined tokens can be any property; the values are supplied through the provisioning UI and
inserted into the templatized configuration file.
T he token key is a simple attribute-value assertion, with the input_field as the element in the UI and the
property being the value in the configuration file. T he property of user-defined tokens must contain only
alphanumeric characters, an underscore (_), or a period (.); no other characters are allowed.
input_field=@@property@@
For example, to set a port number token in a configuration file, define the property:
port=@@listener.port@@
T he user-defined token then must be noted in the recipe, so that the provisioning process knows to
realize the phrase. T o configure a property in an Ant recipe, add a <rhq:input-property> key in the
Ant XML file.
For example:
<rhq:input-property
name="listener.port"
... />
T he provisioning wizard prompts for a value for all of the user-defined tokens referenced in the recipe.
Figure 3. Port T oken During Provisioning
Along with user-defined variables that can be specified in the recipe file, there are variables that are
made implicitly available to recipes. T hese tokens can be used in a templatized file as a user-defined
variable without having to define the token template in the recipe itself.
21
JBoss Operations Network 3.1 D eploying Applications and Content
T able 2. Variables Defined by JBoss ON
T oken
Description
rhq.deploy.dir
T he directory location where the bundle will be
installed.
rhq.deploy.id
A unique ID assigned to the specific bundle
deployment.
rhq.deploy.name
T he name of the bundle deployment.
Additionally, some tokens can be realized by the provisioning process pulling information from the local
system. T hese values, listed in T able 3, “System-Defined T okens”, are taken either from the Java API or
from Java system properties. T hey can be inserted directly in the templatized configuration file without
having to put a corresponding entry in the recipe. For example:
@@rhq.system.hostname@@
22
6. The Workflow for Creating and D eploying a Bundle
T able 3. System-Defined T okens
T oken Name
T aken From...
Java API
rhq.system.hostname
Java API
SystemInfo.getHostname()
rhq.system.os.name
Java API
SystemInfo.getOperatingSystem
Name()
rhq.system.os.version
Java API
SystemInfo.getOperatingSystem
Version()
rhq.system.os.type
Java API
SystemInfo.getOperatingSystem
T ype().toString()
rhq.system.architecture
Java API
SystemInfo.getSystemArchitectu
re()
rhq.system.cpu.count
Java API
SystemInfo.getNumberOfCpus()
rhq.system.interfaces.java.addre
ss
Java API
InetAddress.getByName(System
Info.getHostname()).getHostAdd
ress()
rhq.system.interfaces.network_a
dapter_name.mac
Java API
NetworkAdapterInfo.getMacAddr
ess()
rhq.system.interfaces.network_a
dapter_name.type
Java API
NetworkAdapterInfo.getT ype()
rhq.system.interfaces.network_a
dapter_name.flags
Java API
NetworkAdapterInfo.getAllFlags(
)
rhq.system.interfaces.network_a
dapter_name.address
Java API
NetworkAdapterInfo.getUnicastA
ddresses().get(0).getHostAddre
ss()
rhq.system.interfaces.network_a
dapter_name.multicast.address
Java API
NetworkAdapterInfo.getMulticast
Addresses().get(0).getHostAddr
ess()
rhq.system.sysprop.java.io.tmpdi
r
Java system property
rhq.system.sysprop.file.separato
r
Java system property
rhq.system.sysprop.line.separat
or
Java system property
rhq.system.sysprop.path.separa
tor
Java system property
rhq.system.sysprop.java.home
Java system property
rhq.system.sysprop.java.version
Java system property
rhq.system.sysprop.user.timezo
ne
Java system property
rhq.system.sysprop.user.region
Java system property
rhq.system.sysprop.user.countr
y
Java system property
rhq.system.sysprop.user.langua
ge
Java system property
7.6. Limits and Considerations for Ant Recipes
23
JBoss Operations Network 3.1 D eploying Applications and Content
7.6.1. Unsupported Ant T asks
As stated in Section 7.4.1, “Supported Ant T asks”, most standard Ant tasks are supported for use in
bundle recipes, but there are some tasks which are not supported:
<antcall> (instead, use <ant> to reference a separate XML file in the bundle which contains the
Ant targets)
<m acrodef> and macro definitions
7.6.2. Symlinks
T he Java utilities library (java.util.zip) included for the bundling system does not support symbolic
links. T herefore, bundle recipes and configuration files cannot use symlinks.
Symlinks may be an issue for an application server (such as EAP or EPP) which was installed initially
from an RPM and then compressed to be used in a bundle. T he RPMs available from Red Hat Network
contain operating system-specific symlinks which would cause failures during provisioning.
If it is necessary to reference shared libraries or other files (which would normally be referenced with a
symlink), then include the required libraries in an archive with the bundle and use an Ant task to extract
the files when deploying the bundle. For example:
<untar src="abc.tar.gz" compression="gzip" dest="somedirectory"/>
7.6.3. WARNING: T he Managed (T arget) Directory and Overwriting or Saving Files
One important thing to consider with an Ant recipe is how to handle files in the deployment directory.
(T his is touched on in Section 2.3, “File Handling During Provisioning”.)
By default, deploying or updating a bundle replaces everything in the deployment directory, either by
overwriting it or deleting it. T he file handling rules are very similar to RPM package upgrade rules. T his is
very simplified, but the provisioning process responds in one of two ways to existing files the
deployment directory:
1. T he file in the current directory is also in the bundle. In this case, the bundle file always overwrites
the current file. (T here is one exception to this. If the file in the bundle has not been updated and
is the same version as the local file, but the local file has modifications. In that case, the local file is
preserved.)
2. T he file in the current directory does not exist in the bundle. In that case, the bundle deletes the
file in the current directory.
T he behavior for #2, when a file is deleted, can be changed by settings in the Ant recipe.
T here are three ways to manage if and how files are preserved during provisioning: m anageRootDir,
<rhq:ignore>, and cleanDeploym ent.
manageRootDir
All of the information about the application being deployed is defined in the <rhq:deploym ent-unit>
element in a bundle recipe. T he m anageRootDir attribute on the <rhq:deploym ent-unit> element
sets how the provisioning process should handle existing files in the deployment directory.
T he default value is manageRootDir=true which means that the provisioning process deletes any other
files in the root directory.
24
6. The Workflow for Creating and D eploying a Bundle
NOTE
Any existing content in the root directory is backed up before it is deleted, so it can be restored
later.
T he backup directory is /hom e/.rhqdeploym ents/resourceID/backup.
Alternately, the value can be set to false, which tells the provisioning process to ignore any existing files
in the root directory, as long as there is not a corresponding file in the bundle.
T he m anageRootDir attribute applies to both the initial deployment and upgrade operations, so this
can be used to preserve files that may exist in a directory before a bundle is ever deployed.
See Section 7.7.3, “rhq:deployment-unit”.
NOTE
When a bundle will no longer be used on a resource, it can be entirely removed from the
filesystem. T his is called purging. T he way that the provisioning system handles files when
purging a bundle mirrors that way that it handles files when provisioning a system. By default,
purging a bundle deletes everything in the deployment directory. If the manageRootDir option is
set in the bundle, then the provisioning process removes all of the files and directories
associated with the bundle and leaves unrelated files and directories intact.
<rhq:ignore>
T here can be files that are used or created by an application, apart from the bundle, which need to be
preserved after a bundle deployment. T his can include things like log files, instance-specific
configuration files, or user-supplied content like images. T hese files can be ignored during the
provisioning process, which preserves the files instead of removing them.
T o save files, use the <rhq:ignore> element and list the directories or files to preserve.
<rhq:ignore>
<rhq:fileset>
<include name="logs/*.log"/>
</rhq:fileset>
</rhq:ignore>
T he <rhq:ignore> element only applies when bundles are updated; it does not apply when a bundle
is initially provisioned.
Also, the <rhq:ignore> element only applies to file that exist outside the bundle. Any files that are in
the bundle will overwrite any corresponding files in the deployment directory, even if they are specified in
the <rhq:ignore> element.
See Section 7.7.10, “rhq:ignore”.
Clean Deployment
Both m anageRootDir and <rhq:ignore> are set in the recipe. At the time that the bundle is actually
provisioned, there is an option to run a clean deployment. T he clean deployment option deletes
everything in the deployment directory and provisions the bundle in a clean directory, regardless of the
25
JBoss Operations Network 3.1 D eploying Applications and Content
m anageRootDir and <rhq:ignore> settings in the recipe.
See Section 9.5, “Deploying a Bundle to a Clean Destination”.
7.7. A Reference of JBoss ON Ant Recipe Elements
Section 7.7.1, “rhq:bundle”
Section 7.7.2, “rhq:input-property”
Section 7.7.3, “rhq:deployment-unit”
Section 7.7.4, “rhq:archive”
Section 7.7.5, “rhq:url-archive”
Section 7.7.6, “rhq:file”
Section 7.7.7, “rhq:url-file”
Section 7.7.8, “rhq:audit”
Section 7.7.9, “rhq:replace”
Section 7.7.10, “rhq:ignore”
Section 7.7.11, “rhq:fileset”
Section 7.7.12, “rhq:system-service”
Section 7.4.2, “Using Default, Pre-Install, and Post-Install T argets”
7.7.1. rhq:bundle
Contains the definition for the main JBoss ON-related Ant task that is required for any Ant bundle recipe.
T his element defines basic information about the bundle and is the parent element for all of the specific
details about what is in the bundle and how it should be provisioned.
Element Attributes
Attribute
Description
Optional or Required
name
T he name given to the bundle.
Required
version
T he version string for this
Required
specific bundle. Bundles can
have the same name, but each
bundle of that name must have
a unique version string. T hese
version strings normally conform
to an OSGi style of versioning,
such as 1.0 or 1.2.FINAL.
description
A readable description of this
specific bundle version.
Optional
Example
<rhq:bundle name="example" version="1.0" description="an example bundle">
7.7.2. rhq:input-property
Adds a property to the bundle task that defines a template token that must have its value supplied by a
user at the time the bundle is deployed. T his is similar to standard Ant properties.
26
6. The Workflow for Creating and D eploying a Bundle
NOTE
All of the system properties listed in T able 3, “System-Defined T okens” and the Ant-specific
tokens in T able 2, “Variables Defined by JBoss ON” are available to be used as templatized
tokens in bundle configuration without having to set a <rhq:input-property> definition.
All input properties set some parameter that must have its value defined by a user when the bundle is
provisioned on a resource, and the fields to enter those values are automatically generated in the JBoss
ON UI bundle deployment wizard.
Element Attributes
Attribute
Description
Optional or Required
name
T he name of the user-defined
property. Within the recipe, this
property can be referred to by
this name, in the format
${property_name}.
Required
description
A readable description of the
property. T his is the text string
displayed in the JBoss ON
bundle UI when the bundle is
deployed.
Required
type
Sets the syntax accepted for the
user-defined value. T here are
several different options:
Required
string
longString
long
password
file
directory
boolean
integer
float
double
required
Sets whether the property is
required or optional for
configuration. T he default value
is false, which means the
property is optional. If this
argument isn't given, then it is
assumed that the property is
optional.
Optional
defaultValue
Gives a value for the property to
use if the user does not define a
value when the bundle is
deployed.
Optional
27
JBoss Operations Network 3.1 D eploying Applications and Content
Example
<rhq:input-property
name="listener.port"
description="This is where the product will listen for incoming messages"
required="true"
defaultValue="8080"
type="integer"/>
See Also
Section 7.7.4, “rhq:archive”
Section 7.7.6, “rhq:file”
7.7.3. rhq:deployment-unit
Defines the bundle content — such as applications or configuration files — being deployed by the
bundle. A deployment unit can be simple text files, archives, or a full software product, including an
application server, web server, or database. A deployment unit can have multiple archive and
configuration files associated with it.
Only a single deployment unit is provisioned at a time by the provisioning process, so there can be only
one <rhq:deploym ent-unit> element in a bundle recipe.
Element Attributes
Attribute
Description
Optional or Required
name
T he name of the application.
Required
manageRootDir
Sets whether JBoss ON should
manage all files in the top root
directory (deployment directory)
where the bundle is deployed. If
false, any unrelated files found
in the top deployment directory
are ignored and will not be
overwritten or removed when
future bundle updates are
deployed. T he default is true.
Any existing content in the root
directory is backed up before it
is deleted, so it can be restored
later. T he backup directory is
/hom e/.rhqdeploym ents/re
sourceID/backup.
Optional
preinstallT arget
An Ant target that is invoked
before the deployment unit is
installed.
Optional
postinstallT arget
An Ant target that is invoked
after the deployment unit is
installed.
Optional
Example
28
6. The Workflow for Creating and D eploying a Bundle
<rhq:deployment-unit name="appserver" preinstallTarget="preinstall"
postinstallTarget="postinstall">
See Also
Section 7.4.2, “Using Default, Pre-Install, and Post-Install T argets”
7.7.4 . rhq:archive
Defines any archive file that is associated with deploying the application. An archive can be a Z IP or JAR
file. A bundle doesn't require an archive file, so this element is optional.
Element Attributes
Attribute
Description
Optional or Required
name
T he filename of the archive file
to include in the bundle.
Required
IMPORTANT
If the archive file is
packaged with the Ant
recipe file inside the
bundle distribution Z IP
file, then the nam e must
contain the relative path
to the location of the
archive file in the Z IP file.
exploded
Sets whether the archive's
contents will be extracted and
stored into the bundle
destination directory (true) or
whether to store the files in the
same relative directory as is
given in the nam e attribute
(false). If the files are exploded,
they are extracted starting in the
deployment directory. Postinstall targets can be used to
move files after they have been
extracted.
Optional
Example
<rhq:archive name="file.zip">
<rhq:replace>
<rhq:fileset>
<include name="**/*.properties"/>
</rhq:fileset>
</rhq:replace>
</rhq:archive>
29
JBoss Operations Network 3.1 D eploying Applications and Content
See Also
Section 7.7.2, “rhq:input-property”
Section 7.7.11, “rhq:fileset”
Section 7.7.9, “rhq:replace”
7.7.5. rhq:url-archive
Defines remote archive to use, which is accessed through the given URL. T his is similar to
rhq:archive except that the server accesses the archive over the network rather than including the
archive directly in the bundle distribution file.
Element Attributes
Attribute
Description
Optional or Required
url
Gives the URL to the location of
the archive file. T he archive is
downloaded and installed in the
deployment directory.
Required
NOTE
For the bundle to be
successfully deployed,
the URL must be
accessible to all agent
machines where this
bundle is to be deployed.
If an agent cannot
access the URL, it cannot
pull down the archive and
thus cannot deploy it on
the machine.
name
Example
30
Sets whether the archive's
contents will be extracted and
stored into the bundle
destination directory (true) or
whether to store the files in the
same relative directory as is
given in the nam e attribute
(false). If the files are exploded,
they are extracted starting in the
deployment directory. Postinstall targets can be used to
move files after they have been
extracted.
Optional
6. The Workflow for Creating and D eploying a Bundle
<rhq:url-archive url="http://server.example.com/apps/files/archive.zip">
<rhq:replace>
<rhq:fileset>
<include name="**/*.properties"/>
</rhq:fileset>
</rhq:replace>
</rhq:url-archive>
See Also
Section 7.7.4, “rhq:archive”
Section 7.7.2, “rhq:input-property”
Section 7.7.11, “rhq:fileset”
Section 7.7.9, “rhq:replace”
7.7.6. rhq:file
Contains the information to identify and process configuration files for the application which have token
values that must be realized. Normally, configuration files are copied directly from the bundle package
into the deployment directory. T he <rhq:file> element calls out files that require processing before
they should be copied to the destination. T he attributes on the <rhq:file> element set the name of
the raw file in the bundle distribution Z IP file and the name of the target file that it should be copied to.
Raw files can be included with the archive files that contain properties or configuration for the
application. T hese configuration files can be templatized with user-defined or system-defined tokens,
like those listed in Section 7.5, “Using T emplatized Configuration Files”. Any templatized files that are
included in the bundle distribution file that are templatized must be listed in the Ant recipe so that they
are processed and the tokens are realized.
Element Attributes
Attribute
Description
Optional or Required
name
T he name of the raw
configuration file.
Required
IMPORTANT
If the configuration file is
packaged with the Ant
recipe file inside the
bundle distribution Z IP
file, then the nam e must
contain the relative path
to the location of the file
within the Z IP file.
destinationFile
T he full path and filename for
the file on the destination
resource. Relative paths must
be relative to the final
deployment directory (defined in
the rhq.deploy.dir
parameter when the bundle is
Required, unless destinationDir
is used
31
JBoss Operations Network 3.1 D eploying Applications and Content
deployed). It is also possible to
use absolute paths, as long as
both the directory and the
filename are specified.
NOTE
If the destinationDir
attribute is used, the
destinationFile
attribute cannot be used.
destinationDir
T he directory where this file is
to be copied. If this is a relative
path, it is relative to the
deployment directory given by
the user when the bundle is
deployed. If this is an absolute
path, that is the location on the
filesystem where the file will be
copied. T his attribute sets the
directory for the file to be copied
to. T he actual file name is set in
the nam e attribute.
Required, unless destinationFile
is used
If the destinationFile
attribute is used, the
destinationDir attribute
cannot be used.
replace
Indicates whether the file is
templatized and requires
additional processing to realize
the token values.
Required
Example
<rhq:file name="test-v2.properties" destinationFile="subdir/test.properties"
replace="true"/>
If neither the destinationDir nor the destinationFile attribute is used, then the raw file is
placed in the same location under the deployment directory as its location in the bundle distribution.
7.7.7. rhq:url-file
As with rhq:file, contains the information to identify and process configuration files for the application
which have token values that must be realized. T his option specifies a remote file which is downloaded
from the given URL, rather than being included in the bundle archive.
Element Attributes
Attribute
Description
Optional or Required
url
Gives the URL to the
Required
32
6. The Workflow for Creating and D eploying a Bundle
templatized file. T he file is
downloaded and installed in the
deployment directory.
NOTE
For the bundle to be
successfully deployed,
the URL must be
accessible to all agent
machines where this
bundle is to be deployed.
If an agent cannot
access the URL, it cannot
pull down the archive and
thus cannot deploy it on
the machine.
destinationFile
T he full path and filename for
the file on the destination
resource. Relative paths must
be relative to the final
deployment directory (defined in
the rhq.deploy.dir
parameter when the bundle is
deployed). It is also possible to
use absolute paths, as long as
both the directory and the
filename are specified.
Required, unless destinationDir
is used
NOTE
If the destinationDir
attribute is used, the
destinationFile
attribute cannot be used.
T his attribute must give both the
path name and the file name.
destinationDir
T he directory where this file is
to be copied. If this is a relative
path, it is relative to the
deployment directory given by
the user when the bundle is
deployed. If this is an absolute
path, that is the location on the
filesystem where the file will be
copied. T his attribute sets the
directory for the file to be copied
to. T he actual file name is set in
the nam e attribute.
Required, unless destinationFile
is used
33
JBoss Operations Network 3.1 D eploying Applications and Content
If the destinationFile
attribute is used, the
destinationDir attribute
cannot be used.
replace
Indicates whether the file is
templatized and requires
additional processing to realize
the token values.
Required
Example
<rhq:url-file url="http://server.example.com/apps/files/test.conf"
destinationFile="subdir/test.properties" replace="true"/>
If neither the destinationDir nor the destinationFile attribute is used, then the raw file is
placed in the same location under the deployment directory as its location in the bundle distribution.
See Also
Section 7.7.6, “rhq:file”
7.7.8. rhq:audit
Sets custom audit trail messages to use during the provisioning process. T his is useful with complex
recipes that perform some additional custom tasks. As the tasks are processed, the rhq:audit
configuration sends information to the server about the additional processing steps and their results.
Element Attributes
Attribute
Description
Optional or Required
status
T he status of the processing.
T he possible values are
SUCCESS, WARN, and
FAILURE. T he default is
SUCCESS.
Optional
action
T he name of the processing
step.
Required
info
A short summary of what the
action is doing, such as the
name of the target of the action
or an affected filename.
Optional
message
A brief text string which provides
additional information about the
action.
Optional
Example
<rhq:audit status="SUCCESS" action="Preinstall Notice" info="Preinstalling to
${rhq.deploy.dir}" message="Another optional message">
Some additional, optional details regarding
the deployment of ${rhq.deploy.dir}
</rhq:audit>
34
6. The Workflow for Creating and D eploying a Bundle
7.7.9. rhq:replace
Lists templatized files, in children <rhq:fileset> elements, contained in the archive which need to
have token values realized when the archive is deployed.
Any file which uses a token that must be replaced with a real value is a templatized file. When the
provisioning process runs, the token value is substituted with the defined value. T his element lists all of
the files which are templatized; the only files which are processed by the provisioning system for token
substitution are the ones listed in the <rhq:replace> element.
Example
<rhq:archive name="file.zip">
<rhq:replace>
<rhq:fileset>
<include name="**/*.properties"/>
</rhq:fileset>
</rhq:replace>
</rhq:archive>
See Also
Section 7.7.11, “rhq:fileset”
Section 7.7.4, “rhq:archive”
7.7.10. rhq:ignore
Lists files in the deployment directory which should not be deleted when a new bundle is deployed. T his
only applies to upgrade operations, not to the initial deployment of a bundle.
Once an application is deployed, instance-specific files — like data files or logs — can be created and
should be retained if the application is ever upgraded. T his element, much like <rhq:replace>,
contains a list of files or directories in the instance to save.
NOTE
If a file is ignored in the recipe, then the file is not deleted when the bundle is deployed. However,
if a file of the same name exists in the bundle, then the local file is overwritten.
Do not attempt to ignore files that are packaged in the bundle. Only files generated by the applications,
such as log and data files, should be ignored by the provisioning process since they should be
preserved for the upgraded instance.
IMPORTANT
It is possible to deploy one bundle to a subdirectory of another bundle (such as Bundle A is
deployed to /opt/m yapp and Bundle B to /opt/m yapp/webapp1).
In that case, set the recipe in Bundle A to ignore the directory to which Bundle B will be deployed.
T his prevents updates or reversions for Bundle A from overwriting the configuration from Bundle
B.
Example
35
JBoss Operations Network 3.1 D eploying Applications and Content
<rhq:ignore>
<rhq:fileset>
<include name="logs/*.log"/>
</rhq:fileset>
</rhq:ignore>
See Also
Section 7.7.11, “rhq:fileset”
7.7.11. rhq:fileset
Provides a list of files.
T wo JBoss ON elements — <rhq:replace> and <rhq:ignore> — define file lists in either the
archive file or the deployment directory. T his element contains the list of files.
Child Element
Child Element
Description
<include name=filename />
T he filename of the file. For <rhq:replace>,
this is a file within the archive (JAR or Z IP) file
which is templatized and must have its token
values realized. For <rhq:ignore>, this is a file
in the application's deployment directory which
should be ignored and preserved when the
bundle is upgraded.
Example
<rhq:replace>
<rhq:fileset>
<include name="**/*.properties"/>
</rhq:fileset>
</rhq:replace>
See Also
Section 7.7.10, “rhq:ignore”
Section 7.7.9, “rhq:replace”
7.7.12. rhq:system-service
Points to a script file to launch as part of the provisioning process. T his is usually an init file or similar
file that can be used by the deployed application to set the application up as a system service.
Element Attributes
Attribute
Description
Optional or Required
name
T he name of the script.
Required
scriptFile
T he filename of the script. If the
script file is packaged with the
Ant recipe file inside the bundle
distribution Z IP file, then the
scriptFile must contain the
Required
36
8. Testing Bundle Packages
relative path to the location of
the file in the Z IP file.
configFile
T he name of any configuration
or properties file used by the
script. If the configuration file is
packaged with the Ant recipe file
inside the bundle distribution
Z IP file, then the configFile
must contain the relative path to
the location of the file in the Z IP
file.
Optional
overwriteScript
Sets whether to overwrite any
existing init file to configure the
application as a system service.
Optional
startLevels
Sets the run level for the
application service.
Optional
startPriority
Sets the start order or priority
for the application service.
Optional
stopPriority
Sets the stop order or priority
for the application service.
Optional
Example
<rhq:system-service name="example-bundle-init" scriptFile="example-init-script"
configFile="example-init-config" overwriteScript="true"
startLevels="3,4,5" startPriority="80" stopPriority="20"/>
8. Testing Bundle Packages
Ant recipes can be complex, so it's important (and useful) to test a bundle before deploying it. JBoss ON
includes a command-line tool that can be used to test Ant provisioning bundles quickly.
8.1. Installing the Bundle Deployer Tool
T his tool can be downloaded and installed on any machine, independent of any JBoss ON server or
agent.
1. Click the Adm inistration tab in the top menu.
2. Select the Downloads in the left menu table.
3. Scroll to the Bundle Deployer Download section, and click the package download link.
37
JBoss Operations Network 3.1 D eploying Applications and Content
4. Save the .zip file into the directory where the bundle tool should be installed, such as /opt/.
5. Unzip the packages.
cd /opt/
unzip rhq-bundle-deployer-version.zip
8.2. Using the Bundle Deployer Tool
IMPORTANT
T his bundle deployment tool is only to test the provisioning process and deployed application.
T his tool does not interact with the JBoss ON server or agent, so JBoss ON is unaware of any
applications deployed with this tool and cannot manage them.
1. Unzip the bundle distribution package to check (or copy an unzipped directory that contains the
application files). For example:
mkdir /tmp/test-bundle
cd /tmp/test-bundle
unzip MyBundle.zip
2. Open the top directory of the bundle distribution, where the deploy.xm l Ant recipe file is.
3. Set the bundle deployer tool location in the PAT H.
PATH="/opt/rhq-bundle-deployer-3.0.0/bin:$PATH"
4. Run the bundle deploy tool, and use the format -Dinput_properties to pass the values to userdefined tokens in the templatized files. For example:
rhq-ant -Drhq.deploy.dir=/opt/exampleApp -Dlistener.port=7081
T his installs the application in /opt/exam pleApp and sets a port value of 7081.
38
9. Provisioning Bundles
TIP
Optionally, use the rhq.deploy.id attribute to set an identifier for the deployment. T he
default is 0, which means a new deployment. When bundles are deployed in the UI, the
server assigns a unique ID to the deployment. Using the rhq.deploy.id attribute on a
new deployment simulates the server's ID assignment.
Using the rhq.deploy.id attribute if there is already a previous deployment allows you
to test the upgrade performance of the bundle. Performing an upgrade requires a new,
unique ID number.
9. Provisioning Bundles
9.1. Uploading Bundles to JBoss ON
All of the files associated with a distribution — the recipe, any JARs or Z IPs, and any configuration files
— have to be accessible to JBoss ON. Either the files need to be uploaded and stored in the JBoss ON
database or a URL to the packages needs to be configured.
NOTE
If the files are all combined in a single Z IP file to upload, then the recipe file must be in the top
level of the package.
1. In the top menu, click the Bundles tab.
2. Scroll to the bottom of the window and click the New button.
3. Upload the distribution package or the recipe file.
39
JBoss Operations Network 3.1 D eploying Applications and Content
T here are three options on how the bundle distribution is made available to the JBoss ON server:
URL points to any URL, such as an FT P site or SVN or GIT repo, where there is a complete
bundle distribution file available.
TIP
Using an SVN or GIT repo allows you to pull the packages directly from a build system.
Upload uploads a single bundle distribution file (which includes both the recipe an all
associated files) from the local system to the JBoss ON server.
Recipe uploads a recipe file only, and then any additional files required for the bundle are
uploaded separately. T his option includes an edit field where the uploaded recipe can be
edited before it is sent to the server.
40
9. Provisioning Bundles
NOTE
When uploading a recipe file separately than the bundle archive files, every closing tag
be explicitly stated (meaning every entry must have the format <tag></tag>, not the
abbreviated format <tag />). Otherwise, the recipe may be incorrectly interpreted in
the text box and fail to upload to the server.
T he XML must be well-formed, or the recipe fails validation and the upload fails.
Additionally, the Recipe option's upload button does not work on Internet Explorer. T o
add a recipe file using this option with Internet Explorer, copy the entire recipe file and
paste it directly into the text box.
4. In the next screen, upload any associated files that were not uploaded previously. For the URL and
Upload, all of the files are usually uploaded in a single file, so there is nothing to do on this
screen. For the Recipe option, all of the files listed in the recipe must be uploaded manually at
this step.
5. T he final screen shows all of the information for the new bundle. Click Finish to save the new
bundle.
41
JBoss Operations Network 3.1 D eploying Applications and Content
9.2. Deploying Bundles to a Resource
Bundles are deployed to resources by deploying the bundle to a JBoss ON group. Any compatible group
that contains resources which support bundles (platforms and JBoss AS resources by default) is
automatically listed as an option for the destination.
For platforms, the groups cannot contain different operating systems and architectures. However, the
same bundle distribution file and properties can be used for any platform because the provisioning
process will automatically format the deployment directory and provisioned files to match the platform's
architecture.
1. In the top menu, click the Bundles tab.
2. Scroll to the bottom of the window and click the Deploy button.
Alternatively, click the name of the bundle in the list, and then click the deploy button at the top of
the bundle page.
3. Select the bundles to deploy from the list on the left and use the arrows to move them to the box
on the right.
42
9. Provisioning Bundles
4. Once the bundles are selected, define the destination information.
T he destination is a combination of the resources the bundle is deployed on and the directory to
which is it deployed. Each destination is uniquely defined for each bundle.
T o define the destination, first select the resource group from the Resource drop-down menu.
T he resource group identifies the type of resource to which the bundle is being deployed, and the
resource type defines other deployment parameters. When the group is selected, then the base
location is defined. For a platform, this is the root directory. For a JBoss AS instance, it is the
installation directory. For custom resources, the base location is defined in the plug-in descriptor.
TIP
If you haven't created a compatible group or if you want to create a new group specifically
for this bundle deployment, click the + icon to create the group. T hen, continue with the
provisioning process.
Set the actual deployment directory to which to deploy the bundle. T his directory is a relative path
to the plug-in-defined base location.
43
JBoss Operations Network 3.1 D eploying Applications and Content
5. Select the version of the bundle to deploy. If there are multiple versions of a bundle available, then
any of those versions can be selected. T here are also quick options to deploy the latest version
or the currently deployed version.
6. If there are any user-defined properties, then they are entered in the fields in the next page. Userdefined properties are configured in the bundle recipe using tokens.
44
9. Provisioning Bundles
7. Fill in the information about the specific deployment instance. T he checkbox sets the option on
whether to overwrite anything in the existing deployment directory or whether to preserve any
existing files.
8. T he final screen shows the progress for deploying the packages. Click Finish to complete the
deployment.
9.3. Viewing the Bundle Deployment History
A bundle has two areas of information: one for its versions and one for its destinations (places where it
is deployed). T he main bundle entry shows only those two things, the versions and the destinations.
T he version area is a way to track and control the content of the bundle, while the destinations area is a
way to track and control the process of deploying bundles.
45
JBoss Operations Network 3.1 D eploying Applications and Content
Figure 4 . Bundles, Versions, and Destinations
Selecting a version under the main bundle entry shows its recipe (on the Sum m ary tab) and a list of all
of the files associated with that particular version (on the Files tab). T he Deploym ents tab shows
every destination, with timestamps and comments, that that particular version of the bundle has been
deployed to.
Figure 5. Deployment Information for a Version
A destination entry shows only a list of versions that have been deployed to that destination. In a sense,
the destination area is the best areas to track the audit history of an application. Each deployment of a
bundle version to a destination is listed below the destination, with the live version marked. Reversions
are also marked, showing what version the deployment was downgraded to.
46
9. Provisioning Bundles
Figure 6. Deployment History for a Destination
Along with showing the history of deployments and updates, the destinations area is the place where
new versions can be deployed or reverted most directly.
9.4. Reverting a Deployed Bundle
Ant bundles can be rolled back to a previous version number or a previous deployment of that bundle.
T his provides some extra protection and flexibility when deploying and managing applications,
particularly for testing and production systems.
1. In the top menu, click the Bundles tab.
2. In the left navigation window, expand the bundle node, and then open the Destinations folder
beneath it.
3. Select the destination from the left navigation.
4. In the main window for the destination, click the Revert button.
47
JBoss Operations Network 3.1 D eploying Applications and Content
5. T he next page shows the summary of the current deployment and the immediate previous
deployment, which it will be reverted to.
48
9. Provisioning Bundles
6. Add any notes to the revert action. Optionally, select the checkbox to clean the deployment
directory and install the previous version fresh.
7. Click Finish on the final screen to complete the rollback.
9.5. Deploying a Bundle to a Clean Destination
A bundle can be deployed to a destination where there may already be an application, files, or even a
previous bundle deployment. When deploying a new bundle, there are two options for how the
provisioning process handles the update:
Preserve the existing files and directories, with appropriate upgrades, according to the recipe
configuration (Section 7.6.3, “WARNING: T he Managed (T arget) Directory and Overwriting or Saving
Files”)
Completely overwrite the existing files and deploy the bundle in an empty directory
T o deploy the bundle in a clean directory, then select the Clean Deploy checkbox when running
through the deployment wizard in Section 9.2, “Deploying Bundles to a Resource”.
9.6. Purging a Bundle from a Resource
Purging a bundle removes all of the files associated with the bundle from all of the target resources.
However, this does not remove the bundle from the JBoss ON database, so it can be easily re-deployed
to the same resources later or to other resources.
49
JBoss Operations Network 3.1 D eploying Applications and Content
IMPORTANT
T he exact files that are purged mirrors how the bundle manages the deployment directory. By
default, purging includes deleting the deployment directory (m anageRootDir=true). If the
deployment directory is used by other applications – like an app server deploy/ directory —
then those other applications or files will also be deleted. After purging, there is no live
deployment and nothing to revert.
1. In the top menu, click the Bundles tab.
2. In the left navigation window, expand the bundle node, and then open the Destinations folder
beneath it.
3. Select the destination from the left navigation.
4. In the main window for the destination, click the Purge button.
5. When prompted, confirm that you want to remove the bundled application and configuration from
the target resources.
9.7. Upgrading Ant Bundles
T he bundle upgrade process decides whether to upgrade (meaning, overwrite) files within the
application's deployment directory by comparing the MD5 hash codes on the files. T here are several
different upgrade scenarios:
If the hash code on the new file is different than the original file and there are no local modifications,
then JBoss ON installs the new file over the existing file.
If the hash code on the new file is different than the original file and there are local modifications, then
JBoss ON backs up the original file and installs the new file.
50
9. Provisioning Bundles
If the hash code on the new file and the original file is the same and there are local modifications on
the original file, then the provisioning process preserves the original file, in place.
If there was no file in the previous bundle but there is one in the new bundle, then the new file is
used and any file that was added manually is backed up.
Backed up files are saved to a backup/ directory within the deployment's destination directory. If the
original file was located outside the application's directory (like, it was stored according to an absolute
location rather than a relative location), then it is saved in an ext-backup/ directory within the
deployment's destination directory.
NOTE
If a file is ignored in the recipe, then the file is left unchanged. Never ignore files packaged in the
bundle. Only files generated by the applications, such as log and data files, should be ignored by
the provisioning process since they should be preserved for the upgraded instance.
If a completely fresh installation is required, then it is possible to run a clean deployment. T his is
described in Section 9.5, “Deploying a Bundle to a Clean Destination”.
9.8. Deleting a Bundle from the JBoss ON Server
Deleting a bundle removes all of its recipes and associated files from the JBoss ON database. T he
deployed applications or configuration remain intact on the target resources.
1. In the top menu, click the Bundles tab.
2. In the left navigation window, expand the bundle node, and then open the Destinations folder
beneath it.
3. Select the destination from the left navigation.
4. In the main window for the destination, click the Delete button.
51
JBoss Operations Network 3.1 D eploying Applications and Content
5. When prompted, confirm that you want to delete the bundle.
10. Managing Resource-Level Content Updates
JBoss Operations Network can be used to store and deploy content to resources. T his can be done to
apply updates and patches (as with JBoss AS servers) or to set up repositories used for provisioning
applications and deploying custom software.
10.1. About Content
Content for a resource can be almost anything, such as WAR and EAR files, configuration files, or
scripts. JBoss ON provides a central framework to associate content, repositories, and resources in the
inventory.
10.1.1. What Content Is: Packages
A package is anything that is installed on a platform or for a server or application. T his can be a JAR file
or even a configuration file. A package simply provides some form of content for a resource. Packages
can be sent to a resource through a JBoss ON-recognized repository or simply by uploading the
package to the JBoss ON server and then sending it to the resource.
A resource can only be associated with or manage content if the resource plug-in identifies that content
is available and the type of content that is supported. For example, application and web servers like
JBoss AS/EAP and T omcat support EAR, WAR, and JAR files as content; but a database like
PostgreSQL does not support any content types.
In a sense, content is both the software bits, scripts, or configuration files associated with a resource
and also a resource itself. When content is added to a resource, it becomes a child resource in the
JBoss ON hierarchy — but it can be managed, reverted, updated, or replaced by uploading new software
bits. T he parent resource (such as the application server) supports content; the child resource is a
content backed resource.
Content can be added to a resource either by manually creating a child resource (and uploading the
packages) or by adding the package to a content source and deploying it to the parent resource. T he
52
10. Managing Resource-Level Content Updates
agent can also actively check for new content as part of its discovery scan and add any discovered
content to its inventory. T he agent's recurring package discovery scan has a default interval of 24
hours, as with the services scan.
10.1.2. Where Content Comes From: Providers and Repositories
Content sources are developers and distributors of content. Sources can be external third party software
developers or internal development teams that create custom content. T he type of content available from
sources includes both software packages (such as configuration scripts) and updates (version
upgrades, patches, and errata).
A repository is a user-defined collection of software packages, which can come from one or multiple
content sources. A repository may contain packages for an application or family of applications or for a
specific purpose, like repositories for laptop configuration and repositories for installing web servers.
Repositories aren't siloed, separate containers for packages; they are essentially views that show a
subset of available packages. All packages are stored in the JBoss ON database. A JBoss ON
repository is a way of grouping those packages, both to make it easier to administer with resources and
to provide a mechanism of access control for users (Section 10.1.4, “Authorization to Repositories and
Packages”).
Resources can be subscribed to content repositories that are configured in JBoss ON, which provides a
smooth and reliable mechanism for delivering consistent, administrator-configured content to resources.
10.1.3. Package Versions and History
Packages are versioned within JBoss ON itself. When a package is added to a resource or content
source, the installer prompts for a version number; this is used as the UI display number.
T his display version number is not required; if it is not given, then the JBoss ON server derives a
number based on a calculated SHA-256 checksum for the package and the specification version and the
implementation version in the MET A-INF/MANIFEST .MF file (for EARs and WARs).
SPEC(IMPLEMENTATION)[sha256=abcd1234]
Figure 7. Package Version Numbers
For example, for a MET A-INF/MANIFEST .MF file with these version numbers:
53
JBoss Operations Network 3.1 D eploying Applications and Content
Manifest-Version: 1.0
Created-By: Apache Maven
Specification-Title: My Example App
Specification-Version: 1.0.0-GA
Specification-Vendor: Example, Corp.
Implementation-Title: My Example App
Implementation-Version: 1.x
Implementation-Vendor-Id: org.example
Implementation-Vendor: Example, Corp.
...
T his creates a version number for the package like this:
1.0.0-GA(1.x)[sha256=abcd1234]
If the MET A-INF/MANIFEST .MF file does not contain one of the specification version or the
implementation version, then only one is used. For example, if only the implementation version is given:
(1.x)[sha256=abcd1234]
If no version number is given, then the SHA is used as the identifier. (T he SHA is used as the identifier
internally, anyway.)
[sha256=abcd1234]
For exploded WARs and EARs, the calculated SHA-256 checksum is added to the MANIFEST .MF file.
T his allows the agent to check the file during discovery scans to verify the version of the package
quickly.
Manifest-Version: 1.0
Created-By: Apache Maven
RHQ-Sha256: 570f196c4a1025a717269d16d11d6f37
...
For unexploded (archived) content, the checksum is recalculated with every package discovery scan and
compared to the checksum in inventory.
NOTE
Exploded WARs and EARs can be deployed on JBoss and T omcat servers. Because the content
deployment process edits the MET A-INF/MANIFEST .MF file, the deployed content is not exactly
identical to the content packages that were uploaded.
A clear versioning system makes it possible to handle package lifecycles in a clear and effective way.
Updated content can be tracked as it is deployed, updates can be applied consistently, and packages
can be reverted to a previous version. T he same repository can also contain different versions of the
same package, making it possible to apply different versions to different resources.
54
10. Managing Resource-Level Content Updates
TIP
Package versions from different content sources can be associated with the same repository.
Whenever a package is installed on a resource, it is recorded in the content history for the resource and
the package. Since there can be multiple files associated with a single package, then there can be
multiple files recorded in the content history, all associated with that package version.
NOTE
Versioning only matters to content knit with a resource, like EARs and WARs. Other types of
content stored in content sources (like CLI scripts used for alerting) do not track versions.
Content deployed in bundles handles versioning through the bundle definition, not the content
system.
10.1.4 . Authorization to Repositories and Packages
T here are a lot of reasons that users need to be able to access content in repositories. T he most
common is to manage packages on resources, but there are other reasons, too, like using the server CLI
scripts in a repository to respond to alerts.
JBoss ON provides a way to balance the need for clear and simple access to content with the need to
protect private or sensitive information. JBoss ON defines clear authorization rules for content
repositories.
Every user has the ability to create repositories and to upload packages to them — regardless of the
permissions for that user.
When a repository is created, there are settings which control access to them:
Owner sets write access to a repository. It assigns the repository to belong to a specific user. If no
user is specified, then only users with the manage repositories permission have the right to access
those repositories.
Private sets read (download) access to the repository. It sets whether the repository can be viewed
by anyone or only by the owner and users with the manage repositories permission. Public
repositories are viewable by everyone, regardless of the owner.
Figure 8. Repository Ownership and Access Settings
55
JBoss Operations Network 3.1 D eploying Applications and Content
Repo managers (users with the manage repositories permission) can change the ownership and privacy
settings of a repository. Users without the manage repositories permission can change the privacy
settings but they cannot change the ownership; the repository is always owned by them or managed by
the repo manager.
NOTE
Be very careful when switching public repositories to private. Any operations which relied on
those repositories, such as running server CLI scripts in response to alerts, will no longer work if
the privileges of the user are insufficient to access the repository.
JBoss ON uses the repositories access control permission to define users with administrative access to
repositories. Any user with that permission can manage any configured repository, regardless of who
the repository's owner is. Repositories without an owner can only be managed by users with the
repositories permission. Lastly, only users with this permission can associate a content source with a
repository; all other users must add packages to the repository manually.
10.2. Creating a Content Source
A content source is whatever mechanism supplies software packages to JBoss ON and, through JBoss
ON's content management, to resources. JBoss ON supports several different types of content sources.
T able 4 . T ypes of Content Sources
Source T ype
Description
Requires Credentials?
Remote URL
Downloads from a remote URL.
No
T his can use a couple of
different protocols, such as FT P.
HT T P
Similar to the Remote URL
content source, connects over a
network connection to the
source. T his uses specifically
the HT T P protocol. T he HT T P
content source can also connect
to an HT T P proxy.
Optionally allows credentials to
log into the given HT T P site or
the proxy server [a]
HT T PS is not supported.
JBoss Customer Portal Feed
(RSS)
Similar to the Remote URL
content source, except that it
works specifically with the
Customer Portal RSS feed for
JBoss cumulative patches.
Yes [a]
Local Disk
Connects to a single local
directory (on the local system or
NFS-mounted) and looks for
packages of the specified type
and architecture to download.
No
[a] Any p as s wo rd s g iven in the c o ntent s o urc e c o nfig uratio n are o b fus c ated in the JBo s s O N d atab as e.
56
10. Managing Resource-Level Content Updates
10.2.1. Creating a Content Source (General)
1. In the top menu, click the Adm inistration tab.
2. In the Content menu table on the left, select the Content Sources item.
3. Below the list of current content sources, click the CREAT E NEW button.
4. Select the content source type, which defines how the content is delivered from the source.
T able 4, “T ypes of Content Sources” describes the different content sources.
5. When the content source type is selected, a form automatically opens to fill in the basic details
and configuration for the resource. T hese basic details identify the content source in the JBoss
ON server and are the same for each content source type, while the configuration is specific to the
content source type.
Give a unique name and optional description for the content source provider.
T he schedule sets how frequently the content in the JBoss ON database is updated by the
content source; this uses a standard Quartz Cron Syntax.
T he lazy load setting sets whether to download packages only when they are installed (Yes)
or if all packages should be download immediately.
57
JBoss Operations Network 3.1 D eploying Applications and Content
T he download mode sets how the content is stored in JBoss ON. T he default is DAT ABASE,
which stores all packages in the JBoss ON database instance. T he other options are to store
the packages on a network filesystem or not to store them at all.
6. Fill in the other configuration information for the content source. T he required information varies
depending on the content source type. T his is going to require some kind of connection
information, such as a URL or directory path, and possibly authentication information, like a
username and password.
NOTE
Any passwords stored for content sources are obfuscated in the JBoss ON database.
10.2.2. Enabling the Default JBoss Patch Content Source
For JBoss patches, the default content provider connects the JBoss ON server to the cumulative
patches provided by the JBoss Customer Service Portal. T he default repository associated with the
content provider is where the metadata about the patches and the patches themselves are stored within
JBoss ON.
T he JBoss ON agent is the entity which actually executes the patching process on a resource. T he
agent is informed of updates, pulls the information from the server, and then updates the local JAR and
class files within the managed JBoss instance. T he patching process runs independently of any server
configuration profile or base configuration.
JBoss products can receive and apply patch updates through the JBoss Customer Portal feed in JBoss
ON. T he supported products include:
JBoss Enterprise Application Platform (EAP)
JBoss Enterprise Web Platform and Web Services (EWP and EWS)
JBoss Enterprise Data Services (EDS)
JBoss SOA Platform (SOA-P)
NOTE
A Customer Portal feed is only available for a product or a specific version of a product if there is
a patch in the Customer Portal for that product. JBoss ON depends on the JBoss Customer
Portal to provide patch information.
TIP
Perform patch installations during off hours or scheduled maintenance periods.
1. In the Adm inistration tab in the top menu, open the Content menu and select the Content
Sources item.
2. Click the JBoss Custom er Portal Patch Feed source.
58
10. Managing Resource-Level Content Updates
3. Click the Edit button at the bottom of the Custom er Portal Feed Settings area to modify
the content source.
4. Fill in the required connection information.
T he Customer Portal username and password.
59
JBoss Operations Network 3.1 D eploying Applications and Content
NOTE
T he Customer Portal password is obfuscated when it is stored in the JBoss ON
database.
T he URL for the content source
(https://access.redhat.com/jbossnetwork/restricted/feed/software.html?
product=all&downloadT ype=all&flavor=rss&version=&jonVersion=2.0).
T he activation state. T his should be Yes to enable automatic patching.
Most of the default settings, such as the schedule, can be kept.
IMPORTANT
Keep the Lazy Load checkbox activated, or all patches defined in the RSS feed, 1 GB of
data, is preemptively downloaded by the JBoss ON server.
5. Click Save.
6. Optionally, use Synchronize button to force the content source to pull down the latest RSS
Feed and synchronize it with the local data. T he history of synchronization attempts is listed in the
Synchronization Results section.
7. Perform any manual steps to complete the patch installation.
Some patches require additional, manual changes, such as editing an XML configuration file.
T here are several different situations that require manual intervention:
T he file to be patched is not present in the configuration.
T here are files that need to be removed manually.
Configuration files, such as XML or Java properties files, require patches that need to be
applied manually.
Seam is being used and must be patched manually.
Basically, admin intervention is required to resolve anything that is outside the default
configuration, like merging in custom configuration or updating custom libraries.
JBoss ON performs the standard steps required to apply patches to a JBoss instance, but it does
not (and should not) have any way to parse and then merge changes in the configuration. JBoss
ON does not attempt to determine, value, and apply custom changes. T hat sort of heuristic is best
performed by an administrator.
Any manual steps which are required to complete the patch are listed in the content update
summary after the patch is applied.
10.2.3. Creating a Content Source (Local Disk)
A local disk content source is set up more or less as described in Section 10.2.1, “Creating a Content
Source (General)”, but the values for both the content source setup and the repository setup are critical
for content synchronization to work.
A single content source can be associated with multiple repositories, and this is true for local disk
configuration. For local disk providers, the content source defines a root directory, and then the
repository name identifies the subdirectory which contains the packages.
60
10. Managing Resource-Level Content Updates
Figure 9. Local Disk Structure
T his structure allows multiple repositories to use the same base directory in the content provider.
JBoss ON derives the information for the local disk based on the combination of the content source
configuration (root directory) and the repository configuration (subdirectory). For the sync to work, the
repository must have the identical name as the subdirectory which contains the packages.
IMPORTANT
Each subdirectory name must be unique through the hierarchy of the root directory tree. For
example, there should not be directories named /export/m yContentSource/test and
/export/m yContentSource/subdir/test.
Having two directories, even at different levels, with the same name can result in unpredictable
package sync behavior.
T o set up the local disk provider:
1. Set up the content source as in Section 10.2.1, “Creating a Content Source (General)”.
TIP
If the subdirectories to sync already exist, then the content source configuration prompts
for possible repositories to associate with the local disk provider based on the subdirectory
names.
2. Enter the root directory path.
61
JBoss Operations Network 3.1 D eploying Applications and Content
3. Enter the content package information, which the JBoss ON server uses to identify the packages
to pull into the content storage.
62
10. Managing Resource-Level Content Updates
4. Create the repository, as in Section 10.3.1, “Creating a Repository”, and give it the name of the
subdirectory to use.
IMPORTANT
Each subdirectory name must be unique through the hierarchy of the root directory tree.
For example, there should not be directories named /export/m yContentSource/test
and /export/m yContentSource/subdir/test.
Having two directories, even at different levels, with the same name can result in
unpredictable package sync behavior.
5. Create the subdirectory on the local system, and copy in the packages which should be added to
the JBoss ON content system.
10.3. Managing Repositories
A repository is essentially a mapping between the data in a content source and specific resources in the
JBoss ON inventory.
10.3.1. Creating a Repository
63
JBoss Operations Network 3.1 D eploying Applications and Content
1. In the top menu, click the Adm inistration tab.
2. In the Content menu table on the left, select the Repositories item.
3. Below the list of current repositories, click the CREAT E NEW button.
4. Fill in the name and a description. Additionally, set the authorization restrictions for the repository
by setting an owner for the repo and whether it is public or private.
Only users with the repositories permission can set an owner. All repositories created by users
without the repositories permission automatically belong to that user.
5. Click Save.
6. On the Repositories page, click the name of the new repository in the list.
7. Optional. T o change the default synchronization schedule, click the Edit button and enter a new
schedule, in a cron format, in the Sync Schedule field.
8. Add content sources to supply content to the repository, as in Section 10.3.2.1, “Associating
Content Sources with a Repository”.
More than one content source can supply content to a repository.
9. Associate resources with the repository, as in Section 10.3.3, “Associating Resources with the
Repository”. A resource can only receive packages from a repository if it is associated with the
repository.
TIP
You can search for specific resources or types of resources and subscribe multiple
resources at once.
10.3.2. Linking Content Sources to Repositories
64
10. Managing Resource-Level Content Updates
T here are a couple of ways to map the repositories to the right content sources. A repository can be
subscribed to multiple content sources by editing the repository configuration. A content source can be
added to multiple repositories simultaneously by importing the content source.
10.3.2.1. Associating Content Sources with a Repository
1. In the top menu, click the Adm inistration tab.
2. In the Content menu table on the left, select the Repositories item.
3. On the Repositories page, click the name of the repository in the list.
4. In the Content Sources section of the repository's details page, click the Associate button to
add existing content sources to the repository.
5. Select checkboxes next to the content sources to associate with the repository.
65
JBoss Operations Network 3.1 D eploying Applications and Content
6. Click the ASSOCIAT E SELECT ED button.
10.3.2.2. Importing a Content Source into Repositories
If the same content source will be associated with multiple repositories, the content source can be
imported into all of them simultaneously.
1. In the top menu, click the Adm inistration tab.
2. In the Content menu table on the left, select the Repositories item.
3. On the Repositories page, click the IMPORT button.
4. Select the radio button by the name of the content source to import.
5. When the content source is selected, then a list of available repositories for that content source
automatically opens. In the Available repositories.... area, select the checkbox by the
name of each repository to associate with the content source.
6. Click the IMPORT SELECT ED button.
66
10. Managing Resource-Level Content Updates
NOTE
As described in Section 10.1.2, “Where Content Comes From: Providers and Repositories”, a
repository is a user-defined view of a subset of packages stored in the JBoss ON database. A
repository is not a separate container.
When adding a package to one repository through the UI, it may fail with an error claiming that the
package already exists, even if the package isn't in the specified repository. T his is because a
package with the same name exists in another repository and it causes a collision in the
database.
It is currently not possible to have the same package in two repositories or to move or share a
package between repositories.
It is possible to work around this issue by using CLI scripts. T he JBoss ON CLI scripts store the
username of the person uploading the package in the package version data automatically. If a
person has access to all of the packages one has uploaded, then it is possible to extrapolate
which repository contains the package and then manage the package there.
10.3.3. Associating Resources with the Repository
Content can only be sent to a resource if that resource is first associated with a repository. A resourcerepository association can be made by editing the resource entry or by editing the repository entry.
10.3.3.1. Adding Resources to a Repository
1. In the top menu, click the Adm inistration tab.
2. In the Content menu table on the left, select the Repositories item.
3. On the Repositories page, click the name of the repository to edit.
4. In the Resources section, click the SUBSCRIBE button to add resources to the repository.
67
JBoss Operations Network 3.1 D eploying Applications and Content
5. Select checkboxes next to the resources to associate with the repository. It is possible to filter the
list of resources by name or by type.
6. Click the SUBSCRIBE SELECT ED button.
68
10. Managing Resource-Level Content Updates
Click the SUBSCRIBE SELECT ED button.
10.3.3.2. Managing the Repositories for a Resource
A few resource types, like platforms, have content tabs in their configuration which allows them to control
their content subscriptions.
1. Select the resource type in the Resources menu table on the left, and then browse or search for
the resource.
2. Click the Content tab of the resource.
3. Open the Subscriptions subtab.
4. T he Available Repositories section has a list of repositories that the resource isn't
subscribed to. Click the checkboxes by all of the repositories to subscribe the resource to.
5. Click ADD SUBSCRIPT IONS.
T he same process can be used to unsubscribe a resource from content repositories.
10.4. Uploading Packages
Packages can be pulled from a content source, but individual packages can also be uploaded directly to
the JBoss ON server. A variety of package types are supported, including JAR files, basic scripts, JBoss
ON CLI scripts, and patches.
1. In the top menu, click the Adm inistration tab.
69
JBoss Operations Network 3.1 D eploying Applications and Content
2. In the Content menu table on the left, select the Repositories item.
3. On the Repositories page, click the name of the repository in the list.
4. Scroll to the bottom of the page, to the Upload Packages section.
5. Click the Upload File button to upload the package.
6. In the pop-up window, click the Add button to browse to the package, then click the Upload
button.
7. Some information about the package is automatically filled in, including the name and a default UI
version number. Set the package type, architecture, and any other necessary information.
If a version number is set, then this value is displayed in the UI. If not, then a version number is
calculated, based on the spec version and implementation version in MANIFEST .MF (for EARs
and WARs) or the calculated SHA-256 value for the package itself. Internally, the package is
identified by the SHA value.
SPEC(IMPLEMENTATION)[sha256=abcd1234]
NOTE
For exploded content for EARs and WARs, the calculated SHA-256 version number is
written into the MANIFEST .MF file.
70
10. Managing Resource-Level Content Updates
8. Click the CREAT E PACKAGE button to finish adding the package to the repository.
10.5. Synchronizing Content Sources or Repositories
T he original source of content is external to JBoss ON, and the content packages are pulled into JBoss
ON and stored. Any changes that are made at the original content source need to be pulled into JBoss
ON by synchronizing the two sources.
Likewise, any changes in the content source are carried over to the repository when the source and
repository are synchronized.
10.5.1. Scheduling Synchronization
Synchronization is already scheduled in the content source entry in JBoss ON. T his schedule has the
standard cron format.
*
*
*
*
* [sync-command]
|
|
|
|
|
|
|
|
|
+----- Day of Week (0=Sunday ... 6=Saturday)
|
|
|
+------- Month (1 - 12)
|
|
+--------- Date (1 - 31)
|
+----------- Hour (0 - 23)
+------------- Minute (0 - 59)
For example, to synchronize the source with JBoss ON on T uesday and Friday at 3am:
0 3 * * 2,5
T he Quartz documentation explains the cron syntax in more detail.
T o edit the schedule synchronization times for a source:
1. In the top menu, click the Adm inistration tab.
2. In the Content menu table on the left, select either the Content Sources orRepositories item.
3. Click the name of the item to edit.
4. Reset the cron schedule in the Sync Schedule field.
5. Click Save.
10.5.2. Manually Synchronizing Content Sources or Resources
If a major change happens to the content source, then the changes can be manually sent over to the
71
JBoss Operations Network 3.1 D eploying Applications and Content
JBoss ON server by initiating a synchronization manually.
1. In the top menu, click the Adm inistration tab.
2. In the Content menu table on the left, select the Content Sources or Repositories item.
3. Click the name of the item to edit.
4. Click the Synchronize button. All of the synchronization attempts, with the outcome of the
operation, are listed at the bottom of the screen.
72
11. D eploying Applications on Application Servers
TIP
You can test the connection to a source or repository by clicking the T est Connection button.
T his ensures that the JBoss ON server can connect to the content source before attempting to
pull down the packages.
T o synchronize multiple sources, stay on the main content sources or repositories page, select the
checkbox by each of the content sources to synchronize, and click the Sync Selected button.
10.6. Tracking Content Versions for a Resource
Every time a package is installed on a resource through a repository, the resource shows the operation.
T his includes even installation failures. T he content package history for a resource is viewable in the
Content tab, under the History subtab.
Figure 10. Package History for a Resource
T he package history shows both the time the operation was initiated and completed and the user who
initiated it. T his is valuable for auditing changes, correlating incidents and response, and tracking
resource configuration.
11. Deploying Applications on Application Servers
73
JBoss Operations Network 3.1 D eploying Applications and Content
Applications such as EAR and WAR files that are deployed on an application server are cross between
a child resource (of the application server) and content that is managed in a repository.
For these content-backed resources, the child resource is created first, by uploading a package to the
JBoss server. After that, they are managed like content, with updated packages added to a content repo
and then applied to the application server.
11.1. Setting Permissions for Agent and Resource Users
T he assumption is that the JBoss ON agent and resources like a JBoss server or T omcat server run as
the same system user. T his allows the agent and the application server itself to manage resource
content and configuration simultaneously.
However, if the agent user is different than the resource user, then there can be problems when one
entity makes a configuration change and the other attempts a change later.
For example, when deploying an application, the deployment operation is initiated by the agent and the
content is supplied through the agent, and then the application server completes the actual deployment.
When deleting an application, the application server handles the undeployment by itself.
If a WAR file is deployed exploded without a MANIFEST .MF file, the agent creates one when it writes the
SHA-256 value for the package. When the JBoss AS server tries to remove the WAR application later
(and the JBoss AS user is different than the agent user), then the removal fails. T he JBoss AS server
cannot delete the MANIFEST .MF file. T he agent then rediscovers the application directory and reinitiates the deployment operation for the removed WAR.
NOTE
T his situation only occurs when the application is exploded and does not contain the
MANIFEST .MF file — meaning, a situation where the agent creates a file within the deployment
directory. Even if the agent and JBoss AS users are different, this situation does not occur if the
application is not exploded or where the agent does not write any files.
T his situation can be avoided. If the agent user and resource user are different, then change the system
settings:
1. Add the agent user and the resource user to the same primary group.
2. Set the um ask value for the agent user to give read and write permissions, such as 660. For
example:
vim /home/rhqagent/.bashrc
umask 660
11.2. Deploying EAR and WAR Files
1. Search for the JBoss server instance to which to deploy the EAR or WAR.
2. On the details page for the selected JBoss server instance, open the Inventory tab.
3. In the Create New menu at the bottom, select the item for - Web Application (WAR) or Enterprise Application (EAR), as appropriate.
74
11. D eploying Applications on Application Servers
4. Enter the version number.
T his is not used for the resource. T he actual version number is calculated based on the spec
version and implementation version in MANIFEST .MF, if any are given, or the calculated SHA-256
value for the package itself:
SPEC(IMPLEMENTATION)[sha256=abcd1234]
If no version numbers are defined in MANIFEST .MF, then the SHA value is used. T he SHA value
is always used to identify the package version internally.
NOTE
When the EAR or WAR file is exploded after it is deployed, the MANIFEST .MF file is
updated to include the calculated SHA version number. For example:
Manifest-Version: 1.0
Created-By: Apache Maven
RHQ-Sha256: 570f196c4a1025a717269d16d11d6f37
...
For more information on package versioning, see "Deploying Applications and Content".
5. Upload the EAR/WAR file.
75
JBoss Operations Network 3.1 D eploying Applications and Content
6. Enter the information for the application to be deployed.
Whether the file should be exploded (unzipped) when it is deployed.
T he path to the directory to which to deploy the EAR or WAR package. T he destination
directory is relative to the JBoss server instance installation directory; this cannot contain an
absolute path or go up a parent directory.
Whether to back up any existing file with the same name in the target directory.
7. At the bottom of the wizard, set an optional timeout period. T his is how long the JBoss ON server
will wait during the deployment process before determining that the deployment has failed.
76
11. D eploying Applications on Application Servers
NOTE
T he timeout period only applies to the server's reporting a result. If the operation continues
running, it can still complete successfully, and the web application is deployed.
Particularly for large application files, do not set a low timeout period, or the server will mark
the deployment as having failed. If the deployment completes later, the web application
must be imported into the inventory manually; it will not be discovered by the agent.
8. Click Finish.
Once the EAR/WAR file is confirmed, the new child resource is listed in the Child History subtab of
the Inventory tab.
Figure 11. WAR Child Resource
11.3. Updating Applications
After the EAR or WAR resource is created, changes are treated like updated content packages.
Updating the EAR/WAR resource is the same as uploading and applying new packages to that
EAR/WAR resource entry.
1. Browse to the EAR or WAR resource in the JBoss ON UI.
2. In the EAR or WAR resource details page, open the Content tab, and click the New subtab.
77
JBoss Operations Network 3.1 D eploying Applications and Content
3. Click the UPLOAD NEW PACKAGE button.
4. Click the UPLOAD FILE button.
5. In the pop-up window, click the Add button, and browse the local filesystem to the updated WAR or
EAR file to be uploaded.
78
11. D eploying Applications on Application Servers
6. Click the UPLOAD button to load the file and dismiss the window.
7. In the main form, select the repository where the WAR or EAR file package should be stored. If one
exists, select an existing repository or a subscribed repository for the resource. Otherwise, create
a new repository.
8. Optionally, set the version number for the EAR/WAR package.
If this is set, then this value is displayed in the UI. If not, then a version number is calculated,
based on the spec version and implementation version in MANIFEST .MF, if any are given, or the
calculated SHA-256 value for the package itself. Internally, the package is identified by the SHA
value.
SPEC(IMPLEMENTATION)[sha256=abcd1234]
For more information on package versioning, see "Deploying Applications and Content".
9. Confirm the details for the new package, then click CONT INUE.
When the package is successfully uploaded, the UI redirects to the history page on the Content tab.
79
JBoss Operations Network 3.1 D eploying Applications and Content
Figure 12. Deployment History for a Resource
11.4. Deleting an Application
Deleting an EAR/WAR application is the same as deleting the currently deployed package associated
with that EAR/WAR resource entry.
1. Browse to the EAR or WAR resource in the JBoss ON UI.
2. In the EAR or WAR resource details page, open the Content tab, and click the Deployed
subtab.
3. Select the checkbox by the EAR/WAR package, and click the DELET E SELECT ED button.
80
12. D ocument Information
12. Document Information
T his guide is part of the overall set of guides for users and administrators of JBoss ON. Our goal is
clarity, completeness, and ease of use.
12.1. Giving Feedback
If there is any error in this Admin Tasks: Deploying Applications and Content or there is any way to
improve the documentation, please let us know. Bugs can be filed against the documentation for the
community-based RHQ Project in Bugzilla, http://bugzilla.redhat.com/bugzilla. Make the bug report as
specific as possible, so we can be more effective in correcting any issues:
1. Select the Other products group.
2. Select RHQ Project from the list.
3. Set the component to Docum entation.
4. Set the version number to 3.1.2.
5. For errors, give the page number (for the PDF) or URL (for the HT ML), and give a succinct
description of the problem, such as incorrect procedure or typo.
For enhancements, put in what information needs to be added and why.
6. Give a clear title for the bug. For example, "Incorrect com m and exam ple for setup
script options" is better than "Bad exam ple".
We appreciate receiving any feedback — requests for new sections, corrections, improvements,
enhancements, even new ways of delivering the documentation or new styles of docs. You are welcome
to contact Red Hat Content Services directly at [email protected].
12.2. Document History
Revision 3.1.2-0.4 00
Rebuild with publican 4.0.0
2013-10-31
Rüdiger Landmann
Revision 3.1.2-0
January 23, 2013
Adding note that symlinks are not supported in bundle recipes.
Reorganizing the bundles sections slightly.
Ella Deon Lackey
Revision 3.1.1-1
Ella Deon Lackey
October 3, 2012
81
JBoss Operations Network 3.1 D eploying Applications and Content
Bug fixing for JBoss ON 3.1.1.
Revision 3.1-0
June 12, 2012
Initial release of JBoss ON 3.1.
Ella Deon Lackey
Index
A
access controls
- to repositories, Authorization to Repositories and Packages
Ant
- recipe example, Breakdown of an Ant Recipe
- upgrading bundles, Upgrading Ant Bundles
authorization
- to repositories, Authorization to Repositories and Packages
B
bundles
-
and the CLI, Managing and Deploying Bundles with the JBoss ON CLI
Ant recipe, Breakdown of an Ant Recipe
creating, Creating Ant Bundles
creating associated archive files, T he Workflow for Creating and Deploying a Bundle
deleting a bundle from a resource, Purging a Bundle from a Resource
deleting from the server, Deleting a Bundle from the JBoss ON Server
deploying to a clean destination, Deploying a Bundle to a Clean Destination
deploying to a resource, Deploying Bundles to a Resource
destinations, Destinations (and Bundle Deployments)
reverting deployed bundles, Reverting a Deployed Bundle
template configuration, Using T emplatized Configuration Files
testing deployment, T esting Bundle Packages
upgrading, Upgrading Ant Bundles
uploading, Uploading Bundles to JBoss ON
viewing deployment history, Viewing the Bundle Deployment History
C
CLI, Managing and Deploying Bundles with the JBoss ON CLI
content, Summary: Using JBoss ON to Deploy Applications and Update Content
- authorization, Authorization to Repositories and Packages
- packages, About Content
- providers, About Content
- resources, About Content
82
Index
content sources
- and passwords, Creating a Content Source (General)
- associating with repositories, Associating Content Sources with a Repository
- creating, Creating a Content Source
- importing, Linking Content Sources to Repositories
- importing multiple content sources into multiple repositories, Importing a Content Source
into Repositories
- manually synchronizing, Manually Synchronizing Content Sources or Resources
- scheduling synchronization, Scheduling Synchronization
- synchronization, Synchronizing Content Sources or Repositories
D
deploying apps
- timeout, Deploying EAR and WAR Files
- troubleshooting, Deploying EAR and WAR Files
deployment
- bundles on resources, Deploying Bundles to a Resource
- bundles to clean destinations, Deploying a Bundle to a Clean Destination
- testing bundles, T esting Bundle Packages
- view bundle history, Viewing the Bundle Deployment History
I
importing
- content sources, Linking Content Sources to Repositories
- content sources into multiple repositories, Importing a Content Source into Repositories
J
JBoss
- default patch content source, Enabling the Default JBoss Patch Content Source
P
packages
- authorization, Authorization to Repositories and Packages
R
repositories
- associating with content sources, Associating Content Sources with a Repository
- associating with resources, Associating Resources with the Repository
- authorization, Authorization to Repositories and Packages
- creating, Creating a Repository
- importing content sources into multiple repositories, Importing a Content Source into
83
JBoss Operations Network 3.1 D eploying Applications and Content
Repositories
- managing, Managing Repositories
- managing content, About Content
- managing repositories on resources, Managing the Repositories for a Resource
- synchronizing and content sources, Synchronizing Content Sources or Repositories
resources
- and managing repositories, Managing the Repositories for a Resource
- associating with repositories, Associating Resources with the Repository
- child
- EAR and WAR, Deploying EAR and WAR Files
- child types, Deploying Applications on Application Servers
- packages, About Content
S
synchronization
- content sources, Synchronizing Content Sources or Repositories
- repositories and content sources, Synchronizing Content Sources or Repositories
- scheduling and content sources, Scheduling Synchronization
T
timeout
- manually discover app, Deploying EAR and WAR Files
[1] There is no d efined d ep lo yment d irec to ry fo r s ervers in an EAP 6 d o main. Dep lo yments are hand led c entrally, thro ug h o ther
mec hanis ms .
84