1
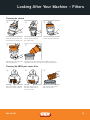
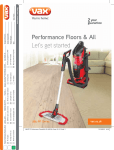
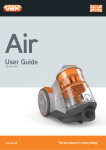
Mach 9
User Guide
Mach 9 series
Performance is everything.
Contents
1
Contents
1
Machine Overview
2
General Safety Information
3
Getting Started
4
Looking After Your Machine – Filters
5
Looking After Your Machine – Filters
6
FAQs
7
Other Information
8
Guarantee
9
Machine Overview
1
2
3
4
5
6
7
8
9
10
11
12
13
14
15
16
17
18
19
Handle
Dirt container lid
Power On/Off button
Inner separator
Hose connector
Base
Dirt container release button
Cord rewind button
Main body
Wheel outer
Wheel inner
Outer cyclone
Dirt container
Crevice tool
Flexible hose
Extension tubes
Dusting brush
Combination floorhead
Fur n’ Fluff tool
1
2
3
4
5
6
19
7
16
18
17
15
14
9
8
12
13
10
11
NOTE: Some parts may vary according to model. Please check inside flap of box for more details.
vax.co.uk
2
General Safety Information
This vacuum cleaner is intended for household use only and NOT for commercial or industrial use.
Please keep instructions for further use.
When using the vacuum cleaner basic safety precautions should always be observed, including the following:
1.
Only use the vacuum cleaner indoors on dry surfaces.
2.
Turn off the on/off switch on the vacuum cleaner controls before disconnecting or connecting
from the mains supply.
3.
Always unplug the vacuum cleaner before connecting or disconnecting the vacuum hose and accessories.
4.
Children should be supervised to ensure that they do not play with the appliance.
5.
This appliance is not intended for use by children under eight years of age and persons with reduced physical, sensory or mental capabilities or lack of experience and knowledge, unless they have
been given supervision or instruction concerning use of the appliance in a safe way and understands the hazards involved.
6.
Cleaning and maintenance shall not be made by children without supervision.
7.
The appliance should only be used as described in the quick start guide or in the full online user guide.
8.
Only Vax recommended attachments should be used with this appliance.
9. Do not use this vacuum cleaner if it has been dropped, damaged, left outdoors or dropped into water.
Do not use this vacuum cleaner with a damaged cord or plug. If the supply cord is damaged please contact
Vax Careline for assistance.
10. Do not pull or carry this appliance by the cord. Do not use the cord as a handle, close a door on the cord
or pull the cord around sharp edges or corners. Do not run the vacuum cleaner over the cord. Keep the cord away from heated surfaces.
11.
Do not handle the plug or the vacuum cleaner with wet hands.
12. Keep hair, loose clothing, fingers and all parts of the body away from openings and moving parts.
13. Do not pick up any hot coals, cigarette butts, matches or any hot, smoking or burning objects.
14. Do not pick up any flammable or combustible materials (lighter fluid, petrol, kerosene etc.) or use in the
presence of explosive liquids or vapours.
15. Do not vacuum up harmful or toxic material (chlorine, bleach, ammonia, drain cleaner etc.).
16. Do not vacuum up hard or sharp objects such as glass, nails, screws, coins etc.
17. Store the vacuum cleaner in a cool, dry area.
18. Use only CE approved 13 amp extension cords. Non-approved cords may overheat. Care should be taken
to arrange the cord so that the cord cannot be tripped over.
19. Do not put any objects into openings. Do not use with any openings blocked and do not restrict airflow.
Keep all openings free of dust, lint, hair or anything that might reduce airflow.
20. Do not use without all of the filters in place.
21. Keep vacuuming area well lit.
3
Getting Started
PLEASE READ SAFETY INFORMATION BEFORE USE (p3)
Before plugging the cord into the electrical outlet, make sure the switch is in the ‘off’ position. Hold the vacuum cleaner firmly when starting and in use.
Assembling your cylinder
Insert the end of the hose
into the unit. Ensure the
hose has clicked into place.
How to use
Slot the metal telescopic
extension tube and hose
handle together. All
accessories can be fitted
to the end of the metal
telescopic extension tube.
Fully unwind the power
cord. A yellow mark on the
cord indicates the
recommended cord length.
Do not exceed the cord
beyond the yellow mark.
Plug in and switch the unit on
by pressing the power button.
For use on carpets click
rocker switch forward.
For use on hard floors click
rocker switch back.
Storage
Cable rewind button is
located at the rear of the
machine. After unplugging
press the cable rewind until
the cord is fully retracted.
vax.co.uk
For convenience there is a parking slot located at the rear
of the vacuum cleaner where the floor head and tubes can
be attached for storage and carrying.
4
Looking After Your Machine – Filters
WARNING: Always switch off and unplug the vacuum cleaner from the electrical socket before assembling, opening or emptying
the dirt container, or before connecting/disconnecting the attachments.
IMPORTANT: For best cleaning results filters require cleaning at least every three months. Do not use your vacuum cleaner
without all of the filters in place.
IMPORTANT: The motor is equipped with a thermal cut-out. If for any reason the unit should overheat, the thermostat will
automatically turn the unit off. Please refer to the FAQs on page 7 for more information.
Emptying and cleaning the dirt container
Remove dirt container
by pushing down the dirt
container release button and
lifting the dirt container.
Hold dirt container over a
bin and press dirt release
button to open, allowing dirt
to fall out.
Cleaning the pre-motor filter
1
2
Hold the dirt container and
twist the lid anti-clockwise.
4
3
Lift the lid to reveal the
pre-motor filter.
6
5
P
TA
Lift out the pre-motor filter.
40˚C
MAX
Tap excess dirt from the filter. Rinse under a tap and leave to dry for 24 hours.
5
24hr
Looking After Your Machine – Filters
Cleaning the shroud
1
Hold the dirt container and
twist the lid anti-clockwise.
5
Remove the inner separator
from the container.
2
Lift the lid to reveal the
pre-motor filter.
3
Lift out the pre-motor filter.
6
Dislodge any excess dirt by gently tapping the inner
separator over a bin. Do not wash the inner separator.
Cleaning the HEPA post-motor filter
1
Post-motor filter is located
at the rear of the machine.
vax.co.uk
2
With the filter cover off
the post-motor filter is
easily removed.
3
Tap all excess dirt off the
filter. Do not wash.
6
FAQs
Warning: To reduce the risk of personal injury, unplug the vacuum cleaner before performing maintenance/troubleshooting checks.
Is there an accessory missing?
• Check the ‘Getting Started’ page in this guide or the box that the machine came in to make sure that the part is definitely included
in your unit.
•If it is missing, we’re here to help. Simply call us on 0844 412 8455
Why won’t the vacuum cleaner pick up?
• The filters may need cleaning, please refer to the ‘Looking After Your Machine – Filters’ page of this user guide (p5-6)
• The separator may be clogged, please refer to the ‘Looking After Your Machine – Filters’ page of this user guide (p5-6)
• There may be a blockage in the hose, please check the hose and remove the blockage
• The dirt container may be full or blocked, please refer to the ‘Looking After Your Machine – Emptying and cleaning dirt container’
page of this user guide (p5)
• The dirt container may be incorrectly fitted, please ensure the dirt container is locked in place
Why won’t the accessories pick up properly?
•The accessory may be broken, blocked, or the filters may need changing. If broken please contact our Vax Careline: 0844 412 8455 or visit
our ‘spares shop website’– vax.co.uk/support
What do I do if an accessory/the unit becomes damaged or broken?
• Please check if the damage is with the accessory or the unit. To do this, firstly remove the accessory from the unit and check if there
is suction from the hose. If there is suction from the hose this confirms that the damage is with the accessory. Please visit ‘spares shop website’ – vax.co.uk/support
• If having done the above checks, checked the hose for blockages and cleaned the filters there is still no suction/limited suction from the
hose, please call our Vax Careline 0844 412 8455
Why is dust escaping from the vacuum?
• The filters may not be fitted correctly, please refer to the ‘Looking After Your Machine – Filters’ page of the user guide (p5-6)
• The dirt container may be full or blocked, please refer to the ‘Looking After Your Machine – Emptying and cleaning dirt container’
page of this user guide (p5)
•The filters may need cleaning, please refer to the ‘Looking After Your Machine – Filters’ page of this user guide (p5-6)
•There may be a blockage in the hose, please check the hose and remove the blockage
Why does my vacuum cleaner have no power?
•It may not be plugged into the electrical socket correctly. Ensure that the plug is pushed into the electrical socket securely
•The electrical socket may not be working. Check the fuse or breaker and consult an electrician
•The motor thermostat may have tripped. Switch off and unplug the vacuum cleaner. Check the unit for blockages, clean the filters – please
refer to the ‘Looking After Your Machine – Filters’ page of this user guide (p6) and clean the separator – please refer to the ‘Looking
After Your Machine – Emptying and cleaning dirt container’ page of this user guide (p5). Leave the vacuum cleaner for 24 hours before
switching the vacuum cleaner back on
Why does the vacuum cleaner cut out?
•The motor is equipped with a thermal cut-out. If for any reason the unit should overheat, the thermostat will automatically turn the unit off. Should this occur, unplug the vacuum cleaner from the electrical socket and turn off the switch. Remove and empty the dirt container. Check the hose for blockages. Clean the filters. When you have cleaned the filters you will need to wait 24 hours for the filters to dry before
putting them back into the machine.
7
Other Information
UK Service & Help
Any queries or concerns about using your Vax, simply visit; vax.co.uk/support – vaxireland.ie or call the
Vax Careline. Calls are charged at the UK local rate. Please have your machine with you when calling.
Vax Careline:
(UK) 0844 412 8455
(ROI) 1-800 928 308
Monday-Friday 8.30am to 6.30pm
Saturday 9.00am to 5.00pm
Consumables
To purchase spares and accessories, please visit vax.co.uk
The use of genuine Vax spare parts helps to maintain optimised
performance and validates your guarantee
Pre Motor filter (Type 79): 1-1-133013-00
Post-motor filter (Type 80): 1-1-133014-00
Combi Tool (Type 2): 1-1-124961-00
Crevice Tool (Type 2): 1-1-39-01-010
Turbo Tool (Type 1): 1-1-126261-00
Dusting Brush (Type 6): 1-1-13-01-001
Upholstery Tool (Type 1): 1-1-13-02-001
Hardfloor Tool (Type 1): 1-1-125784-01
Fur n’ Fluff tool (Type 1): 1-1-131392-00
Technical Specification
Voltage: 220-240V -50Hz
Filters: Pre-motor filter (washable)
H12 HEPA Post-motor filter
Subject to technical change without notice.
EEC Statement of Compliance
Manufacturer/EEC importer: Vax Limited, hereby on our own responsibility, declare that the
C86-M9-FF series is manufactured in compliance with the following Directives:
Safety: 2006/95/EC Low Voltage Directive
EMC: 2004/108/EC Electromagnetic Compatibility Directive
Waste electrical products should not be disposed of with household waste. Please recycle where facilities exist.
Check with your Local Authority or retailer for recycling advice.
vax.co.uk
8
Guarantee
It’s quick and easy to register for your
FREE 2 year guarantee
online at: vax.co.uk/guarantees
Please retain your original receipt for proof of purchase.
UK based customer care centre:
Monday-Friday
8:30-18:30
Saturday 9:00-17:00
we’re here if you need us
Instead of taking me back to the shop, simply visit:
vax.co.uk/support or call (UK) 0844 412 8455 (ROI) 1-800 928 308
Let us know what you think @VaxUK
9
Notes
vax.co.uk
10
Vax Ltd., Kingswood Road, Hampton Lovett, Droitwich, Worcestershire, WR9 0QH, UK
email: [email protected] website: vax.co.uk
Version 1.0
Performance is everything.