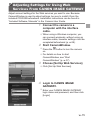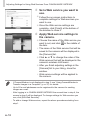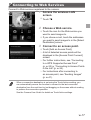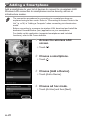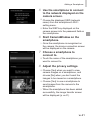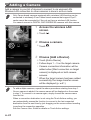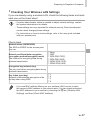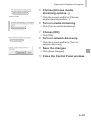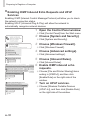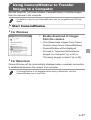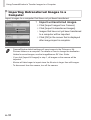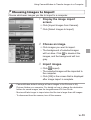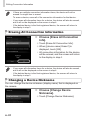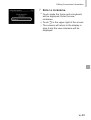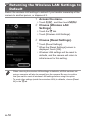
1
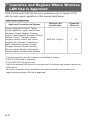
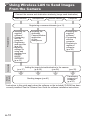
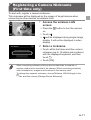
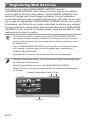
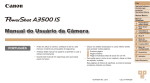
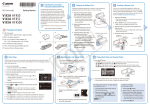
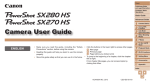
Wireless LAN Guide
• This guide explains how to use the camera to send and
receive images wirelessly. For instructions on how to
operate the camera, and safety precautions, be sure to
read the Camera User Guide.
• This guide will familiarize you with how to use the camera
correctly.
• Keep the guide handy for future reference.
English
w-1
What You Can Do With the Wireless
LAN Function
This camera is an approved Wi-Fi®* product. You can wirelessly connect to
and send images to the following Wi-Fi capable devices.
*Wi-Fi is a brand name that indicates interoperability certification of wireless LAN
devices.
Video
sharing sites
YouTube
facebook
twitter
E-mail
Social
networking
services
Connect to Web services
CANON iMAGE GATEWAY is an online photo service available to those
who have purchased this product. If you register for free as a member, you
can use CANON iMAGE GATEWAY to access various Web services, such
as social networking services set on a computer.
w-2
Connect to a
Smartphone
Send images to smartphones
and tablet computers that have
wireless functions. Installation of
a dedicated application on the
smartphone or tablet is required.
See the Canon website for details.
Connect to another
camera
Use the wireless function to send
images between Canon-brand
cameras.
Connect to a Computer
Use the included software to
wirelessly send images from the
camera to a computer.
For details on the included
software, see the ImageBrowser
EX User Guide.
w-3
Countries and Regions Where Wireless
LAN Use is Approved
IXUS 510 HS and IXUS 240 HS are in compliance (as of January 2012)
with the radio signal regulations of the regions listed below.
IXUS 510 HS / IXUS 240 HS
Applicable Countries and Regions
Wireless LAN
Specification
Supported
Channels
People’s Republic of China*3, Taiwan,
Hong Kong/Macao, Japan, South Korea,
Singapore, Austria, Belgium, Bulgaria,
Cyprus, Czech Republic, Denmark, Estonia,
Finland, France*1, Germany, Greece,
Hungary, Iceland, Ireland, Italy, Latvia,
Liechtenstein, Lithuania, Luxembourg,
Malta, Netherlands, Norway, Poland,
Portugal, Romania, Russia, Slovakia,
Slovenia, Spain, Sweden, Switzerland,
United Kingdom, Australia, New Zealand
IEEE 802.11 b/g/n*2
1 – 13
*1 Using the wireless function outdoors is prohibited in France.
*2 Only 2.4 GHz band is supported.
*3 Only IXUS 510 HS can be used.
•Use of the wireless LAN function is not approved in countries and regions that are not
listed above.
•Be sure to check the Canon website for the latest information on countries and
regions where wireless LAN use is approved.
w-4
Table of Contents
What You Can Do With the
Wireless LAN Function............... w-2
Countries and Regions Where
Wireless LAN Use is
Approved.................................... w-4
Before Using the Camera........w-6
4
Adding a Camera...................... w-24
5
Wireless LAN
Preparations.......................w-9
Using Wireless LAN to Send
Images From the Camera......... w-10
Registering a Camera
Nickname (First time only)........ w-11
2
Connecting to Web
Services............................w-13
Registering Web Services......... w-14
Adjusting Settings for Using
Web Services From CANON
iMAGE GATEWAY.................... w-15
Connecting to Web Services..... w-17
3
Connect to a
Smartphone......................w-19
Connect to a
Computer..........................w-25
Preparing to Register a
Computer.................................. w-26
Adding a Computer................... w-32
Using CameraWindow
to Transfer Images to a
Computer.................................. w-37
Radio Wave Precautions............ w-6
Wireless LAN Precautions.......... w-6
Security Precautions................... w-7
1
Connect to Another
Camera.............................w-23
6
Sending Images...............w-41
Sending Images Individually..... w-42
Sending Multiple Images.......... w-43
7
Helpful Information..........w-45
Editing Connection
Information................................ w-46
Returning the Wireless LAN
Settings to Default.................... w-50
Troubleshooting........................ w-51
On-Screen Messages............... w-53
Glossary.................................... w-55
Specifications............................ w-56
Index......................................... w-57
Adding a Smartphone............... w-20
w-5
Before Using the Camera
Radio Wave Precautions
• This product incorporates an approved WLAN module. The model
number is PC1735 in the case of IXUS 510 HS , and PC1739 in the case
of IXUS 240 HS (including WLAN module model WM217).
• Doing any of the following may incur legal penalties:
- Altering or modifying the product
- Removing the certification labels from the product
• According to foreign exchange and foreign trade law regulations, export
permission (or service transaction permission) from the Japanese
government is necessary to export strategic resources or services
(including this product) outside Japan.
• Because this product includes American encryption software, it falls
under U.S. Export Administration Regulations, and cannot be exported to
or brought into a country under U.S. trade embargo.
Radio Wave Interference Precautions
• This product may receive interference from other devices that emit radio
waves. To avoid interference, be sure to use this product as far away as
possible from such devices, or avoid using the devices at the same time
as this product.
Wireless LAN Precautions
• Be sure to make notes of the wireless LAN settings you use.
The wireless LAN settings saved to this product may be erased due to
incorrect operation of the product, the effects of radio waves or static
electricity, accident or malfunction. Be sure to make notes of wireless
LAN settings as a precaution. Please note that Canon accepts no
responsibility for degradation of content, direct or indirect damages or
loss of revenue arising from use of the product.
• When transferring this product to another person, disposing of it, or
sending it for repair, be sure to note the wireless LAN settings and reset
the product to its default settings (erase settings) if necessary.
• Canon will not make compensation for loss or theft of the product.
Canon accepts no responsibility for damages incurred due to
unauthorized access to registered data (image transfer destinations, etc.)
if the product is lost or stolen.
w-6
• Be sure to use the product as directed in this guide.
Be sure to use the wireless LAN function of this product within the
guidelines noted in this guide. Canon accepts no responsibility for
damages or loss even if the function and product are used in ways other
than as described in this guide.
• Do not use the wireless LAN function of this product near medical
equipment or other electronic equipment.
Use of the wireless LAN function near medical equipment or other
electronic equipment may affect operation of those devices.
Security Precautions
Since wireless LAN uses radio waves to transmit signals, tighter security
precautions are necessary than when using a LAN cable.
When using wireless LAN, keep the following points in mind.
• Only use networks you are authorized to use.
This product searches for wireless LAN networks in the vicinity and
displays the results on the screen. Networks you are not authorized to
use (unknown networks) may also be displayed. However, connecting to
or attempting to use those networks could be regarded as unauthorized
access. Be sure to use only networks you are authorized to use, and do
not attempt to connect to other unknown networks.
If security settings have not been properly set, the following problems may
occur.
• Transmission monitoring
Third parties with malicious intent may monitor wireless LAN
transmissions and attempt to acquire the data you are sending.
• Unauthorized network access
Third parties with malicious intent may gain unauthorized access to
the network you are using and steal, modify, or destroy information.
Additionally, you could fall victim to other types of unauthorized access
such as impersonation (where someone assumes an identity to gain
access to unauthorized information) and springboard attacks (where
someone gains unauthorized access to your network as a springboard to
cover their tracks when infiltrating other systems).
w-7
To prevent these types of problems from occurring, be sure to thoroughly
secure your wireless LAN network.
Be sure to use the wireless LAN function of this camera with a proper
understanding of wireless LAN security, and balance risk and convenience
when adjusting security settings.
Complies with
IDA Standards
DB00671
Hereby, Canon Inc., declares that this WM217 is in
compliance with the essential requirements and other relevant provisions of Directive 1999/5/EC.
Please contact the following address for the original
Declaration of Conformity:
CANON EUROPA N.V.
Bovenkerkerweg 59-61, 1185 XB Amstelveen, The Netherlands
CANON INC.
30-2, Shimomaruko 3-chome, Ohta-ku, Tokyo 146-8501, Japan
w-8
1
Wireless LAN Preparations
This chapter explains how to use the camera’s
wireless LAN function to connect to another device,
including all necessary settings.
w-9
Using Wireless LAN to Send Images
From the Camera
Connect the camera and destination wirelessly (image send destination)
Web services
Smartphones
Another camera
Computer
Send/
Import
Connection
Preparations
Registering a camera nickname (p.w-11)
• Installing the
supplied
software*
• Connecting
with the
computer
• Registering
web services
(p.w-14)
• Adjusting
settings for
using web
services from
CANON
iMAGE
GATEWAY
(p.w-15)
(p.w-17)
• Installing the
dedicated
CameraWindow
application
on the
smartphone
• Installing the
supplied
software*
• Connecting
with the
computer
• Preparing to
register a
computer
(p.w-26)
Adding the target device/destination to the camera
(p.w-20)
(p.w-24)
(p.w-32)
Sending images (p.w-41)
Transferring
images to a
computer
(p.w-37)
*Instructions in this guide apply when the software on the included CD-ROM has been
correctly installed. See the Camera User Guide for software installation instructions.
w-10
Registering a Camera Nickname
(First time only)
To start with, register a camera nickname.
This nickname will be displayed on the screen of target devices when
connecting to other devices via wireless LAN.
1 Access the wireless LAN
screen.
the 1 button to turn the camera
on.
●● Touch
.
●●
will be displayed during single-image
display. It will not be displayed in index
display.
●● Press
2 Enter a nickname.
●● Touch
within the frame and then enter a
nickname (up to 16 letters and numbers)
with the displayed keyboard, and then
touch ^.
●● Touch [OK].
• When connecting wirelessly with any device other than a computer, a
memory card must be inserted in the camera. When connecting wirelessly
with a smartphone, images must be stored in the memory card.
• To change the camera’s nickname, choose [Wireless LAN Settings] on the
3 tab, and then choose [Change Device Nickname].
w-11
w-12
2
Connecting to Web Services
This chapter explains how to register various Web
services to your camera.
• A computer is required for Web service settings, starting with CANON
iMAGE GATEWAY.
• For information on countries and regions where CANON iMAGE
GATEWAY is available, visit the Canon website (http://canon.com/cig).
w-13
Registering Web Services
First, sign up for a free CANON iMAGE GATEWAY account.
CANON iMAGE GATEWAY offers various services, such as the ability to
share images in an online photo album. CANON iMAGE GATEWAY also
serves as a bridge site to send images wirelessly to e-mail addresses,
social networking services, and other Web services. Click http://canon.com/
cig, access the appropriate CANON iMAGE GATEWAY site for your country
of residence, and follow the on-screen instructions to register as a member.
You can continue to register other Web services other than CANON iMAGE
GATEWAY to your account. For further details, check the websites for each
web service you want to register.
• An Internet connection is required to access CANON iMAGE GATEWAY
(an Internet browser must be installed on the computer, you must have an
account with an Internet service provider, and an Internet connection must
be established).
• Check CANON iMAGE GATEWAY for browser (Microsoft Internet Explorer,
etc.) settings, conditions and version information when connecting to
CANON iMAGE GATEWAY.
• Separate ISP connection and access point fees may be applicable.
• Camera Transmission History: you can check the image transfer history from
your camera to Web services.
• Help: Provides details on how to use CANON iMAGE GATEWAY.
• Library: A timeline of images transferred from the camera will be displayed
as an index.
Camera Transmission History Help
w-14
Library
Adjusting Settings for Using Web
Services From CANON iMAGE GATEWAY
Adjust account settings for the Web services you want to use. Because
CameraWindow is used to adjust settings, be sure to install it from the
included CD-ROM beforehand. Installation instructions can be found in
“Included Software, Manuals” in the Camera User Guide.
1 Connect the camera to a
computer with the interface
cable.
●● When
using a Windows computer, you
can connect wirelessly, without using an
interface cable, however settings must be
completed beforehand (p. w-28).
2 Start CameraWindow.
the 1 button to turn the camera
on.
●● For details on how to start
CameraWindow, see “Start
CameraWindow” (p. w-37).
●● Press
3 Choose [Set Up Web Services].
●● Click
[Set Up Web Services].
4 Login to CANON iMAGE
GATEWAY.
●● Enter
your CANON iMAGE GATEWAY
login name and password, and then click
[Login].
w-15
Adjusting Settings for Using Web Services From CANON iMAGE GATEWAY
5 Set a Web service you want to
use.
●● Follow
the on-screen instructions to
complete settings for Web services you
want to use.
●● Once the Web service settings are
complete, click [Finish] at the bottom of
the window to close it.
6 Apply Web service settings to
the camera.
●● Choose
the name of the Web service you
in the middle of
want to set, and click
the lists.
▶▶ The name of the Web service that will be
saved to the camera will be displayed in
the [Camera] list.
●● Click ▲ or ▼ to change the order of the
Web services that will be displayed in the
camera’s wireless LAN menu.
●● After you finish adjusting settings in the
[Camera] list to your liking, close the
window.
▶▶ Web service settings will be applied to
the camera.
• If CameraWindow is not displayed in step 2, see “Using CameraWindow to
Transfer Images to a Computer” (p. w-37) for details.
• Up to 20 e-mail addresses can be registered to the camera for sending
images as e-mail.
• After logging in to CANON iMAGE GATEWAY the second time in step 4, the
screen in step 6 will be displayed. To change settings for Web services you
use, click [Edit Web Services].
• To add or change Web services, repeat the above procedures starting from
step 1.
w-16
Connecting to Web Services
Connect to Web services registered to the camera.
1 Access the wireless LAN
screen.
●● Touch
.
2 Choose a Web service.
●● Touch
the icon for the Web service you
want to send images to.
●● If you chose e-mail, touch the addresses
you want to send images to in the [Select
Destination] screen.
3 Connect to an access point.
●● Touch
[Add an Access Point].
of detected access points will be
displayed in the [Access Point Connect]
screen.
▶▶ For further instructions, see “Connecting
to a WPS Supported Access Point” (p. w-33) or “Connecting to Access Points
in the List” (p. w-34).
▶▶ For instructions after connecting to an access point, see “Sending Images”
(p. w-41).
▶▶ A list
• When a connection destination is set using the Touch Actions setting, you
can automatically access the function to connect to the last connected
destination from the next time by just dragging on the screen without needing
to perform the connection operation.
See the Camera User Guide for details on Touch Action settings.
w-17
w-18
3
Connect to a Smartphone
This chapter explains how to add wireless LAN
enabled smartphones to your camera’s connection
list.
w-19
Adding a Smartphone
Add a smartphone to your list of devices to connect to via wireless LAN.
Wireless LAN connection to smartphones can be done by ad hoc or
infrastructure modes.
• The connection procedures for connecting to a smartphone here are
explained using ad hoc mode. Refer to “Connecting to Access Points in the
List” (p. w-34) in “Adding a Computer” when connecting via infrastructure
mode.
• Before connecting to a camera via wireless LAN, download and install the
dedicated CameraWindow (free) application on your smartphone. For details on this application (supported smartphones and included
functions), refer to the Canon website.
1 Access the wireless LAN
screen.
●● Touch
.
2 Choose a smartphone.
●● Touch
.
3 Choose [Add a Device].
●● Touch
[Add a Device].
4 Choose ad hoc mode.
●● Touch
w-20
[Ad Hoc] and then [Next].
Adding a Smartphone
5 Use the smartphone to connect
to the network displayed on the
camera screen.
●● Choose
the displayed SSID (network
name) from the smartphone’s Wi-Fi
setting menu.
●● Enter the WEP key displayed on the
camera screen into the password field on
the smartphone.
6 Start CameraWindow on the
smartphone.
▶▶ Once
the smartphone is recognized on
the camera, the device connection screen
will be displayed on the camera.
7 Choose a smartphone to
connect to.
●● Touch
the name of the smartphone you
want to connect to.
8 Adjust the privacy settings.
●● Choose
[Yes] when you want to view
camera images on a smartphone, and
choose [No] when you don’t want the
images to be viewed on a smartphone.
●● Choose [Yes] to use a smartphone to
send images from the camera to the
smartphone.
▶▶ When the smartphone has been added
successfully, the image transfer screen
will be displayed (p. w-41).
w-21
Adding a Smartphone
• Setting the smartphone’s IP address as follows will shorten connection time
when connecting to a smartphone via ad hoc mode.
-IP address: 169.254.0.9
-Subnet mask: 255.255.0.0
• The image quality level for movies that can be sent may differ depending
on the smartphone. Refer to the instruction manual provided with your
smartphone for details.
• To add multiple smartphones, repeat the above procedures starting from
step 1.
• Once a smartphone is added, the smartphone name will be displayed on
the screen in step 3. To connect to a smartphone again, simply choose the
smartphone name from the list.
• To change privacy settings for smartphones added to the list, choose the
smartphone whose settings you want to change from [Edit a Device] in step
3, and then choose [View Settings].
• When a connection destination is set using the Touch Actions setting, you
can automatically access the function to connect to the last connected
destination from the next time by just dragging on the screen without needing
to perform the connection operation.
See the Camera User Guide for details on Touch Action settings.
w-22
4
Connect to Another Camera
This chapter explains how to connect two cameras
via wireless LAN, and how to send images between
them.
w-23
Adding a Camera
Add a camera to your list of devices to connect to via wireless LAN.
Wireless LAN connection to other cameras is done in ad hoc mode.
• Only Canon-brand cameras equipped with a wireless LAN function can be
connected to wirelessly. Even Canon-brand cameras that support Eye-Fi
cards cannot be connected to if they do not have a wireless LAN function.
You cannot connect to DIGITAL IXUS WIRELESS cameras with this camera.
1 Access the wireless LAN
screen.
●● Touch
.
2 Choose a camera.
●● Touch
4.
3 Choose [Add a Device].
●● Touch
[Add a Device].
steps 1 – 3 on the target camera.
▶▶ Camera connection information will be
added when [Start connection on target
camera] is displayed on both camera
screens.
▶▶ When the target camera has been added
successfully, the image transfer screen
will be displayed (p. w-41).
●● Follow
• To add multiple cameras, repeat the above procedures starting from step 1.
• Once a camera is added, the camera name will be displayed on the screen
in step 3. To connect to a camera again, simply choose the camera name
from the list.
• When a connection destination is set using the Touch Actions setting, you
can automatically access the function to connect to the last connected
destination from the next time by just dragging on the screen without needing
to perform the connection operation.
See the Camera User Guide for details on Touch Action settings.
w-24
5
Connect to a Computer
This chapter explains necessary settings for
connecting to a computer, how to register settings on
the camera, and how to use the included software
CameraWindow to wirelessly transfer images to a
computer.
• When connected to a computer, the camera is used to establish the
connection and then the computer (included software CameraWindow) is
used to transfer images.
• For details on the included software, see the ImageBrowser EX User Guide.
w-25
Preparing to Register a Computer
Prepare to register a computer.
Checking the Computer and Wireless LAN
Setup
Computer Requirements
The camera can connect to the following computers via wireless LAN.
Windows
• Windows 7 Service Pack 1
Macintosh
• Macintosh OS X 10.6.8 or later
• Windows 7 Starter and Home Basic editions are not supported.
• Windows 7 N (European version) and KN (South Korean version) require a
separate download and install of Windows Media Feature Pack.
For further details, see the following websites.
http://go.microsoft.com/fwlink/?LinkId=159730
Required Components for Wireless LAN Use
To use wireless LAN, an access point base unit (wireless LAN router, etc.)
connected to a computer is required.
Additionally, the included software, CameraWindow must be installed.
• Be sure to use a wireless LAN base unit that conforms to standards listed
on p. w-4.
• A router is a device that creates a network (LAN) structure for connecting
multiple computers. A router that contains an internal wireless function is
called a wireless (LAN) router.
• This guide will refer to all wireless routers and base stations as “access
points”.
• When unsure of your computer setup, refer to the user manual provided with
the computer.
w-26
Preparing to Register a Computer
Checking Your Wireless LAN Settings
If you are already using a wireless LAN, check the following items and mark
each one on the check sheet.
• If system administrator status is needed to adjust network settings, contact
the system administrator for details.
• These settings are very important for network security. Exercise adequate
caution when changing these settings.
• For instructions on how to check settings, refer to the user guide included
with your access point.
Check sheet
Network name (SSID/ESSID)
The SSID or ESSID for the access point
you use.
Network certificate/data encryption
(encryption method/encryption mode)
The method for encrypting data during
wireless transmission.
Encryption key (network key)
The key used when encrypting data during
wireless transmission.
Key index (sent key)
Network certificate/data encryption is the
set key when using WEP.
○ None
○ WEP
○ WPA-PSK (TKIP)
○ WPA-PSK (AES)
○ WPA2-PSK (TKIP)
○ WPA2-PSK (AES)
○1
○2
○3
○4
• If you use MAC address filtering on your wireless LAN, be sure to enter
the camera’s MAC address to your access point. You can check and select
the MAC address for your camera by choosing the 3 tab, [Wireless LAN
Settings], and then [Check MAC Address].
w-27
Preparing to Register a Computer
• The different types of security are as follows.
-None: Encryption is not used when connecting to an access point.
-WEP: A standard of encryption supported by most wireless LAN devices.
-WPA-PSK (TKIP): An improved WEP standard that uses TKIP encryption.
-WPA-PSK (AES): An improved WEP standard that uses AES encryption.
-WPA2-PSK (TKIP): An improved WPA standard that uses TKIP encryption.
-WPA2-PSK (AES): An improved WPA standard that uses AES encryption.
• AES uses higher security than TKIP.
• There is no difference in security levels between WPA and WPA2.
Computer Settings for Connecting to a
Wireless LAN (Windows only)
When using a Windows computer, wireless LAN connection settings on the
computer are necessary to connect to a camera wirelessly.
Confirm that your computer is connected to a wireless LAN, and then follow
each of the next steps.
Turning On Media Streaming and Network Discovery
If you activate media streaming, the camera will be able to detect and
search your computer when they are connected wirelessly.
If you activate network discovery, your computer will be able to detect and
search the camera.
1 Open the Control Panel window.
●● Click
[Control Panel] from the Start menu.
●● Click
[Network and Internet].
2 Choose [Network and Internet].
3 Choose [Network and Sharing
Center].
●● Click
[Network and Sharing Center].
4 Choose [Change advanced
sharing settings].
●● Click
[Change advanced sharing
settings].
w-28
Preparing to Register a Computer
5 Choose [Choose media
streaming options...].
●● Click
the current profile for [Choose
media streaming options...].
6 Turn on media streaming.
●● Click
[Turn on media streaming].
7 Choose [OK].
●● Click
[OK].
8 Turn on network discovery.
●● Click
the current profile for [Turn on
network discovery].
9 Save the changes.
●● Click
[Save changes].
10 Close the Control Panel window.
w-29
Preparing to Register a Computer
Enabling ICMP Inbound Echo Requests and UPnP
Services
Enabling ICMP (Internet Control Message Protocol) will allow you to check
the network connection status.
Enabling UPnP (Universal Plug & Play) will allow the network to
automatically recognize network devices.
1 Open the Control Panel window.
●● Click
[Control Panel] from the Start menu.
●● Click
[System and Security].
2 Choose [System and Security].
3 Choose [Windows Firewall].
●● Click
[Windows Firewall].
●● Click
[Advanced settings].
4 Choose [Advanced settings].
5 Choose [Inbound Rules].
●● Click
[Inbound Rules].
6 Enable ICMP inbound echo
requests.
●● Choose
[File and Printer Sharing] items
ending in [ICMPv4], and then click
[Enable Rule] on the right side of the
window.
7 Turn on UPnP services.
●● Choose
[Wireless Portable Devices
(UPnP-In)], and then click [Enable Rule]
on the right side of the window.
w-30
Preparing to Register a Computer
8 Close the [Windows Firewall
with Advanced Security]
window.
9 Close the Control Panel window.
• If [Disable Rule] is displayed in steps 6 – 7, the item is already enabled, and
can be left as is.
w-31
Adding a Computer
Add a computer to your list of devices to connect to via wireless LAN.
Infrastructure mode will be used for wireless LAN connection to a computer.
• Be sure to also read the user guide included with your access point.
1 Access the wireless LAN
screen.
●● Touch
.
2 Choose a computer.
●● Touch
.
3 Choose [Add a Device].
●● Touch
[Add a Device].
of detected access points will be
displayed in the [Access Point Connect]
screen.
▶▶ Proceed to either “Connecting to a WPS
Supported Access Point” or “Connecting
to Access Points in the List”.
▶▶ To manually choose and connect to an
supplemental
access point, see the
explanation column (p. w-35) in
“Connecting to Access Points in the List”.
▶▶ A list
• Once a computer is added, the computer name will be displayed on the
screen in step 3. To connect to a computer again, simply choose the
computer name from the list.
• When a connection destination is set using the Touch Actions setting, you
can automatically access the function to connect to the last connected
destination from the next time by just dragging on the screen without needing
to perform the connection operation.
See the Camera User Guide for details on Touch Action settings.
w-32
Adding a Computer
Connecting to a WPS Supported Access Point
WPS (Wi-Fi Protected Setup) is a structure for simplifying settings when
connecting one wireless LAN device to another. You can use either
Push Button Configuration Method or PIN Method for settings on a WPS
supported device.
The push button configuration method is used in the following explanation.
• Refer to the user guide provided with your access point to check if it supports
WPS.
4 Choose [WPS Connection].
●● Touch
[WPS Connection].
5 Choose [PBC Method].
●● Touch
[PBC Method].
6 Press and hold the WPS
connection button on the
access point.
7 Choose [Next].
●● Touch
[Next].
camera will connect to the access
point.
▶▶ A list of computers connected to the
access point will appear in the [Select a
Device] screen.
▶▶ The
w-33
Adding a Computer
8 Choose a computer to connect
to.
●● Touch
the name of the computer you
want to connect to.
▶▶ The computer will be added to the list on
the camera.
▶▶ When connecting to a Windows computer
for the first time, continue to “Installing
Drivers (Windows only)” (p. w-36).
▶▶ To connect again, or when using a
Macintosh, see “Using CameraWindow to Transfer Images to a Computer” (p. w-37).
• If you chose [PIN Method] in step 5, a PIN code will be displayed on the
screen. Be sure to set this code in the access point. Choose a device in the
[Select a Device] screen. For further details, refer to the user guide included
with your access point.
• To add multiple computers, repeat the above procedures starting from step 1.
• To complete the registration, touch ^ in the upper right of the image transfer
screen that is displayed after connecting to the target computer in step 8,
and then touch [OK] in the confirmation screen.
Connecting to Access Points in the List
4 Choose an access point.
●● Touch
an access point.
5 Enter an encryption key.
●● Touch
inside the frame and a keyboard
will be displayed. Enter the encryption
key and touch [Next].
w-34
Adding a Computer
6 Choose [Auto].
●● Touch
[Auto].
of other connected devices
connected to the access point will appear
in the [Select a Device] screen.
▶▶ A list
7 Choose a computer to connect
to.
●● Touch
the name of the computer you
want to connect to.
▶▶ The computer will be added to the list on
the camera.
▶▶ When connecting to a Windows computer
for the first time, continue to “Installing
Drivers (Windows only)” (p. w-36).
▶▶ To connect again, or when using a
Macintosh, see “Using CameraWindow to Transfer Images to a Computer” (p. w-37).
• Up to 16 access points will be displayed. If no access points are detected,
choose [Manual Settings] in step 4 to manually set an access point.
Follow on-screen instructions and enter an SSID, security settings, and an
encryption key.
• When connecting to the same access point again, the encryption key in step
5 will be hidden, and only asterisks (*) will be displayed. To continue using
the same encryption key, touch [Next].
• To add multiple computers, repeat the above procedures starting from step 1.
• To complete the registration, touch ^ in the upper right of the image transfer
screen that is displayed after connecting to the target computer in step 7,
and then touch [OK] in the confirmation screen.
w-35
Adding a Computer
Installing Drivers (Windows only)
The first time the camera and computer are connected, it will be necessary
to install drivers for the camera.
1 Open the Control Panel window.
●● Click
[Control Panel] from the Start menu.
2 Choose [Network and Internet]
and [View network computers
and devices].
●● Click
[Network and Internet] and [View
network computers and devices].
3 Choose a connected camera.
●● Choose
the connected camera from
[Other Devices] and then double click the
camera icon.
▶▶ Driver installation will begin.
▶▶ After driver installation is complete, and
the camera and computer connection
is enabled, the AutoPlay screen will be
displayed. Nothing will be displayed on
the camera screen.
▶▶ Proceed to “Using CameraWindow to
Transfer Images to a Computer” (p. w-37).
w-36
Using CameraWindow to Transfer
Images to a Computer
Use the computer (included software CameraWindow) to transfer images
from the camera to the computer.
• For details on how to use CameraWindow, see the ImageBrowser EX User
Guide.
Start CameraWindow
For Windows
1 Enable download of images
from the camera.
●● Click
[Downloads Images From Canon
Camera using Canon CameraWindow].
▶▶ CameraWindow will be displayed.
▶▶ Proceed to “Importing Untransferred
Images to a Computer” (p. w-38) or
“Choosing Images to Import” (p. w-39).
For Macintosh
CameraWindow will be automatically displayed when a wireless connection
is established between the camera and computer.
• If CameraWindow is not displayed when using a Macintosh, click the
CameraWindow icon in the Dock.
w-37
Using CameraWindow to Transfer Images to a Computer
Importing Untransferred Images to a
Computer
Import images to a computer that have not yet been transferred.
1 Import untransferred images.
●● Click
[Import Images from Camera].
[Import Untransferred Images].
▶▶ Images that have not yet been transferred
to a computer will be imported.
●● Click [OK] in the screen that is displayed
after image import is complete.
●● Click
• CameraWindow default settings will save images to the Pictures or My
Pictures folders on a computer. For details on how to change the destination
folders for saved images, see the ImageBrowser EX User Guide.
• If you click [Import All Images] in step 1, all images on the camera will be
imported.
• Movies will take longer to import since the file size is larger than still images.
• To disconnect from the camera, turn off the camera.
w-38
Using CameraWindow to Transfer Images to a Computer
Choosing Images to Import
Choose whichever images you like to import to a computer.
1 Display the image import
screen.
●● Click
●● Click
[Import Images from Camera].
[Select Images to Import].
2 Choose an image.
●● Click
images you want to import.
background of selected images
to deselect the
will turn blue. Click
images, and the background will turn
gray.
▶▶ The
3 Import images.
●● Click
(import).
selected images will be imported to
the computer.
●● Click [OK] in the screen that is displayed
after image import is complete.
▶▶ The
• CameraWindow default settings will save images to the Pictures or My
Pictures folders on a computer. For details on how to change the destination
folders for saved images, see the ImageBrowser EX User Guide.
• Movies will take longer to import since the file size is larger than still images.
• To disconnect from the camera, turn off the camera.
w-39
w-40
6
Sending Images
This chapter explains how to use the camera to
send images wirelessly to destinations saved in the
camera.
• When the destination you want to send images to is a social networking
service or e-mail, sent images will be saved to CANON iMAGE GATEWAY
and a link to the album containing the images will be added to the social
networking service or e-mail. When the destination is YouTube, the sent
movie will be uploaded directly to YouTube.
• You can send up to 50 images together with one send operation. You can
send movies together as long as the total recording time is within 2 minutes.
However, if the destination is a Web service, the number of movies and
images that can be sent may be less depending on the Web service. See the
desired Web service for details.
• Depending on the condition of the network you are using, it may take a long
time to send movies. Be sure to keep an eye on the camera battery level.
• When connected to a computer, images are transferred using the computer
(included software CameraWindow) instead of the camera (p. w-37).
w-41
Sending Images Individually
1 Send images individually.
●● Drag
left or right across the screen to
choose an image to send.
●● Choose the resolution setting for the
image you want to send (resize the image
to M2 or S, or keep the image at its
original setting). Touch p or o to choose an option and
complete the setting.
●● Touch [Send this image].
●● When sending movies to YouTube, read
the terms of service that is displayed, and
then touch [I Agree].
▶▶ Image transfer will begin.
▶▶ After the image or movie is sent to the
desired Web service, touch [OK] on the
screen that is displayed to return to the
playback mode screen.
▶▶ After sending images to a camera
or smartphone, [Image sent] will be
displayed, and the display will return to
the image transfer screen.
• Images can only be resized to a smaller resolution setting.
• Movies cannot be resized.
• To disconnect from the camera, touch ^ in the upper right of the screen, and
then touch [OK] in the disconnection confirmation screen.
w-42
Sending Multiple Images
1 Choose [Select and send].
●● Touch
[Select and send].
2 Choose an image.
●● Touch
the image you want to send.
will be displayed on selected images.
Touching the image again will deselect it,
will disappear. Drag up or down
and
on the screen to scroll through displayed
images.
●● After you finish choosing images, touch
[OK].
▶▶
3 Send images.
●● Choose
the resolution setting for the
images you want to send (resize the
image to M2 or S, or keep the image at
its original setting). Touch p or o to choose an option and
complete the setting.
●● Touch [Send].
●● When sending movies to YouTube, read
the terms of service that is displayed, and
then touch [I Agree].
▶▶ Image transfer will begin.
▶▶ After the image or movie is sent to the
desired Web service, touch [OK] on the
screen that is displayed to return to the
playback mode screen.
▶▶ After sending images to a camera
or smartphone, [Image sent] will be
displayed, and the display will return to
the image transfer screen.
w-43
Sending Multiple Images
• If you move the zoom lever twice toward k (magnifying glass) in step 2, the
camera will switch to single image display. You can also drag left or right
across the screen to choose images.
• Images can only be resized to a smaller resolution setting than that chosen
in step 3.
• Movies cannot be resized.
• To disconnect from the camera, touch ^ in the upper right of the screen, and
then touch [OK] in the disconnection confirmation screen.
w-44
7
Helpful Information
This chapter explains how to edit and erase wireless
LAN settings, offers hints when you are unsure of
what to do, and includes a glossary.
w-45
Editing Connection Information
Edit connection information saved to the camera. You can change device
nicknames (display names) that are displayed on the camera, and erase
connection information.
The following explains the procedure when the target device is a computer.
1 Access the wireless LAN
screen.
●● Touch
.
2 Choose a device to edit.
●● Touch
the icon for the device you want
to edit.
3 Choose [Edit a Device].
●● Touch
[Edit a Device].
4 Choose a device to edit.
●● Touch
the device you want to edit.
5 Choose an option to edit.
●● Touch
the option you want to edit.
instructions on how to erase
connection information or changing
nicknames, continue to the next page.
●● For
w-46
Editing Connection Information
• Editable items differ depending on the device or destination.
Web services
Smartphones
Another camera/
computer
•Erase connection information (access points)
•Change nickname that is displayed on the camera
•Change privacy settings for images
•Erase connection information
•Change nickname that is displayed on the camera
•Erase connection information
• Connection information refers to information on how the camera connects to
another device or destination.
Connection information includes connection modes (Ad Hoc, Infrastructure),
and access points (when connected in Infrastructure mode).
If the connection mode or access point differs, connection information will be
treated as separate, even if the connected device or destination is the same.
Erasing Individual Items of Connection
Information
6 Choose [Select & Delete
Connection Info].
●● Touch
[Select & Delete Connection Info].
the target device is a camera,
touch [Erase All Connection Info].
●● When
7 Choose the connection info to
delete.
●● Touch
the connection info you want to
delete.
●● When [(connection info item) Erase?] is
displayed, touch [OK].
▶▶ The selected connection information item
will be erased.
▶▶ If there are other connection information
items in the device, return to step 6.
▶▶ If there are no more connection
information items in the device, return to
step 4.
w-47
Editing Connection Information
• If there are multiple connection information items, the device will not be
erased if a single item is erased.
To erase a device, erase all of the connection information for that device.
• If you erase all information items for a device, the device will also be erased,
and it will not be displayed on the screen in step 4.
• If the deleted device is the final registered device, the screen will return to
the display in step 3.
Erasing All Connection Information
6 Choose [Erase All Connection
Info].
●● Touch
[Erase All Connection Info].
[(device name) Erase?] is
displayed, touch [OK].
▶▶ All connection information for the device
will be erased, and the screen will return
to the display in step 4.
●● When
• If you erase all information items for a device, the device will also be erased,
and it will not be displayed on the screen in step 4.
• If the deleted device is the final registered device, the screen will return to
the display in step 3.
Changing a Device Nickname
You can change the device nickname (display name) that is displayed on
the camera.
6 Choose [Change Device
Nickname].
●● Touch
w-48
[Change Device Nickname].
Editing Connection Information
7 Enter a nickname.
●● Touch
inside the frame and a keyboard
will be displayed. Enter the new
nickname.
●● Touch ^ in the upper right of the screen.
▶▶ The camera will return to the display in
step 4 and the new nickname will be
displayed.
w-49
Returning the Wireless LAN Settings to
Default
Return the wireless LAN settings to default if you transfer ownership of the
camera to another person, or dispose of it.
1 Access the menu.
●● Touch
H, and then touch n.
2 Choose [Wireless LAN
Settings].
●● Touch
●● Touch
the 3 tab.
[Wireless LAN Settings].
3 Choose [Reset Settings].
●● Touch
[Reset Settings].
the [Reset Settings] screen is
displayed, touch [OK].
▶▶ Wireless LAN settings will be reset to
defaults, and the camera will return to
initial screen for this setting.
●● When
• When returning the wireless LAN settings to defaults, all Web services set
using a computer will also be erased from the camera. Be sure to confirm
that you want to reset all wireless LAN settings before using this option.
• To reset other settings (aside from wireless LAN) to defaults, choose [Reset
All] in the 3 tab.
w-50
Troubleshooting
When you are unsure of how to proceed with certain wireless LAN
operations, or experiencing trouble, check the following items for possible
solutions.
is not displayed, and you cannot access the wireless LAN menu.
• You cannot access the wireless LAN menu from a shooting mode. Switch to playback
mode and try again.
•
will not be displayed even in playback mode, when using magnified display
will also not be
or index display. Switch to single image display and try again.
displayed when an image is displayed by specifying search conditions. Cancel the
playback state of the image in image search mode.
•
will not be displayed when the camera is connected to a printer or computer with
a cable. Disconnect the cable.
The camera’s SSID (network name) is not displayed when you try to
connect to a smartphone.
• You are attempting to connect using infrastructure mode. Select ad hoc mode and try
again (p. w-20).
• Check to make sure your smartphone supports ad hoc mode. If your smartphone
does not support ad hoc mode, connect using infrastructure mode.
Cannot add a device/destination
• A total of 20 items of connection information can be added to the camera. Erase
unneeded connection information from the camera first, and then add new devices/
destinations (p. w-46).
• E-mail is the only web service for which multiple accounts can be set. Use
CameraWindow to change the desired Web service (p. w-15).
• To add a smartphone as a device, first install the dedicated application
CameraWindow on your smartphone.
• To add a computer as a device, first install the included software CameraWindow on
the computer.
• Avoid using the camera’s wireless LAN function around microwave ovens, Bluetooth
devices, and other devices that operate on the 2.4 GHz band, as this will weaken
wireless LAN signals.
• When using infrastructure mode, use the camera within a close distance to the
access point, and avoid placing objects or obstructions between the camera and
access point.
• When using ad hoc mode, use the camera within a close distance to the connected
device, and avoid placing objects or obstructions between the camera and device.
w-51
Troubleshooting
Cannot send images
• The destination device has insufficient storage space. Increase the storage space on
the destination device and resend the images.
• Images shot in high-speed burst mode are grouped. Cancel grouping and then send
the images.
• The write-protect tab of the SD/SDHC/SDXC memory card or Eye-Fi card of the
destination camera is set to the locked position. Slide the write-protect tab to the
unlocked position. IXUS 240 HS
Cannot resize images for sending
• Images cannot be resized to be bigger than the resolution setting of their original size.
• Movies cannot be resized.
Images take a long time to send
• Multiple images may take a long time to send. Try resizing the image to M2 or S to
reduce sending time (p. w-41).
• Movies may take a long time to send.
• Avoid using the camera’s wireless LAN function around microwave ovens, Bluetooth
devices, and other devices that operate on the 2.4 GHz band, as this will weaken
wireless LAN signals.
• When using infrastructure mode, use the camera within a close distance to the
access point, and avoid placing objects or obstructions between the camera and
access point.
• When using ad hoc mode, use the camera within a close distance to the connected
device, and avoid placing objects or obstructions between the camera and device.
The wireless connection is disrupted
• Avoid using the camera’s wireless LAN function around microwave ovens, Bluetooth
devices, and other devices that operate on the 2.4 GHz band, as this will weaken
wireless LAN signals.
• When using infrastructure mode, use the camera within a close distance to the
access point, and avoid placing objects or obstructions between the camera and
access point.
• When using ad hoc mode, use the camera within a close distance to the connected
device, and avoid placing objects or obstructions between the camera and device.
• When sending images to a computer from a memory card with a large amount
of images (approximately 1,000), the connection may be disrupted. Import any
necessary images to a computer, and then reduce the number of images on the
memory card by erasing unnecessary images.
Erasing wireless connection information when transferring ownership
of or disposing of the camera.
• Reset the wireless LAN to default settings (p. w-50).
w-52
On-Screen Messages
If an error message is displayed on the camera screen, try one of the
following solutions.
Also refer to “On-Screen Messages” in the Camera User Guide.
Connection failed
• No access points were recognized. Check the access point settings (p. w-27).
• A device could not be found. Turn the camera off and on again, and retry the
connection.
• Check the device you want to connect to and make sure it is ready for connection.
Cannot determine access point
• The WPS button on numerous access points were pressed simultaneously. Try
reconnecting again.
No access points found
• Check to make sure that the access point is turned on.
• When connecting to an access point manually, make sure that you entered the
correct SSID.
Incorrect wireless LAN encryption key/Incorrect wireless LAN security
settings
• Check the access point security settings (p. w-27).
IP address conflict
• Reset the IP address so that it does not conflict with another.
Disconnected/Receiving failed/Sending failed
• The environment you are in may not be suitable for wireless LAN use.
• Avoid using the camera’s wireless LAN function around microwave ovens, Bluetooth
devices, and other devices that operate on the 2.4 GHz band.
• When using infrastructure mode, use the camera within a close distance to the
access point, and avoid placing objects or obstructions between the camera and
access point.
• When using ad hoc mode, use the camera within a close distance to the connected
device, and avoid placing objects or obstructions between the camera and device.
• Check the connected device to make sure it is not experiencing errors.
Sending failed
Memory card error
• If the same error message is displayed even when you have inserted a formatted
memory card facing the correct way, contact a Canon customer support.
w-53
On-Screen Messages
Receiving failed
Insufficient space on card
• There is not enough free space on the memory card to receive images. Erase images
to create space on the memory card, or insert an empty memory card.
Receiving failed
Memory card locked
• The write-protect tab of the SD/SDHC/SDXC memory card or Eye-Fi card of the
camera to receive the images is set to the locked position. Slide the write-protect tab
to the unlocked position. IXUS 240 HS
Receiving failed
Naming error!
• When the highest folder number (999), and the highest image number (9999) have
been reached on the receiving camera, images cannot be received.
Insufficient space on server
• Delete unnecessary images uploaded to CANON iMAGE GATEWAY to create space.
SSL certificate not valid
Connect PC, use supplied
software to make settings again
• Check to make sure the date/time settings on the camera are correct. After confirming
that the settings are correct, follow the on-screen instructions and reset the settings.
Check network settings
• Check to make sure your computer can connect to the Internet with the current
network settings.
w-54
Glossary
Terms related to wireless LAN are explained here. Also refer to the
explanations of terms given in the respective sections of this guide.
• Access point
A device that relays radio wave signals to create a wireless LAN network.
This term also refers to a place where you can connect to the Internet via
wireless LAN.
• Ad hoc mode
A wireless LAN connection method. This method allows two devices to
connect to each other without using an access point.
• Encryption key
This is a key used to encrypt data for transmission to and from an access
point.
• Firewall
This is a system that protects computers from electronic viruses, external
unauthorized access, and security threats. This is set in your wireless
LAN router or computer.
• Infrastructure mode
A wireless LAN connection method. This mode is used to connect
through an access point.
• IP address
This is an address used to identify a device within a network.
• MAC address
This is a unique address pre-assigned to a network device. It is also
referred to as a “physical address”.
• SSID/ESSID
Numbers and letters used to identify a specific existing access point. This
is also called the “access point name” or “network name”.
w-55
Specifications
Only functions related to wireless LAN functions are noted here. See the
Camera User Guide for camera specifications.
Wireless Standard
IEEE 802.11b/g/n*
*2.4 GHz band only
Transmission Method
OFDM modulation (IEEE 802.11g/n)
DSSS modulation (IEEE 802.11b)
Connection Method
Infrastructure mode*, Ad hoc mode
*Supports Wi-Fi Protected Setup
Security
WEP, WPA-PSK (AES/TKIP), WPA2-PSK (AES/TKIP)
Trademark Acknowledgments
• Wi-Fi®, Wi-Fi Alliance®, WPA™, WPA2™ and Wi-Fi Protected Setup™
are marks (or registered marks) of the Wi-Fi Alliance.
w-56
Index
A
M
Access point
Manual settings...........................w-35
Number of display items..............w-35
Add target device
Camera.......................................w-24
Computer....................................w-32
Smartphones...............................w-20
Web services...............................w-15
MAC address.....................................w-27
C
Camera
Add target device........................w-24
Nickname.................................... w-11
CameraWindow
Display........................................w-37
Smartphone.................................w-20
CANON iMAGE GATEWAY...............w-14
Settings.......................................w-15
Computer
Add target device........................w-32
Environment................................w-26
Preparation..................................w-26
Connection
Web services...............................w-17
Connection information
Change nickname.......................w-48
Edit..............................................w-46
Erase all......................................w-48
Erase individually........................w-47
E
Error messages.................................w-53
F
Failure...............................................w-51
I
Import images to a computer.............w-37
Selected images..........................w-39
Untransferred images..................w-38
Memory card..................................... w-11
N
Nickname
Camera....................................... w-11
Device.........................................w-48
R
Return wireless LAN settings to
default................................................w-50
S
Send images.....................................w-41
Maximum number of images
that can be sent together............w-41
Resize...............................w-42, w-43
Send individually.........................w-42
Send multiple images..................w-43
Set Touch Actions................. w-17, w-22, w-24, w-32
Smartphones
Add target device........................w-20
CameraWindow...........................w-20
Change Privacy Settings.............w-22
IP Address Settings.....................w-22
Privacy Settings..........................w-21
W
Web services
Add target device........................w-15
Connection..................................w-17
Display order...............................w-16
Maximum number of mail
addresses....................................w-16
Wi-Fi....................................................w-2
Windows
Display CameraWindow..............w-37
Driver...........................................w-36
Settings.......................................w-28
w-57
Wireless LAN
Access point................................w-26
Security.......................................w-28
Settings.......................................w-27
WPS..................................................w-33
PBC Method................................w-33
PIN Method.................................w-34
Trademark Acknowledgments
• The microSDXC logo is a trademark of SD-3C, LLC.
• The SDXC logo is a trademark of SD-3C, LLC.
• This device incorporates exFAT technology licensed from Microsoft.
• HDMI, the HDMI logo and High-Definition Multimedia Interface are
trademarks or registered trademarks of HDMI Licensing LLC.
• The iFrame logo and the iFrame symbol are trademarks of Apple Inc.
About MPEG-4 Licensing
This product is licensed under AT&T patents for the MPEG-4 standard
and may be used for encoding MPEG-4 compliant video and/or decoding
MPEG-4 compliant video that was encoded only (1) for a personal and
non-commercial purpose or (2) by a video provider licensed under the AT&T
patents to provide MPEG-4 compliant video.
No license is granted or implied for any other use for MPEG-4 standard.
*Notice displayed in English as required.
w-58
© CANON INC. 2012
CEL-SS6SA210