1
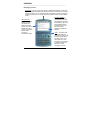
Zipit™ Wireless Messenger
Why talk when you can Chat?
GETTING STARTED GUIDE
AND USERS GUIDE
WELCOME
_________________________________________________________________________
Thank you for choosing Zipit Wireless Messenger.
We hope that you are completely satisfied with your product. Please visit us at
www.zipitwireless.com if you have any comments or suggestions.
Copyright
Copyright © 2004, 2005 Aeronix, Inc. All rights reserved. K-Byte is a registered trademark of
All Components, Inc. The “Z” logo, Zipit Wireless Messenger, MyFriendz, MyFriendz Key,
MyEmoticonz, IMessage Alert and IMessage Response are trademarks of Aeronix, Inc. and
may be registered in some jurisdictions. All other trademarks are the property of their
respective owners.
Disclaimers
Zipit Wireless Messenger is not endorsed or affiliated with AOL, Yahoo, or Microsoft.
Aeronix, OEM, and its suppliers assume no responsibility for any damages or loss from the
use of this guide or damages or loss caused by failures in delivery or receipt of messages.
Aeronix and OEM do not guarantee uninterrupted service to any Instant Message service.
Aeronix and OEM reserve the right to change the software, features and support for IM
services at will. This document may also change from time to time. Please visit
http://www.zipitwireless.com for the latest version.
End User License Agreement
Please visit http://www.zipitwireless.com for the latest copy of the End User License
Agreement. By using this product, you agree not to reverse engineer, decompile or disable
the software and/or hardware.
Safety Warnings
Zipit Wireless Messenger includes a Lithium Ion battery. Please dispose of properly when
replacing.
2
_________________________________________________________________________
Zipit™ Wireless Messenger
Why talk when you can Chat?
Product Features
Portable Instant Messaging
Works with your existing IM accounts and friend lists
Connects to wireless 802.11b or g home networks & public hotspots
Compatible with popular IM services
Support for future Music services (requires purchase of software
update available at a future date)
One year warranty
Convenience
No PC required
Quick and easy first-time setup
Automatic detection and connection to wireless networks
Multiple, concurrent conversations
Automatic software updates via wireless connection
Instant on
Security
Immune to viruses
No pop-ups
Password protection to prevent IM account theft
3
OVERVIEW
_________________________________________________________________________
Messaging Screen
Header Bar - The top portion of the screen is called the Header Bar. From left to
right, the Header Bar provides the following information: the IM service and screen
name of the friend you are chatting with, the Conversation Counter, the incoming
message indicator, the ALT, CTRL, and SHIFT status indicators, and the battery
meter.
Text Entry Window –
During conversations,
History Window characters that you type
Displays lines of text
are displayed in the Text
typed by you and
Entry Window. When you
your friend in the
press ENTER, the text
order that they are
message is sent to your
entered. The UP and
friend and is then
DOWN cursor keys
displayed in the History
can be used to scroll
Window.
back and forth
through the
LEDs – The Amber LED
conversation history.
blinks slowly when the
device is in Standby mode
and blinks quickly when
the battery is low. The
Green LED is on when
the device is connected to
a wireless network and
blinks when a new
message is received.
4
_________________________________________________________________________
Keyboard
MyFriendz Key – Opens and closes the MyFriendz List. (The MyFriendz List is
a pop-up window that displays the screen names of your friends currently
logged on to the same Instant Messenger services that you are logged in to.)
PREV & NEXT – During
chatting, used to cycle
through chat windows.
When the MyFriendz
List is active, used to
scroll one page at a
time through screen
names.
ALT-⌧ – Closes
a conversation
window
Cursors – Used to
navigate. ALT-UP or
ALT-DOWN enables
volume control
function.
Menu – Opens and
closes the Setup
Menu
SHIFT – For caps, press Shift once prior to pressing a letter
key. Press Shift twice to enable Caps-Lock.
CTRL – Press Control once followed by a letter key to generate
Control functions..
ALT – Alternate characters can be accessed by pressing Alt once before
the desired key. Press Alt twice to enable Alt-Lock.
5
GETTING STARTED
What you need to get started:
Wireless Internet Access – To use your Zipit Wireless Messenger,
you must be near an IEEE 802.11b or IEEE 802.11g wireless
network (frequently called a Wi-Fi® network). Zipit Wireless
Messenger contains an 802.11b radio and will work with both
802.11b and 802.11g networks.
If you are using the device at home, you will need an 802.11b or
802.11g wireless access point or router that is connected to a
broadband Internet service (such as a cable or DSL connection).
Outside the home, many businesses are now offering wireless
access. Such locations are frequently called “hotspots”. In order
to use Zipit Wireless Messenger outside the home, you will need
to access a “hotspot” that doesn’t require you to pay a subscription
fee.
Instant Messenger Accounts – Before using your Zipit Wireless
Messenger, you must have an existing IM account. (You can not
setup a new account on Zipit Wireless Messenger.) If you don’t
have an existing account, you can easily setup new accounts for
free on any Internet connected PC. When setting up a new
account, you will choose or be provided with a screen name and a
password.
6
Charging the battery
Plug the AC-Adapter into the DC input jack on the back side of the unit and
into an AC Power outlet. Zipit Wireless Messenger can be used while it is
being charged. The Lithium Ion battery in Zipit Wireless Messenger should
be charged for 3 hours before portable use.
Powering Zipit Wireless Messenger on and off
To turn Zipit Wireless Messenger on or off, press and hold the Power button
for at least one second.
During normal use, closing the lid will cause the unit to go into a low power
(Standby) mode. If connected to the network when the lid is closed, Zipit
Wireless Messenger will remain connected to the network until the lid is reopened or until the unit is moved outside the range of the wireless network.
Power consumption is reduced when the device is in Standby – significantly
lengthening the battery life.
First Time Use
The first time you turn on your Zipit Wireless Messenger the Setup Wizard
will guide you through a brief setup process. During this process, you will
search for and connect to your wireless network, you will enter the screen
name and password for your Instant Messenger account, and you will define
how the programmable keys on the Zipit Wireless Messenger keyboard will
be used.
7
NETWORK BASICS
Signal Strength: The strength of the connection is determined by your proximity to the Wireless Access Point
(or Wireless Router), structural interference, and device interference (devices such as Microwave ovens or 2.4
GHz cordless phones operate on the same radio frequency as 802.11b and g and can cause performance
degradation on your wireless network).
SSID: Wireless Access Points typically broadcast a name or identifier – called an SSID – so that the network
can easily be identified and selected by wireless device users. Access points can be configured to not
broadcast the SSID so that the network is not easily available to other users. If your network does not
broadcast the SSID, you will be able to enter the SSID manually on Zipit Wireless Messenger.
Encryption: Wireless Access Points can be configured to encrypt network traffic so that unauthorized users
can’t use the networks. When the Access Point is configured for encryption, a key will be generated that can
be used by wireless devices to access the network. This key is commonly known as a WEP (Wired
Equivalent Privacy) key. Only users that know the key will be able to access the wireless network.
For Fee Hotspots: Some hotspots require the user to pay a fee or have a monthly subscription in order to
access their network. These locations typically expect the user’s device to have a web browser where the user
can enter a pin number or credit card information to pay for using the network. These networks are not
currently supported by Zipit Wireless Messenger
DHCP: All networked devices must have an IP address assigned to them which lets them know where to send
and retrieve information in order to attach to the Internet. Most Wireless Access Points will be configured to
automatically provide an IP Address to devices that attempt to connect to the network. Such devices have
DHCP enabled - which allows the access point to dynamically assign IP addresses to devices as they connect.
An access point can be configured such that DHCP is disabled and devices can only attach to the network if
they know the (static) IP address required by the Access Point.
8
CONNECTING TO A WIRELESS NETWORK
Automated Connection
Although wireless networks can be configured in a variety of ways, Zipit
Wireless Messenger is designed to make the Wireless connection process
as automated and simple as possible.
When the device is turned on, Zipit Wireless Messenger will search for all
available wireless networks and attempt to connect to the strongest
unencrypted networks first, followed by the strongest encrypted networks.
If your network is unencrypted, it is likely that the connection will not require
any input. Otherwise, follow the on screen instructions to connect to your
network. If you prefer to manually select or configure a network, press NEXT
while the device is searching for networks.
If your network is encrypted, you will be asked to enter a password (WEP
Key). If your network is hidden, you will have to identify your network.
Checking for Software Updates
Each time the Zipit Wireless Messenger connects to the Internet, it will
determine if a new software update is available. If a software update is
available, the Zipit Wireless Messenger will automatically install it and then
re-start.
WARNING: If your device is connected to an AC Power Outlet while
downloading a new software load, do not unplug your device from the AC
Power Outlet until the download and installation is complete.
9
LOGIN TO IM ACCOUNTS
After successfully connecting to the Internet and checking for software
updates, you will need to setup your Instant Messenger accounts.
Remember: Before using your Zipit Wireless Messenger, you must have an
existing IM account.
The Setup Wizard will ask if you have AOL, Yahoo, and MSN accounts. You
will then be asked to enter the Screen Name and Password for each of your
accounts.
Note: Restricted AOL accounts, such as KAOL accounts, are not supported.
MSN accounts require the full account name, not just the screen name. For
example, if you have a Hotmail account, you must add ‘@hotmail.com’ to
your screen name.
10
ENTER YOUR IM ACCOUNT INFORMATION
The Setup Wizard will ask if you have existing IM accounts with AOL, MSN,
and Yahoo. When prompted (as shown below), press Y if you have an
existing Screen Name and Password. Otherwise, press N.
After pressing Y, you will be asked to type in your Screen Name and
Password (as shown below). Type your Screen Name in the first field and
then use the DOWN cursor key to move to the second field. Type in your
Password and then press NEXT. Note: If you make a mistake while typing,
use the BACKSPACE key to delete characters.
11
CONFIGURE YOUR MyEmoticonz KEYS
_________________________________________________________________________
The final step in the Setup Wizard guides you through programming the
MyEmoticonz keys (P1, P2 and P3) on the keyboard. These keys enable
you to assign your favorite Emoticons (Smiley faces) to the keyboard. After
completing Setup, when you press these keys, the keyboard will generate
the correct Emoticon for the IM service you are using.
Note: The keyboard also has three dedicated keys that enable you to quickly
enter the most commonly used Emoticons. The Emoticons provided on the
Zipit Wireless Messenger keyboard are the Smiley Face, Sad Face, and
Surprised Face.
Use the LEFT or RIGHT cursor keys to cycle through and assign one of the
available Emoticons to a programmable key. Use the UP and DOWN cursor
keys to move between P1, P2, and P3. After you have assigned an
Emoticon to each key, press NEXT to save the assignments and complete
the Setup Wizard.
12
MyFriendz KEY
_________________________________________________________________________
Once the Setup Wizard is complete, you will see the following screen:
Press the MyFriendz Key to start messaging!
13
MESSAGING
_________________________________________________________________________
Initiate a Conversation
To start a new conversation, press the MyFriendz Key™ to open
the MyFriendz List, highlight the desired friend using the UP and
DOWN cursor keys, and press ENTER.
Respond to a New Message
Anyone on your MyFriendz List can initiate a new conversation with you by
sending you a message. When a new message is sent from a friend, a
“swoosh” sound is played and a pop-up dialog will be displayed on the
screen to alert you - enabling an active conversation to continue without
interruption while showing you which friend has sent a new message.
Switching Between Conversations
The PREV and NEXT keys on the keyboard allow you to switch between
active conversations. The conversations can be accessed in the order they
were initiated. For example, if there are 10 active conversations, and you are
viewing conversation 5 of 10, pressing PREV will display conversation 4 and
pressing NEXT will display conversation 6.
Tip: Another method of switching between conversations is to press the
MyFriendz Key and select the desired user from the list of active screen
names.
14
_________________________________________________________________________
Using the MyFriendz List
The MyFriendz List is a pop-up window that displays the screen names of
friends that are currently logged on to the instant messenger services that
you are using. You can open or close the MyFriendz List at any time by
pressing the MyFriendz Key.
When at least one conversation is in progress, the top portion of the
MyFriendz List displays the list of friends, in alphabetical order, that you
currently have engaged in conversations. This list is useful when you are
engaged in a number of simultaneous conversations and want to jump to a
specific conversation without having to page through each conversation one
at a time.
The bottom portion of the MyFriendz List will display an alphabetical list of
the friends that are currently logged into the IM services that you are using
but that you have not currently engaged in conversation.
Tip: To quickly find a friend in the list, type the first character of the friend’s
screen name. The highlight will jump to the first screen name that begins
with that character. Additional characters can be entered (within a second of
the previous character) in order to quickly narrow in on the desired screen
name.
Tip: While the MyFriendz List is displayed, you can use PREV and NEXT to
scroll up and down through the list a page at a time.
15
SETUP MENU
_________________________________________________________________________
The Setup Menu can be opened and closed by pressing the MENU key on
the keyboard. To cancel a Setup function at any time, press MENU prior to
completing the directions on the screen.
Add and Delete MyFriendz
Enables you to add and delete friends on the IM services that you are
currently logged into. All services may not support this feature.
Setup Display
Enables you to change the contrast of the LCD screen.
Manage IM Accounts
Enables you to logout from any or all of your active IM Accounts and to login
with a different screen name. Also, enables you to attempt to re-connect to
an IM Service that may have dropped during usage or that wasn’t available
when you first connected to the wireless network.
Manage Network Connection
Enables you to manually select a different wireless network than the one you
are currently connected to.
Manage MyEmoticonz
Enables you to assign different emoticons to the three programmable keys.
16
_________________________________________________________________________
Enable or Disable Password Protection
Enables you to enable or disable password protection on your Zipit Wireless
Messenger. If password protection is enabled, you will be prompted to enter
the Password in order to 1) make modifications to the Owner information, the
IM Account settings, or the programmable Emoticons, 2) add or delete
buddies, 3) access any of the Zipit Wireless Messenger features after turning
the unit ON or after returning to regular use from Standby, and 4) to disable
the password protection feature.
Note: Please write down your password and keep it in a safe place.
Owner
Enables you to enter your name and address so that your unit can be
identified if it is ever lost
System Information
Provides information that may be required for support, including Software
Version, Hardware Version, Product ID Code, MAC Address, and Network
SSID
Rerun Setup Wizard
Wipes out all saved data (such as network configurations, IM login
information, and programmable emoticon settings) and takes the user back
through the Setup Wizard. Note: This function does not affect your IM
Accounts or their respective friends lists. Your accounts and list of friends
are maintained by the IM service providers.
17
VOLUME CONTROL
_________________________________________________________________________
To raise and lower the volume on Zipit Wireless Messenger, press and
release the ALT key followed by either the UP or DOWN cursor keys. A popup window will be displayed showing a volume indicator that changes each
time you press UP or DOWN. The pop-up window will disappear 2 seconds
after the last key press or immediately if you press NEXT.
The volume indicator changes in preset increments of 10% each time UP or
DOWN is pressed.
18
SUPPORTED NETWORKS
_________________________________________________________________________
Open Network
SSID broadcast
Encrypted
DHCP enabled
Yes
No
Yes
Encrypted Network
SSID broadcast
Encrypted
DHCP enabled
Yes
Yes
Yes
Hidden Network
SSID broadcast
Encrypted
DHCP enabled
No
No
Yes
Hidden & Encrypted
Network
SSID broadcast
Encrypted
DHCP enabled
No
Yes
Yes
Static IP Network
DHCP enabled
No
Zipit Wireless Messenger will automatically connect and the Setup Wizard will
advance to the next step.
The Setup Wizard will ask you to enter your WEP key. After entering the
correct key, Zipit Wireless Messenger will connect to the network and the Setup
Wizard will advance to the next step. The WEP key can typically be obtained
from your Access Point’s setup or configuration screens.
If no other networks are found, a screen will be provided asking you to move to
a new location or to enter the SSID. Also, if other networks exist, press NEXT
while the device is scanning for networks to advance to a manual configuration
screen that allows you to enter an SSID. After entering the correct SSID, Zipit
Wireless Messenger will connect to the network and the Setup Wizard will
advance to the next step.
This scenario is the same as the one described above, except after entering the
correct SSID, Zipit Wireless Messenger will ask you to enter your WEP key.
After entering the correct key, Zipit Wireless Messenger will connect to the
network and the Setup Wizard will advance to the next step.
If DHCP is not enabled, you will get a DHCP error when you try to connect to
the network (unless the device successfully connects to another network) and
will be provided with a manual configuration screen where you must enter an IP
Address, Netmask, Gateway, and DNS. The correct values can typically be
obtained from your Access Point’s setup or configuration screens.
19
NETWORK TROUBLESHOOTING
_________________________________________________________________________
No networks found – the device was unable to detect any wireless networks
Possible
1) Your device is not in range of any wireless access points
causes:
2) Available access points are not broadcasting their SSID
Solutions:
1) Move closer to known wireless access points. Also, make sure
that your wireless access point is turned on and is functional.
2) Manually enter the SSID of the network in the space provided
(the SSID can be found in the setup/configuration page of the
access point)
Unable to auto-connect – The device was able to detect one or more networks, but was
unable to automatically connect to any of them.
Possible
1) You may have entered an invalid SSID
causes:
2) You may have entered an invalid WEP key
3) The Access Point has been configured to disable DHCP
4) The Internet connection may be down
5) The DHCP server may be providing incorrect network
information
6) The only networks available are “for fee” Hotspots.
Solution:
From the “Uh Oh” screen, select the network that you want to
access. You will be given a brief list of the possible reasons for the
failure and a method to correct the failure condition.
20
_________________________________________________________________________
Failed to connect due to a DHCP error – Zipit Wireless Messenger was unable to connect to a
wireless access point
Possible causes:
1) You may have entered an invalid SSID
2) You may have entered an invalid WEP key
3) The Access Point has been configured to disable DHCP
4) The DHCP server may be providing incorrect network information (this
is very uncommon)
Solution
1) From the DHCP error screen, press Next to verify the SSID and WEP
information.
2) Verify that your Access Point or Wireless Router has DHCP enabled. If
not, enable it and re-scan or press Next after verifying the SSID and
WEP to enter the Static IP configuration screen. The required
information can be obtained from your Access Point or Wireless Router.
Failed to connect due to a DNS error – Zipit Wireless Messenger successfully connected to a
wireless access point but was unable to connect to the Internet.
Possible causes:
1) Your Internet service provider is having a service outage
2) Your cable or DSL modem is turned off or is malfunctioning
3) The DHCP server on your access point has provided incorrect data (this is
very uncommon).
Solutions:
1 and 2) Verify that you can access the Internet from a PC. If not, check the
status of your cable or DSL modem to see if it is receiving data from the
Internet.
Failed to connect because you are unauthorized to access this network – Zipit Wireless Messenger
could not connect to the network because it requires a subscription service or a special password.
Note: After the first successful connection to a wireless network, Zipit Wireless Messenger will
always attempt to connect to networks it has previously connected to before attempting to connect to
new networks.
21
TECHNICAL SUPPORT
_________________________________________________________________________
K-Byte technical support is available Monday through Friday from 9:30am to
5:30pm EST at 1-800-840-9212. For online support please visit
www.kbytememory.com
22