1
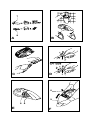
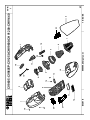
www.blackanddecker.co.uk
4
3
1 2
3
6
1 2
6
3
6
1 2
5
4
4
�
�
�
�
�
�
�
�
�
�
�
�
�
�
�
�
��
�
�
��
�
�
�
�
��
��
��
�
��
�
��
��
�
��
�
5
Intended use
Your Black & Decker Dustbuster® hand held vacuum
cleaner has been designed for light dry vacuum cleaning
purposes. This product is intended for household use
only.
Safety instructions
•Warning! When using batterypowered
appliances, basic safety precautions,
including the following, should always be
followed to reduce the risk of fire, leaking
batteries, personal injury and material
damage.
•Read this manual carefully before using the
appliance.
•The intended use is described in this manual.
The use of any accessory or attachment
or the performance of any operation with this
appliance other than those recommended in
this instruction manual may present a risk of
personal injury.
•Leaks from battery cells can occur under
extreme conditions. If the liquid, which is 2035% solution of potassium hyroxide, gets on
the skin (1)Wash quickly with soap and water
(2)neutalize with a mild acid such as lemon
juice or vinegar. If liquid gets into teh eyes,
flush them immediatly with clean water for a
minimum if 10 mins. Seek medical attention
•Retain this manual for future reference.
Additional safety instructions for
Australia and New Zealand
•This appliance is not intended for use by
young or infirm persons without supervision.
Children must be supervised to ensure they
do not play with the appliance.
•If the supply cord is damaged, it must be
replaced by the manufacturer or an
authorised Black & Decker Service Centre in
order to avoid a hazard.
Using your appliance
•Do not use the appliance to pick up liquids or
any materials that could catch fire.
•Do not use the appliance near water.
•Do not immerse the appliance in water.
•Never pull the charger lead to disconnect the
charger from the socket. Keep the charger
lead away from heat, oil and sharp edges.
After use
•Unplug the charger before cleaning the
charger or charging base.
•When not in use, the appliance should be
stored in a dry place.
•Children should not have access to stored
appliances.
Inspection and repairs
•Before use, check the appliance for damaged
or defective parts. Check for breakage of
parts, damage to switches and any other
conditions that may affect its operation.
•Do not use the appliance if any part is
damaged or defective.
•Have any damaged or defective parts
repaired or replaced by an authorised repair
agent.
•Regularly check the charger lead for
damage. Replace the charger if the lead is
damaged or defective.
•Never attempt to remove or replace any parts
other than those specified in this manual.
Battery and charger
•Never attempt to open the battery.
•Do not expose the battery to water.
•Do not incinerate the battery.
•Do not expose the charger to water.
•Do not open the charger.
Electrical safety
Your charger has been designed for a specific voltage.
Always check that the mains voltage corresponds to the
voltage on the rating plate. Never attempt to replace the
charger unit with a regular mains plug.
Symbols on the charger
Your charger is double insulated;
therefore no earth wire is required.
Fail safe isolating transformer.
The mains supply is electrically separated
from the transformer output.
130oC
The charger automatically shuts off if the
ambient temperature becomes too high. As
soon as the ambient temperature has cooled
down, the charger will resume operating.
The charger is intended for indoor use only.
Features
1. On/off switch
1. Two-speed on/off switch (CV1205/CHV1200/CHV1440)
2. Release button
3. Dust bowl
4. Charging base
5. Filter cleaning wheel (CV9605/CV1205/CHV9600/
CHV1200/CHV1400)
6. Charging indicator
Fig. A
7. Crevice tool
8. Brush tool
Installation
Fitting the charging base to the wall
(fig. B)
The charging base can be placed on a worktop or fitted
to the wall to provide a convenient storage and charging
point for the appliance.
Assembly
Fitting the accessories (fig. A & C)
These models are supplied with the following
accessories:
- a crevice tool (7) for confined spaces
- a brush tool (8) for furniture and stairs
To fit an accessory, proceed as follows:
•Take the accessories from the appliance.
•Insert the appropriate accessory into the front
of the appliance.
Use
•Before charging, preferably discharge the
battery by operating the appliance until motor
slows (DO NOT run until the motor stops)
•Before first use, the battery must be charged
for at least 16 hours. Place the appliance on
the charging base whenever it is not in use.
Charging the battery (fig. B)
•Make sure that the appliance is switched off.
The battery will not be charged with the on/off
switch in the on position.
•Place the appliance on the charging base as
shown.
•Plug in the charger. Switch on at the mains.
The charging indicator (6) will be lit.
•Leave the appliance to charge for at least 16
hours.
Whilst charging, the charger may become Warm. This is
normal and does not indicate a problem. The appliance
can be left connected to the charger indefinitely. The
charging indicator will be lit as long as the appliance is
connected to the plugged-in charger.
Warning! Do not charge the battery at ambient
temperatures below 4 °C or above 40 °C.
Switching on and off (fig. D)
•1 Speed Model: To start, slide on/off switch
forward to “1”(ie 0=off 1=on). To stop slide
the switch back to “0”.
•2 Speed Model: To start, slide on/off switch
forward (ie 0=off, 1 = low speed, 2= high speed). To stop
slide back to position “0”
CV9605/CV1205/CHV9600/CHV1200/CHV1440
- Optimising the suction force (fig. E)
In order to keep the suction force optimised, the filter
must be cleared regularly during use.
•Rotate the wheel (5) a few turns to shake out
dust clogging the filter (9).
Cleaning and maintenance
Warning! Regularly clean the filters.
Cleaning the dust bowl and filters
(fig. F - I)
The filters are re-usable and should be cleaned regularly.
•Press the release button (2) and remove the
dust bowl (3) (fig. F).
•Empty the dust bowl (fig. G).
•Remove the filters (9 & 10) by twisting them
clockwise (fig. H).
•Brush any loose dust off the filters.
•Wash the filters in warm, soapy water (fig. I).
The bowl can also be washed if necessary.
Do not immerse the appliance in water (fig. J).
•Make sure the dust bowl and filters are dry.
•Refit the filters (9 & 10) onto the appliance,
twisting them counterclockwise until they lock
into place.
•Refit the dust bowl onto the appliance. Make
sure the dust bowl clicks into place.
Warning! Never use the appliance without the filters.
Optimum dust collection will only be achieved with clean
filters and an empty dust bowl.
CV7205/CV9605/CV1205/CHV7200/
CHV9600/CHV1200/CHV1440Cleaning
the exhaust filter (fig. K)
•Open the lid (11).
•Remove the filter (12) from the recess.
•Wash the filter in warm, soapy water.
•Make sure the filter is dry.
•Refit the filter (12).
•Close the lid.
Replacing the filters
The filters should be replaced every 6 to 9 months and
whenever worn or damaged. Replacement filters are
available from your Black & Decker dealer (cat. no.
VF40).
Remove the old filters as described
above. Fit the new filters as described above.
Protecting the environment
Should you find one day that your Black &
Decker product needs replacement, or if it is of
no further use to you, think of the protection of
the environment. Black & Decker repair agents
will accept old Black & Decker products and ensure that
they are disposed of in an environmentally safe way.
Battery (fig. L - N)
If you want to dispose of the product yourself, the
battery must be removed as described below and
disposed of in accordance with local regulations.
•Preferably discharge the battery by perating
the appliance until the motor stops.
The battery is located under the back end of the
appliance.
•Take the accessories from the appliance.
•Remove the screws (13).
•Unlock the tabs (14) holding the accessory
holder in place.
•Remove the accessory holder (15).
•Remove the screws (16) holding the battery
in place.
•Slide the battery (17) backward as shown.
•Remove the battery.
•Place the battery in a suitable packaging
to ensure that the terminals cannot be shortcircuited.
•Take the battery to your service agent or a
local recycling station.
Warning! Once removed, the battery cannot be refitted.
Technical data
Voltage
Weight
Voltage
Weight
Voltage
Weight
Voltage
Weight
V4805
V4806
V4807
V 4.8
4.8
4.8
kg 1.0
1.0
1.0
CV7205 CV9605
CV1205
V
7.2
9.6
12
kg
1.1
1.3
1.4
CHV4800 CHV7200
CHV9600
V
4.8
7.2
9.6
kg
1.0
1.1
1.3
CHV1200 CHV1440
V
12.0
14.4
kg
1.4
1.5
Charger
Input voltage VAC 230
Approx. charging time h 16
EC declaration of conformity
V4805/V4806/V4807/CV7205/CV9605/CV1205/
CHV4800/CHV7200/CHV9600/CHV1200/CHV1440
Black & Decker declares that these
products conform to:
89/336/EEC, 73/23/EEC, EN 55014,
EN 60335, EN 61000
Colin Wills, Director of Engineering
BDCI, 4/F, 2 Dai Wang Street
Tai Po Industrial Estate
Tai Po NT, Hong Kong
1-1-2004
Guarantee
Black & Decker is confident of the quality of its products
and offers an outstanding guarantee. This guarantee
statement is in addition to and in no way prejudices
your statutory rights. The guarantee is valid within the
territories of the Member States of the European Union
and the
European Free Trade Area. If a Black & Decker product
becomes defective due to faulty materials, workmanship
or lack of conformity, within 24 months from the date
of purchase, Black & Decker guarantees to replace
defective parts, repair products subjected to fair wear
and tear or replace such products to ensure minimum
inconvenience to the customer unless:
•The product has been used for trade,
professional or hire purposes;
•The product has been subjected to misuse or
neglect;
•The product has sustained damage through
foreign objects, substances or accidents;
•Repairs have been attempted by persons
other than authorised repair agents or
Black & Decker service staff.
To claim on the guarantee, you will need to submit proof
of purchase to the seller or an authorised repair agent.
You can check the location of your nearest authorised
repair agent by contacting your local Black & Decker
office at the address indicated in this manual.
Alternatively, a list of authorised Black & Decker repair
agents and full details of our after-sales service and
contacts are available on the Internet at:
www.2helpU.com
Please visit our website
www.blackanddecker.co.uk to register your new Black
& Decker product and to be kept up to date on new
products and special offers.
Further information on the Black & Decker brand and our
range of products is available at
www.blackanddecker.co.uk
Australia
Black & Decker (Australia) Pty. Ltd.
20 Fletcher Road, Mooroolbark,
Victoria, 3138
Tel. 03-8720 5100
Fax 03-9727 5940
New Zealand
Black & Decker 81 Hugo Johnston Drive
Penrose, Auckland, New Zealand
Tel. 09 579 7600
Fax 09 579 8200
E13917
1
19
20
21
2
14
3
10
17
WWW.2helpU.com
9
6
15
22
23
16
7
8
16-03-04
1
V4805-V4805Y-V4806-V4807VCV7205-CV7205B-CHV4800-CHV7200
TYP.
1
12
E13918
21
20
19
19
1
11
9
2
14
3
15
13
4
22
WWW.2helpU.com
10
17
16
5
6
18
1
7
23
16-03-04
8
CV9605-CV9605P-CV1250-CHV9600-CHV1200-CHV1440
TYP.
1