1
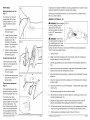
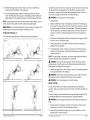
Operator's
Manual
I CRAFTSMRN°I
Reciprocating
Saw
Model No. 320. 17196
0 us
CAUTIONZ
Read, understand
• Warranty
and
• Safety
follow all Safety Rules and Operating
Instructions in this Manual before
• Unpacking
• Description
using this product.
Sears,
Roebuck
www.craftsman.com
• Assembly
• Maintenance
and Co., Hoffman
Estates,
IL 60179
The purpose of safety symbols is to attract your attention to possible dangers.
The safety symbols and the explanations with them deserve your careful
attention and understanding.
The symbol warnings do not, by themselves,
eliminate any danger. The instructions and warnings they give are no substitutes
for proper accident prevention measures.
Warranty
Page 2
Safety Symbols
Page 3
Safety Instructions
Pages 4-9
Unpacking
Pages 9-10
Description
Pages 10-11
Operation
Pages 12-17
Maintenance
Page 17-18
Troubleshooting
Page 19
Parts List
Pages 20-24
Sears Repair Parts Phone Numbers
Pages 26
SYMBOL MEANNING
_,
ALERT SYMBOL:
Indicates
DANGER,
with other symbols
This warranty gives you specific legal rights, and you may also have
other rights, which vary from state to state.
_1, CAUTION: Failure to obey this safety warning may result in death
or serious injury to yourself or to others. Always follow the safety precautions
reduce the risk of fire, electric, shock and personal injury.
These inform user of important information and/or instructions that could lead to
equipment or other property damage if not followed. Each message is preceded
by the word "NOTE" as in the example below.
A
chemicals
or other
harm.
NOTE: Equipment and/or property damage may result if these instructions
are not followed.
The operation of any power tool can result in foreign
objects being thrown into your eyes, which can result
in severe eye damage. Before beginning power tool
operation, always wear safety goggles or safety glasses
with side shields and a full-face shield when needed.
We recommend a Wide Vision Safety Mask for use over
eyeglasses or standard safety glasses with side shields,
available at Sears Stores or other Craftsman outlets.
SAVE THESE INSTRUCTIONS!
WEAR
READ ALL INSTRUCTIONS!
YOUR
Always use eye protection
ANSI Z87.1
0526
to
DAMAGE PREVENTION AND INFORMATION MESSAGES
Sears, Roebuck and Co., Hoffman Estates IL 60179
Manual_Revised_09
OR CAUTION.
_, WARNING:
Failure to obey this safety warning can result in death or serious
injury to yourself or to others. Always follow the safety precautions to reduce the
risk of fire, electric shock, and personal injury.
This warranty applies for only 90 days from the date of purchase if this
product is ever used for commercial or rental purposes.
17196
WARNING,
or pictographs.
_, DANGER: Failure to obey this safety warning will result in death or serious
injury to yourself or to others. Always follow the safety precautions to reduce the
risk of fire, electric shock, and personal injury.
This warranty does not include expendable parts, such as blades and
lamps.
reproductive
SAFETY
May be used in conjunction
ONE YEAR FULL WARRANTY ON CRAFTSMAN ® TOOL
If this Craftsman tool fails to give complete satisfaction within one
year from the date of purchase, return it to any Sears store or other
Craftsman Outlet in the United States for free replacement.
WARNING:
Some dust created by using power tools contains
known to the state of California to cause cancer and birth defects
_L. WARNING:
Be sure to read and understand all safety instructions in this
manual, including all safety alert symbols, such as "DANGER,"
"WARNING,"
and "CAUTION,"
before using this Reciprocating
Saw. Failure to following all
instructions listed below may result in electric shock, fire and/or serious personal
injury.
Page 2
17196
Manual_Revised_09
0526
that is marked to comply
with
Page 3
_,
WARNING:
Be sure to read and understand
all instructions
Remove adjusting keys or wrenches before turning the tool on. A wrench
or a key that is left attached to a rotating part of the tool may result in
personal injury.
in this manual
before using the reciprocating
saw. Failure to follow all instructions may result in
hazardous radiation exposure, electric shock, fire, and/or serious personal injury.
Do not overreach. Keep proper footing and balance at all times.
footing and balance enables better control of the tool in unexpected
situations.
A_, WARNING: Do not attempt to operate this tool until you have thoroughly
read all instructions, safety rules, and warnings. Failure to comply with them can
result in fire, electric shock, or serious personal injury. Save the manual and refer
to it frequently.
Use safety equipment. Always wear eye protection. A dust mask, nonskid safety shoes, hard hat, and/or hearing protection must be used for
appropriate conditions.
TOOL USE AND CARE
GENERAL SAFETY PRECAUTIONS
,_, WARNING:
WORK AREA SAFETY
•
Keep your work area clean and well lit. Do not leave tools or wood scraps
on the saw while it is in operation. Cluttered workbenches and dark areas
invite accidents
Keep children and bystanders and visitors away while operating
tool. Distractions can cause you to lose control.
Do not force the tool. Use the correct tool for your application. The correct
tool will do the job better and more safely at the rate for which is designed.
Do not use the tool if the switch does not turn it "ON" and "OFF." Any tool
that cannot be controlled with the switch is dangerous and must be repaired.
Lock
Disconnect
the plug from the power source before making any adjustments,
changing accessories, or storing the tool. Such preventive safety measures
reduce the risk of starting the tool accidentally.
Make sure that the work area has ample lighting so you can see the work
and that there are no obstructions that will interfere with safe operation.
Never leave the tool running. Always turn it off. Do not leave the tool until it
comes to a complete stop.
PERSONAL SAFETY
Store idle tools out of the reach of children and other untrained persons.
Tools are dangerous in the hands of untrained users.
Know your power tool. Read this operator's manual carefully. Learn the
reciprocating
saw's applications and limitations, as well as the specific,
potential hazards related to this tool.
Stay alert, watch what you are doing, and use common
operating a power tool.
Maintain tools with care. Keep cutting tools sharp and clean. Properly
maintained tools with sharp cutting edges are less likely to bind and are
easier to control.
sense when
Check for misalignment or binding of moving parts, breakage of parts, and
any other condition that may affect the tool's operation. If damaged, have the
tool serviced before using. Many accidents are caused by poorly maintained
tools.
Do not use a power tool while tired or under the influence of drugs, alcohol,
or medication. A moment of inattention while operating power tools may
result in serious personal injury.
17196
and follow all safety rules and
Always use clamps or other practical ways to support and secure the
workpiece to a stable platform. Holding the work by hand or against your
body is unstable and may lead to loss of control.
a power
and master switches.
Be sure to read, understand,
operating instructions in this manual before using this tool. Failure to do so may
result in electric shock, fire, and/or serious personal injury.
Do not operate power tools in explosive environments,
such as in the
presence of flammable liquids, gases, or dust. Power tools create sparks that
may ignite the dust or fumes.
Make your workshop childproof with padlocks
tools away when they are not in use.
Dress properly. Do not wear loose clothing or jewelry. Contain long hair.
Keep your hair, clothing, and gloves away from moving parts. Loose clothes,
jewelry, or long hair can be caught in moving parts.
•
Avoid accidental starting of tools. Be sure that the switch is off before
attaching the tool to a power source. Carrying tools with your finger on the
switch or plugging in tools that have the switch "ON" invites accidents.
_1, WARNING: When using power tools, basic safety precautions
be followed to reduce the risk of fire, electric shock, and personal
Manual_Revised_09
0526
Proper
Page 4
17196
Use only accessories that are recommended
by the manufacturer for your
model. Accessories that may be suitable for one tool may become hazardous
when used on another tool.
Manual_Revised_09
0526
should always
injury.
Page 5
_I,
WARNING:
The operation
of any tool can result in foreign objects
Recommended sizes of extension cords
being
propelled into your eyes, resulting in severe eye damage. When operating power
tool, always wear safety goggles or safety glasses with side shields and a full
face shield when needed.
A_, WARNING:
If any part is missing,
part has been replaced.
do not operate the tool until the missing
Doing so could result in serious
personal
Volts
Ampere
100ft
150ft
AWG
0
6
18
16
16
14
6
10
18
16
14
12
10
12
16
16
14
12
12
16
14
12
Not Recommended
SAFETY SYMBOLS FOR YOUR TOOL
The label on your tool may include the following
A wet power tool
Do not abuse the cord. Never use the cord to carry the tool or to pull
the plug out of an outlet. Keep the cord away from heat, oil, sharp edges,
or moving parts. Replace damaged cords immediately. Damaged cords
increase the risk of electric shock.
When operating a power tool outdoors, use an outdoor extension cord
that is marked W-A or W. These cords are rated for outdoor use and reduce
the risk of electric shock.
Using a damaged
50ft
Before connecting the tool to a power source (receptacle, outlet, etc.), be
sure that the voltage supplied is the same as that specified on the nameplate
of the tool. A power source with voltage greater than that specified for the
tool can result in serious injury to the user, as well as damage to the tool.
Avoid contact with grounded surfaces, such as
pipes, radiators, ranges, and refrigerators. There
is an increased risk of electric shock if your body is
grounded.
Replace damaged cords immediately.
shock, burns, or electrocution.
25ft
Not More Than
Double insulated tools are equipped with a
polarized plug (one blade is wider than the other).
This plug will fit into a polarized outlet only one way. If
the plug does not fit into the outlet, reverse the plug.
If it still does not fit, contact a qualified electrician to
install a proper outlet.
•
120v
Total Length of Cord in feet
More Than
injury.
ELECTRICAL SAFETY
Do not expose power tools to rain or wet conditions.
will increase the risk of electric shock.
Rating
V ...............................................................
Volts
A ...............................................................
Amps
Hz .............................................................
Hertz
W ..............................................................
Watts
symbols.
min ...........................................................
Minutes
co .............................................................
Alternating
.............................................................
Direct Current
Current
no ...........................................................
No-load Speed
[] ..............................................................
Class II construction
.../min .......................................................
Revolutions
• IL ...........................................................
Indicates danger,
warning caution.
It means attention!
involved.
Your safety is
cord can cause
If an extension cord is required, use a cord with the proper size of conductor
to prevent excessive voltage drop, loss of power, or overheating. The
following table shows the correct size to use, depending on cord length
and the nameplate amperage rating of the tool. When in doubt, use the next
heavier gauge. Always use UL and CSA listed extension cords.
SERVICE
or Strokes
per minute
SAFETY
If any part of this saw is missing or should break, bend, or fail in any
way; or should any electrical component fail to perform properly: shut off the
power switch, remove the saw's plug from the power source, and have the
missing, damaged, or failed part replaced before resuming operation.
Tool service must be performed only at a Sears Parts and Repair
Center. Service or maintenance performed by unqualified personnel could
result in a risk of injury.
17196
Manual_Revised_09
0526
Page 6
17196
Manual_Revised_09
0526
Page 7
When servicing a tool, use only identical replacement parts. Follow
instructions in the maintenance section of this manual. Use of
unauthorized parts or failure to follow maintenance instructions may create a
risk of electric shock or injury.
SPECIFIC
SAFETY
RULES FOR RECIPROCATING
SAW
WARNING: To avoid injury, hold the tool by the insulated gripping surfaces
only. If the tool contacts hidden wiring or its own cord, exposed metal parts
of the tool could shock the operator and cause serious injury. Make sure that
hidden electrical wiring, water pipes, or other hazards are not in the cutting path.
Never operate the saw without the pivot shoe in position. The spindle may
strike against the workpiece and damage the reciprocating
mechanism.
•
Do not touch the blade or the workpiece immediately after the sawing
operation. They may be extremely hot and could burn your skin.
•
Hold the tool firmly
•
Do not reach underneath
the workpiece.
hand is hidden from your sight.
•
Hold tool by the insulated gripping surfaces when performing
an operation
where the cutting tool may contact hidden wiring or its own cord.
with two hands when operating
the tool.
The proximity
of the blade to your
•
If you are not thoroughly
familiar
saw, obtain advice from a qualified
•
When servicing,
•
Avoid cutting nails and staples when operating with the wood-cutting
blade. Inspect the workpiece carefully and remove all nails and staples
before operation.
A_, WARNING: Your saw should never be connected to the power source when
you are assembling parts, making adjustments,
installing or removing blades,
cleaning, or when it is not in use. Disconnecting
the reciprocating
saw will
prevent accidental starting, which could cause serious personal injury.
•
Make sure that the blade always extends beyond the shoe and the
workpiece throughout the stroke. Blades may shatter if they strike the
workpiece or shoe.
When unpacking the box, do not discard
contents are accounted for:
•
Do not cut an oversized
1.
Carefully lift the reciprocating
flat surface.
•
Check for proper clearance beyond the workpiece
the blade will not strike the floor, workbench, etc.
2.
Open the parts bag to locate the following:
•
with the operation
person.
•
use only identical replacement
of a reciprocating
parts.
workpiece.
before cutting,
Keep the saw blade clean and sharp.
blades. Always use blades recommended
Do not leave the tool running.
materials
until all of the
saw out of the carton and place it on a stable,
so that
Make sure that the blade is not contacting the workpiece before the switch
is turned on.
Use only correct
workpiece.
any packing
for the type of
Operate the tool only when hand-held.
Always release the switch to "OFF" and wait for the tool to come to a
complete stop before removing the blade from the workpiece.
Keep the handle dry, clean, and free from oil and grease. Always use
a clean cloth when cleaning. Do not use solvents, brake fluids, gasoline or
other petroleum products to clean the tool; they may damage plastic parts.
Do not operate this tool in a gaseous or explosive environment or near
explosive materials.
3.
•
Reciprocating
saw
•
1 Wood-cutting
•
Hex key
•
Carry bag
•
Operator's
blade
manual
Inspect the items carefully to make sure that no breakage or damage has
occurred during shipping. If any of the items mentioned is missing, (refer to
"PARTS LIST" illustration), return the reciprocating
saw to your nearest Sears
store or Craftsman outlet to have the reciprocating
saw replaced.
_, WARNING: If any part is broken or missing, do not attempt to assemble the
reciprocating
saw, plug in the power cord, or operate the saw until the broken or
missing part is replaced. Failure to do so could result in possible serious injury.
Never force the tool. Apply firm pressure against the saw's pivot shoe for
the sawing operation--too
little or too much pressure could cause jumping or
vibration and may break the blade.
17196
Manual_Revised_09
0526
Page 8
17196
Manual_Revised_09
0526
Page 9
CARTON
CONTENTS/LOOSE
PARTS (Fig. 1)
PRODUCT
Reciprocating
Wood-cutting
saw
Motor
120V ~ 60 Hz,10A
No load Speed:
800-2700/Min
Blade stroke
1-1/8"
Weight
7.71bs (3.5 kg)
,_, WARNING:
blade
SPECIFICATIONS
The safe use of this product
(29mm)
requires an understanding
of the
information on the tool and in this operator's manual, as well as knowledge of
the project you are attempting. Before use of this product, familiarize yourself
with all operating features and safety rules.
TOOL-LESS
Hex key
BLADE CHANGE
SYSTEM
The saw has a blade clamp design that does not require the use of a tool (blade
wrench) when installing or removing the blade. Pull the blade-clamp
lever to
install or remove the saw blade. See INSTALLING SAW BLADE on PAGE 12.
ID]d_.'_o_]l_llKe]_l
VARIABLE-SPEED
DIAL
KNOW YOUR RECIPROCATING SAW (Fig. 2)
Variable Speed is controlled
Before attempting to use this reciprocating
operating features and safety requirements.
saw, familiarize
by the dial located
PIVOT SHOE
A_, WARNING:
Do not allow familiarity with your reciprocating
saw to make you
careless. Remember that a careless fraction of a second is sufficient to inflict
The shoe pivots to provide maximum
severe injury.
LED WORKLIGHT
LED worklight
Fig. 2
Tool-less
Trigger switch
blade
in the handle
yourself with all of its
illuminates
cutting
control against
the surface being cut.
area.
Lock-on
Blade-clamp
lever
ORBITAL
FUNCTION
The orbital blade action thrusts the blade forward on the cutting stroke, and
greatly increases the cutting speed over the normal up-and-down
blade action.
clamp
LIVE-TOOL
INDICATOR
Variablespeed dial
Orbital-action
Pivot shoe
Live-Tool
_,
lever
indicator
WARNING:
illuminates
To avoid injury and damage,
pivot shoe in place. The spindle
the reciprocating
mechanism.
LED worklight
when there is power to the tool.
do not operate the saw without
may strike against the workpiece
the
and damage
'_Jdicator
Shoe-adjustment
17196
Manual_Revised_09
0526
screw
Page 10
17196
Manual_Revised_09
0526
Page 11
blade (Fig.4).
A_, WARNING:
Your saw should never be connected
to the power source when
3.
Position "1" selects the slowest blade speed; position "6" selects the fastest
blade speed. Adjust the blade speed for optimum performance.
you are assembling parts, making adjustments, installing or removing blades,
cleaning, or when it is not in use. Disconnecting
the reciprocating
saw will
prevent accidental starting, which could cause serious personal injury.
NOTE: Determine the optimum speed for cutting your workpiece
trial cut in a scrap piece of material.
ON/OFF SWITCH CONTROL (Fig. 3)
LED WORKLIGHT
Your reciprocating saw is
equipped with a trigger switch
to turn the saw on and off.
Your reciprocating
saw has a built-in LED worklight to illuminate the cutting area.
To activate the LED worklight, plug in your reciprocating
saw and depress the
trigger switch; the LED worklight turns on when the switch is depressed.
1.
2.
3.
4.
Lock-on
button
LIVE-TOOL INDICATOR (Fig. 5)
To start the saw, squeeze
the trigger switch.
Your reciprocating
saw also has
a Live-Tool Indicator: a green
LED light located adjacent to
where the power cord enters
the handle. This green light
is always on when the saw is
plugged into a power source.
To stop the saw, release
the trigger switch and
allow it to return to the
"OFF" position.
To lock the on/off switch
in the "ON" position, press
trigger switch and while
holding it "ON", press
in the lock-on button. The lock-on button allows the operator to keep the
reciprocating
saw running without squeezing the trigger switch. This feature
is convenient for continuous sawing applications.
INSTALLING AND REMOVING
A SAW BLADE (Fig. 6)
To release the lock-on
3.
WARNING:
trigger cannot
button,
If the "lock-on"
press and release the trigger switch.
button is continuously
being depressed,
1.
2.
1.
The variable-speed
dial is
used to adjust the speed
of the blade.
2.
Turn the dial to increase or
decrease the speed of the
Manual_Revised_09
0526
the saw from
Pull the blade-clamp
lever.
Insert the saw blade into
the blade clamp as far as
possible, and release the
blade-clamp
lever to lock
the blade in position.To
remove the blade, pull down
on the blade clamp lever
and pull the blade out of the
clamp
the
DIAL (Fig. 4)
The variable speed feature of
this reciprocating
saw allows
you to match the proper
cutting speed to the material
being cut, enhancing the
overall performance of your
saw and helping to save the
blades from undue wear.
Disconnect
Fig. 5
the power supply.
be released.
VARIABLE-SPEED
17196
Fig. 3
by making a
Fig. 4
Fig. 6
\
BLADE SELECTION
In order to obtain the best
performance from the saw,
it is important to select the
correct blade for the particular
application and type of material
to be cut.
Page 12
17196
Manual_Revised_09
0526
Page 13
PIVOT SHOE
orbital action increases the efficiency of cutting. Experiment
material to determine the optimum orbital- action setting.
I Fig. 7
Sliding the Shoe In or Out
(Fig. 7)
For maximum
control
Orbital action increases the speed of cut, but may result in a rougher finish to
the cut in some materials.
and
longer blade life, the base
assembly slides in or out to
adjust the effective stroke
length.
1.
Disconnect
GENERAL
the saw from
3.
Loosen the shoe-release
_,
Fig. 8
position.
Pivoting the Shoe (Fig. 8)
The shoe pivots to provide
maximum control against the
surface being cut.
1.
Disconnect
the saw from
Hold the saw securely, and
then pivot the shoe to the
desired angle.
O
This reciprocating
saw has a
pendulum action to make the
blade swing slightly as it cuts.
to swing slightly backwards
and forwards as it cuts. This
Manual_Revised_09
0526
WARNING:
Hold the tool
Page 14
electrical
wiring. Sawing
into a
2.
Make sure that the workpiece is firmly anchored:
prevent slipping or moving while cutting.
3.
Use the appropriate
size.
4.
Adjust the pivot shoe as necessary to make sure that the blade will extend
beyond the shoe and the workpiece at all times.
4.
Adjust the pivot shoe as necessary to expose
blade life.
5.
Check for clearance
another surface.
6.
Clearly mark the line of cut on the workpiece.
oil on the line.
7.
Plug the reciprocating
8.
Hold the saw firmly with both hands. Make sure to keep your hands on the
insulated gripping areas only.
9.
Depress the trigger switch to start the saw and bring it to the maximum
desired cutting speed before applying the blade to the workpiece.
lever
has two positions. The first
position selects normal cutting
without orbital action. The
other position selects orbital
action and causes the blade
17196
\
Unplug the saw.
Fig. 9
Orbital-action adjustment
(Fig. 9)
The orbital-action
\
1.
the power supply.
2.
I Fig. 10
only by the plastic handle and
the insulated grip area to help
prevent electrical shock. When
sawing into walls or floors you may encounter
"live" wire will cause electric shock.
Tighten the shoe-release
screws to lock the shoe in
the desired
(Fig. 10)
performs properly and returns
to the "OFF" position when
released.
screws with the hex key
(supplied), and slide
the shoe to the desired
position. The shoe can be
locked in any position.
CUTTING
WARNING:
in the
tool, alwaysBefore
checkplugging
to
determine that the switch
the power supply.
2.
on a piece of scrap
clamp the workpiece
type and size of blade for the workpiece
behind the workpiece
saw into an electrical
to
material and
unworn blade teeth for longer
so that the blade will not impact
If cutting
metal, apply cutting
outlet
10.
Do not force the tool. Place the shoe firmly on the workpiece while cutting.
Use only enough steady pressure on the blade to keep the saw cutting.
11.
Reduce pressure as the blade comes to the end of the cut.
17196
Manual_Revised_09
0526
Page 15
12.
Release the trigger switch. Allow the saw to come to a complete
before removing the blade from the workpiece.
13.
If sawing fiberglass, plaster, wallboard, or spackling compound, clean the
motor vents frequently with a vacuum or compressed air. These materials are
highly abrasive and may accelerate the wear on motor bearings and brushes.
stop
NOTE: Cutting speeds should vary with the workpiece. Hard materials,
metals, require lower speeds; for softer materials use higher speeds.
_,
WARNING:
careless
fraction
Do not allow familiarity
of a second
such as
with the saw to make you careless.
surfaces that cannot be cut from an edge, such as walls or floors. Plunge cutting
may be done two ways, depending on how the blade is inserted. Column A
shows how to plunge cut with the teeth of the blade facing down. Column B
shows how to plunge cut with the teeth of the blade facing up.
_,
WARNING:
1.
Unplug the saw
2.
Insert the blade into the tool. If
down toward the lower surface
A, resting the edge of the shoe
with the teeth facing up toward
as shown in Column B, resting
shown.
3.
With the tip of the blade just above the workpiece,
the tool to come to the desired speed.
4.
Carefully pivot the tool on the edge of the shoe, so that the moving saw
blade pierces the workpiece.
5.
As the blade starts cutting, continue to pivot the tool until the entire shoe
rests firmly on the workpiece. The guide the tool along your cutting line to
make the desired cut.
One
is enough to inflict serious injury.
PLUNGE CUTTING (Fig.11)
Your Craftsman
reciprocating
saw is ideal for plunge cutting directly
Do not plunge cut into metal surfaces.
the blade was inserted with the teeth facing
of the tool, hold the tool as shown in Column
on the workpiece. If the blade was inserted
the upper surface of the tool, hold the tool
the edge of the shoe on the workpiece as
into
Fig. 11
pull the trigger and allow
NOTE: To make plunge cutting easier, use a heavy gauge blade and install the
blade with the teeth facing upward as show in column B.
_,
WARNING:
To reduce the risk of explosion,
electric
shock and property
damage, always check the work area for hidden gas pipes, electrical
water pipes when making blind or plunge cut.
wires or
6.
stop before
Release the trigger switch. Allow the saw to come to a complete
removing the blade from the workpiece.
,_, WARNING:
To avoid loss of control and serious
blade reaches maximum
A_, WARNING:
speed before touching
injury, make sure that the
it to the workpiece.
Do not make plunge cuts in metal materials.
METAL CUTTING
The saw can be used to cut metals, such as sheet steel, pipe, steel rods,
aluminum, brass, and copper. Be careful not to twist or bend the saw blade. Do
not force.
The use of cutting oil is recommended when cutting soft metals and steel. Cutting
oil will keep the blade cool, increase cutting action, and prolong blade life.
_, WARNING:
fumes.
17196
Manual_Revised_09
0526
Page 16
Never use gasoline,
because normal sparking
could ignite the
1.
Securely clamp the workpiece in position, and make the cut close to the
clamping point in order to minimize workpiece vibration.
2.
When cutting conduit pipe or angle iron, clamp the workpiece
possible, and cut close to the vise.
17196
Manual_Revised_09
0526
in a vise, if
Page 17
3.
To cut thin sheet material, "sandwich" the material between pieces of
hardboard or plywood, and clamp the layers together in order to reduce
vibration and tearing of the material.
_,
WARNING:
A_, WARNING:
_1, WARNING:
by a qualified
_,
To ensure safety and reliability,
service technician
WARNING:
reciprocating
cleaning.
all repairs should
be performed
For your safety, always turn off the switch and unplug the
any maintenance
lubrication,
and maintenance
As a common-sense
and preventive
recommended
steps:
•
schedule
maintenance
or
should be maintained.
1.
Unplug the saw before
inspecting or replacing
brushes.
2.
Open the left or right cover
by loosening the locking
screw.
3.
Replace the carbon bushes
and keep the brushes clean
and sliding freely in their
guide channels.
practice, follow these
Inspect the blade; check it for wear or damage.
Keep the ventilation slots of the motor clean to prevent overheating of the
motor. Electric tools are subject to accelerated wear and possible premature
failure when they are used to work on fiberglass boats and sports cars,
wallboard, spackling compounds or plaster. The chips and grindings from
these materials are highly abrasive to electrical tool parts, such as bearings,
brushes, commutators,
etc. Consequently, it is not recommended that
this tool be used for extended work on any fiberglass material, wallboard,
spackling compound, or plaster. During any use on these materials, it is
extremely important that the tool is cleaned frequently by blowing with an air
jet.
•
_,
Use a soft clean and damp cloth to wipe the tool housing. A mild detergent
can be used but nothing like alcohol, gasoline or other cleaning agent. Never
use caustic agents to clean plastic parts.
WARNING:
Always
wear safety goggles
during power tool operations
wear a dust mask.
A_, WARNING:
When changing
blade to cool before removing
A_, WARNING:
or safety glasses with side shields
or when blowing
Keep the tool's
dust. If operation
a blade immediately
it to avoid possible
air vents unclogged
Water must never come
Replacement
brush sets are
available through Sears Parts
and Repair Centers.
Periodic maintenance of your reciprocating saw allows for long life and troublefree operation. The saw can generate considerable quantities of cutting residue.
A cleaning,
petroleum-
into the tool.
allow the
1
I
I Fig. 12
Locking
screw
NOTE: To reinstall the same brushes, make sure the brushes go back in the
same way they came out. This will avoid a break-in period.
4.
Install the left/right covers and tighten the locking screw, but do not overtighten. The saw should be allowed to "RUN IN" (run at no-load without a
blade) for 5 minutes before use, to seat the new brushes properly.
PROBLEM
CAUSE
The saw will not start
Not plugged
source
Blade cannot be
removed
Saw dust in the clamp
slot
is dusty, also
after operation,
gasoline,
REPLACEMENT OF CARBON BRUSHES (Fig. 12)
at a Sears Service Center.
saw from the power source before performing
Do not at any time let brake fluids,
based products, penetrating oils, etc. to come in contact with plastic parts.
Chemicals can damage, weaken or destroy plastic which may result in serious
personal injury.
SOLUTION
into power
Plug the saw into a
power source
Clean the clamp slot
with brush
burning.
and clean at all times.
A_, WARNING: Avoid using solvents when cleaning plastic parts. Most plastics
are susceptible to damage from various types of commercial
solvents and may
be damaged by their use. Use clean cloths to remove dirt, dust, oil, grease,
etc.
17196
Manual_Revised_09
0526
Page 18
17196
Manual_Revised_09
0526
Page 19
Reciprocating
Always
Saw MODEL NUMBER
320.17196
mention the Model Number when ordering
parts for this tool
29
28
15
17196
Manual_Revised_09
0526
Page 20
17196
1
3320686000
Right Handle
1
2
3320685000
Left Handle
1
3
3124207000
Right Cover
1
4
3124206000
Left Cover
1
5
4900272000
Speed Adjustor
1
6
4930004000
Connecter
1
7
4870378000
Switch
1
8
4540017000
Power Supply
9
4890462000
PCB Assembly
1
10
3120234000
Cord Anchorage
1
11
5610024000
Tapping
Screw
2
12
3124301000
Indicator
Cover
1
13
5610093000
Tapping
Screw
2
14
5610035000
Tapping
Screw
2
15
5610103000
Tapping
Screw
5
16
4960260000
Carbon
17
2800164000
Brush Holder
2
18
3660271000
Snailed
Spring
2
19
5610006000
Tapping
Screw
4
20
5610010000
Tapping
Screw
1
21
3124933000
Motor Housing
1
22
3120993000
Bearing Holder
1
23
5700008000
Ball Bearing
1
24
3700796000
Terminal
4
25
2740115000
Stator
1
26
5610049000
Tapping
27
3124205000
Fan Baffle
Manual_Revised_09
0526
Brush
Screw
Indicator
1
2
2
1
Page 21
17196
28
2750841000
Rotor
1
56
5670186000
Pin
29
3704086000
Bearing Clamping
1
57
3520336000
Oil Impreging
30
3700335000
Washer
1
58
3700197000
Washer
1
31
3121057000
Rubber
1
59
3550169000
Crank Roller
1
32
5700015000
Ball Bearing
1
60
5620399000
Hexagon
33
5660013000
Circlips
1
61
3660375000
Spring
2
34
3124208000
Support
1
62
3420830000
Bevel Support
1
35
3420653000
Gear Case
1
63
3520255000
Guiding
1
36
5660029000
E Ring
1
64
3704273000
Bearing Clamping
37
3124150000
Limit Plate
1
65
5650007000
Spring Washer
38
3402303000
Pendulum
1
66
5610030000
Thread
39
3660050000
Spring
1
67
5670185000
Pin
1
40
3700191000
Cap
1
68
3700546000
Felt Block
2
41
5610045000
Tapping
4
69
2822522000
Plunger Assy
1
42
3124131000
Front Handle
1
70
5660032000
Circlips
1
43
3704264000
Front Handle
1
71
3123512000
Sleeve
44
5650015000
Spring Washer
2
72
3660386000
Torsion
45
5620018000
Hexagon
2
73
5670199000
Pin
1
46
3122839000
Screw Cover
2
74
3551279000
Bush
1
47
2820166000
Pivot Shoe
1
75
5670182000
Pin
1
48
5700182000
Needle Bearing
1
76
3420679000
Rotate Bush
1
49
5660013000
Circlips
1
77
5660145000
Circlips
For Shaft
1
50
5620396000
Screw with Washer
2
78
3420826000
Gear Case Cover
1
51
2822482000
Gear Set
1
79
3402195000
Lever
1
52
3704188000
Counterweight
1
80
3660260000
Torsion
53
5620074000
Screw
1
81
3550727000
Shaft
54
3700352000
Washer
1
82
5610057000
Thread
55
3551281000
Crank Roller
1
83
3121045000
Cord Guard
Manual_Revised_09
0526
Plate
Ring
For Shaft
Lever Set
B
Screw
Support
Socket
Screw
For Shaft
Page 22
17196
Manual_Revised_09
0526
1
Bearing
Socket
Screw
Bearing
Forming
Plate
1
2
1
2
Screw
For Shaft
2
1
Spring
1
Spring
1
1
Forming
Screw
4
1
Page 23
[_:e) i =
17196
84
4810002000
Power Cord & Plug
1
85
5680031000
Hexagon
1
86
4930008000
Sleeve
2
87
4930038000
Receptacle
2
88
4860006000
Inner Wire
5
89
4930094000
Sleeve
2
90
4930030000
Receptacle
4
91
4930061000
Shark Teeth Terminal
4
92
5700025000
Needle Bearing
1
93
5670194000
Pin
1
94
3123891000
LED Holder
1
95
4890433000
PCB Assembly
1
96
3123890000
LED Cover
1
97
5620033000
Screw
2
Manual_Revised_09
0526
Wrench
Page 24
17196
Manual_Revised_09
0526
Page 25
Your Home
For expert troubleshooting and home solutions advice:
manage
home
www.managemyhome.com
For repair - in your home - of all major brand appliances,
lawn and garden equipment, or heating and cooling systems,
no matter who made it, no matter who sold it !
For the replacement parts, accessories and
owner's manuals that you need to do-it-yourself
For Sears professional installation of home appliances
and items like garage door openers and water heaters
1-800-4-MY-HOME
(1-800-469-4663)
www,sears,com
®
Call anytime, day or night
(U.S.A. and Canada)
www,sears,ca
Our Home
Forrepair
ofcaw-initems
likevacuums
lawnequipment
i
and electronics call anytime for the location of the nearest
Sears Parts & Repair Service Center
1"800-488"1222
(U.S.A.)
www.sears.com
1"800"469-4663
(Canada)
www.sears.ca
TO purchase a protection agreement on a product serviced by Sears:
1"800"827"6655
(U.S.A.)
Para pedir servicio de reparaci6n
a domicilio, y para ordenar piezas:
1-888-SU-HOGAR®
1"800"361"6665
(Canada)
Au Canada pour serv ce en franc_,a
s
1.800.LE.FOYERMC
(1-800-533-6937)
(1-888-784-6427)
www.sears.ca
SesIrS
@Sears Brands, LLC
® Registered Trademark / TMTrademark / SMService Mark of Sears Brands, LLC
® Marca Registrada / TMMarca de F__briea / SMMarca de Servieio de Sears Brands, LLC
MCMarque de commerce / MDMarque d6pos6e de Sears Brands, LLC