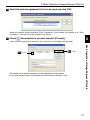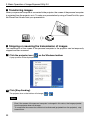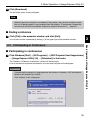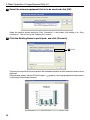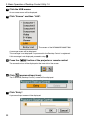
1
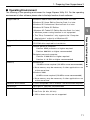
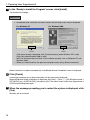
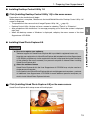
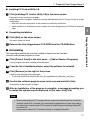
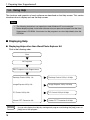
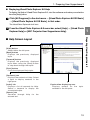
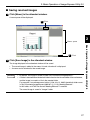
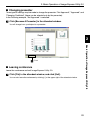
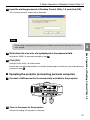
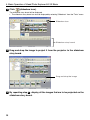
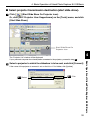
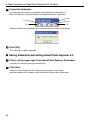
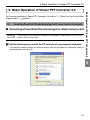
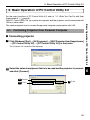
NEC Projector User Supportware 3 User's Guide 1 2. Basic Operation of Image Express Utility 2.0 2 3. Basic Operation of Desktop Control Utility 1.0 3 4. Basic Operation of Ulead Photo Explorer 8.0 SE Basic 4 5. Basic Operation of Viewer PPT Converter 3.0 5 6. Basic Operation of PC Control Utility 3.0 6 7. Appendix 7 POW ECT SEL P D STA CAR BY PC ND STA ON/ RCE SOU UST ADJ O AUT ORM REF 3D LAM TUS ER 1. Preparing User Supportware 3 This manual describes the software included on the supplied User Supportware 3 CD-ROM. 1 Introduction Thank you for purchasing the NEC projector. The User Supportware 3 CD-ROM contains the following five software programs to enable you to make effective presentations. Each program runs on Windows XP and Windows 2000. • • • • • Image Express Utility 2.0 Desktop Control Utility 1.0 Ulead Photo Explorer 8.0 SE Basic Viewer PPT Converter 3.0 PC Control Utility 3.0 This document explains the basic operations of the above software. For details of operations, refer to help function of the software. For the network settings on the personal computer, refer to the User's Manual for the personal computer or the peripheral equipment for the network. Use a wireless LAN card conforming to the Wi-Fi standard for your personal computer. NOTES (1) The contents of this guide may not be reprinted in part or whole without permission. (2) The contents of this guide are subject to change without notice. (3) Great care has been taken in the preparation of this guide; however, should you notice any questionable points, errors or omissions, please contact us. (4) Notwithstanding article (3), NEC will not be responsible for any claims on loss of profit or other matters deemed to result from using the Projector. 2 Notice: Please connect to a LAN Notice: Please connect to a LAN Before operating User Supportware 3 in accordance with the examples in this manual, set the LAN configurations in your personal computer and projector. *1 The examples of "5. Basic Operation of Viewer PPT converter 3.0" do not need connections to a LAN. (1) Connect a LAN cable or LAN card to the projector. For wired LAN Connect a commercially available LAN cable to the LAN port (RJ-45). For wireless LAN Insert NEC's optional wireless LAN card (NWL-100 series) into the PC card slot. (2) Set the LAN configurations in the projector. While displaying the on-screen menu for the projector, set the configurations as appropriate to the wired LAN or wireless LAN. (3) Set the LAN configurations in the personal computer. Set the LAN configurations in your personal computer. The "Network Setup Guide" manual which provides an example using Windows XP settings is included. (4) Operate each software program contained in User Supportware 3 Operate each software program according to the explanations in this manual. 3 Contents Contents Introduction ....................................................................................................2 Notice: Please connect to a LAN..................................................................3 Contents .........................................................................................................4 1. Preparing User Supportware 3 .................................................................5 1-1. What You Can Do with User Supportware 3 ........................................................ 5 1-2. Operating Environment ....................................................................................... 10 1-3. Installing User Supportware 3 ............................................................................ 12 1-4. Using Help ........................................................................................................... 18 2. Basic Operation of Image Express Utility 2.0 ......................................20 2-1. Sending Images to Projector .............................................................................. 20 2-2. Holding Conferences .......................................................................................... 23 2-3. Participating in Conference ................................................................................ 25 3. Basic Operation of Desktop Control Utility 1.0 ....................................30 3-1. Manipulating Desktop Screen by Using Projector .............................................. 30 4. Basic Operation of Ulead Photo Explorer 8.0 SE Basic ......................37 4-1. Sending Slideshow of Image to Projector .......................................................... 37 5. Basic Operation of Viewer PPT Converter 3.0 .....................................41 5-1. Converting PowerPoint file and displaying it with viewer function of projector .. 41 6. Basic Operation of PC Control Utility 3.0 .............................................45 6-1. Controlling Projector from Personal Computer .................................................. 45 7. Appendix ..................................................................................................48 7-1. Installation when User Supportware 2 has been Introduced ............................. 48 7-2. Troubleshooting .................................................................................................. 48 7-3. About the Downloading Service ......................................................................... 52 7-4. For Information .................................................................................................... 52 4 1. Preparing User Supportware 3 1. Preparing User Supportware 3 1-1. What You Can Do with User Supportware 3 ■ Image Express Utility 2.0 ( page 20) Image Express Utility 2.0 is a software tool used to send the screen of your personal computer to the projector via a network, without the signal cables. NEC's original compression algorithm allows high-quality images to be sent over the network at high speed, from your personal computer to the projector. SELECT 3D REFORM AUTO ADJUST SOURCE ON/ST PC LAMP CARD STATUS POWER AND BY PC USB CARD COMPONE NT LAN IN S-VIDEO IN VIDEO Cb/Pb IN AUDIO Cr/Pr IN COMPUTER L/MONOAUDIO 3 IN COMPUTER R 1 IN AUDIO OUT COMPUTER MONITOR OUT 2 IN PC CONTROL AC IN ● Simultaneous projection by multiple projectors Images can be sent from a personal computer to not only one projector but also to two or more projectors at the same time. SELECT 3D REFORM AUTO ADJUST SOURCE ON/STA PC LAMP CARD STATUS POWER ND BY PC USB CARD COMPONENT LAN IN S-VIDEO IN VIDEO Cb/Pb IN AUDIO Cr/Pr IN COMPUTER L/MONOAUDIO 3 IN COMPUTER R 1 IN AUDIO OUT COMPUTER MONITOR OUT 2 IN PC CONTROL AC IN SELECT 3D REFORM AUTO ADJUST SOURCE ON/STA PC LAMP CARD STATUS POWER ND BY PC USB CARD COMPONENT LAN IN S-VIDEO IN VIDEO Cb/Pb IN AUDIO Cr/Pr IN COMPUTER L/MONOAUDIO 3 IN COMPUTER R 1 IN AUDIO OUT COMPUTER MONITOR OUT 2 IN PC CONTROL AC IN 5 Preparing User Supportware 3 ● High-speed, high-quality image transmissions based on NEC's original compression algorithm 1 1. Preparing User Supportware 3 ● "Easy Connection" function for connecting wireless LAN By using "Easy Connection" function*1, the complicated setting of wireless LAN can be simplified. *1 This function can be used when Windows XP is used as the OS and when you have a "Computer Administrator" privilege. The communication mode is set to "802.11 Ad Hoc". The "Easy Connection" function cannot be used with Windows 2000. ● Projected images can be transferred and saved to personal computers. When "Meeting Mode" is used, projected images can be sent to the personal computers of all the participants (attendants) of a "Meeting". The received images can be saved to your personal computer with a memo (text data) attached. Attendant SELECT 3D REFORM AUTO ADJUST SOURCE ON/STAND PC LAMP CARD STATUS POWER BY PC USB CARD COMPONENT LAN IN S-VIDEO IN VIDEO Cb/Pb IN AUDIO Cr/Pr IN COMPUTER L/MONOAUDIO 3 IN COMPUTER R 1 IN AUDIO OUT COMPUTER MONITOR OUT 2 IN PC CONTROL AC Attendant IN Presenter Attendant ● 1-click switching of presenter When switching to another presenter during the conference, the participants (attendants) can simply click a button to switch over to the new presenter. ● Central management of the projecting personal computer Using the Training Mode allows you to use a single personal computer (Manager) to manage which personal computer (Attendant) projects. Possible operation includes switching projecting personal computers to project from, as well as temporarily terminating communication with the projector. Mr. D, please start your presentation. Manager SELECT 3D REFORM AUTO ADJUST SOURCE ON/STAND PC LAMP CARD STATUS POWER BY PC USB CARD COMPONENT LAN IN S-VIDEO IN VIDEO Cb/Pb IN AUDIO Cr/Pr IN COMPUTER L/MONOAUDIO 3 IN COMPUTER R 1 IN AUDIO OUT COMPUTER MONITOR OUT 2 IN PC CONTROL AC Attendant A Attendant B 6 IN Attendant D (presenter) Attendant C 1. Preparing User Supportware 3 Note The Training Mode is not installed via the "Typical" installation option when Image Express Utility 2.0 is installed. To use Training Mode, select "Extension" installation option on the install selection screen that is displayed while Image Express Utility 2.0 installation is in progress, and select "Training Mode (Attendant)" or "Training Mode (Manager)". 1 ■ Desktop Control Utility 1.0 ( page 30) ● A commercially available USB mouse is connected to the projector to operate the personal computer. ● Suppose, for example, a PowerPoint file to be presented in a conference is saved to a personal computer in your office. If this personal computer is connected to the projector in the conference room with LAN when the conference is held, the desktop screen of the personal computer in your office (Windows XP/Windows 2000) can be projected and the Power-Point file can be presented by operating the projector. In other words the personal computer does not need to be brought into the conference room. Conference room SELECT 3D REFORM AUTO ADJUST SOURCE ON/STAN PC LAMP CARD STATUS POWER D BY PC USB CARD COMPONENT LAN IN S-VIDEO IN VIDEO Cb/Pb IN AUDIO Cr/Pr IN COMPUTER L/MONOAUDIO 3 IN COMPUTER R 1 IN AUDIO OUT COMPUTER MONITOR OUT 2 IN PC CONTROL Office 7 Preparing User Supportware 3 Desktop Control Utility 1.0 is software that operates the desktop screen of a personal computer at a remote location from the projector by using a network. 1. Preparing User Supportware 3 Important • You can use the Desktop Control Utility 1.0 to operate a personal computer located in a separate room from the projector over a network. Therefore, care must be exercised to prevent any third party from viewing the screen of your personal computer (important documents), copying files, or turning off the power. NEC assumes no liability for any loss or damages arising from information leak or system failure while you are using Desktop Control Utility 1.0. • In the Windows operating system, click [Control Panel] → [Performance and Maintenance] → [Power Options] → [System Standby] → [Never]. This will disconnect LAN connection when the personal computer goes in the standby mode while the Desktop Control Utility 1.0 is being used. • The screen saver function is off while Desktop Control Utility 1.0 is running. ■ Ulead Photo Explorer 8.0 SE Basic ( page 37) Ulead Photo Explorer 8.0 SE Basic (hereafter referred to as "Ulead Photo Explorer 8.0") is a multimedia image file management tool developed by Ulead Systems, Inc. This tool has functions to capture images from a digital camera or scanner and to process or edit images, as well as image file management functions. In addition, slideshows and screen savers can also be easily created. ● Ulead Photo Explorer 8.0 in the User Supportware 3 CD-ROM has functions that allow you to use the projector more conveniently, in addition to the functions that come with the software, for when an NEC projector is connected. Additional functions are listed below. For details of each function, refer to the help function of Ulead Photo Explorer 8.0. 8 • Image transmission Sends images to the projector. • PowerPoint file conversion Converts a PowerPoint file into an image file. • Logo transfer Registers an image file as the logo data of the projector. • Capture Saves the screens of the personal computer as image files. • Slideshow start Sends the image of a slideshow to the projector and executes the slideshow on the projector. • Viewer output Converts a slideshow into an index file that can be played back by the viewer function of the projector and outputs the index file. 1. Preparing User Supportware 3 • Connection destination selection Select the projector to connect. ● The personal computer and projector may be connected with wired LAN or wireless LAN. ■ Viewer PPT Converter 3.0 ( page 41) Viewer PPT Converter 3.0 is software that converts files created with PowerPoint 95/97/2000/ 2002/2003 into an index file that can be displayed with the viewer function of the projector. ● If PowerPoint 2000/2002/2003 is installed in your personal computer, you can activate Viewer PPT Converter 3.0 from PowerPoint (PPT Converter add-in is automatically registered to PowerPoint). ■ PC Control Utility 3.0 ( page 45) PC Control Utility 3.0 is software that allows you to operate the projector from the personal computer when the personal computer and the projector are connected with LAN (wired or wireless) or a serial cable. ● You can operate the projector as follows from your personal computer. For details of each function, refer to the help function of PC Control Utility 3.0. • Power on/off • Input signal switching • Muting (temporarily disabling audio/video) • Freezing (locking the projected image) • Logo image transmission 9 1 Preparing User Supportware 3 ● When converting, specify a flash memory card or USB memory as the destination to which the index file is to be saved. Then you can easily make your presentation by simply inserting the flash memory card or USB memory into the projector (viewer function of the projector). 1. Preparing User Supportware 3 1-2. Operating Environment ■ Supported Projector User Supportware 3 supports the following NEC projector (as of February 2006) Reference 10 NP Series NP2000/ NP1000 LT Series LT380/ LT280 Some of software can be used with projectors other than the above projectors. For details, refer to the help function of each software. 1. Preparing User Supportware 3 ■ Operating Environment The following is the operating environment for Image Express Utility 2.0. For the operating environment of other software, please refer to the help function of each software. Supported OS Windows 2000 Professional Service Pack 4 or later Windows XP Home Edition Service Pack 2 or later Windows XP Professional Service Pack 2 or later Windows XP Tablet PC Edition (Windows XP Tablet PC Edition Service Pack 2 or later) 1 • Windows power-saving function is not supported. • The "Easy Connection" only supports the "Computer IBM PC/AT compatible personal computers CD-ROM drive required for installation CPU Sender personal computer Pentium MMX processor or higher required Pentium 800 MHz or higher recommended Recipient personal computer Pentium III 800 MHz or higher required Pentium 4 1.6 GHz or higher recommended Memory Windows XP 128 MB or more required (192 MB or more recommended) • More memory may be necessary if other applications run at the same time. Windows 2000 64 MB or more required (128 MB or more recommended) • More memory may be necessary if other applications run at the same time. Network environment TCP/IP-compatible LAN or wireless LAN environment required Resolution 1024 dots x 768 lines recommended Screen Colors High Color (15 bits, 16 bits) True Color (24 bits, 32 bits) • 256 or fewer colors are not supported. 11 Preparing User Supportware 3 Administrator" authority of Windows XP. Supported hardware 1. Preparing User Supportware 3 1-3. Installing User Supportware 3 Note • The following description applies to Windows XP. • When installing/uninstalling the software in Windows XP, you must log on as a user with "Computer Administrator" privileges. For Windows 2000, log on as a user with "Administrators" privileges. • To install the software in a PC with User Supportware 2 already installed, refer to "7.1 Installation when User Supportware 2 has been Introduced" ( page 48). ■ Installation ● Before starting installation Preparation: • Turn on your personal computer and start Windows. • Before starting the installation, exit all running applications. The installation may not complete properly if other applications are running. 1 Insert the User Supportware 3 CD-ROM into the CD-ROM drive. The following menu screen will be displayed. Reference 12 If the above menu is not displayed, follow these steps. 1. Click [Start] of Windows. 2. Click [Run...]. 3. In the [Open:] field, enter the CD-ROM drive name*1 (e.g., "Q:\") followed by "SETUP.EXE" (e.g., "Q:\SETUP.EXE). *1 The CD-ROM drive name will vary depending on your personal computer's configuration. 4. Click [OK]. The menu will be displayed. 1. Preparing User Supportware 3 2 Click [Please read this first]. "NEC Projector User Supportware 3 Readme File" will be displayed. 3 After reading the readme, click the [×] on the [Please read this first] window. The readme window will close. ● Installing Image Express Utility 2.0 1 Click [Installing Image Express Utility 2.0] on the menu screen. 2 Click [Next]. The "License Agreement" screen will be displayed. Carefully read the contents of the "END USER LICENSE AGREEMENT". 3 If you agree to the End User License Agreement, click [I accept the terms in the license agreement], then [Next]. The "Customer Information" screen will be displayed. 4 Input [User Name:] and [Organization:] and click [Next]. The "Destination Folder" screen will be displayed. • As necessary, change "Install this application for:" on the "Customer Information" screen. Usually, select "Anyone who uses this computer (all users)". 5 Confirm the installation destination and click [Next]. The "Setup Type" screen will be displayed. 6 Select [Typical] or [Extension] and click [Next]. "Ready to Install the Program" screen will be displayed. Typical Installs the standard function (Meeting Mode) of Image Express Utility 2.0 ( Extension page 6). Installs "Training (Attendant/Manager)" in addition to the standard function (Meeting Mode) of Image Express Utility 2.0 ( page 6). 13 1 Preparing User Supportware 3 Preparation for the installation will begin. Once the preparation is complete, the "Welcome to the InstallShield Wizard for Image Express Utility 2.0" screen will be displayed. 1. Preparing User Supportware 3 7 In the "Ready to Install the Program" screen, click [Install]. The installation will begin. Important • Immediately after installation has been started, the following screen may be displayed. For Windows XP Click For Windows 2000 Click If the above screen is displayed, click [Continue Anyway] when Windows XP is used. Click [Yes] when Windows 2000 is used. NEC has confirmed that the driver of this software correctly runs on Windows XP and Windows 2000. • When you install the driver, the personal computer screen will go blank momentarily. When installation has been completed, the "InstallShield Wizard Completed" screen is displayed. 8 Click [Finish]. A message prompting you to restart the system will be occasionally displayed. When the desktop screen of Windows is displayed, click [Start] → [Run...] → [CD-ROM drive name + SETUP.EXE (e.g., Q\:SETUP.EXE)], followed by [OK]. The menu screen of the User Supportware 3 CD-ROM will be displayed again. 9 When the message prompting you to restart the system is displayed, click [Yes]. Windows will be restarted. 14 1. Preparing User Supportware 3 ● Installing Desktop Control Utility 1.0 1 Click [Installing Desktop Control Utility 1.0] in the menu screen. Preparation for the installation will begin. When preparation is complete, "Welcome to the InstallShield Wizard for Desktop Control Utility 1.0" screen is displayed. • The procedure is the same as that of Image Express Utility 2.0 ( page 13). • Desktop Control Utility 1.0 does not have a screen for selecting "Typical" or "Extension". • After completion of the installation, if a message prompting you to restart the system is displayed, click [Yes]. • When the desktop screen of Windows is displayed, redisplay the menu screen of the User Supportware 3 CD-ROM. 1 Preparing User Supportware 3 ● Installing Ulead Photo Explorer 8.0 Important • Be sure to register your software. Technical support for Ulead Photo Explorer 8.0 is provided to registered users only. Note that user registration for Ulead Photo Explorer 8.0 included on the User Supportware 3 CD-ROM is possible only via the registration site that is displayed during the installation of the software. Be sure to connect your personal computer to Internet when installing Ulead Photo Explorer 8.0. • About the software license Ulead Photo Explorer 8.0 in the User Supportware 3 CD-ROM may only be used on a single personal computer. If you need to install Ulead Photo Explorer 8.0 onto multiple personal computers, purchase an additional User Supportware 3 CD-ROM for each additional personal computer you wish to install Ulead Photo Explorer 8.0 onto. 1 Click [Installing Ulead Photo Explorer 8.0] on the menu screen. Ulead Photo Explorer 8.0's setup screen will be displayed. 15 1. Preparing User Supportware 3 2 Click [Install Ulead Photo Explorer 8.0]. The “Welcome to Ulead Photo Explorer 8.0 SE Basic Setup” screen will be displayed. 3 Click [Next]. The “License Agreement” screen will be displayed. Carefully read the contents of the “End User License Agreement”. 4 If you agree to the End User License Agreement, click [Yes]. The “User Information” screen will be displayed. 5 Input [Name:] and [Company:], and click [Next]. The “Choose Destination Location” screen will be displayed. • This software does not require you to input the “Serial Number”. • After that, follow the instructions on the screen to continue with the installation. • When installation is complete, the menu screen of the User Supportware 3 CD-ROM is displayed again. ● Installing Viewer PPT Converter 3.0 1 Click [Installing Viewer PPT Converter 3.0] on the menu screen. Preparation for the installation will begin. When preparation is complete, the “Welcome to the InstallShield Wizard for Viewer PPT Converter 3.0” screen is displayed. • After that, follow the instructions on the screen to continue the installation. • When installation is complete, the menu screen of the User Supportware 3 CD-ROM is displayed again. Note • When Viewer PPT Converter 3.0 has been installed, once start Viewer PPT Converter 3.0 once with the privilege used for installation. Then exit from Viewer PPT Converter 3.0 without doing anything. • Starting Click Window’s [Start] → [All Programs] → [NEC Projector User Supportware] → [Viewer PPT Converter 3.0] → [Viewer PPT Converter 3.0], in that order. 16 1. Preparing User Supportware 3 ● Installing PC Control Utility 3.0 1 Click [Installing PC Control Utility 3.0] in the menu screen. Preparation for the installation will begin. When preparation is complete, "Welcome to the InstallShield Wizard for PC Control Utility 3.0" screen is displayed. • After that, follow the instructions on the screen to continue the installation. • When installation is complete, the menu screen of the User Supportware 3 CD-ROM is displayed again. 1 ● Completing installation Preparing User Supportware 3 1 Click [Exit] on the menu screen. The menu screen will close. 2 Remove the User Supportware 3 CD-ROM from the CD-ROM drive. ■ Uninstalling The following procedure removes the installed software from the hard disk. Uninstall one software program at a time. 1 Click [Control Panel] in the start menu → [Add or Remove Programs]. A list of programs currently installed will be displayed. 2 From the list of installed software, select the software to uninstall. 3 Click [Remove] on the right of the screen. A confirmation message will be displayed. • To uninstall Ulead Photo Explorer 8.0, click [Change/Remove], [Remove], and [Next]. 4 Confirm the software program name to be removed and click [Yes]. Uninstallation of the program will begin. 5 After an installation of the program is complete, a message prompting you to restart the system may be displayed. In this case, click [Yes]. Note • When installing Viewer PPT Converter 3.0 onto a personal computer that has PowerPoint installed, Viewer PPT Converter 3.0 is automatically registered as a Power-Point add-in. It is necessary to cancel Viewer PPT Converter 3.0 add-in before uninstalling Viewer PPT Converter 3.0. Please refer to Viewer PPT Converter 3.0 Help to unregister the add-in. 17 1. Preparing User Supportware 3 1-4. Using Help The functions and operation of each software are described on the Help screen. This section introduces how to display and use the Help screen. Note • The following instructions use operations under Windows XP as an example. • Before displaying Help, install each software onto your personal computer from the User Supportware 3 CD-ROM. You cannot run the programs nor view Help directly from the CD-ROM. ■ Displaying Help ● Displaying Helps other than Ulead Photo Explorer 8.0 Click in the following order. Start All Programs NEC Projector User Supportware Desktop Control Utility 1.0 Desktop Control Utility 1.0 Help Image Express Utility 2.0 Image Express Utility 2.0 Help PC Control Utility 3.0 PC Control Utility 3.0 Help Viewer PPT Converter 3.0 Viewer PPT Converter 3.0 Help Reference 18 You can also display the Help by starting each program and clicking the [Help] menu or [Help] icon of that program. 1. Preparing User Supportware 3 ● Displaying Ulead Photo Explorer 8.0 Help To display the Help of Ulead Photo Explorer 8.0, start the software and make your selection from the [Help] menu. 1 Click [All Programs] in the start menu → [Ulead Photo Explorer 8.0 SE Basic] → [Ulead Photo Explore 8.0 SE Basic], in that order. The Ulead Photo Explorer 8.0 will start. 2 From the Ulead Photo Explorer 8.0 menu bar, select [Help] → [Ulead Photo Explorer Help] or [NEC Projector User Supportware Help]. Preparing User Supportware 3 ■ Help Screen Layout [Hide] button Shows/hides the left pane. [Back] button Displays the previously displayed topic. [Forward] button Displays the previously displayed topic when using the [Back] button to step back through the topics. [Print] button Prints the displayed Help topic. [Contents] tab Displays the contents of Help. Select a topic to display contents in the right pane. [Index] tab Displays a list of keywords for Help. Select a keyword to display the associated topics. [Search] tab Searches through entered text. Help for 1 Explanation displaying area Displays content for the selected in the left pane. topic the 19 2. Basic Operation of Image Express Utility 2.0 2. Basic Operation of Image Express Utility 2.0 This section explains the following three cases as examples of operating Image Express Utility 2.0. (1) Transferring images to the projector (2) Holding a conference (3) Participating in a conference For the major functions of Image Express Utility 2.0, refer to "1-1. What You Can Do with User Supportware 3" ( page 5). 2-1. Sending Images to Projector ■ Connecting projector 1 Turn on the power to the projector for which LAN has been set. 2 Click Windows [Start] → [All Programs] → [NEC Projector User Supportware] → [Image Express Utility 2.0] → [Presenter], in that order. The "Selection Of Network Connections" window will be displayed. A list of the network equipment connected to your personal computer will be displayed. Important A screen like the one below is displayed when the software is started on a PC installed with Windows XP Service Pack 2 (SP2). Click “Unblock” if this is displayed. 20 2. Basic Operation of Image Express Utility 2.0 3 Select the network equipment that is to be used and click [OK]. Select the network device displaying “Easy Connection” if the product LAN setting is for “Easy Connection.” This will call up the “Projector List” window. 4 Check( 2 ) the projector to connect and click [Connect]. If the name of the projector to connect is not on the list or if it is hidden, click [Update]. Click 4-2 Basic Operation of Image Express Utility 2.0 4-1 Click The screen of your personal computer will be projected from the projector. At this time, the input signal of the projector will automatically change to "LAN". 21 2. Basic Operation of Image Express Utility 2.0 ■ Transferring images When your personal computer is connected to the projector, the screen of the personal computer is projected from the projector as is. To make your presentation by using a PowerPoint file, open the PowerPoint file and start your presentation. SELECT 3D REFORM AUTO ADJUST SOURCE ON/ST PC LAMP CARD STATUS POWER AND BY PC USB CARD COMPONE NT LAN IN S-VIDEO IN VIDEO Cb/Pb IN AUDIO Cr/Pr IN COMPUTER L/MONOAUDIO 3 IN COMPUTER R 1 IN AUDIO OUT COMPUTER MONITOR OUT 2 IN PC CONTROL AC IN ■ Stopping or resuming the transmission of images The transmission of the screen of the personal computer to the projector can be temporarily stopped and then resumed. 1 Click the projector icon ( ) on the Windows taskbar. A pop-up menu will be displayed. 2 Click [Stop Sending]. The projector icon on the taskbar will change ( → ). Note Even if the screen of the personal computer is changed in this status, the image projected from the projector does not change. To manipulate the screen that should not be disclosed (projected from the projector), stop transmission. 22 2. Basic Operation of Image Express Utility 2.0 3 Click the projector icon ( ) on the Windows taskbar. A pop-up menu will be displayed. 4 Click [Start Sending]. The projector icon on the taskbar will change ( → ). The transmission of the screen for the personal computer will be resumed, and the current screen of the personal computer will be projected from the projector. ■ End the transmission of images Exit Image Express Utility 2.0. 1 Click the projector icon ( 2 ) on the Windows taskbar. A pop-up menu will be displayed. 2-2. Holding Conferences ■ Holding conferences 1 Follow steps 1 through 4 in "Connecting projector" of "2-1. Sending Images to Projector" ( page 20). The screen of your personal computer will be projected from the projector. ■ Disclose a file to the participants of the conference. Note • To disclose a file to the participants, selection can be made only in folder units. Therefore, a folder only having files that can be disclosed to the participants must be created in advance. 23 Basic Operation of Image Express Utility 2.0 2 Click [Exit]. 2. Basic Operation of Image Express Utility 2.0 1 Click the projector icon ( ) on the Windows taskbar. A pop-up menu will be displayed. 2 Before clicking [Sent to PC and Projector], check that there is a “•” mark applied. 3 Click the [Image Express Utility 2.0] button on the taskbar. The presenter window will be opened. 4 Click [Select Folder]. 4 Click 5 Select a folder saving the file to be disclosed to the participants, and click [OK]. The file in the selected folder will be displayed in the list of files to transfer. 24 2. Basic Operation of Image Express Utility 2.0 6 Click [Download]. The file will be shown to the participants. Note When the personal computer is connected to the projector, the personal computer screen that is in of being progress is also projected from the projector. To manipulate a screen that should not be shown (not projected), temporarily stop the transmission ( page 22). ■ Ending conference 1 Click [File] in the presenter window, and click [Exit]. 2 You can also end the conference by clicking [×] at the upper right of the presenter window. ■ Participating in conferences 1 Click Windows [Start] → [All Programs] → [NEC Projector User Supportware] → [Image Express Utility 2.0] → [Attendant], in that order. The "Selection Of Network Connections" window will be displayed. A list of the network equipment connected to your personal computer will be displayed. Important A screen like the one below is displayed when the software is started on a PC installed with Windows XP Service Pack 2 (SP2). Click “Unblock” if this is displayed. 25 Basic Operation of Image Express Utility 2.0 2-3. Participating in Conference 2. Basic Operation of Image Express Utility 2.0 2 Select the network equipment that is to be used and click [OK]. Select the network device displaying “Easy Connection” if the product LAN setting is for “Easy Connection.” This will call up the “ Meeting List” window. 3 Click the Meeting Name to participate, and click [Connect]. 3 Click The personal computer will be connected to the selected conference and the attendant window will be displayed. page 24), the image projected from the projector If the presenter selects "Send to PC And Projector" ( is displayed in the attendant window. 26 2. Basic Operation of Image Express Utility 2.0 ■ Saving received images 1 Click [Memo] in the attendant window. A memo pane will be displayed. 2 Click 2 Memo pane Click 2 Click [Save Image] in the attendant window. The image displayed in the attendant window will be saved. • The saved image is added to the memo list and a thumbnail is displayed. • A memo can be attached to the saved image. Reference • By default, the image is saved to folder "My Documents\ImageExpress\". • A folder is created below the default folder based on the time and date of the conference, and the image is saved to a file in the created folder. For example, if a conference was held at 11:20, July 12, 2005, the default folder name is "My Documents\ImageExpress\2005-07-12_11-20_Meeting Records". In this folder, an HTML file named "Meeting Records" is created. The saved image is saved in "Images" folder. 27 Basic Operation of Image Express Utility 2.0 1 2. Basic Operation of Image Express Utility 2.0 ■ Downloading disclosed file 1 Click [File Transfer] in the attendant window. The "File Transfer" window will be opened. 1 Click 2 Select a file to download, and click [Download]. Downloading will begin. The progress of the downloading is displayed at the lower left of the window. 3 When downloading is complete, click [File] in the "File Transfer" window, and click [Exit]. The "File Transfer" window will be closed. Reference 28 • If "Open After Downloading" is checked, the file is opened by specified Windows application software after downloading is complete. • The default folder name for storing files is "My Documents\ImageExpress\". • A folder is created below the default folder based on the time and day of the conference, and the file is saved to a file in the created folder. For example, if a conference was held at 11:20, July 12, 2005, the default folder name is "My Documents\ImageExpress\2005-07-12_11-20_Meeting Records\download". 2. Basic Operation of Image Express Utility 2.0 ■ Changing presenter Three types of settings may be made to change the presenter: "Not Approved", "Approved", and "Changing Prohibited" (these can be selected only by the presenter). In the following example, "Not Approved" is selected. 1 Click [Become A Presenter] in the attendant window. You will change from a participant to a presenter. 2 Basic Operation of Image Express Utility 2.0 1 Click ■ Leaving conference Leave the conference and exit Image Express Utility 2.0. 1 Click [File] in the attendant window, and click [Exit]. You can also leave the conference by clicking [×] at the upper right of the attendant window. 29 3. Basic Operation of Desktop Control Utility 1.0 3. Basic Operation of Desktop Control Utility 1.0 For the major functions of the Desktop Control Utility 1.0, refer to "1-1. What You Can Do with page 7). User Supportware 3" ( 3-1. Manipulating Desktop Screen by Using Projector ■ Operation on personal computer 1 Click Windows [Start] → [All Programs] → [NEC Projector User Supportware] → [Desktop Control Utility 1.0] → [Desktop Control], in that order. The "Startup password settings" window will be displayed. Screen when Desktop Control Utility 1.0 is started first time already Screen if starting password has been set Important • Be sure to write down the starting password in case you forget it. • The starting password must be input each time Desktop Control Utility 1.0 is started. • Should you forget the starting password, reinstall the Desktop Control Utility 1.0. A screen like the one below is displayed when the software is started on a PC installed with Windows XP Service Pack 2 (SP2). Click “Unblock” if this is displayed. 30 3. Basic Operation of Desktop Control Utility 1.0 2 Input the starting password of Desktop Control Utility 1.0, and click [OK]. The "Current password" window will be displayed. Note The character string displayed in the password field varies each time Desktop Control Utility 1.0 is started. 3 Write down "NDKE" in the screen example of step 2 . 4 Click [OK]. Desktop Control Utility 1.0 will be started. Move to the room where the projector is installed, with the paper on which you have written down the password in step 3 . ■ Operating the projector (connecting personal computer) 1 Connect a USB mouse that is commercially available to the projector. USB USB LAN COMPUTER 3 IN PC CARD COMPONENT IN Y S-VIDEO IN Cb/Pb AUDIO IN COMPUTER 1 IN COMPUTER 2 IN AUDIO OUT MONITOR OUT PC CONTROL Cr/Pr AUDIO VIDEO IN L/MONO R AC IN 2 Turn on the power to the projector. Set the LAN setting of the projector in advance. 31 Basic Operation of Desktop Control Utility 1.0 3 Write down the character string displayed in the password field. 3. Basic Operation of Desktop Control Utility 1.0 3 Click the USB mouse. An on-screen menu will be displayed. 4 Click "Source" and then "LAN". * The screen of the NP2000/NP1000/LT380 A message screen will be displayed. This message is not displayed if a password for the Desktop Control is registered. If this message is not displayed, proceed to step 5 . 5 Press the button of the projector or remote control. The connection bar will be displayed at the lower left of the screen. 6 Click (password input icon). The "Password (Desktop Control)" screen will be displayed. 7 Click "Entry". A password input screen will be displayed. 32 3. Basic Operation of Desktop Control Utility 1.0 8 Click " ". The software keyboard will be displayed. 9 Input the password you have written down in step 3 of "Operation on 3 personal computer". 10 After inputting the password, click [OK] on the password input screen. The password input screen will be closed. 11 Click (PC search icon). The "PC Search" screen will be displayed. 33 Basic Operation of Desktop Control Utility 1.0 Items other than the characters in the software keyboard have the following functions. "BS" ........................ Deletes one character to the left of the character insertion position in the "Password" field. " " " " ................. Moves the character insertion position in the "Password" field to the left or the right. [OK] ........................ Finalizes the input character and closes the software keyboard. [Cancel] .................. Cancels the input character and closes the software keyboard. 3. Basic Operation of Desktop Control Utility 1.0 12 Click [OK]. A connection destination selection screen will be displayed. If the connection destination has not been found as a result of a PC search, search for the connection destination by inputting the IP address of the personal computer at the connection destination, click " " on the "PC Search" screen, and click "Input IP Address" and [OK]. 13 Click the personal computer at the connection destination and then [OK]. The desktop screen of the personal computer at the connection destination will be displayed. Note When the desktop screen is displayed, the on-screen menu is not displayed even if the USB mouse is clicked. To display the on-screen menu while the desktop screen is displayed, press the button of the projector or remote control twice. ■ Operating the projector (manipulating desktop screen) The displayed desktop screen can be manipulated by using the USB mouse connected to the button of the projector or remote control is pressed while the desktop projector. If the screen is displayed, an auxiliary operation bar is displayed at the lower left of the screen. Manipulate the auxiliary operation bar by using the buttons of the projector or remote control. 34 3. Basic Operation of Desktop Control Utility 1.0 <1> <2> <3> <4> (cut-off icon) ............. Disconnects communication with the personal computer. <2> (Shift icon) ............... When the highlight is moved to this icon and the button is pressed, shift lock status is set. The shift lock is canceled if the highlight is moved to this icon and the button is pressed again. <3> (Ctrl icon) ................. When the highlight is moved to this icon and the button is pressed, control lock status is set. The control lock is canceled button is if the highlight is moved to this icon and the pressed again. <4> (ESC icon) ............... The same operation as when the [ESC] key of the personal computer is pressed is performed. This icon is used, for example, to stop a slideshow of PowerPoint. ■ Operating the projector (disconnecting communications) 1 Press the button while the desktop screen is displayed. An auxiliary operation bar will be displayed at the lower left of the screen. 2 Move the highlight to (cut-off icon) and press the button. Communication will be disconnected and a connection bar will be displayed at the lower left of the screen. To resume communication, click (PC search icon). After that, follow steps 12 and 13 on the preceding page. Reference Communication can also be disconnected by clicking the projector icon on the taskbar and then clicking "Disconnect" while the desktop screen is displayed. 35 3 Basic Operation of Desktop Control Utility 1.0 <1> 3. Basic Operation of Desktop Control Utility 1.0 ■ Operating the projector (exiting Desktop Control Utility 1.0) 1 Click the projector icon [ displayed. ] on the taskbar while the desktop screen is 2 Click [Exit]. Desktop Control Utility 1.0 will be terminated. 3 Click the USB mouse. A connection bar will be displayed at the lower left of the screen. 4 Click the USB mouse once again. The on-screen menu will be displayed. 5 Click "Source" and click an input source other than "LAN". The on-screen menu will be closed. 36 4. Basic Operation of Ulead Photo Explorer 8.0 SE Basic 4. Basic Operation of Ulead Photo Explorer 8.0 SE Basic For major functions of Ulead Photo Explorer 8.0 SE Basic (hereafter referred to as "Ulead Photo page 8). Explorer 8.0"), refer to "1-1. What You Can Do with User Supportware 3" ( 4-1. Sending Slideshow of Image to Projector ■ Move an image to the slideshow story board. 1 Click Windows [Start] → [All Programs] → [Ulead Photo Explorer 8.0 SE Basic] → [Ulead Photo Explorer 8.0 SE Basic], in that order. Ulead Photo Explorer 8.0 will be started. 2 Display the thumbnail of the needed image by manipulating the folder list. 4 Folder list Basic Operation of Ulead Photo Explorer 8.0 SE Basic 37 4. Basic Operation of Ulead Photo Explorer 8.0 SE Basic 3 Click (slideshow icon). The slideshow story board will be displayed. • The slideshow story board can also be displayed by selecting "Slideshow" from the "Tools" menu. Slideshow icon Slideshow story board 4 Drag and drop the image to project it from the projector to the slideshow story board. Drag and drop the image 5 By repeating step 4 , display all the images that are to be projected on the slideshow story board. 38 4. Basic Operation of Ulead Photo Explorer 8.0 SE Basic ■ Select projector transmission destination (start slide show). 1 Click [ ] (Start Slide Show On Projector icon). Or, click [NEC Projector User Supportware] on the [Tools] menu, and click [Start Slide Show]. Start Slide Show On Projector icon 4 The "Projector List" window will be displayed. If your personal computer has already been connected to the projector, proceed to step 4 . If the name of the projector to connect is not on the list or if it is hidden, click [Update]. 2-1 Select 2-2 Click 39 Basic Operation of Ulead Photo Explorer 8.0 SE Basic 2 Select a projector to which the slideshow is to be sent, and click [Connect]. 4. Basic Operation of Ulead Photo Explorer 8.0 SE Basic 3 Project the slideshow. The slideshow will be sent to the projector and projected from the projector. While the slideshow is being transferred, the operation window is displayed. Back Pause Play Next Exit When the slideshow is completed, the following confirmation window is displayed. 4 Click [OK]. The slideshow has been completed. ■ Saving slideshow and exiting Ulead Photo Explorer 8.0 1 Click [×] at the upper right of the Ulead Photo Explorer 8.0 window. A window for confirming saving will be displayed. 2 Click [Yes]. After that, save the slideshow file, following the messages on the screen. After the slideshow file has been saved, Ulead Photo Explorer 8.0 is terminated. 40 5. Basic Operation of Viewer PPT Converter 3.0 For the major functions of Viewer PPT Converter 3.0, refer to "1-1. What You Can Do with User page 9). Supportware 3" ( 5-1. Converting PowerPoint file and displaying it with viewer function of projector ■ Converting a PowerPoint file and saving it to a flash memory card Reference To send data from the personal computer to the projector, USB memory, as well as flash memory card, can be used. 1 Set the flash memory card to the PC card slot of your personal computer. If an operation selection window for the flash memory card that has been set is displayed, select an appropriate item and click [OK]. Basic Operation of Viewer PPT Converter 3.0 5. Basic Operation of Viewer PPT Converter 3.0 5 41 5. Basic Operation of Viewer PPT Converter 3.0 2 Click Windows [Start] → [All Programs] → [NEC Projector User Supportware] → [Viewer PPT Converter 3.0] → [Viewer PPT Converter 3.0], in that order. Viewer PPT Converter 3.0 will be started. 3 Click [Browse], select a PowerPoint file to be converted, and click [Open]. 4 Click [Next]. 42 5. Basic Operation of Viewer PPT Converter 3.0 5 Select [Card Drive] and input [Index name]. 6 Click [Export]. A confirmation message will be displayed. Basic Operation of Viewer PPT Converter 3.0 Specify an index name using up to eight 1-byte alphanumeric characters. A long file name exceeding eight characters must not be specified. 7 Click [OK]. Outputting of the file will start. When outputting has been completed, a completion message is displayed. 5 8 Click [OK]. The "Viewer PPT Converter 3.0" window will be displayed again. 9 Click [Exit]. Viewer PPT Converter 3.0 will be terminated. 10 Remove the flash memory card from the personal computer. Note To remove the flash memory card from the PC card slot of the pesonal computer, click the "Safely Remove Hardware" icon on the taskbar. 43 5. Basic Operation of Viewer PPT Converter 3.0 ■ Projecting image by using viewer function of projector 1 Turn on the power to the projector. 2 Set the flash memory card to which the converted PowerPoint file has been output to the projector. Note If the wireless LAN card has already been set to the projector, turn off the power to the projector once, and remove the wireless LAN card. Then set the flash memory card to the projector, and turn on the power to the projector. 3 Press the button of the remote control. The input source of the projector will change to "Viewer" and the image output to the flash memory card will be projected. • To use the button of the projector, press the button and select "Viewer". • For the operatoin of the “Viewer,” refer to the User’s Manual (in User’s Manual CD-ROM). • To end the "Viewer", select another input signal by pressing the COMPUTER 1 button of the remote control. 4 When the viewer ends, remove the flash memory card from the projector. Note Do not remove the flash memory card while the PC card access indicator lights. Otherwise, the flash memory card may be damaged. 44 6. Basic Operation of PC Control Utility 3.0 6. Basic Operation of PC Control Utility 3.0 6-1. Controlling Projector from Personal Computer ■ Connecting projector 1 Click Windows [Start] → [All Programs] → [NEC Projector User Supportware] → [PC Control Utility 3.0] → [PC Control Utility 3.0], in that order. The “Projector List” window will be displayed. 2 Select the network equipmeut that is to be used and the projector to connect, and click [Connect]. 2-1 2-2 Select Click 3 Click 45 Basic Operation of PC Control Utility 3.0 For the major functions of PC Control Utility 3.0, refer to "1-1. What You Can Do with User page 9). Supportware 3" ( With PC Control Utility 3.0, your personal computer and the projector can be connected with LAN or a serial cable. This section explains how to connect the personal computer and projector with LAN. 6 6. Basic Operation of PC Control Utility 3.0 3 Click [Connect]. Connection with the projector will start. When the projector has been connected, the tool bar is displayed. ■ Controlling projector Control the projector by using the tool bar. <1> <2> <3> <4> <5> <6> <7> <8> <1> System button ................ Displays a submenu for "Hide tool bar", "Reconnect", "Cancel", and "Exit". <2> Power button ................. Each time this button is clicked, power is turned on and off. <3> Source select button ...... Each time this button is clicked, the input signal is selected. <4> Mute button .................... When this button is clicked, the video and audio are temporarily muted. Clicking it once again restores the original condition. <5> Freeze button ................. Clicking this button makes motion pictures still. <6> Logo Transfer button ...... Transfers edited image data to the logo screen of the projector. <7> Option button ................. Sets options. <8> Help button .................... Displays the help for PC Control Utility 3.0. 46 6. Basic Operation of PC Control Utility 3.0 ■ Exiting PC Control Utility 3.0 1 Click the system button on the tool bar. The submenu will be displayed. Basic Operation of PC Control Utility 3.0 2 Click [Exit]. PC Control Utility 3.0 will be terminated. 6 47 7. Appendix 7. Appendix 7-1. Installation when User Supportware 2 has been Introduced To install User Supportware 3 to the PC to which User Supportware 2 has been introduced, uninstall User Supportware 2 and then install User Supportware 3. If you install User Supportware 3 without uninstalling User Supportware 2, the following situation may occur depending on the application. ■ Viewer PPT Converter 3.0 The names of install folder and program menu are not updated. In addition, because the item names in [Tools] menu of PowerPoint are not updated, two tool bars are registered. Use the program as it is with reading the menu titles in this document and help file corresponding to the actual indications or uninstall and then re-install the software. ■ PC Control Utility 3.0 The names of install folder and program menu are not updated. Use the program as it is with reading the menu titles in this document and help file corresponding to the actual indications or uninstall and then re-install the software. 7-2. Troubleshooting Also refer to the description of troubleshooting in the help function of each software program. * The software names are abbreviated as follows in this Appendix. Image Express Utility 2.0 .................... Desktop Control Utility 1.0 ................... Ulead Photo Explorer 8.0 .................... Viewer PPT Converter 3.0 .................. PC Control Utility 3.0 ........................... IEU2.0 DCU1.0 PEX8.0 PPTC3.0 PCON3.0 ■ Installation is not completed correctly. (IEU2.0/DCU1.0/PEX8.0/PPTC3.0/PCON3.0) Check • • Action 48 Did you log on with the "Administrators" privilege (when Windows 2000 is used)? Did you log on with the "Computer Administrator" privilege (when Windows XP is used)? Log on with the above privileges to Windows 2000 or Windows XP and install the program. 7. Appendix ■ Installation is not completed correctly (PPTC3.0). Check Is PowerPoint installed in the personal computer to which Viewer PPT Converter 3.0 is to be installed? If Viewer PPT Converter 3.0 is installed in a personal computer to which PowerPoint is not installed, the following message is displayed in the middle of installation. "Error 1904. There was an error in registering the Add-In function. Please check that Microsoft PowerPoint 2000 or later is installed and start over from the installation." Action Confirm that PowerPoint 2000 or later is installed to your personal computer, and reinstall Viewer PPT Converter 3.0. ■ The following screen is displayed while installing (IEU2.0/DCU1.0). Windows XP If [STOP Installation] (Windows XP) or [No] (Windows 2000) is clicked on the following screen while the installation of Image Express Utility 2.0 or Desktop Control Utility 1.0 in progress. Windows XP Appendix Check Windows 2000 Windows 2000 7 Action Select Windows [Control Panel] → [Add or Remove Programs], and remove (uninstall) the software whose installation has been stopped. Then reinstall the software. 49 7. Appendix ■ To cancel the add-in function of PowerPoint (PPTC3.0) Check Add-in to PowerPoint is automatically registered if Viewer PPT Converter 3.0 is installed to a personal computer to which PowerPoint 2000/2002/ 2003 is installed. Action For how to cancel the add-in function of PowerPoint, refer to the help function of Viewer PPT Converter 3.0. Be sure to cancel the add-in function of PowerPoint before uninstalling Viewer PPT Converter 3.0. ■ No image can be projected onto the screen by using LAN environment (IEU2.0/DCU1.0). Check Image Express Utility 2.0 and Desktop Control Utility 1.0 do not support the following. (1) Software using DirectX. (2) A Video screen may not be sent if video playback software is started first or if in an ordinary personal computer environment. Action Check • • Action To use this software on a personal computer where the personal firewall function is used, setting of the personal firewall function may be necessary. If the personal computer cannot communicate correctly with the projector, change the setting of the personal firewall function. For how to set the personal firewall function, refer to the User's Manual of the software, or consult the software developer. Isn't the personal firewall function used on your personal computer? Is Windows XP Service Pack 2 (SP2) installed? If Windows XP Service Pack 2 (SP2) is installed, the setting of the firewall is enabled. ■ Colors are not displayed correctly if the number for colors of Windows is 256 or fewer colors (IEU2.0/DCU1.0). Check Image Express Utility 2.0 and Desktop Control Utility 1.0 do not support 256 or fewer colors. Action Set the number of colors of Windows to High Color (15 bits) or more. Depending on the application software, the number of colors changes when the full screen is displayed. 50 7. Appendix ■ It takes time to send images from the personal computer to the projector (IEU2.0). Check • • • • Depending on the image, it takes time to send. To send images to two or more projectors at the same time, the transmission time increases as the number of projectors increases. The transmission time may vary depending on the network environment. The transmission time may vary depending on the performance of the personal computer and on the other application software running at the same time. Action Check If the resolution of the personal computer is different from that of the projector, the transmission time increases because the resolution must be converted. Action It is recommended to set resolution for both the personal computer and projector as the same. To send images to the NP2000/NP1000/LT380/LT280, set the resolution of the personal computer to 1024 × 768 dots. Check Depending on the personal computer and application software, some of the screen's graphics and characters may not be sent to the projector. Appendix ■ The image projected from the projector is different from the screen of the personal computer (IEU2.0/DCU1.0). 7 Action ■ The slideshow screen of PowerPoint cannot be selected (IEU2.0/DCU1.0). Check If Image Express Utility 2.0 or Desktop Control Utility 1.0 is started while PowerPoint is running, the slideshow screen cannot be selected. Action Exit PowerPoint once and then restart it. 51 7. Appendix ■ The screen of the personal computer on the sender side is distorted or the colors are strange (IEU2.0/DCU1.0). Some application software automatically changes the resolution and the number of colors. Such application software is not supported. Check Action 7-3. About the Downloading Service For update information on NEC Projector User Supportware 3 (Image Express Utility 2.0, Desktop Control Utility 1.0, Viewer PPT Converter 3.0, and PC Control Utility 3.0) refer to the NEC Projector's support page (http://www.nec-pj.com). 7-4. For Information ■ Ulead Photo Explorer 8.0 Visit: http://www.ulead.com/pex ■ Other software • • Image Express Utility 2.0 Viewer PPT Converter 3.0 Visit: 52 http://www.nec-pj.com • • Desktop Control Utility 1.0 PC Control Utility 3.0 • • • • IBM and PC/AT are registered trademarks of International Business Machines Corporation. Microsoft, Windows, PowerPoint, MS, MS-DOS, and DirectX are registered trademarks or trademarks of Microsoft Corporation in the U.S. or other countries. Ulead Systems and Photo Explorer are registered trademarks of Ulead Systems, Inc. Other manufacturer names and product names in this document are registered trademarks or trademarks of the respective companies. NEC Viewtechnology, Ltd. 2005 - 2006 Second edition February 2006 Reproduction, modification, and other uses are prohibited without the permission of NEC Viewtechnology, Ltd. ■ ■ ■ ■ ■ Image Express Utility 2.0 Desktop Control Utility 1.0 Ulead Photo Explorer 8.0 SE Basic Viewer PPT Converter 3.0 PC Control Utility 3.0 User Supportware 3 User’s Guide NEC Projector User Supportware 3