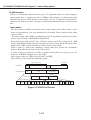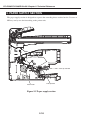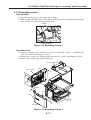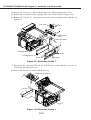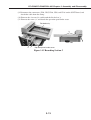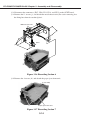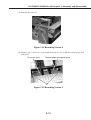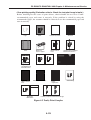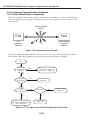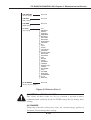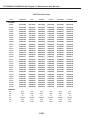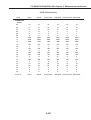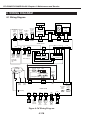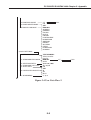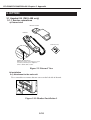
1
REVISION 0
PC-D320
H12-2553
PC-D340
H12-2563
FAX-L400
H12-2573
FAX-L400
H12-2575
FAX-L400
H12-2577
HANDSET APPARATUS
JAN. 2003
COPYRIGHT © 2003 CANON INC.
230V EC/UK/GER/FRN/
SWI/AST/SAF
230V EC/UK/GER/FRN/
SWI/AST/SAF
230V EC/UK
230V GER
230V FRN
HY8-10AX-000
CANON PC-D320/340 FAX-L400 JAN. 2003
Application
This manual has been issued by Canon Inc. for qualified persons to learn technical theory, installation, maintenance,
and repair of products. This manual covers all localities where the products are sold. For this reason, there may be
information in this manual that does not apply to your locality.
Corrections
This manual may contain technical inaccuracies or typographical errors due to improvements or changes in products.
When changes occur in applicable products or in the content of this manual, Canon will release technical information
as the need arises. In the event of major changes in the contents of this manual, Canon will issue a new editions of
this manual.
The following paragraph does not apply to any countries where such provisions are inconsistent with local law.
Trademarks
The product names and company names described in this manual are the registered trademarks of the individual
companies.
Copyright
This manual is copyrighted with all rights reserved. Under the copyright laws, this manual may not be copied,
reproduced or translated into another language, in whole or in part, without the written consent of Canon Inc.
Copyright © 2003 by Canon Inc.
CANON INC.
Consumer Imaging Products Quality Assurance Dept. 1
5-1 Hakusan 7-Chome, Toride-city, Ibaraki 302-8501, Japan
DTP System
The data contained on this manual were created using Windows 2000® computers.
Document creation and page layout were performed using Adobe® PageMaker® 6.5.
Logos and illustrations were created using Adobe® Illustrator® 9.0.
I. MEANING OF MARKS
The marks used in this manual have the following meanings.
Mark
Meaning
States a precaution to be taken to prevent danger to personnel, damage to
the product, or damage to electronic components by discharge of static
electricity. for example.
States a precaution to be taken to prevent damage to electronic components
by electrostatic discharge.
If the following mark is used, following the directions given.
Informs you of fire-related cautions.
Informs you that the plug must be removed from the power outlet before
starting an operation.
Gives useful information to understand descriptions.
NOTE
Indicates sections to be read to obtain more detailed information.
REFERENCE
I
II. ABOUT THIS MANUAL
This manual is divided into five parts, and contains information required for servicing the
product.
Each of the above parts is further divided into the following four chapters:
Chapter 1: General Description
This part explains product specifications and the how to service the unit safely. It is very
important, so please read it.
Chapter 2: Technical Reference
This part explains the technical theory the product.
Chapter 3: Assembly and Disassembly
This part explains the assembly and disassembly of the product.
Chapter 4: Maintenance and Service
This part explains how to maintain the products for adjustment and troubleshooting and
service operations and service switches.
Chapter 5: Appendix
This part explains the informations of the optional products and user data flow.
REFERENCE
• For more details of user operations and user reports, see the separate volume
of Basic Guide and Printer Guide.
• Detailed description of each SSSW/parameter is not given in this manual
except the new SSSWs/parameters added to this model.
See G3 Facsimile Service Data Handbook (supplied separately) for
details them.
II
III. REVISION HISTORY
REVISION
0
CONTENT
Original
III
IV. TABLE OF CONTENTS
Page
1- 1
1- 1
1- 1
1- 2
1- 2
1- 3
1- 5
1- 7
1 -10
1 -10
1 -13
1 -16
1 -16
1 -19
1 -24
1 -24
1 -26
Chapter 1: General Description
1. FEATURES
1.1 Overview
1.2 Option overview
2. SPECIFICATIONS
2.1 General Specifications
2.2 Communication Specifications
2.3 Scanner Specifications
2.4 Printer Specifications
2.5 Copy Specifications
2.6 Functions
2.7 Interface Specifications
3. OVERVIEW
3.1 External View
3.2 Operation Panel
3.3 Consumables
3.3.1 Toner Cartridge
3.3.2 Print media
2- 1
2- 1
2- 2
2- 4
2- 6
2- 7
2 -10
2 -11
2 -11
2 -12
2 -12
2 -12
2 -12
2 -12
2 -12
2 -12
2 -14
2 -15
2 -16
2 -16
2 -17
2 -17
2 -18
Chapter 2: Technical Reference
1. COMPONENT LAYOUT
1.1 Parts Layout
1.2 Printed Circuit Boards Layout
1.3 Sensors Layout
2. SCANNER SECTION
2.1 Names and Functions of Parts
3. PAPER SUPPLY SECTION
3.1 Recording Paper Pick-up Function
3.1.1 Paper size error
3.2 Recording Paper Jam Detection Configuration
3.2.1 Pick-up delay jam
3.2.2 Pick-up stationary jam
3.2.3 Delivery delay jam
3.2.4 Wrapping jam
3.2.5 Delivery stationary jam
3.2.6 Residual paper jam
4. PRINTER SECTION
4.1 Laser/Scanner Section
4.2 Toner Cartridge
4.3 Toner Transfer Section
4.4 Fixing Section
4.4.1 Fixing unit Malfunction
5. NEW FUNCTION
IV
Chapter 3: Assembly and Disassembly
3- 1
1. ATTENTION TO BE PAID DURING ASSEMBLY/ DISASSEMBLY
3- 1
1.1 Safety Cautions
3- 2
1.2 General Cautions
3- 3
1.3 Product-Inherent Cautions
3- 4
1.4 All Clear (Action in the Event of Abnormality)
3- 5
2. DISASSEMBLY/ASSEMBLY
3- 5
2.1 Disassembly Procedure
3- 5
2.1.1 Document feed section
3 -11
2.1.2 Recording section
3 -17
2.1.3 Fixing section
4- 1
4- 1
4- 1
4- 2
4- 2
4- 2
4- 2
4- 2
4- 3
4- 3
4- 3
4- 3
4- 3
4- 3
4- 3
4- 3
4- 3
4- 3
4- 5
4- 5
4- 5
4- 5
4- 5
4- 5
4- 5
4- 5
4- 5
4- 7
4- 7
4- 8
Chapter 4: Maintenance and Service
1. MAINTENANCE LIST
1.1 Consumables
1.2 Cleaning
1.3 Periodic Inspection
1.4 Periodic Replacement Parts
1.5 Adjustment Items
1.6 General Tools
1.7 Special Tools
2. HOW TO CLEAN PARTS
2.1 Main Unit Outer Covers
2.2 Platen Glass
2.3 Platen Glass Cover
2.4 Document Pick-up Roller for PC-D340/FAX-L400 only
2.5 Document Separation Roller for PC-D340/FAX-L400 only
2.6 Document Separation Guide for PC-D340/FAX-L400 only
2.7 Document Feed Roller for PC-D340/FAX-L400 only
2.8 Document Eject Roller for PC-D340/FAX-L400 only
2.9 White Sheet for PC-D340/FAX-L400 only
2.10 Transfer Guide
2.11 Paper Pick-up Roller
2.12 Separation Guide
2.13 Transfer Charging Roller
2.14 Static Charge Eliminator
2.15 Paper Feed Belt
2.16 Fixing Entrance Guide
2.17 Fixing Film
2.18 Fixing Pressure Roller
3. ADJUSTMENT
3.1 Checking the Nip Width of the Pressure Roller
3.2 Gain Auto Adjustment
V
4- 9
4- 9
4 -11
4 -11
4 -15
4 -26
4 -26
4 -27
4 -34
4 -36
4 -42
4 -42
4 -42
4 -44
4 -45
4 -52
4 -53
4 -69
4 -69
4 -70
4 -71
4 -71
4 -72
4 -73
4 -77
4 -81
4 -81
4 -81
4 -83
4 -116
4 -116
4. TROUBLESHOOTING
4.1 Troubleshooting Index
4.2 Errors Shown on the Display
4.2.1 User error message
4.2.2 Error codes
4.3 Errors not Shown on the Display
4.3.1 General errors
4.3.2 Printing problems
4.3.3 Scanning problems
4.3.4 Test mode function problems
5. SERVICE SWITCHES
5.1 Hardware Switches
5.2 Service Data Setting
5.3 Service Data Registration/Setting Method
5.4 Service Data Flowchart
5.5 Explanation of SSSW (Service Soft Switch Settings)
5.6 New SSSWs/Parameters Added to this Model
6. TEST FUNCTIONS
6.1 Test Mode Overview
6.2 Test Mode Flowchart
6.3 D-RAM Tests
6.4 CCD Tests
6.5 Print Tests
6.6 Modem and NCU Tests
6.7 Faculty Tests
7. SERVICE REPORT
7.1 Report Output Function
7.1.1 User report output functions
7.1.2 Service report output functions
8. WIRING DIAGRAM
8.1 Wiring Diagram
5- 1
5- 1
5- 1
5- 2
5- 2
5 -10
5 -10
5 -10
Chapter 5: Appendix
1. INSTALLATION
1.1 Setting up
1.2 Checking Operation
2. USER DATA FLOW
2.1 User Data Flow (by Operation Panel)
3. OPTION
3.1 Handset Kit (FAX-L400 only)
3.1.1 Service operations
VI
Chapter 1
General
Description
PC-D320/PC-D340/FAX-L400 Chapter 1: General Description
1. FEATURES
1.1 Overview
Small-Sized Printer with High Speed and High Resolution
This Printer is compact enough to set on a desk and has realized high speed of 15 pages per
minute (Letter) and high resolution of Approx.1200 dpi × 600 dpi.
Shortened Wait Time & Low Power Consumption
By adopting an on-demand fixing method that drives the heater only during printing, the printer
has shorten the wait time and reduced the consumption power during standby.
Employment of USB Interface as a Standard
The printer employs an USB interface as a standard, allowing easy connection to peripherals.
1.2 Option overview
Handset Kit (FAX-L400 only)
The handset kit includes a handset, a cradle, and installation screws. Installing the handset
enables the telephone functions to be used.
1-1
PC-D320/PC-D340/FAX-L400 Chapter 1: General Description
2. SPECIFICATIONS
2.1 General Specifications
Type
Personal Desktop
Body color
Cool White
Power source
Voltage
Frequency
Power consumption
Standby (Energy Saver On)
PC-D320/D340
FAX-L400
Standby (Energy Saver Off)
PC-D320/D340
FAX-L400
Operation
Maximum
from AC 220 to 240 V
from 50 Hz
approx. 5W
approx. 6W
approx. 10W
approx. 11W
approx. 440W
approx. 670W
Main unit usage environment
Temperature
from 10°C to 32.5°C (50.0°F to 90.5°F )
Humidity
from 20% to 80% RH
Horizontality
±3° or less
Operating noise
Measured in accordance with ISO standards
Standby
approx. 30 dB(A)
Operating
approx. 50 dB(A)
Dimensions
FAX-L400
PC-D340
PC-D320
including tray
543mm × 457mm × 453mm
543mm × 457mm × 453mm
543mm × 446mm × 347mm
Weight
FAX-L400
PC-D340
PC-D320
including toner cartridge
Approx. 16.1 kg
Approx. 16.0 kg
Approx. 14.5 kg
1-2
PC-D320/PC-D340/FAX-L400 Chapter 1: General Description
2.2 Communication specifications (FAX-L400 only)
Applicable lines
Analog line (one line)
PSTN (Public Switched Telephone Network)
Handset (Option)
Handset with no numeric buttons
Transmission method
Half-duplex
Transmission control protocol
ITU-T V.8 protocol V.34 protocol/ECM protocol
ITU-T T.30 binary protocol/ECM protocol
Modulation method
G3 image signals
ITU-T V.27ter (2.4k, 4.8k bps)
ITU-T V.29 (7.2k, 9.6k bps)
ITU-T V.17 (14.4kbps, 12kbps, TC9.6kbps, TC7.2kbps)
ITU-T V.34 (2.4kbps, 4.8kbps, 7.2kbps, 9.6kbps, 12kbps, 14.4kbps,
16.8kbps, 19.2kbps, 21.6kbps, 24kbps, 26.4kbps,
28.8kbps, 31.2kbps, 33.6kbps )
G3 procedure signals ITU-T V.21 (No.2) 300bps
ITU-T V.8, V.34 300bps, 600bps, 1200bps
Transmission speed
33.6k, 31.2k, 28.8k, 26.4k, 24k, 21.6k, 19.2k, 16.8k, 14.4k, 12k, TC9.6k, TC7.2k, 9.6k,
7.2k, 4.8k, 2.4k bps
With automatic fallback function
Coding
MH, MR, MMR, JBIG
Error correction
ITU-T ECM
Canon express protocol
None
1-3
PC-D320/PC-D340/FAX-L400 Chapter 1: General Description
Time required for transmission protocol
Mode
V.8 / V.34
T.30 Standard
Post-message
Protocol *2
(between pages)
Approx. 1 s
Approx. 4 s
Pre-message
Protocol *1
Approx. 6 s
Approx. 18 s
*1
Post-message
Protocol *3
(after pages)
Approx. 1 s
Approx. 4 s
Time from when other facsimile is connected to the line until image
transmission begins.
*2
Post-message (between pages): Time from after one document has been sent
until transmission of the next document starts if several pages are
transmitted.
*3
Post-message (after last pages): Time from after image transmission is
completed until line is switched from facsimile to telephone.
Minimum transmission time
G3
G3 (ECM)
10 ms
0 ms
Transmission output level
from -8 to -15 dBm
Minimum receive input level
-43 dBm
Modem IC
CONEXANT (formerly Rockwell) FM336 Plus
1-4
PC-D320/PC-D340/FAX-L400 Chapter 1: General Description
2.3 Scanner Specifications
Type
Sheet/Books
Sheet dimensions
ADF Maximum
ADF Minimum
Platen glass
Thickness
ADF
Platen glass
Weight
ADF capacity
A4/Letter
Legal
Width 216mm × length 356mm
(Width 8.50" × length 14.02")
Width 148mm × length 105mm
(Width 5.83" × length 4.13")
Width 216mm × length 297mm
(Width 8.50" × length 11.69")
Multiple pages
from 0.06mm to 0.13mm (0.002" to 0.005")
Single page
from 0.06mm to 0.16mm (0.002" to 0.006")
35mm or less (1.38" or less)
Max. 2 kg (4.4 lb)
64 to 105 g/m2 bond. (17 to 28 lb)
50 sheets or less
30 sheets or less
Effective scanning width
A4
206 mm (8.11")
LTR/LGL
212 mm (8.35")
FAX Scanning Speed
standard
Approx. 4.3 sec./page
When reading Canon FAX Standard Chart No.1 at the
standard resolution
FAX Scanning line density
Standard:
8 dots/mm (203.2 dpi) × 3.85 line/mm (97.79 dpi)
Fine:
8 dots/mm (203.2 dpi) × 7.7 line/mm (195.58 dpi)
Superfine:
8 dots/mm (203.2 dpi) × 15.4 line/mm (391.16 dpi)
Ultrafine
16 dots/mm (406.4 dpi) × 15.4 line/mm (391.16 dpi)
Scanning density adjustment
Lighter, Standard, Darker: The density level of each mode can be selected by the
user data.
Halftone
256-gradation error diffusion system (UHQ)
1-5
PC-D320/PC-D340/FAX-L400 Chapter 1: General Description
Scanning range
Item
Effective
scanning width
Left margin
Right margin
Top margin
(Book mode)
Top margin
(ADF mode)
Bottom margin
A4
208 ±1.0 mm
(8.19"±0.04")
2.0 ±2.0 mm
(0.08" ±0.08")
2.0 ±2.0 mm
(0.08" ±0.08")
3.5 ±2.0 mm
(0.14" ±0.08")
3.5 +2.0/-2.5 mm
(0.14" +0.08"/-0.1")
2.0 ±2.0 mm
(0.08" ±0.08")
Letter
214 ±1.0 mm
(8.43"±0.04")
2.0 ±2.0 mm
(0.08" ±0.08")
2.0 ±2.0 mm
(0.08" ±0.08")
3.5 ±2.0 mm
(0.14" ±0.08")
3.5 +2.0/-2.5 mm
(0.14" +0.08"/-0.1"
2.0 ±2.0 mm
(0.08" ±0.08")
Legal
214 ±1.0 mm
(8.43"±0.04")
2.0 ±2.0 mm
(0.08" ±0.08")
2.0 ±2.0 mm
(0.08" ±0.08")
3.5 ±2.0 mm
(0.14" ±0.08")
3.5 +2.0/-2.5 mm
(0.14" +0.08"/-0.1")
2.0 ±2.0 mm
(0.08" ±0.08")
Units are inches with mm shown in parentheses.
Document leading edge
Left margin
Right margin
Effective scanning width
SCANNING
DROP OUT RANGE
Top margin
SCANNING RANGE
Effective scanning length
Bottom margin
Document trailing edge
Figure 1-1 Scanning Range
Document scanning width “A4/LTR” is set in service data #1SSSW SW 06,
bit 4.
NOTE
1-6
PC-D320/PC-D340/FAX-L400 Chapter 1: General Description
2.4 Printer Specifications
Paper types
Plain paper, colored paper, recycled paper, transparencies, envelopes, heavy paper
Paper size
76.2 (W) × 127 (L) mm - 216 (W) × 356 (L) mm sized plain paper (64 - 90 g/m2
recommended paper), thick paper (91 - 128 g/m2 recommended paper), and above
mentioned paper)
Paper cassette capacity
Cassette
25mm (0.98") or less in stacking height (Approx. 250 sheets of 64 g/m2)
Multi-purpose (MP) tray
1mm (0.04") or less in stacking height (Approx. 10 sheets of 64 g/m2)
Tray stacking
Face-down delivery slot
Plain
50 sheets (A4/Letter)
30 sheets (Legal)
Transparencies 10 sheets
Labels
10 sheets
Envelopes
10 sheets
Face-up delivery slot
Plain
1 sheet
Transparencies 1 sheet
Labels
1 sheet
Envelopes
1 sheet
Printing method
Laser beam printer
Printing cartridge
Product name
Product code
Strage conditions
Valid period
Toner detection
PC-D320/PC-D340
FAX-L400
Canon S35 Toner Cartridge
H11-6481
Temperature
From 32.0°F to 95.0°F (0°C to 35°C)
Humidity
From 35% to 85% RH
2.5 years from date of manufacture displayed on carton.
None
FAX communication only
1-7
PC-D320/PC-D340/FAX-L400 Chapter 1: General Description
Printing speed
LetterI
Approx. 15 Sheets/min
A4
Approx. 14 Sheets/min
Printing resolution
1200 dpi × 600 dpi
Recommended recording paper
Canon Copier LTR/LGL Premium Paper
Weight
75 g/m2
Paper size
Letter, Legal
Manufactured by
BOISE CASCADE
KANGAS
Weight
Paper size
Manufactured by
80 g/m2
A4
KANGAS
NEUSIEDLER Canon Paper
Weight
80 g/m2
Paper size
A4
Manufactured by
NEUSIEDLER
1-8
PC-D320/PC-D340/FAX-L400 Chapter 1: General Description
Printing range
Item
Effective
Printing width
Effective
Printing length
Left margin
Right margin
Top margin
Bottom margin
A4
206 ±2.0 mm
(8.11"±0.08")
287.5 ±3.0 mm
(11.32"±0.12")
2.0 ±2.0 mm
(0.08" ±0.08")
2.0 ±3.0 mm
(0.08" ±0.12")
3.5 ±2.0 mm
(0.14" ±0.08")
3.5 ±2.0 mm
(0.14" ±0.08")
Letter
212 ±2.0 mm
(8.35"±0.08")
269.9 ±3.0 mm
(10.63"±0.12")
2.0 ±2.0 mm
(0.08" ±0.08")
2.0 ±3.0 mm
(0.08" ±0.12")
3.5 ±2.0 mm
(0.14" ±0.08")
3.5 ±2.0 mm
(0.14" ±0.08")
Legal
212 ±2.0 mm
(8.35"±0.08")
346.1 ±3.5 mm
(13.63"±0.14")
2.0 ±2.0 mm
(0.08" ±0.08")
2.0 ±3.0 mm
(0.08" ±0.12")
3.5 ±2.0 mm
(0.14" ±0.08")
3.5 ±2.0 mm
(0.14" ±0.08")
Paper leading edge
Left margin
Right margin
Effective scanning width
PRINTING DROP OUT RANGE
PRINTING RANGE
Top margin
Effective scanning length
Bottom margin
Paper trailing edge
Figure 1-2 Printing Range
1-9
PC-D320/PC-D340/FAX-L400 Chapter 1: General Description
2.5 Copy Specifications
Copy resolution
Scanning
Printing
600 dpi × 600 dpi
1200 dpi × 600 dpi
First copy time
ADF (A4/Letter)
Platen glass (A4/Letter)
Approx. 14 sec.
Approx. 11 sec.
Multiple copy
99 copies
Color copy
None
Copy ratio
Inch
Preset copy ratio:
2 on 1 copy ratio:
A
Preset copy ratio:
2 on 1 copy ratio:
AB
Preset copy ratio:
2 on 1 copy ratio:
50%, 64%, 78%, 100%, 129%, 200%
64%, Letter size
50%, 70%, 100%, 141%, 200%
70%, A4 size
50%, 70%, 81%, 86%, 100%, 115%, 141%, 200%
70%, A4 size
Zoom
50 % to 200 %
2.6 Functions
Collate copy
The collate copy allows you to sort copies. It convenient when you make multiple copies of
multipage documents.
2 on 1 copy
Use 2 on 1 to reduce 2 sheets to fit on one sheet. Two letter-size documents are
automatically reduced to fit on a letter-size page.
FAX/TEL switching
Method
Message
Pseudo CI
Pseudo ring
Pseudo ringback tone
CNG detection
None
None
Yes
Yes
1-10
PC-D320/PC-D340/FAX-L400 Chapter 1: General Description
Answering machine connection
Yes (Telephone answering priority type)
Polling
Polling transmission
The document is accumulated into memory ahead of time, then transmitted when there is a
polling request from the other party.
Polling reception
Receives from a fax in automatic transmission mode
Confidential reception
None
Remote reception
Method
Remote ID (with ID call#)
ID call# (ID input method)
2 digits
Auto dialing
Telephone number digits
One-touch dial
Coded speed dial
Group dial
Redial
Max. 38 digits
Max. 30
Max. 100
Max. 129 (One-touch: 29, Coded speed dial: 100)
Numeric button redial function (max. 120 digits)
Delayed transmission
No. of Destinations
No. of Reservation
Broadcast transmission
No. of Destinations
Max. 131 (One-touch :30, Coded speed dial :100)
Numeric button:1)
Max. 70 time
Max. 131 (One-touch :30, Coded speed dial :100)
Numeric button:1)
Relay broadcasting originating
An equivalent function (Tx only) is available using the Password/Subaddress sending
setting.
Closed network
None
Direct mail prevention
None
1-11
PC-D320/PC-D340/FAX-L400 Chapter 1: General Description
Memory reception
When receiving Canon FAX Standard Chart No.1
Standard
Max. 250 pages
Ohters
Display
Display size
Memory backup
Backup contents
Backup IC
Backup battery
Battery life
2 rows × 20 digits
dial registration data, user data, service data, time
1024 kbyte SRAM
Lithium battery 3.0 V DC / 320 mAh
Approx. 5 years
Image data backup
Backup contents
Memory reception, memory copy, delayed transmission and
broadcast transmission image data, activity management report
Backup IC
16 Mbyte DRAM
Backup battery
Rechargeable capacitor
Backup time
1 hour
Activity management
a) User report
Activity management report
(Every 20 transactions: always transmission and reception together)
Activity report (sending/receiving)
One-touch speed dial tel # list
Coded speed dial tel # list
Group dial tel # list
Memory clear list
User’s data list
Multi TX/RX report
Transmission reserve list
Document memory list
b) Service report
SERVICE DATA LIST
SYSTEM DUMP LIST
KEY HISTORY REPORT
MAIL HISTORY REPORT
COUNTER REPORT
PRINT SPEC REPORT
1-12
PC-D320/PC-D340/FAX-L400 Chapter 1: General Description
2.7 Interface Spcifications
Serial interface (USB)
a) Specifications
Interface Type
USB Interface (Universal Serial Bus; USB Specification Release Number 1.10)
Data Transmission
Control transfer method
Bulk transfer method
Signal Voltage Level
Input:
Input defference sensitivity:
Common-mode defference:
Output:
Static output high:
Static outpu low:
+0.2V (Max.)
+0.8V to +2.5V
+2.8V to 3.6V
less than +0.3V
Input/Output
Data signal pulled up with 3.3V
VBUS signal pulled up with 5.5V
Interface Cable
Twisted-pair shielded cable
USB standard compatible required
Material
AWG No. 28, Data pair (AWG: American Wire Gauge)
AWG No. 20 to No. 28, Power distribution pair
Interface Connector
Printer-side
USB standard, Series B receptacle
Cable-side
USB standard, Series B plug
3
2
4
1
Figure 1-3 USB Connector (J1)
J1
1
2
3
4
←
—
—
—
PC
1
2
3
4
Signal name
VBUS
D–
D+
GND
1-13
Description
Cable power supply (+5V DC)
Data
Data
Cable GND
PC-D320/PC-D340/FAX-L400 Chapter 1: General Description
b) USB interface
USB is a serial interface which connects up to 127 peripheral devices to a host computer,
and transmits data at a high-speed rate of 12Mbps. Hot plugging, in which connecting/
disconnecting devices while the host or the printer is in use, is supported. Each device is
connected to a hub's port, where each port’s detection/disconnection status is returned to the
host.
Data transfer
The data transfer in USB is executed in terms of the transfer unit called a frame, a time
frame of approximately 1ms, into which the data is divided. Data is transferred by piling
up these frames.
All packets begin with a SYNC (synchronizing) field to synchronize with the local clock,
and are separated with an EOP (End of Packet) field.
Frame lines begin with an SOF (Start of Frame) packet. An SOF is composed of a PID
(Packet Identification Field) that represents the type of the packet and the direction, frame
number, and a CRC (Cyclic Redundancy Check) used for error-check.
Inside a frame is a packet line containing a token packet, data packet and a handshake
packet, which indicates the status of the flow control.
A token packet is composed of a PID, an address field which can specify up to 128
addresses, an ENDP (endpoint) field, and a CRC.
Inside a data packet are a PID, data field, CRC, and EOP.
Only a PID is present inside the handshake packet.
1Frame (approx. 1ms)
Frame Line
Time Lapse
SOF
Frame Structure
SOF
SOF
Packet Line
Printer
Token
Other Function
Data
Handshake
Packet Structure
Frame
SYNC Number CRC EOP
SYNC PID ADDR ENDP CRC EOP
SYNC PID
DATA
Figure 1-4 USB Data Transfer
1-14
CRC EOP SYNC PID EOP
PC-D320/PC-D340/FAX-L400 Chapter 1: General Description
Encoding/Decoding the Data
In USB, data transfer lines are ultimately encoded with NRZI (Non Return to Zero Invert)
method. When the original data bit is 0, sent data bits are inverted; when the original data
bit is 1, the value is retained.
However, if the level of the transferred data remain unchanged for a certain period of time,
the receiving side may not be able to synchronize with the data sample position, which
will result in data bits being out of phase. This is prevented by a method called bit stuffing;
when data bit 1 is repeated 6 times, one 0 bit is added to the original data before encoded
with NRZI.
0
Data
NRZI
1
1
0
1
0
1
0
0
0
1
0
0
1
1
0
Idle
Idle
Figure 1-5 NRZI
Supported Software
The following table shows the relationship between available drivers and the interfaces for
this model.
Windows 95
Windows 98
Windows NT 4.0
Windows 2000
Windows Me
Windows XP
D320/D340/L400 Suite
Suite USB I/F
not
supported
conditionally
supported*
not
supported
conditionally
supported*
conditionally
supported*
conditionally
supported*
*: A USB connection applies to Windows XP/Me/2000 pre-install models and to
pre-install models upgraded to Windows XP/Me/2000 from Windows 98 or later.
Windows Drivers
Win98.Me LBP Printer Driver (USB supported)
Win2000.XP LBP Printer Driver (USB supported)
1-15
PC-D320/PC-D340/FAX-L400 Chapter 1: General Description
3. OVERVIEW
3.1 External View
Main Components of the Machine
This section describes the main components of the machine.
FAX-L400
Left Side View
DOCUMENT FEEDER TRAY
Place documents for copying.
ADF (AUTOMATIC DOCUMENT FEEDER)
Holds documents for copying and feeds
them automatically into the scanning unit.
DOCUMENT OUTPUT TRAY
Documents come out here.
LEFT COVER
Open it when you
output paper face
up or remove
jammed paper.
SLIDE GUIDE
Adjust to the width of the document.
OPERATION PANEL
Cotrols the machine
POWER CORD CONNECTOR
USB INTERFACE CONNECTOR
HANDSET JACK
Connect the optional handset
TELEPHONE LINE JACK
Connect the telephone line.
EXTERNAL DEVICE JACK
Connect external devices.
Figure 1-6 External View (1)
1-16
Appendix B.
PC-D320/PC-D340/FAX-L400 Chapter 1: General Description
PC-D340
DOCUMENT FEEDER TRAY
Place documents for copying.
ADF (AUTOMATIC DOCUMENT FEEDER)
Holds documents for copying and feeds
them automatically into the scanning unit.
DOCUMENT OUTPUT TRAY
Documents come out here.
LEFT COVER
Open it when you
output paper face
up or remove
jammed paper.
OPERATION PANEL
Controls the machine.
POWER CORD CONNECTOR
USB INTERFACE CONNECTOR
Figure 1-7 External View (2)
1-17
PC-D320/PC-D340/FAX-L400 Chapter 1: General Description
Right Side View
PLATEN GLASS COVER
Open it when you place documents
on the platen glass for copying.
PC-D340 / FAX-L400
PLATEN GLASS
Place documents for copying.
OUTPUT TRAY
Outputs printed pages.
RIGHT COVER
Open it when you install the cartridge,
or remove jammed paper.
MULTI-PURPOSE TRAY
Load paper one by one.
CASSETTE
Load paper stack.
PC-D320
PLATEN GLASS COVER
Open it when you place documents
on the platen glass for copying.
OPERATION PANEL
Controls the machine.
OUTPUT TRAY
Outputs printed pages.
RIGHT COVER
Open it when you install the cartridge
or remove jammed paper.
MULTI-PURPOSE TRAY
Load paper one by one.
CASSETTE
Load paper stack.
Figure 1-8 External View (3)
1-18
PC-D320/PC-D340/FAX-L400 Chapter 1: General Description
3.2 Operation Panel
FAX-L400
1
13
14
15
2
3
4
01
09
02
10
16
5
03
11
6
04
12
7
05
13
06
14
07
15
08
16
8
9
17
18
19
20
10
11
12
1 Hook Key
Enables you to dial, even when the handset is still on the handset cradle.
2 Directory Key
Enables you to search for fax/telephone numbers by the name under which they are registered for speed
dialling, and then use the number for dialling.
3 Coded Dial Key
Press Coded Dial, followed by a two-digit code to dial the telephone number registered for coded speed
dialling.
4 Redial/Pause Key
Redials the previous number dialled manually with the keys on the numeric keypad, and enters pauses between
digits or after the entire telephone number when dialling or registering facsimile numbers.
5 One-touch Speed Dialling Keys
Dial numbers registered under one-touch speed dialling keys.
6 LCD
Displays messages and prompts during operation. Also displays selections, text and numbers when specifying
settings.
7 OK Key
Determines the contents you set or register. Also, if the document being scanned stops in the ADF, pressing this
key makes the document come out automatically.
8
(-) ,
(+) Keys
Scroll through the selections so you can see other settings.
9 Exposure Key
Adjusts the fax exposure.
10 Additional Functions Key
Customizes the way your machine operates.
11 Fax Resolution Key
Adjusts the quality of fax image.
Figure 1-9 Operation Panel (1)
1-19
PC-D320/PC-D340/FAX-L400 Chapter 1: General Description
12 System Monitor Key
Checks the status of fax, copy, print and report jobs.
13 In Use/Memory indicator
Flashes green when a fax is being received or sent. Lights green when the reservation of fax transmission is set,
or a fax is received into the memory.
14 Alarm indicator
Flashes orange when the machine has a problem such as a paper jam.
(The error message is displayed in the LCD.)
15 COPY Key
Switches standby display to Copy mode.
16 FAX Key
Switches standby display to Fax mode.
17 Energy Saver Key
Sets or cancels the energy saver mode manually. The key lights green when the energy saver mode is set, and
goes off when the mode is cancelled.
18 Numeric Keys
Enter numbers when dialling or registering fax/telephone numbers. Also, enter characters when registering
names.
19 Stop/Reset Key
Cancels sending or receiving faxes and other operations, and brings back the standby display in the LCD.
20 Start Key
Starts sending faxes.
Figure 1-10 Operation Panel (2)
1-20
PC-D320/PC-D340/FAX-L400 Chapter 1: General Description
PC-D340/PC-D320
Figure 1-11 Operation Panel (3)
1-21
PC-D320/PC-D340/FAX-L400 Chapter 1: General Description
One-touch Panel Opened (FAX-L400)
1
Receive
Mode
2
8
Function
17
24
18
R
25
Memory
Reference
19
D.T.
26
Report
20
Tone/+
27
Delayed
Transmission 21
Space
28
Book Sending 22
Delete
29
23
Clear
30
3
9
10
4
5
6
7
Polling
11
12
13
14
1 One-touch Speed Dialling Keys
The keys marked 17 to 30 can be used to dial fax/telephone numbers pre-registered.
To dial using these keys, you need to register the number for one-touch speed dialling. When the Function key
is pressed, the following keys can be used for the fax functions. Also, if fax functions are programmed into
these keys, they can be used directly as one-touch keys without pressing the Function key to execute the fax
functions.
2 Receive Mode Key
Selects the receive mode.
3 Memory Reference Key
Confirms documents stored in the machine for memory sending or memory receiving.
4 Report Key
Prints a report listing fax communications, dial list, data list or document list. You can also use this key to
cancel the report job.
5 Delayed Transmission Key
Specifies the fax sending time for the delayed sending function.
6 Book Sending Key
This key can be used to send documents from the platen glass.
7 Polling
Press to set a document for advanced communications, such as polling sending and receiving.
8 Function Key
After pressing this key, you can use the keys marked Memory Reference, Report, Delayed Transmission, Book
Sending, Polling, R, D.T., Tone/+, Space, Delete and Clear for the fax functions.
9 R Key
Press to dial an outside telephone number, or an extension number, when the fax is connected
through a switchboard (PBX).
Figure 1-12 Operation Panel (4)
1-22
PC-D320/PC-D340/FAX-L400 Chapter 1: General Description
10 D.T. Key
Press to. confirm the dial tone when dialling or registering a telephone number.
11 Tone/+ Key
Enters a plus sign in a fax number only when registering for USER TEL NO. Connects to information services
that accept tone dialling only, even if you are using a rotary pulse.
12 Space Key
Enters a space between letters and numbers.
13 Delete Key
Deletes characters one by one.
14 Clear Key
Deletes all characters.
Figure 1-13 Operation Panel (5)
1-23
PC-D320/PC-D340/FAX-L400 Chapter 1: General Description
3.3 Consumables
3.3.1 Toner Cartridge
Handling and Storing the Cartridge
This section describes the precautions to ensure optimum copy quality.
Handling Precautions
WARNING
Do not throw cartridge into open flames, as this may cause the toner to ignite and result in burns
or a fire.
The cartridge emits low level magnetic flux. If you use a cardiac pacemaker and feel
abnormalities, please move away from the cartridge, and consult your doctor.
Never attempt to disassemble the cartridge or open the protective shutter of the drum.
IMPORTANT
NOTE
If the machine is brought from the cold outdoors into a warm room, or if the room is rapidly heated,
condensation may form inside the machine.
This can adversely effect the quality of your copy image (e.g., copies are completely black).
When the machine is exposed to such conditions, allow at least two hours for the machine to adjust to
room temperature before attempting to use it.
Always hold the cartridge as shown so that the side with the instructions are facing upward. Do not
forcefully move or push the protection shutter of the drum in any way.
Instructions
Drum protective shutter
Figure 1-14 Toner Cartridge (1)
1-24
PC-D320/PC-D340/FAX-L400 Chapter 1: General Description
Storage Precautions
WARNING
CAUTION
IMPORTANT
Do not store cartridge or copy paper in places exposed to open flames, as this may cause the
toner or copy paper to ignite and resulting in burns or a fire.
Keep cartridges and other consumables out of the reach of children. If the contents of these items
are ingested, consult a physician immediately.
Place the cartridge in its protective bag so that the side with the written instructions is facing upward.
Then, place the bagged cartridge into its shipping box. Store the unused cartridge out of direct sunlight.
For partially used/opened cartridges, place the cartridge in its protective bag so that the side with the
written instructions is facing upward. Then place the bagged cartridge into its shipping box and store it
away from direct sunlight.
Avoid storing the cartridge in front of heaters and humidifiers, etc. Store it in a location where the
temperature does not exceed 104˚F (40˚C).
The recommended storage conditions are as follows:
Temperature
59˚F to 80.6˚F (15˚C to 27˚C)
Relative Humidity 20% to 80%
Do not stand the cartridge on end or turn it upside down.
Storing Partially Used Cartridges
If you remove a cartridge from the machine, store the cartridge as described below.
Place the cartridge in its protective bag so that the side with the written instructions is facing upward. Then, place
the cartridge into its shipping box. Be sure to securely close the lid of the shipping box.
If you do not have the protective bag or shipping box for the cartridge, store the cartridge in a dark location.
Recycling Used Cartridges
Canon has instituted a worldwide recycling program for cartridges called "The Clean
Earth Campaign." This program preserves precious natural resources by utilizing a
variety of materials found in the used cartridges that are of no further use, to
remanufacture new cartridges which, at the same time, keeps the environment cleaner
by reducing landfill waste. Complete details concerning this program are enclosed in
each shipping box.
Figure 1-15 Toner Cartridge (2)
1-25
PC-D320/PC-D340/FAX-L400 Chapter 1: General Description
3.3.2 Print media
Paper Handling
Print Media Requirements
For high-quality copies, we recommend using paper and transparencies recommended by Canon. Some types of
paper available at office supply stores may not be suitable for this machine. If you have any questions about
paper and transparencies, consult your dealer or Canon Customer Relations.
Paper Storage
In order to prevent paper jams, follow the procedure below:
To prevent moisture buildup, store remaining paper wrapped tightly in its original package. Store paper in a dry
location, out of direct sunlight.
To prevent curling, store paper flat, not upright.
After copying, do not leave paper in the multi-purpose tray.
Unacceptable Paper
Do not copy on the following types of copy stock; doing so will result in paper jams.
Severely curled or wrinkled paper
Transparencies for full-color copiers or printers
Paper which has already been copied using a digital full-color copier (Do not copy on the reverse side either.)
Paper which has been printed on using a thermal transfer printer (Do not copy on the reverse side either.)
Never attempt to make copies on full-color transparencies. Doing so may result in copier malfunction.
IMPORTANT
Acceptable Paper
Cassette/Multi-purpose Tray
Paper size
Letter, Legal, Executive, A4, B5, A5
Envelope : COM10, MONARCH, DL, ISO-C5
Free Size : 8.5 (216.0 mm) 14 in. (356 mm)[max.] / 3 (76.2mm)
Paper weight
17 - 32-lb bond or 64 - 128 g/m2
Type of paper
Ð Plain paper (17 - 24-lb bond or 64 - 90 g/m2)
Ð Transparencies
Ð Special paper 1 (25 - 32-lb bond or 91 - 128 g/m2) :Thick paper
Ð Special paper 2
:Rough paper
NOTE
5 in. (127.0 mm)[min.]
The printing speed may be gradually slower than usual depending on the paper size, the paper type and
the number of sheets you specify.
This is because safety function works to prevent the failure due to the heat.
.
Figure 1-16 Print media (1)
1-26
PC-D320/PC-D340/FAX-L400 Chapter 1: General Description
Printing Areas
Please note that the term "printing area" represents both the recommended area for optimum print quality and the
entire area where the machine can technically print from your computer.
Printing area (light shade) : Canon recommends that you print within this area.
Paper
0.20" (5 mm)
0.24" (6 mm)
0.20" (5 mm)
0.24" (6 mm)
0.16"
(4 mm)
0.16"
(4 mm)
FEEDING
DIRECTION
FEEDING
DIRECTION
LETTER
LEGAL
0.16"
(4 mm)
0.16"
(4 mm)
Envelope
0.4" (10 mm)
0.4" (10 mm)
0.4" (10 mm)
0.4" (10 mm)
0.4"
(10 mm)
0.4"
(10 mm)
FEEDING
DIRECTION
U.S.
COMMERCIAL
NO. 10
FEEDING
DIRECTION
0.4"
(10 mm)
Copying areas are a little larger than printing areas.
NOTE
Figure 1-17 Print media (2)
1-27
EUROPEAN DL
0.4"
(10 mm)
PC-D320/PC-D340/FAX-L400 Chapter 1: General Description
This page intentionally left blank
1-28
Chapter 2
Technical
Reference
PC-D320/PC-D340/FAX-L400 Chapter 2: Technical Reference
1. COMPONENT LAYOUT
1.1 Parts Layout
The parts layout of this machine consists of the scanner section, printer section and paper
supply section.
Scanner section
Printer section
Paper supply section
Figure 2-1 Parts Layout
2-1
PC-D320/PC-D340/FAX-L400 Chapter 2: Technical Reference
1.2 Printed Circuit Boards Layout
The following four printed circuit boards are located in this machine:
1.SCNT board that controls the entire system
• Operation panel control
• Scanner control
• Printer interface control
• Sensor detection
• Memory functions
• Energy Saver control
2.ECNT board used to control the operation of the laser scanner, motor, and solenoid as
well as pickup from the cassette.
A Power supply unit is also located in the ECNT board
• Fixing heater control
• High voltage control
• Drive control
• Sensors detection
• Laser control
• Scanner motor control
• Switching regulator as power supply
3.OPCNT board that controls the operation panel’s keys and LCD
• Keys detection and LED drive function
• Display
• Serial communication
4.USB board, which connects to the USB cable from the computer, for PC-D320/D340
only
• USB interface
5.NCU board, which interfaces with to the telephone line, for FAX-L400 only
• Hybrid circuit
• Line voltage conversion circuit
6.USB-MJB board, which connects to the telephone line, to the NCU board, and to
the USB cable from the computer, for FAX-L400
• Line interface
2-2
PC-D320/PC-D340/FAX-L400 Chapter 2: Technical Reference
OPCNT board
SCNT board
ECNT board
NCU board
for FAX-L400 only
USB-MJB board
for FAX-L400 only
USB board
for PC-D320/D340 only
Figure 2-2 PCBs Layout
2-3
PC-D320/PC-D340/FAX-L400 Chapter 2: Technical Reference
1.3 Sensors Layout
As many as 8 sensors are used to monitor the movement of original and recording paper or to
detect the home position of contact sensor.
Document sensor (DS)
Document edge sensor (DES)
Toner sensor
CS home position sensor
Cartridge cover sensor
Paper eject sensor
Recording paper sensor
Over flow sensor
Page top sensor
Figure 2-3 Sensors Layout
2-4
PC-D320/PC-D340/FAX-L400 Chapter 2: Technical Reference
1. Document sensor (DS) for PC-D340/FAX-L400 only
It detects the presence/absence of a document.
2. Document edge sensor (DES) for PC-D340/FAX-L400 only
It detects the leading and trailing edges of a document.
3. CS home position sensor
It detects the home position of contact sensor.
4. Page top sensor
It detects the leading edge of the recording paper.
5. Paper eject sensor
It detects the recording paper eject conditions.
6. Over flow sensor
It checks the full loading of recording paper.
7. Recording paper sensor
It detects the presence/absence of recording paper.
8. Cartridge cover sensor
It detects the opening/closing of the cartridge cover.
9. Toner sensor (FAX-L400 only)
It detects the whether there is toner in the toner cartridge.
2-5
PC-D320/PC-D340/FAX-L400 Chapter 2: Technical Reference
2. SCANNER SECTION
The scanner section scans documents that are to be copied.
Separation roller
Pick-up roller
Paper guide
Document eject roller
Document feed roller
Document feed motor
CS drive motor
Contact sensor
Figure 2-4 Scanner section
2. SCANNER SECTION
2-6
PC-D320/PC-D340/FAX-L400 Chapter 2: Technical Reference
2.1 Names and Functions of Parts
1. Paper Guide for PC-D340/FAX-L400 only
This guide is used to hold the document in horizontal direction to prevent it from moving
askew.
2. Pick-up Roller for PC-D340/FAX-L400 only
This roller is used to pick-up a document and feed it to the separation roller.
3. Separation Roller for PC-D340/FAX-L400 only
This roller uses differences in the coefficients of function of the separation guide, document
and separation roller to separate each of the sheets in a multiple-page document.
4. Document Feed Roller for PC-D340/FAX-L400 only
This roller feeds documents to the contact sensor after they are separated by the separation
roller.
5. Contact Sensor
The contact sensor scans the image information from the document, converts it to serial
data, and transmits it to the SCNT board as an electrical signal.
The contact sensor has a scanning resolution of 600 dpi.
6. Document Eject Roller for PC-D340/FAX-L400 only
This roller ejects documents fed from the document feed roller.
7. Document Feed Motor for PC-D340/FAX-L400 only
This motor drives all the rollers in the scanner section.
8. CS Drive Motor
This motor drives the contact sensor.
2-7
PC-D320/PC-D340/FAX-L400 Chapter 2: Technical Reference
NOTE
Initializing the document stopper
The projection on the middle document feed ass’y needs to be set (initialized)
to the optimum position to operate the document stopper properly.
The machine performs initialization when the power is turned on, and after a
document is ejected.
Document jam detection
The document edge sensor detects such document jams as pick-up jams and
document too long errors.
A “pick-up jam” means the document edge sensor cannot detect the leading
edge of the document within 10 seconds after document feeding begins.
A “document too long error” means that the document edge sensor cannot
detect the trailing edge of the document, even after the stepping pulses for
feeding more than 14" (356 mm) of document have been transmitted.
Document jam processing
If a document jam occurs, the machine stops the document feed motor and
ADF operations and displays the error.
For a pick-up jam, “CHECK DOCUMENT” is displayed. For document too
long error, “DOCUMENT TOO LONG” is displayed.
If the document is being copied when a document jam occurs, the image data
scanned in and stored in memory are erased for all pages, and print operations
are stopped.
2-8
PC-D320/PC-D340/FAX-L400 Chapter 2: Technical Reference
This page intentionally left blank
2-9
PC-D320/PC-D340/FAX-L400 Chapter 2: Technical Reference
3. PAPER SUPPLY SECTION
The paper supply section is designed to separate the recording sheets stacked on the Cassette or
MP tray one by one for forwarding to the printer unit.
Pick-up solenoid
Pick-up roller
Main motor
Figure 2-5 Paper supply section
2-10
PC-D320/PC-D340/FAX-L400 Chapter 2: Technical Reference
3.1 Recording Paper Pick-up Function
(from Multi-purpose (MP) tray)
In case of paper pick-up from the MP tray, while the main motor rotates, the paper pick-up
solenoid is turned ON. Then, the pick-up roller rotates, and a sheet of paper is fed into the
printer section.
Up to 10 pages (64 g/m2) can be loaded into the MP tray at one time and the position of the
movable paper guides can be adjusted for recording paper.
(from cassette)
In case of paper pick-up from the cassette, while the main motor rotates, the pick-up solenoid is
turned ON. Then, the pick-up roller rotates, and a sheet of paper is fed into the printer section.
3.1.1 Paper size error
The machine does not have a paper size sensor. It recognizes the paper sizes (Letter, A4, and
Legal etc.) according to the user data setting (Additional Functions setting).
A paper size error occurs if the specified paper size is different from the size of the paper
placed in the MP tray and cassette when one page is actually printed.
In this case, a message “INCORRECT PAPER SIZE” appears on the display.
2-11
PC-D320/PC-D340/FAX-L400 Chapter 2: Technical Reference
3.2 Recording Paper Jam Detection Configuration
The following paper sensors are installed to detect paper presence and paper feed condition.
• Page top sensor
• Paper eject sensor
The CPU on the ECNT board determines a paper jam by checking whether or not paper is
present on the sensor at the timing stored in the CPU.
When the CPU judges a paper jam, it stops print operation and notifies the jam.
3.2.1 Pick-up delay jam
This machine performs retry control to redress the pick-up delay jam caused by pick-up error.
In this control, a pick-up operation is conducted a maximum of twice.
If the page top sensor cannot detect the leading edge of the paper within 1.4 seconds after the
pick-up solenoid is turned ON in the first pick-up operation, the CPU tries another pick-up
operation, the CPU determines a pick-up delay jam.
3.2.2 Pick-up stationary jam
If the page top sensor cannot detect the trailing edge of the paper within 4.6 seconds after
detecting the leading edge, the CPU determines a pick-up stationary jam.
3.2.3 Delivery delay jam
If the leading edge of the paper cannot reach the paper eject sensor within 2.1 seconds after
the page top sensor detects the edge, the CPU determines a delivery delay jam.
3.2.4 Wrapping jam
The CPU determines a wrapping jam under both the following two conditions:
• 10 seconds passed after the paper eject sensor detected the leading edge of the paper
• The paper eject sensor cannot detect the trailing edge within 1.5 seconds after the page
top sensor detected the leading edge.
In case of judging a wrapping jam, the CPU notifies the jam as a delivery
stationary jam.
NOTE
3.2.5 Delivery stationary jam
If the paper eject sensor cannot detect the leading edge of the paper within 2.2 seconds after
the page top sensor detected the trailing edge, the CPU determines a delivery stationary
jam.
3.2.6 Residual paper jam
During the initial rotation period, if the page top sensor or paper eject sensor detects the
paper, the CPU determines a residual jam.
2-12
PC-D320/PC-D340/FAX-L400 Chapter 2: Technical Reference
This page intentionally left blank
2-13
PC-D320/PC-D340/FAX-L400 Chapter 2: Technical Reference
4. PRINTER SECTION
The LASER beam printer engine comprises the following sections.
Laser/Scanner section
Fixing section
Toner transfer section
Figure 2-6 Printer section
2-14
Toner cartridge
PC-D320/PC-D340/FAX-L400 Chapter 2: Technical Reference
4.1 Laser/Scanner Section
This section comprises a Laser unit, cylindrical lens, 4-faced polygon mirror, scanner motor,
imaging lens, reflection mirror and BD sensor. The Laser is driven in accordance with the Laser
drive signals that are sent from the SCNT board. This Laser light passes through the cylindrical
lens to fall on the 4-faced polygon mirror that is rotating at a fixed speed. The Laser light is
reflected from the 4-faced polygon mirror and passes through the imaging lens, and reflects
from the reflection mirror to scan the photosensitive drum in the toner cartridge.
NOTE
BD Malfunction
The CPU on the ECNT board determines a BD malfunction if the /BDI signal
is not detected within 0.1 second after the scanner motor is forcibly driven.
Or, if the detected cycle of the /BDI signal has not reached the specified value
within 2 seconds after the scanner motor reached its specified rotation
number.
Laser/scanner unit Malfunction
If the /BDI signal is not detected within 1.5 seconds after the scanner motor is
forcibly driven, the CPU on the ECNT board extends the time to 120 seconds,
the CPU determines a scanner malfunction.
The Laser/scanner unit contains parts that require adjustment that cannot
adjust in the field. Never disassemble the Laser/scanner unit.
2-15
PC-D320/PC-D340/FAX-L400 Chapter 2: Technical Reference
4.2 Toner Cartridge
This cartridge comprises the primary charging roller, developing cylinder, photosensitive drum,
cleaner blade, and toner.
The Laser beam from the Laser/scanner section forms a latent static image on the photosensitive
drum that is charged by the primary charging roller.
The photosensitive drum rotates inside the toner cartridge, and rotation of the developing
cylinder causes toner to adhere to the photosensitive drum to from a visible image which is then
transferred to the recording paper at the toner transfer section. Residual toner is then removed
from the surface of the photosensitive drum by the cleaning blade.
Drum cover shutter
If the photosensitive drum is subjected to strong light, optical memory can
cause dropout areas or black bands to occur. To prevent the photosensitive
drum from strong light, a drum cover shutter is attached. Do not open this
cover unless absolutely necessary.
4.3 Toner Transfer Section
This section comprises the transfer charging roller and the static eliminator.
The recording paper passes between the photosensitive drum and the transfer charging roller,
and the transfer charging roller is charged with a charge opposite to that of the toner to transfer
the toner on the photosensitive drum to the recording paper. The charge on the rear side of the
recording paper is then removed by the static eliminator.
2-16
PC-D320/PC-D340/FAX-L400 Chapter 2: Technical Reference
4.4 Fixing Section
This section comprises the fixing ass’y and pressure roller. The fixing section on this machine is
an on-demand method that uses fixing film with low thermal capacity.
The toner that was transferred to the recording paper at the toner transfer section is fused to the
paper and fixed as a permanent image.
The fixing ass’y has a built-in fixing heater and thermistor.
4.4.1 Fixing unit Malfunction
The CPU on the ECNT board assesses a fixing unit malfunction under the conditions a) to g)
indicated below and it performs the following three procedures:
1. Cuts off power to the fixing heater by setting the FIXING HEATER DRIVE
(FSRD:ECNT board-IC201-39pin) signal “L”.
2. Sets the RELAY DRIVE (RLYD:ECNT board-IC201-38pin) signal “L” to turn OFF the
relay (RL101:ECNT board-RL101).
3. Stops the main motor, scanner motor, and high-voltage power supply system
immediately, and then sets the printer an error state and notifies the malfunction to the
SCNT board.
a) The main thermistor does not exceed 50 °C within 1.47 seconds after the start of startup temperature control.
b) The main thermistor remains 230 °C or more continuously for 1.5 seconds during fixing
heater temperature control.
c) The temperature of the main thermistor is 100°C or less continuously for 1.5 seconds
during normal temperature control. Or, the main thermistor remains 50°C or less
continuously for 1.5 seconds during between-sheet temperature control.
d) The temperature of the main thermistor remains less than 20°C continuously for 3
seconds during fixing heater temperature control.
e) The main thermistor does not exceed 100 °C within 30 seconds after the start of start-up
temperature control.
f) The sub thermistor remains less than 20 °C continuously for 1.5 seconds during fixing
heater temperature control.
g) The temperature of the sub thermistor is 320°C or more continuously for 3 seconds
during fixing heater temperature control.
2-17
PC-D320/PC-D340/FAX-L400 Chapter 2: Technical Reference
5. NEW FUNCTION
There is no new function in this model.
2-18
Chapter 3
Assembly and
Disassembly
PC-D320/PC-D340/FAX-L400 Chapter 3: Assembly and Disassembly
1. ATTENTION TO BE PAID DURING ASSEMBLY/DISASSEMBLY
1.1 Safety Cautions
Electrical shock
In order to prevent any risk of electrical shock, always be sure to check that the power cord
and modular jack have been removed. Also, remove all cables connecting to the computer.
When conducting service that requires the main unit to be powered on, be sure to wear
some kind of earthing, such as a wrist strap, etc. Otherwise, there is a
danger of conduction and electrical shock.
Parts which are generally likely to cause electrical shock are as follows.
• Power supply unit primary (supplied with AC voltage)
• Telephone line primary
• LBP engine high voltage contacts (for high voltage during developing and
transfer)
High temperature
In order to prevent burns during disassembly, allow at least ten minutes, after
the power has been switched off, for the high temperature components to cool
down.
General high temperature components are as follows.
• Motors
• Power supply unit
• Elements on driver ICs, etc., on PCBs (in particular, ICs with heatsinks)
• BJ cartridge aluminium plate (for BJ cartridge engine models)
• Fixing unit and peripheral covers (for LBP engines)
Battery Replacement
The batteries must be replaced correctly to avoid explosion.
Do not replace any battery with one not indicated for the machine, i.e., use one of the same
type or equivalent. Be sure to dispose of used batteries according to local laws and
regulations.
Fire
It is dangerous to throw lithium batteries and parts and components containing flammable
substances, such as cartridges, etc., into fire. Such parts and components must be disposed
of in accordance with local laws and regulations.
Ignition
When using solvents such as alcohol, etc., while conducting service, there is a
danger of fire igniting from heat from internal circuitry and from sparks. Before using any
such solvents, be sure to switch off the power and allow time for high temperature parts to
cool down. Make sure that there is sufficient ventilation when working with solvents.
3-1
PC-D320/PC-D340/FAX-L400 Chapter 3: Assembly and Disassembly
Movable parts
In order to prevent accidents with movable parts, be sure to remove the power cable when
conducting service that requires disassembly. Also, take care that
personal accessories and hair, etc., are not caught in any moving parts.
1.2 General Cautions
Damage due to electrostatic discharge
This machine contains contact sensors and printed circuit boards that use ROMs, RAMs,
custom chips and other electronic components that are vulnerable to damage by
electrostatic discharge.
Be careful to avoid any damage from electrostatic discharge when conducting
service that requires disassembly.
Static electricity warning
Electrostatic discharge can destroy electronic components and alter electrical
characteristics. Plastic tools and even your hands, if they are not earthed,
contain sufficient static electricity to damage electronic components.
The following materials may be used as countermeasures against electrostatic
discharge:
• an earthed, conductive mat
• an earthed wrist-strap
• crocodile clips for the purpose of grounding metallic parts of the main unit
For service conducted on the user’s premises, etc., where such countermeasure materials are
not available, the following countermeasures may be employed.
• Use anti-static bags for the storage and carrying of PCBs and electrical elements.
• Avoid silk and polyester clothing and leather soled shoes, favouring instead cotton clothes
and rubber soled shoes.
• Avoid working in a carpeted area.
• Before beginning the work, touch the grounded earth terminals of the main unit in order to
discharge any static electricity.
• Use a wrist-strap and earth the metal parts of the main unit.
• PCBs and electrical elements must lifted around the edges and their terminals must not be
touched.
Caution against electrical shock while working with power on
In cases where service must be carried out with power on, via a connected
power cable, be sure to wear an anti-static wrist-strap or other earth, in order
to prevent an electrical path being created through you body.
3-2
PC-D320/PC-D340/FAX-L400 Chapter 3: Assembly and Disassembly
Application of grease
Grease must not be applied to any parts that are not so designated. Also, never use any other
than the specified type of grease. Otherwise, plastic parts and rubber parts may melt or be
otherwise deformed.
Attaching and removing cables
Attaching and removing cables with the power still on may cause breakdowns and should
be avoided. In particular, flat cables are likely to cause short circuit.
When attaching or removing cables, always be sure to turn the power off.
1.3 Product-Inherent Cautions
Laser Light
Do not perform any tasks outside the scope of work indicated in the manual. (If exposed to
laser light, the retina of the eye can permanently be damaged.)
Further, the laser scanner unit must not be disassembled or modified under any
circumstances.
Handling of the Transfer Charging Roller
The presence of oils or the like on the sponge portion of the transfer charging roller leads to
faults in the printer. Do not hold the transfer charging roller by its sponge portion during
service work.
Handling the Fixing Unit
The presence of oils or the like on the surface of the pressure roller or the fixing film found
inside the fixing unit can cause fixing faults or jams. Do not hold the pressure roller during
service work.
3-3
PC-D320/PC-D340/FAX-L400 Chapter 3: Assembly and Disassembly
1.4 All Clear (Action in the Event of Abnormality)
In the event of extreme noise or shock, etc., in very rate cases, the display may go out, and all
the keys become inoperable. In that case, perform an All Clear.
This operation returns all values and settings to their default settings. However, as all settings,
such as user data and service data, etc., will be re-initialized, be sure to note down any settings
that you will need to re-enter later.
Data Registration
OK
#
Display #12 CLEAR by
pressing or button
Display ALL by
pressing or button
SERVICE MODE
#12 CLEAR
#12 CLEAR
ALL
OK
#12 CLEAR
CLEAR OK
PLEASE WAIT
DISPLAY LANGUAGE
< ENGLISH
>
Select language by
pressing or button
OK
COUNTRY SELECT
UK
Select country by
pressing or button
OK
Standby
: FAX-L400 onry
Figure 3-1 All Clear Operation
While waiting to return to the ready state after executing “All clear”, please
do not press the stop button. Doing so may cause a malfunction afterwards.
In the case of PC-D320/D340, if you execute “All Clear”, the setting, #5
TYPE in SERVICE MODE will be set up to U.S.A.. Therefore, be sure to
change #5 TYPE to a setting that is suitable for each country/region after “All
Clear”.
In the case of FAX-L400, execute “All Clear” by following the steps on the
display, and set up DISPLAY LANGUAGE and COUNTRY SELECT to
settings that are suitable for each country/region.
3-4
PC-D320/PC-D340/FAX-L400 Chapter 3: Assembly and Disassembly
2. DISASSEMBLY/ASSEMBLY
As a rule, refer to the Parts Catalog for instructions on how to disassemble and assemble the
machine. The discussions that follow are limited to those components that are thought to require
replacement relatively more often than others.
2.1 Disassembly Procedure
2.1.1 Document feed section
Separation Roller Ass’y, Separation Guide Unit, Document Feed Roller
(1) Open the cartridge cover and the face-up cover; remove the 2 screws (a). Remove the
front cover while detaching the 2 claws.
(2) Remove the 3 screws (b), and remove the left cover ass’y while detaching the 2 claws.
(3) Remove the pressure plate unit by lifting up.
Pressure plate unit
Claw
Left cover ass'y
b
b
Face-up
cover
Claw
a
Claw
Claw
Cartridge
cover
a
Front cover
Figure 3-2 Document Feed Section 1
3-5
PC-D320/PC-D340/FAX-L400 Chapter 3: Assembly and Disassembly
(4) Disconnect the connectors (J505 and J509) on the SCNT board, and detach the cable
from the clamp.
(5) Remove the screw (c) on the rear side of the main unit, and detach the grounding
cable. Remove the cable from the clamp.
Clamp
Grounding cable
c
Figure 3-3 Document Feed Section 2
(6) Open the upper document feed ass’y, and remove the document feed front cover while
detaching the 2 claws.
Upper document feed ass'y
Claws
Document feed
front cover
Figure 3-4 Document Feed Section 3
3-6
PC-D320/PC-D340/FAX-L400 Chapter 3: Assembly and Disassembly
(7) Open the document feed ass’y, and detach the stopper. While lifting up the rear side of
the document feed ass’y, shift it to the rear side for removing.
Document feed ass'y
Stopper
Figure 3-5 Document Feed Section 4
(8) Remove the document feed rear cover while detaching the 3 claws.
Document feed rear cover
Claws
Figure 3-6 Document Feed Section 5
3-7
PC-D320/PC-D340/FAX-L400 Chapter 3: Assembly and Disassembly
(9) Remove the 2 screws (d), and detach the document feed gear ass’y.
(10) Remove the 2 screws (e), and detach the document feed motor ass’y.
(11) Remove the springs (front and rear) from the hooks of the upper document feed ass’y.
(12) Remove the screw (f), and detach the stoppers (front and rear) and the turning lever.
(13) Remove the upper document feed ass’y while bending.
(14) Remove the 2 screws (g), and detach the lower document feed ass’y while
disconnecting the connector of the sensor.
Document feed
motor ass'y
f
Upper document feed ass'y
Stopper
e
Spring
Stopper
Turning lever
Spring
d
Lower document feed ass'y
Document feed
gear ass'y
g
Figure 3-7 Document Feed Section 6
3-8
PC-D320/PC-D340/FAX-L400 Chapter 3: Assembly and Disassembly
NOTE
Note for Assembling
When attaching the turning lever, be sure the positions of the stopper and the
release lever (See the figure below).
Turning lever
Release lever
Stopper
Figure 3-8 Document Feed Section 7
Check to make sure that the stopper lifts up the left side of the turning lever,
and the right side of the turning lever pushes down the release lever.
Upper document feed ass'y
Turning lever
Release lever
Stopper
Figure 3-9 Document Feed Section 8
3-9
PC-D320/PC-D340/FAX-L400 Chapter 3: Assembly and Disassembly
(15)Remove the retaining ring (h), and detach the bushing.
(16) Remove the gear (i), and detach the bushing.
(17) Remove the separation roller ass’y while shifting it to the front and the rear.
(18) Remove the claw of the separation guide unit, and detach the separation guide unit
while rotating it up. Care should be taken not to lose the detached spring.
(19) Remove the gear (j), and detach the bushing.
(20) Remove the gear (k), and detach the bushing.
(21) Remove the retaining ring (l), and detach the document feed roller by shifting the
shaft. Care should be taken not to lose the detached pin.
Separation roller ass'y
Bushing h
Pin
Bushing
Separation
guide unit
Shaft
Document
feed roller
Claw
l
Spring
Bushing
i
k
Bushing
Figure 3-10 Document Feed Section 9
3-10
j
PC-D320/PC-D340/FAX-L400 Chapter 3: Assembly and Disassembly
2.1.2 Recording section
Pick-up Roller
(1) Open the cartridge cover, and remove the cartridge.
(2) While opening the both claws of the pick-up roller placed on far behind of the cartridge
inlet, remove the roller by rotating to the front.
Claws
Pick-up roller
Figure 3-11 Recording Section 1
Separation Pad
(1) Open the cartridge cover and the face-up cover; detach the 2 screws (a). Remove the
front cover while detaching the 2 claws.
(2) Remove the 3 screws (b), and detach the left cover ass’y while detaching the 2 claws.
(3) Remove the pressure plate unit by lifting up.
Pressure plate unit
Claw
Left cover ass'y
b
b
Face-up
cover
Claw
a
Claw
Claw
Cartridge
cover
a
Front cover
Figure 3-12 Recording Section 2
3-11
PC-D320/PC-D340/FAX-L400 Chapter 3: Assembly and Disassembly
(4) Remove the 2 screws (c), and detach the right cover while removing the 5 claws.
(5) Remove the 2 interlocks of the cartridge cover arm, and detach the cartridge cover.
(6) Remove the 5 screws (d), and detach the fan cover, the rear bottom cover, and the rear
right cover.
Fan cover
d
d
Rear bottom
cover
Rear right cover
d
c
Cartridge cover arm
Claws
Cartridge cover
Claws
Right cover
Figure 3-13 Recording Section 3
(7) Disconnect the connector J503 on the SCNT board, and detach the 2 screws (e);
remove the operation panel ass’y.
(8) Remove the 4 screws (f), and detach the left stay.
Operation panel ass'y
e
f
Left stay
f
e
Figure 3-14 Recording Section 4
3-12
PC-D320/PC-D340/FAX-L400 Chapter 3: Assembly and Disassembly
(9) Disconnect the connectors (J504, J505, J506, J509, and J516) on the SCNT board, and
detach the cable from the clamp.
(10) Remove the 4 screws (h), and detach the flat bed ass’y.
(11) Remove the screw (i), and detach the operation panel under cover.
Flat bed ass'y
h
Rear side
h
i
Opration panel under cover
Figure 3-15 Recording Section 5
3-13
PC-D320/PC-D340/FAX-L400 Chapter 3: Assembly and Disassembly
(12) Disconnect the connectors (J507, J508, J511, J514, and J515) on the SCNT board.
(13) Remove the 11 screws (j), and detach the metal chassis unit (For easier removing, free
the fixing boss from its attached place).
Metal chassis unit
j
Boss
j
Figure 3-16 Recording Section 6
(14) Remove the 4 screws (k), and detach the paper eject frame unit.
k (rear side)
k
Paper eject frame unit
Figure 3-17 Recording Section 7
3-14
PC-D320/PC-D340/FAX-L400 Chapter 3: Assembly and Disassembly
(15) Remove the screw (l).
l
Figure 3-18 Recording Section 8
(16) Remove the 2 screws (m), and detach the front stay ass’y and the manual paper feed
guide plate.
Front stay ass'y
Manual paper feed guide plate
m
Figure 3-19 Recording Section 9
3-15
PC-D320/PC-D340/FAX-L400 Chapter 3: Assembly and Disassembly
(17) While pushing the sensor lever and the arm, shift the pick-up roller holder to the left
by pushing the claw.
Arm
Sensor lever
Claw
Pick-up roller holder
Figure 3-20 Recording Section 10
(18) Remove the separation pad with the flathead screwdriver.
Separation pad
Figure 3-21 Recording Section 11
3-16
PC-D320/PC-D340/FAX-L400 Chapter 3: Assembly and Disassembly
2.1.3 Fixing section
Fixing ass’y
For disassembling the fixing ass’y, follow the steps below after the steps (1)~(14) of 2.1.2
Recording Section: Removing the Separation Pad.
(15) Remove the 3 screws (l), and detach the plate.
(16) Remove the gear (m).
l
Plate
m
Figure 3-22 Fixing Section 1
(17) Disconnect the connectors (J102, J206 and J210) on the ECNT board, and disconnect
the connector of the cable between the J305 on the ECNT board and the fixing ass’y.
(18) Remove the 2 screws (n); remove the fixing ass’y by shifting to the upper left while
detaching the bosses on the both sides of the fixing ass’y.
Fixing ass'y
Rear side
n
Boss
n
Figure 3-23 Fixing Section 2
3-17
Boss
PC-D320/PC-D340/FAX-L400 Chapter 3: Assembly and Disassembly
This page intentionally left blank
3-18
Chapter 4
Maintenance
and Service
PC-D320/PC-D340/FAX-L400 Chapter 4: Maintenance and Service
1. MAINTENANCE LIST
1.1 Consumables
Level
User
Consumable
When
Toner cartridge (S35)
When “REPLACE CARTRIDGE” is
displayed.
Location
Main unit outer covers
Platen glass
When
When dirty.
When black vertical stripes appear in
copied or transmitted.
When copied or scanned images are light.
1.2 Cleaning
Level
User
Platen glass cover
Service
technician
Document pick-up roller
Document separation roller
Document separation guide
Document feed roller
Document eject roller
Platen glass
White sheet
Transfer guide
Paper pick-up roller
Separation guide
Transfer charging
Static charge eliminator
Paper feed roller
Fixing entrance guide
Fixing film
Fixing pressure roller
4-1
When document pick-up performance fails.
When document separation or feed
performance roller fails.
When document separation
performance roller fails.
When document feed performance
fails.
When document feed performance fails.
When black vertical stripes appear in copied
or transmitted.
When copied or scanned images are light.
When dirty.
When recording paper pick-up technician
performance fails.
When recording paper separation
performance fails.
When marks on back of recording paper or
roller blank spots at intervals of 45 mm in
copied or received images.
When polka appear dots in copied images.
When marks on back of recording paper.
When marks, marks on back of recording
paper, irregular/smudged black vertical line,
paper jam, or wrinkles in copied or received
images.
When marks at intervals of 56 mm or poor
fixing in printed-out.
When marks on back of recording paper at
intervals of 63 mm , poor fixing, paper jam,
or wrinkles in printed-out.
PC-D320/PC-D340/FAX-L400 Chapter 4: Maintenance and Service
1.3 Periodic Inspection
None
1.4 Periodic Replacement Parts
None
1.5 Adjustment Items
Checking the Nip Width of the Pressure Roller
Gain Auto Adjustment
1.6 General Tools
Tool
Phillips screwdriver
Flat bladed screwdriver
Precision Phillips screwdriver
Precision flat bladed screwdriver
Tweezers
Pliers, needle nose
Lint-free paper
Isopropyl alcohol
1.7 Special Tools
Tool
Grease (MOLYKOTE EM-50L)
Grease (MOLYKOTE EMD-110)
Grease (MOLYKOTE PG-641)
Grease (IF-20)
Grease (MOLYKOTE 41)
IC-Removing Tool (24-64 pin)
Use
Removing/inserting screws
Removing/inserting screws
Removing/inserting screws
Removing plastic tabs
Removing/inserting coil springs
Driving retaining ring
Clean transfer charging roller, fixing film etc.
Clean fixing film, fixing pressure roller, etc.
Use
Part No.
Apply to specified parts
Apply to specified parts
Apply to specified parts
Apply to specified parts
Apply to specified parts
Remove the main ROM on the
SCNT board
HY9-0007
HY9-0023
CK-0562
CK-8006
CK-8007
HY9-0022
4-2
PC-D320/PC-D340/FAX-L400 Chapter 4: Maintenance and Service
2. HOW TO CLEAN PARTS
REFERENCE
As for the parts (such as the separation guide and the fixing film) that require
disassembly of each unit to clean, see Chapter 3. Assembly and Disassembly.
2.1 Main Unit Outer Covers
Wipe any dirt off with a soft, dry cloth.
2.2 Platen Glass
Open the ADF or platen glass cover and wipe any dirt off with a soft, dry cloth.
2.3 Platen Glass Cover
Open the platen glass cover and wipe any dirt off with a soft, dry cloth.
2.4 Document Pick-up Roller for PC-D340/FAX-L400 only
Open the ADF and wipe any dirt off with a soft, dry cloth.
2.5 Document Separation Roller for PC-D340/FAX-L400 only
Open the ADF and wipe any dirt off with a soft, dry cloth.
2.6 Document Separation guide for PC-D340/FAX-L400 only
Open the ADF and wipe any dirt off with a soft, dry cloth.
2.7 Document Feed Roller for PC-D340/FAX-L400 only
Open the ADF and wipe any dirt off with a soft, dry cloth.
2.8 Document Eject Roller for PC-D340/FAX-L400 only
Open the ADF and wipe any dirt off with a soft, dry cloth.
2.9 White Sheet for PC-D340/FAX-L400 only
Open the ADF and wipe any dirt off with a soft, dry cloth.
4-3
PC-D320/PC-D340/FAX-L400 Chapter 4: Maintenance and Service
Document
separation guide
Document
pick-up roller
Document
separation roller
White sheet
Platen glass cover
Platen glass
Document
feed roller
Document
eject roller
Figure 4-1 Cleaning Location 1
Do not use tissue. Otherwise, paper dust may stick to the parts or a static
charge may be generated.
Precautions when using Isopropyl alcohol (IPA)
When cleaning with IPA, take care to prevent the IPA from splashing hightemperature parts. If IPA splashes high-temperature parts, leave for at least
three minutes to allow the IPA to evaporate.
4-4
PC-D320/PC-D340/FAX-L400 Chapter 4: Maintenance and Service
2.10 Transfer Guide
(1) Disconnect the power cord of the main unit from the power source.
(2) Open the right cover and remove the toner cartridge.
Store the toner cartridge in its original protective bag to avoid exposure to
light.
(3) Using a soft clean cloth, wipe any dust off the blank plate of the transfer
guide.
To avoid the deterioration of print quality, never touch the transfer charging
roller when you clean the metal strip.
NOTE
2.11 Paper Pick-up Roller
Wipe with lint-free paper and remove any toner or paper debris.
2.12 Separation Guide
Wipe with lint-free paper and remove any toner or paper debris.
2.13 Transfer Charging Roller
Wipe with lint-free paper and remove any toner or paper debris.
Do not touch or hold the sponge section of the transfer charging roller. Doing
so can cause marks on back of paper or blank spots in copied images. Do not
use solvent.
Replace the charging roller it is deformed or cannot be thoroughly cleared
using lint-free paper.
2.14 Static Charge Eliminator
Wipe with a lint-free paper and remove any foreign matter, such as paper fragments.
2.15 Paper Feed roller
Wipe with lint-free paper and remove any toner or paper debris.
2.16 Fixing Entrance Guide
Wipe with a lint-free paper and remove any toner or paper debris.
2.17 Fixing Film
Using lint-free paper dipped in isopropyl alcohol, wipe of the fixing film.
2.18 Fixing Pressure Roller
Using lint-free paper dipped in isopropyl alcohol, wipe of the fixing pressure roller.
4-5
PC-D320/PC-D340/FAX-L400 Chapter 4: Maintenance and Service
Fixing film
Paper Pick-up roller
separation guide
Paper feed roller
Fixing pressure roller
Transfer guide
Transfer charging roller
Static charge eliminator
Fixing entrance guide
Figure 4-2 Cleaning Location 1
4-6
PC-D320/PC-D340/FAX-L400 Chapter 4: Maintenance and Service
3. ADJUSTMENT
3.1 Checking the Nip Width of the Pressure Roller
The fixing unit is not designed to allow adjustment of the pressure (nip width); however, the
incorrect nip width can cause fixing problems.
Follow the procedures below to check the nip width:
(1) Make an all-black print of A4 size using an EP cartridge,and bring the print to the customer’s site.
(2) Place the all-black print in the multi-purpose tray of the printer,with the printed side
facing down.
(3) Select face-up delivery by shifting the delivery switching lever downward.
(4) Press the test print switch.
(5) Turn OFF the printer when the leading edge of the print emerges at the face-up
tray. Openthe rear cartridge cover and take out the print about 60 seconds later.
(6) Measure the width of the glossy band across the paper and check that it meets the
require-ments as shown in Figure 4-3.
Center (a):6.0 mm to 7.6 mm
Right and left:6.0 mm to 7.6 mm
Difference between right side and left side (|b-c|):1.0 mm or less
Difference between right/left side and center (b-a,c-a):1.0 mm or less
c
Paper feed
direction
Center of A4
size paper.
a
b
Figure 4-3 Fixing Nip Width
4-7
PC-D320/PC-D340/FAX-L400 Chapter 4: Maintenance and Service
3.2 Gain Auto Adjustment
Performing Gain Auto Adjustment
In case of having replaced the SCNT board, the contact sensor, or the platen glass, check to
make sure that the platen glass cover is closed properly before implementing Gain Auto
Adjustment.
Procedure
(1) Select “TEST MODE” in Service Mode.
(2) Press the numeric key “2”, and select “CCD TEST”.
(3) Press the numeric key “0”,“8”, and Gain Auto Adjustment is performed. Be sure that
“OK” is indicated on the display.
(4) Press STOP/RESET key, and the display goes back to TEST MODE.
In case that the test result is NG, check the following and try the adjustment again.
(1) Be sure that the platen glass cover is closed properly.
(2) Be sure that the platen glass is attached properly.
(3) Check if dirt is stuck to the white sheet.
(4) Be sure that the cable is connected between the contact sensor and the SCNT board.
(5) Replace the contact sensor.
4-8
PC-D320/PC-D340/FAX-L400 Chapter 4: Maintenance and Service
4. TROUBLESHOOTING
4.1 Troubleshooting Index
Using the troubleshooting index below to investigate the cause of a problem and refer to the
specified page for countermeasures.
Problem
• Errors shown on the display (Evaluation criteria: Look at the unit in
question.)
• The error message can be checked.
Page 4-11
• The error code can be checked.
Page 4-15
• General errors
• The unit does not pawer on.
• Abnormal display.
Nothing is display.
Part of the LCD panel does not display anything.
• The keys do not work.
Page 4-26
Page 4-26
Page 4-26
• Printing problems (Evaluation criteria: Test printing is faulty.)
• The paper is not fed correctly.
Page 4-27
The main motor does not run.
The paper is not picked up from the multi-purpose tray.
The paper is not picked up from the cassette.
The paper skews.
• The printing operation is abnormal.
Page 4-28
The unit indicates there is a paper jam when there is no paper jam.
• Poor printing quality.
Page 4-29
Light
Dark
Completely blank
All black
Dots
Marks on back of papers
Black vertical lines
Irregular and smudged black vertical lines
Irregular and smudged black horizontal lines
Marks
Blank spots
White vertical lines
White horizontal lines
Faulty registration
Distortion/BD signal failure
Partially compressed/stretched image
Poor fixing
4-9
PC-D320/PC-D340/FAX-L400 Chapter 4: Maintenance and Service
• Scanning problems (Evaluation criteria: Test printing is good, but the
copied image is poor.)
• The document is not fed.
Page 4-34
The document feed motor does not run.
The document slips against the rollers.
The document does not separate.
The scanner unit’s sensors are defective.
• The scanning image is abnormal.
Page 4-34
Noting is printed.
The image has vertical stripes.
The image has thick vertical stripes.
• The contact sensor operation is faulty.
Page 4-35
The CS drive motor does not run.
The CS home position sensor is defective.
• Test mode function problems
• Faulty control panel test.
The LCD panel does not display correctly.
The LED lamp fails to go ON.
The keys on the operation panel fails to work properly.
• Faulty contact sensor test.
The LED of the contact sensor fails to go ON properly.
• Faulty DRAM test.
The indication “READ & COMPARE NG” appears.
• Faulty sensor test.
DES sensor fails to operate properly.
DS sensor fails to operate properly.
Recording paper sensor fails to operate properly.
Cartridge cover sensor fails to operate properly.
4-10
Page 4-36
Page 4-36
Page 4-36
Page 4-36
PC-D320/PC-D340/FAX-L400 Chapter 4: Maintenance and Service
4.2 Error Shown on the Display
4.2.1 User error message
Look for the applicable error message and implement the appropriate countermeasures.
“CHECK DOCUMENT”
Cause: Document jam. This is displayed when the document sensor detects paper, but
the document edge sensor cannot detect the leading edge of the document with
15 seconds from the start of the feed operation.
Solution: (1) Remove the document and try again.
(2) If the document does not feed correctly, clean the rollers.
“CHECK PRINTER”
Cause: (1) An abnormality has occurred in the printer.
(2) BD signal is not detected at the specified interval.
(3) Page top sensor is detected earlier than the specified timing during
paper feeding.
Solution: (1) Reset the machine by opening the right cover and then closing it.
(2) Replace the Laser/Scanner unit.
(3) Replace the ECNT board.
(4) Replace the SCNT board.
“DOCUMENT TOO LONG”
Cause: Displayed when one page of the document was longer than 14 inches (356
mm).
Solution: (1) Use a copy machine to copy the document onto several shorter pages, then
copy again.
(2) Reduce them on a copy machine if necessary. Then paste them on standard
letter or A4-size sheets for scanning.
“HUNG UP HONE”
Cause: The handset was left off the hook after the completion of transmission or
reception.
Solution: Put the handset back on the handset rest.
“INCORRECT PAPER SIZE”
Cause: The size of the available recording paper does not match the size of the
document waiting to be printed.
Solution: Load the correct paper size or change the PAPER SIZE setting of the Additional
Functions. Then reset the machine by opening the right cover and then closing
it.
4-11
PC-D320/PC-D340/FAX-L400 Chapter 4: Maintenance and Service
“INSTALL CARTRIDGE”
Cause: (1) The toner cartridge has run out of toner.
(2) Toner detection structure defects.
Solution: (1) Replace the toner cartridge.
(2) Check the connection the ECNT board (J304).
(3) Clean the primary bias contact on the ECNT board and cartridge contact.
(4) Clean the drum grounding contact pin of the drive unit and cartridge
contact.
(5) Replace the ECNT board.
“LOAD A4 SIZE PAPER”
Cause: No A4-size paper is loaded in the cassette or multi-purpose tray.
Solution: Load A4-size paper in the cassette or multi-purpose tray.
“MEMORY FULL”
Cause: This machine’s memory is full because collate copy or 2 on 1 copy was set
when a large document is loaded.
Solution: (1) Divide the document and send each part separately.
(2) If “MEMORY FULL” and “PRESS OK KEY” appear while scanning
documents using the ADF, the document being scanned stops in the ADF.
In this case, press “OK” to make the document come out automatically.
“OUTPUT TRAY FULL”
Cause: Output tray is full of recording paper.
Solution: (1) Remove the recording paper on the Output tray.
(2) Check if the Over flow sensor is operating correctly using the methodes
given in this chapter, 6.6 Faculty Tests, Test mode [6] Faculty test,
[3] Sensor tests.
(3) Check the connection between the SCNT board (J511) and Over flow
sensor.
(4) Replace the Over flow sensor.
(5) Replace the SCNT board.
“PLEASE WAIT”
Cause: The standby state and the message “PLEASE WAIT” appears alternately on the
screen.
Solution: (1) Check the connection between the CS drive motor and the SCNT board
(J504).
(2) Replace the CS drive motor.
(3) Replace the SCNT board.
4-12
PC-D320/PC-D340/FAX-L400 Chapter 4: Maintenance and Service
“PRINTER DATA ERROR”
Cause: Abnormality has occurred in the data transmission between the mashine and
computer.
Solution: Use Status Monitor to delete the current print job or the final print job (If more
than one jobs are being printed). Then you can shift to the next job.
If you use PRINTER RESET of the Additional Functions, all the print jobs are
deleted.
“RECEIVED IN MEMORY”
Cause: (1) The fax unit has run out of recording paper.
(2) The toner supply of the toner cartridge is exhausted.
(3) The output tray is full of paper.
Solution: (1) Supply paper to the paper cassettes.
(2) Change the toner cartridge.
(3) pick up the printed pages onthetray.
“REC. PAPER JAM”
Cause: Recording paper jam.
This is displayed when the sensor detects a paper jam.
Solution: (1) Recover paper jam.
(2) Check the connection between the ECNT board (J211) and Page top sensor.
(3) Check the connection between the ECNT board (J210) and Paper eject
sensor.
(4) Check the connection between the ECNT board (J204) and Paper pick-up
solenoid.
(5) Check the connection between the ECNT board (J401) and Main motor.
(6) Replace the sensors, solenoid and main motor.
(7) Replace the ECNT board.
(8) Replace the SCNT board.
“START AGAIN”
Cause: An error due to system malfunction or line breakdown.
Solution: Carry out the same operation again.
“STOP KEY PRESSED / PRESS OK KEY”
Cause: You have pressed the Stop / Reset button to cancel the current transaction.
Solution: No need.
4-13
PC-D320/PC-D340/FAX-L400 Chapter 4: Maintenance and Service
“SUPPLY REC. PAPER”
Cause: (1) Either recording paper run out or there is no recording paper cassette loaded.
This is displayed when the recording paper sensor detects no paper.
(2) Either recording paper run out or there is no recording paper multi-purpose
tray loaded.
Solution: (1) Refill the recording paper in the cassette.
(2) Refill the recording paper in the multi-purpose tray.
(3) Install the paper correctly.
(4) Check if the Recording paper sensor is operating correctly using the
methodes given in this chapter, 6.7 Faculty Tests, Test mode [6] Faculty
test, [3] Sensor tests.
(5) Check the Recording paper sensor on the ECNT board (PS201) and
actuator.
(6) Replace the ECNT board.
(7) Replace the SCNT board.
“SYSTEM ERROR”
See Printer error codes (E000, E100, E805)
4-14
PC-D320/PC-D340/FAX-L400 Chapter 4: Maintenance and Service
4.2.2 Error codes
a) Service error code output
TX/RX No. 5001
Display alternates repaetedly
START AGAIN ##0106
Figure 4-4 Service Error Code Display
b) Error code countermeasures
The following item c) lists all the error codes that the product can display. As for causes and
countermeasures, only the error codes which are newly incorporated in the unit as well as
which require remedies unique to the product are included in the item d).
• Increase the transmission level
Increase service data #2 MENU Parameter No.07 toward 0 (dBm).
• Decrease the transmission level
Decrease service data #2 MENU Parameter No.07 toward -15 (dBm).
• Echo measures
Change the following bit switches of service data #1 SSSW SW03.
Bit 4: 1
Ignore the first DIS signal sent by the other fax machine.
0
Do not ignore the first DIS signal sent by the other fax machine.
Bit 5: 1
Transmit a tonal signal (1850 or 1650 Hz) when the other fax machine
sends a DIS signal.
0
Do not transmit a tonal signal when the other fax machine sends a DIS
signal.
Bit 6: 1
Transmit a 1850-Hz tonal signal when bit 5 is 1.
0
Transmit a 1650-Hz tonal signal when bit 5 is 1.
Bit 7: 1
Transmit a tonal signal before sending a CED signal.
0
Do not transmit a tonal signal before sending a CED signal.
4-15
PC-D320/PC-D340/FAX-L400 Chapter 4: Maintenance and Service
• EPT (Echo Protect Tone)
Change service data #1 SSSW SW03 bit 1.
Bit 1: 1
Transmit an echo protect tone.
0
Do not transmit an echo protect tone.
• Adjust NL equalizer.
Set service data #2 MENU Parameter No.05 to “ON”.
• Reduce the transmission start speed.
Reduce the transmission speed by changing “TX START SPEED” setting in user data
“SYSTEM SETTINGS”.
• Loosen the TCF judgment standard.
Not available for this fax.
• Loosen the RTN transmission conditions.
Change service data #3 NUMERIC Param. Parameters No.02 to 04.
No.02 Percentage of errors in all lines
: Set close to 99%.
No.03 Number of lines of burst condition : Set close to 99 lines.
No.04 Lines below the burst condition
: Set close to 99 times.
• Increase the no-sound time after CFR reception.
Change service data #1 SSSW SW04 bit 4 to “1”.
Bit 4: 1
Time when the low-speed signal is ignored after sending a CFR signal:
1500 ms
0
Time when the low-speed signal is ignored after sending a CFR signal:
700 ms
4-16
PC-D320/PC-D340/FAX-L400 Chapter 4: Maintenance and Service
c) ERROR CODE LIST
The error codes that have newly been added starting with the product are identified by the
notation “New” ; those error codes for which remedies unique to the product are offered are
identified by the notation “UNQ (UNIQUE)” .
• User error code
No.
Tx or Rx
Definition
UNQ #0001
[TX
]
Document has jamed
UNQ #0003
[TX/RX]
Document is too long, or page time-over
UNQ #0005
[TX/RX]
Initial identification (T0/T1) time-over
#0006
[TX
]
Transmission cannot be made
[RX
]
Phase synchronization fails in OLD-FM
#0008
[TX
]
Password does not match for polling transmission
UNQ #0009
[RX
]
Recording paper has jamed or the recording paper has run out
#0011
[RX
]
Polling reception error
#0012
[TX
]
The other party has run out of recording paper
#0018
[TX/RX]
Auto dialing transmission error
#0021
[RX
]
The other party has rejected the machine during polling
reception
#0022
[TX
]
Call fails
#0025
[TX/RX]
Auto-dial setting is wrong
#0033
[TX
]
Confidential transmission cannot be used
#0034
[TX
]
Transmission to the confidentical mailbox of the other party
cannot be made in confidential transmission
#0035
[TX
]
Relay control transmission cannot be used
#0036
[TX
]
Relay control transmission cannot be made
#0037
[RX
]
Memory has overflowed when receiving images
#0039
[TX
]
Closed network transmission fails
#0054
[TX/RX]
Call cannot be made
#0056
[RX
]
Recording paper feed fault
#0057
[RX
]
Recording paper feed fault
#0058
[RX
]
Recording paper feed fault
#0059
[TX
]
Dialed number and the connected number (CSI) do not match
#0080
[TX
]
The other party is not equipped with an ITU-T-compliant
subaddress reception function
#0081
[TX
]
The other party is not equipped with an ITU-T-compliant
password reception function
#0082
[RX
]
The other party is not equipped with an ITU-T-compliant
selective polling transmission function
#0083
[RX
]
Selective polling address or the password does not match
during ITU-T-compliant selective polling reception
#0084
[RX
]
The other party is not equipped with a password function
for ITU-T-compliant selective polling reception
#0099
[TX/RX]
Stop button was pressed during a communication
#0995
[TX/RX]
Memory transmission reservation clear/memory reception
image clear
4-17
PC-D320/PC-D340/FAX-L400 Chapter 4: Maintenance and Service
• Service error code
No.
Tx or Rx
##0100 [TX
]
##0101
[TX/RX]
##0102
##0103
##0104
##0106
##0107
##0109
[TX
[RX
[TX
[RX
[RX
[TX
##0111
##0114
##0116
[TX/RX]
[RX
]
[TX/RX]
##0200
##0201
##0220
##0223
##0224
##0229
##0237
##0238
##0261
[RX
]
[TX/RX]
[TX/RX]
[TX
]
[TX/RX]
[RX
]
[RX
]
[RX
]
[TX/RX]
##0280
[TX
]
##0281
[TX
]
##0282
[TX
]
##0283
[TX
]
##0284
##0285
##0286
##0287
##0288
[TX
[TX
[TX
[TX
[TX
]
]
]
]
]
##0289
[TX
]
]
]
]
]
]
]
Definition
The number allowed for retransmission of the procedure signal
was exceeded during transmission
The modem speed of the machine does not match that of the
other party
Fallback is not possible
EOL cannot be detected for 5 sec (15 sec if CBT)
RTN or PIN has been received
The procedure singal cannot be received for 6 sec while in wait
The transmitting machine cannot be use fallback
After transmitting DCS, a signal other than DIS, DTC, FTT,
CFR, and CRP was received, exceeding the permitted number of
transmissions of the procedure signal
Memory error
RTN was transmitted
During a communication, suspension of loop current was
detected
During image reception, a carrier is not detected for 5 sec
DCN was received through a non-normal procedure
System error (e.g., main program may have gone away)
The line was disconnected during communication
Fault occurred in the communication procedure signal
The recording system became locked for 1 min
The IC used to control the decoder malfunctioned
The unit used to control recording malfunctioned
System error occurred between the modem and system control
board
The number of re-transmissions of the procedure signal has been
exceeded
The number of re-transmissions of the procedure signal has been
exceeded
The number of re-transmissions of the procedure signal has been
exceeded
The number of re-transmissions of the procedure signal has been
exceeded
DCN has been received after transmission of TCF
DCN has been received after transmitting EOP
DCN has been received after transmitting EOM
DCN has been received after transmitting MPS
After transmitting EOP, a signal other than PIN, PIP, MCF,
RTP, or RTN was received
After transmitting EOM, a signal other than PIN, PIP,MCF,
RTP, or RTN was received
4-18
PC-D320/PC-D340/FAX-L400 Chapter 4: Maintenance and Service
No.
##0290
Tx or Rx
[TX
]
##0295
[TX
]
##0670
[TX
]
##0671
[RX
]
##0672
[TX
]
##0673
[RX
]
##0674
[TX
]
##0675
[RX
]
##0705
##0711
[TX
[TX
]
]
##0750
[TX
]
##0751
[TX
]
##0752
[TX
]
##0753
[TX
]
##0754
[TX
]
##0755
[TX
]
##0757
[TX
]
##0758
[TX
]
Definition
After transmitting MPS, a signal other than PIN, PIP,MCF,
RTP, or RTN was received
For the auto alarm notification function, the other party does not
have an NTT remote maintenance function
In V.8 late start, the V.8 ability was detected in DIS from the
other party and, in response, CI was transmitted; however, the
procedure failed to advance, causing a T1 time-over condition
In V.8 call arrives, the procedure fails to advance to phase 2 after
CM detection, causing a T1 time-over condition
In V.34 transmission, the procedure fails to move from phase 2
to phase 3 and later, causing a T1 time-over condition
In V.34 reception, the procedure fails to move from phase 2 to
phase 3 and later, causing a T1 time-over condition
In V.34 transmission, the procedure fails to move from phase 3
or phase 4 to a control channel or later, causing a T1 time-over
condition
In V.34 reception, the procedure fails to move from phase 3 or
phase 4 to a control channel or later, causing a T1 time-over
condition
In CHT transmission, DCN was received after detecting NACK
In CHT transmission, REJ was received after transmission of an
image signal
In ECM transmission, no significant signal can be received after
transmission of PPS-NULL, and the allowed number of
procedure signal re-transmissions was exceeded
In ECM transmission, a signal other than MCF, PPR, or RNR
was received after transmission of PPS-NULL
In ECM transmission, DCN was received after transmission of
PPS-NULL
In ECM transmission, the allowed number of procedure signal
re-transmissions was exceeded or a T5 time-over (60 sec)
condition occurred after transmission of PPS-NULL
In ECM transmission, the allowed number of procedure signal
re-transmissions was exceeded after transmission of PPS-NULL
In ECM transmission, no significant signal can be received after
transmission of PPS-MPS, and the allowed number of procedure
signal re-transmissions was exceeded
In ECM transmission, DCN was received after transmission of
PPS-MPS
In ECM transmission, the allowed number of procedure signal
re-transmissions was exceeded or a T5 time-over (60 sec)
condition occurred after transmission of PPS-MPS
4-19
PC-D320/PC-D340/FAX-L400 Chapter 4: Maintenance and Service
No.
##0759
Tx or Rx
[TX
]
##0760
[TX
]
##0762
[TX
]
##0763
[TX
]
##0764
[TX
]
##0765
[TX
]
##0767
[TX
]
##0768
[TX
]
##0769
[TX
]
##0770
[TX
]
##0772
[TX
]
##0773
[TX
]
##0774
[TX
]
##0775
[TX
]
##0777
[TX
]
##0778
[TX
]
##0779
[TX
]
Definition
In ECM transmission, the allowed number of procedure signal
re-transmissions was exceeded after transmission of PPS-MPS
In ECM transmission, no significant signal can be received after
transmission of PPS-EOM, and the allowed number of
procedure signal re-transmissions was exceeded
In ECM transmission, DCN was received after transmission of
PPS-EOM
In ECM transmission, the allowed number of procedure signal
re-transmissions was exceeded or a T5 time-over (60 sec)
condition occurred after transmission of PPS-EOM
In ECM transmission, the allowed number of procedure signal
re-transmissions was exceeded after transmission of PPS-EOM
In ECM transmission, no significant signal can be received after
transmission of PPS-EOP, and the allowed number of procedure
signal re-transmissions was exceeded
In ECM transmission, DCN was received after transmission of
PPS-EOP
In ECM transmission, the allowed number of procedure signal
re-transmissions was exceeded or a T5 time-over (60 sec)
condition occurred after transmission of PPS-EOP
In ECM transmission, the allowed number of procedure signal
re-transmissions was exceeded after transmission of PPS-EOP
In ECM transmission, no significant signal can be received after
transmission of EOR-NULL, and the allowed number of
procedure signal re-transmissions was exceeded
In ECM transmission, DCN was received after transmission of
EOR-NULL
In ECM transmission, the allowed number of procedure signal
re-transmissions was exceeded or a T5 time-over (60 sec)
condition occurred after transmission of EOR-NULL
In ECM transmission, ERR was received after transmission of
EOR-NULL
In ECM transmission, no significant signal can be received after
transmission of EOR-MPS, and the allowed number of
procedure signal re-transmissions was exceeded
In ECM transmission, DCN was received after transmission of
EOR-MPS
In ECM transmission, the allowed number of procedure signal
re-transmissions was exceeded or a T5 time-over (60 sec)
condition occurred after transmission of EOR-MPS
In ECM transmission, ERR was received after transmission of
EOR-MPS
4-20
PC-D320/PC-D340/FAX-L400 Chapter 4: Maintenance and Service
No.
##0780
Tx or Rx
[TX
]
##0782
[TX
]
##0783
[TX
]
##0784
[TX
]
##0785
[TX
]
##0787
[TX
]
##0788
[TX
]
##0789
[TX
]
##0790
[RX
]
##0791
[TX/RX]
##0792
[RX
]
##0793
[RX
]
##0795
##0799
[TX/RX]
[TX
]
No.
New E000
New E100
New E805
Definition
In ECM transmission, no significant signal can be received after
transmission of EOR-EOM, and the allowed number of
procedure signal re-transmissions was exceeded
In ECM transmission, DCN was received after transmission of
EOR-EOM
In ECM transmission, the allowed number of procedure signal
re-transmissions was exceeded or a T5 time-over (60 sec)
condition occurred after transmission of EOR-EOM
In ECM transmission, ERR was received after transmission of
EOR-EOM
In ECM transmission, no significant signal can be received after
transmission of EOR-EOP, and the allowed number of
procedure signal re-transmissions was exceeded
In ECM transmission, DCN was received after transmission of
EOR-EOP
In ECM transmission, the allowed number of procedure signl retransmissions was exceeded or a T5 time-over (60 sec) condition
occurred after transmission of EOR-EOP
In ECM transmission, ERR was received after transmission of
EOR-EOP
In ECM receprion, ERR was transmitted after reception of
EOR-Q
During an ECM mode procedure, a signal other than a
significant signal was received
In ECM reception, PPS-NULL between partial pages cannot be
detected
In ECM reception, no effective frame was detected while signals
were received at high speed, and a time-over condition occurred
A fault occurred in decoding process during a communication
System error
Definition
Fixing unit failure
Scanner unit failure
Fan failure
4-21
PC-D320/PC-D340/FAX-L400 Chapter 4: Maintenance and Service
d) New error codes and recovery methods
Those error codes that have been added starting with the product and those error codes for
which remedies unique to the product are offered are shown together with causes and
remedies, where applicable.
#001 [TX] Document has jammed
Cause:
The document jammed in the fax machine.
Solutions:
Remove the document and transmit/copy again.
Cause:
The document width size or thickness does not meet the standards.
Solutions:
Use a copy machine to copy the document to LTR or other standard size
paper, then transmit that copy.
Cause:
Internal structure defect.
Solutions:
(1) Check if the document sensor (DS) and document edge sensor
(DES) are operating correctly using the methods given in this
chapter, 6.7 Faculty Tests, Test mode [6] Faculty test, [3] Sensor
tests.
(2) Check the document sensor(DS) and SCNT board (J509)
connections.
(3) Check the document edge sensor (DES) and SCNT board (J509)
connections.
(4) Make a copy, and make sure that the document feed motor is
operating corrctly.
(5) Check the document feed motor and SCNT board (J505)
connections.
(6) Replace the document sensor(DS).
(7) Replace the document edge sensor (DES).
(8) Replace the document feed motor.
(9) Replace the SCNT board.
4-22
PC-D320/PC-D340/FAX-L400 Chapter 4: Maintenance and Service
#003 [TX/RX] Document is too long, or page time-over
Cause:
One page of the document was longer than 39.4 inches (1 meter) or
transmission/copying took longer than the regulated time (32 minutes).
Solutions:
(1) Use a copy machine to copy the document onto serveral shorter
page, then tranmit/copy.
(2) Raise the page timer value with Service Data #1 SSSW SW12.
Cause:
Reception took longer than the regulated time (32 minutes).
Solutions:
(1) Have the other party split the document over multiple pages and
receive it that way.
(2) Contact the other party and check the cause.
(3) Raise the page timer value with Service Data #1 SSSW SW12.
Cause:
Internal structure defect.
Solutions:
(1) Check if the document edge sensor (DES) are operating correctly
using the methods given in this chapter, 6.7 Faculty Tests, Test
mode [6] Faculty test, [3] Sensor tests.
(2) Check the document edge sensor (DES) and SCNT board (J509)
connections.
(3) Make a copy,and make sure that the document read motor is
operating corrctly.
(4) Check the document feed motor and SCNT board (J505)
connections.
(5) Replace the document edge sensor (DES).
(6) Replace the document feed motor.
(7) Replace the SCNT board.
4-23
PC-D320/PC-D340/FAX-L400 Chapter 4: Maintenance and Service
#005 [TX/RX] Initial identification (T0/T1) time-over
Cause:
Tone/pulse parameter set incorrectly.
Solutions:
Set the user data “TEL LINE TYPE” tone/pulse parameter correctly.
Cause:
The time until connection with the other fax is too long.
Solutions:
(1) When registering for auto dialing, add a long pause to delay the
start of the timer.
(2) Lengthen the T0 timer with Service Data #3 Numeric param.10 so
that the timer does not time out.
Cause:
The other fax does not answer.
Solutions:
Contact the other party and have them check for the cause.
Cause:
A significant signal has not been received after starting transmitting
theDIS signal.
Solutions:
Lengthen the T1 timer (Rx) with Service Data #3 Numeric param.11 so
that the time-out error does not occurr.
Cause:
The communications mode (G2,G3,etc) of the other fax does not match
that of this fax.
Solutions:
The communications mode is a part of specification for the fax, so there is
no countermeasure.
Cause:
(1) The other fax malfunctioned during transmission due to echoes.
(2) Malfunction due to echoes during reception.
Solutions:
Provide measures against echoing using SW03 of service data #1 SSSW.
#009 [RX] Recording paper has jammed or the recording paper has run out
Cause:
The recording paper jammed.
Solutions:
Clear the recording paper jam.
Cause:
There is no recording paper.
Solutions:
Load recording paper.
Cause:
Internal structure defect.
Solutions:
(1) Check if the cassette recording paper sensor, multi-purpose tray
paper sensor are operating correctly using the methodes given in
this chapter, 6.7 Faculty Tests, Test mode [6] Faculty test, [3] Sensor
tests.
(2) Check the page top sensor, the sensor cable and the ECNT board
(J211) connections.
(3) Check the paper eject sensor, the sensor cable and the ECNT board
(J210) connections.
(4) Check the main motor, main motor connector and the ECNT
board(J401).
(5) Replace the page top sensor.
(6) Replace the paper eject sensor.
(7) Replace the main motor.
(8) Replace the ECNT board.
(9) Replace the SCNT board.
4-24
PC-D320/PC-D340/FAX-L400 Chapter 4: Maintenance and Service
E000 Fixing unit failure
Cause:
(1) Shorted/broken wired main thermistor
(2) Shorted/broken wired sub thermistor
(3) Broken wired heater/blown thermal fuse
Solutions:
(1) Turn the power off and remove the fixing unit from the machine.
Measure the resistance between the fixing unit connector J206-2
(FSRTH) and J206-1 (GND).
If the resistance is not within the range between 350 KW and 520
KW (room temperature of 20°C), replace the fixing film unit.
(2) Turn the power off and remove the fixing unit from the machine.
Measure the resistance between the fixing unit connector J206-3
(FSRTH2) and J206-4 (+3.3V).
If the resistance is not within the range between 370 KW and 520
KW (room temperature of 20°C), replace the fixing film unit.
(3) With the fixing film unit removed, if there is no continuity between
the fixing unit connectors J102-1 (ACH) and J102-2 (ACN), replace
the fixing film unit.
(4) Replace the ECNT board.
(5) Replace the SCNT board.
E100 Scanner unit failure
Cause:
(1) Poor contact in the Laser/Scanner unit connectors
(2) Defective Laser/Scanner unit
(3) Poor contact in the SCNT board connectors
(4) Defective SCNT board
Solutions:
(1) Reconnect the SCNT board connectors J507 and J508 correctly.
(2) Reconnect the Laser driver board (J801), and the Scanner motor
connector (J802).
(3) Replace the Laser/Scanner unit
(4) Replace the SCNT board.
E805 Fan failure
Cause:
(1)
(2)
Solutions:
(1)
(2)
(3)
While the fan is rotating, fan lock state is detected for 10 sec. or
more continuously.
When the fan starts rotating, fan lock state is not detected within 10
sec.
Reconnect the ECNT board connector J203 correctly.
Disconnect the ECNT board connector J203. Measure the voltage
between the ECNT board connector J203-1 (/FANON) and J203-2
(GND) immediately after power-ON.
If the voltage changes from 0V to about 24V, replace the fan.
Replace the ECNT board.
4-25
PC-D320/PC-D340/FAX-L400 Chapter 4: Maintenance and Service
4.3 Errors not Shown on the Display
4.3.1 General errors
• The unit does not power on. (Evaluation criteria: Look at the actual unit.)
(1) Check the power cord connection.
(2) Check the connection between the SCNT board (J514) and the ECNT board (J201).
(3) Replace the ECNT board.
(4) Replace the SCNT board.
• Abnormal display. (Applicable test mode: Operation panel test)
Nothing is displayed.
(1) Check the connection between the OPCNT board (J1) and the SCNT board (J503).
(2) Check the connection between the LCD unit and the OPCNT board (J5).
(3) Replace the LCD unit.
(4) Replace the OPCNT board.
(5) Replace the SCNT board.
Part of the LCD panel does not display anything.
(1) Check for LCD problems with the test mode.
(2) Check the connection between the OPCNT board (J1) and the SCNT board (J503).
(3) Check the connection between the LCD unit and the OPCNT board (J5).
(4) Replace the LCD unit.
(5) Replace the OPCNT board.
(6) Replace the SCNT board.
• The keys do not work. (Applicable test mode: Operation panel test)
(1) If the test mode can be used, check for faulty keys.
(2) Check the connection between the OPCNT board (J1) and the SCNT board (J503).
(3) Replace the OPCNT board.
(4) Replace the SCNT board.
4-26
PC-D320/PC-D340/FAX-L400 Chapter 4: Maintenance and Service
4.3.2 Printing problems
• Faulty printing (Evaluation criteria: Test print is faulty.)
• The paper is not fed correctly. (Evaluation criteria: Look at the actual unit.)
The main motor does not run.
(1) Check the connection between the main motor and the ECNT board (J401).
(2) Replace the main motor.
(3) Replace the ECNT board.
(4) Replace the SCNT board.
The paper is not picked up from the multi-purpose tray.
(1) Check whether the recommended paper is used.
(2) Check whether more than 10 sheets of paper have been loaded in the multi-purpose
tray.
(3) Check whether the paper has been loaded into the multi-purpose tray correctly.
(4) Check the connection between the paper pick-up solenoid and the ECNT board (J204).
(5) Replace the paper pick-up solenoid.
(6) Clean the separation pad.
(7) Replace the separation pad.
(8) Replace the ECNT board.
(9) Replace the SCNT board.
The paper is not picked up from the cassette.
(1) Check whether the recommended paper is used.
(2) Check whether more than 250 sheets of paper have been loaded in the cassette.
(3) Check whether the paper has been loaded into the cassette correctly.
(4) Check the connection between the paper pickup solenoid and the ECNT board (J204).
(5) Replace the paper pickup solenoid.
(6) Clean the separation pad.
(7) Replace the separation pad.
(8) Replace the ECNT board.
(9) Replace the SCNT board.
4-27
PC-D320/PC-D340/FAX-L400 Chapter 4: Maintenance and Service
The paper skews.
(1) Check whether the recommended paper is used.
(2) Check whether more than 10 sheets of paper have been loaded in the multi-purpose
tray.
(3) Check whether more than 250 sheets of paper have been loaded in the cassette.
(4) Check whether the paper has been loaded into the multi-purpose tray correctly.
(5) Check whether the paper has been loaded into the cassette correctly.
(6) Check whether dust or paper debris have built up inside the cassette and the multipurpose tray.
(7) Check whether the paper pickup roller, or any other rollers, are damaged or scratched.
• The printing operation is abnormal.
The unit indicates there is a paper jam when there is no paper jam.
(1) Check if the recording paper sensor is operating correctly using the methodes given in
this chapter, 6.6 Faculty Tests, Test mode [6] Faculty test, [3] Sensor tests.
(2) Check the recording paper sensor, the sensor and the ECNT board (PS201).
(3) Check the page top sensor, the sensor cable and the ECNT board (J211) connections.
(4) Check the paper eject sensor, the sensor cable and the ECNT board (J210)
connections.
(5) Check the main motor, main motor connector and the ECNT board (J401).
(6) Replace the recording paper sensor.
(7) Replace the page top sensor.
(8) Replace the paper eject sensor.
(9) Replace the main motor.
(10) Replace the ECNT board.
(11) Replace the SCNT board.
4-28
PC-D320/PC-D340/FAX-L400 Chapter 4: Maintenance and Service
• Poor printing quality (Evaluation criteria: Check the test print image’s faults.)
Before checking for the cause of print defects, check whether the user uses Canonrecommended paper and stores it correctly. If the problem is solved by using the
recommended paper, the customer should be advised to use the recommended paper and
store it correctly.
Light
Dark
All black
Black vertical
lines
Irregular and smudged
black vertical lines
Marks on
back of paper
Dots
Irregular and
smudged black
horizontal lines
White vertical
lines
Completely blank
Blank spots
Marks
White horizontal lines
Distortion
nBD failure
Faulty
registration
Partially compressed/stretched image
Figure 4-5 Faulty Print Samples
4-29
Poor fixing
PC-D320/PC-D340/FAX-L400 Chapter 4: Maintenance and Service
• Light
Solutions:
• Dark
Solutions:
(1) Remove the toner cartridge and shake it lightly five or six times.
(2) Verify that user data “COMMON SETTING” “TONER SAVER
MODE” is not “ON”.
(3) Replace the toner cartridge.
(4) Open the right cover during printing, and remove the toner cartridge.
Open the cartridge drum cover shutter manually, and check whether
the toner image on the photosensitive drum is transferred onto the
paper. If it is transferred, go to item (7). If not, go the following step.
(5) Clean the transfer bias contact and the transfer charging roller shaft
contact.
(6) Replace the transfer charging roller.
(7) Clean the developing bias contact and the toner cartridge contact.
(8) Replace the ECNT board.
(9) Replace the SCNT board.
(1) Verify that user data “COMMON SETTING” “TONER SAVER
MODE” is not “OFF”.
(2) Clean the drum ground contact and the toner cartridge contact
(3) Clean the primary charging contact and the toner cartridge contact.
(4) Replace the ECNT board.
(5) Replace the SCNT board.
• Completely blank
Solutions: (1) Clean the developing bias contact and the toner cartridge contact.
(2) Check whether the projection for opening and closing the Laser
shutter on the toner cartridge is damaged.
(3) Replace the Laser shutter lever or the Laser shutter.
(4) Replace the Laser/Scanner unit.
(5) Replace the ECNT board.
(6) Replace the SCNT board.
• All black
Solutions:
(1)
(2)
(3)
(4)
Replace the toner cartridge.
Clean the primary charging contact and the toner cartridge contact.
Replace the ECNT board.
Replace the SCNT board.
4-30
PC-D320/PC-D340/FAX-L400 Chapter 4: Maintenance and Service
• Dots
Solutions:
(1)
(2)
(3)
(4)
(5)
Clean the static charge eliminator in the toner transfer section.
Check the static charge eliminator contact.
Clean the transfer charging roller.
Replace the transfer charging roller.
Clean the transfer charging bias contact on the ECNT board
and the transfer charging roller shaft contact.
(6) Replace the ECNT board.
(7) Replace the SCNT board.
• Marks on back of papers
Solutions:
(1) Copy a few white paper documents.
(2) Clean the separation guide.
(3) Replace the separaton guide.
(4) If the marks are at intervals of approx. 45.2mm (1.78"), clean the
transfer charging roller, but if they are at intervals of approx. 62.8mm
(2.47"), clean the pressure roller.
(5) Clean the transfer guide, paper feed guide and fixing entrance guide.
(6) Replace the transfer charging roller.
(7) Replace the pressure roller.
(8) Clean the eject roller.
(9) Replace the eject roller.
• Black vertical lines
Solutions:
(1) Open the printer cover during printing, and remove the toner
cartridge. Open the cartridge drum cover shutter manually, and
check whether there are black vertical lines on the photosensitive
drum. If there are black lines, replace the toner cartridge. If not, go
the following step.
(2) Clean the fixing entrance guide.
(3) Replace the fixing film unit.
• Irregular and smudged black vertical lines
Solutions:
(1) Clean the fixing entrance guide.
(2) Replace the toner cartridge.
4-31
PC-D320/PC-D340/FAX-L400 Chapter 4: Maintenance and Service
• Irregular and smudged black horizontal lines
Solutions:
If the irregular smudged black lines occur cyclically, replace the toner
cartridge. If they are non-cyclical, replace the fixing ass’y.
• Marks
Solutions:
(1) If the marks are at intervals of approx. 62.8mm (2.47"), clean the
pressure roller; if they are at intervals of approx. 56.5mm (2.22"),
clean the fixing film unit; and if they are at intervals of approx.
75.4mm (2.97"),or 37.7mm (1.48"), replace the toner cartridge.
(2) Clean the eject roller.
(3) Clean the fixing entrance guide.
(4) Replace the pressure roller.
(5) Replace the eject roller.
(6) Replace the fixing film unit.
• Blank spots
Solutions:
(1)
(2)
(3)
(4)
(5)
(6)
(7)
Remove the toner cartridge and shake it lightly five or six times.
Replace the toner cartridge.
Clean the transfer charging roller.
Replace the transfer charging roller.
Clean the developing bias contact and the toner cartridge contact.
Replace the ECNT board.
Replace the SCNT board.
• White vertical lines
Solutions:
(1) Remove the toner cartridge and shake it lightly five or six times.
(2) While printing is taking place, open the right cover, and take out
the toner cartridge.
(3) Open the toner cartridge drum shutter and if there are vertical white
lines on the photosensitive drum, replace the toner cartridge.
(4) Check for foreign matter stuck in the Laser output hole on the
Laser/Scanner unit or the Laser input hole on the toner cartridge.
(5) Clean the eject roller.
(6) Replace the eject roller.
(7) Clean the fixing entrance guide.
(8) Clean the fixing film unit.
(9) Replace the fixing film unit.
(10) Replace the Laser/Scanner unit.
4-32
PC-D320/PC-D340/FAX-L400 Chapter 4: Maintenance and Service
• White horizontal lines
Solutions:
(1) Replace the toner cartridge.
(2) Clean the fixing film unit.
(3) Replace the fixing film unit.
• Faulty registration
Solutions:
(1) Check if more than the regulation amount of paper is loaded in the
multi-purpose tray and cassette.
(2) Clean the paper pick-up roller.
(3) Replace the paper pick-up roller.
(4) Check whether the page top sensor actuator is damaged or deformed.
(5) Clean the paper feed roller.
(6) Replace the paper feed roller.
(7) Replace the page top sensor.
(8) Replace the ECNT board.
(9) Replace the SCNT board.
• Distortion/BD signal failure
Solutions:
(1) Check the connection between the Laser/Scanner unit (J801/J802) and
the SCNT board (J507/J508) connector connections.
(2) Replace the Laser/Scanner unit.
(3) Replace the SCNT board.
• Partially compressed/stretched image
Solutions:
(1) Check for foreign matter between the toner cartridge gear and the
drive gear.
(2) Check if the toner cartridge gear is broken.
(3) Replace the toner cartridge.
• Poor fixing
Solutions:
(1) If the marks are at intervals of approx. 56.5mm (2.22"), clean the
fixing film unit; if they are at intervals of approx. 62.8mm (2.47"),
clean the pressure roller.
(2) Replace the pressure roller.
(3) Replace the fixing film unit.
(4) Check the nip width of the fixing section. If it is not as specified,
replace the fixing film unit.
(5) Replace the ECNT board.
(6) Replace the SCNT board.
4-33
PC-D320/PC-D340/FAX-L400 Chapter 4: Maintenance and Service
4.3.3 Scanning problems
• Faulty scanning (Evaluation criteria: Test print is good, but the copied image
is poor.)
• The document is not fed.
The document feed motor does not run. (Evaluation criteria: Check it
visually.)
(1) Check the connection between the document feed motor and the SCNT board (J505).
(2) Replace the document feed motor.
(3) Replace the SCNT board.
The document slips against the rollers. (Evaluation criteria: Check it visually.
Stretched copy image.)
(1) See page 4-3 and clean the document reading section.
(2) Replace the reading section’s rollers.
The document does not separate. (Evaluation criteria: Check it visually.)
(1) Check whether the document feed motor is driving all the rollers.
(Check for any damaged gears or foreign matter stuck inside.)
(2) See page 4-3 and clean the separation roller and separation guide.
(3) Replace the separation roller and separation guide.
The scanner unit’s sensors are defective (Evaluation criteria: The placed
document or transported document is not detected.)
(1) Check for any faulty sensors while executing the copying operation and test mode.
(2) Check the connection between the DS sensor, DES sensor and the SCNT board (J509).
(3) In test mode check whether the DS sensor and the DES sensor are operating correctly.
(4) Replace the DS sensor and DES sensor.
(5) Replace the SCNT board.
• The scanning image is abnormal. (Evaluation criteria: Check the copy
image’s faults.)
Nothing is printed.
(1) Check the connection between the contact sensor and SCNT board (J506).
(2) Replace the contact sensor unit.
(3) Replace the SCNT board.
The image has vertical stripes.
(1) Clean the contact sensor’s scanning glass, platen glass and white sheet.
(2) Check the connection between the contact sensor and SCNT board (J506).
(3) Replace the contact sensor unit.
(4) Replace the SCNT board.
4-34
PC-D320/PC-D340/FAX-L400 Chapter 4: Maintenance and Service
The image has thick vertical stripes.
(1) Clean the contact sensor’s scanning glass, platen glass and white sheet.
(2) Check the connection between the contact sensor and the SCNT board (J506).
(3) Replace the contact sensor unit.
(4) Replace the SCNT board.
• The contact sensor operation is faulty.
The CS drive motor does not run. (Evaluation criteria: Check it visually.)
(1) Check the connection between the CS drive motor and the SCNT board (J504).
(2) Replace the CS drive motor.
(3) Replace the SCNT board.
The CS home position sensor is defective (Evaluation criteria: Check it
visually.)
(1) Check the connection between the CS home position sensor and the SCNT board
(J516).
(2) Check whether the CS home position sensor and actuator are in their correct positions.
(3) In test mode check whether the CS home position sensor (J516) is operating correctly.
(4) Replace the CS home potision sensor.
(5) Replace the SCNT board.
4-35
PC-D320/PC-D340/FAX-L400 Chapter 4: Maintenance and Service
4.3.4 Test mode function problems
• Faulty control panel test
The LCD panel does not display correctly.
(1) Check the connection between the OPCNT board (J1) and the SCNT board (J503).
(2) Check the connection between the LCD unit and the OPCNT board (J5).
(3) Replace the LCD unit.
(4) Replace the OPCNT board.
(5) Replace the SCNT board.
The LED lamp fails to go ON.
(1) Check the connection between the OPCNT board (J1) and the SCNT board (J503).
(2) Replace the OPCNT board.
(3) Replace the SCNT board.
The keys on the operation panel fails to work properly.
(1) Check the connection between the OPCNT board (J1) and the SCNT board (J503).
(2) Replace the OPCNT board.
(3) Replace the SCNT board.
• Faulty contact sensor test.
The LED of the contact sensor fails to go ON properly.
(1) Check the connection between the Contact sensor and the SCNT board (J506).
(2) Replace the Contact sensor.
(3) Replace the SCNT board.
• Faulty DRAM test.
The indication “READ & COMPARE NG” appears.
(1) Perform the DRAM test again. In case “READ & COMPARE NG” still appears,
replace the SCNT board.
• Faulty sensor test.
DES sensor fails to operate properly.
(1) Check whether the actuator of DES sensor is in correct position.
(2) Check the connection between the DES sensor and the SCNT board (J509).
(3) Replace the DES sensor.
(4) Replace the SCNT board.
DS sensor fails to operate properly.
(1) Check whether the actuator of DS sensor is in correct position.
(2) Check the connection between the DS sensor and the SCNT board (J509).
(3) Replace the DS sensor.
(4) Replace the SCNT board.
4-36
PC-D320/PC-D340/FAX-L400 Chapter 4: Maintenance and Service
Recording paper sensor fails to operate properly.
(1) Check whether the actuator of recording paper sensor is in correct position.
(2) Check the connection between the SCNT board (J514) and the ECNT board (J201).
(3) Replace the ECNT board.
(4) Replace the SCNT board.
Cartridge cover sensor fails to operate properly.
(1) Check whether the actuator of cartridge cover sensor is in correct position.
(2) Check the connection between the SCNT board (J514) and the ECNT board (J201).
(3) Replace the ECNT board.
(4) Replace the SCNT board.
4-37
PC-D320/PC-D340/FAX-L400 Chapter 4: Maintenance and Service
4.4 Processing Communication Problems
4.4.1 Initial identification of problems
Since the facsimile must transmit picture information, a transmitter, a receiver and telephone
lines are required for this purpose. Transmissions may cause problems if one or more of the
there is poor.
Communication
trouble
FAX
FAX
Your
customer's
machine
Communication
companion
machine
Figure 4-6 Communication Trouble
To process communication ploblrems, first of all, it is necessary to narrow down the cause of
the problem. Thus, the procedures appearing below must be checked accordingly.
Start
Does an error
appear on the
display?
YES
Errors show on the display.
error massage page 4-11
error code
page 4-15
NO
Is copying
being done?
NG
General error
Page 4-26
OK
Do copying
Is copy
picture OK?
OK
Communication problems
exist. Carry out the procedures
on the next page.
NG
Test print
NG
Printing problem
Page 4-27
OK
Scanning problem
Page 4-34
Figure 4-7 Procedures for Initial Identification of Trouble
4-38
PC-D320/PC-D340/FAX-L400 Chapter 4: Maintenance and Service
4.4.2 Procedures for processing communication problems
If the problem proves to be communication trouble, deal with it according to the following
procedures.
(1) Study the conditions at the time of trouble as closely as possible. Record or keep the
items listed below.
a) Operations at the time of trouble.
Document number, transmission mode, error occurrence timing call set-up method
(auto dialing etc.)
b) Sample of defective picture (When receiving)
c) LCD display at the time of trouble.
d) Communication management report at the time of trouble.
e) User’s name, telephone number (to contact), Fax number, model name.
f) User’s name, of the other party, telephone number (to contact), Fax number, model
name, name of servicemen in charge.
g) Frequency of trouble and error code (##100 etc.).
h) Condition of the other party’s facsimile:
Transmitted/received page number? Automatic or manual?
Error occourred? The receive condition? etc.
NOTE
When visiting a user with a trouble report, a) can be known by outputting the
error protcol data (or error dump), and g) can be known by outputting the total
transacation report (or the system error data list).
(2) Test communication according to flowchart procedures appearing on the next page.
• Carry out the tests with the actual lines on each item, verify the symptoms and record
it.
• In the case of trouble with another manufacturer’s facsimile, refer to the flowchart for
troubles with other manufacture’s.
(3) Finally, process over by judging systematically all the data.
NOTE
If the other party’s facsimile is that of another manufacturer and there is
nothing wrong with your customer’s machine, it is recommended that you ask
your customer to contact the facsimile user of the other party, so that the other
party’s facsimile is checked by the dealer. “Call the service station” in the
flowchart (Fig.4-9) means that problems may occur with regard to the
communication compatibility of facsimile, consult the matter with the staff in
charge at the service station. To quicken the resolving of the problem, report
the information listed in (1) above.
4-39
PC-D320/PC-D340/FAX-L400 Chapter 4: Maintenance and Service
• Procedures for processing communication problems with Canon facsimile.
The process for carrying out communications at three points as shown in the figure.
Trouble
FAX:A
FAX:B
FAX:C
Start
A: Your customer's facsimile
B: Facsimile of other communication party
C: Facsimile for check in the same region. (C should
be the same model of facsimile as A.)
Transmission
or reception?
Transmission
Reception
C
A
OK
B
C
OK
A
C
NG
NG
NG
Check A.
Check B.
Check A.
OK
C
B
OK
NG
Check B.
Check the
line.
Figure 4-8 Flowchart for Processing Communication Troubles
with Canon Facsimile
4-40
PC-D320/PC-D340/FAX-L400 Chapter 4: Maintenance and Service
• Procedures for processing communication problems with other manufacturer’s
facsimiles.
When problems occur with other manufacturer’s facsimiles, make the user of the
other party’s facsimile call the serviceman in charge. Perform communication at the
four points listed in the figure.
Trouble
Start
Is the group
the same?
(G1/G2/G3)
FAX:A
FAX:B
FAX:C
FAX:D
Yes
No
Is there the
similar
trouble case?
Unable to
receive
No
A: Your customer's facsimile
B: Facsimile of other communication
party
C: Facsimile for check in the same
region. (C should be the same mode
of facsimile as A.)
D: Other manufacturer's facsimile for
check that is in the same region.
Yes
Process according
to the case
Transmitter
or receiver?
Transmitter
receiver
OK
OK
D
C
A
A
C
NG
NG
Check A.
Check A.
B
C
C
NG
OK
C
C
B
OK
D
NG
Check B.
OK
A
OK
D
OK
NG
OK
NG
B
NG
D
D
B
OK
Call the service
station.
NG
Call the service
station.
NG
Check B.
Check B.
Figure 4-9 Flowchart for Processing Communication Troubles with
other manufacturer’s facsimile
4-41
PC-D320/PC-D340/FAX-L400 Chapter 4: Maintenance and Service
5. SERVICE SWITCHES
5.1 Hardware Switches
This machine has the following hardware switches. Be sure not to use those switches not
discussed herein; they are for use at the factory.
a) SCNT board
Jumper switch (JP1)
The lithium battery backs up control memory by causing a short with the jumper plug.
b) ECNT board
Push switch (SW201)
This is a test print switch.
5.2 Service Data Setting
Service data can be checked and changed with items on display menus. The effective SSSWs/
parameters and their default values in this machine are shown in 5.4 Service Data Flowchart
in this chapter. Detailed description of each SSSW/parameter is not given in this manual except
the new SSSWs/parameters added to this model. See G3 Facsimile SERVICE DATA
HANDBOOK (Rev. 0) (supplied separately) for details of them. The new switches for this
model are described in 5.6 New SSSWs/Parameters Added to this Model.
#1 SSSW (Service Soft Switch Settings)
These setting items are for basic fax service functions such as error management, echo
countermeasures, and communication trouble countermeasures.
#2 MENU (MENU switch settings)
These setting items are for functions required during installation, such as NL equalizer and
transmission levels.
#3 NUMERIC Param. (NUMERIC parameter settings)
These setting items are for inputting numeric parameters such as the various conditions for
the RTN signal transmission.
#4A SPECIAL (Special settings)
These setting items are for telephone network control functions.
#4B NCU (NCU settings)
These setting items are for telephone network control functions such as the selection signal
transmission conditions and the detection conditions, for the control signals sent from the
exchange.
4-42
PC-D320/PC-D340/FAX-L400 Chapter 4: Maintenance and Service
#5 TYPE (TYPE setting)
The type setting makes the service data conform to a specific country communications
standards.
#6 SCANNER (SCANNER function setting)
These setting items are for scanned image processing such as edge enhancement and error
diffusion processing.
#7 PRINTER (PRINTER function settings)
These setting items are for basic printer service functions such as the reception picture
reduction conditions. Also there is an item for resetting the printer section without
switching the power off-on.
#8 PDL (PDL settings)
Do not use.
#9 COUNTER (Counter indication)
Use it to check estimates for maintenance/parts replacement.
#10 REPORT (Report output)
Use it to output reports on various service data.
#11 DOWNLOAD (Download)
Do not use.
#12 CLEAR (data initialization mode)
Various data are initialized by selecting one of these setting items. There is
a setting item for checking/inputting the total number of pages printed and total number of
pages scanned by this fax.
#13 ROM (ROM management)
ROM data such as the version number and checksum are displayed.
#14 CS SET (CS unit position)
Use it to change the Contact sensor unit back to its position at time of shipment.
4-43
PC-D320/PC-D340/FAX-L400 Chapter 4: Maintenance and Service
5.3 Service Data Registration/Setting Method
Service data can be registered/set by the following operations:
100%
A
A4
TEXT
01
Standby
(1) User data mode selection
Press the Additional Functions key.
ADDITIONAL FUNCTIONS
1. PAPER SETTINGS
(2) Service mode selection
Press the # key.
SERVICE MODE
#1 SSSW
(3) Menu item selection
Select the menu item by pressing the - or + key.
SERVICE MODE
#3 NUMERIC Param.
Press the OK key.
#3 NUMERIC Param.
001:
0
(4) Data registration
Input the data and press the OK key.
Press the stop key to return to standby.
Figure 4-10 Service Data Setting Method
4-44
PC-D320/PC-D340/FAX-L400 Chapter 4: Maintenance and Service
5.4 Service Data Flowchart
Service menu
#1 SSSW
(Service soft switch setting)
Bit
SW01
SW02
SW03
SW04
SW05
SW06
SW07
SW08
SW09
SW10
SW11
SW12
SW13
SW14
SW15
SW16
SW17
SW18
SW19
SW20
SW21
SW22
SW23
SW24
SW25
SW26
SW27
SW28
SW29
SW30
SW31
SW32
SW33
76543210
0––––000
0––––––0
0000––0–
10000000
––00000–
–––0–0––
––––––––
––––––––
––0–––––
Error management
Memory clear list out put settings
Echo solution settings
Communication troublesolution settings
Standard function (DIS signal)settings
Scan condition settings
Not used
Not used
Communications result display function
settings
Not used
––––0–––
Dual-line function setting
––––––––
Page timer settings
0–000010
Not used
––––––––
Inch/mm resolution settings
–––0–001
Dail inn FAX/TEL switching function
––––––0–
setteing
Setting for a No Paper display
––––––11
Not used
––––––––
Communication trouble solutions settings (2)
––––––00
Not used
––––––––
Not used
––––––––
Image data shade adjustmentsettings
––––––––
Field Requests/Troubleshooting Issues
––––0–––
transmission function settings
––––––00
Not used
––––––––
Report diaplay function settings
–––––––0
Transmission function settings
00––00––
Not used
––––––––
V.8/V.34 protocol settings
––000000
Not used
––––––––
Not used
––––––––
Not used
––––––––
Not used
––––––––
Counter related
––––––00
SW34 to SW50: Not used
SW50
Figure 4-11 Service Data 1
The switches marked “-” are not used. Do not change their settings.
4-45
PC-D320/PC-D340/FAX-L400 Chapter 4: Maintenance and Service
#2 MENU
(Menu switch settings)
001:
002:
003:
004:
005:
Not used
Not used
Not used
Not used
NL equalizer setting
ON
OFF
006:
DIAL
SERVICEMAN [1]
SERVICEMAN [2]
OFF
Line monitor settings
007:
10 (-10dBm)
(8~15)
Transmission level setting
008:
3429 (baud)
3200
3000
2800
2743
2400
V.34 Baud rate
009:
33.6
(2.4 kbps~33.6 kbps)
V.34 Transmission speed
010:
50Hz
25Hz
17Hz
Frequency of psudo CI
Items 011 to 020:
Not used
011:
020:
Figures in boldface indicate the default setting.
Figure 4-12 Service Data 2
No.001 to 004, 011 to 020 are not used. Do not change their settings.
SERVICEMAN[2] of No.006 is not used.
4-46
PC-D320/PC-D340/FAX-L400 Chapter 4: Maintenance and Service
#3 NUMERIC Param.
(Numeric parameter settings)
Range
001:
002:
003:
004:
005:
006:
007:
008:
009:
Default
0
10 (10%)
15 (15 times)
12 (12 lines)
4 (sec)
4 (sec)
0
0
6 (6 digits)
010:
011:
012:
013:
5500 (55 sec)
3500 (35 sec)
0 (0 line)
1300 (13 sec)
014:
015:
016:
0
120 (100 ms)
2 (2 seconds)
017:
018:
019:
020:
021:
022:
023:
024:
025:
100 (1000 ms)
0 (0 ms)
400 (4000 ms)
100 (1000 ms)
0 (0 ms)
400 (4000 ms)
0
10
60
026:
027:
028:
0
0
3 (3 sec)
Not used
RTN signal transmission condition (1)
RTN signal transmission condition (2)
RTN signal transmission condition (3)
Pause time for NCC (before the ID code)
Pause time for NCC (after the ID code)
Not used
Not used
(1~20)
The number of digits in telephone
compared against TSI signal to be matched
for restricted receiving function
(0~9999)
Line connection detection time (T0 timer)
(0~9999)
T1 timer (Rx)
(0~65535) Not used
(500~9999) Maximum time allowed to receive one line
of image data
Not used
(0~999)
Hooking detection time
(0~9)
Pseudo RBT transmission from CML on time
until start
(0~999)
Pseudo RBT signal pattern: On time
(0~999)
Pseudo RBT signal pattern: Off time (short)
(0~999)
Pseudo RBT signal pattern: Off time (long)
(0~999)
Pseudo ring pattern: On time setting
(0~999)
Pseudo ring pattern: Off time setting (short)
(0~999)
Pseudo ring pattern: Off time setting (long)
(0~9)
FAX/TEL switching function : Signal detection level
(0~20)
Pseudo-RBT signal transmission level
(0~999)
answering machine connection function
signal detection level
Not used
Not used
(1~60)
Menu pop-up time
(1~99)
(2~99)
(1~99)
(1~60)
(1~60)
Item 029 to 055:
Not used
055:
Figure 4-13 Service Data 3
No. 001, 007, 008, 012, 014, 029 to 055 and 071 to 080 are not used. Do not
change their settings
4-47
PC-D320/PC-D340/FAX-L400 Chapter 4: Maintenance and Service
NOTE
#3 NUMERIC PARAM. (Numeric parameter settings)
The relationship between the settings and the detection levels is as follows:
Parameter 24
0: Not used
1: Not used
2: Not used
3: Not used
4:
5: -8 dBm
6: -9 dBm
7: -10 dBm
8: -11 dBm
9:
10: -13 dBm
11: -14 dBm
12: -15 dBm
13: -16 dBm
14:
15: -18 dBm
16: -19 dBm
17: -20 dBm
18: -21 dBm
19:
20: -23 dBm
4-48
Not used
-12 dBm
-17 dBm
-22 dBm
PC-D320/PC-D340/FAX-L400 Chapter 4: Maintenance and Service
#4A SPECIAL
(Special settings)
Not used
#4B NCU
(NCU settings)
Not used
#4C ISDN
(ISDN settings)
Not used
#5 TYPE
(Type setting)
U.K.
SWEDEN
SWISS
AUSTRIA
DENMARK
NORWAY
HOLLAND
BELGIUM
AUSTRALIA
FINLAND
N.Z.
ITALY
SPAIN
PORTUGAL
IRELAND
HONG KONG
MALAYSIA
HUNGARY
SAF
KOREA
CHINA
GERMAN
FRANCE
SINGAPORE
CZECH
SLOVENIA
ASIA
POLAND
EUROPE2
STANDARD
U.S.A
EUROPE
#6 SCANNER
(Scanner function settings)
Not used
Figure 4-14 Service Data 4
#4A SPECIAL, #4B NCU, #4C ISDN
The values of these items are all set to match a specific nation’s
communications standards by the #5 TYPE setting. Do not change these
settings.
#6 SCANNER
Tampering with this setting may cause the scanned image quality to
deteriorate. Do not change these settings.
4-49
PC-D320/PC-D340/FAX-L400 Chapter 4: Maintenance and Service
#7 PRINTER
(Printer function
settings)
#1 SSSW
Not used
#2 NUMERIC Param
Not used
#3 PRINT COUNT
XXXX/YYYY
#4 PRINTER RESET
Yes = (–)
No = (+)
#5 MLT CLEANING
Yes = (–)
No = (+)
#6 CST
U1
U2
U3
LTR
Printer section reset function
#8 PDL
(PDL settings)
PDL-LIPS MENU
PDL-PCL MENU
Not used
Not used
#9 COUNTER
(Counter indication)
TOTAL
PICK-UP
FEEDER
JAM
MISC
Total counter
Pick-up related counter
Feeder counter
Jam related counter
Other counter
Figure 4-15 Service Data 5
#8 PDL
Not used. Do not change these settings.
4-50
PC-D320/PC-D340/FAX-L400 Chapter 4: Maintenance and Service
#10 REPORT
(Service report
output)
1.SERVICE & SYSTEM
2.SERVICE DATA
3.SYSTEM DUMP
4.KEY HISTORY REPOR
5.COUNTER REPORT
6.PRINT SPEC REPORT
#11 DOWNLOAD
(Download)
Not used
#12 CLEAR
(Data initialization
mode settings)
TEL & USER DATA
USER DATA
SERVICE SW
SERVICE DATA
REPORT
ACTIVITY
JAM
ERR
ALARM
COUNTER
CARD
ERR
ALL
#13 ROM
(ROM management)
MAIN: USA-10-02
Version No. and Checksum display
020830 10D1 FFFF
MAIN2:DD-01-01-QUAD
981111 0000 FFFF
ECONT:0005
FFFF
Dialing data and user data initialization
User data initialization
Service soft switch #1 to #7 initialization
Data on system dump list initialization
Data on activity report initialization
Jam history initialization
Error (E CODE) history initialization
Alarm history initialization
Total number of pages printed/scanned
Not used
--All user data, service data, activity
management data, and image data
initialization (except COUNTER)
#14 CS SET
(CS unit position)
TEST MODE
Figure 4-16 Service Data 6
#11 DOWNLOAD
Not used.
For details on test mode, see this Chapter, 6.TEST FUNCTIONS .
REFERENCE
4-51
PC-D320/PC-D340/FAX-L400 Chapter 4: Maintenance and Service
5.5 Explanation of SSSW (Service Soft Switch Settings)
Bi
t7
Bi
t6
Bi
t5
Bi
t4
Bi
t3
Bi
t2
Bi
t1
Bi
t0
The items registered and set by each of these switches comprise 8-bit switches. The figure
below shows which numbers are assigned to which bits. Each bit has a value of either 0 or 1.
SW01
0
0
0
0
0
0
0
0
Figure 4-17 Bit Switch Display
See the chart in the service menu shown in Section 5.4 Service data flowchart to see effective
bits and their default values. The meanings (functions) of the bits are not described in this
manual except the new switches added to this model. See G3 Facsimile SERVICE DATA
HANDBOOK (Rev. 0) (supplied separately) for details of the switches.
Below are examples showing how to read bit switch tables.
Indicates that the
setting is "1".
Indicates that the
setting is "0".
Figures in boldface
are default settings.
Bit
0
1
2
3
4
5
6
7
Function
Service error code
Error dump list
Receive image transfer
Not used
Not used
Not used
Not used
Not used
1
Output
Output
Yes
0
Not Output
Not output
No
Figure 4-18 How to Read Bit Switch Tables
Do not change the settings of switches listed as “Not used”.
4-52
PC-D320/PC-D340/FAX-L400 Chapter 4: Maintenance and Service
5.6 New SSSWs/Parameters Added to this Model
#1 SSSW
SW01 (service soft switch 01: error management )
Bit
0
1
2
Function
Service error code
Error dump list
Enter password at confidential
Rx image data transfer
3
Copy function
4 (New) ##300 series service error code
5
Not used
6
Date & Time setting restriction
7
User setting restriction
1
Output
Output
No
0
Not output
Not output
Yes
No
Output
Yes
Not output
Setting restricted Setting possible
Setting possible Setting restricted
[Bit 4]
When “Output” is selected, ##300 series Service error codes are displayed and in reports.
When “Not output” is selected, no Service error codes are displayed.
SW28 (service soft switch 28: V.8/V.34 protocol settings)
Bit
0 (New)
1 (New)
2 (New)
3 (New)
4 (New)
5 (New)
6
7
Function
Caller V.8 protocol
Called party V.8 protocol
Caller V.8 protocol late start
Called party V.8 protocol late start
V.34 reception fallback
V.34 transmission fallback
Not used
Not used
1
No
No
No
No
Prohibited
Prohibited
0
Yes
Yes
Yes
Yes
Not prohibited
Not prohibited
[Bit 0]
Select whether to use the V.8 protocol when calling. If “NO” is selected, the V.8 protocol
is inhibited at calling and the V.21 protocol is used.
[Bit 1]
Select whether to use the V.8 protocol when called. If “NO” is selected, the V.8 protocol
is inhibited when called and the V.21 protocol is used.
4-53
PC-D320/PC-D340/FAX-L400 Chapter 4: Maintenance and Service
[Bit 2]
If ANSam signal is not received during transmission, select whether to use the V.8
protocol when the other fax machine declares the V.8 protocol in DIS signal. If “NO” is
selected, the CI signal is not transmitted and the V.8 protocol is not used even if the DIS
that specifies the V.8 protocol is received.
[Bit 3]
Select whether to declare the V.8 protocol in DIS signal for reception. If “NO” is
selected, the V.8 protocol cannot be used because it is not declared in DIS signal.
[Bit 4]
Select whether the reception side falls back during V.34 reception. If Prohibited is
selected, the reception side does not fall back.
[Bit 5]
Select whether the transmission side falls back during V.34 transmission. If Prohibited is
selected, the transmission side does not fall back.
SW33 (service soft switch 33: counter related)
Bit
Function
0 (New) Count B4 as large size
1 (New) Indicate serial No. on counter
check screen
2
Not used
3
Not used
4
Not used
5
Not used
6
Not used
7
Not used
1
Yes
Yes
0
No
No
[Bit 0]
Use it to specify whether B4 paper should be count as large-size paper. If “Yes” is
selected, B4 paper will be counted as large-size paper. If “No” is selected, on the other
hand, B4 paper will be counted as small-size paper.
[Bit 1]
Use it to specific whether to indicate the machine serial No. on the Counter Check screen,
appearing when the Counter button is pressed. If “Yes” is selected, the serial No. will be
indicated. If “No” is selected, on the other hand, the serial No. will not be indicated.
4-54
PC-D320/PC-D340/FAX-L400 Chapter 4: Maintenance and Service
#2 MENU
No.
008
009
Function
V.34 max. baud rate
V.34 max. transmission speed
Selection range
2400~3429
2.4~33.6
Default setting
3429 (3429 baud)
33.6 (33.6 kbps)
[No. 008]
Select the maximum baud rate for V.34 transmission: 3429, 3200, 3000, 2800, 2743, and
2400.
This model cannot use 2743 baud due to its modem specification. If it is set
to 2743 baud, the maximum baud rate is 2400 baud.
NOTE
[No.009]
Select the maximum transmission speed for V.34 transmission: 2.4 to 33.6 kbps.
#3 NUMERIC PARAM. (numeric parameter settings)
No.
028
Function
Menu selection screen display
time length
Selection range
1~60
Default setting
3 (3 sec)
[No.028]
Use it to set the length of time during which the Menu Select screen is indicated on the
LCD.
4-55
PC-D320/PC-D340/FAX-L400 Chapter 4: Maintenance and Service
#9 COUNTER
The following are items under COUNTER.
Small-size paper is counted for “1”, while large-size paper is counted for “2”.
Level 1
Level 2
Level 3
COUNTER
TOTAL (total counter)
SERVICE1
SERVICE2
TTL
COPY
PDL-PRT
FAX-PRT
RPT-PRT
SCAN
Description
total counter 1 for service
total counter 2 for service
total counter
total copy counter
PDL print counter
fax reception print counter
report print counter
scanner counter
PICK-UP (pickup-related counter)
C1
cassette 1 pickup counter
C2
cassette 2 pickup counter
C3
cassette 3 pickup counter
C4
cassette 4 pickup counter
MF
multifeeder tray pickup counter
FEEDER (feeder-related counter)
FEED
feed pickup total counter
JAM (jam counter)
TTL
FEEDER
SORTER
MF
C1
C2
C3
C4
total jam counter for machine
jam counter for feeder
jam counter for sorter
multifeeder tray jam counter
cassette 1 jam counter
cassette 2 jam counter
cassette 3 jam counter
cassette 4 jam counter
MISC (waste toner counter)
WST-TNR
waste toner counter
4-56
PC-D320/PC-D340/FAX-L400 Chapter 4: Maintenance and Service
SSSW Default Setting
TYPE
EUROPE
U.K.
SWEDEN
SWISS
AUSTRIA
DENMARK
SW01
00010000
00010000
00010000
00010000
00010000
00010000
SW02
00000000
00000000
00000000
00000000
00000000
00000000
SW03
SW04
00000000
00000000
00000000
00000000
00000000
00000010
00000000
00000010
00000000
00000010
00000000
00000000
SW05
00000000
00000000
00000000
00000000
00000000
00000000
SW06
SW07
10001000
00000000
10001000
00000000
10001000
00000000
10001000
00000000
10001000
00000000
10001000
00000000
SW08
00000000
00000000
00000000
00000000
00000000
00000000
SW09
SW10
00000000
00000000
00000000
00000000
00000000
00000000
00000000
00000000
00000000
00000000
00000000
00000000
#1 SSSW
SW11
00000000
00000000
00000000
00000000
00000000
00000000
SW12
00000010
00000010
00000010
00000010
00000010
00000010
SW13
SW14
00000000
00000010
00000000
00000010
00000000
00000010
00000000
00000010
00000000
00000010
00000000
00000010
SW15
00000000
00000000
00000000
00000000
00000000
00000000
SW16
SW17
00000011
00000000
00000011
00000000
00000011
00000000
00000011
00000000
00000011
00000000
00000011
00000000
SW18
00000000
00000000
00000000
00000000
00000000
00000000
SW19
00000000
00000000
00000000
00000000
00000000
00000000
SW20
SW21
00000000
00000000
00000000
00000000
00000000
00000000
00000000
00000000
00000000
00000000
00000000
00000000
SW22
00000000
00000000
00000000
00000000
00000000
00000000
SW23
SW24
00000000
00000000
00000000
00000000
00000000
00000000
00000000
00000000
00000000
00000000
00000000
00000000
SW25
00000000
00000000
00000000
00000000
00000000
00000000
SW26
SW27
00000000
00000000
00000000
00000000
00000000
00000000
00000000
00000000
00000000
00000000
00000000
00000000
SW28
00000000
00000000
00000000
00000000
00000000
00000000
SW29
00000000
00000000
00000000
00000000
00000000
00000000
SW30
#2 MENU
00000000
00000000
00000000
00000000
00000000
00000000
05:
OFF
OFF
OFF
OFF
OFF
OFF
06:
07:
DIAL
10
DIAL
10
DIAL
10
DIAL
10
DIAL
10
DIAL
10
08:
3429Hz
3429Hz
3429Hz
3429Hz
3429Hz
3429Hz
09:
33.6
33.6
33.6
33.6
33.6
33.6
10:
25Hz
25Hz
25Hz
25Hz
25Hz
25Hz
4-57
PC-D320/PC-D340/FAX-L400 Chapter 4: Maintenance and Service
SSSW Default Setting
TYPE
NORWAY
HOLLAND
BELGIUM
AUSTRALIA
FINLAND
N.Z.
SW01
00010000
00010000
00010000
00010000
00010001
00010000
SW02
SW03
00000000
00000000
00000000
00000000
00000000
00000000
00000000
00000000
00000000
00000000
00000000
00000000
SW04
00000010
00000010
00000000
00000000
00000000
00000000
SW05
SW06
00000000
10001000
00000000
10001000
00000000
10001000
00000000
10001000
00000000
10001000
00000000
10001000
SW07
00000000
00000000
00000000
00000000
00000000
00000000
SW08
SW09
00000000
00000000
00000000
00000000
00000000
00000000
00000000
00000000
00000000
00000000
00000000
0000000
SW10
00000000
00000000
00000000
00000000
00000000
00000000
SW11
00000000
00000000
00000000
00000000
00000000
00000000
SW12
SW13
00000010
00000000
00000010
00000000
00000010
00000000
00000010
00000000
00000010
00000000
00000010
00000000
SW14
00000010
00000010
00000010
00000000
00000010
00000010
SW15
SW16
00000000
00000011
00000000
00000011
00000000
00000011
00000000
00000011
00000000
00000011
00000000
00000011
SW17
00000000
00000000
00000000
00000000
00000000
00000000
SW18
00000000
00000000
00000000
00000000
00000000
00000000
SW19
SW20
00000000
00000000
00000000
00000000
00000000
00000000
00000000
00000000
00000000
00000000
00000000
00000000
SW21
00000000
00000000
00000000
00000000
00000000
00000000
SW22
SW23
00000000
00000000
00000000
00000000
00000000
00000000
00000000
00000000
00000000
00000000
00000000
00000000
SW24
00000000
00000000
00000000
00000000
00000000
00000000
SW25
SW26
00000000
00000000
00000000
00000000
00000000
00000000
00000000
00000000
00000000
00000000
00000000
00000000
SW27
00000000
00000000
00000000
00000000
00000000
00000000
SW28
00000000
00000000
00000000
00000000
00000000
00000000
SW29
SW30
00000000
00000000
00000000
00000000
00000000
00000000
00000000
00000000
00000000
00000000
00000000
00000000
OFF
DIAL
OFF
DIAL
OFF
DIAL
OFF
DIAL
OFF
DIAL
OFF
DIAL
#1 SSSW
#2 MENU
05:
06:
07:
10
10
10
10
10
10
08:
3429Hz
3429Hz
3429Hz
3429Hz
3429Hz
3429Hz
09:
10:
33.6
25Hz
33.6
25Hz
33.6
25Hz
33.6
25Hz
33.6
25Hz
33.6
25Hz
4-58
PC-D320/PC-D340/FAX-L400 Chapter 4: Maintenance and Service
SSSW Default Setting
TYPE
ITALY
SPAIN
PORTUGAL
IRELAND HONG KONG MALAYSIA
SW01
00010000
00010000
00010000
00010000
00010000
00010000
SW02
SW03
00000000
00000000
00000000
00000000
00000000
00000000
00000000
00000000
00000000
00000000
00000000
00000000
SW04
00000010
00000010
00000010
00000000
00000000
00000000
SW05
SW06
00000000
10001000
00000000
10001000
00000000
10001000
00000000
10001000
00000000
10001000
00000000
10001000
SW07
00000000
00000000
00000000
00000000
00000000
00000000
SW08
SW09
00000000
00000000
00000000
00000000
00000000
00000000
00000000
00000000
00000000
00000000
00000000
00000000
SW10
00000000
00000000
00000000
00000000
00000000
00000000
SW11
00000000
00000000
00000000
00000000
00000000
00000000
SW12
SW13
00000010
00000000
00000010
00000000
00000010
00000000
00000010
00000000
00000010
00000000
00000010
00000000
SW14
00000010
00000010
00000010
00000010
00000000
00000000
SW15
SW16
00000000
00000011
00000000
00000011
00000000
00000011
00000000
00000011
00000000
00000011
00000000
00000011
SW17
00000000
00000000
00000000
00000000
00000000
00000000
SW18
00000000
00000000
00000000
00000000
00000000
00000000
SW19
SW20
00000000
00000000
00000000
00000000
00000000
00000000
00000000
00000000
00000000
00000000
00000000
00000000
SW21
00000000
00000000
00000000
00000000
00000000
00000000
SW22
SW23
00000000
00000000
00000000
00000000
00000000
00000000
00000000
00000000
00000000
00000000
00000000
00000000
SW24
00000000
00000000
00000000
00000000
00000000
00000000
SW25
SW26
00000000
00000000
00000000
00000000
00000000
00000000
00000000
00000000
00000000
00000000
00000000
00000000
SW27
00000000
00000000
00000000
00000000
00000000
00000000
SW28
00000000
00000000
00000000
00000000
00000000
00000000
SW29
SW30
00000000
00000000
00000000
00000000
00000000
00000000
00000000
00000000
00000000
00000000
00000000
00000000
OFF
DIAL
OFF
DIAL
OFF
DIAL
OFF
DIAL
OFF
DIAL
OFF
DIAL
#1 SSSW
#2 MENU
05:
06:
07:
10
10
10
10
10
10
08:
3429Hz
3429Hz
3429Hz
3429Hz
3429Hz
3429Hz
09:
10:
33.6
25Hz
33.6
25Hz
33.6
25Hz
33.6
25Hz
33.6
25Hz
33.6
25Hz
4-59
PC-D320/PC-D340/FAX-L400 Chapter 4: Maintenance and Service
SSSW Default Setting
TYPE
HUNGARY
SAF
KOREA
CHINA
GERMAN
FRANCE
SW01
00010000
00010000
00010000
00010000
00010000
00010000
SW02
SW03
00000000
00000000
00000000
00000000
00000000
00000000
00000000
00000000
00000000
00000000
00000000
00000000
SW04
00000000
00000000
00000000
00000000
00000010
00000010
SW05
SW06
00000000
10001000
00000000
10010000
00000000
10001000
00000000
10001000
00000000
10001000
00000000
10000000
SW07
00000000
00000000
00000000
00000000
00000000
00000000
SW08
SW09
00000000
00000000
00000000
00000000
00000000
00000000
00000000
00000000
00000000
00000000
00000000
00000000
SW10
00000000
00000000
00000000
00000000
00000000
00000000
SW11
00000000
00000000
00000000
00000000
00000000
00000000
SW12
SW13
00000010
00000000
00000010
00000000
00000010
00000000
00000010
00000000
00000010
00000000
00000010
00000000
SW14
00000010
00000010
00000000
00000000
00000010
00000010
SW15
SW16
00000000
00000011
00000000
00000011
00000000
00000011
00000000
00000011
00000000
00000011
00000000
00000011
SW17
00000000
00000000
00000000
00000000
00000000
00000000
SW18
00000000
00000000
00000000
00000000
00000000
00000000
SW19
SW20
00000000
00000000
00000000
00000000
00000000
00000000
00000000
00000000
00000000
00000000
00000000
00000000
SW21
00000000
00000000
00000000
00000000
00000000
00000000
SW22
SW23
00000000
00000000
00000000
00000000
00000000
00000000
00000000
00000000
00001000
00000000
00000000
00000000
SW24
00000000
00000000
00000000
00000000
00000000
00000000
SW25
SW26
00000001
00000000
00000000
00000000
00000000
00000000
00000000
00000000
00000101
00000000
00000000
00000000
SW27
00000000
00000000
00000000
00000000
00000000
00000000
SW28
00000000
00000000
00000000
00000000
00000000
00000000
SW29
SW30
00000000
00000000
00000000
00000000
00000000
00000000
00000000
00000000
00000000
00000000
00000000
00000000
OFF
DIAL
OFF
DIAL
OFF
DIAL
OFF
DIAL
OFF
DIAL
OFF
DIAL
#1 SSSW
#2 MENU
05:
06:
07:
10
10
10
13
10
10
08:
3429Hz
3429Hz
3429Hz
3429Hz
3429Hz
3429Hz
09:
10:
33.6
25Hz
33.6
25Hz
33.6
25Hz
33.6
25Hz
33.6
50Hz
33.6
25Hz
4-60
PC-D320/PC-D340/FAX-L400 Chapter 4: Maintenance and Service
SSSW Default Setting
TYPE
SINGAPORE
CZECH
SLOVENIA
ASIA
POLAND
EUROPE2
SW01
00010000
00010000
00010000
00010000
00010000
00010000
SW02
SW03
00000000
00000000
00000000
00000000
00000000
00000000
00000000
00000000
00000000
00000000
00000000
00000000
SW04
00000000
00000000
00000000
00000000
00000000
00000000
SW05
SW06
00000000
10001000
00000000
10001000
00000000
10001000
00000000
10001000
00000000
10001000
00000000
10001000
SW07
00000000
00000000
00000000
00000000
00000000
00000000
SW08
SW09
00000000
00000000
00000000
00000000
00000000
00000000
00000000
00000000
00000000
00000000
00000000
00000000
SW10
00000000
00000000
00000000
00000000
00000000
00000000
SW11
00000000
00000000
00000000
00000000
00000000
00000000
SW12
SW13
00000010
00000000
00000010
00000000
00000010
00000000
00000010
00000000
00000010
00000000
00000010
00000000
SW14
00000000
00000010
00000010
00000000
00000010
00000010
SW15
SW16
00000000
00000011
00000000
00000011
00000000
00000011
00000000
00000011
00000000
00000011
00000000
00000011
SW17
00000000
00000000
00000000
00000000
00000000
00000000
SW18
00000000
00000000
00000000
00000000
00000000
00000000
SW19
SW20
00000000
00000000
00000000
00000000
00000000
00000000
00000000
00000000
00000000
00000000
00000000
00000000
SW21
00000000
00000000
00000000
00000000
00000000
00000000
SW22
SW23
00000000
00000000
00000000
00000000
00000000
00000000
00000000
00000000
00000000
00000000
00000000
00000000
SW24
00000000
00000000
00000000
00000000
00000000
00000000
SW25
SW26
00000000
00000000
00000000
00000000
00000000
00000000
00000000
00000000
00000000
00000000
00000000
00000000
SW27
00000000
00000000
00000000
00000000
00000000
00000000
SW28
00000000
00000000
00000000
00000000
00000000
00000000
SW29
SW30
00000000
00000000
00000000
00000000
00000000
00000000
00000000
00000000
00000000
00000000
00000000
00000000
OFF
DIAL
OFF
DIAL
OFF
DIAL
OFF
DIAL
OFF
DIAL
OFF
DIAL
#1 SSSW
#2 MENU
05:
06:
07:
10
10
10
10
10
10
08:
3429Hz
3429Hz
3429Hz
3429Hz
3429Hz
3429Hz
09:
10:
33.6
25Hz
33.6
25Hz
33.6
25Hz
33.6
25Hz
33.6
25Hz
33.6
25Hz
4-61
PC-D320/PC-D340/FAX-L400 Chapter 4: Maintenance and Service
SSSW Default Setting
TYPE
STANDARD
U.S.A.
SW01
00010000
00000000
SW02
SW03
10000000
00000000
00000000
00000000
SW04
10000000
10000000
SW05
SW06
00000000
10001000
00000000
10001000
SW07
00000000
00000000
SW08
SW09
00000000
00000000
00000000
00000000
SW10
00000000
00000000
SW11
00000000
00000000
SW12
SW13
00000010
00000000
00000010
00000000
SW14
00000000
00000001
SW15
SW16
00000000
00000011
00000000
00000011
SW17
00000000
00000000
SW18
00000000
00000000
SW19
SW20
00000000
00000000
00000000
00000000
SW21
00000000
00000000
SW22
SW23
00000000
00000000
00000000
00000000
SW24
00000000
00000000
SW25
SW26
00000000
00000000
00000000
00000000
SW27
00000000
00000000
SW28
00000000
00000000
SW29
SW30
00000001
00000000
00000000
00000000
OFF
DIAL
OFF
DIAL
#1 SSSW
#2 MENU
05:
06:
07:
10
10
08:
3429Hz
3429Hz
09:
10:
33.6
25Hz
33.6
25Hz
4-62
PC-D320/PC-D340/FAX-L400 Chapter 4: Maintenance and Service
SSSW Default Setting
TYPE
EUROPE
U.K.
SWEDEN
SWISS
AUSTRIA
DENMARK
02:
03:
10
15
10
15
10
15
10
15
10
15
10
15
04:
12
12
12
12
12
12
05:
06:
4
4
4
1
4
4
4
4
4
4
4
4
09:
6
6
6
6
6
6
10:
11:
5500
3500
5500
3500
5500
3500
5500
3500
5500
3500
5500
3500
13:
1300
1300
1300
1300
1300
1300
15:
120
120
120
120
120
120
16:
17:
2
100
2
100
2
100
2
100
2
100
2
100
#3 NUMERIC
Param
18:
0
0
0
0
0
0
19:
20:
400
100
400
100
400
100
400
100
400
100
400
100
21:
0
0
0
0
0
0
22:
400
400
400
400
400
400
23:
24:
0
10
0
10
0
10
0
10
0
10
0
10
25:
60
60
60
60
60
60
26:
27:
0
0
0
0
0
0
0
0
0
0
0
0
28:
3
3
3
3
3
3
EUROPE
U.K.
SWEDEN
SWISS
AUSTRIA
DENMARK
#5 TYPE
4-63
PC-D320/PC-D340/FAX-L400 Chapter 4: Maintenance and Service
SSSW Default Setting
TYPE
NORWAY
HOLLAND
BELGIUM
AUSTRALIA
FINLAND
N.Z.
02:
10
10
10
10
10
10
03:
04:
15
12
15
12
15
12
15
12
15
12
15
12
05:
4
4
4
4
4
4
06:
09:
4
6
4
6
4
6
4
6
4
6
4
6
10:
5500
5500
5500
5500
5500
5500
11:
13:
3500
1300
3500
1300
3500
1300
3500
1300
3500
1300
3500
1300
15:
120
120
120
120
120
120
16:
2
2
2
2
2
2
17:
18:
100
0
100
0
100
0
100
0
100
0
100
0
19:
400
400
400
400
400
400
20:
21:
100
0
100
0
100
0
100
0
100
0
100
0
22:
400
400
400
400
400
400
#3 NUMERIC
Param
23:
0
0
0
0
0
0
24:
25:
10
60
10
60
10
60
10
60
12
60
10
60
26:
0
0
0
0
0
0
27:
28:
0
3
0
3
0
3
0
3
0
3
0
3
NORWAY
HOLLAND
BELGIUM
AUSTRALIA
FINLAND
N.Z.
#5 TYPE
4-64
PC-D320/PC-D340/FAX-L400 Chapter 4: Maintenance and Service
SSSW Default Setting
TYPE
ITALY
SPAIN
PORTUGAL
IRELAND HONG KONG MALAYSIA
02:
10
10
10
10
10
10
03:
04:
15
12
15
12
15
12
15
12
15
12
15
12
05:
4
15
4
4
4
4
06:
09:
4
6
3
6
4
6
4
6
1
6
4
6
10:
5500
5500
5500
5500
5500
5500
11:
13:
3500
1300
3500
1300
3500
1300
3500
1300
3500
1300
3500
1300
15:
120
120
120
120
120
120
16:
2
2
2
2
2
2
17:
18:
100
0
100
0
100
0
100
0
100
0
100
0
19:
400
400
400
400
400
400
20:
21:
100
0
100
0
100
0
100
0
100
0
100
0
22:
400
400
400
400
400
400
#3 NUMERIC
Param
23:
0
0
0
0
0
0
24:
25:
10
60
10
60
10
60
10
60
10
60
10
60
26:
0
0
0
0
0
0
27:
28:
0
3
0
3
0
3
0
3
0
3
0
3
ITALY
SPAIN
PORTUGAL
#5 TYPE
4-65
IRELAND HONG KONG MALAYSIA
PC-D320/PC-D340/FAX-L400 Chapter 4: Maintenance and Service
SSSW Default Setting
TYPE
HUNGARY
SAF
KOREA
CHINA
GERMAN
FRANCE
02:
10
10
10
10
8
10
03:
04:
15
12
15
12
15
12
15
12
15
6
15
12
05:
4
4
4
4
4
4
06:
09:
4
6
4
6
4
6
4
6
4
6
4
6
10:
5500
5500
5500
4500
9000
5500
11:
13:
3500
1300
3500
1300
3500
1200
3500
1300
3500
1300
3500
1300
15:
120
120
120
120
120
120
16:
2
2
2
2
2
2
17:
18:
100
0
100
0
100
0
100
0
100
0
100
0
19:
400
400
400
400
400
400
20:
21:
100
0
100
0
100
0
100
0
100
0
100
0
22:
400
400
400
400
400
400
#3 NUMERIC
Param
23:
0
0
0
0
0
0
24:
25:
10
60
10
60
10
60
10
60
10
60
10
60
26:
0
0
4
0
0
0
27:
28:
0
3
0
3
0
3
0
3
0
3
0
3
HUNGARY
SAF
KOREA
CHINA
GERMAN
FRANCE
#5 TYPE
4-66
PC-D320/PC-D340/FAX-L400 Chapter 4: Maintenance and Service
SSSW Default Setting
TYPE
SINGAPORE
CZECH
SLOVENIA
ASIA
POLAND
EUROPE2
02:
10
10
10
10
10
10
03:
04:
15
12
15
12
15
12
15
12
15
12
15
12
05:
4
4
4
4
4
4
06:
09:
4
6
4
6
4
6
4
6
4
6
4
6
10:
5500
5500
5500
5500
5500
5500
11:
13:
3500
1300
3500
1300
3500
1300
3500
1300
3500
1300
3500
1300
15:
120
120
120
120
120
120
16:
2
2
2
2
2
2
17:
18:
100
0
100
0
100
0
100
0
100
0
100
0
19:
400
400
400
400
400
400
20:
21:
100
0
100
0
100
0
100
0
100
0
100
0
22:
400
400
400
400
400
400
#3 NUMERIC
Param
23:
0
0
0
0
0
0
24:
25:
10
60
10
60
10
60
10
60
10
60
10
60
26:
0
0
0
0
0
0
27:
28:
0
3
0
3
0
3
0
3
0
3
0
3
SINGAPORE
CZECH
SLOVENIA
ASIA
POLAND
EUROPE2
#5 TYPE
4-67
PC-D320/PC-D340/FAX-L400 Chapter 4: Maintenance and Service
SSSW Default Setting
TYPE
STANDARD
U.S.A.
02:
10
10
03:
04:
15
12
15
12
05:
4
4
06:
07:
4
350
4
350
09:
6
6
10:
11:
5500
3500
5500
3500
13:
1300
1300
15:
120
120
16:
17:
4
100
4
100
#3 NUMERIC
Param
18:
0
0
19:
20:
200
100
200
100
21:
0
0
22:
200
200
23:
24:
3
10
4
10
25:
60
60
26:
27:
3
0
4
0
28:
3
3
STANDARD
U.S.A.
#5 TYPE
4-68
PC-D320/PC-D340/FAX-L400 Chapter 4: Maintenance and Service
6. TEST FUNCTIONS
This machine functions for testing individual operations, such as below.
6.1 Test Mode Overview
Test mode can be executed by following the menu items from the display.
a) D-RAM tests
Writes data to DRAM image storage areas and reads that data to check operations.
b) Print test
Print patterns within the print area.
c) MODEM, NCU test
The frequency test, G3 signal transmission test, and Tonal and DTMF signals reception
tests, and V.34 G3 signal transmission test.
d) Faculty tests
Test the sensor functions and operation of operation panel.
4-69
PC-D320/PC-D340/FAX-L400 Chapter 4: Maintenance and Service
6.2 Test Mode Flowchart
To operate the test mode, after pressing the Additional Function key, press the # key and select
“SERVICE MODE”. After this, select “TEST MODE” with the - or + keys, and press the OK
key.
To end test mode, keep pressing the Stop/Reset key while pressing the Additional Function
key.
TEST MODE
“ * ” indicates that these items
are not used in the field.
[1] D-RAM
[2] CCD TEST
[3] PRINT
*[4] MODEM NCU
*[5] AGING TEST
[6] FACULTY TEST
[1] D-RAM
[2] D-RAM
* [3] I-RAM
* [4] OPT MEM
[08] GAIN AUTO ADJUST
* [0] AMI PT
* [1] WHT
[2] BLK
* [3] STRPS
* [4] CHKRS
* [5] CHKRS2
[6] ENDUR
* [7] BK/WHT
* [8] BIAS
* [9] CHKRS3
* [*] PRT AR
* [#] CRG
* [1] RELAY
[2] FREQ
[4] G3 Tx
* [5] DTMF Tx TEST
[6] TONE Rx
[8] V.34 G3 Tx TEST
* [1] G3 4800BPS Tx
[3] SENSOR
* [4] ADF
* [5] STAMP
* [6] SPEAKER
[7] OPERATION PANEL
* [9] LINE DETECT
Figure 4-19 Test Mode Menu
4-70
PC-D320/PC-D340/FAX-L400 Chapter 4: Maintenance and Service
6.3 D-RAM Tests
D-RAM test menu is selected by pressing the numeric key 1 from the test mode menu. D-RAM
Test 1 writes data to the entire D-RAM region and reads it out to check that operations are
correct. D-RAM Test 2 just reads data at high speed.
Operating
1: D-RAM
. . . .
13824K: D-RAM total memory capacity (bytes)
13824K
: Indicates an address for which write testing is complete.
. : Indicates an address for which read testing is complete.
Error
Normal end
1: D-RAM
complete
Error display
13824K
(no error)
WRT=33CC RD=33EC
ADR=BF840201
WRT: data written
RD: data read
ADR: address
Restart by pressing
Start key
Error display
1: D-RAM
complete
13824K
(error)
Figure 4-20 D-RAM Test
Before D-RAM test, output all image data in image memory. When D-RAM
test is performed, all image data are cleared.
6.4 CCD Test
CCD test menu is selected by pressing the numeric key 2 from the test mode menu. The gain
auto adjustment is selected by pressing the numeric key 08 from the CCD test menu. In this
test, automatically correcting the contact sensor output and setting the contact sensor
parameters.
4-71
PC-D320/PC-D340/FAX-L400 Chapter 4: Maintenance and Service
6.5 Print Tests
a) Test mode print test
The Print Test menu is selected by pressing the numeric key 3 from the test mode menu. In
this test, various print patterns are output from the printer. As service print patterns, press
the numeric key 2 from the Print Test menu to select “2: BLK” or press the numeric key 6
to select “6: ENDUR”. Do not use the other patterns. They are for development and factory
use.
Check the following for the print pattern.
"2: BLK"
Check for white stripes and
unevenness.
"6: ENDUR"
Check for image shrinkig, stretching,
soiling, aand black strips.
Figure 4-21 Print Pattern Check
NOTE
After completion of the print test, if the printing was normal, copy a
document. If there is any defect in the copied image, there is a defect in the
scan section.
4-72
PC-D320/PC-D340/FAX-L400 Chapter 4: Maintenance and Service
6.6 Modem and NCU Tests
The Modem and NCU Test menu is selected by pressing the numeric button 4 from the test
mode menu. These tests test modem and NCU transmission and reception. The modem tests
check whether signals are sent correctly from the modem by comparing the sound of the signals
from the speaker with the sounds from a normal modem. Also, you check on the display
whether or not the modem correctly detected received tone signals and DTMF signals.
End this test by pressing the Stop button.
Modem test type
Frequency test
G3 signal transmission test
Tonal signal/DTMF signal reception
tests
V.34 G3 signal transmission test
Overview
The modem sends tonal signals from the modular
jack and the speaker.
The modem sends G3 signals from the modular
jack and the speaker.
The modem detects specific frequencies and
DTMF signals received from the modular
jack.
The modem sends V.34 G3 signals from the
modular jack and the speaker.
a) Frequency test
The frequency test menu is selected by pressing the numeric button 2 from the MODEM
NCU test menu. Signals of the frequencies below are sent from the modem using the
modular jack and the speaker. The frequency can be changed with the numeric buttons.
Numeric button
1
2
3
4
5
6
7
Frequency
462 Hz
1100 Hz
1300 Hz
1500 Hz
1650 Hz
1850 Hz
2100 Hz
4-73
PC-D320/PC-D340/FAX-L400 Chapter 4: Maintenance and Service
b) G3 signal transmission test
The G3 signal transmission test menu is selected by pressing the numeric button 4 from the
MODEM NCU test menu. The G3 signals below are sent from the modem using the
modular jack and the speaker. The Speed can be changed with the numeric buttons.
Numeric button
0
1
2
3
4
5
6
7
8
Speed
300 bps
2400 bps
4800 bps
7200 bps
9600 bps
TC7200 bps
TC9600 bps
12000 bps
14400 bps
The transmission level for each frequency follows the service data.
NOTE
4-74
PC-D320/PC-D340/FAX-L400 Chapter 4: Maintenance and Service
c) Tonal and DTMF signal reception tests
The tonal and DTMF signal reception test is selected by pressing the numeric button 6 from
the MODEM NCU test menu. In these tests, you can check whether the tonal signals and
DTMF signals received from the modular jack are detected by the modem.
The 462Hz test is included because the modem has a 462Hz detection function.
Tone signal reception test
4-6: TONE Rx
000
0 0 0
When 1300 Hz signal detected, 0 to 1
When 440 Hz signal detected, 0 to 1
When 1100 Hz signal detected, 0 to 1
DTMF signal reception test
4-6: TONE Rx
000
1234567890
The received DTMF signals are displayed in order
from the right on the second line of the display.
Figure 4-22 Tonal and DTMF Signal Reception Tests
4-75
PC-D320/PC-D340/FAX-L400 Chapter 4: Maintenance and Service
d) V.34 G3 signal transmission test
The V.34 G3 signal transmission test menu is selected by pressing the numeric button 8
from the MODEM NCU test menu. The V.34 G3 signals below are sent from the modem
using the modular jack and the speaker by pressing the Start button. The Baud rate can be
changed with the numeric buttons, and the Speed can be changed with the search buttons.
Numeric button
0
1
2
3
4
5
Search button
Baud rate
3429 baud
3200 baud
3000 baud
2800 baud
2743 baud
2400 baud
Speed
33.6 kbps
31.2 kbps
28.8 kbps
26.4 kbps
24.0 kbps
21.6 kbps
19.2 kbps
16.8 kbps
14.4 kbps
12.0 kbps
9.6 kbps
7.2 kbps
4.8 kbps
2.4 kbps
The transmission level for each baud rate and speed follows the service data.
NOTE
4-76
PC-D320/PC-D340/FAX-L400 Chapter 4: Maintenance and Service
6.7 Faculty Tests
The faculty tests are selected by pressing the numeric key 6 from the test mode menu. These
tests test the following faculties of this machine.
Test type
Sensor tests
Operation panel test
Overview
Test whether the sensors are operating correctly.
Tests whether the key switches on the control
panel are operating correctly.
a) Sensor tests
The sensor test is selected by pressing the numeric key 3 from the faculty test menu. In this
test, you can check the status of each sensor of this machine in items 1 to 4 on the display.
You can also check if sensors that use actuators and microswitches are operating correctly
by moving the actuator or microswitch.
a-1) Toner sensor test check method
Use the following methods to test “TN on”, and “TN of”.
"TN on" check
(1) Open the printer cover.
(2) Insert a cartridge containing toner into the machine.
(3) Close the printer cover.
"TN of" check
(1) Open the printer cover.
(2) Insert the empty cartridge into the machine.
(3) Close the printer cover.
If the printer cover is closed without a cartridge being inserted, there will be
“TN on” display.
4-77
PC-D320/PC-D340/FAX-L400 Chapter 4: Maintenance and Service
6-3: SENSOR
[ 1] --- [ 4]
Pressing the 1 key
DS of DES of DOC B4
DFS of
DS
DES
DOC
DFS
: Document sensor on/of
: Document edge sensor on/of
: Not used
: Not used
Pressing the 2 key
COVER on
PAPER on
COVER
JAM
PAPER
OVER
JAM of
OVER of
: Cartridge cover detection on/of
: Recording paper jam detection on/of
: Recording paper detection on/of
: Over flow sensor on/of
Pressing the 3 key
CRG on TN on CVR on
OVR of FU on JAM of
CRG
TN
CVR
OVR
FU
JAM
: Cartridge detection on/of
: Toner sensor on/off
: Cartridge cover sensor on/of
: Recording paper over flow detection on/of
: Not used
: Recording paper jam detection on/of
Pressing the 4 key
PANEL 2
PANEL : Not used
Figure 4-23 Sensor Tests
NOTE
The indication ‘on/of’ of OVR appears after SCNT board recognizes ‘on/of’
of Over flow sensor (OVER), thus ‘on/of’ of OVR is properly indicated 6 sec
after ‘on/of’(OVER) is detected.
4-78
PC-D320/PC-D340/FAX-L400 Chapter 4: Maintenance and Service
b) Operation panel tests
The operation panel test is selected by pressing the numeric key 7 from the faculty test
menu. In this test, check that the display, LED lamps, keys and the sensors of one-touch
speed dialing panel on the operation panel are operating correctly.
b-1) Display test
Pressing the Start key from the operation panel menu, “H” is displayed 20 characters by 2
lines. The next time the Start key is pressed, all the LCD dots are displayed. Check for any
LCD dots in the display that are not displayed.
b-2) LED lamp test
The LED lamp test is selected by pressing the Start key after the display test.
When the Start key is pressed, all the lamps on the operation panel light. Check for any
LED that does not blink during the test.
b-3) Operation key test
The Operation key test is selected by pressing the Start key after the LED lamp test.
In this test, you press the key corresponding to the displayed character to put it out. The
table giving the correspondence between the characters and the keys is below.
Character
0-#
A
B
C
D
E
F
G
H
I
K
L
Operation key
Numeric keys
- key
OK key
+ key
Enlarge/Reduce key
Exposure key
Image Quality key
Additional Functions key
Collate/2 on 1 key
Status Monitor key
Stop/Reset key
Start key
a-p
M
N
O
F
G
H
4-79
One-touch Speed Dialling keys
Redial/Pause key
Corded Dial Key
Directory Key
Hook Key
COPY key
FAX key
PC-D320/PC-D340/FAX-L400 Chapter 4: Maintenance and Service
6-7: OPERATION PANEL
Press Start key.
HHHHHHHHHHHHHHHHHHHH
HHHHHHHHHHHHHHHHHHHH
H pattern displayed
Press Start key.
HHHHHHHHH
HH
All LCD dots displayed
Press Start key.
6-7: OPERATION PANEL
LED TEST
All LED lamps light on
Press Start key.
0123456789*#ABCDEFGH
I KLMNOFGH
When a key is pressed, the corresponding
character goes out.
When the entire display
has gone out.
abcdefghijklmnop
When a key is pressed, the corresponding
character goes out.
When the entire display
has gone out.
yyyyyy EC/US:yyy
'yyyyyy EC/US:yyy' display is normal end.
Press Stop/Rest key to end the test.
Figure 4-24 Operation Panel Test
4-80
PC-D320/PC-D340/FAX-L400 Chapter 4: Maintenance and Service
7. SERVICE REPORT
7.1 Report Output Function
7.1.1 User report output functions
This machine can output user report manually by user operation.
a) Manual output of reports by user operation
Report type
User’s data list
Operations
Press the Functions key, and press the report key,
select the report type and press OK key.
1-touch list
Coded dial list
Group dial list
Activity report
Document memory list
b) Reports output automatically by user data registration
Each report written below can be automatically output by specifying “REPORT
SETTINGS” in user data registration.
Transmission report
Reception report
Memory box report
Activity Report
For
samples
of
user
reports,
REFERENCE
4-81
see
the
Facsimile
Guide.
PC-D320/PC-D340/FAX-L400 Chapter 4: Maintenance and Service
c) Reports output automatically (Memory clear report)
When this fax is turned on and the memory clear report is automatically printed out, the
image data which appears on the report is the data which was deleted without being able to
be backed up. After the memory clear report is printed, the image data management
information is automatically deleted.
Figure 4-25 Memory Clear Report
TX/RX NO
MODE
: Indicates four digits of the transaction number
: Displays the communication modes of TX, RX, delayed TX,
memory RX, etc.
DESTINATION TEL/ID : Displays the number and each digit (24 digits) of one-touch
speed dial and coded speed dial.
PGS.
: Number of pages are stored in memory
SET TIME
: Time when data is stored in memory (24-hour display)
ST. TIME
: Displays a start time for delayed TX, etc. (24-hour display)
SENDER NAME
: Sender name appended to transmission (up to 24 characters)
Displays a 7-digits department ID (only used when department
ID setup is “ON” ).
4-82
PC-D320/PC-D340/FAX-L400 Chapter 4: Maintenance and Service
7.1.2 Service report output functions
This machine outputs the service data setting status, data unique to the machine, etc. in
service mode.
a) List of service reports
This machine outputs the service reports shown below.
Report type
Service data list
System dump list
Key history report
Mail History report
Counter report
Print spec report
Operations
In the service mode, select REPORT menu, and
press OK key. Then select the report type, and
press OK key.
Transmission report
(with service error code
and dump list)
If you set bits 0 and 1 of #1 SSSW SW01 in the service
mode, the service error code and dump list are indicated
on the activity report.
Reception report
(with service error code
and dump list)
If you set bits 0 and 1 of #1 SSSW SW01 in the service
mode, the service error code and dump list are indicated
on the activity report.
4-83
PC-D320/PC-D340/FAX-L400 Chapter 4: Maintenance and Service
a-1) System data list
This list shows service data setting statuses of service soft switches and service
parameters.
Figure 4-26 System Data List 1
4-84
PC-D320/PC-D340/FAX-L400 Chapter 4: Maintenance and Service
Figure 4-27 System Data List 2
4-85
PC-D320/PC-D340/FAX-L400 Chapter 4: Maintenance and Service
Figure 4-28 System Data List 3
4-86
PC-D320/PC-D340/FAX-L400 Chapter 4: Maintenance and Service
Figure 4-29 System Data List 4
4-87
PC-D320/PC-D340/FAX-L400 Chapter 4: Maintenance and Service
Figure 4-30 System Data List 5
4-88
PC-D320/PC-D340/FAX-L400 Chapter 4: Maintenance and Service
Figure 4-31 System Data List 6
4-89
PC-D320/PC-D340/FAX-L400 Chapter 4: Maintenance and Service
Figure 4-32 System Data List 7
4-90
PC-D320/PC-D340/FAX-L400 Chapter 4: Maintenance and Service
Figure 4-33 System Data List 8
4-91
PC-D320/PC-D340/FAX-L400 Chapter 4: Maintenance and Service
Figure 4-34 System Data List 9
4-92
PC-D320/PC-D340/FAX-L400 Chapter 4: Maintenance and Service
Figure 4-35 System Data List 10
4-93
PC-D320/PC-D340/FAX-L400 Chapter 4: Maintenance and Service
Figure 4-36 System Data List 11
4-94
PC-D320/PC-D340/FAX-L400 Chapter 4: Maintenance and Service
Figure 4-37 System Data List 12
4-95
PC-D320/PC-D340/FAX-L400 Chapter 4: Maintenance and Service
Figure 4-38 System Data List 13
4-96
PC-D320/PC-D340/FAX-L400 Chapter 4: Maintenance and Service
Figure 4-39 System Data List 14
4-97
PC-D320/PC-D340/FAX-L400 Chapter 4: Maintenance and Service
Figure 4-40 System Data List 15
4-98
PC-D320/PC-D340/FAX-L400 Chapter 4: Maintenance and Service
Figure 4-41 System Data List 16
4-99
PC-D320/PC-D340/FAX-L400 Chapter 4: Maintenance and Service
Figure 4-42 System Data List 17
4-100
PC-D320/PC-D340/FAX-L400 Chapter 4: Maintenance and Service
Figure 4-43 System Data List 18
4-101
PC-D320/PC-D340/FAX-L400 Chapter 4: Maintenance and Service
Figure 4-44 System Data List 19
4-102
PC-D320/PC-D340/FAX-L400 Chapter 4: Maintenance and Service
Figure 4-45 System Data List 20
4-103
PC-D320/PC-D340/FAX-L400 Chapter 4: Maintenance and Service
Figure 4-46 System Data List 21
4-104
PC-D320/PC-D340/FAX-L400 Chapter 4: Maintenance and Service
Figure 4-47 System Data List 22
This machine does not offer an option for DATE & TIME registration; as
such, the setting START DATE is not valid.
NOTE
4-105
PC-D320/PC-D340/FAX-L400 Chapter 4: Maintenance and Service
a-2) System dump list
This list shows the past communications statuses and error communications history.
Figure 4-48 System Dump List
4-106
PC-D320/PC-D340/FAX-L400 Chapter 4: Maintenance and Service
*1
: Not used
*2
: Not used
*3
: Not used
*4
: Not used
*5
: Not used
*6
: Not used
*7
: Not used
*8
: Not used
*9
: Not used
*10
: Total number of pages printed/scanned
[Display example]
PRINT = 30*/100** READ = 30*/100**
* This value indicates the value of TTL (for PRINT) and SCAN (for READ) in Service
Data #9 COUNTER-TOTAL.
The value of PRINT and READ can be input from TTL and SCAN menu in Service
Data #9 COUNTER-TOTAL.
The both values are cleared to “0” by the clear operation of Service Data #12
CLEAR-COUNTER.
** This value indicates the value (not including service reports output) counted since
shipment from the factory.
*11
: Not used
[Display example]
##100
0
0
0
0
0
##0100
##0101
##0102
errors
errors
errors
4-107
PC-D320/PC-D340/FAX-L400 Chapter 4: Maintenance and Service
a-3) Key history report
This report shows history of key press.
Figure 4-49 Key History Report
This machine does not offer an option for DATE & TIME registration; as
such, the date is displayed using the following notation: 00/00 00:00:00.
NOTE
4-108
PC-D320/PC-D340/FAX-L400 Chapter 4: Maintenance and Service
a-4) Counter report
This report shows counter of read, print and copy. Then output the list of changes made to
the defaults of user data list and system data list.
Figure 4-50 Counter Report
For particulars of counters, see #9 COUNTER in service mode.
NOTE
4-109
PC-D320/PC-D340/FAX-L400 Chapter 4: Maintenance and Service
Figure 4-51 Changed Data List (User’s Data List) 1
4-110
PC-D320/PC-D340/FAX-L400 Chapter 4: Maintenance and Service
Figure 4-52 Changed Data List (User’s Data List) 2
4-111
PC-D320/PC-D340/FAX-L400 Chapter 4: Maintenance and Service
Figure 4-53 Changed Data List (User’s Data List) 3
4-112
PC-D320/PC-D340/FAX-L400 Chapter 4: Maintenance and Service
Figure 4-54 Changed Data List (System Data List)
4-113
PC-D320/PC-D340/FAX-L400 Chapter 4: Maintenance and Service
a-6) Print spec report
This report shows specification of the machine.
Figure 4-55 Print Spec Report
4-114
PC-D320/PC-D340/FAX-L400 Chapter 4: Maintenance and Service
*1
*2
*3
*4
*5
*6
*7
*8
: Country setting under ‘#5 TYPE’ in service mode
: Total memory size
: Version of the ROM on the SCNT board
: Version of the CPU on the SCNT board
: Version of the ROM on the ECNT board
: Adjustment items and settings for the service mode item #6 SCANNER>7.CCD
: Contact sensor size
: Use of USB
4-115
PC-D320/PC-D340/FAX-L400 Chapter 4: Maintenance and Service
8. WIRING DIAGRAM
8.1 Wiring Diagram
Laser/Scanner unit
Scanner
motor
LCD unit
1
Document
feed
motor
M
CS home
position
sensor
Over flow
sensor
CS drive
motor
1 3
1 3
J511
Contact sensor
OPCNT board
1
1 4
J504
1 3
J516
1
12
M
Laser/BD
board
J802
1 4
J801
1 10
J1
11
1 3
M
1 4
J505
14
J5
1 11
J503
1 4
J508
1 12
J506
1 10
J507
SCNT board
J509
1
6
1 3
J44
1 2
J515
1 4
1 4
1 3
Speaker
DES
sensor
DS
sensor
J513
1 4
1 4
5
J5(J2)
J4
Moduler/USB board
1
Toner
Sensor
FAX-L400 only
PC-D340/
FAX-L400
only
1
1
25
J1
J514
J5
1
6
1
26
1 6
J10
J3
J6(J1)
USB port
LINE TEL HAND
SET
J41
25
1
5
NCU board
Fixing unit
Thermal fuse
Fixing heater
FU1132 J1102 H701
Cartridge
1
1 2
2
2
1
DRGND
Main
Sub
Thermistor Thermistor
2
1
2
Pressure
roller
1
Fixing film unit
FG
J301
(DEV)
J304
(PR1)
1 2
J102
1 4
J206
1
J305
(FB)
Recording
paper
sensor
ECNT board
J302(TRS)
J101
J203
1 3
Fan
J204
1 2
J210
J211
1 3
1 3
SL
1 3
1 3
Paper
eject
sensor
Page
top
sensor
Paper
pick-up
solenoid
J401
3
1
1 4
M
Main
motor
Figure 4-56 Wiring Diagram
4-116
26
J201
AC 120V
PS201
Cartridge
cover
sensor
SW301
PC-D320/PC-D340/FAX-L400 Chapter 4: Maintenance and Service
This page intentionally left blank
4-117
Chapter 5
Appendix
PC-D320/PC-D340/FAX-L400 Chapter 5: Appendix
1. INSTALLATION
1.1 Setting up
• Select a site of installation.
• Unpack the machine, and check the attachments.
Make sure none is missing and there is no damage.
• Remove the packing material.
Remove all tape and protective material used on the machine.
• Fit the attachments.
• Make connections.
Connect the USB cable to the computer.
Connect the telephone line and option handset (FAX-L400 only).
• Turn on the power.
Connect the power cord.
• Selecting the language.
When you turn on the power for the first time, you need to select the correct language.
For the FAX-L400, you also need to select the correct country.
• Fit the toner cartridge.
Shake the cartridge, and remove the protective material; then, pull the tab to remove the seal.
• Set the recording paper.
Put recording paper in the paper tray. Register the size of the recording paper by changing
PAPER SETTINGS under Additional Functions.
• Set the type of telephone line (FAX-L400 only).
To do so, make the following selections: Additional Functions>FAX SETTINGS>USER
SETTINGS>TEL LINE SETTINGS>TEL LINE TYPE.
• Register user data for date and time (FAX-L400 only), by selecting Additional
Functions>TIMER SETTINGS>DATE/TIME SETTINGS; for telephone number, by
selecting FAX SETTINGS>USER SETTINGS>TEL LINE SETTINGS>USER TEL NO.;
for fax machine name, Additional Functions>FAX SETTINGS>USER SETTINGS>UNIT
NAME.
1.2 Checking Operation
• Check the level of quality for both reading and printing.
Make a copy, and see that it is free of a fault for both reading and printing.
• Conduct a communications test.
Send and receive a fax by connecting to another fax machine, making sure that the image is
normally sent and the received image is normally printed.
What to do when trouble occurs
Very rarely, during use, the display may go out, all the keys may stop working,
or some other trouble may occur because of strong electrical noise or a large
amount of static. If such trouble occurs, initialize the RAM (All clear
operation). For how, please refer to Chapter 3, 1.4 All Clear.
5-1
PC-D320/PC-D340/FAX-L400 Chapter 5: Appendix
2. USER DATA FLOW
2.1 User Data Flow (by Operation Panel)
a) COPY model
Press the Additional Functions key.
Additional Functions
1. PAPER SETTINGS
1. PAPER SIZE
A4
B5
A5
LTR
LGL
EXECUTIV
ENVELOPE
FREE SIZE
2. PAPER TYPE
PLAIN PAPER
TRANSPARENCY
SPECIAL PAPER1
SPECIAL PAPER2
2. COMMON SETTINGS
1. PRINT EXPOSURE
2. TONER SAVER MODE
3. DISPLAY LANGAGE
-LT
DK+
ON
OFF
ENGLISH
FRENCH
SPANISH
GERMAN
ITALIAN
DUTCH
FINNISH
PORTUGUESE
NORWEGIAN
SWEDISH
SLOVENE
CZECH
HUNGARIAN
RUSSIAN
Figure 5-1 User Data Flow 1
5-2
PC-D320/PC-D340/FAX-L400 Chapter 5: Appendix
3. COPY SETTINGS
1. STD. IMAGEQUALITY
2. STANDARD EXPOSURE
3. STD ZOOM RATIO
4. STANDARD COPY QTY
5. AUTO SORT
6. PAPER SIZE GROUPE
7. SHARPNESS
TEXT ORIGINAL
TEXT / PHOTO
PHOTO
MANUAL
-LT
AUTO
(050~200) 100%
(01~99) 01
ON
OFF
A
AB
INCH
(1~9) 5
4. PRINTER SETTINGS
1. PRESET PRINT QTY.
2. AUTO ERROR SKIP
3. ERROR TIME OUT
(01~99) 01
ON
OFF
ON
(005~300) 015SEC
OFF
4. PRINTER RESET
5. TIMER SETTINGS
1. AUTO CLEAR
2. ENERGY SAVER
6. PRINT LISTS
ON
OFF
ON
OFF
(1~9) 2MIN.
(03~30) 05MIN.
1. USER DATA
Figure 5-2 User Data Flow 2
5-3
DK+
PC-D320/PC-D340/FAX-L400 Chapter 5: Appendix
a) FAX model
Press the Additional Functions key.
Additional Functions
1. PAPER SETTINGS
1. PAPER SIZE
A4
B5
A5
LTR
LGL
EXECUTIV
ENVELOPE
FREE SIZE
2. PAPER TYPE
PLAIN PAPER
TRANSPARENCY
SPECIAL PAPER1
SPECIAL PAPER2
2. COMMON SETTINGS
1.DEFAULT SETTINGS
2.SW AFTER AUTO CLR
COPY
FAX
DEFAULT MODE
CURRENT MODE
3.VOLUME CONTROL
1. KEYPAD VOLUME
ON
OFF
2.ALARM VOLUME
ON
OFF
3.TX DONE TONE
ERROR ONLY
OFF
ON
4.RX DONE TONE
ERROR ONRY
OFF
ON
5.PRINTING END TONE
ERROR ONLY
OFF
ON
6.SCANNING END TONE
ERROR ONLY
OFF
ON
7.CALLING VOLUME
8.LINE MONITOR VOL.
1
2
3
ON
OFF
1
2
3
1
2
3
1
2
3
1
2
3
1
2
3
1
2
3
1
2
3
1
2
3
1
2
3
1
2
3
1
2
3
Figure 5-3 User Data Flow 1
5-4
PC-D320/PC-D340/FAX-L400 Chapter 5: Appendix
4.PRINT EXPOSURE
5.TONER SEVER MODE
6.DISPLAY LANGAGE
-LT
ON
OFF
ENGLISH
SPANISH
GERMAN
ITALIAN
DUTCH
FINNISH
PORTUGUESE
NORWEGIAN
SWEDISH
DANISH
SLOVENE
CZECH
HUNGARIAN
RUSSIAN
DK+
3.COPY SETTINGS
1. STD. IMAGEQUALITY
2. STANDARD EXPOSURE
3. STD ZOOM RATIO
4. STANDARD COPY QTY
5. AUTO SORT
6. PAPER SIZE GROUPE
7. SHARPNESS
TEXT ORIGINAL
TEXT / PHOTO
PHOTO
MANUAL
AUTO
(050~200) 100%
(01~99) 01
ON
OFF
A
AB
INCH
(1~9) 5
-LT
Figure 5-4 User Data Flow 2
5-5
DK+
PC-D320/PC-D340/FAX-L400 Chapter 5: Appendix
4.FAX SETTINGS
1. USER SETTINGS
1. TEL LINE SETTINGS
1. USER TEL NO.
2.TEL LINE TYPE
3.TX START SPEED
4.RX START SPEED
2.UNIT NAME
3.TX TERMINAL ID
TOUCH TONE
ROTARY PULSE
33600bps
14400bps
9600bps
7200bps
4800bps
2400pbs
33600bps
14400bps
9600bps
7200bps
4800bps
2400pbs
1.TTI POSITION
ON
OFF
2.TEL NUMBER MARK
4.DENSITY CONTROL
5.OFFHOOK ALARM
6.R-KEY SETTING
1.LIGHT
2.STANDARD
3.DARK
ON
OFF
PSTN
PBX
-LT
-LT
-LT
PRINT ERROR ONLY
REPORT WITH TX IMAGE
OUTPUT YES
OUTPUT NO
PRINT ERROR ONLY
OUTPUT YES
OUTPUT NO
ON
OFF
REPORT WITH TX IMAGE
OUTSIDE IMAGE
INSIDE IMAGE
FAX
TEL
DK+
DK+
DK+
HOOKING
PREFIX
2.REPORT SETTINGS
1.TX REPORT
2.RX REPORT
3.ACTIVITY REPORT
ON
OFF
ON
OFF
3.TX SETTINGS
1.ECM TX
2.PAUSE TIME
3.AUTO REDIAL
4.TIME OUT
ON
OFF
(01~99) 04SEC.
ON
OFF
ON
OFF
1.REDIAL TIMES
2.REDIAL INTERVAL
Figure 5-5 User Data Flow 3
5-6
(01~10) 02TIMES
(02~99) 02MIN.
PC-D320/PC-D340/FAX-L400 Chapter 5: Appendix
4.RX SETTINGS
1.ECM TX
ON
OFF
1.RING START TIME
2.F/T RING TIME
3.F/T SWITCH ACTION
2.FAX/TEL OPT. SET
3.INCOMING RING
ON
OFF
ON
OFF
ON
OFF
4.MAN/AUTO SWITCH
5.REMOTE RX
(01~30) 08SEC.
(010~060) 022SEC.
RECEIVE
DISCONNECT
RING COUNT
(01~99) 02TIMES
F/T RING TIME
(01~99) 15SEC.
REMOTE RX ID
25
5.PRINTER SETTINGS
1.RX REDUCTION
1.RX REDUCTION
ON
OFF
AUTO SELECTION
FIXED REDUCATION
2.SELECT REDUCE DIR
2.TONER SUPPLY LOW
RX TO MEMORY
KEEP PRINTING
6.POLLING BOX
1.SETUP FILE
1.FILE NAME
2.PASS WORD
3.ERASE AFTER TX
ON
OFF
2.CHANGE DATA
3.DELETE FILE
Figure 5-6 User Data Flow 4
5-7
97%
95%
90%
75%
VERTICAL ONLY
HORIZ & VERTICAL
PC-D320/PC-D340/FAX-L400 Chapter 5: Appendix
7.SYSTEM SETTINGS
1.FAX DEFAULT
1.RESOLUTION
2.SCAN DENSITY
3.BOOK TX SCAN SIZE
2.LOOK PHONE
3.COUNTRY SELECT
OFF
STANDARD
FINE
PHOTO
SUPER FINE
ULTRA FINE
OFF
LIGHT
STANDARD
DARK
SHEET
A4
A5
ON
OFF
UK
GERMANY
FRANCE
ITALY
SPAIN
HOLLAND
DENMARK
NORWAY
SWEDEN
FINKAND
AUSTRIA
BELGIUM
SWIZERKAND
PORTUGAL
GREECE
LUXEMBOUYRG
HUNGARY
CZECH
RUSSIA
SLOVENIA
SOUTH AFRICA
OTHERS
5.ADD.REGISTRATION
1. 1-TOUCH SPD DIAL
2.CODED SPD DIAL
3.GROUPDIAL
01~30
*00~*99
01~30
Figure 5-7 User Data Flow 5
5-8
PC-D320/PC-D340/FAX-L400 Chapter 5: Appendix
6. PRINTER SETTINGS
1. PRESET PRINT QTY.
2. AUTO ERROR SKIP
3. ERROR TIME OUT
(01~99) 01
ON
OFF
(005~300) 015SEC
ON
OFF
4. PRINTER RESET
7. TIMER SETTINGS
1. DATE/TIME SETTING
2. AUTO CLEAR
3. ENERGY SAVER
4. DATA SETUP
8. PRINT LISTS
DD/MM 'YY HH:MM
(1~9) 2MIN.
ON
OFF
(03~30) 05MIN.
ON
OFF
DD/MM YYYY
YYYY MM/DD
MM/DD/YYYY
1. USER DATA
2. SPEED DIAL LIST
3. CANCEL REPORT
Figure 5-8 User Data Flow 6
5-9
PC-D320/PC-D340/FAX-L400 Chapter 5: Appendix
3. OPTION
3.1 Handset Kit (FAX-L400 only)
3.1.1 Service operations
a) External view
HANDSET CRADLE
HANDSET
SCREWS WITH PLUGS (2)
RINGER VOLUME SWITCH
Adjusts the volume of the ringer.Use a pen
or another pointed object to adjust the
switch to HIGH, LOW, or OFF.
Figure 5-9 External View
b) Installation
b-1) Attachment to the main unit
Use a screwdriver to remove the two covers on the left side of the unit.
Figure 5-10 Handset Installation 1
5-10
PC-D320/PC-D340/FAX-L400 Chapter 5: Appendix
Remove the screws from the plugs and insert the plugs into the holes on the handset cradle.
Figure 5-11 Handset Installation 2
Insert the plugs (with the handset cradle) into the holes on the unit.
If you have difficulty inserting the plugs, turn the unit so that the left side is facing you and
the right side is abainst a wall. You can now insert the plugs without the unit moving.
Figure 5-12 Handset Installation 3
Use your finger to push the screws into the plugs.
If you have difficulty, use a cross-point screwdriver to push the screws all the way into the
plugs. (Do not screw them in as the screws may break.)
Make sure you support the unit when inserting the screws.
Figure 5-13 Handset Installation 4
b-2) Connecting the Handset
5-11
PC-D320/PC-D340/FAX-L400 Chapter 5: Appendix
Place the handset in its cradle and connect the handset cord to the handset jack.
Figure 5-14 Connecting the Handset
Handset jack
5-12
0103IP
CANON INC.