1
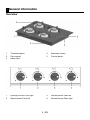
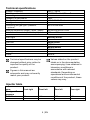
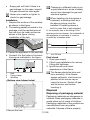
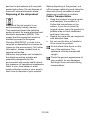
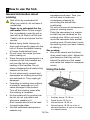
Built-In Hob
HIS 64123 S
Please read this manual first.
Dear Customer,
We would like you to obtain best performance with your product that has been
manufactured in modern facilities and passed through strict quality control
procedures.
Therefore, we advise you to read through this User Manual carefully before using
your product and keep it for future reference. If you hand over the product to
someone else, deliver the User Manual as well.
The User Manual will help you use the product in a fast and safe way.
• Read the User Manual before installing and operating the product.
• You must strictly observe the safety instructions.
• Keep this User Manual within easy reach for future reference.
• Also read other documents supplied with the product.
Remember that this User Manual may also be applicable for several other
models.
Differences between models are explicitly identified in the manual.
Explanation of symbols
Throughout this User Manual the following symbols are used:
Important information or useful hints about usage.
Warning for hazardous situations with regard to life and property.
Warning for electric shock.
Warning for risk of fire.
Warning for hot surfaces.
Table of Contents
1 General information ............... 4
Overview ............................................... 4
Technical specifications ....................... 5
Injector table ......................................... 5
2 Safety instructions ................. 6
Future Transportation ...................... 12
4 Preparation ........................... 13
Tips for saving energy ......................... 13
Initial operation ................................... 13
First cleaning of the appliance ........ 13
General safety ....................................... 6
5 How to use the hob .............. 14
Safety when working with gas ........... 7
Intended use ...................................... 8
Safety for children .............................. 8
General information about cooking .... 14
Using the hobs .................................... 14
3 Installation .............................. 9
General information ............................ 16
Cleaning the hob ................................. 16
Before installation ................................. 9
Installation and connection................. 10
Disposal .............................................. 11
6 Maintenance and care ......... 16
7 Troubleshooting ................... 18
Disposing of packaging material ..... 11
Disposing of the old product ........... 12
3 | EN
1 General information
Overview
1
2
3
Tempered glass
Pan support
Base cover
4
5
Assembly clamp
Control panel
1
2
Auxiliary burner Front right
Rapid burner Front left
3
4
Normal burner Rear left
Normal burner Rear right
4 | EN
Technical specifications
Voltage / frequency
Cable type / section
Cable length
Category of gas product
Gas type / pressure
Total gas consumption
§
Converting the gas type / pressure
– optional
External dimensions (height / width / depth)
Installation dimensions (width / depth)
Burners
Front right
Power
Front left
Power
Rear left
Power
Rear right
Power
230 V ~ 50 Hz
2
H05RR-FGm 3 x 0,75 mm
max. 2 m
II 2H3+
LPG G 30/28-30 mbar
7.9 kW
NG G 20/20 mbar
98 mm/590 mm/510 mm
560 mm/490 mm
Auxiliary burner
1000 W
Rapid burner
2900 W
Normal burner
2000 W
Normal burner
2000 W
Technical specifications may be
changed without prior notice to
improve the quality of the
product.
Values stated on the product
labels or in the documentation
accompanying it are obtained in
laboratory conditions in
accordance with relevant
standards. Depending on
operational and environmental
conditions of the product, these
values may vary.
Figures in this manual are
schematic and may not exactly
match your product.
Injector table
Position hob
zone
Gas type / Gas
pressure
G 20/20 mbar
G 30/28-30 mbar
1000 W
Front right
2900 W
Front left
2000 W
Rear left
2000 W
Rear right
72
50
115
87
103
72
103
72
5 | EN
2 Safety instructions
•
General safety
•
•
•
•
•
This product is not intended to be
used by persons with physical,
sensory or mental disorders or
unlearned or inexperienced people
(including children) unless they are
attended by a person who will be
responsible for their safety or who
will instruct them accordingly for
use of the product.
Children must be supervised to
prevent them from tampering with
the product.
Connect the product to a
grounded outlet/line protected by
a fuse of suitable capacity as
stated in the "Technical
specifications" table. Have the
grounding installation made by a
qualified electrician while using the
product with or without a
transformer. Our company shall
not be liable for any damages that
will arise due to using the product
without a grounding installation in
accordance with the local
regulations.
Do not operate the product if the
power cable or plug is damaged.
Call Authorized Service Agent.
Do not operate the product if it is
defective or has any visible
damage.
Do not carry out any repairs or
modifications on the product.
However, you may remedy some
troubles that do not require any
repairs or modifications. See
Troubleshooting, page 18.
•
•
•
•
•
•
•
•
6 | EN
Never wash down the product with
water! There is the risk of electric
shock!
Never use the product when your
judgment or coordination is
impaired by the use of alcohol
and/or drugs.
Product must be disconnected
from the mains during installation,
maintenance, cleaning and repair
procedures.
Installation and repair procedures
must always be performed by
Authorized Service Agents.
Manufacturer shall not be held
responsible for damages arising
from procedures carried out by
unauthorized persons and may
void the warranty.
Be careful when using alcoholic
drinks in your dishes. Alcohol
evaporates at high temperatures
and may cause fire since it can
ignite when it comes into contact
with hot surfaces.
Do not heat closed tins and glass
jars in the oven. The pressure that
would build-up in the jar may
cause it to burst out.
Do not place any flammable
materials close to the product as
the sides become hot during use.
Keep all ventilation slots clear of
obstructions.
Make sure that the product is
switched off after every use.
•
Product must be installed by a
qualified person in accordance
with the regulations in force.
Otherwise, the warranty shall
become void.
•
Safety when working with gas
•
•
•
•
Any works on gas equipment and
systems may only be carried out
by authorised qualified persons
who are Gas Safe registered.
"Prior to the installation, ensure
that the local distribution
conditions (nature of the gas and
gas pressure) and the adjustment
of the appliance are compatible."
"This appliance is not connected
to a combustion products
evacuation device. It shall be
installed and connected in
accordance with current
installation regulations. Particular
attention shall be given to the
relevant requirements regarding
ventilation;" See Before installation,
page 9
"CAUTION:"The use of a gas
cooking appliance results in the
production of !heat, moisture and
products of combustion" in the
room in which it is installed.
Ensure that the kitchen !is well
ventilated especially when the
appliance is in use": keep natural
ventilation holes open or install a
mechanical ventilation device
(mechanical extractor hood).
Prolonged intensive use of the
appliance may call for additional
ventilation, for example increasing
the level of the mechanical
ventilation where present."
•
•
Gas appliances and systems must
be regularly checked for proper
functioning. Please arrange for
annual maintenance.
Clean the gas burners regularly.
The flames should be blue and
burn evenly.
Good combustion is required in
gas appliances. In case of
incomplete combustion, carbon
monoxide (CO) might develop.
Carbon monoxide is a colourless,
odourless and very toxic gas,
which has a lethal effect even in
very small doses.
Request information about gas
emergency telephone numbers
and safety measures in case of
gas smell from you local gas
provider.
What to do when you smell gas
Risk of explosion and poisoning!
Put out all naked flames and do
not smoke, strike matches or do
anything that could cause
ignition.
Do not operate any electric
switches (e.g. light switch, TV,
computer, cooker or door bell).
Do not use a telephone or mobile
phone.
1. Turn off all valves on gas
appliances and gas meter at the
main control valve, unless it's in a
confined space or cellar.
2. Open doors and windows.
3. Check all tubes and connections
for tightness. If you still smell gas
leave the property.
4. Warn the neighbours.
7 | EN
5. Call the fire-brigade. Use a
telephone outside the house.
5.1 If you have door or gates that
are secured by an electric lock,
or entry phone, please open
these manually.
6. Do not re-enter the property until
you are told it is safe to do so.
Intended use
This product is designed for domestic
use. Commercial use is not admissible.
"CAUTION: This appliance is for
cooking purposes only. It must not be
used for other purposes, for example
room heating."
The manufacturer shall not be liable for
any damage caused by improper use
or handling errors.
Safety for children
•
•
•
8 | EN
Accessible parts of the appliance
will become hot whilst the
appliance is in use and until the
appliance has cooled, children
should be kept away.
Do not store any items above the
appliance that children may reach.
The packaging materials will be
dangerous for children. Keep the
packaging materials away from
children. Please dispose of all
parts of the packaging according
to environmental standards.
3 Installation
Before installation
The hob is designed for installation in a
commercial worktop. A safety distance
must be left between the appliance
and the kitchen walls and furniture.
See figure (values in mm).
• Remove packaging materials and
transport locks.
•
•
•
Surfaces, synthetic laminates and
adhesives used must be heat
resistant (100 °C minimum).
The worktop must be aligned and
fixed horizontally.
Cut aperture for the hob in
worktop as per installation
dimensions.
Failure to install correctly is dangerous
Room ventilation
and could result in prosecution.
The air for combustion is taken from
the room air and the exhaust gases are Prolonged intensive use of the
appliance may call for additional
emitted directly into the room.
ventilation, for example the opening of
Good room ventilation is essential for
a window, or the use of permanent
safe operation of your appliance. If
fixed mechanical ventilation system,
there is no window or door available
for example, an extractor fan or cooker
for room ventilation, an extra
hood that ventilates to the outside.
ventilation must be installed.
Room size
Ventilation
Do not install this appliance in a room
opening
below ground level unless it is open to
3
2
smaller than 5 m
min. 100 cm
ground level on at least one side.
9 | EN
Room size
3
3
5 m to 10 m
3
greater than 10 m
In the cellar or
basement
•
Ventilation
opening
2
min. 50 cm
not required
2
min. 65 cm
The plug should be easily
accessible after installation (but
not above the hob).
Installation and connection
•
For installation the appliance must
be connected in accordance with
all local gas and/or electrical
regulations.
Connection to the mains supply
This appliance must be
earthed!
Our company shall not be held
responsible for any damage
caused by using the appliance
without an earthed socket.
Plug the mains lead into the socket.
Risk of electric shock!
Before starting any work on the
electrical installation, please
disconnect the appliance from
the mains supply.
Connection to the gas supply
Risk of explosion or poisoning by
unprofessional installation.
The appliance may be connected
to the gas distribution system
only by an authorized qualified
person who is Gas Safe
registered.
Risk of electric shock, short
circuit or fire by unprofessional
installation!
The appliance may be connected
to the mains supply only by an
authorized qualified person and
the appliance is only guaranteed
after correct installation.
Risk of electric shock, short
circuit or fire by damage of the
mains lead!
The mains lead must not be
clamped, bent or trapped or
come into contact with hot parts
of the appliance.
If the mains lead is damaged, it
must be replaced by a qualified
electrician.
•
The appliance mains cable must
correspond to the specifications
and the power consumption; see
Technical specifications, page 5.
Risk of explosion!
Before starting any work on the
gas installation, please shut off
the gas supply.
•
The mains supply data must
correspond to the data specified
on the rating plate of the appliance.
The rating plate is located at the
rear housing of the appliance.
"The adjustment conditions for this
appliance are stated on the label
(or data plate)."
See gas connection and conversion
details in the booklet given with your
appliance.
Leakage control at the connection
point
• Make sure that all knobs on the
appliance are turned off. Make
sure that the gas supply is on.
Prepare soapy foam and apply it
onto the connection edge of the
hose for gas leakage control.
10 | EN
•
Soapy part will froth if there is a
gas leakage. In this case, inspect
the gas connection once again.
Clamping to different holes is not
a good practice in terms of safety
since it can damage the gas and
electrical system.
Never use a match or lighter to
check for gas leakage.
Installation
1. Prepare the surface of the worktop
as shown in the figure.
2. The sealing gasket provided in the
package must be applied around
the hob from its lower surface as
shown in the figure, during
installation of the hob.
3. Center the appliance in the worktop.
4. Connect it to the holes in the lower
housing as indicated in the figure.
1
2
3
When installing the hob above a
cupboard, a dividing shelf as in
the above picture must be
installed. If installing above a
built-in oven this is not required.
If, for example, due to the fitting of the
appliance above a drawer, the underside of
the appliance is touchable, it must be
covered by a wooden plate.
1
min. 50 mm
Final check
1. Open gas supply.
2. Check gas installations for secure
fitting and tightness.
3. Ignite burners and check
appearance of the flame.
The flames should be blue and
burn smoothly. If the flames
appear yellowish, check secure
position of the burner cap or
clean the burner. Switch off gas
and let burner cool before
touching it.
Hob
Fixing clamp
Worktop
» Bottom view (clamp holes)
Disposal
Disposing of packaging material
» Secure the hob.
Packaging materials are dangerous to
children. Keep packaging materials in
a safe place out of reach of children.
Packaging materials of the product are
manufactured from recyclable
materials. Dispose of them properly
11 | EN
and sort in accordance with recycled
waste instructions. Do not dispose of
them with normal domestic waste.
Disposing of the old product
Before disposing of the product, cut
off the power cable plug and make the
door lock (if any) unusable to avoid
dangerous conditions to children.
Future Transportation
•
Dispose of the old product in an
environmentally friendly manner.
This equipment bears the selective
sorting symbol for waste electrical and
electronic equipment (WEEE). This
means that this equipment must be
handled pursuant to European
Directive 2002/96/EC in order to be
recycled or dismantled to minimize its
impact on the environment. For further
information, please contact local or
regional authorities.
Electronic equipments not included in
the selective sorting process are
potentially dangerous for the
environment and human health due to
the presence of hazardous substances.
Refer to your local dealer or solid
waste collection centre in your area to
learn how to dispose of your product.
•
•
12 | EN
Keep the product's original carton
and transport the product in it.
Follow the instructions on the
carton. If you do not have the
original carton, pack the product in
bubble wrap or thick cardboard
and tape it securely.
Secure the caps and pan supports
with adhesive tape.
Do not use the door or handle to
lift or move the product.
Do not place other items on the
top of the appliance. The
appliance must be transported
upright.
Check the general appearance of
your product for any damages
that might have occurred during
transportation.
4 Preparation
Tips for saving energy
Initial operation
The following information will help you
to use your appliance in an ecological
way, and to save energy:
• Defrost frozen dishes before
cooking them.
• Use pots/pans with cover for
cooking. If there is no cover,
energy consumption may increase
4 times.
• Select the burner which is suitable
for the bottom size of the pot to be
used. Always select the correct
pot size for your dishes. Larger
pots require more energy.
First cleaning of the appliance
The surface may get damaged by
some detergents or cleaning
materials.
Do not use aggressive
detergents, cleaning
powder/cream or any sharp
objects.
1. Remove all packaging materials.
2. Wipe the surfaces of the appliance
with a damp cloth or sponge and
dry with a cloth.
13 | EN
5 How to use the hob
General information about
cooking
Risk of fire by overheated oil!
When you heat oil, do not leave it
unattended.
Never try to extinguish the fire
with water! When oil has caught
fire, immediately cover the pot or
pan with a lid. Switch off the hob
if safe to do so and phone the fire
service.
•
•
•
•
•
•
•
•
Put appropriate amount of food in
saucepans and pans. Thus, you
will not have to make any
unnecessary cleaning by
preventing the dishes from
overflowing.
Do not put covers of saucepans or
pans on cooking zones.
Place the saucepans in a manner
so that they are centered on the
cooking zone. When you want to
move the saucepan onto another
cooking zone, lift and place it onto
the cooking zone you want instead
of sliding it.
Before frying foods, always dry
them well and gently place into the
hot oil. Ensure complete thawing
Gas cooking
of frozen foods before frying.
• Size of the vessel and the flame
Do not cover the vessel you use
must match each other. Adjust the
when heating oil.
gas flames so that they will not
Place the pans and saucepans in a
extend the bottom of the vessel
manner so that their handles are
and center the vessel on saucepan
not over the hob to prevent
carrier.
heating of the handles. Do not
place unbalanced and easily tilting
Using the hobs
vessels on the hob.
Do not place empty vessels and
saucepans on cooking zones that
are switched on. They might get
damaged.
Operating a cooking zone without
a vessel or saucepan on it will
cause damage to the product.
Turn off the cooking zones after
the cooking is complete.
As the surface of the product can
1
Auxiliary burner 12-18 cm
be hot, do not put plastic and
2
Rapid burner 22-24 cm
aluminum vessels on it.
Such vessels should not be used
3
Normal burner 18-20 cm
to keep foods either.
4
Normal burner 18-20 cm is list of
advised diameter of pots to be used
Use flat bottomed saucepans or
on related burners.
vessels only.
14 | EN
Large flame symbol indicates the
highest cooking power and small flame
symbol indicates the lowest cooking
symbol. In turned off position (top), gas
is not supplied to the burners.
Gas shut off safety system (in
models with thermic component)
As a counter measure
against blow out due
to fluid overflows at
burners, safety
mechanism trips and
shuts off the gas.
Igniting the gas burners
1. Keep burner knob pressed.
2. Turn it counter clockwise to large
flame symbol.
» Gas is ignited with the spark created.
3. Adjust it to the desired cooking
power.
Turning off the gas burners
Turn the keep warm zone knob to off
(upper) position.
1. Gas shut off
safety
•
•
•
Push the knob inwards and turn it
counter clockwise to ignite.
After the gas ignites, keep the
knob pressed for 3-5 seconds
more to engage the safety system.
If the gas does not ignite after you
press and release the knob, repeat
the same procedure by keeping
the knob pressed for 15 seconds.
Risk of deflagration incase of
unburned gas!
Do not press the knob for longer
than 15 seconds if there was no
ignition.
Wait for one minute and then
repeat the ignition process.
15 | EN
6 Maintenance and care
The surface may get damaged by
some detergents or cleaning
materials.
Do not use aggressive
detergents, cleaning
powder/cream or any sharp
objects.
General information
Service life of the product will extend
and frequent problems will decrease if
the product is cleaned at regular
intervals.
Risk of electric shock!
Switch off the electricity before
cleaning appliance to avoid an
electric shock.
•
•
•
•
Do not use steam cleaners for
cleaning.
Hot surfaces may cause burns!
Allow the appliance to cool down
before you clean it.
Cleaning the hob
Clean the product thoroughly after
each use. In this way it will be
possible to remove cooking
residues more easily, thus avoiding
these from burning the next time
the appliance is used.
No special cleaning agents are
required for cleaning the product.
Use warm water with washing
liquid, a soft cloth or sponge to
clean the product and wipe it with
a dry cloth.
Always ensure any excess liquid is
thoroughly wiped off after cleaning
and any spillage is immediately
wiped dry.
Do not use cleaning agents that
contain acid or chloride to clean
the stainless or inox surfaces and
the handle. Use a soft cloth with a
liquid detergent (not abrasive) to
wipe those parts clean, paying
attention to sweep in one direction.
1. Remove and clean the saucepan
carriers and burner caps.
2. Clean the hob.
3. Install the burner caps and make
sure that they are seated correctly.
4. When installing the upper grills, pay
attention to place the saucepan
carriers so that the burners are
centered.
Gas hobs
Glass ceramic surfaces
Wipe the glass ceramic surface using a
piece of cloth dampened with cold
water in a manner as not to leave any
cleaning agent on it. Dry with a soft
and dry cloth. Residues may cause
damage on the glass ceramic surface
when using the hob for the next time.
Dried residues on the glass ceramic
surface should under no
circumstances be scraped with hook
blades, steel wool or similar tools.
Remove calcium stains (yellow stains)
by a small amount of lime remover
such as vinegar or lemon juice. You
can also use suitable commercially
available products.
16 | EN
If the surface is heavily soiled, apply
the cleaning agent on a sponge and
wait until it is absorbed well. Then,
clean the surface of the hob with a
damp cloth.
Sugar-based foods such as thick
cream and syrup must be
cleaned promptly without waiting
the surface to cool down.
Otherwise, glass ceramic surface
may be damaged permanently.
Slight color fading may occur on
coatings or other surfaces in time. This
will not affect operation of the product.
Color fading and stains on the glass
ceramic surface is a normal condition,
and not a defect.
17 | EN
7 Troubleshooting
Risk of explosion or poisoning by
unprofessional repair.
Repairs on the appliance must be
carried out by an approved
service centre.
Normal operating conditions
• Smoke and smell may emit for a
couple of hours during the first
operation.
• When the metal parts are heated,
they may expand and cause noise.
Before you call the service, please
check the following points.
Gas
Malfunction/problem
No ignition spark is
produced.
No gas is emitted.
Possible cause
No electric supply to the
appliance.
Main gas tap is closed.
Safety tube is bent.
Burners do not burn
smoothly or not at all.
Burners are dirty.
Burners are not dry.
Burner cap is not securely
positioned.
Gas tap is closed.
Gas container is empty (in
case of LPG connection).
If the problem has not been solved:
1. Separate unit from the mains
supply (deactivate or unscrew fuse).
2. Call the after-sales service of your
store reseller.
Do not attempt to repair the
appliance yourself. There are
no customer service items
inside the appliance.
18 | EN
Advice/remedy
Check fuses in the fuse box.
Open gas tap.
Install safety tube without
bends.
Clean burner parts.
Dry burner parts.
Position burner correctly.
Open gas tap.
Replace gas container.