1
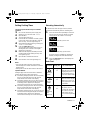
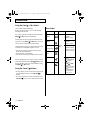
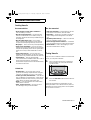
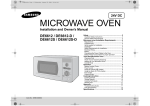
7711-Cover.auto.fm Page 1 Tuesday, August 24, 2004 1:46 PM
12V DC
Microwave
Oven
Installation and Owner’s Manual
DE7711N
DE7711
CODE NO. : DE68-03008A
7711-Safety.auto.fm Page 2 Tuesday, August 24, 2004 1:46 PM
SAFETY
PRECAUTIONS TO
AVOID POSSIBLE
EXPOSURE TO
EXCESSIVE
MICROWAVE
ENERGY:
(a) Do not attempt to operate this oven with
the door open since open-door operation
can result in harmful exposure to
microwave energy. It is important not to
defeat or tamper with the safety interlocks.
(b) Do not place any object between the front
face of the oven and the door or allow soil
or cleaner residue to accumulate on
sealing surfaces.
(c) Do not operate the oven if it is damaged.
It is particularly important that the oven door
close properly and that there is no damage
to the
1) Door (bent or dented),
2) Hinges and latches (broken or loosened),
3) Door seals and sealing surfaces.
(d) The oven should not be adjusted or
repaired by anyone except properly
qualified service personnel.
IMPORTANT SAFETY
INSTRUCTIONS
When using any electrical appliance,
basic safety precautions should be
followed, including the following:
WARNING
To reduce risk of burns, electric shock,
fire, personal injury or exposure to
excessive microwave energy:
•
•
•
•
•
•
WARNING
Always observe Safety Precautions when
using your oven. Never try to repair the
oven on your own – there is dangerous
voltage inside. If the oven needs to be
repaired, call SAMSUNG- for the name of
an authorized service center near you.
•
Read all safety instructions before using the
appliance.
Read and follow the specific “Precautions to
avoid exposure to excessive microwave
energy” on this page.
Install or place this appliance only in
accordance with the installation
instructions provided.
Some items, like whole eggs and food in
sealed containers, may explode if heated in
this oven.
Use this appliance only for its intended use
as described in the manual. Do not use
corrosive chemicals or vapors in this
appliance. This type of oven is specifically
designed to heat, cook, or dry food. It is not
designed for industrial or laboratory use.
IMPORTANT SAFETY INSTRUCTIONS
During cooking, you should look into the
oven from time to time when food is being
heated or cooked in disposable containers
of plastic, paper or other combustible
materials.
IMPORTANT
Young children should NEVER be allowed to
use or play with the microwave oven.
Nor should they be left unattended near the
microwave oven when it is in use. Items of
interest to children should not be stored or
hidden just above the oven.
SAVE THESE INSTRUCTIONS
2
SAFETY
7711-Safety.auto.fm Page 3 Tuesday, August 24, 2004 1:46 PM
SAFETY
Important Safety Instructions,
continued
•
•
•
•
•
•
•
•
•
•
•
•
•
Do not operate this appliance if it has a
damaged Power cable, if it is not working
properly, or if it has been damaged or
dropped.
This appliance should be serviced only by
qualified service personnel. Contact the
nearest authorized service facility for
examination, repair, or adjustment.
Do not cover or block any of the openings on
this appliance.
Do not store this appliance outdoors. Do not
use near water – for example, near a
kitchen sink, in a wet basement, or near a
swimming pool, etc.
Keep the inside of the oven clean. Food
particles or spattered oils stuck to the oven
walls or floor can cause paint damage and
reduce the efficiency of the oven.
Do not immerse power cable in water.
Keep power cable away from heated
surfaces.
When cleaning door and oven surfaces, use
only mild, nonabrasive soaps or detergents
applied with a sponge or soft cloth.
To reduce the risk of fire in the oven:
a. Do not overcook food. Watch appliance
carefully if paper, plastic, or other
combustible materials are inside.
b. Remove wire twist-ties from paper or plastic
cooking bags before placing bags in oven.
c. Do not use the oven compartment for
storage purposes. Do not leave paper
products, cooking utensils, or food in the
oven when not in use.
Do not try to preheat oven or operate while
empty.
Do not cook without the glass tray in place
on the oven floor. Food will not cook properly
without the tray.
Do not defrost frozen beverages in narrow
necked bottles. The containers can break.
Dishes and containers can become hot.
Handle with care.
•
•
•
•
•
•
Carefully remove container coverings,
directing steam away from hands and face.
Do not operate any other heating or cooking
appliance beneath appliance.
Do not mount unit over or near any portion of
a heating or cooking appliance.
DO NOT use any metallic cookware in the
microwave oven:
- Metallic containers
- Dinnerware with gold or silver trimmings
- Skewers, forks, etc.
DO NOT heat:
Airtight or vacuum-sealed bottles, jars,
containers
Ex) Baby food jars
Airtight food.
Ex) Eggs, nuts in shells, tomatoes
Take particular care when heating liquids
and baby foods.
- ALWAYS allow a standing time of at least
20 seconds after the oven has been
switched off so that the temperature can
equalize.
- Stir during heating, if necessary, and
ALWAYS stir after heating.
- Take care when handling the container
after heating. You may burn yourself, if the
container is too hot.
- A risk of delayed eruptive bolling exists.
To prevent delayed boiling and possible
scalding, you should put a plastic spoon or
glass stick into the beverages and stir
before, during and after heating.
- NEVER fill the container to the top and
choose a container that is wider at the top
than at the bottom to prevent the liquid
from boiling over. Bottles with narrow
necks may also explode if overheated.
- ALWAYS check the temperature of baby
food or milk before giving it to the baby.
- NEVER heat a baby's bottle with the teat
on, as the bottle may explode if
overheated.
SAVE THESE INSTRUCTIONS
SAFETY
3
7711-Safety.auto.fm Page 4 Tuesday, August 24, 2004 1:46 PM
SAFETY
WARNING
Safety Requirements: If safety requirements
are not followed, it may result in an injury or
a damage to the appliance.
General Safety Requirements
•
•
Precaution! Safety
Requirements
If safety requirements are not followed,
it may result in a damage to the
appliance or malfunction.
Read the Owner’s Manual carefully before
using the microwave oven.
The Owner’s Manual includes valuable
information necessary not only for your safety,
but also for appliance maintenance.
•
•
•
•
•
•
•
If the oven is not going to be in use for a long
period of time, disconnect it and store it in a
cool, well ventilated place.
If the oven is going to be used and stored by
another person, be sure to include the
Owner’s Manual along with the microwave
oven.
This appliance is equipped with a capacitor.
Therefore, when relocating the oven, be
sure to first disconnect the battery, wait 20
seconds, then disconnect the power cable
connections.
Do not operate the oven if it does not work
properly. Be sure to disconnect the battery
from the oven to prevent an injury or
damage to the appliance.
The oven is only for cooking or boiling.
Only qualified service personnel trained
specifically by the manufacturer should
repair this appliance.
Do not attempt to repair the oven yourself.
Keep the oven out of the reach of children.
When installing the oven in a vehicle, ask a
installation specialist for help.
SAVE THESE INSTRUCTIONS
4
SAFETY
7711-body.auto.fm Page 5 Tuesday, August 24, 2004 1:52 PM
CONTENTS
Microwave Oven Installation
Requirements .................................... 6
Requirements ................................................ 6
Supplied Items ............................................. 6
Items needed for Installation ..................... 6
Installation ..................................................... 6
Safety Requirements for Installation ........ 9
Electrical Wiring .......................................... 9
Battery ...................................................... 9-10
Connecting the power cables to the oven. 10
Battery power consumption for proper
operation ..................................................... 10
Cooking Instructions ................... 15
Cooking Utensils..........................................15
Testing Utensils ...........................................15
Cooking Techniques....................................16
General Tips ................................................16
Appendix .............................................. 17
Troubleshooting Guide ..............................17
Care and Cleaning...................................... 17
Specifications .............................Back Cover
Your New Microwave Oven ...... 11
Checking Parts............................................ 11
Setting Up Your Microwave Oven ........... 11
Control Panel Buttons................................ 12
Operation ........................................ 13
Setting Cooking Times ............................... 13
Reheating Automatically ........................... 13
Using the +30 s Button............................... 14
Using the Cancel Button ........................... 14
Error codes ................................................. 14
CONTENTS 5
7711-body.auto.fm Page 6 Tuesday, August 24, 2004 1:52 PM
MICROWAVE OVEN INSTALLATION REQUIREMENTS
Requirements
Installation
The requirements for proper microwave oven
operation are as follows:
• Operating Voltage: 12V DC
• Breaking Voltage: Min. 11.5V, Max. 15.5V
• Battery life must be at least 90Ah at 12V
If possible, connect the oven to a separate supply
battery (a secondary battery).
Installation Location Tips
• Before installing the oven, be sure to comply with
the following:
The installation location for the oven should be
even, flat, and sturdy.
• Do not allow humidity or heat to affect the oven.
• Allow free space of about 50mm around the oven
for ventilation (Fig.1).
Supplied Items
Microwave oven, Turntable, Terminal Post Cover
(plastic cover), Install bracket(Left/Right), 6-#5 Tap
screws and Owner’s Manual. The battery
connection power cable is not included.
Items needed for Installation
Before installing the appliance, make sure you have
the following items:
• 6-#5 Tap screws (The length of the screw is subject
to the installation requirements. Refer to page 8)
• 2 connection power cables : one red, one
black(refer to the page 10 for the length and size of
the connection cables)
• Power cable terminal, power cable binder, and
electrical tape.
Depending on the installation location, the following
tools may be required.
• Stick ruler, chalk, hammer, and gimlet.
• Drill and borer
• Ring/Fork type spanner set
• Crimp pincers, soldering iron
• Screw driver
6
MICROWAVE OVEN
INSTALLATION
REQUIREMENTS
(Fig. 1)
Microwave Oven
7711-body.auto.fm Page 7 Tuesday, August 24, 2004 1:52 PM
MICROWAVE OVEN INSTALLATION REQUIREMENTS
Installation(Continued)
• Take the oven’s weight into account.
Check whether any protective measure such as a
large support base is necessary or not.
• To determine hole location, refer to the dimensions
in Fig. 2 and follow the instructions.
WARNING
When installing the oven in a vehicle, make
sure that the installation location is safe
enough to avoid an injury.
(including a vehicle’s sudden stop or accident).
(Fig. 2)
Front of Microwave Oven
MICROWAVE OVEN
INSTALLATION
REQUIREMENTS
7
7711-body.auto.fm Page 8 Tuesday, August 24, 2004 1:52 PM
MICROWAVE OVEN INSTALLATION REQUIREMENTS
Installation(Continued)
To make a hole in an accurate location, create a
mark in advance with a hammer and punch.
Smooth any rough edges on the holes and apply
rust proof treatment to them.
• Remove one screw securing outer panel of
microwave oven (Right side)
DE7711
• Attach left and right brackets to the outer panel
using 8 screws(Fig.1)
• Secure the microwave oven brackets to the
frame which has drilled holes(Ø 4.0~4.2) using
6 screws (Tap Screws).(Fig.2)
• Fig.3 shows how the microwave should look
attached to the frame.
DE7711
If the electrical wiring does not work after the oven
is fastened tightly, first follow the “Electrical Wiring
(Page 9-10)” instructions and then re-fasten the
oven.
The oven must be fastened tightly to protect
against vibration.
DE7711
If do not want to use brackets, please attach 8
screws (#4x12) on left and right side of the outer
panel directly.(Fig.4)
DE7711
8
MICROWAVE OVEN
INSTALLATION
REQUIREMENTS
7711-body.auto.fm Page 9 Tuesday, August 24, 2004 1:52 PM
MICROWAVE OVEN INSTALLATION REQUIREMENTS
Safety Requirements for Installation:
Electrical Wiring
The operating voltage should comply with the
voltage specified in the label of the microwave oven
type attached to the back of the appliance.
Connection Power Cable
• Do not pull the power cable forcibly.
• Do not connect to a power supply other than 12V.
• Comply with the minimum diameter of the power
cable as specified in the manual.
• Fasten the power cable properly.
• Install the power cable properly to prevent
tripping over it.
• Install the power cable properly to prevent
damage.
• Use one red (positive/+)and one black(negative/-)
power cable to avoid confusion.
WARNING
This appliance is equipped with a capacitor.
To remove or relocate the appliance, take the
battery out and wait for about 20 seconds, and
then disconnect the power cable connections.
If the power cable is disconnected too soon, it
may cause an electrical short circuit and
discharge (spark).
The operating voltage should comply with the
voltage specified in the microwave oven type label
on the back of the appliance.
It is a good idea to install an additional safety fuse
to a positive(+) power cable. If the connection power
cable is damaged or causes a short circuit,
it means that the safety fuse can no longer prevent
the appliance from being damaged (cable fire). The
safety fuse should be installed as close to the
battery as possible.
If the electrical cabling is not performed properly, it
may cause an electrical short circuit, resulting in the
following:
• Power cable may catch fire.
• Airbag may burst.
• Controller may work improperly.
• An electrical component may malfunction. (Signal
lamp, Brake lamp, Horn, Ignition, Lighting, etc.).
To eliminate the danger of an electrical short circuit,
always disconnect and isolate the battery negative
terminal before using an electrical device in the
vehicle. Also, in the case of a vehicle equipped with
an additional battery, disconnect and isolate the
negative(-) battery power cable.
Precaution
When disconnecting and isolating the
negative battery power cable, all the data
stored in the memory of the vehicle's system
will disappear.
Depending on equipment included in your vehicle,
you may have to enter the following data again:
Ex) Vehicle audio password, vehicle clock, seat
location, panel computer, and time switch.
Battery
WARNING
• Improper connection of power cable wires
(+,- polarity) causes the main fuse or safety
fuse to disconnect in the microwave oven.
Be sure to connect +, - polarity in the proper
way.
• Connect the power cable securely.
If not, the oven may not function correctly and could
cause damage to the vehicle.
Be sure to connect the cable with proper torque
(30~50kg.cm)
Connect the oven to the user’s battery (a secondary
battery) if possible. Connecting to the starter battery
may overload the appliance, which in turn may
cause the engine to not turn over.
• Make sure there is sufficient Battery
Capacity. The battery capacity should be at
least 90Ah for 12V operating voltage.
Power Cable Size and Power Cable Length
For a 3m wire, the size should be a minimum
22mm2 (4AWG) for 12V of operating voltage.
For a power cable more than 3m in length, the size
must be larger in order to reduce the voltage drop.
If the voltage drop is too much, the oven may not
operate properly.
• If you have used the microwave oven for longer
than 10 minutes, keep your vehicle’s engine
running for 2~3 minutes to avoid battery drain.
MICROWAVE OVEN
INSTALLATION
REQUIREMENTS
9
7711-body.auto.fm Page 10 Tuesday, August 24, 2004 1:52 PM
MICROWAVE OVEN INSTALLATION REQUIREMENTS
Connecting the Power Cables to the Oven
• Install the power cable clamp required for the battery connection to the connection power cable. Do not
connect the power cable to the battery yet.
• Bring the power cable close to the oven.
• Strip about 20mm of electric coating off the power cable wire.
• Be careful not to damage the wire.
• Remove the plastic cover from the back of the oven.
• Attach the positive power cable (Battery +) to the red right insulating terminal on the oven.
• Attach the negative power cable (Battery -) to the left terminal.
• Connect the positive power cable (Battery +) to the battery first. Then, connect the negative power
cable(Battery -) to the battery.
• Replace the plastic cover.
• In case of uninstalling the power cable, do it in exactly reverse order.
+
Battery Capacity 12V 90Ah
Power Cable Size: 22mm (4AWG)
+
-
Wire Total Length : MAX. 3m
Red color
Black color
(Fig.1)
Battery Power Consumption for proper
operation
Plastic cover
(Terminal
post cover)
Battery-
10
MICROWAVE OVEN
Microwave oven will operate continuously for a
maximum of 30 minutes of the battery.
The battery life is subject to various conditions such
as battery operating hours, battery charging status,
ambient temperature, etc.
+
Battery+
INSTALLATION
(Fig.2)
REQUIREMENTS
7711-body.auto.fm Page 11 Tuesday, August 24, 2004 1:52 PM
YOUR NEW MICROWAVE OVEN
Checking Parts
Setting Up Your Microwave Oven
Unpack your microwave oven and check to make
sure that you have all the parts shown here. If any
part is missing or broken, call your dealer.
1
microwave oven
Make sure there is adequate ventilation for your
oven by leaving at least 50mm of space behind,
above, and to the side of the oven.
Owner’s manual
2
glass tray
install bracket
(left/right)
3
4
roller guide ring
installation screws
(6-#5 Tap screws)
outer panel screws
(7-#4 screws)
Once connected to the power supply the
display on your oven will show:
5
Open the oven door by pressing the button
below the control panel.
Wipe the inside of the oven with a damp cloth.
Place the pre-assembled ring in the
indentation in the center of the oven.
Place the glass tray on top of the ring so that
the three glass tabs in the center of the tray fit
securely into the tabs on the floor of the oven.
Thank You for Choosing Samsung
Your new oven represents the latest in microwave
cooking technology. This oven is a full-featured,
easy-to-use appliance built to strict quality
standards set by Samsung — the highest in the
industry. We’re proud to offer you a product that will
provide convenient, dependable service for years to
come.
Please record the serial number from the inside or
back of your Samsung microwave oven and the
date of purchase in the space provided below.
We recommend that you keep your purchase
receipt with this manual for easy warranty service.
Model Number _________________________
Serial Number _________________________
Date Purchased _________________________
Dealer
_________________________
Precaution
• Never operate the oven if the vehicle is
experiencing violent movement.
• Operating the oven in a fast moving vehicle
is not recommended.
• Ensure that the spillage is kept to a minimum
by using an appropriate container.
YOUR NEW MICROWAVE OVEN 11
7711-body.auto.fm Page 12 Tuesday, August 24, 2004 1:52 PM
YOUR NEW MICROWAVE
Control Panel Buttons
Display
Auto Reheat Button
Time setting Buttons
Press to set the cooking time.
Cancel Button
Press to correct a mistake.
Start +30 s Button
Press to start cooking and Press once
for every 30 seconds of cooking time.
Push Button
12
YOUR NEW MICROWAVE OVEN
7711-body.auto.fm Page 13 Tuesday, August 24, 2004 1:52 PM
OPERATION
Setting Cooking Times
Reheating Automatically
This oven is preset at the factory for automatic
operation.
To reheat food, select the type of snack, and the
microwave automatically sets the reheating time.
1
2
3
1
4
5
6
7
8
Once connected to the power supply the
display on your oven will show : 8888.
Open the door.
The oven light will turn on.
Put the food into a suitable container, place it
in the center of the oven and then close the
door securely. The oven light will go off.
Set the desired heating time by pressing the
“1 min.” or “10 s” button.
Press the Start +30 s button:
The oven light and cooling fan will come on.
Heating will start. The time on the digital
display will count down.
When time has elapsed, the Beep Tone will
sound 3 times and all heating will stop. The
oven light will go off.
Open the door and take the food out.
Close the door. The oven light will go off.
NOTE
• The oven light and all numbers in the display
automatically turn off after 5 minutes to conserve
battery power.
• Setting time cannot exceed maximum 30 minutes.
Important Remark
Voltage supply of the microwave oven is limited to
protect the safety of product and vehicle
1. If the battery voltage goes below 11V when operating
the oven or 11.5V when the oven is idle, the oven
beeps 6 times and "Lo" blinks on the display.
2. If the battery voltage is low, you can check to see if it
has returned to normal by pressing the Cancel button.
If a blinking period (.) appears, the voltage has
returned to normal and you can use the oven again.
3. If the battery voltage goes above 15V when operating
the oven or 15.5V when the oven is idle, the oven
beeps 6 times and "HI" blinks on the display.
4. If the battery voltage is high, you can check to see if it
has returned to normal by pressing the Cancel button.
If a blinking period (.) appears, the voltage has
returned to normal and you can use the oven again.
Press the Auto button repeatedly to select the
type of snack you wish to reheat. The initial
serving size for each dish is one serving.
For Hamburger Reheat, press 1 time.
For Hot Dog, press 2 times.
For Instant Noodle Soup, press 3 times.
Only one serving is available for Hamburger
Reheat, Hot Dog and Instant Noodle Soup.
2
Press the Start +30 s button. The display will
show Cooking time.
Auto Chart
Icon/Food
Serving Size/
Standing Time
150g/
1-2
Hamburger
(chilled)
100g/
1-2
Hot Dog
(chilled)
250g/
2-3
Instant
Noodle Soup
(room
temperature)
Recommendations
Take one chilled
hamburger(+6°C) out of the
wrapping and place it on a
piece of kitchen paper in
the centre of the turntable.
Take one chilled hot dog
(+6°C) out of the wrapping
and place it on a piece of
kitchen paper in the centre
the turntable.
Use a plastic bowl or cup of
ready product, check if
microwave able. Pour 200 ml
water (+20°C) on top of the
instant noodles (50g). Stir
once or twice during standing
time.
OPERATION 13
7711-body.auto.fm Page 14 Tuesday, August 24, 2004 1:52 PM
OPERATION
Using the Start(
) +30 s Button
This is a ONE TOUCH COOK pad.
By touching the pad once, you can start heating
instantly for 30 seconds.
Error Codes
You can increase the cooking time by pressing the
Start( ) +30 s button during heating.
Low
Voltage
Low Batt. Voltage/
Check the
Batt(Min. 11.5V)
Cooking time increases by 30 seconds button with
each press of the Start( ) +30 s button, but it can
not exceed the maximum time of 30 minutes.
High
Voltage
High Batt. Voltage/
Check the
Batt(Max. 15.5V)
Like traditional cooking, you may find that you have
to adjust the cooking times slightly. You can:
• Check how cooking is progressing at any time
simply by opening the door.
• After checking, close the door.
• Increase the remaining cooking time if necessary.
Error Items
No
Acknowledge
Check-sum
Using the Cancel (
) Button
• To stop cooking, erase instructions, and return the
oven display to period(·): press Cancel ( )
Button.
• To correct a mistake you have just entered: press
Cancel ( ) once, then re-enter the instructions.
14
OPERATION
Beep 6
times
Cause/Remedy
EEPROM(internal
memory IC) error/
Call service center
Error
No current
Before operating the oven, times can be increased
using either the time pads or Start( ) +30 s button.
During operation, time may only be added by using
the Start( ) +30 s button.
Code Error Beep
Over current
No current or over
current.
Press the Cancel
( ) button.
Press the
Start(
) +30 s
button after
setting up cooking
time. Call Service
Center
(Displaying three
time continuous
“nC” or ”oC”).
7711-body.auto.fm Page 15 Tuesday, August 24, 2004 1:52 PM
COOKING INSTRUCTIONS
Cooking Utensils
Recommended Use
Not Recommended
• Glass and glass-ceramic bowls and dishes —
Use for heating or cooking.
• Microwave browning dish — Use to brown the
exterior of small items such as steaks, chops, or
pancakes. Follow the directions provided with your
browning dish.
• Microwavable plastic wrap — Use to retain
steam. Leave a small opening for some steam to
escape and avoid placing it directly on the food.
• Wax paper — Use as a cover to prevent spattering.
• Paper towels and napkins — Use for short-term
heating and covering; they absorb excess moisture
and prevent spattering. Do not use recycled paper
towels, which may contain metal and can catch
fire.
• Paper plates and cups — Use for short-term
heating at low temperatures. Do not use recycled
paper, which may contain metal and can catch fire.
• Thermometers — Use only those labeled
“Microwave Safe” and follow all directions. Check
the food in several places. Conventional
thermometers may be used once the food has been
removed from the oven.
• Glass jars and bottles — Regular glass is too thin
to be used in a microwave, and can shatter.
• Paper bags — These are a fire hazard, except for
popcorn bags that are designed for microwave
use.
• Styrofoam plates and cups — These can melt and
leave an unhealthy residue on food.
• Plastic storage and food containers — Containers
such as margarine tubs can melt in the microwave.
• Metal utensils — These can damage your oven.
Remove all metal before cooking.
Testing Utensils
If you are not sure whether a dish is microwave-safe
or not, you can perform this test:
1
Fill a 1 cup glass measuring cup with water
and put it inside your oven, next to the dish
you want to test.
Limited Use
• Aluminum foil — Use narrow strips of foil to
prevent overcooking of exposed areas. Using too
much foil can damage your oven, so be careful.
• Ceramic, porcelain, and stoneware — Use these if
they are labeled “Microwave Safe.” If they are not
labeled, test them to make sure they can be used
safely. Never use dishes with metallic trim.
• Plastic — Use only if labeled “Microwave Safe.”
Other plastics can melt.
• Straw, wicker, and wood — Use only for shortterm heating, as they can be flammable.
2
Press the Start +30 s button 4 times to heat for
two minutes.
The water should be warm and the dish you are
testing should be cool. If the dish is warm, then it is
absorbing microwave energy and is not acceptable
for use in the microwave.
COOKING INSTRUCTIONS 15
7711-body.auto.fm Page 16 Tuesday, August 24, 2004 1:52 PM
COOKING INSTRUCTIONS
Cooking Techniques
Stirring
Adding Moisture
Stir foods such as casseroles and vegetables while
cooking to distribute heat evenly. Food at the outside
of the dish absorbs more energy and heats more
quickly, so stir from the outside to the center. The
oven will turn off when you open the door to stir your
food.
Microwave energy is attracted to water molecules.
Food that is uneven in moisture content should be
covered or allowed to stand so that the heat
disperses evenly. Add a small amount of water to dry
food to help it cook.
Arrangement
General Tips
Arrange unevenly shaped foods, such as chicken
pieces or chops, with the thicker, meatier parts
toward the outside of the turntable where they
receive more microwave energy. To prevent
overcooking, place thin or delicate parts toward the
center of the turntable.
Shielding
Shield food with narrow strips of aluminum foil to
prevent overcooking. Areas that need shielding
include poultry wing-tips, the ends of poultry legs,
and corners of square baking dishes. Use only small
amounts of aluminum foil. Larger amounts can
damage your oven.
•
Dense foods, such as potatoes, take longer to
heat than lighter foods. Foods with a delicate
texture should be heated at a low power level
to avoid becoming tough.
•
Altitude and the type of cookware you are using
can affect cooking time. When using a new
recipe, use the minimum cooking time and
check the food occasionally to prevent
overcooking.
•
Foods with a non-porous skin or shell, such as
potatoes, eggs, or hot dogs, should be pierced
to prevent bursting.
•
Frying with heating oil or fat is not
recommended. Fat and oil can suddenly boil
over and cause severe burns.
•
Some ingredients heat faster than others.
For example, the jelly inside a jelly doughnut
will be hotter than the dough. Keep this in mind
to avoid burns.
•
Home canning in the microwave oven is not
recommended because all harmful bacteria
may not be destroyed by the microwave
heating process.
•
Although microwaves do not heat the
cookware, the heat is often transferred to the
cookware. Always use pot holders when
removing food from the microwave and instruct
children to do the same.
Turning
Turn foods over midway through cooking to expose
all parts to microwave energy.
Standing
Foods cooked in the microwave build up internal
heat and continue to cook for a few minutes after the
oven stops. Let foods stand to complete cooking,
especially foods such as roasts and whole
vegetables. Roasts need this time to complete
cooking in the center without overcooking the outer
areas. All liquids, such as soup or hot chocolate,
should be shaken or stirred when cooking is
complete. Let liquids stand a moment before serving.
When heating baby food, stir well and test the
temperature before serving.
16
COOKING INSTRUCTIONS
7711-body.auto.fm Page 17 Tuesday, August 24, 2004 1:52 PM
APPENDIX
Troubleshooting Guide
Care and Cleaning
Before you call a repair person for your oven,
check this list of possible problems and solutions.
Follow these instructions to clean and care for your
oven.
• Keep the inside of the oven clean. Food particles
and spilled liquids can stick to the oven walls,
causing the oven to work less efficiently.
• Wipe up spills immediately. Use a damp cloth and
mild soap. Do not use harsh detergents or
abrasives.
• To help loosen baked on food particles or liquids,
heat two cups of water (add the juice of one
lemon if you desire to keep the oven fresh) in a
four-cup measuring glass at High power for five
minutes or until boiling. Let stand in the oven for
one or two minutes.
• Remove the glass tray from the oven when
cleaning the oven or tray. To prevent the tray from
breaking, handle it carefully and do not put it in
water immediately after cooking. Wash the tray
carefully in warm sudsy water or in the
dishwasher.
• Clean the outside surface of the oven with soap
and a damp cloth. Dry with a soft cloth. To prevent
damage to the operating parts of the oven, don’t
let water seep into the openings.
• Wash the door window with very mild soap and
water. Be sure to use a soft cloth to avoid
scratching.
• If steam accumulates inside or outside the oven
door, wipe with a soft cloth. Steam can
accumulate when operating the oven in high
humidity and in no way indicates microwave
leakage.
• Never operate the oven without food in it; this can
damage the magnetron tube or glass tray. You may
wish to leave a cup of water in the oven when it is
not in use to prevent damage if the oven is
accidentally turned on.
The oven does not work properly.
• Check the battery voltage. The operating voltage
for the oven should be greater than 11V or less
than 15V.
• Make sure that the door is closed securely.
• Make sure that the heating time was properly set.
• Make sure that the start button is pressed. If door
is open, close the door and press the start button
again.
• Check if the safety fuse is installed to the positive
cable(near battery).
• Check if the connection cable terminals are
properly connected to the oven.
• Improper use of the microwave stops oven
operation. The Display shows Error Codes
(page 14)
Food heats too slowly.
•
•
•
•
Check if the container is microwavable.
Do not put too much food in the oven at one time.
Check if the heating time was too short.
Check if the battery voltage is too low.
You see sparks or arcing.
• Remove any metallic utensils, cookware, or metal
ties. If using foil, use only narrow strips and allow
at least one inch between the foil and interior
oven walls.
The turntable makes noises or sticks.
• Clean the turntable, roller ring and oven floor.
• Make sure the turntable and roller ring are
positioned correctly.
APPENDIX 17
7711-Cover.auto.fm Page 2 Tuesday, August 24, 2004 1:46 PM
Specifications
Oven cavity
20 liter
Operating Voltage
12V DC
Breaking Voltage
Min. 11.5V, Max. 15.5V
Input Current
65A
Power Consumption
750W
Operating frequency
2,450MHz
Output Power
450W (IEC-705)
Main Fuse
32V DC, 100A
Dimensions(WxHxD)
Outside(mm)
490(W) X 282(H) X 351(D)
Oven(mm)
306(W) X 190(H) X 348(D)
Net/Gross Weight
10.5/12.5kg approx.
ELECTRONICS
Printed in Malaysia