1
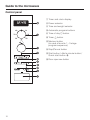
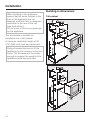
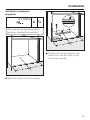
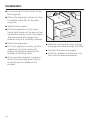
Operating and Installation
Instructions
Microwave
M 8260-1
To prevent accidents
and machine damage
read these instructions
before
installation or use.
en - US, CA
M.-Nr. 07 372 781
Contents
IMPORTANT SAFETY INSTRUCTIONS. . . . . . . . . . . . . . . . . . . . . . . . . . . . . . . . . 4
Guide to the microwave . . . . . . . . . . . . . . . . . . . . . . . . . . . . . . . . . . . . . . . . . . . . 9
Included accessories . . . . . . . . . . . . . . . . . . . . . . . . . . . . . . . . . . . . . . . . . . . . . . . 9
Control panel . . . . . . . . . . . . . . . . . . . . . . . . . . . . . . . . . . . . . . . . . . . . . . . . . . . . . 10
Before the first use . . . . . . . . . . . . . . . . . . . . . . . . . . . . . . . . . . . . . . . . . . . . . . . 11
Selecting cookware . . . . . . . . . . . . . . . . . . . . . . . . . . . . . . . . . . . . . . . . . . . . . . . 12
Clock display . . . . . . . . . . . . . . . . . . . . . . . . . . . . . . . . . . . . . . . . . . . . . . . . . . . . 16
Setting the time of day . . . . . . . . . . . . . . . . . . . . . . . . . . . . . . . . . . . . . . . . . . . . . . 16
Changing the time of day . . . . . . . . . . . . . . . . . . . . . . . . . . . . . . . . . . . . . . . . . . . 16
Turning Off / On the display. . . . . . . . . . . . . . . . . . . . . . . . . . . . . . . . . . . . . . . . . . 16
Overnight turn-off . . . . . . . . . . . . . . . . . . . . . . . . . . . . . . . . . . . . . . . . . . . . . . . . . . 16
Use . . . . . . . . . . . . . . . . . . . . . . . . . . . . . . . . . . . . . . . . . . . . . . . . . . . . . . . . . . . . 17
Starting a program . . . . . . . . . . . . . . . . . . . . . . . . . . . . . . . . . . . . . . . . . . . . . . . . . 17
Interrupting / Re-starting a program . . . . . . . . . . . . . . . . . . . . . . . . . . . . . . . . . . . 19
Changing the settings . . . . . . . . . . . . . . . . . . . . . . . . . . . . . . . . . . . . . . . . . . . . . . 19
Canceling a program . . . . . . . . . . . . . . . . . . . . . . . . . . . . . . . . . . . . . . . . . . . . . . . 19
At the end of a program. . . . . . . . . . . . . . . . . . . . . . . . . . . . . . . . . . . . . . . . . . . . . 19
Warming function . . . . . . . . . . . . . . . . . . . . . . . . . . . . . . . . . . . . . . . . . . . . . . . . . . 19
Quick-Start . . . . . . . . . . . . . . . . . . . . . . . . . . . . . . . . . . . . . . . . . . . . . . . . . . . . . . . 20
System lock . . . . . . . . . . . . . . . . . . . . . . . . . . . . . . . . . . . . . . . . . . . . . . . . . . . . . . 20
Timer . . . . . . . . . . . . . . . . . . . . . . . . . . . . . . . . . . . . . . . . . . . . . . . . . . . . . . . . . . . 21
Automatic programs . . . . . . . . . . . . . . . . . . . . . . . . . . . . . . . . . . . . . . . . . . . . . . 22
Automatic defrosting . . . . . . . . . . . . . . . . . . . . . . . . . . . . . . . . . . . . . . . . . . . . . . . 22
Automatic cooking . . . . . . . . . . . . . . . . . . . . . . . . . . . . . . . . . . . . . . . . . . . . . . . . . 22
Reheating . . . . . . . . . . . . . . . . . . . . . . . . . . . . . . . . . . . . . . . . . . . . . . . . . . . . . . . 24
Cooking. . . . . . . . . . . . . . . . . . . . . . . . . . . . . . . . . . . . . . . . . . . . . . . . . . . . . . . . . 25
Defrosting / Defrosting and reheating or cooking . . . . . . . . . . . . . . . . . . . . . . 26
Suggested uses . . . . . . . . . . . . . . . . . . . . . . . . . . . . . . . . . . . . . . . . . . . . . . . . . . 27
Favorites . . . . . . . . . . . . . . . . . . . . . . . . . . . . . . . . . . . . . . . . . . . . . . . . . . . . . . . . 28
Settings . . . . . . . . . . . . . . . . . . . . . . . . . . . . . . . . . . . . . . . . . . . . . . . . . . . . . . . . . 30
Settings table . . . . . . . . . . . . . . . . . . . . . . . . . . . . . . . . . . . . . . . . . . . . . . . . . . . . . 31
2
Contents
Cleaning and Care . . . . . . . . . . . . . . . . . . . . . . . . . . . . . . . . . . . . . . . . . . . . . . . . 32
Microwave interior and inside of the door . . . . . . . . . . . . . . . . . . . . . . . . . . . . . . . 32
Appliance front . . . . . . . . . . . . . . . . . . . . . . . . . . . . . . . . . . . . . . . . . . . . . . . . . . . 33
Accessories . . . . . . . . . . . . . . . . . . . . . . . . . . . . . . . . . . . . . . . . . . . . . . . . . . . . . . 33
Frequently asked questions . . . . . . . . . . . . . . . . . . . . . . . . . . . . . . . . . . . . . . . . 34
Technical Service. . . . . . . . . . . . . . . . . . . . . . . . . . . . . . . . . . . . . . . . . . . . . . . . . 37
Installation instructions . . . . . . . . . . . . . . . . . . . . . . . . . . . . . . . . . . . . . . . . . . . 39
Caring for the environment . . . . . . . . . . . . . . . . . . . . . . . . . . . . . . . . . . . . . . . . . 40
Disposal of the packing materials . . . . . . . . . . . . . . . . . . . . . . . . . . . . . . . . . . . . . 40
Disposal of an old appliance . . . . . . . . . . . . . . . . . . . . . . . . . . . . . . . . . . . . . . . . . 40
Electrical connection . . . . . . . . . . . . . . . . . . . . . . . . . . . . . . . . . . . . . . . . . . . . . . 41
Installation . . . . . . . . . . . . . . . . . . . . . . . . . . . . . . . . . . . . . . . . . . . . . . . . . . . . . . 42
Building-in dimensions . . . . . . . . . . . . . . . . . . . . . . . . . . . . . . . . . . . . . . . . . . . . . 42
3
IMPORTANT SAFETY INSTRUCTIONS
When using electrical appliances always observe basic safety precautions,
including the following:
WARNING - To reduce the risk of
burns, electric shock, fire, injury to
persons, or exposure to excessive
microwave energy:
Read all instructions before installing
or using the oven.
Read and follow the specific,
"PRECAUTIONS TO AVOID
POSSIBLE EXPOSURE TO
EXCESSIVE MICROWAVE ENERGY"
in the "IMPORTANT SAFETY
INSTRUCTIONS" section of this
manual.
~ To reduce the risk of fire in the oven
cavity:
i) Do not overcook food. Carefully
attend appliance when paper, plastic or
other combustible materials are placed
inside the oven to facilitate cooking.
ii) Remove wire twist-ties from paper or
plastic bags before placing bag in
oven.
iii) If materials inside the oven ignite,
keep the oven door closed, turn oven
off, and disconnect the power cord, or
shut off power at the fuse or circuit
breaker panel.
This appliance is intended for
residential use only. Only use the
appliance for its intended purpose.
iv) Do not use the cavity for storage
purposes. Do not leave paper
products, cooking utensils or food in
the cavity when not in use.
Install or locate this appliance only
in accordance with the provided
installation instructions.
Correct usage
This appliance complies with current
safety requirements. Improper use
of the appliance can lead to
personal injury and material
damage.
~ The appliance is intended for
domestic use only: defrosting, heating
and cooking of food.
It is not designed for industrial or
laboratory use.
~ Do not use corrosive chemicals or
vapors in this appliance.
~ Do not use the appliance to store or
dehydrate flammable materials. This is
a fire hazard.
~ Persons who lack physical, sensory
or mental abilities, or experience with
the appliance should not use it without
supervision or instruction by a
responsible person.
4
IMPORTANT SAFETY INSTRUCTIONS
Children
~ As with any appliance, close
supervision is necessary when used by
children.
Technical safety
~ Installation, repair and maintenance
work should be performed by a Miele
authorized service technician in
accordance with national and local
safety regulations and the provided
installation instructions. Contact Miele’s
Technical Service Department for
examination, repair or adjustment.
~ Before installation make sure that
the voltage and frequency listed on the
data plate correspond with the
household electrical supply. This data
must correspond in order to prevent
injury and machine damage. If in doubt,
consult a qualified technician.
~ To guarantee the electrical safety of
this appliance, continuity must exist
between the appliance and an effective
grounding system. This appliance must
be grounded. Connect only to properly
grounded outlet. See "Electrical
connection - GROUNDING
INSTRUCTIONS". It is imperative that
this basic safety requirement be met. If
there is any doubt, have the electrical
system of the house checked by a
qualified electrician.
~ The appliance must only be
operated after it has been correctly
installed into cabinetry. This is
necessary to ensure that all electrical
components are shielded.
~ Before installing the oven, check for
externally visible damage. Do not
operate a damaged appliance.
~ This appliance must not be installed
or operated outdoors.
~ Do not use this product near water –
for example, near a kitchen sink, in a
wet basement, near a swimming pool,
or similar locations.
~ Do not mount over a sink.
~ Do not store anything directly on top
of the appliance surface when the
appliance is in operation.
~ Defective components should be
replaced by Miele original spare parts
only. Only with these parts can the
manufacturer guarantee the safety of
the appliance.
~ This appliance is not designed for
maritime use or for use in mobile
installations such as recreational
vehicles or aircraft. However, under
certain conditions it may be possible for
installation in these applications. Please
contact the Miele Technical Service
Department with specific requirements.
~ Before service or maintenance work
the power supply must be
disconnected.
5
IMPORTANT SAFETY INSTRUCTIONS
~ Do not operate any appliance with a
damaged cord or plug, or if the
appliance has been damaged in any
manner. Contact Miele’s Technical
Service Department.
~ Do not use an extension cord to
connect this appliance to electricity.
Extension cords do not guarantee the
required safety of the appliance.
~ Do not open the casing of the oven.
Danger of electric shock!
Safety
~ Do not use the oven to heat the
room. Due to the high temperatures
radiated, objects left near the oven
could catch fire.
~ Do not submerge the cord or plug in
water.
~ Keep the power cord away from
heated surfaces.
~ Do not let the cord hang over the
edge of a table or counter.
PRECAUTIONS TO AVOID
POSSIBLE EXPOSURE TO
EXCESSIVE MICROWAVE
ENERGY
~ Do not cover or block any openings
on the appliance.
~ Times for cooking, heating and
defrosting food in the microwave are
shorter than that of traditional food
preparation methods. Extensive
microwaving could dry out food and
cause possible ignition. Fire hazard!
Do not attempt to operate this oven
with the door open since open-door
operation can result in harmful
exposure to microwave energy. It is
important not to damage or tamper
with the safety interlocks.
~ Do not heat cushions filled with
Do not place any object between the
oven front and the door or allow soil
or cleaner residue to accumulate on
sealing surfaces.
~ Do not use full power to warm empty
herbs, gel, etc. with the microwave
function. The cushions could ignite,
even once removed from the oven after
heating. This is a fire hazard.
dishes or dry herbs.
Do not operate the oven if it is
damaged. It is particularly important
that the oven door closes properly
and that there is no damage to the:
(1) door (bent), (2) hinges and
latches (broken or loosened),
(3) door seals and sealing surfaces.
The oven should not be adjusted or
repaired by anyone except properly
qualified service personnel.
6
~ Do not heat an empty microwave.
~ Do not use the appliance for
dehydrating food, or leave it
unattended when cooking with oils and
fats. Fire hazard.
~ Never heat undiluted alcohol in the
microwave oven, it can easily ignite.
IMPORTANT SAFETY INSTRUCTIONS
~ If materials inside the oven ignite,
keep the oven door closed to avoid
fueling any flames. Turn the oven off or
disconnect the power supply.
~ Cover food that is left in the
microwave to stay warm. Otherwise
moisture from the food could damage
the machine. This will also prevent the
food from drying out.
~ Do not use items containing metal,
aluminum foil, cutlery, dishware with
metal decoration, crystal glass
containing lead, bowls with a knurled
rim, non-temperature safe dishware,
wooden dishware, metal clips, wire
twist ties, food containers with metal
coverings or residues.
Danger of machine damage and fire.
Do not leave the appliance
~ Spills or stains from food and liquids ~
unattended when heating food in
containing salt should be immediately
cleaned from the stainless steel interior.
Corrosion may occur.
disposable, e.g. plastic, paper or other
flammable materials.
fueling any flame, do not open the oven
door. Switch the appliance off by
pressing the Stop/C button, switch off
at the mains and remove the plug from
the socket. Do not open the oven door
until the smoke has dispersed.
food bags.
This packaging contains a thin layer of
aluminum foil which reflects the
microwaves. This reflected energy can
cause the paper layer to ignite.
Do not use the oven to heat food in
~ If smoke occurs in the oven, to avoid ~
heat retaining packaging, e.g. take-out
~ Do not use a steam cleaner to clean
~ Before serving food allow a
~ When cleaning surfaces of the door
and oven that come together when the
door is closed, use only mild,
non-abrasive soaps, or detergents
applied with a sponge or soft cloth.
~ Always check the temperature
this appliance. The steam could
penetrate live components and
permanently damage the oven or cause
injury.
~ Do not operate the microwave
empty. This will cause damage.
sufficient standing time. Always check
the temperature of the food itself after
taking it out of the microwave. Do not
judge by the plate temperature. The
heat is created in the food, the dishes
may stay cool to the touch.
before serving heated baby food.
~ Use a food thermometer to measure
the foods temperature. Do not use
thermometers containing mercury or
liquids, they are not suitable for high
temperatures and break easily.
~ Never cook or reheat food and
liquids in sealed containers or bottles.
Remove the nipple or lid before heating
in the microwave. Built-up pressure
may cause them to burst. Danger of
injuries.
7
IMPORTANT SAFETY INSTRUCTIONS
~ When heating liquids, the provided
boiling wand should be placed into the
container.
~ Do not heat closed containers in the
Liquids, such as water, coffee, or tea
are able to be overheated beyond the
boiling point without appearing to be
boiling. Visible bubbling or boiling
when the container is removed from the
microwave oven is not always present.
THIS COULD RESULT IN VERY HOT
LIQUIDS SUDDENLY BOILING OVER
WHEN THE CONTAINER IS
DISTURBED OR A UTENSIL IS
INSERTED INTO THE LIQUID.
as tomatoes, sausages and potatoes
should be pierced in several places
before cooking to allow steam to vent
and prevent the food from bursting.
The built-up pressure may force the
oven door open. This could result in
injury or damage. The boiling wand
ensures that the liquid boils evenly and
that steam bubbles form at an early
stage.
~ Some products such as whole eggs
and sealed containers - for example,
closed glass jars - are able to explode
and should not be heated in this oven.
~ Eggs can be cooked without their
shells in the microwave oven only if the
yolk membrane has been punctured
first. The pressure could otherwise
cause the egg yolk to explode. Danger
of injuries.
8
microwave oven. They may burst.
~ Food with a thick skin or peel, such
~ Always ensure that the turntable is in
place before turning on the microwave.
~ Do not heat dishware with hollow
handles or lid knobs. Moisture can get
into the hollow parts. (The hollow parts
of some dishware can be vented).
Danger of built-up pressure and the
explosion of the hollow parts may
cause injuries.
SAVE THESE INSTRUCTIONS
AND REVIEW THEM
PERIODICALLY
Guide to the microwave
a Microwave door
b Door lock
c Control panel
d Turntable
e Cover
f Boiling wand
Included accessories
Cover
The cover prevents food from drying
out, shortens and evens out the
cooking process, and prevents soiling
of the microwave interior.
Boiling wand
When heating liquids, the provided
boiling wand should be placed into the
container. It helps in even boiling of the
liquid.
9
Guide to the microwave
Control panel
g Timer and clock display
h Power selector
i Time and weight selector
j Automatic program buttons
k Time of day m button
l Timer l button
m Memory button
(to save a favorite 1 - 3 stage
program sequence)
n Stop/Cancel button
o Start button / Add a minute button /
Quick start button c
p Door open a button
10
Before the first use
Allow the microwave to sit unpacked
for approx. 2 hours after transport
before connecting to the power
supply.
This is important for the electronic
functioning of the appliance.
^ Remove all protective packaging and
foil from the appliance.
^ Check the appliance for any visible
damage.
Do not operate the microwave if it is
damaged. It is particularly important
that the microwave door closes
properly and that there is no
damage to the: (1) door (bent), (2)
hinges and latches (broken or
loosened), (3) door seals and
sealing surfaces.
^ Clean the interior of the microwave
and all accessories with a mild
solution of warm water and liquid
dish soap. Dry with a soft cloth.
Do not remove the protective film
from the inside of the door, or the
cover to the outlet inside the
microwave.
^ Stick the included short instructions
to the frame behind the door (as
shown). Be sure not to block the
vents.
11
Selecting cookware
Microwaves:
Material and shape
The material and shape of containers
used affect cooking results and times.
Circular and oval containers work best.
The food will heat more evenly than in a
square container.
– are reflected by metal,
Container and lids which contain
hollow handles or knobs are not
suitable for use in the microwave.
The handles or knobs could collect
moisture if not adequately vented.
Without vent holes pressure can
build up, causing the container to
crack or shatter, danger of injury.
Metal
,Do not use metal containers,
– pass through glass and chinaware,
aluminum foil, cutlery or dishes with
metal decor in the microwave.
The metal reflects the microwaves
which can damage the microwave.
– are absorbed by the food.
12
Selecting cookware
Exceptions:
Porcelain (china)
– Pre-cooked meals in aluminum foil
containers can be defrosted and
reheated in the microwave, if
recommended by the manufacturer.
Important: Remove the lid before
heating the food.
The food is heated only from above.
To heat the food evenly place it in a
container suitable for microwaving.
Porcelain (china) is suitable for use in
the microwave.
Make sure that the aluminum foil is
at least 1 inch (2.5 cm) from the
microwave walls at all times. It must
not touch the walls.
– For even defrosting and to avoid
overcooking unevenly shaped cuts
of meat, poultry or fish, small pieces
of aluminum foil may be used to
mask wing-tips or other thin parts for
the last few minutes of the process.
– Metal meat skewers or clamps
should only be used if they are small
in comparison to the size of the
meat.
Glassware
Do not use porcelain with gold or
silver edging or items with hollow
knobs or handles, insufficient
ventilation may cause damage.
Earthenware
Decorated earthenware is only suitable
if the decoration is beneath the glaze.
Earthenware can get very hot and
may crack.
Glazes and colors
Some glazes and colors contain
metallic substances. They are not
suitable for the microwave.
Wood
Wood containers are not suitable.
The water from the wood evaporates
during the cooking process causing
it to dry out and crack.
Heat-resistant glass or ceramic
glassware are ideal for use in the
microwave.
Crystal contains lead and is
unsuitable.
13
Selecting cookware
Plastic
When purchasing plasticware, be
sure it is suitable for use in a
microwave.
It must be heat resistant up to 230°F
(110°C) otherwise the plastic may
melt into the food. Otherwise the
plastic may melt.
Special plasticware, designed for use
in microwaves is available in retail
outlets.
Plastic boiling bags can be used for
cooking and reheating.
They should be pierced beforehand
so that steam can escape. This
prevents a build-up of pressure and
reduces the risk of the bag bursting.
Do not use metal clips, plastic clips
with metal parts, or twist ties
containing wire. They could ignite
when heated.
14
Disposable containers
Only those plastic disposable
containers specified under "Plastics"
are suitable for use in the microwave.
Do not leave the microwave
unattended when reheating or
cooking food in disposable
containers made of plastic, paper or
other flammable materials.
Disposable containers are not always
microwave safe.
Selecting cookware
Covering the food
Plastics are only heat-resistant up to
230°F (110°C). Higher temperatures
can cause the cover to melt into the
food.
The cover should not completely
seal the container. This may prevent
steam from escaping causing the
cover to melt.
The cover:
– prevents most of the steam from
escaping, especially when cooking
foods which needs longer to cook,
such as potatoes.
– shortens and evens out the cooking
process.
– prevents the food from drying out.
– prevents soiling of the microwave
interior.
^ Always cover food with the supplied
cover.
A glass or plastic lid is also suitable as
an alternative for microwaves. Available
in retail stores.
Plastic wrap suitable for microwaving
can also be used.
Do not heat food in closed containers
e.g. glass baby food containers. Vent
the container before heating.
Do not use a cover if cooking food in
which a crisp finish is desired e.g.
breaded chicken, garlic bread, etc.
15
Clock display
Setting the time of day
Changing the time of day
^ Connect the appliance to the
electrical supply.
^ Press m. The m symbol will flash in
the display, and the current hour will
light up for a few seconds.
12:00 and the m symbol will flash in
the display until the time of day is
set. As soon as the microwave is
connected to the electrical supply
the clock will begin counting
upwards until the time is set.
^ Change the hour as desired using
the time selector.
^ Press m to confirm the selection, or
wait a few seconds.
The m symbol will flash and the
current minutes will light up for a few
seconds.
^ Set the minutes using the time
selector.
^ Press m to confirm the selection, or
wait a few seconds.
Turning Off / On the display
^ Turn the "Time selector" to set the
hour.
^ To turn the display off, press and
hold m until the display goes dark.
^ Press m to confirm the selection.
^ To turn the display on, press and
hold m until the time of day appears
in the display.
^ Turn the "Time selector" to set the
minutes.
^ Press m to confirm the selection, or
wait a few seconds.
The time set is now saved. The colon
between the hours and minutes
flashes.
Overnight turn-off
If desired, the display can be set to turn
itself off from 11:00 p.m. to 4:00 a.m.
^ To turn off: press and hold "Stop/C",
at the same time press m.
ON appears in the display.
The microwave can still be operated
as normal.
^ To turn on: press and hold "Stop/C",
at the same time press m.
OFF appears in the display.
16
Use
Opening the door
Closing the door
^ Press "a" to open the door.
^ Push the door shut.
If the microwave is in use, opening the
door will interrupt the program.
^ Press the "Start" button to restart the
interrupted cooking program.
Placing dish in microwave
^ Place the dish in the middle of the
microwave on the turntable.
The program will not start if the door
is not closed properly.
Starting a program
Do not place food directly on the
turntable.
Be sure that the dish used is not
larger than the turntable
Do not use the microwave without
the turntable in place.
The turntable helps the food cook,
reheat or defrost evenly.
As soon as a program is started the
turntable will begin to turn
automatically.
^ Use the "Power selector" to choose
the desired power level
The h symbol lights up and 0:00
flashes in the display.
There are seven microwave power
levels available. A higher number
indicates increased power.
17
Use
When heating food which cannot be
stirred or turned, it is best to use a
lower power level.
^ Set the desired time using the "Time
selector".
A time between 10 seconds and 90
minutes can be set.
Exception: If the maximum power level
is selected a max. cooking time of 15
minutes can be set. If the max. power
level is continuously selected the power
level may reduce to 600 W, to protect
against overheating.
When selecting a time consider the
following:
– the initial temperature of the food,
– the type and texture of the food.
– the frequency of stirring or turning of
the food.
– the amount of food.
– the type and material of the dish.
^ Press the "Start" button to begin the
program.
The program will only start if the
door is closed properly.
18
"door"warning
If the door has been closed for 20
minutes or longer when the "Start"
button is pressed, the word "door" will
appear in the display. The "door"
message acts as a reminder that the
appliance should not be used without
food inside it.
^ Open the door to make sure food is
in the microwave before pressing
"Start".
The program will not start until you do
this.
Operating the microwave without
food can cause damage.
Use
Interrupting / Re-starting a
program
^ To interrupt a program, press the
"Stop/C" button, or open the
microwave door.
^ To re-start a program, close the
door and press "Start".
The program continues.
Canceling a program
^ Press the "Stop/C" button twice.
At the end of a program
A signal will sound indicating that the
cooking program is complete. The
interior lighting goes out.
Changing the settings
The signal will sound briefly as a
reminder every 5 minutes for 20
minutes after the end of the program.
To select a new power level:
^ To cancel the signal, press "Stop/C".
^ Interrupt the program by pressing the
"Stop/C" button once.
Warming function
^ Set a new time using the "Time
selector".
^ Continue the program by pressing
"Start".
To increase the cooking duration:
^ Press the "Start" button during
operation. Each press increases the
cooking time by one minute.
Exception: If the microwave is being
used at the max. power level the
cooking time will increase by 30
seconds with each press of the "Start"
button.
If the door remains closed and no
buttons are pressed for approx.
2 minutes after the program (450 W or
higher) has ended, the warming
function will turn on.
The warming function turns the
microwave on at 80 W for a max. of 15
minutes.
h, 80 W and H:H appear in the
display.
If the door is opened or a button is
pressed during the warming function,
the function will be canceled.
The warming function cannot be used
as a separate function.
19
Use
Quick-Start
System lock
Press "Start /c" to begin the microwave
operating at maximum power.
Three times are stored in memory:
The microwave can be locked to
prevent misuse.
^ 30 secs: Press "Start /c" once
To activate:
^ 1 min: Press "Start /c" twice
^ 2 min: Press "Start /c" three times
^ Press and hold "Stop/C" until a signal
is heard and the key symbol appears
in the display.
Pressing "Start /c" 4 times will return
you to the first stored time.
While in operation the cooking duration
can be increased by pressing the
"Start" button. Each press of the "Start"
button increases the cooking time by
30 seconds.
Reprogramming the set times:
^ Press "Start /c" to select the time you
would like to reprogram (press 1, 2
or 3 times), and hold in the "Start /c"
button.
^ While holding in the "Start" button,
use the "Time selector" (max. 15
minutes) to reprogram the time.
When the "Start /c" button is
released the reprogrammed time will
run.
If a power failure occurs the
reprogrammed times will need to be
reset.
20
The key symbol will go out after a few
seconds.
The symbol will reappear whenever a
button is pressed or a selector is
turned.
If a power failure occurs the system
lock will need to be reactivated.
To deactivate:
^ Press and hold "Stop/C" until a signal
is heard.
Use
Timer
Timer with cooking program
The timer can be used to time any
activity in the kitchen.
The timer can be used at the same time
as a cooking program by counting
down in the background.
^ Press "l".
0:00 flashes in the display, and "l"
lights up.
^ Using the "Time selector" set the
desired time.
^ Press "Start" to start the timer.
If "Start" is not pressed the timer will
begin on its own after a few seconds.
^ When the set time has elapsed a
signal is heard. The time of day
appears in the display and "l"
flashes.
^ Press "l" while the program is in
progress.
0:00 flashes in the display and "l"
lights up.
^ Using the "Time selector" set the
timer duration desired.
^ The timer will begin counting down
after a few seconds.
A few seconds later the display will
change to shown the cooking
duration counting down. The timer is
indicated with the "l" symbol.
^ Press "Stop/C" and "l" goes out.
Reprogramming the timer
^ Press "Stop/C".
The timer is interrupted.
^ Set a new timer duration using the
method described above.
Do not use the "Start" button to begin
the timer, this will increase the
cooking duration by one minute.
Timer duration remaining
^ Press "l".
The timer duration remaining will
appear in the display.
21
Automatic programs
All automatic programs are weight
dependent.
The weight can be displayed in either
pounds (lb) or grams (g), see
"Settings".
Once a program is selected, enter the
weight of the food. The microwave then
automatically calculated the time
according to the weight entered.
Automatic cooking
Three programs are available for frozen
and fresh food.
The recommended "standing time" for
these programs is approx. 2 minutes.
Cooking frozen food N °
AC 1 1
Vegetables
(0.3 – 1.3 lb)/(100 – 600 g)
When cooking is complete, allow the
food to stand at room temperature for
the suggested "standing time" to allow
the heat to distribute evenly throughout
the food.
AC 2 3
Frozen dinner (can be stirred)
(0.7 – 2.2 lb)/(300 – 1000 g)
Automatic defrosting
Cooking fresh food °
Five programs are available for
defrosting different types of food (N).
AC 1 1
Vegetables
(0.3 – 1.3 lb)/(100 – 600 g)
The recommended "standing time" for
Ad 3 is up to 30 minutes depending on
the weight. Approx. 10 minutes is
recommended for the remaining
programs.
AC 2 E
Potatoes
(0.3 – 1.7 lb)/(100 – 800 g)
Ad 1 0
Steak, cutlets
(0.5 – 2.2 lb)/(200 – 1000 g)
Ad 2 1
Ground meat
(0.5 – 2.2 lb)/(200 – 1000 g)
Ad 3 ;
Chicken
(2.0 – 4.0 lb)/(900 – 1800 g)
Ad 4 T
Cakes
(0.3 – 3.1 lb)/(100 – 1400 g)
Ad 5 k
Bread
(0.5 – 2.2 lb)/(200 – 1000 g)
22
AC 3 W Casseroles
(0.5 – 1.3 lb)/(200 – 600 g)
AC 3 _ Fish
(1.2 – 3.3 lb)/(500 – 1500 g)
Automatic programs
^ Press the relevant button until the
desired program appears in the
display.
Example: To select program Ad 3 ;
(defrosting chicken) press "N" three
times.
If desired the time can be extended by
a few minutes during operating by
pressing the "Start" button repeatedly
until the desired time shows in the
display.
It is only possible to extend the time by
a few minutes.
A signal will sound when the program is
complete, and the interior lighting of the
microwave will go out.
lb or g will flash in the display, and the
selected program will light up along
with the Microwave symbol "h".
^ If desired press "M", to toggle
between the lb and g settings.
^ Enter the weight using the "Weight
selector".
^ Press "Start".
The cooking duration, which was
calculated according to the weight
entered, will being to count down and
the Microwave symbol h will light up.
A signal will sound halfway through the
cooking time.
^ Interrupt the program to turn or stir
the food then continue the program.
23
Reheating
To reheat food/drinks select the
following power levels:
Drinks. . . . . . . . . . . . . . . . . . . 900 Watts
Food. . . . . . . . . . . . . . . . . . . . 600 Watts
Food for babies/toddlers . . . . 450 Watts
Take care that baby/toddler food is
at a safe temperature when served.
Heat for only for 30 seconds at a
time then check temperature.
Reheating tips
– Use a lid or cover for reheating food,
except when a "drier" finish is
needed, e.g. breaded foods.
– Remove the lid from glass containers
e.g. baby food jars.
– Remove the lid or nipple from baby
bottles before heating.
– To heat a liquid, insert the boiling
wand into the container.
Do not reheat hard boiled eggs,
even without the shell, in the
microwave. The eggs can burst.
– Stir or turn food from time to time to
ensure even reheating.
24
After reheating
Be careful when removing a dish
from the microwave, it may be hot.
^ After reheating food, especially food
for babies and small children, stir the
food or shake the container and
check that the temperature does not
pose any danger.
Cooking
Place food in a microwave-safe dish
and cover.
When cooking it is recommended to
select a power level of 900 W to begin
with, and once the food is hot reduce
the power to 450 W for more gentle
cooking.
After cooking
Be careful when removing a dish
from the microwave, it may be hot.
For dishes such as rice or oatmeal, first
select a power level of 900 W then
reduce to 150 W for simmering.
Cooking tips
– Add a little water when cooking
vegetables that are not fresh in the
microwave. Fresh vegetables cook
quicker.
– Food from the fridge needs a longer
cooking time than food at room
temperature.
– Stir of turn food during cooking to
help it cook more evenly.
– Food with a thick skin or peel, such
as potatoes and sausage, should be
pierced several times before cooking
to allow steam to vent and prevent
the food from bursting.
– Eggs can be cooked without their
shells in the microwave only if the
yolk has been punctured. The
pressure could otherwise cause the
egg yolk to explode.
25
Defrosting / Defrosting and reheating or cooking
Defrosting
The following microwave power levels
are recommended for defrosting:
– 80 W
for defrosting delicate food such as
heavy cream, butter, cheese, etc.
– 150 W
for defrosting all other foods.
^ Take the frozen food from the
packaging and put it in a microwave
safe container. Do not cover. Turn,
stir or separate food about halfway
through the defrosting time.
Defrosting tips
– Fish does not need to be fully
defrosted before cooking. Defrost it
so that the surface is soft enough to
adhere seasoning and herbs.
– Turn meat halfway through
defrosting.
Defrosting followed by
reheating or cooking
Deep-frozen food can be defrosted and
then immediately reheated or cooked.
^ After defrosting, select 900 W
followed by 450 W.
Remove food from its packaging and
place in a covered microwave-safe
dish. Exception: ground meat should
be left uncovered.
Tips
– Soups, stew and vegetables should
be stirred several times during the
process.
– Carefully separate and turn slices of
meat/fish halfway though the
program.
After defrosting followed by
reheating or cooking
After defrosting allow the food to stand
at room temperature long enough to
distribute the heat evenly throughout
the food.
26
Suggested uses
Food type
Time
(min:sec)
Additional info
Quantity
Power
level
(Watt)
Melting butter or
margarine
1/4 lb
(100 g)
450
1:00 – 1:10 Do not cover.
Melting
chocolate
1/4 lb
(100 g)
450
3:00 – 3:30 Do not cover.
Stir halfway through.
Dissolving
gelatine
1 packet +
5 T water
450
0:10 – 0:30 Do not cover.
Stir halfway through.
1 packet +
1 cup liquid (250 ml)
450
4–5
Do not cover.
Stir halfway through.
Made with
½ cup (100 g) flour
80
3–5
Cover and leave to proof.
1 T (20 g)
popcorn kernels
900
3–4
Place popcorn in 1 liter container,
cover and cook.
Salad dressings
½ cup
(125 ml)
150
1–2
Heat uncovered.
Tempering citrus
fruits
3/4 cup
(150 g)
150
1–2
Place on a plate, do not cover.
Bacon
1/4 lb
(100 g)
900
2–3
Place on a paper towel, do not
cover.
Softening ice
cream
½ gallon
(500 g)
150
2
Place open ice cream container
in microwave.
Warming plates
4 plates
900
2–3
Do not heat plates with metal
decor.
3 tomatoes
450
6–7
Cut a cross shape into the to of
each tomato, cover and heat in a
little water. Use caution, the
tomatoes may get hot.
1 lb strawberries
1 1/2 cups (300 g) sugar
900
7–9
Mix fruit and sugar, cover and
cook.
Preparing glazes
Yeast dough
Popcorn
Skinning
tomatoes
Strawberry jam
This information in intended only as a guide.
27
Favorites
One favorite program can be saved into
memory (e.g. your most frequently used
program).
The program can incorporate up to 3
stages (e.g. 2 minutes at 600 W,
followed by 10 minutes at 450 W,
followed by 3 minutes at 300 W).
Programming
(This is an example to set a 3 stage
program.)
^ Select the power level for the first
stage.
^ Select the duration.
^ Once you have finished the
programming, turn the "Power
selector" to the 12 o'clock position.
^ To save the entry start the program.
Do not run the entire program unless
food is in the microwave.
If there is no food in the appliance
press the "Stop/C" button twice once
the program starts.
^ Press "M".
1 will light up in the display, and 2 will
flash.
^ Press "M" again.
2 will light up in the display, and 3 will
flash.
1 and 2 stage programs can be
programmed and saved in the same
way. The programming process is
complete when the "Program selector"
is in the 12 o'clock position and the
"Start" button has been pressed, while
pressing the "M" button shows the next
stage.
^ Select the power level and duration
for the third stage. Press the "M"
button.
Changing an entry
^ Select the power level and duration
for the second stage.
Once the third stage is complete you
can use the "M" button to scroll through
your entry to confirm that everything is
correct.
28
^ Once a new program has been
entered the previously saved
program is overridden.
Favorites
Using the "favorite" program
^ Turn the program selector to the
12 o'clock position.
^ Press "M".
^ Press "Start".
If a power failure occurs the
programmed favorite is no longer
saved and will need to be reset.
29
Settings
The default microwave settings can be
changed, if desired, to suit your
preferences.
See the table on the following page for
the different settings available.
^ Turn the "Time selector" if you wish to
change the setting (see Table),
confirm the selection by pressing "M"
(for P 5 and P 0 press and hold "M"
for approx. 4 seconds).
The change is now saved. P will appear
in the display again, together with the
setting number.
All settings can be changed in the
same way.
^ Press and hold "m" and "M" at the
same time until P I and "v" light up in
the display, then release them both.
If they are pressed for too long the
time of day will appear in the display.
^ Using the "Time selector" select the
setting you would like to change (P 0
to P 6).
^ Press "M" to call up the setting.
S will appear in the display to show
that the setting can be changed.
30
^ When you are done making changes
to the settings press "Stop/C".
The changed settings are saved
during a power failure.
Settings
Settings table
Setting
Available settings (* factory default)
P I
S 0 * Deactivated
S I
Activated
The time of day display is turned off from
11 pm to 4 am.
Overnight turn-off
P 2 Warming function
S I * Activated
S 0
Deactivated
P 3 "door" warning
S I * The "door" warning appears if the door has not
been opened for 20 minutes before "Start" is
pressed.
S 0
The "door" warning does not appear.
P 4 Signal tone
S I * Activated
A signal sounds briefly as a reminder every 5 20 minutes after the end of a program.
S 0
Deactivated
P 5 Demo mode
S 0 * Deactivated
(for dealer and
_ _ _ _ appears briefly in the display.
showroom use only) S I
Activated
When a button or selector is operated, MES_
appears briefly in the display. The appliance
can be operated but the microwave will not
turn on.
P 6 Units of weight
S I*
S O
P 0 Factory default
S I * Factory default setting have been restored, or
have not been changed.
S O
Factory default settings have been changed.
Weight for automatic programs appears in lb.
Weight for automatic programs appears in g.
For a more detailed description of each setting see the relevant sections of this
manual.
31
Cleaning and Care
Disconnect the microwave from the
power supply before cleaning.
Microwave interior and inside
of the door
Let the microwave cool before
cleaning the interior, the inside door
and the gasket. Danger of burns!
Clean the microwave after every
use, accumulated soiling makes
cleaning difficult and could damage
the appliance.
Never use abrasive cleaners,
scouring pads or steel wool on any
part of the microwave. They will
damage the surfaces.
Do not remove the microwave outlet
cover inside the microwave, or the
protective film covering the inside of
the door.
Do not use the microwave if the door
or gasket is damaged. Contact
Miele Technical Service.
Do not allow water or debris to
penetrate the appliance vents.
Avoid using too much water, this
could penetrate the openings.
Cleaning tips
Hard-to-clean spills
Place a heat-resistant cup of water in
the microwave and bring it to a boil.
The steam will condensate on the
interior walls making it easier to clean.
Neutralizing odors
Place a heat-resistant cup of water and
lemon juice in the microwave and
simmer for a few minutes.
32
Cleaning and Care
Cleaning the interior
^ When cleaning surfaces of the door
and oven that come together when
the door is closed, use only mild,
non-abrasive soaps, or detergents
applied with a sponge or soft cloth.
Appliance front
Remove any soiling immediately,
otherwise it may become hard to
remove and could cause the surface
to discolor.
^ All external surfaces and controls can
be cleaned with warm water and
liquid dish soap applied with a
sponge.
^ Dry with a soft cloth.
Glass surfaces
Glass surfaces are not scratch proof.
^ Remove the turntable and wash in
the dishwasher or by hand.
Never use abrasive cleaners,
scouring pads, steel wool or oven
cleaners on glass surfaces. They will
cause damage.
Do not use a shielded scraper blade
to clean the door glass surface.
Accessories
Boiling wand
^ Remove any debris from the roller
ring and the space under the roller
ring to ensure the turntable will turn
smoothly.
The boiling wand can be washed in the
dishwasher or by hand.
^ Clean the area between the turntable
and motor.
Wash and dry the cover after each use
either in a dishwasher or by hand with
warm water and liquid dish soap.
Discoloration caused by natural dyes,
e.g. from tomatoes, carrots, etc. may
occur. This discoloration is irreversible
but does not affect the performance of
the cover.
Do not turn the motor manually, this
could cause damage.
Cover
33
Frequently asked questions
Installation work and repairs should only be performed by a qualified
technician in accordance with all applicable codes and standards. Repairs
and other work by unqualified persons could be dangerous and may void the
warranty.
The following faults can be corrected without contacting the Miele Service
Department:
What if a program will not start?
Possible fault
Solution
The door is not closed properly.
Close the door firmly.
The "System lock" has been
activated.
See "System lock" for more information.
The appliance is not correctly
plugged in.
Check the plug.
The circuit breaker has tripped.
Check the breaker.
Why is a noise heard after a program has ended?
This is not a fault. The cooling fan will continue to run for a short time after the
microwave has been switched off to dissipate any moisture from the interior. This
will prevent it from settling on the control panel or surrounding furniture. The fan
will turn off automatically.
What if the display does not light up?
Possible fault
Solution
The time of day display has been
turned off.
Press and hold "m" for a few seconds.
The "Overnight turn-off" setting is
activated.
See "Settings".
34
Frequently asked questions
What if the turntable does not rotate smoothly?
Possible fault
Solution
The area under the roller ring is soiled, See "Cleaning and Care".
or there is debris between the turntable
and the motor.
Why is the food not adequately defrosted, heated or cooked at the end of
the selected process?
Possible fault
Solution
The program was interrupted.
After interrupting a program the
microwave must be re-started.
The power and/or time settings are
incorrect.
Check if the selected power has the
appropriate time setting when cooking
with the microwave. The lower the
power, the longer the cooking time.
Why does the microwave operate but the light is off?
The lighting is defective. Contact Miele Technical Service to replace the
lighting.
Why are there strange noises when the microwave is being used?
Possible fault
Solution
Sparks are created by the use of
dishware with a metallic finish.
See "Selecting cookware".
The food is covered with aluminum foil.
Remove the aluminum foil.
Why is the time of day shown in the display not correct?
A power failure has occurred. The time of day need to be reset. See "Setting the
time of day".
35
Frequently asked questions
Why does the food cool so fast when heated or cooked with Microwave?
In the microwave, food begins to cook from the outside first, the inside of the
food relies on the transfer of heat. If food is cooked at a high power level it is
possible that the heat may not have reached the center of the food. At the
temperature equalization time the food will become hot in the inside and warm
on the outside. When heating a meal, select a lower power level and a longer
cooking time.
Why did the microwave turn itself off during a program?
Possible fault
Solution
There may be insufficient air
circulation.
^ Check if the air inlet or outlet is blocked.
Remove any objects.
The appliance turns itself off automatically
to prevent overheating. The program can
be continued once the microwave is
allowed to cool.
If the microwave turns itself off repeatedly,
contact Miele Technical Service.
Contact Technical Service for all other fault messages or if the fault could not
be fixed. Do not open the outer casing of the appliance. The appliance must
only be repaired by a qualified service technician.
36
Technical Service
In the event of a fault which you cannot
easily fix yourself, please contact the
Miele Technical Service Department at
the address on the back of this booklet.
When contacting Technical Service
please quote the serial number and
model of your microwave. This
information is visible on the silver data
plate.
MieleCare
(USA only)
MieleCare, our Extended Service
Contract program, gives you the
assurance of knowing that your
appliance investment is covered by
5 years of worry free ownership.
MieleCare is the only Extended Service
Contract in the industry that guarantees
repairs by a Miele Authorized Service
Provider using genuine Miele parts.
Only genuine Miele parts installed by
factory trained professionals can
guarantee the safety, reliability, and
longevity of your Miele appliance.
Please note that unless expressly
approved in writing by Miele’s Service
department, Extended Service
Contracts offered by other providers for
Miele products will not be recognized
by Miele. Our goal here is to prevent
unauthorized (and untrained) service
personnel from working on your Miele
products, possibly doing further
damage to them, you and/or your
home.
To learn more about MieleCare
Extended Service Contracts, please
contact your appliance dealer or visit
us online at:
http://miele.com/mielecare
37
38
Installation Instructions
Caring for the environment
Disposal of the packing
materials
The cardboard box and packing
materials protect the appliance during
shipping. They have been designed to
be biodegradable and recyclable.
Ensure that any plastic wrappings,
bags, etc. are disposed of safely and
kept out of the reach of children.
Danger of suffocation!
40
Disposal of an old appliance
Old appliances may contain materials
that can be recycled. Please contact
your local recycling authority about the
possibility of recycling these materials.
Ensure the appliance presents no
danger to children while being stored
for disposal. Before discarding an old
appliance, unplug it from the outlet and
cut off its power cord. Remove any
doors to prevent trapping hazards.
Electrical connection
,CAUTION: Before servicing,
disconnect the power supply by
either removing the fuse, shutting off
the power main or manually
"tripping" the circuit breaker.
Installation work and repairs should
only be performed by a qualified
technician in accordance with all
applicable codes and standards.
Repairs and service by unqualified
persons could be dangerous.
Before connecting the appliance to
the power supply, make sure that
the voltage and frequency listed on
the data plate correspond with the
household electrical supply. This
data must correspond in order to
prevent machine damage. Consult
an electrician if in doubt.
Only operate the appliance after it
has been installed into cabinetry.
The appliance must be plugged into
an appropriate outlet that is installed
and grounded in accordance with all
local codes and ordinances.
Power supply
The microwave comes equipped with a
power cord with a molded plug ready
for connection to a:
120V, 60 Hz power supply.
WARNING: THIS APPLIANCE
MUST BE GROUNDED
GROUNDING INSTRUCTIONS
This appliance must be grounded.
In the event of an electrical short
circuit, grounding reduces the risk of
electric shock by providing an
escape wire for the electric current.
This appliance is equipped with a
cord having a grounding wire with a
grounded plug. The plug must be
plugged into an outlet that is
properly installed and grounded.
WARNING - Improper use of the
grounding can result in a risk of
electric shock.
Consult a qualified electrician or
serviceman if the grounding
instructions are not completely
understood, or if doubt exists as to
whether the appliance is properly
grounded, do not use an extension
cord. If the power supply cord is too
short, have a qualified electrician or
serviceman install an outlet near the
appliance.
Installer:
Please leave these instructions with
the consumer.
41
Installation
Building-in dimensions
When building in the appliance,
ensure that the vents located at the
front of the appliance are not
blocked, and that there is adequate
ventilation to the rear of the unit
(see illustrations).
Do not cover or block any openings
on the appliance.
Tall cabinet
This microwave is suitable for
installation into a tall cabinet.
A minimum installation height of 33
7/16" (850 mm) must be maintained.
3
452,5
During transport be sure to lift the
appliance by the housing, not by the
frame. The framework is not sturdy
enough to support the weight of the
appliance while being carried.
5
>850
59
42
20
Installation
Installation accessories
(supplied)
4 x 16mm
3
Only operate the appliance after it
has been installed into cabinetry.
^ Position the fitting bracket on the
center line. Use the mark on the
bracket as a guide.
^ Mark the center line of the cabinet.
43
Installation
^ Fit a screw a in to the center of the
first long hole.
^ Check the alignment of the unit, then
fit another screw a into the other
long hole.
^ Tighten both screws.
^ Place the appliance in the niche.
Using both hands on the back of the
microwave interior move it into place.
The microwave will engage into
position once it is correctly installed.
^ Check the alignment.
^ If it is not aligned correctly, pull the
appliance out of the niche and
realign it by slightly adjusting the
bracket on the long holes.
^ Once correctly aligned, to prevent
the unit from moving insert a third
screw a into the middle of the
bracket.
44
^ Slide the unit into the niche, pulling
the plug and cable through the back.
^ Connect the electrical supply.
^ Push the appliance all the way in to
the niche as described above.
45
46
47
Alteration rights reserved / 0909
For the most updated manual see the Miele web site.
M.-Nr. 07 372 781 / 00