1
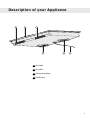
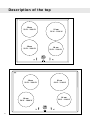
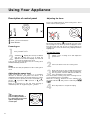
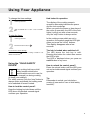
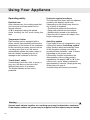
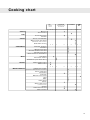
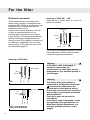
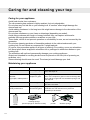
INSTRUCTIONS FOR USE
HI1632
HI1832
Instructions for use
Induction hob
Dear ASKO Customer,
Thank you for choosing this superior-quality product.
We guarantee that the quality of the internal components of your new
machine is equal to that of its external elements, and that the
standards adhered to during its manufacture are as high as the
efficiency of its performance.
We hope that this product will fully meet your expectations for many
years.
In order to get the best from your machine, we recommend that you
begin by familiarising yourself with the manual.
This manual also contains information on protecting the environment.
Tips
Safety recommendation
We have designed this cooking hob for use by private individuals in their homes.
These cooking hobs are intended exclusively for cooking beverages and foodstuffs and
do not contain any asbestos-based materials.
Residual heat
A cooking zone can remain hot for several minutes after use.
An “H“ is displayed during this period.
Avoid touching the hot areas during this time.
Child safety
Your hob has a child safety which locks it when stopped or during cooking (see section:
use of child safety).
Do not forget to unlock before using again.
For users with heart pacemakers and active implants.
The functioning of the hob conforms to current electromagnetic interference standards and
thus is in total compliance with legal requirements (89/335/EEC directives).
In order to avoid interference between your cooking hob and a pacemaker, your
pacemaker must be designed and programmed in compliance with the regulations that
apply to it.
Consequently, we can only guarantee that our own product is compliant.
With regard to the compliance of the pacemaker or any potential incompatibility, you can
obtain information from the manufacturer or your attending physician.
Warning
Electrical Danger
Ensure that the power cable of a connected electrical appliance near the hob is not
in contact with the cooking zones.
If a crack appears in the surface of the glass, disconnect your appliance immediately to prevent a risk of electric shock.
To do this, remove the fuses or use the circuit breaker.
Do not use your hob until you have replaced the glass worktop.
Warning
Keep this user guide with your appliance. If the appliance is ever sold or
transferred to another person, ensure that the new owner receives the user guide.
Please become familiar with these recommendations before installing and using
your oven. They were written for your safety and the safety of others.
2
Tips
Care for the ENVIRONMENT
— This appliance’s packing materials are recyclable. Recycle them and play a role in
protecting the environment by depositing them in municipal containers provided for this
purpose.
— Your appliance also contains many recyclable materials. It is therefore marked with this
logo to indicate that used appliances must not be mixed with other waste. Recycling of the
appliances organised by your manufacturer will thus be undertaken in optimum
conditions, in accordance with European directive EC/2002/96 relating to
electrical and electronic equipment waste. Consult your local authority or your
retailer to find the drop-off points for used appliances that is nearest to your
home.
— We thank you for your help in protecting the environment.
Warning
Installation should only be performed by installers and qualified technicians.
This appliance complies with the following European directives:
- Low Voltage Directive 73/23/CEE modified by directive 93/68/CEE for the
insertion of the EC marking.
- Electromagnetic Compatibility Directive 89/336/CEE modified by directive
93/68/CEE for attaching the CE mark.
- EC regulation no. 1935/2004 concerning materials and objects intended for
contact with food substances.
3
Table of contents
Tips
2
Safety recommendation
2
Residual heat
2
Child safety
2
For users with heart pacemakers
and active implants.
2
Care for the ENVIRONMENT
3
Description of your Appliance
5
Description of the top
6
Using your Appliance
7
Induction receptacles
7
The induction principle
7
Cookware
7
Which cooking zone should I use with
which receptacle?
7
Description of control panel
8
Powering on
8
Off
8
Adjusting the power level
8
Adjusting the timer
8
Using the “CHILD SAFETY DEVICE” 9
How to lock the control panel?
9
How to unlock the control
panel?
9
Operating safety
10
Residual heat
10
Temperature limiter
10
Protection against overflows
10
“Small Items” safety
10
Auto-Stop system
10
4
Cooking chart
For the fitter
Electrical connection
Hook-up of 400V 2N~ - 16A
Hook-up of 220-240V~
Choice of location
Build-in
Caring for and cleaning your top
Caring for your appliance
Maintaining your appliance
11
12
12
12
12
13
13
14
14
14
Description of your Appliance
B
C
B
A
A
D
A Air intake
B Air outlet
C Vitroceramic glass
D Power cord
5
P00023
Description of the top
18 cm
50 W - 2800 W
16 cm
50 W - 2200 W
P00031
18 cm
50 W - 2800 W
21 cm
50 W - 3100 W
18 cm
50 W - 2800 W
18 cm
50 W - 2800 W
6
21 cm
50 W - 3100 W
16 cm
50 W - 2200 W
Using your Appliance
Which cooking zone should I use
with which receptacle?
Induction receptacles
Cooking area
cooking*
A
Cookware to use
16 cm
10 ..... 18 cm
C
18 cm
12 ..... 22 cm
B
21 cm
18 ..... 24 cm
23 cm
12...... 26 cm
28 cm
12 ..... 32 cm
+
-
A Inductor
B Electronic board
C Induced electric current
The induction principle
The principle of induction is based on a
magnetic effect.
When you place your cookware on a
cooking zone and you turn it on, the
electronic boards in your cooking hob
produce “induced” currents in the bottom
of the cookware and instantly raise its
temperature. This heat is then transferred
to the food, which is simmered or seared
depending on your settings.
*depending on model
Tip
To check the suitability of your cookware:
Place the pan on a cooking zone at power
level 4.
If the display remains on, your cookware is
compatible.
If the display flashes, your cookware
cannot be used with induction cooking.
You can also use a magnet to test the
cookware.
If a magnet “sticks” to the bottom of the
cookware, it is compatible with induction.
Cookware
Most cookware is compatible with
induction. Only glass, terra cotta,
aluminium without a special finish on the
bottom, copper and some non-magnetic
stainless steels do not work with induction
cooking. We suggest you choose
cookware with thick flat bottoms. The heat
will be distributed better and cooking will
be more uniform.
By choosing cookware that
displays this logo on its bottom or on its
packaging, you can be certain that it is
perfectly compatible with your hob under
normal operating conditions.
To help you choose, a list of cookware is
provided with this guide.
7
Using Your Appliance
Adjusting the timer
Description of control panel
There is a rotating timer for each cooking zone. The 4
timers can be used together.
C
A
B
A Start/stop buttons.
B Timer / power level buttons.
C Timer buttons.
Powering on
1
2
Press the start/stop button for the cooking
zone you want to use.
A flashing 0 display and a beep indicates
that the cooking zone is on. A fixed dot
appears in the selected display. You can now
choose the desired power level.
If you do not select a power level, the cooking zone
will automatically switch off.
Stop
Hold down the start/stop button for the cooking zone
used.
Adjusting the power level
Slide your finger on the control in a clockwise
direction to increase your power level from 1 to P
(maximum power) and in the anti-clockwise to reduce
it Direct access to power: press the central part
:
P, 2 presses ->6
6, 3 presses -> 3, and 4
1press ->P
P.
presses—>P
When it is switched on you can move directly to
maximum power “P” by pressing the “-” button.
Tip
You can adjust the the
power setting and timer 1
by 1 with each press on the
right or left part of the
circular part.
8
-1
+1
By pressing the button
repeatedly you can select
the cooking zone to which you wish to apply the timer.
The timer leds can only be set for zones that are in
operation. The led of the timer being displayed will be
highlighted.
To use the timer:
1
2
3
Switch on the cooking zone and adjust the
power level.
Select the timer led of the cooking zone.
Slide your finger on the circular part until you
have the desired setting for your cooking time.
For long times, turn the dial anti-clockwise to
get to 99 minutes more quickly.
The timer starts counting only if the cooking zone is
covered with an item of cookware.
When the cooking is finished the zone switches off,
the timer indicates 0, and you are notified by a sound
signal.
4
Press any button to stop the beeping.
Using Your Appliance
Hob locked in operation
To change the timer settings:
1
2
1
2
- Select your timer
- Turn it towards the + or the - on the circular
part.
To stop the timer:
- Select your timer
- Hold down the button
.
To access the timer directly:
Press the button
and the setting is made in 10minute increments.
Using the “CHILD SAFETY
DEVICE”
Your cooking hob has a child
safety function which locks
controls which are not in use (for
cleaning, for example) or during cooking
(to keep your settings).
For safety reasons, only the “stop” button is
always active and allows the heating zone
to be switched off even if locked.
The display of the cooking zones in
operation alternately indicates the power
and the lock symbol .
When you press the power or timer keys of
the zones in operation, the LED of the lock
lights; it will go out after a few seconds,
only the “stop” button is always active.
In the cooking zones which are not in
operation, the symbol and the LED light
when you press the “on/off” buttons.
This display disappears after a few
seconds.
The hob is locked when switched off
The LED above the lock key is unlit.
Pressing this button for a short time causes
the LED to light.
The LED is displayed when you press an
on/off button in any zone.
How to unlock the control panel?
Press the unlock button until the LED goes
out and a double sound signal confirms your
operation.
Tip
Remember to unlock your hob before
reusing it (see section “use of child safety
function”).
How to lock the control panel?
Keep the locking key held down until the
LED above it lights and a sound signal
confirms your operation.
9
Using Your Appliance
Operating safety
Residual heat
After intensive use, the cooking zone that
you have just used can remain hot for
several minutes.
A “H“ is displayed during this period.
Avoid touching the hot areas during this
time.
Temperature limiter
Each cooking zone is equipped with a
safety sensor that constantly monitors the
temperature of the bottom of the cookware.
In the event that an empty vessel is left on
a cooking zone that is on, this sensor
automatically adjusts the power output of
the hob, thereby avoiding any risk of
damage to the cookware or the hob.
“Small Items” safety
A small object (such as a fork, a spoon, a
ring, etc.) left alone on the hob is not
detected as a piece of cookware.
The display flashes and no heat is
produced.
Protection against overflows
The hob may shut down (with the adjacent
symbol in the display) and a beep
(depending on the model) may sound in
any of these 3 situations:
- Overflow that spills onto the buttons.
- Damp cloth placed over the buttons.
- Metallic object placed on the buttons.
Clean the hob or remove the object, then
begin cooking again.
Auto-Stop system
If you forget to turn off a preparation, your
cooking hob has an “Auto-Stop system”
safety function which automatically turns
off the forgotten cooking zone after a
predefined time (between 1 and 10 hours,
depending on the power used).
If this safety function is activated, the
disconnection of the cooking zone is
signalled by the display “AS” or “A” in the
control zone and a beep is emitted for
approximately 2 minutes. Simply press any
of the buttons to stop it.
A double beep will confirm your action.
Warning
Several small objects together on a cooking zone may be detected as cookware.
If the display remains on: power may be supplied and the objects may be heated.
10
Cooking chart
FRY
SOUPS
COOK/GLAZE
BRING TO
BRING BACK TO THE
THE BOIL
BOIL SIMMERING
COOK/SIMMER
KEEP
HOT
P
9
8
7
6
5
4
3
2
1
P
9
8
7
6
5
4
3
2
1
P
9
8
7
6
5
4
3
2
1
BROTHS
THICK
SOUPS
FISH
COURT-BOUILLON
FROZEN
SAUCE
THICK, FLOUR-BASED
WITH BUTTER AND EGGS
(BEARNAISE, HOLLANDAISE)
PREPARED
ENDIVES, SPINACH
LEGUMES
BOILED POTATOES
VEGETABLES
GOLDEN
BROWN POTATOES
SAUTÉE
DEFROSTING
MEAT
FRYING
SAUCES
POTATOES
OF VEGETABLES
THIN MEAT
PAN-FRIED STEAKS
BARBECUE (CAST IRON GRILL)
DEEP
FROZEN CHIPS
FRESH
MISCELLANEOUS
CHIPS
PRESSURE COOKER
(AS SOON AS A WHISPERING SOUND IS HEARD)
FRUIT
COMPOTES
PANCAKES
CUSTARD
MELTED
CHOCOLATE
JAMS
MILK
FRIED EGGS
PASTA
SMALL
BABY POTS
(DOUBLE-BOILER)
STEWS
CREOLE-STYLE RICE
RICE PUDDING
11
For the fitter
Electrical connection
These hobs must be connected to the
mains using a socket in compliance with
publication IEC 60083 or an all-pole circuitbreaker device in compliance with the
installation rules in force.
When power is first supplied to your hob,
or after an extended power cut, an
indicator light will appear on the control
panel. Wait for 30 seconds approximately
until this information disappears before
using your hob (This display is normal and
it is intended, if applicable, for your aftersales service. In all cases, the user of the
hob should disregard it).
Hook-up of 400V 2N~ - 16A
Separate the 2 phase wires (L1 and L2)
before connection.
Black-grey
Brown
Green/yellow
Blue
N
Neutral
L1 L2
Live
Earth
For a 400 V 2N triphase connection, if your
hob malfunctions, check that the neutral
conductor is properly connected.
Hook-up of 220-240V~
Warning
Black-grey
Green/yellow
Blue
Brown
L
Warning
Earth
Live
Neutral
N
32A
Green/yellow
Blue
Brown
16A for model 803HI16322
32A for model 803HI18322
Earth
Live
Neutral
N L
12
If the power cable is damaged, it
should be replaced by the
manufacturer, its after-sales service
department or by a qualified person to
avoid danger.
The safety wire (green-yellow) is
connected to the appliance’s terminal
and must be connected to the
ground lead of the electrical set-up.
In the case of connection to an electric
wall socket, it must remain accessible
after installation.
The fuse in your set-up must be
10 amperes.
If the power cable is damaged, it must
be replaced by the manufacturer, its
After-Sales Service Department or a
similarly qualified person to avoid
danger.
For the fitter
51
58 - 77
6,4
49
4c
56 - 75
4c
m
A
4c
m
m
On 80cm models, ensure that the unit
cross member is not blocking air
passage. If necessary, make a
chamfer.
m
4 cation
il
nt ce
ve spa
Choice of location
Your appliance should be positioned so
that the mains switch is accessible. The
distance between the edge of your
appliance and the side and rear walls (or
partitions) must be at least four centimetres
(area A).
Your appliance can be easily integrated
above a cabinet, an oven or a build-in
household appliance. You must simply
ensure that the air intakes and air outlets
are clear (See “Description of Your
Appliance” section).
Build-in
Follow the diagram above.
Glue the foam seal underneath your
appliance by following the outline of the
worktop upon which your appliance will
rest. This will allow you to achieve an
airtight seal with the worktop.
To do this:
1
Follow the diagram above.
Glue the foam seal underneath your
appliance by following the outline of
the worktop upon which your appliance will
rest. This will allow you to achieve an airtight
seal with the worktop.
2
Attach the clips to the hob*.
*Depending on model
Tip
If your oven is located below your hob, the
hob’s thermal safety measures forbid the
simultaneous use of the hob and the
pyrolysis program of your oven.
Your hob is equipped with an antioverheating safety device.
This safety can be activated, for example,
when the hob is installed over an oven that
is not sufficiently insulated. If this occurs, a
series of small lines appear in the control
panel. In this case, we recommend that
you increase the ventilation of your hob by
creating an opening in the side of your
cabinet (8 cm x 5 cm) and/or you can also
install the oven insulation kit that is
available from the After-Sales Service
Department.
Warning
You must ensure that the air intakes located under your cooking appliance remain
clear at all times. For all types of installation, your induction hob needs proper
ventilation.
13
Caring for and cleaning your top
Caring for your appliance
Avoid hard shocks from cookware:
The vitroceramic glass surface is highly resistant, but not unbreakable.
Do not place any hot lids flat on your cooking hob. A “suction” effect might damage the
vitroceramic top.
Avoid rubbing cookware: in the long term this might cause damage to the decoration of the
vitroceramic top.
Do not place cookware on your frame or trimmings (depending on model).
Avoid using cookware with rough or bumpy bottoms: they can capture and transfer
particles that may produce stains or scratches on your hob.
These faults, which do not prevent operation or unsuitability for use, are not covered by the
guarantee.
Do not store cleaning products or flammable products in the cabinet underneath your
cooking hob. Do not reheat an unopened tin: it might explode.
Of course, this precaution applies to all types of cooking. For cooking, never use aluminium
foil. Never place items wrapped in aluminium foil or packaged in aluminium dishes on your
cooking hob.
The aluminium will melt and permanently damage your cooking appliance.
Objects not intended for cooking should never be placed on the hob (risk of powering on,
scratches, etc.).
Steam cleaning should never be used. The steam jet could damage your hob.
Maintaining your appliance
TYPES OF STAINS/SPOTS
USE
WHAT TO DO?
Light.
Cleaning sponges.
Thoroughly moisten the zone to be cleaned with hot
water, then wipe off.
Accumulation of baked-on
stains/dirt.
Sugar spills, melted plastics.
Cleaning sponges.
Scraper for glass.
Thoroughly moisten the zone to be cleaned with hot
water. Use a scraper for glass to remove the large bits,
follow with the rough side of a household sponge, and
then wipe off.
Rings and hard water residue. White vinegar.
Apply warm white vinegar to the stain, let stand, then
wipe with a soft cloth.
Shiny metallic streaks.
Weekly maintenance.
Apply a cleaning agent for vitroceramic glass
(preferable one with silicone for its protective
properties) to the surface.
cream
14
Cleaning agent for
vitroceramic glass.
cleaning sponge
special sponge for delicate crockery
powder
abrasive sponge
CZ5700116 / EN 11/09