1
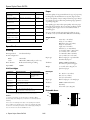
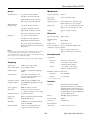
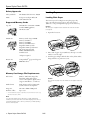
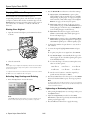
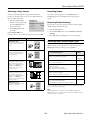
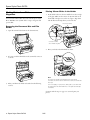
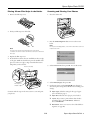
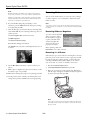
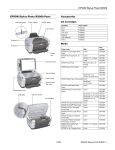
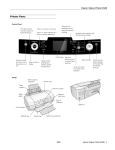
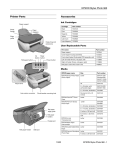
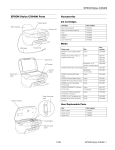
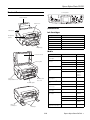
Epson Stylus Photo RX700
Control panel
Product Parts
Paper support
LCD screen
Accessories
Scanner lid
Ink Cartridges
On (power)
button
Output tray
Cartridge
Part number
Black
T559120
Cyan
T559220
Magenta
T559320
Yellow
T559420
Light Cyan
T559520
Light Magenta
T559620
Media
Document mat
Scanner glass
Scanner
transportation lock
Memory card
slot cover
CD/DVD guide
EXT. I/F
(USB) port
Paper name
Size
Part number
Epson®
Premium Bright
White Paper
Letter (8.5 × 11 inches)
S041586
Epson Photo Quality Ink
Jet Paper
Letter (8.5 × 11 inches)
S041062
A4 (8.3 × 11.7 inches)
S041061
Legal (8.5 × 14 inches)
S041067
Epson Photo Paper
Letter (8.5 × 11 inches)
S041140
Epson Glossy Photo
Paper
Borderless 4 × 6 inches
S041809
Letter (8.5 × 11 inches)
S041141
S041649
S041271
S041272
Epson All-Purpose
Glossy Paper
Letter (8.5 × 11 inches)
S041654
Epson ColorLife® Photo
Paper
Letter (8.5 × 11 inches)
S041500
Epson Matte Paper
Heavyweight
Borderless 8 × 10 inches
S041467
Letter (8.5 × 11 inches)
S041257
Epson Double-Sided
Matte Paper
Letter (8.5 × 11 inches)
S041568
Epson Premium Glossy
Photo Paper
Borderless 4 × 6 inches
S041727
S041808
Borderless 5 × 7 inches
S041464
Borderless 8 × 10 inches
S041465
Letter (8.5 × 11 inches)
S041286
S041667
Letter (8.5 × 11 inches)
S041331
Epson Premium
Semigloss Photo Paper
Ink
cartridges
5/05
Epson Stylus Photo RX700 - 1
Epson Stylus Photo RX700
Paper name
Size
Part number
Epson Premium Luster
Photo Paper
Letter (8.5 × 11 inches)
S041405
Epson Photo Quality
Self Adhesive Sheets
A4 (8.3 × 11.7 inches)
S041106
Epson Ink Jet
Transparencies
Letter (8.5 × 11 inches)
S041064
Epson Iron-On Transfer
Paper
Letter (8.5 × 11 inches)
S041153
Epson Glossy Photo
Greeting Card Kit
Letter (8.5 × 11 inches)
S041606
Epson Semigloss
Scrapbook Photo Paper
Letter (8.5 × 11 inches)
SCR1001
PremierArtTM Matte
Scrapbook Photo Paper
Letter (8.5 × 11 inches)
SCR1002
Epson Photo Quality Ink
Jet Cards
A6 (4.1 × 5.8 inches)
Paper
Since the quality of any particular brand or type of paper may
be changed by the manufacturer at any time, Epson cannot
attest to the quality of any non-Epson brand of paper. Always
test samples of paper stock before purchasing large quantities
or printing large jobs.
Poor quality paper may reduce print quality and cause paper
jams and other problems. If you encounter problems, switch
to a higher grade of paper. Do not load curled, folded, or
wrinkled paper.
Use paper under normal environmental conditions: 59 to
77 °F (15 to 25 °C) and 40 to 60% RH (relative humidity).
Single sheets
S041054
Size
Letter (8.5 × 11 inches)
A4 (8.3 × 11.7 inches)
Half-letter (5.5 × 8.5 inches)
A5 (5.8 × 8.3 inches)
Legal (8.5 × 14 inches)
Executive (7.3 × 10.5 inches)
4 × 6 inches (101.6 × 152.4 mm)
5 × 7 inches (127 × 178 mm)
8 × 10 inches (203 × 254 mm)
3.5 × 5 inches (89 × 127 mm)
180 nozzles
900 nozzles (180 nozzles per color × 5)
Paper type
Plain bond paper or special media
distributed by Epson
Print direction
Bidirectional with logic seeking
Thickness
Input Buffer
256KB
0.003 to 0.004 inch (0.08 to
0.11 mm) for plain bond paper
Weight
17 to 24 lb (64 to 90 g/m2) for
plain bond paper
Specifications
Printing
Printing method
On-demand ink jet
Nozzle configuration
Black
Color
Ink Cartridges
Specification
Black ink cartridge
Color ink cartridges
Color(s)
Black
Cyan, Magenta, Yellow,
Light Cyan, Light
Magenta
Storage
temperature
Envelopes
Size
No. 10 (4.1 × 9.5 inches)
DL (4.3 × 8.7 inches)
C6 (4.5 × 6.4 inches)
– 4 to 104 °F (– 20 to 40 °C)
1 month at 104 °F (40 °C)
Paper type
Plain bond paper or air mail paper
Transit
temperature
– 22 to 122 °F (– 30 to 50 °C)
10 days at 122 °F (50 °C)
Thickness
0.006 to 0.02 inch (0.16 to
0.52 mm)
Freezing
temperature*
3.2 °F (– 16 °C)
Weight
20 to 24 lb (75 to 90 g/m2)
Dimensions
1.7 × 3.3 × 0.5 inches (W × D × H)
42 mm × 83 mm × 13 mm (W × D × H)
*
Printable Area
A
Ink thaws and is usable after approximately 3 hours at 77 °F (25 °C).
Caution:
To ensure good results, use genuine Epson cartridges. Other
products may cause damage to your printer not covered by Epson’s
warranty.
B-L
C
Don’t use an ink cartridge if the date on the package has expired.
Single sheets or cards
Do not refill the ink cartridge. An IC chip on the cartridge calculates
the amount of remaining ink based on the initial supply. Adding ink
does not increase the amount available for use.
2 - Epson Stylus Photo RX700
B-R
Envelopes
5/05
Epson Stylus Photo RX700
Mechanical
Margins
Standard sheets
With minimum
margin setting
Top (A): 0.12 inch (3.0 mm)
Paper feed method
Friction
Left (B-L): 0.12 inch (3.0 mm)
Paper path
Front- and back-loading
Right (B-R): 0.12 inch (3.0 mm)
Bottom (C): 0.12 inch (3.0 mm)
Sheet feeder
capacity (approx.)
Top (A): 0.10 inch (2.5 mm)
Dimensions
17.7 × 16.5 × 9.3 inches (W × D × H)
450 × 418 × 236 mm (W × D × H)
Weight
Approx. 28.4 lb (12.9 kg)
Left (B-L): 0.10 inch (2.5 mm)
Right (B-R): 0.10 inch (2.5 mm)
Envelopes
Front: 150 sheets at 17 lb (64 g/m2)
Back: 120 sheets at 17 lb (64 g/m2)
Bottom (C): 0.10 inch (2.5 mm)
Electrical
Top (A): 0.12 inch (3.0 mm)
Input voltage range
100 to 120 V
Left (B-L): 0.2 inch (5.0 mm)
Rated frequency
range
50 to 60 Hz
Rated current
0.8 A (max. 1.1 A)
Right (B-R): 0.2 inch (5.0 mm)
Bottom (C): 0.79 inch (20 mm) for
Windows ® and 0.12 inch (3.0 mm) for
Mac ® OS X
Power consumption Approx. 25 W (ISO 10561 Letter
(stand-alone copying) Pattern)
Approx. 2.5 W in sleep mode
Approx. 0.2 W in power-off mode
Note:
Depending on the type of paper, the print quality may deteriorate in
the top and bottom areas of the print, or these areas may be
smeared. Before printing large jobs using an extended margin setting,
print a single sheet to confirm print quality.
Environmental
Temperature
You can create borderless prints using certain special Epson papers.
Scanning
Scanner type
Flatbed color image scanner
Photoelectric device
Color CCD line sensor
Effective pixels
27,200 × 37,440 pixels at 3200 dpi,
100%
Document size
Letter (8.5 × 11.0 inches) or A4
(8.5 × 11.7 inches); reading area is
selectable with software
Scanning resolution
3200 dpi (main), 6400 dpi (sub)
Output resolution
50 to 6400 dpi (adjustable in one-dpi
increments)
Operation
50 to 95 °F (10 to 35 °C)
Storage*
– 4 to 140 °F (– 20 to 60 °C)
1 month at 104 °F (40 °C)
Transit*
– 4 to 140 °F (– 20 to 60 °C)
120 hours at 140 °F (60 °C)
Humidity (without condensation)
*
Operation
20 to 80% RH
Storage*
5 to 85% RH
Stored in shipping container.
Interface
Standard
Based on Universal Serial Bus
Specifications Revision 2.0, Universal
Serial Bus Device Class Definition for
Printing Devices version 1.1; Universal
Serial Bus Mass Storage class Bulk-only
Transport Revision 1.0
Color separation
RGB color filters on CCD
Image data
16 bits per pixel per color input
1 to 16 bits per pixel per color output
Gamma correction
User defined 2 level
Light source
White cold cathode fluorescent lamp
Bit rate
480 Mbps (high speed device)
Interface
USB 2.0 High Speed
Data encoding
NRZI
Reliability
36,000 cycles of carriage movements
(main unit MCBF)
Connector
USB Series B
Recommended
cable length
6.6 feet (2 meters) or less
Integrated TPU
Scans up to six 35-mm film strip
images and four 35-mm slides
5/05
Epson Stylus Photo RX700 - 3
Epson Stylus Photo RX700
Safety Approvals
Loading Paper
Safety standards
UL 60950, CSA C22.2 No. 60950
EMC
FCC part 15 subpart B class B
CSA C108.8 class B
Loading Plain Paper
The front tray is for loading letter-size plain paper only
(8.5 × 11-inch photocopier paper). You can load up to
150 sheets of 17-pound plain bond paper in the front tray.
Supported Memory Cards
Top slot
SmartMedia TM (maximum 128MB;
standard 2000 compliant)
xD-Picture Card TM
Caution:
All other types of paper must be loaded in the rear sheet feeder
(see page 5).
1. Open the front cover.
Middle slot
Memory Stick ® (max. 128MB)
Memory Stick Duo ®*
Memory Stick PRO
Memory Stick PRO Duo TM
MagicGate Memory Stick
MagicGate Memory Stick Duo*
SD (Secure Digital) Card
MMC (MultiMediaCard)
miniSD Card*
Press
2. Fan a stack of paper (up to 150 sheets), then tap it on a flat
surface to even the edges.
* Adapter required
Bottom slot
3. Load the paper. Align it with the line on the yellow sticker,
being careful not to push it in too far.
TM
CompactFlash Type I and Type II
IBM Microdrive TM
Memory Card Image File Requirements
File format
JPEG or TIF format image files,
DOS FAT taken with a DCF
version 1.0 compliant digital camera
(supports Exif Print v. 2.1 and 2.2)
Media format
DCF (Design rule for Camera File
system) version 1.0 compliant*
Image size
80 × 80 to 4600 × 4600 pixels
Number of files
Up to 999
*
Caution:
Do not push the paper in too far. Make sure the paper is stacked
evenly.
The DCF standard is set by the Japan Electronics and Information Technology
Industries Association (JEITA).
Too far in
Note:
You can’t print images whose file names contain double-byte
characters, as is the case with some Asian language fonts. Do not
use Asian language fonts to name your files if you will be printing
from the memory card.
4 - Epson Stylus Photo RX700
5/05
Edges not even
Epson Stylus Photo RX700
2. Open the front cover.
4. Slide the edge guide against the left side of the paper.
Press
5. Extend the output tray.
3. Extend the output tray.
Loading Epson Paper
Load specialty Epson papers in the rear sheet feeder only.
Plain paper may also be loaded in the rear sheet feeder, but
you have to specify Plain(Back) as the Paper Type when
printing (see page 6).
4. Load your paper and slide the edge guide lightly against it.
Never load more sheets than can fit under the arrow mark
on the edge guide.
Note:
Epson paper is designed to work with Epson printers and ink. If you
use different brands, you may not get the results you expect.
1. Extend the paper support.
Note:
If you’re using Epson paper, follow any instructions that came with it.
For example, some types of paper should be loaded only one sheet at
a time. See the electronic Reference Guide for details.
To ensure good results, always:
5/05
■
Load paper short edge first.
■
Load paper with the printable side up (it’s usually whiter or
brighter).
■
Check the RX700’s Paper Type setting before printing to make
sure it matches the type of paper you’ve loaded (see page 7).
Epson Stylus Photo RX700 - 5
Epson Stylus Photo RX700
2. Use the u, d, l, r arrow buttons to select these settings:
Copying Without a Computer
❏ Copy Layout: Select Borderless to print a photo
without white borders around the edges (not available
when printing on plain paper). To copy your original
with a 1/8-inch (3 mm) white margin, select Copy w/
Borders. See page 7 for more layout options.
You can make color or black-and-white copies of
scrapbooking materials, photos, and other items. To reprint
your photos without white borders around the edges, use the
Borderless layout setting and select an Epson photo paper in
one of these sizes: 4 × 6-inch, 5 × 7-inch, 8 × 10-inch, or
letter-size.
❏ Paper Type: Select the setting for the type of paper
you’ve loaded (see page 7). Select Plain(Front) if you’ve
loaded plain paper in the front tray; or Plain(Back) if
you’ve loaded plain paper in the back tray.
Placing Your Original
❏ Paper Size: Select the size of paper you’ve loaded.
(Letter is automatically selected when plain paper is
chosen as the Paper Type.)
1. Open the scanner lid and place your document face-down
as shown.
❏ Quality: When printing a photo, select Photo or Best
Photo. When copying text and graphics on plain paper,
select Draft for quick copies or Text for quality copies.
3. To change the number of copies (from 1 to 99), use the +
and – buttons.
4. To resize the original, highlight Zoom In/Out and press
OK.
Place against this
corner
❏ To print your photo at its original size, select Actual.
❏ Use Auto Fit Page to automatically fit the copy to the
selected paper size. (For borderless printing, this option
is automatically selected.)
2. Close the scanner lid.
❏ To resize the image to fit various common photo sizes,
select one of these options:
Note:
If the edges of your original are important, slide the document about
1/8 inch away from the edges of the glass to ensure that the entire
document is copied.
To copy a thick document, such as a book, lift or remove the scanner
lid. Make sure your original lies flat on the glass.
Letter Æ 4 × 6
Letter Æ 5 × 7
4 × 6 Æ 8 × 10
4 × 6 Æ Letter
5 × 7 Æ Letter
8 × 10 Æ 5 × 7
❏ Use the + and – buttons to resize the original by a
specific amount (from 25% to 400%).
Selecting Copy Settings and Printing
5. Press the x Color button (for color copies) or the x B&W
button (for black-and-white copies). Your copy is printed.
1. Press the Copy button. You see this screen:
Note:
For best results, press the x Color button even if you’re printing
black-and-white photos. Color inks can be combined for improved
results over black ink alone.
Arrow
buttons
Lightening or Darkening Copies
1. After pressing the Copy button (to enter Copy mode), press
the Options button.
2. Adjust the Copy Density as needed, or select Auto
Document to adjust the copy density automatically (when
printing on plain paper only).
Note:
The RX700 retains the last settings you used, so always check
them to make sure they’re the ones you want to copy with.
3. Press the OK button when done to apply the setting.
6 - Epson Stylus Photo RX700
5/05
Epson Stylus Photo RX700
Selecting a Copy Layout
Canceling Copies
You can access basic layouts (to copy with and without
borders) on the main copy screen. To use additional layout
options, follow these steps:
To cancel a job in progress, press the y Stop button.
Canceling appears on the LCD screen and your page is
ejected.
1. After pressing the Copy
button (to enter Copy mode),
press the Options button.
You see this screen:
Restoring Default Settings
If you want to reset copy and print settings to their original
default settings, follow these steps:
2. Select More Layout and
press OK.
1. Press the Setup button.
2. Use the u and d buttons to choose Restore to Factory
Settings.
Use the u, d, l, r arrow
buttons to choose one of these layout options, then press OK.
Copy Layout setting
3. Press OK, then press OK again to restore your settings.
Result
Selecting the Correct Paper Type
Repeat Copy–Auto
Prints a photo at actual size as
many times as it will fit on one
sheet.
When copying or printing without a computer, select the
Paper Type setting according to these guidelines:
Repeat Copy–4, 9, or 16
Prints a photo multiple times on
one sheet; select 4, 9, or 16
photos per sheet.
If you’ve loaded this paper . . .
Select this
setting
Plain paper
Epson Premium Bright White Paper*
Plain(Front)
or
Plain(Back)
2-up Copy
Copies two originals onto one
sheet. After placing the first
original on the RX700, press the
x Color or x B&W button.
Repeat for the second copy
when prompted.
Epson Premium Glossy Photo Paper
Epson Ink Jet Transparencies
Prem.Glossy
Epson Glossy Photo Paper
Epson Photo Paper
Epson All-Purpose Glossy Paper
Epson Glossy Photo Greeting Cards
Glossy
Photo
4-up Copy
Copies four originals onto one
sheet. After placing the first
original on the RX700, press the
x Color or x B&W button.
Repeat for each additional copy
when prompted.
Epson Premium Semigloss Photo Paper
Epson ColorLife Photo Paper
Epson Semigloss Scrapbook Photo Paper
SemiGloss
Epson Premium Luster Photo Paper
Prem.Luster
Epson Matte Paper Heavyweight
Epson Double-Sided Matte Paper
PremierArt Matte Scrapbook Photo Paper for Epson
Matte
Wallet Photo Copy
Prints nine wallet-size copies of
the photo on the page.
* You can load up to 100 sheets of Epson Premium Bright White Paper in
the front tray instead of plain paper.
Note:
When printing from a computer, there are additional paper type
settings you can use. See the electronic Reference Guide to select
the best setting for your paper.
5/05
Epson Stylus Photo RX700 - 7
Epson Stylus Photo RX700
Placing 35-mm Slides in the Holder
Making Prints from Slides or
Negatives
1. Fit the holder’s tabs into the two small holes at the rear edge
of the glass. Make sure the cutouts for 35-mm slides are in
the middle of the glass (not at the rear edge) to align them
with the fluorescent lamp when you close the lid.
You can use the film holder that came with the Epson Stylus
Photo RX700 to scan 35-mm slides or strips of negative and
positive film.
Fluorescent lamp
Removing the Document Mat and Film
Holder
1. Open the scanner lid and remove the document mat.
Cutouts for slides
are in middle of glass
2. Place your slides in the film holder as shown.
2. If you’ve stored the film holder in the scanner lid, remove it
as shown.
Note:
The photos should be mirror-imaged when viewed from
overhead. (The shinier side of the film faces down; the duller side
faces up.)
3. Place your film in the holder as described in the following
sections.
To avoid cropping of your photos, always place your slides with
the wider part of the film width-wise on the glass (in landscape
orientation).
Continue with the steps on page 9 to scan and print your
photos.
8 - Epson Stylus Photo RX700
5/05
Epson Stylus Photo RX700
Placing 35-mm Film Strips in the Holder
Scanning and Printing Your Photos
1. Remove the film strip cover.
1. Close the scanner lid.
2. Slide your film strip into the holder.
2. Press the Slides Negatives button. You see the screen
below.
Note:
Do not press the Copy button, or the film holder will be scanned
instead of the film.
Note:
The photos should be mirror-imaged when viewed from
overhead. (The shinier side of the film faces down; the duller side
faces up.)
3. Replace the film strip cover.
4. Fit the holder’s tabs into the two small holes at the rear edge
of the glass. Make sure the film strip is in the middle of the
glass (not at the rear edge) to align it with the fluorescent
lamp when you close the lid.
3. Select Custom Print, then press OK. You see this screen:
Fluorescent lamp
4. Select Photo(Single), then press OK.
Film strip is in
middle of glass
5. On the next screen, use the u, d, l, r arrow buttons to
select basic print settings. Press OK when done making your
settings.
❏ Paper Type: Select the setting for the type of paper
you’ve loaded (see page 7).
Continue with the steps in the next section to scan and print
your photos.
❏ Paper Size: Select the size of paper you’ve loaded.
❏ Layout: If you want to print without white borders
around the edges, choose Borderless. Otherwise
choose with Border.
❏ Restoration: Turn on to restore color to faded slides or
negatives (see page 10).
5/05
Epson Stylus Photo RX700 - 9
Epson Stylus Photo RX700
Note:
Borderless printing is available only for Epson photo papers in
these sizes: 4 × 6-inch, 5 × 7-inch, 8 × 10-inch, and letter-size.
Restoring Color
Whether you print with or without borders, your photos will be
slightly cropped because 35-mm film has different proportions
than those of the paper you’re printing on.
You can use Color Restoration to restore the color of images
on slides, negatives, or 4 × 6-inch photos that have become
faded over time.
6. If you would like change the print quality or color
saturation, press the Options button. Change any settings
as needed, then press OK.
Note:
You can also restore color to photos as large as letter size when you
scan them from your computer. See your electronic Reference Guide
for details.
7. Select the film type you’ve loaded. If you’re scanning slides,
select Color slide. If you’re scanning a film strip, select one
of these options:
Restoring Slides or Negatives
To restore color from faded
slides or negatives, follow
the instructions on page 8
to place your film on the
scanner and adjust the
settings for the type of
paper you’ve loaded.
❏ Color negative film (used in most cases)
❏ B&W negative
❏ Positive color film (strip)
Press OK after making your selection.
The RX700 scans your photos and displays the first one on
its screen:
Before printing, make sure
Restoration is set to On, as shown.
Restoring 4 × 6 Photos
Follow these steps to restore faded 4 × 6-inch photos. You can
place two photos on the scanner at once; a separate print will
be made of each photo. Before starting, you’ll need to have
some Epson Premium Glossy Photo Paper in one of these
sizes: 4 × 6-inch, 5 × 7-inch, 8 × 10-inch, or letter-size.
8. Use the l and r arrow buttons to preview each of your
photos.
1. Press the Creative Projects button.
9. While a photo is displayed, use the + and – buttons to select
how many copies of it you’d like.
3. Place one or two photos on the scanner glass. Align them
with the edges of the glass, and make sure they’re separated
by at least 1/2 inch. Then press OK.
2. Select Reprint/Restore Photos then press OK.
10. When done selecting all your photos for printing, press OK.
11. On the preview screen, confirm your selected photos and
settings, then press the x Color button to begin printing.
Note:
If the edges of your photos are important, slide them about 1/8
inch away from the edges of the glass to ensure that the entire
photo is copied.
10 - Epson Stylus Photo RX700
5/05
Epson Stylus Photo RX700
4. Load one or more sheets (up to 20) of Epson Premium
Glossy Photo Paper.
4. Insert the tray into the RX700.
5. Select the Paper Size of the paper you loaded, turn
Restoration ON, and then press OK. Your photos are
scanned.
6. Use the l and r arrow buttons to preview each of your
photos. While a photo is displayed, use the + and – buttons
to select how many copies of it you’d like. Press OK when
done.
7. At the preview screen, press the x Color button to print
your color-restored photos.
5. Make sure the arrow marks are aligned.
Printing on a CD/DVD
You can print photos and designs directly on any ink-jet
printable CD or DVD. You can use both regular 12-cm disks
and 8-cm mini CDs.
Align arrows
Caution:
Use only ink jet-printable CDs or DVDs for printing. Do not use
thermal-printable or regular CDs or DVDs.
Loading a Disk
Printing a CD/DVD Without a Computer
1. Turn on the RX700 and open the front cover.
Follow these steps to print directly onto a CD or DVD
without using your computer. You can’t print text on your
disk this way, but you can either scan a photo (or other
printed image) and copy it onto the disk or use photos from
your digital camera’s memory card.
Note:
If you use the included EPSON Print CD software, you can import
your photos, add text, and modify your designs with a variety of
special effects. See the Basics book for details.
Press
Using a Printed Image
2. Press the 5 open tab. The CD/DVD guide slides out.
Follow these steps to copy a photo or other printed image
onto your disk.
1. Place the design you want to copy on the scanner glass (see
page 6). The image is automatically cropped and resized to
fit on the disk.
2. Press the Copy button, then select CD Copy as the Copy
Layout.
3. Place your disk on the CD/DVD
tray with the label surface up.
Note:
For small 8-cm disks, place the
included adapter on the tray first.
3. Select Text as the Quality setting.
5/05
Epson Stylus Photo RX700 - 11
Epson Stylus Photo RX700
6. Select your photo(s) for printing.
4. Press the x Color button to copy in color, or the x B&W
button to copy in grayscale. Your disk is printed.
❏ Use the l and r arrow buttons to preview your photos.
To cancel printing, press the y Stop button.
❏ While a photo is displayed, use the + and – buttons to
select how many copies of it you’d like (for 4-up and
12-up mode only).
5. When printing is complete, pull the tray out of the printer
and let the disk dry fully before handling it.
❏ Press OK when done.
Note:
If ink smears on your printed disks, you may need to adjust the ink
density. Disks from different manufacturers absorb ink differently, so
you may need to adjust the setting for each brand. After making basic
print settings, press the Options button. Change the Copy Density
as needed, then press OK.
7. At the preview screen, press the x Color button to print in
color, or the x B&W button to print in grayscale. Your disk
is printed.
To cancel printing, press the y Stop button.
Printing From a Memory Card
8. When printing is complete, pull the tray out of the printer
and let the disk dry fully before handling it.
Follow these steps to print using an image from your camera’s
memory card.
1. Insert a memory card (see page 4).
Printing Photos from Your Camera’s
Memory Card
2. Press the Memory Card button, select Custom Print, and
press OK.
3. Select CD/DVD, then press OK.
After inserting a memory card, you can view and select the
photos you want to print from the RX700 screen.
Note:
To select photos for printing, you can also print an index sheet or use
your camera’s DPOFTM function (if supported by your camera). See
the Basics book for details.
1. Insert a memory card (see page 4).
2. Press the Memory Card button.
4. Change the Layout if desired:
3. Select Custom Print, then press OK.
❏ 1-up to print one image on your disk
❏ 4-up to print four images on your disk
4. Select Photo (Single) to print one photo per sheet. To
create a multi-photo layout, select Photo (Multi).
❏ 12-up to print twelve images on your disk
5. Use the u, d, l, r arrow buttons to select these settings:
❏ Paper Type: Select the setting for the type of paper
you’ve loaded (see page 7).
Note:
If you wish to print with stronger colors, increase the Density
setting. Disks from different manufacturers absorb ink
differently, so increasing this setting may not produce
satisfactory results with some brands.
❏ Paper Size: Select the size of paper you’ve loaded.
❏ Layout: Select your desired layout option.
5. Press OK when done making your selections.
6. If you would like to change the print Quality setting or
make any special enhancements to your photos, press the
Options button and change any settings as needed. Press
OK when done to save these settings.
You see your memory card’s first photo displayed on the
screen:
7. Press OK when done making your selections.
12 - Epson Stylus Photo RX700
5/05
Epson Stylus Photo RX700
You see your memory card’s first photo displayed on the
screen:
3. To select a range of photos, press the Options button. You
see this screen:
8. Use the l and r arrow buttons to preview each of your
photos.
4. Highlight Select Range, then press OK.
Note:
You can also select or deselect all the photos on the card. When
selecting a range of photos, it is helpful to view them nine per
screen.
9. While a photo is displayed, use the + and – buttons to select
how many copies of it you’d like.
Note:
See “Other Ways to View and Select Your Photos” below.
5. Move the highlight box to the first photo in the range of
photos you want to print, then press OK. Then use the
u, d, l, r arrow buttons to highlight additional adjacent
photos. Press OK when done.
10. When done selecting all your photos for printing, press OK.
11. At the preview screen, press the x Color button to print
your photos.
6. By default, each photo in the range is set to print one copy.
If you wish to make additional copies of any photo,
highlight it and use the + and – buttons to select the
number of copies.
To cancel printing, press the y Stop button.
Note:
For best results, press the x Color button even if you’re printing
black-and-white photos. Color inks can be combined for improved
results over black ink alone.
7. Press OK when done.
8. At the preview screen, press the x Color button to print
your photos.
If part of your photo is cut off when you print, select with Border
as the Layout setting. Then press the Options button and turn off
Fit to Frame.
Printing From Other Devices
Other Ways to View and Select Your
Photos
The RX700 can print photos by directly connecting one of
these devices:
When previewing your photos, you can choose whether to
view them one-at-a-time or nine per screen. You can also
select photos for printing one-by-one, in a range, or all at
once.
❏ PictBridge ® or USB Direct Print TM enabled digital camera
❏ Data storage device, such as a USB thumb drive (flash
memory device), CD-ROM, or Iomega® Zip drive
1. After making your print
settings, you see the first
photo on your card. Press
the Screen View button.
Your photos are displayed
nine per screen.
❏ Bluetooth®- enabled device (requires an optional Bluetooth
Photo Print adapter)
See the Basics book and electronic Reference Guide for more
information.
Note:
Press the Screen View button
again to view your images as a slide show. (You cannot select
the number of prints in this mode.) Press Screen View again to
return to viewing one photo per screen.
2. To select photos one-by-one, use the u, d, l, r arrow
buttons to select each photo, and the + and – buttons to
select the number of copies. Press OK when done making
your selections. Continue with step 8.
5/05
Epson Stylus Photo RX700 - 13
Epson Stylus Photo RX700
Scanning to a File With EPSON Scan
Cleaning the Print Head Nozzles
Follow these steps to scan directly to a file on your computer:
If printouts are unexpectedly light, colors are missing, or you
see light or dark lines across the page, you may need to clean
the print head nozzles.
1. Place your document on the scanner glass (see page 6).
2. Start EPSON Scan.
Checking the Print Head
Windows: Select Start > All Programs (or Programs) >
EPSON Scan > EPSON Scan.
Print a nozzle check pattern to see if any print head nozzles are
clogged, or to check the results after cleaning the print head.
Macintosh: Double-click EPSON Scan in the
Applications folder.
1. Make sure plain letter-size paper is loaded in the front tray
(see page 4).
Note:
You can also open EPSON Scan from any TWAIN-compliant
program, such as Adobe® Photoshop® or ArcSoft
PhotoImpression.TM
2. Press the Setup button. (If you’ve just finished cleaning the
print head, the setup screen appears automatically).
3. Use the u and d buttons to select Nozzle Check, then
press OK. Press OK again to print the nozzle check.
3. Choose the scanning mode from
the Mode list (see “Selecting
Scanning Modes” below).
4. Examine the nozzle check pattern you printed. Each
staggered line should be solid, with no gaps, as shown.
4. Click the Scan button. You see
the File Save Settings window:
❏ If your printout looks okay, you’re done. Press Back to
return to the Setup menu.
Type a name for
your file here
❏ If you see any gaps, as shown below, press OK and
follow the on-screen steps to clean the print head.
Select a file
format here
Cleaning the Print Head
Follow these steps to clean the print head so it can deliver ink
properly. Print head cleaning uses ink, so clean it only if
quality declines.
5. Type a name for your file in the Prefix box.
6. Select a file format in the Type box.
7. Click OK. The RX700 scans your image and saves it to the
location you specified.
1. Press the Setup button.
2. Use the u and d buttons to select Head Cleaning.
3. Press the OK button, then press OK again to start cleaning.
Selecting Scanning Modes
Cleaning takes about a minute, and you see a message on
the RX700 screen indicating that cleaning is in progress.
Three scanning modes provide progressive levels of control over
your scanned image:
❏ Full Auto Mode makes scanning quick and easy, with
automatic image type and resolution settings.
4. When cleaning finishes, press OK to print a nozzle check
pattern to check the results.
❏ Home Mode provides a simple screen giving you automatic
image adjustments, previewing and cropping capability, and
preset configurations for various types of scans.
If you don’t see any improvement after cleaning three or four
times, turn the RX700 off and wait overnight—this allows any
dried ink to soften—and try cleaning the print head again.
❏ Professional Mode lets you manually configure advanced
image settings.
Note:
It’s a good idea to turn the RX700 on at least once a month to
maintain good print quality.
See the electronic Reference Guide for more information.
14 - Epson Stylus Photo RX700
5/05
Epson Stylus Photo RX700
Removing and Installing Ink Cartridges
Replacing Ink Cartridges
When you print with low ink cartridges, you
see a message on the RX700 screen. Look at
this icon in the upper-right corner of the Copy
or Preview screens to check ink status.
Follow these steps to replace one or more ink cartridges that
are outdated, low on ink, or empty.
1. Open the cartridge covers.
Ink levels
When a cartridge is more than six months old, print quality
may decline. If necessary, try cleaning the print head as
described on page 14. If printouts still don’t look their best,
you may need to replace the cartridge.
Warning:
Keep ink cartridges out of the reach of children.
If ink gets on your hands, wash them thoroughly with soap and
water. If ink gets in your eyes, flush them thoroughly with water.
2. Remove the cartridge you need to replace. (Press in to
release it, then pull it out of its slot.) Dispose of the
cartridge carefully.
Checking the Ink Supply
To check your ink supply, do the following:
1. Press the Setup button.
2. Use the u and d buttons to select Ink Levels.
3. Press the OK button.
You see a graphic showing the amount of ink available in
each cartridge: B (Black) C (Cyan), LC (Light Cyan), M
(Magenta), LM (Light Magenta), and Y (Yellow).
3. Unwrap the new cartridge.
4. When you’re done checking the ink levels, press the OK
button.
4. Insert the cartridge so it
clicks into place.
When your ink starts getting low, make sure you have
replacement cartridges available. You can’t print if a cartridge
is empty.
If you need to replace any
other cartridges, repeat
steps 2 through 4 before
continuing.
Caution:
Leave the empty cartridge installed until you have obtained a
replacement, or ink remaining in the print head nozzles may dry out.
5. Close the cartridge covers.
Purchasing Ink Cartridges
Use the Epson ink cartridges listed on page 1 within six
months of installing them and before their expiration date.
Caution:
To ensure good results, use genuine Epson ink cartridges and do not
refill them. Other products may cause damage to your RX700 not
covered by Epson’s warranty.
You can purchase genuine Epson ink cartridges from an
authorized Epson reseller. To find the nearest reseller, please
call 800-GO-EPSON (800-463-7766). To purchase online,
visit www.epsonstore.com (U.S. sales only). In Canada, please
call (800) 463-7766 for reseller referral.
The RX700 begins charging the ink delivery system, and
you hear noise during charging.
Caution:
Never turn off the RX700 during ink charging. This may cause
incomplete charging of ink.
5/05
Epson Stylus Photo RX700 - 15
Epson Stylus Photo RX700
Aligning the Print Head
Transporting the RX700
If your printouts have vertical lines that appear jagged, you
may need to align the print head.
If you move your RX700 some distance, you need to prepare
it for transportation in its original box or one of a similar size.
1. Make sure plain letter-size paper is loaded in the front tray
(see page 4).
Caution:
To avoid damage, always leave the ink cartridges installed when
transporting the RX700. Never transport or store the RX700 on its
side or in a tilted or upside-down position.
2. Press the Setup button, select Head Alignment, then press
the OK button.
1. Press the P On button to turn off the RX700. Wait until
the Ppower light turns off, then unplug the RX700 from
the electrical outlet and disconnect the USB cable from
your computer.
3. Press OK again to print the alignment pattern.
2. Open the scanner lid and slide the transportation lock to
the
locked position. Then close the scanner lid.
Caution:
Be sure to move the transportation lock back to the unlocked
position after installing the RX700 in its new location.
3. Remove any paper from the RX700. Then close the paper
output tray, CD/DVD guide, front paper tray, and rear
sheet feeder.
4. Repack the RX700 and in its original box (or equivalent)
using the protective materials that came with it.
Caution:
Keep the RX700 level as you transport it.
4. Examine the printout. For each section (#1 through #4),
circle the box with the least amount of streaking (light or
dark vertical lines). You may need to use a magnifying glass
or loupe.
After transporting the RX700, unlock the transportation lock
and print a test copy. If you notice a decline in quality, clean
the print head (see page 14); if output is misaligned, align the
print head (see “Aligning the Print Head” on this page).
5. On the RX700 screen, use the l and r buttons to select the
number of the circled box in section #1.
6. Press the d button to highlight each of the remaining
sections (#2, #3, and #4), and use the l and r buttons to
select the circled number for each one.
Related Documentation
7. Press OK when done.
8. You see a message that head alignment is complete. Press
OK to return to the Setup menu.
16 - Epson Stylus Photo RX700
5/05
CPD-19734
Epson Stylus Photo RX700 CD-ROM
(includes electronic Reference Guide)
CPD-19735
Epson Stylus Photo RX700 Start Here
CPD-19736
Epson Stylus Photo RX700 Basics