1
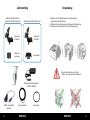
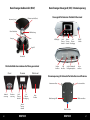
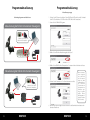
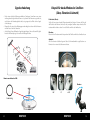
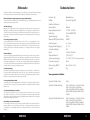
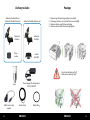
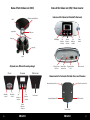
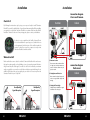
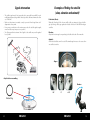
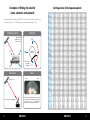
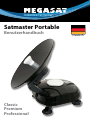
Brillantes Fernsehen Satmaster Portable Benutzerhandbuch Classic Premium Professional Deutsch Sicherheitshinweise Bitte lesen Sie vor Inbetriebnahme des Produkts die Bedienungsanleitung sorgfaltig durch und folgen Sie exakt den Anweisungen zum Auf- und Einbau, sowie zum Ausrichten der Antenne. •Führen Sie alle Schritte in der angegebenen Reihenfolge durch, um zu einem einwandfreien Ergebnis zu kommen. •Elektromagnetische Felder in unmittelbarer Nähe zur Antenne können zu schlechtem Empfang bis hin zu Signalverlust führen. •Durchbohren Sie keinenfalls die Plastikabdeckung, die die Antenne vor Feuchtigkeit schützt. •Gehen Sie sorgsam mit der Antenne um, lassen Sie diese nicht fallen, da sie sonst beschädigt werden könnte. •Öffnen Sie niemals das Antennengehäuse, versuchen Sie nie, eigenhändig Reparaturen durchzuführen, da Sie sich damit selbst gefährden und die Gewährleistung verlieren. •Hindernisse (Gebäude, Bäume, etc.…) zwischen Antenne und Satellit können den Empfang stören bzw. verhindern. •Sie sollten die Antenne weder lackieren, noch andere Substanzen aufbringen, da dadurch die Empfangsqualität maßgeblich verringert wird. Inhaltsverzeichnis 04 Lieferumfang 05 Verpackung 06 Bezeichnungen - Außeneinheit 07 Bezeichnungen - Steuergerät / Stromeinspeisung 08 - 09 Installation 10 Inbetriebnahme 11 Anzeigen des LCD Display 12 - 13 Programmaktualisierung 14 Signalschwächung 15 - 16 Beispiele für das Auffinden des Satelliten 17 Einstellwerte für europäische Hauptstädte 18 Fehlersuche 19 Technische Daten •Der Gebrauch von verlustarmen Steckern schützt vor Schwächung oder Verlust des Signals. •Dieses Produkt enthält ein universal LNB. Führen Sie daran keine Änderungen oder Manipulationen durch. •Für weitergehende Informationen zu vorgenannten Punkten, wenden Sie sich bitte an Ihren Fachhändler oder unsere Kundenservice. Megasat | Industriestraße 4a | D-97618 Niederlauer | www.megasat.tv | [email protected] 02 DEUTSCH DEUTSCH 03 Lieferumfang Satmaster Portable Classic Satmaster Portable Premium Verpackung Satmaster Portable Professional Satmaster Portable Satmaster Portable Stromeinspeisung Steuergerät 1. Entfernen Sie das Klebeband von der Verpackung (Verwenden Sie kein Messer) 2. Entfernen Sie die Antenne vorsichtig aus der Verpackung 3. Entfernen Sie die Schaumteile aus der Verpackung. ! LNB USB to Seriel Kabel (optinal) 04 Fassen Sie die Antenne nicht am „Teller“ an, sondern nur am Gehäuse! Netzgerät (für Automobile) 12V IN / 24V OUT Einspeisekabel DEUTSCH Gummiring DEUTSCH 05 Bezeichnungen Außeneinheit (ODU) Polarisationsskala (Skew) Antennen Spiegel Obere Endschalter Bezeichnungen Steuergerät (IDU) / Stromeinspeisung Steuergerät für Satmaster Portable Professional LNB Abdeckung Arm Kompass LCD Display „Hoch“ Taste zur Auswahl „Runter“ „Set“ Taste zur Taste zur Auswahl Bestätigung EIN/AUS Schalter Serielle Schnittstelle für Programmupdate Stromanschluss Saugfuß Bedienfeld Die Bedienfelder der einzelnen Ausführungen variiren! Classic Premium Professional Receiver Anschluss LNB Anschluss Stromeinspeisung für Satmaster Portable Classic und Premium Antennenanschluss Azimuthsteuerung 06 Elevationssteuerung „Hoch“ Taste zur Auswahl „Set“ Taste zur Bestätigung Keine Funktion Receiveranschluss Betriebsanzeige LED DC Stromanschluss „Runter“ Teste zur Auswahl EIN/AUS Schalter DEUTSCH DEUTSCH 07 Installation Installation Verbindungsdiagramm Classic und Premium Einleitung Befolgen Sie die nachfolgenden Anweisungen Schritt fur Schritt, um Ihren Satmaster Portable problemlos alleine oder mit Hilfe eines Fachmannes zu montieren und anzuschließen. Bevor Sie mit dem Aufbau beginnen, überprüfen Sie bitte zunächst, ob alle gelisteten Teile enthalten sind. Sollte etwas fehlen, wenden Sie sich bitte an Ihren Händler. Außenbereich FALSCH! Innenbereich RICHTIG! Receiver Hinweis; Um den Kompass genau lesen zu können, stellen Sie bitte sicher, dass Sie ihn außer Haus ablesen. Bleiben Sie weg von großen Metall-Objekten, insbesondere Elektrokabel und nehmen dann mehrere Lesungen vor. Netzteil Einspeisekabel Wahl des Standortes 1. Antennenposition Um ein Satellitensignal zu empfangen, muss der Satmaster portable stets im Freien installiert und nach Süden ausgerichtet werden. Idealerweise nutzen Sie einen Kompass, um die exakte Himmelsrichtung festzustellen. (Hinweis: richten Sie sich nach den Azimuthwerten in der Tabelle am Ende des Handbuches) Vergewissern Sie sich, dass keine Hindernisse (Gebäude, Bäume, etc.) in Richtung Süden vor der Antenne liegen. Wenn Sie die Antenne montieren, suchen Sie nach einem gut zugänglichen, sicheren Standort. Überlegen Sie vorher, wo und wie Sie das Kabel zwischen Antenne und Receiver verlegen können. TV Einspeisekabel Platzieren Sie die Antenne mit freier Sicht zum Himmel. Vermeiden Sie die Platzierung nahe übermäßiger Feuchtigkeit. Die Antenne kann auf einem Sockel platziert werden. Verbindungsdiagramm Professional 2. Grobe Ausrichtung der Antenne Drehen Sie das Antennengehäuse solange bis die Richtung des Zielsatelliten auf der Kompassanzeige mit dem Dreieck grob übereinstimmt. Innenbereich 3. Polarisation (Skew Einstellung) Gutes Empfangssignal Schlechtes Empfangssignal Drehen Sie das Antennengehäuse solange bis die Richtung des Zielsatelliten auf der Kompassanzeige mit dem Dreieck grob übereinstimmt. Receiver Netzteil TV 08 DEUTSCH DEUTSCH 09 Inbetriebnahme Anzeige des LCD Display Wählen Sie die für Ihre Ausführung zutreffende Spalte und folgen Sie den Anweisungen. Das LCD Display zeigt den aktuellen Status des automatischen Suchsystems. (gilt für Satmaster Portable Premium und Professional) Satmaster Portable Classic Satmaster Portable Premium Satmaster Portable Professional Schalten Sie TV und Receiver ein. Konfigurieren Sie Ihren Receiver. (Konsultieren Sie die Bedienungsanleitung Ihres Receivers.) Schalten Sie die Stromeinspeisung ein. Schalten Sie die IDU ein. Warten Sie 10 Sekunden um den automatischen Suchlauf mit der letzten Einstellung zu starten. Um die Einstellung zu ändern oder manuell zu suchen, drücken Sie eine beliebige Taste. Haben Sie eine Taste gedrückt, startet der Suchlauf sofort. Ansonsten warten Sie 10 Sekunden, bis der Suchlauf automatisch startet. Warten Sie, bis die Antenne Ihren Suchlauf und die Positionierung beendet hat. (ca. eine Minute ). Haben Sie eine Taste gedrückt, erscheint der Satellitenname auf dem LCD. Wenn nicht, sucht die Antenne nun den voreingestellten Satelliten und Sie können die nächsten 6 Schritte übergehen. H POL, SELECTED 18V vom Receiver V POL, SELECTED 13V vom Receiver CHECK STB CBL. Nicht mit Receiver verbunden. Prüfen Sie das Einspeisekabel am STB-1-Anschluss. SIGNAL DETECTED Satellitensignal gefunden NIT DETECTED Bestätigt, dass das Signal des Zielsatelliten richitg ist SIGNAL LOST. Kann kein Satellitensignal finden. Prüfen Sie die Ausrichtung der Antenne. Wählen Sie den gewünschten Satelliten mit den “hoch”- und “runter”-Tasten. Anschließend drücken Sie die “Set”-Taste um die Einstellung zu übernehmen. Ein paar Sekunden später erscheint das, “Elevationswinkel Menü” auf dem LCD. Wählen Sie eine passende Elevation mit den “hoch”- und “runter”-Tasten. Anschließend drücken Sie die “Set”-Taste um die Einstellung zu übernehmen. Warten Sie, bis die Antenne Ihren Suchlauf und die Positionierung beendet hat (ca. eine Minute ). Nach erfolgter Inbetriebnahme müssen Sie die Stromversorgung abschalten, damit Sie alle TV-Programme problemlos empfangen können. (Entfernen Sie nicht das Einspeisekabel zwischen Antenne und Receiver.) Nachdem die Positionierung abgeschlossen ist startet der TV-Empfang automatisch und Sie empfangen ein TV-Signal. Sollten Sie kein Fernsehbild bekommen, prüfen Sie alle Verbindungen und Einstellungen (Receiver, Satmaster Portable und TV) und folgen den obigen Schritten noch einmal. Wenn Sie die Nutzung des Satmaster Portable beenden oder die Antenne zum Transport in die Parkposition bringen möchten, schließen Sie die Stromversorgung (wenn Sie diese entfernt haben) an und schalten Sie die IDU oder die Einspeisebox aus und wieder ein. Dies setzt die Antenne automatisch in die Parkposition zurück. Die Elevation fällt ab und die Basiseinheit rotiert, bis die Antenne in der Parkposition abschaltet. Dieser Vorgang dauert ca. eine Minute. Beispiel (Parkposition) ASTRA1 19.2E Elevation und Azimuth Nutzen Sie die “hoch”- und “runter”- Tasten um den Elevationswinkel oder den Azimuthwinkel einzustellen. Beispiel (Satellitenauswahl) Der Elevationswinkel lässt sich von 20 bis 70 Grad einstellen. Die Werkseinstellung sollte 30 Grad sein. Nachdem die ersten Einstellungen gemacht sind, werden diese automatisch gespeichert. Es gibt keinen Grund diese zu verändern, solang Sie sich in der selben Region aufhalten. EL 30DEG Beispiel (Elevationsauswahl) 10 DEUTSCH DEUTSCH 11 Programmaktualisierung Programmaktualisierung Aktualisierungsvorgang Verbindungsdiagramm zum Aktualisieren Aktualisierung der Einheit mit externem Steuergerät 1. Schalten Sie die IDU aus und verbinden Sie den COM-Port des PCs und die serielle Schnittstelle der IDU. (Das Kabel muss RS-232C und über USB “USB zu Seriell” unterstützen) 2. Starten Sie das DOWNLOAD Programm. Schließen Sie ein serielles Kabel an die Schnittstelle an 3. Wählen Sie den Pfad Ihrer Aktualisierungsdatei über “Open”. 4. Wählen Sie den COM-Prot Ihres Computers den Sie nutzen wollen und aktivieren sie diesen. Aktualisierung der Einheit mit internem Steuergerät 5. Schalten Sie den Satmaster ein. Der Download startet von selbst. Schließen Sie ein serielles Kabel an die Schnittstelle an Wenn die Antenne schon eingeschaltet ist, dann schalten Sie sie aus und wieder an, damit der Download startet. In ‘Com Port Select’ werden nur die Nummern der COM-Ports angezeigt, die genutzt werden können. Das Programm unterstützt Windows XP & 7. Kein Vista. 6. Nachdem der Download abgeschlossen ist ziehen Sie das Datenkabel ab und starten den Satmaster Portable neu. 12 DEUTSCH DEUTSCH 13 Signalschwächung • Durch extrem schlechte Witterungsverhältnisse (Starkregen, Sturm) kann es zu einem vorübergehenden Signalverlust kommen. Je optimaler die Antenne ausgerichtet ist, und je kürzer die Verbindungskabel sind, desto geringer ist das Risiko solcher Signalschwächungen. • Überprüfen Sie unter solchen Bedingungen unbedingt den sicheren Halt der Antenne und den festen Sitz aller Schrauben. • Auch heftiger Schneefall kann das Signal beeinträchtigen. Schnee sollte nach Möglichkeit nicht im Parabolspiegel oder auf dem LNB liegen bleiben. Beispiel für das Auffinden des Satelliten (Skew, Elevation & Azimuth) Polarisation (Skew) : Stellen Sie den entsprechenden Polarisationswinkel ein. Nutzen Sie hierzu die Skala auf der Rückseite der Antenne. Um den, für den jeweiligen Satelliten entsprechenden, Polarisationswinkel zu finden sehen Sie in der Tabelle am Ende des Handbuches. Elevation : Passen Sie den Elevationswinkel entsprechend der Tabelle am Ende des Handbuches an. Azimuth : Alle EU-relevanten Satelliten liegen im Süden. Der Azimuthwinkel vergrößert bzw. verkleinert sich von einem Satelliten zum nächsten. - Grad + Grad Hinweis zum Anbau des LNB: Elevation - 20° 0° + 20° Gummiring 14 DEUTSCH DEUTSCH 15 Beispiel für das Auffinden des Satelliten (Skew, Elevation & Azimuth) Einstellungswerte für europäische Hauptstädte Wenn Sie beispielsweise Canal+ über ASTRA1 (19.2 Ost) in Paris empfangen möchten, muss der Polarisationswinkel Skew bei -7.2, die Elevation bei 31.6, und Azimuth bei 158° liegen (diese Werte entnehmen Sie bitte der Tabelle am Ende des Handbuchs). Satelliten Position Azimuth Alle EU-relevanten Satelliten liegen im Süden. S E W N N W 158° vom geographischen Nordpol Elevation Astra 19,2° Ost 31,6° von der horizontalen Ebene 16 Satmaster Portable E S Skew - Grad + Grad Die Skala für Skew ist in 5er Schritte unterteilt, was der Toleranz für die Einstellung entspricht. Runden Sie also den Wert -7.2˚ auf -10° oder -5° und stellen Sie den Zeiger entsprechend zwischen diese Werte. DEUTSCH DEUTSCH 17 Fehlersuche Technische Daten Es gibt diverse Probleme, die das Empfangssignal und die Funktion des Satmaster Portable beeinträchtigen können. Der Folgende Abschnitt beschreibt diese Probleme und Möglichkeiten diese zu beheben. Defekte Sicherung, zu niedrige Spannungsversorgung, Kabelverbindung Wenn die Antenne bereits installiert ist, aber keine Funktion zeigt, gibt es drei Hauptfehlerquellen, die Sie bei der Fehlersuche zuerst überprüfen sollten: 1. Defekte Sicherung Bewegen Sie bei eingeschalteter Antenne den Spiegel langsam per Hand. Lässt sich der Spiegel nicht frei bewegen, ist eine defekte Sicherung nicht das Problem. Lässt sich der Spiegel frei bewegen, wird wahrscheinlich eine der beiden Sicherungen auf der CPU Platine defekt sein. Die Sicherungen dürfen nur von autorisiertem Servicepersonal ersetzt werden. Kontaktieren Sie Ihren Megasat Händler oder den Megasat Kundenservice. 2. Zu niedrige Spannungversorgung Ist das Verbindungskabel zu der Antenne länger als 15m, kann der Lei tungswiderstand des Kabels die Spannungsversorgung der Antenne soweit absenken, dass ein störungsfreier Betrieb nicht mehr möglich ist. Das Megasat Servicepersonal kann Ihnen dabei behilfich sein eine ausreichende Spannungsversorgung für Ihre Antenne herzustellen. Kontaktieren Sie Ihren Megasat Händler oder den Megasat Kundenservice. 3. Kabelverbindung Auch eine nicht ordnungsgemäße Kabelverbindung kann der Grund dafür sein, dass die Anlage nicht richtig funktioniert. Prüfen Sie alle Kabel und Steckverbindungen. Ausgebildetes Servicepersonal kann Ihnen behilflich sein. Kontaktieren Sie Ihren Megasat Händler oder den Megasat Kundenservice. 4. Unzureichendes Satellitensignal Vergewissern Sie sich, dass keine Hindernisse (Bäume, Gebäude, Dachüberstände, etc.) die Sicht auf den Satelliten versperren. Dies kann das Satellitensignal abschwächen oder blockieren. Auch durch Glas kann das Signal nicht empfangen werden. 5. Satellitenabdeckung Der Satmaster Portable bringt hervorragende Empfangsleistung in der Ausleuchtzone für 46cm Antennen Ihres gewählten Satellitenbetreibers. Trotzdem kann das Signal in den Randzonen schwächer bis unzureichend sein. Konsultieren Sie bitte die Serviceanleitung oder die Website Ihres gewählten Satellitenbetreibers um die Ausleuchtzone für eine 46cm Antenne zu prüfen. 6. Störungen durch Funk und Radar ie Abstrahlung von Funk und Radaranlagen kann zu einer Überlast an den Eingangsschaltkreisen der Antenne führen. Stellen Sie sicher, dass der Satmaster Portable nicht in unmittelbarer Nähe solcher Anlagen betrieben wird. 7. Frequenzdatenänderung der Satelliten Wenn einige Kanäle funktionieren und ein oder mehrere nicht, oder die Antenne nicht in der Lage ist den Satelliten zu finden, kann es sein, dass sich die Frequenzdaten des Satelliten geändert haben. Diese Frequenzdaten können über den Wartungsanschluss aktualisiert werden. Kontaktieren Sie Ihren Megasat Händler oder den Megasat Kundenservice. 8. Beschädigte oder lose Antennenstecker Ein loser Antennenstecker kann zu einem schlechten Signal führen. Prüfen Sie alle Schraub- und Steckverbindungen. Prüfen Sie auch, ob das Kabel an der Antenne an dem richitgen Anschluss angeschlossen ist. Kontaktieren Sie Ihren Megasat Händler oder den Megasat Kundenservice, wenn Sie weitere Hilfe benötigen. 18 DEUTSCH Antennen Typ LNB Typ Anzahl der Teilnehmer Frequenzband Eingangsfrequenzbereich Polarisation Signalverstärkung Minimum EIRP (Ausleuchtzone) Ausrichtungszeit Neigungswinkel (Neigung) Suchwinkel (Azimut) Motor Temperaturbereich Spannungsversorgung Durchmesser Spiegel Abmessungen (B/H/T) Gewicht Parabolantenne Universal Single LNB 1 Ku Band 10.7GHz - 12.75GHz V/H oder RHCP/LHCP 33dBi 50dBW ca. 1-2 min. 10° - 60° 360° 2-Achsen DC Motor -30°C bis 80°C 12 V / 24 V / 230 V (mit optionalen Netzteil) 46cm 46cm / 46cm / 41cm 7kg Vorprogrammierte Satelliten: Satmaster Portable Classic: Astra1 Satmaster Portable Premium: Astra 1 Nord, Astra 1 Süd, Astra 2 Nord, Astra 2 Süd, Astra 3, Astra 4 Nord, Astra 4 Süd, Atlantic Bird 3, Eurobird 9, Eutelsat W2M, Hispasat, Hotbird, Thor, TürkSat Satmaster Portable Professional: Astra 1 Nord, Astra 1 Süd, Astra 2 Nord, Astra 2 Süd, Astra 3, Astra 4 Nord, Astra 4 Süd, Atlantic Bird 3, Eurobird 9, Eutelsat W2M, Hispasat, Hotbird, Thor, TürkSat DEUTSCH 19 Brillantes Fernsehen Brillantes Fernsehen Satmaster Portable user manual Stand: 04.04.2012 Classic Premium Professional English Safety Contents Before using this product please read this manual carefully and follow exactly all installation, mounting & orientation instructions. 04 Delivery includes •All the instructions should be followed in order to avoid any technical problems. 05 Package •Any electric or magnetic fi eld close to Satmaster Portable may cause a bad reception or even cut off the signal completely. 06 Name of Part - Outdoor Unit (ODU) 07 Name of Part - Indoor unit (IDU) / Power Inserter •Do not drill the plastic cover of the antenna, which seals the antenna from moisture. 08 - 09 Installation •Handle the antenna with care as any impact will cause damage to the electronics. 10 Commissioning •Do not open the cover, any attempt to repair by a non-qualifi ed person can be dangerous and void the warranty. 11 LCD Display •Any obstacle (buildings, tree, etc…) will block the reception of the signal from the satellite to the antenna. •Do not paint or add any substance on the antenna cover, this will block the reception of the signal from the satellite. •The use of non-isolated jacks will result in a loss of the signal level. •This product contains one universal LNB, it is forbidden to add, change or modify the LNB. 12 - 13 Program update 14 Signal attenuation 15 - 16 Examples of finding the satellite 17 Setting values for European capitals 18 Troubleshooting 19 Specifications •For more precise details on the above points or for any information, please ask your retailer or customer service. Megasat | Industriestraße 4a | D-97618 Niederlauer | www.megasat.tv | [email protected] 02 ENGLISH ENGLISH 03 Delivery includes Satmaster Portable Classic Satmaster Portable Premium Package Satmaster Portable Professional Satmaster Portable Satmaster Portable Power Inserter Control unit (IDU) 1. 2. 3. 4. Remove tape from packaging (Do not use knife) Packaging contains user manual. Please read carefully. Remove antenna gently from packaging Remove antenna parts from packaging foam ! Horn USB to Seriel cabel (option) 04 Do not handle antenna “dish”. Hold antenna by body “only”. Power Supply (For Automotive) 12V IN / 24V OUT Feeder Cable ENGLISH Rubber Ring ENGLISH 05 Name of Part Outdoor unit (ODU) Polarisationsskala (Skew) Dish upper limit Name of Part Indoor unit (IDU) / Power Inserter Indoor unit for Satmaster Portable Professional LNB cover arm Compass LCD Display „Up“ button to selection „Down“ button to selection „Set“ button to confirm Power Switch squeegee panel All panels are different for each package! Classic Premium Professional SetTop Connection Port Antenna Con- Program Update nection Port Port Powerinserter for Satmaster Portable Classic and Premium Antenna Connection Port Azimuthcontrol 06 Elevationscontrol „Up“ button to selection „Set“ button to confirm DC Power Jack SetTop Connection Port No Function Operation Display LED DC Power Jack „Down“ button to selection Power Switch ENGLISH ENGLISH 07 Installation Installation Connection diagram Classic and Premium Check First! By following the instructions step by step you can proceed easily to install “Satmaster Portable” by yourself or with the help of a professional antenna installer. Before installing your antenna, you check that Satmaster Portable box contains all the items listedAbove in the ‘Box Contents’. In the event of any missing parts, please contact your distributor. Outdoor WRONG! Indoor RIGHT! Set-top-box In order to receive a signal from the Satellite, Satmaster Portable is to be installed in an open loop space (outside the house or the apartment), in the direction of the satellite towards the equator, for which, you can refer a compass to exactly orient Satmaster Portable toward the satellite. Power Supply Feeder Cable Where to Install? TV Feeder Cable Make sure that there are no obstacles in front of Satmaster Portable which can decrease the signal reception quality, such as buildings, or trees (you may keep in mind that trees will grow and may block the signal). In order to be able to fix and install your antenna easily you might choose an easily accessible place without any potential danger for installation. Think about the way you might pass your cable in a discreet way from the Satmaster Portable to your Set-top Box. 1. Antenna Location Place antenna with unobstructed line of sight (sky). Avoid placement near excessive moisture. Antenna may be placed on stand. connection diagram Professional Indoor 2. Setting Antenna Direction Move antenna body until compass direction to target satellite aligns with triangle. Good Quality Signal Reception Bad Quality Signal Reception 3. Setting the Skew Angle Set-top-box Satellite direction & LNB skew angles are different for each region. Power Supply TV 08 ENGLISH ENGLISH 09 Startup LCD Display Select the appropriate version for your column and follow the instructions. The LCD display shows the current status of the automated search system. (applies to Satmaster Portable Premium and Professional) Satmaster Portable Classic Satmaster Portable Premium Satmaster Portable Professional Turn on the TV and Settop box. H POL, SELECTED 18V from set-top-box V POL, SELECTED 13V from set-top-box CHECK STB CBL. Not connected to receiver. Check the supply cable to the STB-1 connection. SIGNAL DETECTED Satellite signal is found After positioning is completed the TV reception is automatically started and you receive a TV signal. If you get no TV, check all connections and settings (Receiver, Portable and Satmaster TV) and follow the above steps again. NIT DETECTED Confirmed that the signal from the target satellite is correct If you want to stop using the Portable Satmaster or bring the antenna for transport into the park position, connect the power supply (if you removed it) and turn from the IDU or the Einspeisebox and again. The antenna is automatically returned to the park position. The elevation drops and rotates the base unit to the antenna off in the park position. This process takes about one minute. SIGNAL LOST. Can not find a satellite signal. Check the orientation of the antenna. Setting the set-top box options to watching TV. (Refer to Subscriber’s Manual of your settop box.) Turn on the power inserter Turn on the IDU Wait 10 seconds to start the automatic search with the last setting. To change the setting or manual search, press any key. Did you press a button, the scan starts now. Otherwise, wait 10 seconds before the scan starts automatically. Wait until the antenna and the positioning of your search has ended. (about one minute). Did you press a button, the satellite name appears on the LCD. If not, the antenna is now investigating the pre-satellite and you can skip the next 6 steps. Select the desired satellite using the „up“ - and „down“ buttons. Then press the „Set“ button to accept the setting. A few seconds later the „elevation angle menu“ on the LCD. Choose an appropriate elevation with the „up“ - and „down“ buttons. Then press the „Set“ button to accept the setting. Wait until your antenna has finished scanning and positioning (about one minute). After commissioning, you must turn off the power supply so that you can receive all TV programs easily. (Do not remove the input cable between antenna and receiver.) Example (Parking position) ASTRA1 19.2E Example Screen (Satellite Selection) EL 30DEG Elevation und Azimuth use the „high“ - and „down“ - the keys to adjust the azimuth or elevation angle. Elevation angles are set from 20 degree to 70 degrees. Factory setting will be 50 degrees. After the first settings have been activated they will be automatically memorized. There is no need to reset as long as you remain in the same location. Example Screen (Elevation Selection) 10 ENGLISH ENGLISH 11 Program update Program update update process Connection diagram for updating Update the unit with external control unit 1. Switch off the IDU and Connect a cable between any COM port of PC and IDU’s ‘Program upgrade PORT (A cable must support RS-232C and “USB to Serial converting function) 2. Run the DOWNLOAD Program. Connect a serial Cable to the interface 3. Select the path of your update file from „Open“. 4. Select the COM-Prot on your computer you wish to use and activate it. Update the unit with internal controller 5. Switch the Satmaster ‘ON’ then ‘DOWNLOAD’ will be Processed. Connect a serial Cable to the interface If the antenna is already on, then turn it off and back on, so that the download starts. In ‚Com Port Select‘ Only numbers are displayed to the COM ports that can be used. The program supports Windows XP & 7th No Vista. 6. When ‘DOWNLOAD’ is finished, let ‘DATA CABLE’ out and run Satmaster Portable. 12 ENGLISH ENGLISH 13 Signal attenuation • The satellite signal may be lost temporarily due to unusually heavy rainfall. An optimally aligned antenna, along with the shortest possible cable run, minimizes the chances of “rain fade”. • Make sure the antenna is mounted securely to prevent it from being blown out of alignment in a heavy wind. • Heavy snow accumulation on the antenna may reduce the satellite signal strength; snow should be swept away as soon as possible. • Tree foliage growth into antenna’s line-of-sight to the satellite may result in gradual loss of picture. Examples of finding the satellite (skew, elevation and azimuth) Polarisation (Skew) : Obtain the Skew Angle of the chosen satellite to tilt your antenna to the specified degree by looking to the degree graduation located on the back of the LNB skew degree controller. Elevation : Adjust the elevation angle corresponding to the table at the end of the manual in. Azimuth : All EU-related satellites are in the south. The azimuth angle increases or decreases from one satellite to another. - Degree + Degree A tip for the horn assembling Elevation - 20° 0° + 20° Rubber Ring 14 ENGLISH ENGLISH 15 Examples of finding the satellite (skew, elevation and azimuth) Setting values f or European capitals In order to watch Canal + through ASTRA1 (19.2 East) from the city ‘Brest’ of France, you will see Skew angle at -19.7, Elevation angle at 30, and Azimuth angle at 149.6. Satellite position Azimuth All EU-related Satellites are located in the south. S E W N N W 158 ° from the geographic North Pole Elevation Astra 19,2° Ost 31.6 ° from the horizontal plane 16 Satmaster Portable E S Skew - Grad + Grad The scale for skew is divided in 5 steps, which is the tolerance for the setting. So make the value of -7.2 ˚ to -10 ° or -5 ° and place the pointer will move between these values. ENGLISH ENGLISH 17 Troubleshooting Specifications There are a number of common issues that can affect the signal reception quality or the operation of the Satmaster Portable. The following sections address these issues and potentialsolutions. Blown Fuse, Low Power, or Wiring If the antenna unit is installed but entirely non-responsive, there are three key factors to check as part of the troubleshooting Process: 1. Blown Fuse With the system powered on, move the antenna reflector slowly by hand. If the reflector does not move freely, a fuse is not the Problem. If the reflector does move freely, one of the two fuses mounted on the CPU Board may have blown or been broken. The Satmaster Portable Technical Manual Provides detailed instructions for authorized service personnel who may be required to replace a fuse. Contact your local Megasat dealer or service center for assistance. 2. Low Power If the power cable to the antenna unit is more than 50ft (15 m), the power levels can decrease over the course of the cable, resulting in a voltage or current level at the antenna unit that is too low to power the system Properly. The Satmaster Portable Technical Manual Provides detailed instructions for supplying adequate power to the antenna unit. Contact your local Megasat dealer or service center for assistance. 3. Cable connection If the system has been imProperly wired, it will not operate correctly. The Satmaster Technical Manual Provides detailed instructions for authorized service personnel who may be required to check the wiring. Contact your local Megasat dealer or service center for assistance. 4. Satellite Signal Blocked Satellite signals can be blocked or degraded by buildings, other vessels, or equipment on the vessel itself. Simply moving the vessel or obstruction will clear the signal. 5. Satellite Coverage Issue Satmaster Portable will Provide outstanding reception within the 18” (46 cm) antenna coverage area for your satellite television service of choice. However, reception can be degraded as you apProach the fringe coverage areas. Refer to your satellite television service manual to check the viable coverage area for a18” (46 cm) antenna. 6. Radar Interference The energy levels radiated by radar units can overload the antenna’s front-end circuits. Check with your installer to make certain that the Satmaster Portable antenna unit is in the optimal location with regard to your radar unit. 7. Satellite Frequency Data Changed If some channels work while one or more other channels do not, or if the antenna is unable to find the satellite, the selected satellite’s frequency data may have changed. This frequency data can be updated via the maintenance port. Contact your local Megasat dealer or service center for assistance. 8. Incorrect or Loose RF Connectors A loose RF connector can reduce the quality of the satellite signal. Also, if you cannot switch satellites using your IRD remote, your IRD may be connected to the wrong antenna base plate connector. The Satmaster Portable Technical Manual Provides instructions for authorized service personnel who may need to check the RF connections. Contact your local Megasat dealer or service center for assistance. 18 ENGLISH Antenna Typ LNB Typ User Frequency Band Operating Frequency Polarization Antenna Gain Minimum EIRP (reception area) Tracking Rate Elevation Range Azimuth Range Type of Stabilization Temperate Range Power Dish Diameter Dimensions (W/H/D) Weight Parabolantenna Universal Single LNB 1 Ku Band 10.7GHz - 12.75GHz V/H or RHCP/LHCP 33dBi 50dBW ca. 1-2 min. 10° - 60° 360° 2-Achsen DC Motor -30°C to 80°C 12 V / 24 V / 230 V (Power supply option) 46cm 46cm / 46cm / 41cm 7kg Preprogramed Satellite: Satmaster Portable Classic: Astra1 Satmaster Portable Premium: Astra 1 Nord, Astra 1 Süd, Astra 2 Nord, Astra 2 Süd, Astra 3, Astra 4 Nord, Astra 4 Süd, Atlantic Bird 3, Eurobird 9, Eutelsat W2M, Hispasat, Hotbird, Thor, TürkSat Satmaster Portable Professional: Astra 1 Nord, Astra 1 Süd, Astra 2 Nord, Astra 2 Süd, Astra 3, Astra 4 Nord, Astra 4 Süd, Atlantic Bird 3, Eurobird 9, Eutelsat W2M, Hispasat, Hotbird, Thor, TürkSat ENGLISH 19 Brillantes Fernsehen Status: 04.04.2012