1
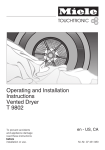
Operating Instructions for the
T 9820 Gas Dryer
To prevent accidents
and machine damage
read these instructions
before
installation or use.
en - US, CA
M.-Nr. 07 268 170
2
,WARNING
For your safety the information in this manual
must be followed to minimize the risk of fire or
explosion or to prevent property damage,
personal injury or death.
– Do not store or use gasoline or other flammable
vapors and liquids in the vicinity of this or any
other appliance.
– WHAT TO DO IF YOU SMELL GAS
ß Do not try to light any appliance.
ß Do not touch any electrical switch.
ß Do not use any phone in your building.
ß Clear the room, building or area
of all occupants.
ß Immediately call your gas supplier from a
neighbor’s phone. Follow the gas supplier’s
instructions.
ß If you cannot reach your gas supplier,
call the fire department.
– Installation and service must be performed by a
qualified installer, service agency or the gas
supplier.
(In Massachusetts a licensed plumber / gas fitter)
3
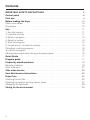
Contents
IMPORTANT SAFETY INSTRUCTIONS. . . . . . . . . . . . . . . . . . . . . . . . . . . . . . . . . 5
Control panel . . . . . . . . . . . . . . . . . . . . . . . . . . . . . . . . . . . . . . . . . . . . . . . . . . . . . 8
First use . . . . . . . . . . . . . . . . . . . . . . . . . . . . . . . . . . . . . . . . . . . . . . . . . . . . . . . . . 9
Before loading the dryer . . . . . . . . . . . . . . . . . . . . . . . . . . . . . . . . . . . . . . . . . . . 10
Fabric care labels . . . . . . . . . . . . . . . . . . . . . . . . . . . . . . . . . . . . . . . . . . . . . . . . . 10
Drying tips . . . . . . . . . . . . . . . . . . . . . . . . . . . . . . . . . . . . . . . . . . . . . . . . . . . . . . . 10
Use . . . . . . . . . . . . . . . . . . . . . . . . . . . . . . . . . . . . . . . . . . . . . . . . . . . . . . . . . . . . 11
1. Sort the laundry . . . . . . . . . . . . . . . . . . . . . . . . . . . . . . . . . . . . . . . . . . . . . . . . . 11
2. Load the laundry . . . . . . . . . . . . . . . . . . . . . . . . . . . . . . . . . . . . . . . . . . . . . . . . 11
3. Select a program . . . . . . . . . . . . . . . . . . . . . . . . . . . . . . . . . . . . . . . . . . . . . . . . 13
4. Select an option . . . . . . . . . . . . . . . . . . . . . . . . . . . . . . . . . . . . . . . . . . . . . . . . . 14
5. Start the program . . . . . . . . . . . . . . . . . . . . . . . . . . . . . . . . . . . . . . . . . . . . . . . . 15
6. Program end - Unload the laundry . . . . . . . . . . . . . . . . . . . . . . . . . . . . . . . . . . 16
Changing a running program . . . . . . . . . . . . . . . . . . . . . . . . . . . . . . . . . . . . . . . . 16
To cancel a program . . . . . . . . . . . . . . . . . . . . . . . . . . . . . . . . . . . . . . . . . . . . . . . 16
Adding/removing laundry during a drying program . . . . . . . . . . . . . . . . . . . . . . . 16
Quick Guide . . . . . . . . . . . . . . . . . . . . . . . . . . . . . . . . . . . . . . . . . . . . . . . . . . . . . 17
Program guide . . . . . . . . . . . . . . . . . . . . . . . . . . . . . . . . . . . . . . . . . . . . . . . . . . . 17
Frequently asked questions . . . . . . . . . . . . . . . . . . . . . . . . . . . . . . . . . . . . . . . . 19
General problems . . . . . . . . . . . . . . . . . . . . . . . . . . . . . . . . . . . . . . . . . . . . . . . . . 19
Fault indicators . . . . . . . . . . . . . . . . . . . . . . . . . . . . . . . . . . . . . . . . . . . . . . . . . . . 21
After sales service . . . . . . . . . . . . . . . . . . . . . . . . . . . . . . . . . . . . . . . . . . . . . . . . 23
User Maintenance Instructions. . . . . . . . . . . . . . . . . . . . . . . . . . . . . . . . . . . . . . 25
Dryer Care. . . . . . . . . . . . . . . . . . . . . . . . . . . . . . . . . . . . . . . . . . . . . . . . . . . . . . . 26
Cleaning the lint filter . . . . . . . . . . . . . . . . . . . . . . . . . . . . . . . . . . . . . . . . . . . . . . . 26
Cleaning the exterior and the control panel . . . . . . . . . . . . . . . . . . . . . . . . . . . . . 27
Changing the light bulb . . . . . . . . . . . . . . . . . . . . . . . . . . . . . . . . . . . . . . . . . . . . . 28
Caring for the environment . . . . . . . . . . . . . . . . . . . . . . . . . . . . . . . . . . . . . . . . . 29
4
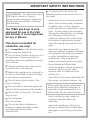
IMPORTANT SAFETY INSTRUCTIONS
,WARNING - To reduce the risk of
fire, electric shock or injury to
persons when using your appliance
follow basic precautions, including
the following:
The T9820 gas dryer is only
approved for use in the USA
and Canada. It is not approved
for use in Mexico.
This dryer is intended for
residential use only!
~ It is essential to read all instructions
before using the appliance.
~ Do not allow children to play on or in
the appliance. Close supervision is
necessary when the appliance is used
near children.
~ Always close the door after use to
prevent child or pet hazards.
~ Before this appliance is removed for
service or discarded, remove the door
to the drying compartment.
~ Do not reach into the dryer if the
drum is moving.
~ Do not install or store the appliance
where it will be exposed to the weather.
~ Do not lean on the door. The dryer
may tip over.
~ To prevent the risk of fire, the
following textiles must not be dried in
this dryer:
– items which have not been washed.
– items, such as work-wear, exposed
to grease, oils, or other deposits
(such as lotions or cosmetics) in your
dryer. If these items have not been
thoroughly cleaned there is a danger
that they may contribute to a
chemical reaction that could cause
the laundry to ignite when heated
even after being removed from the
dryer.
– items that have been previously
cleaned, washed, soaked or spotted
with gasoline, dry-cleaning solvents
or other flammable or explosive
substances. They may give off
vapors that could ignite or explode.
– items treated with flammable
cleaning agents or items containing
acetone, alcohol, petrol, stain
remover, wax or chemicals from
buffing, etc.
– items which have been splashed with
hair spray, nail polish remover, etc.
When washing heavily soiled items
ensure that sufficient detergent is
used with a high temperature. If in
doubt wash the item several times.
with the controls.
– items containing foam rubber or
similarly textured rubber-like
materials.
~ Do not use fabric softeners or
products to eliminate static unless
recommended by the fabric
manufacturer.
– items with padding or filling (e.g.
pillows or jackets) which have been
damaged. Loose filling could catch
fire.
~ Do not tamper
5
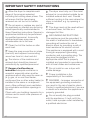
IMPORTANT SAFETY INSTRUCTIONS
~ Allow the dryer to complete each
stage of the program selected,
including the cooling down phase. This
will ensure that the items being
removed are not too hot to handle.
~ Do not repair or replace any part of
the appliance or attempt any servicing
unless specifically recommended in
these Operating instructions. Repairs to
appliances should only be performed
by qualified personnel. Incorrectly
repaired machines may pose a
considerable risk to the user.
~ Clean the lint filter before or after
each load.
~ Keep the area around the air intake
(toe-kick) and adjacent surrounding
areas free from lint, dust and dirt.
~ The interior of the machine and
exhaust duct should be cleaned
periodically by qualified personnel.
~ Danger of suffocation or
toxication Adequate ventilation is
essential, especially when another
appliance which also uses the room air
(e.g. gas, oil or coal fired heater,
continuous flow or other water heater) is
installed in the same or an adjacent
room. Allow sufficient room ventilation
by unlockable ventilation openings in
the wall.
Check with your building inspector for a
riskless use to avoid a low pressure of
4 Pa or more.
6
~ The dryer must only run if the moist
exhaust air is conducted outside by an
installed exhaust duct vent. Provide
sufficient venting in the room where the
dryer is installed, e.g. by opening a
window.
~ This dryer must not be used without
an exhaust hose, lint filter or a
damaged lint filter.
~ GROUNDING INSTRUCTIONS
This appliance must be grounded. In
the event of malfunction or breakdown,
grounding will reduce the risk of
electric shock by providing a path of
least resistance for electric current.
This appliance is equipped with a cord
having an equipment-grounding
conductor and a grounding plug. The
plug must be plugged into an
appropriate outlet that is properly
installed and grounded in accordance
with all local codes and ordinances.
~ Do not install or use a dryer with
visible damage.
~ Proper installation is the
responsibility of the installer.
~ WARNING – Improper connection of
the equipment grounding conductor
can result in the risk of electric shock.
Contact a qualified electrician if you are
in doubt as to whether the appliance is
properly grounded.
~ Do not modify the plug provided
with the appliance; if it will not fit the
outlet, have a proper outlet installed by
a qualified electrician.
IMPORTANT SAFETY INSTRUCTIONS
~ Product failure due to improper
installation is not covered under the
Warranty.
~ Gas dryers are not approved for
mobile home installation.
~ Check regularly on the exhaust
parts (e.g. wall vent duct, louvered wall
vent, bends, etc.) if enough air gets
through. Lint can collect and block the
air flow. If an exhaust hose is already
installed, it should be checked before
connected to the dryer.
Using accessories
~ Only use genuine Miele
accessories. If unapproved parts are
used, guarantee, performance and
product liability claims may become
void.
KEEP THESE INSTRUCTIONS
FOR FUTURE REFERENCE
In case of change of ownership, this
manual should stay with the dryer.
~ Faulty components must only be
replaced with original Miele spare
parts.
~ If the power cord is damaged it
must only be replaced by a Miele
Service technician with a genuine Miele
power cord.
7
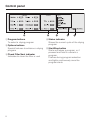
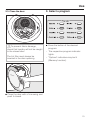
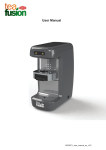
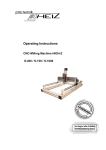
Control panel
a Program buttons
To select a drying program
b Options buttons
Special features to enhance a drying
program
c Check Filter/Vent indicator
Indicates to clean the filter or vent
8
d Status indicator
Shows the current cycle of the drying
program
e Start/Stop button
Starts and stops a program, or if
pressed and held in cancels a
program.
Flashes during program selection
and lights continuously once the
program starts.
First use
Metal components of the dryer's gas
burner have a protective coating
which may give off a slight odor the
first time the appliance is turned on.
The smell will dissipate after a short
time and does not indicate a faulty
connection or appliance defect.
9
Before loading the dryer
Clean the drum interior before the
first use.
Fabric care labels
Before drying, check fabric care labels
for special drying instructions.
q = Drying with a normal temperature
r = Drying with a low temperature
s = Do not dry in a tumble dryer
Drying tips
– Observe the maximum loads, see the
"Program Guide".
Overloading the dryer will result in
poor drying results and wrinkling.
– Dry delicate fabrics with the fabric
care symbol r with the "Gentle"
option.
– Do not dry dripping wet items in the
dryer. Spin the laundry after the wash
for at least 30 seconds.
– Open jackets to allow even drying.
– Wool and wool blends tend to felt
and shrink. Dry these items in the
"Woolens" program.
10
– The fine cotton fabric or down filled
items tends to shrink.
– Dry pure linen items only if it is
advised on the fabric care label. The
surface of the fabric otherwise tends
to become "rough".
– Knitted fabrics (e.g. T-Shirts and
underwear) tend to shrink when
washed and dried for the first time.
Do not over-dry these fabrics.
– Permanent press and delicate
fabrics tend to crease more the
bigger the load size.
For better drying results reduce the
load size or select the "Delicates"
program.
– Starched laundry can be dried in the
tumble dryer. However, the amount
of starch must be doubled during the
wash.
– Wash new, colored items before
drying for the first time and do not
dry with light-colored items. These
fabrics can "bleed" (also on plastic
parts of the dryer). Colored lint could
adhere to light-colored items.
Use
1. Sort the laundry
2. Load the laundry
^ Sort the laundry by desired dryness,
fabric, size and similar residual
moisture after spinning to assure
even drying results.
,Do not dry items that may melt or
ignite in the dryer such as plastics or
rubber. They could melt and
damage the laundry.
^ Check hems and seams, so that no
filling can fall out.
^ Duvet covers and pillowcases should
be fastened in order to prevent small
items from rolling inside of them.
^ Open the door.
2.1. Without the laundry basket
^ Close zippers, hooks and eyelets.
^ Tie up fabric belts and apron ties.
^ Remove or sew up loose bra
under-wires.
^ Load the laundry loosely into the
drum.
Do not overload the drum.
Overloading strains the fabrics and
leads to poor drying results.
11
Use
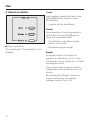
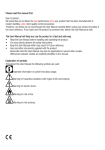
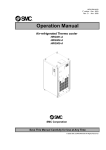
2.2. With laundry basket
Reduce the load size to ½ of a
normal load.
Use the laundry basket to dry or air
e.g. sport shoes.
The laundry basket is designed in such
a way that it does not turn with the drum
and avoids strain on the drying item.
The laundry basket supports itself with
the bottom in the dryer and is held in
place with the front straps (arrows).
,Make sure no sleeves, ties,
belts, etc. stick out of the basket.
They might get entangled which
could damage the laundry basket
and the drum.
Drying with the laundry basket is
only possible with the programs
"45 min. warm" and "15 min. cold".
All other programs are not suitable
since the load sensor does not
recognize a load and cancels the
program.
^ Hang the laundry basket in the
opening.
12
Use
2.3. Close the door
,To prevent fabric damage,
check that laundry will not be caught
in the closed door.
The lint filter must always be
inserted in the door opening.
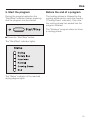
3. Select a program
^ Press the button of the desired
program.
– The respective program indicator
lights.
– "Options" indicators may be lit
(Memory function).
^ Close the door with a firm swing and
push it closed.
13
Use
4. Select an option
Turbo
Heat resistant items (with fabric care
symbol q) will be dried at a high
temperature.
– Laundry will be dried faster.
Gentle
Items sensitive to high temperatures
(with fabric care symbol r) will be
dried at a low temperature.
– For delicate or permanent press
fabrics, like acrylic.
^ Press any button.
– Extended program length
The combination "Turbo/Gentle" is not
possible.
Buzzer
An signal sounds at the end of a
program in intervals for up to 1 hour.
The buzzer can be turned on or off after
the program starts.
The constant tone to signal a fault is
independent from the turned on or off
buzzer.
By pressing the "Buzzer" button the
buzzer volume can be adjusted
between normal - loud - off.
14
Use
5. Start the program
Before the end of a program
During the program selection the
"Start/Stop" indicator flashes meaning
that the program can be started.
The heating phase is followed by the
cooling phase which cools the laundry
("Cooling Down" indicator). Only after
the cooling phase has ended has the
program finished.
The "Woolens" program does not have
a cooling phase.
^ Press the "Start/Stop" button.
The "Start/Stop" indicator lights.
The "Status" indicator of the reached
drying degree lights.
15
Use
6. Program end - Unload the
laundry
The "Anti-crease/End" indicator will light
at the end of the program and the
buzzer will sound if it was selected.
The indicator of the reached drying
degree lights (depending on program).
To avoid wrinkles, the drum turns in
intervals for up to one hour, if the
laundry is not immediately removed
(Anti-crease).
^ Open the door.
If the door remains open, the light goes
off after a few minutes (saving energy).
^ Remove the laundry.
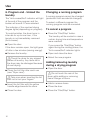
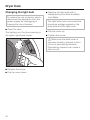
Changing a running program
A running program cannot be changed
(protection from accidental changes).
To select a different program the
running program must be canceled.
To cancel a program
^ Press the "Start/Stop" button.
The laundry will be cooled in case a
certain drying time and temperature
were reached.
If you press the "Start/Stop" button
again during the cooling phase, the
"Anti-crease/End" indicator lights.
^ Open and close the door.
,Check the drum for any missed
^ Select the new program.
pieces of laundry. Any items left in
the dryer may be damaged because
of over drying.
Adding/removing laundry
during a drying program
^ Clean the lint filter after each use
(see "Dryer care").
,Take care when inserting the lint
filter not to hurt your fingers.
^ Insert the lint filter with the yellow
handle edge towards the drum.
^ Close the door.
16
^ Open the door.
,Do not touch the rear of the
drum while adding or removing
items! Danger of burns.
^ Add or remove items.
^ Close the door.
^ Press the "Start/Stop" button.
Quick Guide
Remove this guide for easy reference
To prevent accidents
and machine damage
read these instructions
before
installation or use.
Quick Guide
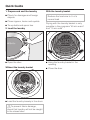
1. Prepare and sort the laundry
^ Check for damages and foreign
objects.
With the laundry basket
Reduce the load size to ½ of a
normal load.
^ Close zippers, hooks and eyelets.
^ Tie up belts and apron ties.
2. Load the laundry
Drying with the laundry basket is only
possible in the programs "45 min warm"
and "15 min cold".
^ Open the door.
^ Hang the laundry basket in the
opening.
Without the laundry basket
^ Close the door.
^ Load the laundry loosely in the drum.
,To prevent fabric damage,
check that laundry will not be caught
in the closed door.
Quick Guide
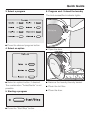
3. Select a program
6. Program end - Unload the laundry
The Anti-crease/End indicator lights.
^ Press the desired program button.
4. Select an option
^ Open the door.
^ Select an option button, if desired.
^ Remove the laundry/laundry basket.
The combination "Turbo/Gentle" is not
possible.
^ Clean the lint filter.
5. Starting a program
^ Press the "Start/Stop" button.
^ Close the door.
Quick Guide
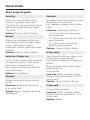
Short program guide
Extra Dry
Delicates
Multi-layer, mixed loads of sturdy
cottons, e.g. towels, bath robes.
The "Extra dry" program should not be
selected for jersey materials. Items
may shrink.
Options: Turbo or Gentle, Buzzer
Permanent Press items made of cotton,
mixed fabrics or synthetics
e.g. Sweaters, dresses, pants, table
cloths.
Load size: Reduce the load size
– to ½ of a normal load without any
option selected.
– to ½ of a normal load with the "Turbo"
option selected.
– to 1/3 of a normal load with the
"Gentle" option selected.
Options: Turbo or Gentle, Buzzer
Normal
Single and multilayered cotton and
linen laundry e.g. terry towels, beach
towels, bath robes, T-Shirts,
underwear, cottons, bed linens, baby
clothing.
Options: Turbo or Gentle, Buzzer
Hand iron / Rotary iron
Cotton or linen fabrics to be left damp
for easier ironing. e.g. table cloths,
bed linens, starched laundry.
Roll up items until they are ironed to
keep them damp.
Options: Turbo, Buzzer
Woolens
Woolen items which allow machine
drying.
Load size: Reduce the load size to 1/3
of a normal load.
Options: Buzzer, Gentle (cannot be
deselected)
45 min warm
Final drying of multi-layer fabrics, with
unique drying characteristics
e.g. jackets, pillows and voluminous
textiles.
Drying of single items: beach towels,
bathing suits, etc.
Airing articles
Load size: When using the laundry
basket reduce the load size to ½ of a
normal load.
Options: Turbo or Gentle, Buzzer
15 min cold
Airing or fluffing articles
Load size: When using the laundry
basket reduce the load size to ½ of a
normal load.
Options: Buzzer
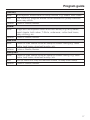
Program guide
Extra Dry
Items
Note
Multi-layered, mixed loads of sturdy cottons, e.g. towels, bath robes.
The "Extra dry" program should not be selected for jersey materials.
Items may shrink.
Options
Turbo or Gentle, Buzzer
Normal
Items
Options
Single and multilayered cotton and linen laundry e.g. terry towels,
beach towels, bath robes, T-Shirts, underwear, cotton bed linens,
baby clothing, etc.
Turbo or Gentle, Buzzer
Hand iron
Items
Cotton or linen fabrics to be left damp for easier ironing e.g. table
cloths, bed linens, starched laundry, etc.
Options Turbo or Gentle, Buzzer
Rotary iron
Items
Cotton or linen fabrics to be left damp for easier ironing. e.g. table
cloths, bed linens, starched laundry, etc.
Note
Roll up items until they are machine ironed, to keep them damp.
Options
Turbo or Gentle, Buzzer
17
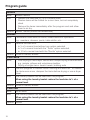
Program guide
Woolens
Items
Note
Woolen fabrics
– Reduce the load size to 1/3 of a normal load.
– Woolen items will be fluffed for a short time, but not completely
dried.
– Remove the items immediately after the program end and allow
them to air dry.
Options Buzzer, Gentle (cannot be deselected)
Delicates
Items
Permanent Press items of cotton, mixed fabrics or synthetics
e.g. sweaters, dresses, pants, table cloths, etc.
Note
Reduce the load size:
– to ½ of a normal load without any option selected.
– to ½ of a normal load with the "Turbo" option selected.
– to 1/3 of a normal load with the "Gentle" option selected.
Options Turbo or Gentle, Buzzer
45 min warm
Items
– Final drying of multi-layer fabrics with unique drying characteristics
e.g. jackets, pillows and voluminous textiles.
– Drying of single items: beach towels, bathing suits
Tip
Use this program to freshen cotton clothing with warm air. To freshen
the items even more, dampen the items before drying or use a dryer
sheet.
Note
The laundry basket can be used with this program.
When using the laundry basket reduce the load size to ½ of a
normal load.
Options Turbo or Gentle, Buzzer
15 min cold
Items
To air items
Note
The laundry basket can be used with this program.
When using the laundry basket reduce the load size to ½ of a
normal load.
Options Buzzer
18
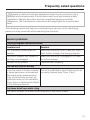
Frequently asked questions
,Repairs to electrical and gas appliances must only be carried out by a
qualified and trained person in accordance with local and national safety
regulations. Repairs and other work by unqualified persons could be
dangerous. The manufacturer cannot be held responsible for unauthorized
work.
The following section will help you avoid placing a service call by identifying
issues you may encounter while operating the machine:
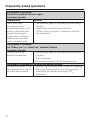
General problems
A drying program cannot be started
Possible fault
Solution
The "Start/Stop" button was not
pressed.
Make sure the dryer is on. Press the "Start/
Stop" button to begin the drying program.
The circuit breaker has tripped or
the dryer is unplugged.
Make sure the dryer is plugged in or reset
the circuit breaker.
The door is not closed.
Close the door properly.
Lint has built-up on laundry
Lint is the result of friction caused The lint is collected in the lint filters and can
by items being worn and washed. be easily cleaned (see "Dryer Care").
Machine drying causes minimal
strain of the laundry and has no
significant effect on the durability.
Dryers have no detrimental effects
on the lifetime of fabrics.
The items dried have static cling
Add fabric softener to laundry when washing or use dryer sheets.
19
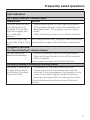
Frequently asked questions
The laundry is not dry enough.
Possible fault
The load contained too many
dissimilar items (size and fabrics.)
Solution
– Continue drying using the "Warm air"
program.
– Select a suitable program.
The laundry is still wet. The program runs too long.
The gas supply is insufficient.
Check if the gas shut-off valve is closed.
The drum light does not come on.
The light turns off automatically
(energy saving).
The bulb may be bad or burned
out.
Close and open the door, the light should
come on.
Change the light bulb.
See "Dryer Care".
The program runs too long or stops.
Important: To fix the following problems, open and close the dryer door.
The air supply is insufficient.
The lint filter is clogged with lint.
The exhaust hose or the
connection is clogged with lint.
Open a window or door to increase air flow.
Clean the lint filter.
– Check the exhaust parts (e.g. wall vent
duct, louvered wall vent, bends, etc.)
regularly for air permeability.
– Remove the lint.
The laundry was not spun
sufficiently in the washer.
The dryer is over loaded.
Spin laundry thoroughly before drying.
Metallic zippers prevent a correct
measurement of the laundry’s
residual moisture.
20
Regard the maximum load size per
program.
– Open the zippers of the laundry before
drying.
If the problem persists, dry items with long
zippers using the "45 min. warm" program,
if necessary use the laundry basket.
Frequently asked questions
Fault indicators
The "Check Filter/Vent" indicator lights.
Possible fault
Solution
The dryer does not work – Usually cleaning the lint filter fixes the problem.
at its optimum or not
If the problem persists, check all possibilities as
efficiently. The lint filter
described under "The program runs too long or
might be clogged with
stops".
lint or detergent
– Open and close the door to turn off the indicator.
residues.
The exhaust duct may
With a long exhaust duct, program times and energy
be too long. This is not a consumption increase. See Installation Instructions.
fault.
A program is canceled.
The "Check Filter/Vent" indicator flashes.
The fault cannot be
– Check the possible faults as described above.
detected immediately.
– Open and close the door to turn off the indicator.
– Start a program.
If the problem persists call Technical Service.
The dryer is making a thumping or grinding sound.
The sound is caused by – To determine if the noise is due to airflow,
the high airflow rate in
temporarily remove the exhaust duct from the
the ducting of the dryer.
machine. If the noise lessens, the ductwork is the
This is not a fault.
cause of the noise. Rigid or flexible aluminum
ducting is the best option for reducing the noise.
If the problem persists please contact Technical
Service.
21
Frequently asked questions
The program is canceled.
The Anti-crease/End indicator lights.
The buzzer sounds.
Possible fault
Solution
This is not a fault.
– The indicator goes out by opening and closing
the door.
The electronic has
detected that there is no
– Single items should be dried with the
laundry in the drum and
"45 min. warm" program, if necessary use the
cancels the program.
laundry basket.
Single items or already
dried laundry can also
cause a program stop.
The program is canceled.
The "Rotary iron" or "Hand iron" indicator flashes.
The buzzer sounds.
The fault cannot be
– The indicator goes out by opening and closing
detected immediately.
the door.
– Start a program.
If the problem persists call Technical Service.
The laundry is pressed on the door and below the door.
The restriction insert in the – Reinsert the restriction insert in the vent opening.
vent opening at the rear of
Removing it may result in poor drying results,
the dryer was removed.
damage to the laundry and higher CO2
emissions.
22
After sales service
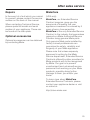
Repairs
MieleCare
In the event of a fault which you cannot
fix yourself, please contact the service
number on the back of this manual.
(USA only)
When contacting Technical Service,
please quote the model and serial
number of your appliance. These can
be found on the data plate.
Optional accessories
Optional accessories can be obtained
by contacting Miele.
MieleCare, our Extended Service
Contract program; gives you the
assurance of knowing that your
appliance investment is covered by 5
years of worry free ownership.
MieleCare is the only Extended Service
Contract in the industry that guarantees
repairs by a Miele Authorized Service
Provider using genuine Miele parts.
Only genuine Miele parts installed by
factory trained professionals can
guarantee the safety, reliability and
longevity of your Miele appliance.
Please note that unless expressly
approved in writing by the Miele
Service department, Extended Service
Contracts offered by other providers for
Miele products will not be recognized
by Miele. Our goal is to prevent
unauthorized (and untrained) service
personnel from working on your Miele
products, possibly doing further
damage to them, you and/or your
home.
To learn more about MieleCare
Extended Service Contracts, please
contact your appliance dealer or visit
us online at:
http://store.miele.com
23
24
User Maintenance Instructions
To prevent accidents
and machine damage,
read these instructions
before
installation or use.
Dryer Care
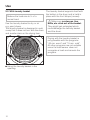
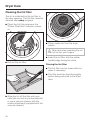
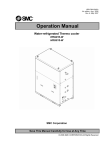
Cleaning the lint filter
The lint is collected by the lint filter in
the door opening. The lint filter must be
cleaned after every program.
^ Clean the lint filter whenever the
"Check Filter/Vent" indicator comes
on.
^ Clean visible lint from the dryer
interior.
,Take care when inserting the lint
filter not to hurt your fingers.
^ Insert the lint filter with the yellow
handle edge facing the drum.
^ Pull out the lint filter.
Rinsing the lint filter
^ The lint filter can be rinsed with hot
water if necessary.
^ The filter must be dried thoroughly
before being returned to the dryer
door.
^ Wipe the lint off the filter with your
hand (do not use any sharp objects!)
or use a vacuum cleaner with the
nozzle attachment (supplied with the
vacuum cleaner).
26
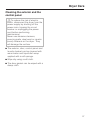
Dryer Care
Cleaning the exterior and the
control panel
,To reduce the risk of electric
shock, disconnect the dryer from the
power supply by shutting off the
power main, tripping the circuit
breaker or unplugging the power
cord before performing
maintenance.
Never use abrasive cleaners,
scouring pads, steel wool or caustic
(oven) cleaners on the dryer. They
will damage the surface.
^ The exterior, door, control panel and
laundry basket can be cleaned with
warm water and liquid dish soap
applied with a soft sponge.
^ Wipe dry using a soft cloth.
^ The door gasket can be wiped with a
damp cloth.
27
Dryer Care
Changing the light bulb
To reduce the risk of electric shock,
disconnect the appliance from the
power supply by unplugging or
tripping the circuit breaker.
^ Open the door.
The lighting is in the drum opening in
the upper right-hand corner.
^ Replace the light bulb with a
temperature proof bulb available
from Miele.
The light bulb must not exceed the
maximum wattage quoted on the
data plate and the light cover.
^ Flip the cover up.
^ Tighten the screw.
,Make sure the bulb cover is
securely closed to prevent a short
circuit or penetrating moisture.
Penetrating moisture can cause a
short circuit.
^ Remove the screw.
^ Flip the cover down.
28
Caring for the environment
Disposal of the packing
materials
The packing materials protect the
appliance during shipping. They have
been designed to be biodegradable
and recyclable.
To prevent suffocation, ensure that any
plastic wrappings, bags, etc. are
disposed of safely and kept out of the
reach of children.
Disposal of an appliance
Old appliances may contain materials
that can be recycled. Please contact
your local recycling authority about the
possibility of recycling these materials.
Ensure that a discarded dryer presents
no danger to children. When being
stored for disposal remove the door to
the drying compartment.
29
30
31
All rights reserved / 2108
For the most updated manual please see the Miele web site.
M.-Nr. 07 268 170 / 01