1
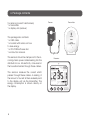
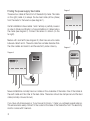
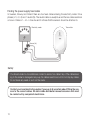
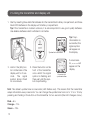
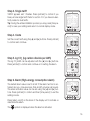
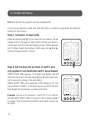
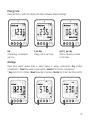
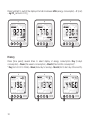
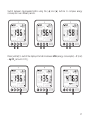
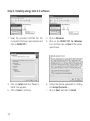
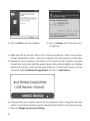
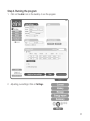
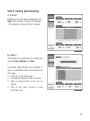
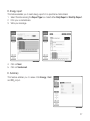
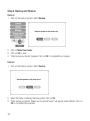
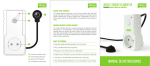
EN
Wireless Electricity Monitor
Art. no 36-4500
Modell efergy e2
Points worth bearing in mind!
• Other wireless equipment operating on the same frequency band may
reduce the range of the product.
• The range of all wireless equipment is affected by obstacles between
the transmitter and the receiver (a concrete wall reduces the signal far
more than a plasterboard partition, for example).
If you are having problems with the operation of
the system, try the following solutions
• Switch off any other wireless equipment to check whether it could be
causing the problem.
• Move the wireless equipment and/or reduce the distance, and reduce the number
of obstacles (walls, furniture, etc.) between the transmitter and the receiver.
2
1. Contents
2. Introduction.....................................................................................................4
3. Safety..............................................................................................................5
4. Package contents...........................................................................................6
5. Buttons and functions.....................................................................................7
5.1 Locating the power feed cable of your electricity meter (UK/Irland)..................7
5.2 Locating the power feed cable for your electricity meter (SE) (NO) (FI)..............9
6. Installation.....................................................................................................11
6.1 Fitting the sensors.........................................................................................11
6.2 Connect the sensor to the transmitter...........................................................11
7. Linking the transmitter and display unit..........................................................12
8. Setting the time and date..............................................................................13
9. Single tariff setup...........................................................................................14
10. Multiple tariff setup........................................................................................16
11. Display information........................................................................................18
12. Symbols on display.......................................................................................22
13. Toubleshooting/FAQ......................................................................................23
14. Disposal........................................................................................................25
15. Specifications................................................................................................25
16. Installing the provided software......................................................................26
3
2. Introduction
Wireless Electricity Monitor
Art. no 36-4500
Model efergy e2
The metering and monitoring of energy is the basis for saving energy. You need this information
in order to know where and how you can save money.
Efergy is an electricity monitor which shows how much electrical energy is being consumed in your
home at the actual moment you read the display. The display can also inform the consumer how
much the consumed energy costs. You can walk around your home with the display unit and turn
electrical devices on and off to see the difference in power consumption directly on the display.
Please read the entire instruction manual before using the product and save it for future reference.
We reserve the right for any errors in text or images and any necessary changes made to technical
data. If you have any questions regarding technical problems please contact Customer Services.
4
3. Safety
IT IS VERY IMPORTANT THAT YOU TAKE INTO CONSIDERATION A FEW SIMPLE PRECAUTIONARY MEASURES BEFORE USING THIS PRODUCT.
Efergy electricity monitors are easy to install. Still, there are some essential safety rules that you
must be conscious of:
In the UK or Ireland the installation of the electricity monitor is easy, since the only thing that is
required is to connect a sensor to the incoming mains power cable. If you still feel unsure as to
how to fit the sensor, we recommend that you contact a qualified electrician.
In the Nordic countries a 3-phase system is used, which means that one must install all three
included sensors. The sensor clamps should be clamped over the incoming electrical cables in
or outside the distribution box. Contact a qualified electrician if you are in any doubt as to how
to fit the sensors.
Read and follow the important information contained in the following pages. Remember that the
electricity monitor’s sensors do not need to have direct electrical contact at the measuring point.
The sensors should sit around the cable.
If you find something unusual in or around the distribution box such as loose cables, bare cables,
burn marks, holes in the insulation material or any other damage, etc. you must immediately stop
work and contact your electric company or the person responsible for electrical installations.
Do not force or bend the cables in any way whilst fitting the sensors.
If you are uneasy or have any questions regarding the fitting of the electricity monitor’s sensors,
contact a qualified electrician immediately.
The sensors will not need to be removed at all during the normal useful operating life of the
electricity monitor. However, the transmitter and display unit require batteries that will need to be
changed occasionally.
5
4. Package contents
3 x sensors (current transformers)
1 x transmitter
1 x display unit (receiver)
Sensor
Transmitter
The package also contains:
1 x USB cable.
1 x booklet with advice on how
to save energy.
1 x CD-ROM software disc.
1 x instruction manual.
The sensors should be clamped onto the incoming mains power cables leading into the
distribution box. All electricity consumed in
the household enters through these cables.
The sensors measure the current which
passes through these cables. A reading of
the amount of current is then wirelessly sent
to the display unit via the transmitter. The
energy consumption is shown directly on
the display.
6
Receiver
5. Buttons and functions
Display unit (receiver)
[time period] Save and finish.
[◄] Step left.
[►] Step right.
[unit/set] Confirm setting and advance.
[function] (on top) Function button for display setup.
[link] (on back) Link button for wireless linking to the transmitter.
[time set. alarm on/off] (on back) Setting the time.
Transmitter
Button for the wireless linking of the transmitter and receiver/display unit.
5.1 Locating the power feed cable of your electricity
meter/distribution box (UK/Irland)
The Efergy electricity monitor is installed by clamping the sensor around the mains power feeder
cable entering into your electricity meter.
Locating your electricity meter
Find your electricity meter and check which type you have. It is normally found on an outer wall,
in the garage, in the cellar or in a utility room. If you live in a flat, it may be located near the entry
door, in the stairway, or in the cellar. Make sure the cables exiting the bottom of the electricity
meter are accessible.
Modern offices and flats can have safety panels which protect the cables entering the electricity
meter. If this is your situation, we recommend that you contact a qualified electrician.
7
Finding the power supply feed cable
Diagram 1
There are four cables at the bottom of the electricity meter. The cable
on the right (cable 4) is always the live feed cable (Active phase)
from the meter to the fuse box (see diagram 1).
Feed Wire
Certain installations have cables 1 and 2 entirely or partially covered
in order to hinder modification or home installation of cables before
the meter (see diagram 2). Connect the sensor to cable 4 (on the
far right).
Meters with dual tariffs (see diagram 3) often have an extra cable
between cable 3 and 4. The extra cable has a smaller diameter than
the other cables and leads to another electricity meter close by.
1
2
3
Diagram 2
4
Feed Wire
Diagram 3
Fe
ed
W
ire
1
1
2
3
4
2
3
Newer installations normally have two cables on the underside of the meter. One of the cables is
the earth cable and the other is the feed cable. The sensor should be clamped around the feed
cable (normally coloured brown).
If you have a 3-phase supply or if you have an Economy 7 meter you will need several sensors.
The extra sensors easily connect to the socket at the base of the transmitter. N.B. The electricity
monitor comes with 3 sensors.
8
Safety
You should under no circumstances connect a sensor to a cable if any of the cables leading to the meter is damaged in any way. No cables need to be cut. Do not clip any cables.
Do not break any seals or such on the meter.
Contact your local electricity supplier if you are at all uncertain about connecting the
sensor to the correct cable. All work inside distribution boxes/consumer units must
be carried out by competent electricians.
5.2 Locating the power feed cable of your
electricity meter (SE) (NO) (FI)
The Efergy electricity monitor is installed by clamping the sensor clips around the incoming mains
power cables leading to your electricity meter.
Locating your electricity meter/distribution box
Find out where your meter is located. It is normally found on an outer wall, in the garage, in the
cellar or in a utility room. If you live in a flat, it may be located near the entry door, in the stairway,
or in the cellar. Make sure the cables exiting the bottom of the electricity meter are accessible.
Modern homes and flats can have safety panels which protect the cables entering the meter.
These are often sealed. Under no circumstances should the seals be broken other than by
a competent electrician. Instead, we recommend that the sensors be fitted after the main
switch in your distribution box.
If you still feel unsure as to how to mount the sensor, we recommend that you contact a qualified
electrician.
9
Finding the power supply feed cable
In Sweden, Norway and Finland there are four feed cables entering the electricity meter: 3 live
phases (L1, L2, L3) and 1 neutral (N). The neutral cable is usually blue and the live cables are black
or brown. Cables L1 – L2 – L3 are live and it is these that the sensors should be attached to.
Electricity meter
Transmitter
Sensor (3x)
Safety
You should under no circumstances connect a sensor to a cable if any of the cables leading to the meter is damaged in any way. No cables need to be cut. Do not clip any cables.
Do not break any seals or such on the meter.
Contact your local electricity supplier if you are at all uncertain about fitting the sensors to the correct cables. All work inside distribution boxes/consumer units must
be carried out by competent electricians.
10
6. Installation - fitting
6.1 Fitting the sensors
1
2
3
Feed Wire
Feed Wire
The sensors should be clamped onto one (UK) or three (SE) (NO) (FIN) live feed cables. The
sensors can be used on cables up to 12 mm in diameter. The sensor must not be fitted to the
cable using force.
4
1. Find your live feed cable (UK), cables (SE) (NO) (FI).
2. Press the release cap outwards to open the sensor.
3. Make sure that you have the correct cable and place the sensor around the cable.
4. Press the sensor together and a click will be heard when the release cap locks.
5. Fit a sensor onto each live feed cable L1, L2, L3 (SE) (NO) (FI).
6.2 Connect the sensor to the transmitter
Plug the sensors into the sockets on the bottom of the transmitter.
The sensors/plugs do not have to be in any particular order.
The sensor meters the current which passes through these cables. A reading of the amount of
drawn current is then wirelessly sent to the display unit via the transmitter. The energy consumption is shown directly on the display.
11
7. Linking the transmitter and display unit
1. Start by inserting three AA/LR6 batteries into the transmitter’s battery compartment, and three
AAA/LR03 batteries in the display unit’s battery compartment.
Tip: If the transmitter is located outdoors, it is extra important to use good quality batteries.
Use alkaline batteries which withstand cold better.
Symbol for transmition
2. Hold in the [link] button on the back of the
display unit for 2 seconds. The signal
symbol should flash
for one minute.
3. Press the button on the
front of the transmitter
once whilst the signal
symbol is flashing and
then wait until the symbol stops flashing.
Tip: If synchronisation is
successful, the
signal symbol
will appear on
the display.
If unsuccessful, ─ ─ ─ will
appear on the
display.
Unsuccessful
synchronisation
N.B. The default update time is 6 seconds (LED flashes red). This means that the transmitter
relays information every 6 seconds. You can change the update time from 6 s to 12 s or 18 s by
pressing and holding in the button on the transmitter for two seconds (the LED changes colour).
Red = 6 s.
Orange = 12 s.
Green = 18 s.
12
8. Setting the time and date
The electricity monitor must be programmed with the correct time and date in order to give
accurate information.
N.B. Make sure that the time and date of the electricity monitor match the time and date on
your computer, otherwise you may experience difficulty when transferring data. Remember
that you will have to change from summer to winter time manually.
Setting the time and date:
Step 1
On the back of the display there is a settings button [time set
alarm on/off]. Press and hold in this button for two seconds.
The hours display will begin to flash. Set the correct hour using the [◄] and [►] buttons. Press [unit/set] to confirm and
to advance to the minutes setting.
Step 2
Set the correct minutes using the [◄] and [►] buttons. Press
[unit/set] to confirm and to advance to the year, month and day
setting. Press [time period] to finish and exit the settings mode.
13
9. Single tariff setup
The electricity monitor must be programmed with the correct unit cost per kWh if it is to provide
you with accurate cost readings. Set the tariff as follows (valid only if you DO NOT have a dual
tariff meter):
First enter the settings mode: Press and hold in [unit/set] for two seconds.
N.B. If no button is pushed for 20 seconds the display will go back to normal display mode
without saving any changes.
Step 1. Voltage
Press and hold in [unit/set] for two seconds. 230* flashes
(230 V is the default setting). Change the voltage using
the [◄] and [►] buttons if you have a different mains
voltage. Press [unit/set] to confirm and to advance to the
currency setting.
* Even if you have a 400 V supply, the voltage per phase
is 230 V.
Step 2. Currency
Set the correct currency (kr, €, $ or ₤) using the using the
[◄] and [►] buttons. Press [unit/set] to confirm and to
advance to the tariff setting.
14
Step 3. Single tariff
TARIFF appears and 1 flashes. Press [unit/set] to confirm if you
have just one single tariff. Refer to section 10 if you have an electricity meter for dual tariffs.
Tip: During the entire installation process you may press [time period] to save your settings and return to normal display mode.
Step 4. Costs
Set the correct tariff using the [◄] and [►] buttons. Press [unit/set]
to confirm and continue.
Step 5. kg CO2 (kg carbon dioxide per kWh)
The kg CO2/kWh can be adjusted with the [◄] and [►] buttons.
Press [unit/set] to confirm and continue on to setting the alarm.
Step 6. Alarm (High-energy consumption alarm)
The default alarm value is set to 5 kW. If the alarm function is activated and you consume more than 5 kWh a buzzer will sound.
The alarm activation value can be set using the [◄] and [►] buttons. Press [unit/set] to confirm and then [time period] to exit the
settings mode.
Press [alarm on/off] on the back of the display unit to activate or
deactivate the alarm.
The
symbol is displayed when the alarm is activated.
15
10. Multiple tariff setup
N.B. This section only applies if you have multiple tariffs.
If you have an electricity meter with dual tariff rates, you need to programme the electricity
monitor for this function.
Step 1. Activation of dual tariffs
Press and hold in [unit/set] for two seconds. The value for the set
voltage (230 V) will begin to flash. Press [unit/set] two times to
confirm and open the dual tariff settings mode. TARIFF appears
and 1 flashes. Select the number of tariffs using the [◄] and [►]
buttons. Press [unit/set] to confirm.
Step 2. Set the start and end time for tariff 1 (this
only applies if more tariffs than tariff 1 are activated)
TARIFF START TIME appears. 12.00 (start time) flashes. Set the
start time (hours and minutes) using [◄] and [►] and press [unit/
set] to save and continue to the next setting.
TARIFF START TIME will be replaced on the display by TO. Set
the end time for TARIFF 1 in the same way as you did for the start
time. Repeat the procedure if you have more tariffs.
Example: You are on an Economy-7 tariff from 01.00 to 08.00.
Set the TARIFF START TIME 01.00 and TO 08.00. Press [unit/set]
to confirm. Then set the tariff per kWh for both tariffs for both day
and night.
16
Step 3. Set TARIFF 1.
The default tariff flashes. Set the correct tariff (unit cost
per kWh) using the [◄] and [►] buttons. Press [unit/set] to
confirm. The next activated tariff will appear on the display
(2, 3 or 4 depending on the number of activated tariffs).
Steg 4. Set TARIFF 2 (or 3, 4)
The default tariff flashes. Set the correct tariff (unit cost
per kWh) using the [◄] and [►] buttons. Press [unit/set] to
confirm.
N.B. The time for last tariff (2, 3 or 4) does not need to
be set manually. It will automatically be the time that is not
included in the previous tariff/s.
17
11. Display information
Press [function] to select a display of the present energy consumption, previous consumption
or average consumption.
Energy now
Displays the values at
the present time.
Average
Displays the mean
average value.
Choose from kW, £ per
day and kg CO2 per day.
Choose between
day/week/month
and period’s average
consumption in kWh,
cost or carbon dioxide
emissions*.
History
Displays earlier values.
Choose between day/
week/month, period’s
average consumption
in kWh, cost or carbon
dioxide emissions* and
period to be displayed.
* Amount of CO2 (in kilograms) produced for the electricity you have consumed.
The amount of CO2 produced depends on how your electrical energy is produced e.g. hydroelectric-, wind-, coal-power, etc. It is up to you to determine and set the CO2 per kWh value.
(Refer to section 9, Step 5)
18
Energy now
Press [unit/set] to switch the display information between different readings:
kW
Total energy consumption
just now.
£ per day
Energy cost so far today.
kg CO2 per day
Carbon dioxide produced
so far today.
Average
Press [time period] several times to select display of energy consumption. Day (today’s
consumption) – Week (this week’s consumption) – Month (this month’s consumption)*.
* Day (from 00.00 to 23.59) – Week (Saturday to Sunday) – Month (first to last day of the month).
19
Press [unit/set] to switch the display information between kWh (energy consumption) – £ (cost)
– kg CO2 (amount of CO2).
History
Press [time period] several times to select display of energy consumption. Day (today’s
consumption) – Week (this week’s consumption) – Month (this month’s consumption)*.
* Day (from 00.00 to 23.59) – Week (Saturday to Sunday) – Month (first to last day of the month).
20
Switch between days/weeks/months using the [◄] and [►] buttons to compare energy
consumption over different periods.
Press [unit/set] to switch the display information between kWh (energy consumption) – £ (cost)
– kg CO2 (amount of CO2).
21
12. Symbols on display
The following symbols appear on the display:
This symbol flashes when the display unit batteries are low.
This symbol flashes when the transmitter batteries are low.
The alarm is activated: The alarm is deactivated: USB cable connected.
22
13. Toubleshooting/FAQ
If I remove the battery, will I lose all my saved data?
No, the information is saved in the internal memory and is not lost when the battery is changed.
How do I reset the display (erase all data and start over)?
Press and hold in [function] and [unit/set] simultaneously, Voltage (230 V) flashes when everything
has been erased.
N.B. If you reset the electricity monitor all information on previous consumption is erased.
However, time and date information is saved in the memory.
What is the transmitter’s range?
The range is up to 40 metres in a normal home. The 433 MHz frequency is very suitable for this
purpose. With good conditions the signals are able to span up to three floors.
The display shows – – – . What does it mean?
Move the display unit closer to the transmitter and press [link]. If the problem persists, contact
our Customer Services.
Why does the backlight come on sometimes, but not all the time?
The backlight is timer-controlled in order to save the battery. It is only activated from 18.00
to 06.00.
The transmitter and the display unit (receiver) don’t seem to have contact with each other.
What do I do?
Move the display unit closer to the transmitter and press [link]. If this does not help, try changing
the batteries in the transmitter.
How much electricity can the electricity monitor measure?
It can measure up to 999 kWh in a week.
How thick can the cables be that the sensors clamp onto?
The sensors can be used on cables up to 12 mm in diameter.
23
Setup for Norway, what do I do?
Settings specific to Norwegian electrical networks (IT-net, TN-net)
IT-net: The value should be set to 130 V, (IT net has 230 V between phases).
TN-net: The value should be set to 230 V, (TN-net has 400 V between phases).
What should the measurement voltage be set to in each respective country?
In Sweden, Norway and the UK, the voltage should be set to 230 V (even if you have a 400 V
supply, each phase only has 230 V).
In Norway the measurement voltage should be set to: 130 V (IT-net) or 230 V (TN-net). My computer loses contact with the electricity monitor when I connect it to the USB port,
what should I do? Unplug the USB cable and then plug it in again.
I am having trouble transferring my data from my electricity monitor to my computer, what
should I do? Make sure that the time and date on the two devices is the same. Remember that
you will have to change from summer to winter time manually.
The elink 2.0 software shows “NO CONNECTION TO SERVER”.
1. Install the latest version of Adobe AIR.
2. Install the latest version of Java.
3. Enable the installation of Java when the message appears as you open the elink software.
It should work then.
It is not possible to transfer data to computers using Windows Vista and Windows 7.
In order to be able to transfer data to computers using Windows Vista and Windows 7, the UAC
(User Account Control) must be disabled/turned off by going to the Control Panel and selecting
Change User Account Settings.
My electricity consumption is entered in the wrong week in the data software compared
to the monitor.
If, for example, the electricity consumption data stored in the monitor for the first week in July
is entered into the software on the computer as the consumption for the last week in June, this
means that you need to upgrade your version of the software from the included version i.e. 1.10,
to the newer version i.e. elink 2.0.
The software can be downloaded free from efergy’s website.
24
How do I clear the monitor display?
Press and hold in both the [TIME PERIOD] and [UNIT SET] buttons simultaneously for 3 seconds
until CLr appears on the display.
Does the electricity monitor work with Windows 7?
The electricity monitor is compatible with both the 32-bit and 64-bit version of Windows 7.
14. Disposal
Follow local ordinances when disposing of this product. If you are unsure of how to dispose of this product, please contact your local authority.
15. Specifications
Model:
efergy e2
Frequency:
433 MHz
Transmission intervals: 6 – 12 – 18 seconds
Range:
> 40 metres
Measuring voltage:
110 – 400 V
Measuring current:
50 mA – 95 A
Accuracy:
> 90 %
Backlight:
Activated between 18:00 and 06:00
Power supply:
Display unit (receiver): Batteries: 3 x AA/LR6 (not included)
Transmitter: Batteries: 3 x AAA/LR03 (not included)
25
16. Installing the provided software
Step 1. Preparations before software installation
First, ensure that any previous versions of the software have been uninstalled.
If you are re-installing efergy elink software, you must uninstall any previous versions of the elink
software and any files/folders related to it before installing the new version.
Note: Follow these installation instructions carefully.
1. Make sure that the latest versions of Adobe AIR and Java are installed on your computer
before beginning to install the provided software (efergy elink).
2. Check that the latest versions of Java and Adobe AIR are installed on your computer. If not,
install the missing software and re-start your computer. There is an icon for Java on your
Control Panel, click on the icon to see which version you have. It is advised that you update
to the latest version.
A. Retrieve Adobe AIR from get.adobe.com/air/ or ADOBE’s website. You might need to
disable your antivirus software temporarily to enable the installation.
26
B. Retrieve Java from: www.java.com
3. Check that your UAC (User Account Control) is:
• Turned off (applies to Windows Vista).
• Lowered to no higher than level 3 (applies to Windows 7).
Procedure: Open the Control Panel and select User Accounts. Click on Change User
Account Settings and check/change the settings. Click OK to return to the main menu.
4. Make sure you are logged on as the administrator (select Run as Administrator).
27
Step 2. Installing efergy elink 2.0 software
1. Insert the provided CD-ROM into the
computer’s CD player, open Explorer and
click on ELINK V2.1.
2. Click on Windows.
3. Click on the ELINK V2.1 for Windows
icon, and then click on Next in the subsequent boxes.
4. Click on Install when the “Ready to
install” box appears.
5. Click on Next to continue.
6. Accept the licence agreement by clicking
on I accept the terms …
7. Click on Next, and then on Install.
28
8. Make sure that the Launch the CP210… 9. The next stage of the installation will now
box has been selected. Click on Finish to
begin. Click on Install to continue.
finish the first stage of the installation.
10.Wait while the driver is installed.
11.Click on OK.
29
12.Click on Finish to end the installation.
13.Click on Unblock in the “Windows Security Alert” box.
14.Make sure that the time and date on the computer and electricity monitor are the same.
Connect the electricity monitor to one of your computer USB ports using the provided cable.
15.Depending on your computer, it could take 15 to 30 seconds for the computer to recognize
the electricity monitor and install the relevant drivers. Wait until the installation is completely
finished and a prompt comes onto the screen asking you to specify which device you have
connected. Select e2 Wireless Energy Monitor and click on select device.
16.In the event that your computer does not find your electricity monitor: Unplug the USB cable,
wait for 15 to 20 seconds and then plug the cable into another USB port on the same computer.
17.Reset the Change User Account Settings.
30
Step 3. Running the program
1. Click on the elink icon on the desktop to run the program.
2. Adjusting your settings: Click on Settings.
31
User settings
Enter your Name, Country, Postcode, Carbon ratio (kg carbon dioxide per kWh) and Voltage.
The value can be set using the [◄] and [►] buttons. Press [UNIT/SET] to confirm and continue.
Target
Set the Time period (time period for comparison of energy consumption). Choose from:
Day, Week or Month.
Set the Target (the consumption you wish to stay below (000-999)).
Set the unit displayed, kWh, £ or kg carbon (value of CO2 emission corresponding to your energy
consumption).
Time and Data (time synchronisation and data editing)
The Sync Date function, for synchronising time is not available on this product. The time must
be set manually.
Reset Data (deletes your settings and any saved data).
Warning: Clicking on Reset Data (and confirming in the subsequent box) will delete your saved
data and settings.
Energy Cost (your electricity tariffs)
Start by finding your latest electricity bill. Fill in the necessary information under Energy Cost.
Utility ID
Enter the name of your electricity provider, supplier or meter location.
32
Periods (enter tariff)
1. Click on Add period… to create one or more tariffs. The tariff units are named P1, P2, etc.
2. Enter a tariff and the time and the days for each period in turn.
3. Click on Apply and save settings to save your settings. Click on Clear to delete your settings.
Tiers (for those with tiered rates)
1.
2.
3.
4.
Click on Add tier… to create one or more cost levels. The tiers are named T1, T2, etc.
Enter the threshold value in kWh per month.
Enter your tariff per kWh.
Click on Apply and save settings to save your settings. Click on Clear to delete your settings.
33
Monthly standing charge (divide quarterly figure by 3)
1. Enter the fixed amount you pay to your supplier every month.
2. Click on Apply and save settings to save your settings. Click on Clear to delete your settings.
Troubleshooting
Click on troubleshooting to open a contact box. Describe your problem for the manufacturer.
Fill in your name and e-mail address and click on Send email.
Step 4. Collect data from the electricity monitor
When all the settings have been made the elink software is ready for use.
1. Connect the provided USB cable
from the electricity monitor’s USB
port (under the rubber flap on the
back of the unit) to a USB port on
your computer.
2. Wait until the message “Your device is now
connected” appears on the screen. Click
on OK.
3. Click on Collect Data to retrieve data.
4. When the message “Data has been collected…” appears on the screen, the retrieval is complete.
Press OK to finish.
34
Step 5. Viewing saved readings
A. Current
Displays your current energy usage and cost.
Note: This function can only be displayed
if the receiver is connected to a computer.
B. History
This feature is for reviewing your usage over
the past Days, Months and Years.
Comments called stickies can be added to
help you remember events which influenced
the usage:
1. Left-click on the desired day.
2. “Add stickie” appears. Click on the box.
3. Write a note/comment in the box on
the left.
4. Click on the “save” symbol to save
the stickie note.
35
C. Manage
This feature enables you to compare the cost of your energy consumption from different suppliers.
Demand
Allows you to review how much energy you
consumed over various time intervals.
Plan
Allows you to see if you are over or under your
planned energy consumption for a 30-day or
100-day interval.
Add Utility
Click Add to add another electricity
provider. Click on Save Changes to save.
Compare
Compare the cost of your energy consumption
from various suppliers to find the best deal for you.
36
D. Energy report
This feature enables you to send energy reports to a specified e-mail address:
1. Select the interval using the Report Type box. Select either Daily Report or Monthly Report.
2. Fill in your e-mail address.
3. Write your message.
4. Click on Next.
5. Click on Send email.
E. Summary
This feature enables you to review total Energy, Cost
and CO2 output.
37
Step 6. Backup and Restore
Backup
1. Click on the backup symbol. Select Backup.
2. Click on Make New Folder.
3. Click on OK to save.
4. “Data backup successful” appears. Click on OK to complete this procedure.
Restore
1. Click on the backup symbol. Select Restore.
2. Select the folder containing the backup files. Click on OK.
3. “Data restore successful. Please quit and restart eLink” will appear when finished. Click on
OK to complete this procedure.
38
Declaration of Conformity
Hereby, Clas Ohlson AB, declares that following product(s):
Wireless Power Meter
36-4500
e2
is in compliance with the essential requirements and other relevant
provisions of Directive 1999/5/EC.
Article 3.1a (Safety): EN 60950-1
Article 3.1b (EMC):
EN 301489-1
EN 301489-3
Article 3.2 (Radio):
EN 300220-1
EN 300220-2
Insjön, Sweden, January 2011
Klas Balkow
President
Clas Ohlson, 793 85 Insjön, Sweden
Sverige
Kundtjänst
Tel: 0247/445 00
Fax: 0247/445 09
E-post: [email protected]
Internet
www.clasohlson.se
Post
Clas Ohlson AB, 793 85 INSJÖN
Norge
Kundesenter
Internett
Post
Tlf.: 23 21 40 00
Faks: 23 21 40 80
E-post: [email protected]
www.clasohlson.no
Clas Ohlson AS, Postboks 485 Sentrum, 0105 OSLO
Suomi
Asiakaspalvelu
Puh.: 020 111 2222
Sähköposti: [email protected]
Internet
www.clasohlson.fi
Osoite
Clas Ohlson Oy, Annankatu 34–36 A, 00100 HELSINKI
Great Britain
40
For consumer contact, please visit
www.clasohlson.co.uk and click on
customer service.
Internet
www.clasohlson.co.uk