1
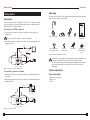
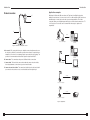
FlexCam® iCam
Digital User Manual
910-171-102
910-171-102-PAL
5615 Raytown Road • Kansas City, MO 64133 U.S.A.
Tel.: 816-353-4787 • Fax: 816-358-5072
email: [email protected] • www.ken-a-vision.com
800-171-102
Table of Contents
Table of Contents
Introduction . . . . . . . . . . . . . . . . . . . . . . . . . . . . . . . . . . . . . . . . . . . . . . 1
Service and support . . . . . . . . . . . . . . . . . . . . . . . . . . . . . . . . . . . . . . . . 1
Product returns . . . . . . . . . . . . . . . . . . . . . . . . . . . . . . . . . . . . . . . . . . . . 1
Important safeguards . . . . . . . . . . . . . . . . . . . . . . . . . . . . . . . . . . . . . . . 2
Handling the camera. . . . . . . . . . . . . . . . . . . . . . . . . . . . . . . . . . . . . . . . 2
Unpacking . . . . . . . . . . . . . . . . . . . . . . . . . . . . . . . . . . . . . . . . . . . . . . . . 3
System requirements . . . . . . . . . . . . . . . . . . . . . . . . . . . . . . . . . . . . . . . 3
Product overview . . . . . . . . . . . . . . . . . . . . . . . . . . . . . . . . . . . . . . . . . . 4
Application examples . . . . . . . . . . . . . . . . . . . . . . . . . . . . . . . . . . . . . . . 5
Getting Started . . . . . . . . . . . . . . . . . . . . . . . . . . . . . . . . . . . . . . . . . . . 6
Connections . . . . . . . . . . . . . . . . . . . . . . . . . . . . . . . . . . . . . . . . . . . . . . 6
Using the Camera . . . . . . . . . . . . . . . . . . . . . . . . . . . . . . . . . . . . . . . . . 7
General usage . . . . . . . . . . . . . . . . . . . . . . . . . . . . . . . . . . . . . . . . . . . . 7
Troubleshooting . . . . . . . . . . . . . . . . . . . . . . . . . . . . . . . . . . . . . . . . . . . 8
Troubleshooting
Introduction
Troubleshooting.
Introduction
I’ve installed the FlexCam iCam Digital, but the picture doesn’t
appear.
Connect the FlexCam iCam Digital to the computer using the supplied USB cable. Check
to see that the video source (S-video or composite) is set correctly. Ensure that the USB
port is enabled in your computer’s BIOS and in the Windows Control Panel/System Device
Manager.
How do I know the driver for the FlexCam iCam Digital has been
properly installed?
Right-click the My Computer icon on the desktop. Choose Properties. Click the Hardware
tab, then Device Manager. Click the plus sign next to the icon labeled Imaging. If the
Imaging folder is missing, you need to reinstall the drivers.
If you are experiencing other problems with your camera,
• Ensure all camera adapter/cable connections and electrical connections are done
correctly and completely.
• Check all equipment for faulty operation
• Check all settings on your camera and adjust them for viewing conditions in the
presentation room.
If any component of any camera is damaged, contact Ken-A-Vision Technical Support for
repair information.
®
The FlexCam® iCam Digital is a user-friendly presentation camera that features S-Video
and USB digital capabilities for enhanced flexibility in a wide variety of classroom
applications. This innovative camera is perfect for presenting objects, images, text or
microscopic images to a classroom. Using the USB connection and powerful software,
students and teachers can easily capture video, create video presentations and edit for
special effects.
Professional Services
If you need any additional information on how to install, set up, or operate your camera,
please contact us. We welcome and encourage your comments so we can continue to
improve our products and serve your needs.
Corporate Headquarters:
Ken-A-Vision Mfg. Co., Inc.
5615 Raytown Road
Kansas City, MO 64133 U.S.A.
Tel.: 816-353-4787
Fax: 816-358-5072
email: [email protected]
www.ken-a-vision.com
Product registration
Please register your camera using the online registration form in the Product section at
www.ken-a-vision.com/warranty.htm. We are better able to provide technical assistance
when your product is properly registered. Registration information is also used to notify
you of upgrades and new product information.
Product returns
All product returns require a return authorization (RA) number. Please contact Ken-A-Vision
Technical Support before attempting to return your product. Make sure you return all the
items that shipped with your product and include a brief description of how the product was
being used when the problem occurred.
8
1
Introduction
Important safeguards
Before operating the FlexCam® iCam Digital camera, please read the entire manual
thoroughly. The FlexCam iCam Digital was designed, built and tested for use indoors.
Using a power supply other than the one provided or using the camera outside could
damage the camera or peripheral equipment and/or create a potentially unsafe operating
condition.
• Do not operate the camera if the power cord is damaged or if the camera has been
dropped or damaged. A qualified service technician must examine the camera before
operating.
• Position the cord so that it will not be tripped over, pulled on or come into contact with
hot surfaces
• Always unplug the camera from the electrical outlet before cleaning or servicing.
• To reduce the risk of electric shock, do not immerse in water or other liquids.
Using the Camera
Using the Camera
General usage
To view images on a TV
1. Connect the camera to a TV.
2. Switch the TV to video mode by pressing the button the TV front panel or remote
control (consult your owner’s manual for further instructions).
Note: Not all TVs have video inputs. If your TV only has an antenna input, you will
need a modulator or a VCR with video inputs.
3. Turn camera on using the on/off switch located at the base of the gooseneck. You
should see an image on the television screen.
4. Position the camera.
Handling the camera
• All Ken-A-Vision® cameras are for indoor use only.
5. Turn the focus ring to the left for close-up or to the right for distance.
To record images on a VCR
• Do not use the cameras next to food or beverages. Cameras have been tested and
approved for use in chemistry labs. However, be careful not to spill liquid or dry
chemicals or solvents on the camera.
1. Connect the camera to a VCR using the S-Video cable or composite adapter.
• Do not use cameras right next to working TVs, radios, motors, transformers or magnetic
fields.
3. Turn camera on using the on/off switch located at the base of the gooseneck.
• Avoid touching the lens. To clear any dust, blow pressurized air onto the lens. Clean
smears or smudges by wiping with a lens cleaning cloth.
• Clean exterior of camera by wiping with a clean, damp cloth; do not use any abrasive
chemicals.
2. Switch the VCR to the video-in mode (consult your owner’s manual for instructions).
4. Turn the VCR/TV switch to VCR and the TV to either channel 3 or 4
5. Position the camera.
6. Turn the focus ring to the left for close-up or to the right for distance.
7. Press Record on the VCR.
• Use both hands whenever adjusting the neck of the camera; this will avoid any
unnecessary strain on the camera base and will keep the camera from tipping over.
To view images on a LCD projector
• Do not attempt to take the camera apart. There are no user-serviceable components inside.
1. Connect the camera to a projector using the S-video cable or composite adapter.
• Do not direct the lens of the camera toward the sun. This may damage the camera.
2. Turn the projector on (consult your owner’s manual for further instructions).
• Do
•
•
•
•
3. Turn camera on using the on/off switch located at the base of the gooseneck.
not store or operate the camera under the following conditions:
Outdoors or connected to outdoor or auxiliary power sources
In environments with high humidity.
In inclement weather.
Under severe vibration
4. Position the camera
5. Turn the focus ring to the left for close-up or to the right for distance.
To use the microscope couplers
1. Slide the microscope coupler (26, 28 or 34mm depending on the size of the
microscope) over the microscope eyepiece.
2. Adjust the camera to fit the camera lens into the coupler on the microscope.
2
7
Getting Started
Introduction
Unpacking
Getting Started
Carefully remove the FlexCam® iCam Digital, cables and power supply from the packaging.
Ensure that you received the following items:
Connections
You can connect the FlexCam® iCam Digital to a TV, a VCR or an LCD projector using the
included 12’ S-Video cable. If your video display device requires a composite signal, use
the provided S-Video to composite adapter.
FlexCam® iCam
Digital User Manual
To connect to a TV, VCR or projector
1. Connect the S-Video cable of the FlexCam iCam Digital to the video input on the
display device.
Note: If needed, use the S-Video to composite video adapter
FlexCam iCam Digital
6’ USB Cable
12’ S-video
Plug
FlexCam iCam
Digital Manual
2. Attach the power plug to the power jack o the back of the camera and plug the power
adapter into the wall.
To S-video
To S-video
Input
To S-video
Input
Input
To S-video
Input
To Composite
Composite Adapter
Applied Vision
Software and Driver
Disk
Ken-A-Vision® is not responsible for product damage incurred during shipment. You
must make claims directly with the carrier. Inspect your shipment carefully
for obvious signs of damage. If the shipment appears damaged, retain the original
boxes and packing material for inspection by the carrier. Contact your carrier
immediately.
USB
USB
12 VDC Power
Figure 1. FlexCam iCam Digital and accessories
POWER
S-VIDEO
S-Video to
Composite Adapter
To Composite
Composite Adapter
S-VIDEO
Microscope Couplers
26mm, 28mm and 34mm
POWER
12V
DC
DC 12V
FlexCam iCam Digital
FlexCam iCam Digital
Figure 4. Connection to an S-Video display device.
System requirements
To connect the camera to a computer
1. Connect the USB cable of the FlexCam® iCam Digital to the USB input on the back of
the computer.
2. Attach the power plug to the power jack on the back of the camera and plug the power
adapter into the wall.
To USB
Connector
To USB
Connector
FlexCam iCam Digital
• Windows 2000, XP or Vista
• Mac OS 10.2+
• USB 2.0
To USB
Output
To USB
Output
PC or Mac
PC or Mac
To Outlet
To Power
To Outlet
To Power
POWER
S-VIDEO
S-VIDEO
USB
USB
POWER
DC
12V
DC 12V
FlexCam iCam Digital
FlexCam iCam Digital
Figure 5. Connection to computer
6
3
Introduction
Introduction
Product overview
Application examples
C
D
With simple S-Video and USB connections, the FlexCam® iCam Digital is the perfect
addition to any classroom. You can connect to a PC or a Mac using the USB connection to
add still images or movie clips to web sites, reports, and presentations. The S-video
connection allows you to display images and objects as well as share documents on a TV
or LCD projector. You can also use the camera with a microscope to capture lab
experiments.
A
USB
Microscope
B
POWER
S-VIDEO
FlexCam iCam Digital
PC or Mac
USB
DC 12V
Figure 2. FlexCam® iCam Digital overview
A. Gooseneck. The gooseneck allows you to adjust the camera head/camera lens over
the object to be viewed. Do not bend the gooseneck more than 90° in any direction or
attempt to tie it in a knot. Do not attempt to repair any cracks in the vinyl coating. The
gooseneck is non-removable and should be replaced only by Ken-A-Vision®.
USB
PC or Mac
B. Camera base. The camera base has power, USB and S-video connections.
C. Camera head. The head of the camera unit contains the camera lens, lens holder,
focus ring attachments, connections to gooseneck and all cables.
FlexCam iCam Digital
S-Video
D. Camera lens and lens holder. The camera lens is held in place by the lens holder. If
you remove the lens, take care not to cross thread the lens when replacing it.
TV or Video Monitor
S-Video
VCR
FlexCam iCam Digital
S-Video
FlexCam iCam Digital
LCD Projector
Figure 3. Applications
4
5