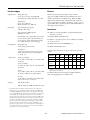
1
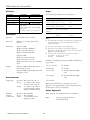
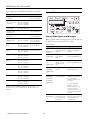
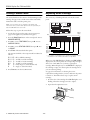
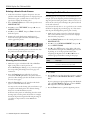
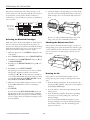
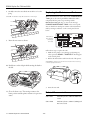
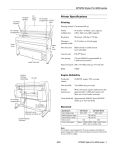
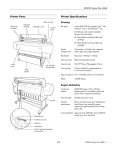
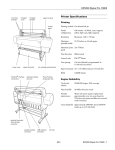
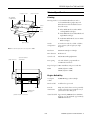
EPSON Stylus Pro 7600 and 9600
-
roll paper cover
Printer Specifications
paper set lever
ink cartridge
compartment
Printing
Printing method 7 color EPSON UltraChrome ink or
6 color EPSON Photographic Dye ink
control
panel
UltraChrome model switchable between
three ink modes:
front
cover
❏ Photo Black Mode (uses Photo Black
and Light Black cartridges)
❏ Matte Black Mode (uses Matte Black and
Light Black cartridges)
❏ Dual Matte Black Mode (uses two Matte
Black cartridges)
paper guides
Nozzle
configuration
96 nozzles for each color: black 1, black 2,
cyan, magenta, yellow, light cyan, light
magenta
Resolution
Maximum 2880 dpi × 1440 dpi
Print direction
Bidirectional
Control code
ESC/P® Raster Photographic Driver
Line spacing
1/6 inch (default), programmable in
1/1440-inch increments
Note: The stand is optional for the Stylus Pro 7600.
paper set lever
optional interface
shield plate
Paper feed speed 200 ± 10 milliseconds per 1/6-inch line
RAM
32MB (Stylus Pro 7600)
64MB (Stylus Pro 9600)
Engine Reliability
AC inlet
USB interface
connector
Total print
volume
20,000 B0 images, 360 × 360 dpi
Print head life
28 billion dots per nozzle
Periodic
maintenance
Pump unit, head cleaner, and cap assembly
require replacement approximately every 2
years based on 25% duty cycle
Cutter blade life Approximately 2000 B0+ sheets (EPSON
media up to 4.33 mil thick); approximately
1000 B0+ film sheets
parallel interface connector
7/02
EPSON Stylus Pro 7600 and 9600 - 2
EPSON Stylus Pro 7600 and 9600
Electrical
Paper
Specification
120V Model
The allowable paper dimensions are shown below:
220−240V Model
Input voltage range
90 to 132V
198 to 264V
Rated frequency range
50 to 60 Hz
Input frequency range
49 to 61 Hz
Rated current
1.0A
Power consumption
Stylus Pro 7600: Approx. 50 W (ISO 10561
Letter Pattern)
0.5A
Stylus Pro 9600: Approx. 55 W (ISO 10561
Letter Pattern)
Both printers: 12 W or less in sleep mode
Mechanical
Roll paper
Cut sheets
Size
(Stylus Pro 9600)
8.3 to 44.0 in. wide
(210 to 1118 mm)
8.5 × 11 in. up to 44 in.
wide
Size
(Stylus Pro 7600)
8.3 to 24.0 in. wide
(210 to 610 mm)
8.5 × 11 in. up to 24 in.
wide
Maximum
external roll
diameter
2 in. core: 4 in. (103 mm)
3 in. core: 6 in. (150 mm)
—
Thickness
3.15 to 19.7 mil (0.8 to
0.5 mm)
3.15 to 59 mil (0.8 to
1.5 mm)
Paper feed
Friction feed (roll and cut sheet)
Paper path
Roll paper or cut sheets with manual
insertion
❏
Poor quality paper may reduce print quality and cause paper jams
and other problems. If you encounter problems, switch to a
higher grade of paper.
Dimensions
Stylus Pro 7600:
❏
Do not use curled, folded, or deckle-edge paper.
Width: 43.3 inches (1100 mm)
Depth: 22.5 inches (572 mm)
Height: 22.0 inches (560 mm)
❏
Depending on the media, best feed and print quality are
guaranteed on EPSON paper with thicknesses of 3.15 to 4.33 mil
(0.08 to 0.11 mm), 64 to 90 gsm.
❏
For best results, use paper under the following conditions:
Temperature: 59 to 77 °F (15 to 25 °C)
Humidity:
40 to 60% RH
Notes:
Stylus Pro 9600:
Width: 63.9 inches (1624 mm)
Depth: 28.2 inches (717 mm)
Height: 46.5 inches (1181 mm), including
stand
Weight
BorderFree™ (marginless) printing is available in the following
paper widths:
Stylus Pro 7600: 96 lb (43.5 kg) without
ink cartridges or stand
Stylus Pro 9600: 185 lb (84 kg) without ink
cartridges or stand
❏ 8 to 8.5 inches
❏ 20 inches
❏ 10 inches
❏ 24 inches
❏ 12 inches
❏ 36 inches (Stylus Pro 9600
only)
❏ 14 inches
❏ 44 inches (Stylus Pro 9600
only)
Environmental
Temperature
Humidity
(without
condensation)
❏ 16 inches
Operation: 50 to 95 °F (10 to 35 °C)
Storage:
–4 to 104 °F (–20 to 40 °C)
1 month at 104 °F (40 °C)
Transit
–4 to 140 °F (–20 to 60 °C),
stored in shipping container
120 hours at 140 °F (60 °C)
When printing BorderFree, set the image size in your
application to be approximately 3 mm (1/8 inch) larger than
the intended size of your printed image.
Safety Approvals
Operation: 20 to 80% RH
Storage:
20 to 85% RH
Transit
5 to 85% RH (stored in
shipping container)
3 - EPSON Stylus Pro 7600 and 9600
Safety standards UL 1950, CSA C22.2 No. 950 FDA
EMC
7/02
FCC part 15 subpart B, class B,
CSA C108.8 class B
EPSON Stylus Pro 7600 and 9600
Ink Cartridges
Drivers
Lightfastness*
Macintosh® System 8.5.1 through 9.x (OS X clients
supported via RIP, available from the EPSON web site for
download), Windows® 95, Windows 98, Windows 2000,
Windows Me, Windows XP, and Windows NT 4.0. Raster
drivers are standard. For Adobe® PostScript® support, use the
optional EFI® Fiery® Spark Professional 2.0 Software RIP or a
third-party software solution.
Photographic Dye:
Color: up to 26 years (using EPSON
ColorLife paper); black and white not rated
UltraChrome:
Color: up to 100 years
Black and white: over 100 years
Print yield
Cartridge life:
Approximately 28 pages/A1
(720 dpi, 40% duty)
Interfaces
Approximately 3,800 pages/A4
(360 dpi, 5% duty)
❏ USB (1.1 and 2.0 compatible), recommended length less
than 6 feet (2 meters)
Print yield may vary, depending on how often
you run cleaning cycles and how much you
use the printer; yield of the initial cartridge
set is reduced because of ink charging.
❏ Parallel (IEEE-1284 ECP mode)
In addition, a Type B expansion slot is available for installing
one of these options:
❏ Ethernet network card (10/1000 Base T)
Photographic Dye
2 years from production date
❏ IEEE 1394 (FireWire) card
UltraChrome
2 years from production date if unopened;
within 6 months after opening package, at
77 °F (25 °C)
Temperature:
The following connections are supported for each operating
system:
Storage (uninstalled):
–22 to 104 °F (–30 to 40 °C); 1 month at 104
°F (40 °C)
Win
95
Parallel
X
USB
Ethernet
(optional)
Storage (installed):
–4 to 104 °F (–20 to 40 °C); 1 month at 104
°F (40 °C)
FireWire
(optional)
*
Transit:
–22 to 140 °F (–30 to 60 °C); 1 month at 104
°F (40 °C), 120 hours at 140 °F (60 °C)
Win
98
Win
NT 4.0
X
X
X*
X
X
X
Win
2000
Win
Me
Win
XP
Mac
X
X
X
X
X
X
X
X
X
X
X
X
X
X
X
Supported on pre-installed operating systems, not upgraded from
earlier versions of Windows.
In addition, Macintosh OS X supports USB and Ethenet
when running applications in Classic mode.
Freezing:
14 °F (–10 °C); ink thaws and is usable after
at least 3 hours at 77 °F (25 °C)
Capacity
Connection
110 ml (all models)
220 ml (Stylus Pro 9600, UltraChrome only)
*
Preliminary data from Wilhelm Imaging Research, Inc. indicate the
lightfastness of color UltraChrome prints made by the EPSON Stylus
Pro 7600 and 9600 printers will be rated up to 100 years under glass
on specific EPSON media. Data indicate the lightfastness of black and
white UltraChrome images printed using the 7-color mode will be
rated as greater than 100 years under glass on specific EPSON media.
Ink lightfastness ratings are based on accelerated testing of prints on
specialty media, displayed indoors, under glass. Actual print stability
will vary according to media, printed image, display conditions, light
intensity, humidity, and atmospheric conditions. EPSON does not
guarantee longevity of prints. For maximum print life, display all prints
under glass or lamination or properly store them. Visit www.wilhelmresearch.com for the latest information.
7/02
EPSON Stylus Pro 7600 and 9600 - 4
EPSON Stylus Pro 7600 and 9600
User-Replaceable Parts
Consumables and Accessories
You can order these user-replaceable parts:
Ink Cartridges
When you install the printer’s first ink cartridges, it takes
about 10 minutes to initialize the printer. Do not interrrupt
this process by turning off the printer, opening the printer
covers, or releasing the paper set lever, or the printer will have
to re-initialize. In that case, there may not be enough ink left
in the original cartridges and you may have to replace them
with new ones.
Use the following cartridges before the expiration date on the
package:
Photographic Dye ink users:
T545100
Light cyan
T545600
T545200
Light magenta
T545500
Magenta
T545300
Yellow
T545400
*
Cartridge
110 ml
220 ml*
Photo Black**
T543100
T544100
Matte Black**
T543800
T544800
Light Black**
T543700
T544700
Cyan
T543200
T544200
Magenta
T543300
T544300
Light Magenta
T543600
T544600
Light Cyan
T543500
T544500
Yellow
T543400
T544400
C12C815241
Part
Part number
EPSON Stylus Pro 7600 Printer Stand
C12C844061
EFI® Fiery® Spark Professional 2.0 Software RIP
C842832
Internal 10/100 BaseT (Ethernet™) Type-B interface
card
C12C823912
Internal IEEE 1394 (FireWire™) Type-B interface card
C823722
Automatic Take-Up Reel System (Stylus Pro 9600 only)
C12C815251
Replacement 44-inch Take-up Reel Core
(Stylus Pro 9600 only)
C815121
Paper Roller Spindle (Normal Tension) — 2- or 3-inch
Stylus Pro 7600:
Stylus Pro 9600:
C12C811161
C12C811151
Paper Roller Spindle (High Tension) — 2- or 3-inch
Stylus Pro 7600:
Stylus Pro 9600:
C12C811155
C12C811152
Manual Media Cutting System*
Stylus Pro 7600:
Stylus Pro 9600:
C12C815231
C815182
C815192
* Designed for use with heavy media, which may damage the printer’s
built-in cutter.
Stylus Pro 9600 only.
** Your printer uses two black ink cartridges. Unless you are switching
between black ink modes, use the same type of cartridges as are
currently installed. Check their type by looking at the installed
cartridges. If you install an incorrect cartridge, you will see the
message WRONG INK CARTRIDGE.
5 - EPSON Stylus Pro 7600 and 9600
Replacement Printer Cutter Blade (replaces the
printer’s built-in cutter)
Replacement Manual Cutting Blade (for Manual Media
Cutting System)
Your printer requires two black ink cartridges.
UltraChrome ink users:
*
C120890071
The following options are available:
If you have a Stylus Pro 9600 that uses UltraChrome ink, you
can install any combination of 110 and 220 ml cartridges.
Unless you’re planning to switch between black ink modes
(see page 12), be sure to replace the black ink cartridges with
the same type as you’re currently using.
Cyan
Part number
Relacement Ink Maintenance Tank
Options
When you installed the ink cartridges that came with the
printer, it was initialized as either a Photographic Dye ink
model or UltraChrome ink model. If you don’t use the correct
replacement cartridges for your model, you will see an error
message and your printer won’t work until you insert the
correct cartridges.
Black*
Part
7/02
EPSON Stylus Pro 7600 and 9600
Papers supported by Photographic Dye ink model (continued)
EPSON Paper and Other Media
The papers you can use vary, depending on whether you have
the Photographic Dye ink model or the UltraChrome ink
model, as shown in the tables below.
Paper type
Roll sizes
Sheet sizes
Matte Paper Heavyweight
—
8.3" × 11.7": S041257
11.7" × 16.5": S041260
13" × 19": S041263
NOTE: The Stylus Pro 7600 cannot use paper wider than 24 inches.
Enhanced Matte
Posterboard
—
24" × 30": S041598
30" × 40": S041599
EPSON Proofing
Paper Commercial
Semimatte
13-inch roll: S041668
24-inch roll: S041658
36-inch roll: S041659
44-inch roll: S041660
—
Glossy Paper
Heavyweight
24-inch roll: S041291
36-inch roll: S041227
44-inch roll: S041226
—
Semigloss Paper
Heavyweight
24-inch roll: S041292
36-inch roll: S041229
44-inch roll: S041228
—
Posterboard
Semigloss
—
20.25" × 28.75":
S041237
28" × 40": S041236
Backlight Film
24-inch roll: S041482
36-inch roll: S041483
44-inch roll: S041484
—
Papers supported by Photographic Dye ink model
Paper type
Roll sizes
Sheet sizes
Premium Glossy
Photo Paper (250)
8.3-inch roll: S041376
13-inch roll: S041378
24-inch roll: S041638
36-inch roll: S041639
44-inch roll: S041640
11" × 17": S041290
11.7" × 16.5": S041288
13" × 19": S041289
10-inch roll: S041644
20-inch roll: S041645
24-inch roll: S041461
36-inch roll: S041462
44-inch roll: S041463
8.3" × 11.7": S041602
11.7" × 16.5": S041406
13" × 19": S041604
Premium Semigloss
Photo Paper
—
8.3" × 11.7": S041331
13" × 19": S041327
Premium
Semimatte Photo
Paper (250)
24-inch roll: S041655
36-inch roll: S041656
44-inch roll: S041657
—
Photo Paper
13-inch roll: S041233
8.3" 11.7": S041141,
S041271,S041272
8.3" × 11.7": S041140
11.7" × 16.5": S041142
11" × 17": S041156
13" × 19": S041143
8.3" × 23.4"
(Panoramic):
S041145
Premium Luster
Photo Paper
Photo Glossy Paper
24-inch roll: SP91021
36-inch roll: SP91001
44-inch roll: SP91002
—
Photo Semigloss
Paper
24-inch roll: SP91022
36-inch roll: SP91003
44-inch roll: SP91004
—
Photo Quality Ink
Jet Paper
—
11" × 17": S041070
13" × 19": S041069
16.5" × 23.4": S041079
17" × 22": S041171
16.5" × 49.21' (Banner):
S041102
ColorLife™ Photo
Paper Semigloss
24-inch roll: S041664
44-inch roll: S041666
—
Presentation Matte
Paper
24-inch roll: S041295
36-inch roll: S041221
44-inch roll: S041220
—
Doubleweight
Matte Paper
24-inch roll: S041385
36-inch roll: S041386
44-inch roll: S041387
—
Enhanced Matte
Paper
24-inch roll: S041595
36-inch roll: S041596
44-inch roll: S041597
8.3" × 11.7": S041603
13" × 19": S041605
Papers supported by UltraChrome ink model
7/02
Paper type
Roll sizes
Sheet sizes
Premium Glossy
Photo Paper (250)
8.3-inch roll: S041376
13-inch roll: S041378
24-inch roll: S041638
36-inch roll: S041639
44-inch roll: S041640
11" × 17": S041290
11.7" × 16.5": S041288
13" × 19": S041289
Premium Luster
Photo Paper
10-inch roll: S041644
20-inch roll: S041645
24-inch roll: S041461
36-inch roll: S041462
44-inch roll: S041463
8.3" × 11.7": S041602
11.7" × 16.5": S041406
13" × 19": S041604
Premium Semigloss
Photo Paper
—
8.3" × 11.7": S041331
13" × 19": S041327
Premium Semimatte
Photo Paper (250)
24-inch roll: S041655
36-inch roll: S041656
44-inch roll: S041657
—
Photo Glossy Paper
44-inch roll: SP91002
36-inch roll: SP91001
24-inch roll: SP91021
—
Photo Semigloss
Paper
44-inch roll: SP91004
36-inch roll: SP91003
24-inch roll: SP91022
—
Doubleweight Matte
Paper
44-inch roll: S041387
36-inch roll: S041386
24-inch roll: S041385
—
Enhanced Matte
Paper
24-inch roll: S041595
36-inch roll: S041596
44-inch roll: S041597
8.3" × 11.7": S041603
13" × 19": S041605
EPSON Stylus Pro 7600 and 9600 - 6
EPSON Stylus Pro 7600 and 9600
Papers supported by UltraChrome ink model (continued)
Paper type
Roll sizes
Sheet sizes
Enhanced Matte
Posterboard
—
24" × 30": S041598
30" × 40": S041599
EPSON Proofing
Paper Commercial
Semimatte
13-inch roll: S041668
24-inch roll: S041658
36-inch roll: S041659
44-inch roll: S041660
—
Glossy Paper Photo Weight
44-inch roll: S041389
22-inch roll: S041388
13" × 19": S041456
Watercolor PaperRadiant White
—
13" × 19": S041351
EPSON Velvet Fine
Art Paper*
—
8.5" × 11": S041636
13" × 19": S041637
Somerset Velvet for
EPSON Fine Art
Paper
24-inch roll: SP91203
44-inch roll: SP91204
24" × 30": SP91200
36" × 44": SP91201
44" × 60": SP91202
Smooth Fine Art
Paper*
24-inch roll: S041431
36-inch roll: S041432
44-inch roll: S041433
24" × 30": S041434
36" × 44": S041435
Textured Fine Art
Paper*
24-inch roll: S041447
36-inch roll: S041448
44-inch roll: S041449
Synthetic Paper*
Control Panel
Control Panel Lights and Messages
When a problem occurs, a message appears on the display and
the lights on the control panel come on or flash.
Error messages
Message/Light
Explanation
Response
24" × 30": S041450
36" × 44": S041451
INK LOW
Ink cartridge(s) are
nearly empty (printing
continues).
Make sure you have
replacement cartridges
available.
24-inch roll: S041399
36-inch roll: S041400
44-inch roll: S041401
—
INK OUT
Ink cartridge(s) are
empty (printing
stops).
Replace the ink cartridge(s)
indicated by Ink Out light(s).
Adhesive Synthetic
Paper*
24-inch roll: S041402
36-inch roll: S041403
44-inch roll: S041404
—
Replace the ink cartridge(s)
indicated by Ink Out light(s).
Adhesive Vinyl
24-inch roll: S041436
36-inch roll: S041437
44-inch roll: S041438
—
Not enough ink is
available to finish
cleaning the print
head.
24-inch roll: S041482
36-inch roll: S041483
44-inch roll: S041484
—
Ink cartridge(s) not
installed.
Install ink cartridges as
indicated by the lights.
Tyvek® Brillion™
24-inch roll: S041494
36-inch roll: S041495
44-inch roll: S041496
—
You tried to install the
wrong ink cartridge.
Canvas
24-inch roll: S041531
36-inch roll: S041532
44-inch roll: S041533
—
If you are installing ink
cartridges for the first time,
you must install the
cartridges that came with
your printer.
Backlight Film
Ink Out light(s)
flashing
Ink Out light(s)
on
NOT ENOUGH
INK
Ink Out light(s)
on
NO INK
CARTRIDGE
Ink Out light(s)
on
WRONG INK
CARTRIDGE
INVALID INK
CARTRIDGE
Ink Out light(s)
on
If you are replacing ink
cartridges, check the
package and product code.
You must use the ink
cartridges designed for your
printer. Other cartridges will
not work.
NOTE: Check the EPSON Pro Graphics web site (http://
prographics.epson.com) for additional media that may become
available.
LOAD PAPER
Paper Out light
on
7 - EPSON Stylus Pro 7600 and 9600
7/02
Paper lever is in the
released position (all
the way back) while
loading paper.
After you finish loading
paper, pull the paper lever all
the way forward, to the
secured position.
EPSON Stylus Pro 7600 and 9600
Error messages (continued)
Error messages (continued)
Message/Light
Explanation
Response
Message/Light
Explanation
Response
LOAD ROLL
PAPER
Paper source setting
in printer software is
different from control
panel.
Make sure the right paper is
loaded and the paper source
setting is the same on the
control panel and printer
software.
SET INK LEVER
The ink lever was left
in the unlocked
position.
Pull the lever down to lock
the ink cartridges.
FRONT COVER
OPEN
Front cover is open.
Close the front cover.
LOAD SHEET
PAPER
Paper Out light
on
PAPER JAM
Paper Out light
flashing
PAPER NOT
CUT
Pause light on
Paper has jammed in
the printer.
Remove the jammed paper.
TURN PRINTER
PWR OFF AND
ON
This message
appears after you
clear a paper jam.
Press the Power button to
turn the printer off and back
on again.
Roll paper was not
cut completely.
Cut the paper manually,
remove the cut paper from
the printer, then reload
paper.
UNABLE TO
PRINT
Cut paper did not fall
off.
Remove the cut paper from
the printer. Reload paper.
You tried to print
while an error
condition was
present or the ink
compartment cover
was open.
After 3 seconds the message
disappears. Press the Pause
button to exit SelecType
mode. If the message
appears again, clear the error
before you print.
Paper slipped and fed
into the printer at an
angle.
Reload paper, making sure
the edges are straight and
aligned with the vertical row
of holes at the paper exit.
MAINTENANCE
TANK ALMOST
FULL
The maintenance
tank is almost full.
Make sure you have a
replacement maintenance
tank.
The maintenance
tank is full.
Replace the maintenance
tank.
The maintenance
tank is not installed.
Make sure the maintenance
tank is fully inserted.
Paper Out light
flashing
PAPER NOT
STRAIGHT
Paper Out light
flashing
PAPER OUT
No paper is loaded.
Load paper.
Paper Out light
on
Paper ran out.
Remove any printouts or
paper remaining in the printer
and load more paper.
Maintenance
Tank light
flashing
CHANGE
MAINTENANCE
TANK
All lights
flashing
If the message appears
during a print job, reset the
printer by pressing the Pause
button for 3 seconds. Then
load paper and resend the
job.
RELOAD
PAPER
Paper Out light
on
REMOVE
PAPER
Paper Out light
on
Maintenance
Tank light is on
Paper could not be
reversed into the
printing position.
Remove the paper. Reload it
so that the bottom edge is
straight and aligned with the
vertical row of holes at the
paper exit.
OPTION I/F
ERROR
Wrong interface card
installed.
Turn off the printer and
remove the card. See the
documentation that came
with the card.
Image is too wide for
the paper loaded in
the printer.
Resize your image or load
wider paper.
SERVICE REQ.
An error has
occurred.
Note the error number, then
turn the printer off and back
on.
Paper is not fully
ejected.
Cut the paper at the paper
insertion slot, then reload
paper.
MAINTENANCE
REQ.
PAPER NOT CUT
error was cleared.
Reload paper.
A printer part will
need to be replaced
soon.
Note the error number and
contact EPSON. (If only the
cutter blade is worn out, you
can replace it yourself.)
Paper is too thick for
head cleaning.
Pull the paper set lever out to
remove the paper. Head
cleaning automatically starts.
After cleaning, reload paper.
COMMAND
ERROR
You’re using the
wrong printer driver.
Make sure you installed the
correct driver for your printer.
Damaged data was
sent to the printer.
To clear the data, press the
printer’s Power button to
turn the printer off. Wait for
about a minute, then turn the
printer on again.
Paper Out light
on
SET PAPER
LEVER
NO
MAINTENANCE
TANK
Paper lever was
released during the
printing process or
another operation.
All lights
flashing
Pull the lever all the way
forward, to the secured
position. Start printing again
from the beginning for best
results.
7/02
EPSON Stylus Pro 7600 and 9600 - 8
EPSON Stylus Pro 7600 and 9600
Printing a Status Check
Replacing an Ink Cartridge
The status check shows the amount of ink remaining in each
cartridge, the page count, and the status of the cutter blade,
maintenance tank, and other printer parts.
The easiest way of checking ink levels is from the control
panel:
NOTE: You can replace the ink cartridges, cutter blade, and
maintenance tank yourself. Other parts need to be replaced by an
authorized EPSON service technician.
Follow these steps to print the status check:
(almost
1. Load a sheet of paper in the printer. (You can print test
pages on roll paper, but you will use more paper.)
(full)
empty)
2. Press the SelecType button on the control panel. You see
PRINTER SETUP.
3. Press d so you see TEST PRINT, then press r. You see
NOZZLE CHECK.
black*
black*
cyan
magenta
light cyan
light magenta
yellow
4. Press d so you see STATUS CHECK, then press r. You
see PRINT.
5. Press Enter. The status check sheet prints.
The amount of ink left or the component life is indicated as
follows:
*
E*****F = full (or full life remaining)
E**** F = 3/4 full (or 3/4 life remaining)
E*** F = 1/2 full (or 1/2 life remaining)
E**
F = 1/4 full (or 1/4 life remaining)
E*
F = nearly empty (or service life near end)
E
F = empty (or service life ended)
If your printer uses UltraChrome ink, the black ink cartridges may be
a combination of Photo Black, Matte Black, or Light Black.
When one of the Ink Out lights is flashing (and INK LOW is
displayed on the control panel), the corresponding cartridge is
almost out of ink. Make sure you have a replacement
cartridge. When the light stays on and INK OUT is displayed,
the cartridge is empty. You must replace the cartridge before
you can continue printing.
6. Press Pause to exit the Test Print menu.
See page 5 for information on selecting the correct
replacement cartridges. Before you start, make sure the printer
is turned on. Then follow these steps to replace an ink
cartridge:
1. Note the color of the cartridge whose Ink Out light is on or
flashing. This is the cartridge you need to replace.
2. Open the ink compartment cover.
9 - EPSON Stylus Pro 7600 and 9600
7/02
EPSON Stylus Pro 7600 and 9600
7. Lower the ink lever to its locked position.
3. Raise the ink lever to the unlocked position.
8. If you’re using 110 ml cartridges, close the ink
compartment cover. If you’re using 220 ml cartridges, you’ll
have to leave the cover open.
4. Remove the empty ink cartridge from the printer.
Once the cartridges are installed, the printer returns to its
READY state (or says LOAD PAPER if paper isn’t loaded).
If you see the message WRONG INK CARTRIDGE, you
may have loaded an incorrect black ink cartridge for the black
ink mode you’re currently in, or loaded a cartridge containing
the wrong type of ink for your printer (Photographic Dye or
UltraChrome). Remove any cartridges indicated by a red Ink
Out light on the control panel, and replace them with the
correct cartridges.
5. Make sure the replacement
cartridge is the correct color,
and remove it from its
package.
Paper Type and Banding
If you’re using UltraChrome
Ink, gently shake the
cartridge before installing it.
Banding can be caused by several problems, such as clogged
print head nozzles or a mis-aligned print head. It can also be
caused by using a paper that is not defined in the EPSON
printer driver or in a third-party RIP. To correct this problem,
make sure you select the correct paper type in the driver.
6. Hold the cartridge with the arrow pointing toward the
printer. Then insert the cartridge into the slot. Don’t force
it in.
If your paper type is not defined, use the printer’s SelecType
menu to create a custom paper type. See “Optimizing the
Settings for Your Paper” in the Printer Guide.
Running a Nozzle Check and Cleaning
Cycle
If your printed image is unexpectedly light or faint or dots are
missing from the image, you may need to run a cleaning cycle.
This unclogs the print head nozzles so they can deliver ink
properly.
The cleaning cycle uses ink, so you should run it only if print
quality declines. To determine if a cleaning cycle is needed,
print a nozzle check (below). You should also print a nozzle
check after cleaning to see if the cleaning cycle was successful.
7/02
EPSON Stylus Pro 7600 and 9600 - 10
EPSON Stylus Pro 7600 and 9600
Printing a Nozzle Check Pattern
Aligning the Print Head
1. Load a letter-size sheet of paper in the printer. (You can
print the nozzle check on larger sheets or roll paper, but you
will use more paper; you’ll also have to remove any roll
paper before running the cleaning cycle.)
If banding appears on your prints, or vertical lines are not
straight, you need to align the print head. Although you can
align the print head using the printer software, it’s best to do
this from the control panel. This aligns the print head for all
modes and resolutions.
2. Press the SelecType button on the control panel. You see
PRINTER SETUP.
If you haven’t already done so, it’s a good idea to run a nozzle
check before aligning the print head (page 11). This ensures
that the print head alignment patterns print correctly.
3. Press d so you see TEST PRINT, then press r. You see
NOZZLE CHECK.
4. Press r so you see PRINT, then press Enter. The nozzle
check sheet prints.
1. Make sure the printer is turned on. Then load roll paper
that is at least 24 inches wide (you can use the roll paper
that came with your printer).
5. Examine the nozzle check pattern. Each staggered
horizontal and straight vertical line should be complete,
with no gaps in the pattern:
2. Press the SelecType button on the control panel. You see
PRINTER SETUP.
3. Press u so you see HEAD ALIGNMENT, then press r.
You see PAPER THKNS.
4. Press r so that *STD appears on the display. This is the
correct thickness setting for most EPSON papers. If you’ll
be printing on one of the papers listed below after
completing the alignment, use the u and d buttons to
select the appropriate thickness setting for that paper.
If dots are missing from the pattern, as shown below, clean
the print head as described in the next section.
Thickness
setting
Cleaning the Print Head
1. Make sure no paper is loaded and all of the H Ink Out
lights on the printer’s control panel are off.
If an H Ink Out light is flashing or on, you need to replace
the corresponding ink cartridge instead. See page 9 for
instructions.
For EPSON Premium Glossy Photo Paper (250) and
Premium Semimatte Photo Paper (250)
0N
For film
0.0 to 1.6 mm
For non-EPSON media
5. Press Enter.
2. Press the Cleaning button and hold it for at least 3
seconds. The Pause light flashes as the printer cleans its
print head. The cleaning cycle takes about 60 seconds and
does not use any paper.
6. Press the d button to select the mode you want to perform
the adjustment in (BI-D BLACK, BI-D ALL, or UNI-D
ALL).
If you’re printing non-photographic images with black ink
only, select BI-D BLACK. Otherwise, perform a UNI-D
ALL adjustment, followed by BI-D ALL.
3. When the Pause light goes off, print the nozzle check
again to confirm that the head is clean.
You may need to run the cleaning cycle several times to get
a complete nozzle check pattern. For effective cleaning,
always run a nozzle check between cycles.
7. Press the Enter button to print the alignment patterns.
If the lines in the pattern are still missing dots after several
cleaning cycles, turn the printer off and leave it overnight,
then clean the print head again the following morning. If
you still see no improvement, contact EPSON for
assistance.
11 - EPSON Stylus Pro 7600 and 9600
Paper type
3N
7/02
EPSON Stylus Pro 7600 and 9600
8. Once the patterns are done printing, examine the first row
(K1) in group #1. You see a pattern similar to that shown
below (only part of it is shown in the drawing). Use your
own eye loupe or the one that came with the printer to
determine which line looks the best. In the example below,
the middle line (numbered 5) is the best.
Switching Between Black Ink Modes
If your printer uses EPSON UltraChrome ink, you can switch
between black ink modes to optimize your black ink density.
When you installed the cartridges that came with your printer,
your printer was initialized in Photo Black Mode. You can
switch between the three modes shown below:
NOTE: You must use at least a 10× eye loupe to check the pattern.
best line in K1
K1
1
2
3
4
5
6
7
2
3
4
5
6
7
Mode
Image and paper type
Photo Black Mode
For printing photographic images on all media
types. Optimized for traditional photographic and
ink jet-coated papers, such as EPSON Premium
Luster Photo Paper, Photo Semigloss Paper,
Premium Semimatte Photo Paper, etc.
Matte Black Mode
Optimized for printing photographic images on
matte or plain papers, such as EPSON Enhanced
Matte Paper, Smooth and Textured Fine Art
Paper, and Somerset Velvet for EPSON, when the
highest level of photographic quality is desired.
Dual Matte Black
For printing on matte or plain paper, such as
newsprint and plain bond, when print speed is
favored over photographic image quality.
K2
1
best block in K2
Lc
1
2
3
4
5
6
7
9. Use the u and d buttons to select the best line.
After deciding on the black ink mode you want to switch to,
make sure you have the black ink cartridge(s) you’ll be
installing. In some cases, you’ll be replacing only one of the
cartridges.
10. Press Enter.
11. Examine the black set of blocks (K2) in group #1. Select the
block with the smallest gap, then press Enter.
12. Repeat this process for each of the other patterns, when
prompted.
13. If number 5 (the current alignment setting) shows the
smallest gap for each pattern, the print head is aligned and
you can exit the adjustment early by pressing Pause. You
may need to repeat the alignment more than once to ensure
that number 5 is the best choice for all patterns.
Mode
Required cartridges
Photo Black Mode
Photo Black and Light Black
Matte Black Mode
Matte Black and Light Black
Dual Matte Black
Matte Black and Matte Black
Since this process consumes ink from the color cartridges
as well as the black ones, you need to make sure there is
enough ink in all the cartridges before you begin. Check
the Ink Out lights on the control panel:
14. When done, press Pause to exit the head alignment.
If an Ink Out light is
on or flashing, you’ll
need to replace the
cartridge
If there is not enough ink in one or more cartridges to carry
out the procedure (5% or less), you’ll be prompted during the
procedure to replace the cartridges. If any cartridges are low
on ink but not low enough to prevent the procedure from
being carried out, you should still make sure you have
replacements available, or you will be limited in how much
you can print after switching black ink modes.
7/02
EPSON Stylus Pro 7600 and 9600 - 12
EPSON Stylus Pro 7600 and 9600
8. The printer displays a message telling you to release the ink
lever and remove the cartridges. Raise the lever and remove
all the cartridges; do not re-insert them until instructed to
do so.
If the printer’s maintenance tank is almost used up, you’ll
need to replace it as well. The printer will tell you if it needs to
be replaced, but you may wish to check it in advance, as
shown below, so you can make sure you have one available, in
case it’s needed.
Maintenance
tank indicator
(showing a
new tank)
Be sure to set aside any black ink cartridges you won’t be
using, so that you don’t accidentally re-insert them.
Selecting the Black Ink Cartridges
Make sure you have all the needed supplies as described above.
Once you remove the ink cartridges from the printer, you
must not turn off the printer until you have finished switching
black ink modes. Follow these steps to start the process and
tell the printer which cartridges you want to install:
Checking the Maintenance Tank
Once you have removed all the ink cartridges, you may see a
message telling you to replace the maintenance tank. If so, pull
out the tank from the side of the printer and replace it with a
new one. If you don’t see this message, continue on to the
next section.
1. Make sure the printer is on and READY is displayed on the
control panel.
2. Press the SelecType button. You see PRINTER SETUP.
3. Press d until you see MAINTENANCE, then press r. You
see PWR CLEANING.
4. Press d so you see BK INK CHANGE, then press r. You
see EXEC.
5. Press Enter. You see SELECT INK SET.
The printer gives you two choices for the new set of black
ink cartridges, depending on which ones are already
installed (press u or d to see the choices). For example, if
you’re in Photo Black Mode, the printer will let you switch
to either Matte Black Mode (#1 MAT: #2 LBK) or Dual
Matte Black Mode (#1 MAT: #2 MAT).
Draining the Ink
Once you have removed all the ink cartridges, you see a
message that the printer is ready for draining. Follow these
steps:
6. Make sure you know which cartridges you want to install,
then press u or d until the correct set of cartridges is
displayed.
1. Insert the draining cartridge into the slot indicated on the
control panel (#1 or #2 slot). The position is also indicated
by the flashing Ink Out light.
7. Press ENTER.
2. Lower the ink lever. The printer begins draining the ink
delivery system.
If you see the message NOT ENOUGH INK, lift the ink
lever and remove any low or empty cartridges. (Check the
Ink Out lights on the control panel to see which cartridges
are low or empty.) Insert the replacement cartridge(s), then
lower the ink lever.
13 - EPSON Stylus Pro 7600 and 9600
3. Once the draining is complete, the printer stops making
noise and you see a message telling you to remove the
draining cartridge.
If you are replacing both black ink cartridges, you see a
message prompting you to insert the draining cartridge in
the second slot. Once you do this, the draining process
repeats a second time.
7/02
EPSON Stylus Pro 7600 and 9600
Charging the Ink
Replacing the Cutter Blade
Once draining is complete, make sure you have the correct
black ink cartridges available for the black ink mode you’re
switching to. Then follow these steps:
1. Insert all the ink cartridges into the printer. Be sure to
install the correct black ink cartridges for the black ink
mode you’re switching to.
If you notice that your paper isn’t cut cleanly, the cutter blade
may need to be replaced. If you use the blade to cut heavy
stock or non-EPSON media, you may need to replace it more
often. You can check the status of your cutter by printing the
status check sheet (see page 9).
2. Lower the ink lever. The printer begins charging the ink
delivery system.
1. Make sure that the printer is on and the front cover is
closed.
3. Once the charging is complete, the printer stops making
noise and displays READY on the control panel.
2. Press the SelecType button on the control panel. You see
PRINTER SETUP.
Continue on to the next section to update your printer driver
software.
3. Press d until you see MAINTENANCE, then press r. You
see PWR CLEANING.
Updating the Macintosh Driver
4. Press d until you see CUTTER REPL, then press r. You
see EXEC.
5. Press Enter. The carriage moves to the cutter replacement
position.
If you’re printing from a Macintosh, you need to update
the driver so that it knows which black ink mode you’re
using. (In Windows, the driver is updated automatically.)
6. You see a message on the control panel telling you to open
the front cover. Open the cover to access the carriage.
1. Open the Chooser from the Apple menu.
2. Click the printer icon and port, as shown.
Click
here . . .
then here
7. Push down on the side pin, then turn the latch to the right.
Close when done
3. Close the Chooser. This completes the black ink
replacement.
7/02
EPSON Stylus Pro 7600 and 9600 - 14
EPSON Stylus Pro 7600 and 9600
8. Carefully remove the cutter blade. Be careful not to lose the
spring.
Replacing the Maintenance Tank
CAUTION: The blade is sharp. Be careful when removing it.
When the maintenance tank is almost full, the Maintenance
Tank light on the control panel flashes. When the tank is
completely full, the printer stops working and the
Maintenance Tank light stays on. You see the message
CHANGE MAINTENANCE TANK on the control panel.
You can check how much space remains in the maintenance
tank by viewing its indicator on the control panel, shown
below.
Maintenance
tank indicator
(showing a
new tank)
9. Insert the new cutter as shown.
Follow these steps to replace the tank:
1. Make sure the printer is not printing or performing any
other operations (READY or PAPER OUT should appear
on the control panel).
2. Pull out the maintenance tank from the side of the printer.
CAUTION: Be careful not to spill ink from the tank when removing
it. Hold it upright at all times.
10. Push down on the side pin while turning the latch to
the left.
3. Insert the new tank.
11. Close the front cover. The carriage returns to the
home position and the printer returns to its previous
status.
15 - EPSON Stylus Pro 7600 and 9600
Related Documentation
7/02
CPD-14021
EPSON Stylus Pro 7600 and 9600 Printer
Guide
CPD-14020
EPSON Stylus Pro 7600 and 9600 Quick
Reference Guide