1
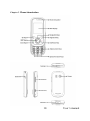
User’s Manual EL350Dual 1 User’s manual Please read the manual carefully. The phone supports dual-card online at the same time, you remove the two phones at the same time bring the trouble to truly enjoy a life of science and technology. This color-screen phone is designed for use on the GSM/GPRS network. Along with the basic communication function, it also provides you with practical functions to help with your work and life, such as card-styled phonebook, 64-chord ring tone, watch/alarm clock,,calculator, games, Bluetooth, FM Radio, powerful film recorder, mp3 and mp4 player, and memory card. In addition, the phone is programmed with a personalized interface and well-designed functions to satisfy your individual needs. 2 User’s manual Contents CHAPTER 1 SAFETY INFORMATION ··············································5 1.1 GENERAL PRECAUTIONS ···························5 1.2 BATTERY PRECAUTIONS ···························6 1.3 CHARGER PRECAUTIONS···························8 CHAPTER 2 PHONE INTRODUCTION ··········································· 10 2.1 SIM CARD ········································· 11 2.2 BATTERY ··········································· 12 2.3 DATA LINE ········································· 14 2.4 POWER ON/OFF ···································· 15 CHAPTER 3 MENU DETAILS ······················································· 15 3.1 FILE MANAGER ···································· 20 3.2 PHONEBOOK ······································· 21 3.3 FUN & GAME ······································ 22 3.4 CALL CENTER······································ 23 3.5 MESSAGES ········································· 25 3.6 MULTIMEDIA ······································ 32 3.7 ORGANIZER ········································ 35 3.8 SETTINGS ·········································· 38 3.9 USER PROFILES ··································· 44 3.10 EXTRA ············································ 45 3 User’s manual 3.11 SERVICES ········································· 45 3.12 BLUETOOTH ······································ 48 CHAPTER 4 INPUT METHODS····················································· 50 CHAPTER 5 TROUBLESHOOTING ··············································· 51 CHAPTER 6 LIMITED WARRANTY ··············································· 53 CHAPTER 7 DECLARATION OF CE CONFORMITY·························· 56 4 User’s manual Chapter 1 Safety Information 1.1 General Precautions Please turn off your phone in an airplane, hospital or areas where the phone may disturb the operation of sensitive or medical equipment. Please use your phone in accordance with the rules of the areas. To prevent the disturbance of the radio wave from causing malfunction or other problems, do not use your phone around weak signal or high accuracy electronic equipment, especially otophone, pacemaker or other medical equipment, fire detector, auto-controlled door and devices. Do not knock violently, shake or toss the phone; otherwise the phone may break down or cause fire. Do not put the battery, phone, or the charger into a microwave oven or high tension apparatus; otherwise the phone may break down. Do not use the phone in areas with a potentially explosive atmosphere; otherwise the phone may break down or cause fire. Do not put the phone in areas with high temperature, high humidity or with air that contains dust; otherwise the phone may break down. Keep the phone out of a child’s reach; otherwise the child may take it as a toy and suffers injury. Do not put the phone on an uneven or unsteady table; otherwise the phone may fall off and break. Do not dismantle or refit the phone; otherwise the phone may break down or 5 User’s manual cause electric leakage or other problems. Do not use needle, stylus or pointed objects to press the keys; otherwise the phone may break down and malfunction. Prevent the phone from nearing magnetic objects such as magnetic cards, credit cards, floppy disks. The radio wave of the phone may erase the information stored on them. Do not expose the phone to humidity, water or other liquid; otherwise the phone may break down. To prevent traffic accident, do not use the phone when driving. Always use the battery and battery charger authorized by the manufacturer. Such products of other brands may cause leakage, excessive heat, burst and fire. Only professional personnel are allowed to assemble and repair the phone. It may be of great danger and against warranty to assemble and repair the phone without permission. 1.2 Battery Precautions Do not throw the battery in fire; otherwise fire and burst may occur. Do not use force when removing the battery; otherwise leakage, excessive heat, burst and fire may occur. Do not short-circuit or put the battery together with metal objects like wire, needle and necklace; otherwise leakage, excessive heat, burst and fire may 6 User’s manual occur. Do not dismantle or refit the battery or weld the contact points otherwise leakage, excessive heat, burst and fire may occur. The liquid leaked from the battery may cause blind if entering into the human eyes. In this case, please wash the eyes with clean water immediately (do not rub the eyes) and go to hospital as soon as possible. Do not use and put the phone near areas of high temperature such as fire or heaters; otherwise leakage, excessive heat, burst and fire may occur. If the battery suffers heating up, discoloration or distortion during use, charging or storage, stop using it and change a new one. If the liquid leaked from the battery contacts skin or clothes, it may cause burn. Wash the skin or clothes with water or go to the hospital when necessary. If the battery leaks liquid or gives off bizarre odor, take it away from the open fire; otherwise leakage, excessive heat, burst and fire may occur. Prevent the battery from humidity otherwise excessive heat, fuming and erosion may occur. Do not use or place the battery under direct sunshine or near areas of high temperature such as automobiles; otherwise it may cause leakage and excessive heat as well as affect the performance of the battery and reduce its life span. Do not charge the batter over 24 hours on end. 7 User’s manual The battery life is limited and will be reduced after long and frequent charging. If it doesn’t work after several charging, it indicates the end of its life. You need to replace it with new battery of specified model. Do not dispose of the battery with domestic garbage; instead you should dispose of it in line with the regulations. 1.3 Charger Precautions Use a 220V AC power; otherwise it may cause leakage, excessive heat and damage to the phone and charger. Do not short-circuit the charger; otherwise it may cause electric shock, fuming and damage to the charger. Do not use the charger when the power cord is broken; otherwise it may cause fire and electric shock. Do not put a container with water near the charger; otherwise water may spill out and enter into the phone to cause excessive heat, electric leakage and other problems. If contacted with water or other liquid, the charger must be removed from the power socket immediately to prevent excessive heat, fire, electric shock and other problems to the charger. Do not dismantle or refit the charger; otherwise injury to the human body, electric leakage and fire may occur. Do not use the charger in places of high humidity such as bathroom; 8 User’s manual otherwise electric leakage, fire and other problems to the charger. Do not touch the charger, power cord or power socket with a wet hand; otherwise electric shock may occur. Do not put heavy objects upon the power cord or refit it. Otherwise electric shock or fire may occur. Disconnect the charger with electric power during cleaning and maintenance. Hold the body of the charger other than the cord when disconnecting the charger with electric power; otherwise electric shock or fire may occur. If the contents of this manual are not consistent with your phone, the phone shall prevail. 9 User’s manual Chapter 2 Phone Introduction 10 User’s manual 2.1 SIM Card Before you use your phone, you must insert your SIM card. It’s your key to enter into the GSM network. All the information related to the connection to the network and logs of calls is recorded in the metal area of the SIM card. Also recorded on the SIM card are names and calls in the phonebook as well as text messages. You can also take the SIM card out and put it into another GSM mobile phone. (The new phone will read the SIM card automatically) To prevent the loss and damage of information stored on the SIM card, the metal area of the SIM card should not be touched and the card should be kept away from electrical and magnetic area. Once the SIM card is damaged, you are unable to enter into the GSM network. TF (T--Flash) Card is the portable memory card with large capacity for storing music and video files, which considerably expands the storage room of the phone. *Note: The phone must be turned off before you remove the SIM/ TF card. It’s prohibited to insert or remove the SIM/ TF card when the phone is in connection with an external power supply; otherwise the SIM/ TF card may be damaged. Before installing the SIM card, turn the phone off and remove the battery as well as other external power. Insert the SIM card into the SIM slot and slide the SIM slot strip back. 11 User’s manual When the SIM card needs to be taken out, turn the phone off, open the back cover, remove the battery; then open the SIM slot strip and take the SIM card out of the slot. Before installing the TF card, turn the phone off and remove the battery as well as other external power. Insert the TF card into the TF slot. When the TF card needs to be taken out, turn the phone off and take the TF card out of the slot. 2.2 Battery 50% of the battery power is charged initially and can be used after unpacking. The new battery needs to be charged for at least 14 hours. After the power is used up (with no power to turn the phone on) for the first time, charge the battery fully. For the second time, charge the battery fully again after the power is used up. And to do it the same way for three tim es to maximize its performance. Installing and Removing the Battery Remove the battery in the following way: 1. Remove the battery cover by sliding it. 2. Uplift the battery from the backside and take it out. Install the battery in the following way: 1. Lock the battery into the battery slot. 2. Push the back cover upward until it is locked firmly. 12 User’s manual Charging the Battery Plug the charger into a power socket. The power is on when the power indictor light is lit *Note:Don’t take up the battery when the battery is charging. Insert the connector of the charger into the port on the right side of the phone. The battery symbol appeared at the top right corner indicates the state of charging. If the phone is turn off during charging, a charging indication picture will be shown instead signifying that charging is in progress. If the phone is in low battery and being used overly, it may take a while for the charging icon to appear on the screen after charging is started. When the charging bars are full and steady, it means charging is complete. If the phone is turn off during charging, a charging indication picture will be shown instead signifying that charging is complete. The process usually takes 3~4 hours. It is normal that the battery, phone and charger may generate some heat during charging. When charging is complete, disconnect the charger from the phone and electric power. *Note: - The battery must be charged with the charger supplied by the manufacturer in a ventilated place with a temperature between +5℃ and +40℃. The use of unapproved charger may cause danger and will invalidate the warranty. 13 User’s manual - Charge the battery when the phone is turned off automatically or displays the warning of low battery. If the battery has not used up, the charging time will be shortened. - The standby time and talk time provided by the manufacturer is calculated in the ideal environment. The actual time may vary with the network condition, working condition and running mode. - Make sure that the battery is well installed and can not be removed during charging. - When charging is complete, disconnect the charger from the phone and electric power. - If the charger has not been disconnected from the phone and electric power, charging will start again after a certain amount of battery power is used in a period of 5~8 hours. This is not advised due to the fact that doing so may have some adverse impact on the life of the battery. 2.3 Data Line Connect the data line when the phone is turned off. The charging icon is displayed on the screen, which indicates that the phone is off and being charged. Connect the data line when the phone is turned on. Menus are displayed on the screen. - Storage Unit: in the storage mode, contents of the phone can be accessed by the computer. - Web Camera: in the camera mode, the phone can work as a camera. 14 User’s manual *Note: Install the drive of web camera on PC. - Charging: use the charging function only. The phone returns to standby, and the other functions are still available. 2.4 Power on/off Press and hold the Power Key to turn the phone on or off. If the phone is turned on without a SIM card, the message of “inserting the SIM card” will be shown. The SIM card will be checked out after being inserted. Then the following information will be shown on the screen: Enter PIN1 (if you have set a password for the SIM card), Enter password of the mobile phone (if you have set a password for unlocking the phone). After the SIM card is decoded successfully, your phone will search for an available network (displayed on the screen). Once the connection is made, the icon of the network supplier will appear in the center of the screen. Now the phone is in standby and ready to use. *Note: if “Emergency number” appears, it means you are out of the service area of the network. However, you can still make emergency calls according to the signal strength of your phone. Chapter 3 Menu Details 3.1 Personal setting of your phones Time and date [Menu] → [Settings] → [Phone settings ] 15 → [Time and date] User’s manual Display launuage selection [Menu] → [Settings] → [Phone settings] → [Launguage] Wallpaper setting on display [Menu] → [Settings] → [Phone settings] → [Display] → [Wallpaper] Tone, Volume, Alert type, Ring type, Answer mode setting [Menu] → [User profiles] → [General] → [Customize] Security settings such as Phone and Key lock [Menu] → [Settings] → [Security settings] Speech volume during phone conversation: You can adjust the speech volume through pressing the volume keys at the phone during the phone conversation 3.2 Usefull Informations WAP und MMS- Einstellung: In order to use WAP and MMS functions you have to do the setting of the WAP, 16 User’s manual MMS and data account profiles of your network provider before using. You have the following three possibilities to set the profiles: Your network provider will send you the profiles automatically, if you change the phone: This option depends on your network provider You can ask your network provider to send the profiles by SMS You can input the profiles by yourself Please refer to the following menu for your input of the profiles: WAP Settings Menue→ Services → Inernet service→ Settings →SIM selection → Profiles → Your network provider select →Options → Aktivate. MMS-Settings Menue Messaging MMS MMS settings Profiles SIM selection Your network provider select Options Activate. Audio player settings Your phone can play only the MP3 files. 1) Please check before, whether the music file is a MP3 file or not. 2) Please save your music files in the folder of My Music or Music in the memory card. 3) Please refresh the list of music: Menu Multimedia Audioplayer List Options Refresch list 17 User’s manual Factory reset(Restore factory settings In case you have any problem by using of your phone you can reset you phone, then the phone will be back to factory settings: Menu Settings Restore factory settings: Please input the password 1122.. Please make sure your datas in the phone before your factory reset. User memory extention Unfortunately the user memory of the phone is limited. We recommend you to use your memory card for the extention of memory capacity of the phone. You can use the T-Flash(MicroSD and MicroSDHC) card to the phone. Standard storage Please be informed of the standard storages of your phone for the following functions: - In Phone: Camera capture, Video recording, Tone recording - In Memory card: Audio player Time and date setting In case your phone is in the position longer than 1 min. without battery, the time and date of your phone will be reset and your phone will indicate by pop up on 18 User’s manual display to set the time and date newly and you should set the new time and date again. Data management and edit by PC You can manage and edit your data and files stored in the memory card by PC, but not your data and files stored in the phone. Therefore, please be informed that PC will show only the storage of memory card, if you connect your phone to the PC by USB cable. Please put your memory card into the phone and connect your phone to the PC and select <Storage mode> on display. Please open the work station on your PC and find the external driver for the memory card and make proceed you data management and edition in PC. Key lock You can lock and unlock the keys on the phone in order to prevent a usuefull operaton of phone: Menu Settings Security settings Auto keypad lock You can select your preferred setting for keypad lock.. Usefull Writing You can change the input methode by the following keys during writing: : ABC, Abc, abc : DE, eZiDE, ABC, eZiABC, 123 19 User’s manual Flashlight Your phone has a flash function. You can switch on and off through pressing and holding the camera keys: 3.3 File manager Functions: Open: display the contents of the folder. Create: create a new archive under the current folder. Format: format the folder. Rename: rename the files or folders. Delete: delete the files or folders. Sort: sort the files or folders. Details: check the details of the files or folders. Copy: copy the files or folders to any position. Move: move the files or folders to any position. Delete All: delete all the files or folders of the current folder. Folder - Audio: the default storage path of audio. - Images: the default storage path of images. - My Music: the folder for uploaded audio files and the default reading path of 20 User’s manual the audio player. - Photos: the default storage path of photos. - Video: the default storage path of videos . 3.4 Phonebook Quick Search: enter into the browse screen of the phonebook. You can enter corresponding information in the searching column below to sort the entries out. Modes of searching include: 1. English (lower case); 3. Number. Press the IME Key to switch among input methods. - SIM1 IP Dial: activate the IP dial-up of numbers in the phonebook by SIM1 - SIM2 IP Dial: activate the IP dial-up of numbers in the phonebook by SIM2 - Send SMS: send message to the number - View: check the details of entry - Edit: edit the entry - Delete: delete the entry - Duplicate: backup the entry - Move: move the entry - Copy: copy the entry Search contact: search the phonebook for entry by name. Add new contact: add a new entry into the phonebook. You can store the entry into the SIM1 card , SIM2 card or the phone *Note: They are different from each other in terms of storage format Copy All: copy all the entries from the phone to the card1, card2 ; copy all the 21 User’s manual entries form the card to the phone, or copy all the entries form the card1 to card 2; or vice versa. Delete: select the items to delete the call record. Select to delete all the call record from SIM card1 . Select to delete all the call record from SIM card12.Select to delete all the call record from the phonebook. Select to delete one by one of the call record. Calls Groups: the phone is programmed with 5 calls groups. You can make individual setting for each group, such as rename, ring type, incoming call picture and each group member’s personal setting. Settings: set the phonebook in four categories: Memory Status, Preferred Storage, Extra number and My Number. - Memory Status: check the memory of the SIM card and the phone. - Preferred Storage: choose the preferred storage location, the phone or the SIM card. - Extra Number: Other numbers such as the caller ID, service number and urgency number stored on the SIM card. * Note: service number need the support of SIM card. - My Number: edit and save the detailed information of the user. 3.5 Fun & Game Puzzle - New game: start a new game. - Game level: select the game level. - Best grades: record the player’s playing record. 22 User’s manual - Help: get to see the game rules. Game setting - Audio: turn on/off the background music - Vibration: turn on/off the games vibration. - Volume: set the volume level. 3.6 Call center Call history You can select SIM1 call history,or SIM2 call history,the manus as follows : Missed Calls: to take the record of 20 missed calls. Dialed Calls: to take the record of 20 dialed calls. Received Calls: to take the record of 20 received calls. In the list of Logs, press Ok to check the detail of the entry, such as the date, time, name (if recorded in the phonebook) number and times of calling. In Detail of the entry, press Option for the following operations: - IP Dial-up: activate the IP dial-up of numbers in the record - Send message: send message to the number - Send MMS:send mms message to he number - Delete all:Delete all the record - Delete: delete the entry. - Save: save the entry in the SIM card or the phone. - Dial: dial the entry. - Edit: edit the entry and add it into the phonebook. 23 User’s manual Delete Log: The user can choose to clear all the entries of a list. Call time: Four sub-menus are provided in Call time: Last Call, Dialed Calls, Received Calls and Clear All. Last Call: check the duration of the last call. Dialed Calls: check the total duration of dialed calls. - Received Calls: check the total duration of received calls. - Clear All: clear the timer and restart counting. Call cost:The Call Meters can keep the record of your total call charge. - Last Call Charge: Check the last call charge. - All Call Charger:Check the total call charge. - Reset Call Meter: Enter PIN2 code to reset the call meter. - Charge Limitation: Enter into this sub-menu and key in the PIN2 code to browse, edit or deactivate the function. - Price and Rate: Enter into this sub-menu to browse, edit or deactivate the function, the latter two functions need the input of PIN2 code. *Note: Some operations require the PIN2 code; please contact your network supplier for it. *Note: Network support is needed. Message Counter Sent: record the number of sent messages. Received: record the number of received messages. Press the Left Soft Key of “reset” to clear the above two items. 24 User’s manual GPRS counter - Last Sent: record the bytes sent last time. - Last received: record the bytes received last time. - All Sent Data: record all the bytes sent. - All Received Data: record all the bytes received. - Clear Counters: start counting 3.7 Messages Text Message Inbox:Can select the SIM1 Inbox or the SIM2 Inbox.Check the received messages. When the Inbox message list appears, press Ok to read the message. You can choose the following options: - Reply: reply to the sender of the message. - Delete: delete the message. - Edit: edit the message. - Forward: forward the message. - Copy to SIM Card (Phone): copy the message from the phone to the SIM card, or vice versa. - Move to SIM Card (Phone): move the message from the phone to the SIM card, or vice versa. - Delete All: delete all the message in the inbox - Copy All: copy all the message from SIM card to the phone or from the phone to SIM card. - Move All: move all the messages from SIM card to the phone or from the 25 User’s manual phone to SIM card. - Use Number: dial or store in the phonebook the number extracted from the message. - Use Link: Extract and store the web link contained in the message. Outbox: Can select the SIM1 outbox or the SIM2 outbox check the un-sent messages. When checking the Outbox message list, press Confirm to read the message. You can choose the following options: - Send form SIM1: you can send the message form SIM1 to more than one recipient by choosing sending to multiple recipients or group. - Send form SIM2: you can send the message form SIM2 to more than one recipient by choosing sending to multiple recipients or group - Edit: edit the message. - Delete: delete the message. - Copy to SIM Card (Copy to Phone): copy the message from the phone to the SIM card, or vice versa. - Move to SIM Card (Move to Phone): move the message from the phone to the SIM card, or vice versa. - Delete All: delete all the message in the outbox. - Copy All: copy all from SIM card to the phone or from the phone to SIM - Move All: move all from SIM card to the phone or from the phone to SIM - Use Number: dial or store in the phonebook the number extracted from the message - Use Link: Extract and store the web link contained in the message 26 User’s manual Write message: Enter in to write message. You can enter short message. - Complete: select the entry to stand for finishing keying message and you can take the next steps. 1. Send: to send the message, select to get into recipients and you can enter the phone number or look from the phonebook and select the receiver’s phone number. Enter confirm to send. 2. Save to drafts: save it into the drafts. 3. Send to many: send the message to several phone numbers. - Insert templates: insert the text template into the message. - Insert number: add numbers from the phonebook. - Insert name: add names from the phonebook - Insert bookmark: insert bookmarks from the wap. - Input method: change the input method. - Save to drafts: save it into the drafts. *Note: some of the cities and district message centers do not support message over than 70 characters (or 160 English texts). Templates: frequent used sentences could be saved here to avoid rewrite it during message editing. It is editable and could be deleted. Message setting: before using message function, you need to do necessary settings. - Profile settings: set a proper mode for mobile message. Enter into each mode to find the matching name, message centre number, validate time, sending profile setting. 27 User’s manual - Common settings: activate Reports or Reply Path. - Memory status: check the available space in SIM card or mobile message box. - Preferred storage: choose to save in mobile or SIM card. MMS Multimedia messages contain text, picture and sound.Through MMS (Multimedia Messaging Service), you can not only send or receive pictures and texts, but also receive audio files attached to messages. The phone supports multimedia messages with multiple pages, i.e. each page consists of one picture, one piece of music and text. A multimedia message contains several such pages. Size of pictures in the multimedia messages will be automatically adjusted to the screen of the phone. * Note: This function requires the support of the network supplier. Write a Message: create a new multimedia message. You need to fill in the recipient, copy, confidential copy, subject content and attachment. Inbox: read the multimedia messages received. (Similar to the inbox of text messages.) Read: read the multimedia message. - Details: check the detail of the multimedia message, including the addresser, subject, date, time and size.。 - Use number: extract the sender’s number. - Reply: reply in multimedia format to the sender of the multimedia message or 28 User’s manual all the senders and recipients - Reply: reply in text message to the sender of the multimedia message or all the senders and recipients Forward: forward the multimedia message to others. Delete: delete the multimedia message. Delete All: delete all the multimedia messages in the inbox. Outbox: store the multimedia messages sent unsuccessfully. Drafts: store the multimedia message not intended to send. Templates: frequent used sentences could be saved here to avoid rewrite it during message editing. It is editable and could be deleted. MMS Setting: set the parameters of sending and receiving the multimedia message. - Profiles Setting: MMS setting, including the settings of MMS center, linking type, gateway, port and account. *Note: MMS setting needs to set according to the local network supplier’s standard, such as linking type select as WAP or HTTP. - Compose: set the parameters of editing multimedia message, such as edit mode, Picture Zoom Out, signature and so on. - Send: set the parameters of sending the multimedia message, such as Period Validity, Sent Report, Read Report, Priority, intermission time and Sent Time - Retrieve: set the parameters of receiving the multimedia message, such as 29 User’s manual main network, roaming network, send report, read report and permit sending report and so on. - Filter: filter the multimedia messages. - Memory: space of the saved multimedia messages, used memory and free memory. Email Function of using validates email account to send or receive emails. Emails contain text and attachment. * Note: This function requires the support of the network supplier. Send and Receive: connect to the email server to send or receive emails. Edit emails: edit a new mail message. You can fill in receiver, copy to, confidential copy to, title, priority, mail content and attachment. Inbox: check receiving emails. - Reply: reply emails to the senders or all senders and receivers. - Not attached the receiving emails while replying: reply emails to the senders or all senders and receivers without attaching the receiving mail content. - Forward: forward the current emails to other receivers. - Delete: delete the current emails. Outbox: save the un-sent emails Sent items: save the sent emails: Draft: after finishing editing, the draft could be saved here without sending. Delete emails: all emails in inbox, outbox, sent items and draft could be deleted. 30 User’s manual Email setting: - Sending setting: set the parameters when sending emails, such as files name, sending account, contact agreement, automatic receiving and sending, maximum receiving capacity and so on. *Note: sending account needs to be the defined account setting provided by network supplier, such as China GPRS user can select the sending account as CHINA MOBILE EMAIL. - Sending server setting: set the parameters while sending emails, such as sending server, sending connection, display name, email address, user name, password and so on. - Receiving server setting: the parameters while receiving emails, such as receiving server, receiving connection, receiver name, password and so on. *Note: need to set up the validate email account. - Signature: signature in editing emails. Templates: frequent used sentences could be saved here to avoid rewrite it during email editing. It is editable and could be deleted. Voicemail server Functions of the voice mailbox are as follows: Edit: you can set the name and phone number. Connect to the Voice Mailbox: dial the voice mailbox you set to listen to the voice message. Broadcast message Functions of receiving and reading the messages of cell broadcast are as 31 User’s manual follows: Receiving Mode: open or close the receiving of cell broadcast message. Read Message: read the cell broadcast messages you subscribe to. Language: set the language of cell broadcast. Channel Setting: set the channel of cell broadcast, including the selection, add, edit and delete. 3.8 Multimedia Camera The phone is equipped with a camera. Enter into Camera and press ok to start photo taking. Options are as follows: photos: enter into Album. Camera Settings: set the relevant parameters of photo taking Image Settings: set the size and quality of photos. White Balance: set the color of the light. Scene mode: set the mode of automatic or night shooting. Effects settings: choose the display style. Add Frame: choose the frame for the picture Storage: save the picture in the phone or the memory card. Resotore default: reset to default setting Image viewer Store the pictures taken by the camera. 32 User’s manual View: zoom in the selected picture. Browse style: change the mode of picture browse. “Matrix” and “List” are available. Forward: use the selected pictures as the wallpaper, screen saver, switch on/off film, and adding to the phonebook. Rename: rename the selected picture. Delete: delete the selected picture. Delete All files: delete all the pictures in the album. Sort by: sort the pictures of the selected folder by name, type, date or size. Storage: change or choose a default storage path for the pictures. Video recorder The phone is equipped with a film recorder. Enter into Film Recorder and press ok to start film recording. Options are as follows: To player:enter into film player and play the film recorded Camcorder Settings: set the relevant parameters of the recorder Video Settings: set the size, format, recording time, quality and sound effect of films. Effects settings: choose a special effect for the recording. Storage : save the picture in the phone or the memory card. Restore default : reset to default setting 33 User’s manual Video player Play the films stored by users. Options are as follows: Play: play the selected file. Forward: transfer the selected file to the phonebook, screen saver, and switch on /off film. Rename: rename the selected file. Delete: delete the selected file. Delete All files: delete all the files. Sort by: arrange the files in terms of name, type, date, size or none). Storage: check the location of the file (in the phone and the memory card). Audio player Select Music Player to enter into the Audio Player. Play: play the selected file. Details: check the details of the song Add to the Ring: add the song into the ring library of profiles. Refresh list: update the playlists. Settings: set the playing of multimedia files. Playlist Location: set the default reading path. Create the list automatically: whether to update the playlists every time the phone is turned on or not. Repeat: repeat the playing. 34 User’s manual Random: play randomly. Background playing: playing will not stop when exiting the menu. Sound Effects: Set the sound effect of audio player. Record Choose to record. Press left soft key to do the operations: Record: record a new sound Play: play the selected recorder Append:: add new recorder to the original recorder. (only for AMR format) Rename: rename the recorder Delete: delete the current recorder Delete all files: delete all the recorders Setting: set the recorder’s format Forward: send the recorder to profiles or sendy by multimedia message. FM Radio the phone supports FM broadcast. Select the FM shortcut to to the relative actions. Press select key to do the following actions: Channel list” edit the name of the channel and display in the list Manual Input: direct input FM channel frequency, eg 103.7 Preset auto search: automaticly search FM channel and updated the list. Settings: background play, FM speaker play. 3.9 Organizer Calendar 35 User’s manual Enter into the sub-menus of Calendar. Calendar: create a new event and add an alarm clock to it by Once, Daily, User-defined, Weekly, and Monthly. Once: the event will warn only once. Daily: the event will warn at the specified time every day. User-Defined: the event will warn at a time of the week defined by the user. Weekly: the event will warn at the specified time every week. - Monthly: the event will warn at the specified time every month. Jump to Specified Date: jump from the current date to the specified date. *Note: Due to the memory limit, stored entries should not exceed 70; otherwise entries may be missing Tasks Add Date: the date of a memo entry. Time: the time of a memo entry. Remark: the message shown on the screen when warning. Alarm Clock: open or close the alarm clock. Mode: 1. Once: warn only once. 2. Daily: warn at the specified time every day. 3. User-Defined: set the warning time of the alarm clock in a week. 36 User’s manual 4. Weekly: warn only once in a week. 5. Monthly: warn only once in a month. Browse: check the stored entries. Add: add a new entry Edit: edit the stored entries. Delete: delete a selected entry. Delete All: delete all the entries. Transfer: transfer the selected entry to another phone by messaging, or store it in the archives of the phone. Alarm On/Off: open or close the alarm clock. Time: set the alarm time Mode: Once: warn only once. Daily: warn at the specified time every day. User-Defined: set the warning time of the alarm clock in a week. Ring setting: Choose melody or saved FM record as the ring tone Snooze time (minute) : Choose to snooze every few minutes. There are 11 options such as every 1 min to every 10 min and default. 37 User’s manual Ring method: the option ring tones are ring, vibration, vibration and ring. World clock Use direction key to read each city’s time zone and the date and time in each city. 3.10 Settings Dual SIM settings Dual SIM open:open the dual SIM Only SIM1 open:only open the SIM1 Only SIM2 open:only open the SIM2 Flight mode:close the network,open flight. Phone Setup Time and Date: set time and date of the phone. - Set home city:Set the city of you seat. - Time/ Date Setting: set the current time and date. - Time Format: set the display format of time. Schedule power on/off: set the time when the phone is turned on and off automatically. Language: set the language for the menu Preferred Input Method: select a default input method. Display characteristic: - Wallpaper: select the wallpaper for standby. - Screen saver: select a screen saving picture for standby and set the waiting 38 User’s manual time. - Power on dispaly: select the film played when the phone is turned on. - Power off dispaly: select the film played when the phone is turned off. - Date and Time Display: Open or close the display of the current time in standby. Auto updata of data and time:Open and close the auto updata of data and time. UART settings - Select SIM1 or SIM2 for UART port. Misc. settings: - LCD Backlight:set mobile LCD backlight brightness and time. Call Settings SIM1 call settings 1、Caller ID Default: sending of your phone number in the default setting. Hide: the other side cannot see your phone number during the calling. (Require the support of the network supplier.) Send: the other side can see your phone number during the calling. 2、Call Waiting: You can activate it to be notified of incoming calls while you have a call in progress. 3、Call Diversion: Unconditional: divert incoming calls to another number unconditionally. 39 User’s manual If Out of Reach: divert incoming calls to another number if you cannot be reached. If Not Answered: divert incoming calls to another number after you phone rings for a specified time without answering. If Busy: divert incoming calls to another number when you have an active call. All Data Calls: divert data calls. Cancel Diversion: cancel the diversion of calls. 4、Call Barring: to restrict calls - Outgoing Calls: restrict the making of calls. - Restrict Incoming Calls: restrict the receiving of calls - Cancel Barring: cancel the restriction. (Need PIN2 code.) - Change Password: change the password 5、Line Switch: Switch between line 1 and line 2. (Note: when line 2 is chosen, no calls can be made.) SIM2 call settings The same to the SIM1 call settings. Speed dial In standby, press and hold corresponding numeric keys to dial the number set for them. Advance setting 40 User’s manual 1、Black list:you can edit the phone number in the restricted call lista and choose to turn on or off the function. If set on, the phone number in the list would be rejected to be connected. 2、Automatic Redial: Have your phone redial a number after it fails doing so 3、IP Dial-up: to set and store the IP dial-up of numbers in the phonebook 4、Call time display: Display the duration of a call at the end of a minute 5、Call time reminder: display the duration of a call 6、Auto quick end:end the call at the setting time. 7、Reject by sms:reject through sms Network setup Show SIM1 network settings and SIM2 network settings. Network Selection: Automatic: search automatically for the network to which the SIM card belongs to. Manual: search for all available networks and register manually. Preferred Network: pre-store your preferred networks Security setup SIM security setup 1、SIM1 Lock: You can make the security settings to prevent your phone or SIM card from unapproved use. 41 User’s manual The PIN code can prevent your SIM card from unapproved use. If the PIN code is closed, you can open it to activate its protection. The phone will ask for the PIN code next time the phone is turned on. If the PIN code is opened, you can close it to deactivate its protection. You can also change the PIN code by following the screen indication: input the previous PIN code, input the new PIN code and input again. *Note: The SIM card will be locked if the inputs of PIN codes are wrong for three times. Then you need the PUK code to unlock the SIM card. The PIN code and PUK code are supplied together. If not, please contact your network supplier. The default PIN code is 1234; please change it into your personalized password. 2、 Fixed Dial: If activated, only the numbers set in the list or numbers started with the digits in the list can be made. (Require the support of SIM card.) Mode: open or close the function of Fixed Calls. (Need to input PIN2 code.) - Fixed Calls List: input the fixed phone numbers into the list. *Note: Open or close the function of Fixed Calls requires the input of PIN2 code. Please contact your network supplier for the PIN2 code. Enter Fix Calls; numbers of fixed calls will appear in the directory. 3、Barred Dial: Contrary to Fixed Calls, you can restrict the calling of certain numbers. 4、Change Password: change the passwords of PIN code, PIN2 code and the phone. 42 User’s manual *Note: Certain functions are network service. SIM2 security setup The same to the SIM1 security setup. Phone Lock: The phone lock can prevent your phone from unapproved use. Select Phone Lock to activate the protection of your phone. The phone will ask for the password next time it is turned on; press again to deactivate the protection. Use the Right Soft Key to clear a wrong input when entering the password and press OK to confirm. For example, if the password is set as 1122, enter: 1122. *Note: The default password of the phone lock is 1122; please change it into your personalized password. If you forgot the password of your phone, you would have to contact the distributor or the local service center to unlock your phone Auto Keypad Lock: - the keypad will lock itself after the phone is unused for a specified time you set. - Open Keypad lock in standby: press the send key to unlock the keypad. Change password: - Modify the password. Restore factory Settings 43 User’s manual Reset to default settings with the password of 1122. 3.11 User Profiles General Activate: activate the general profile Personalize: Enter into individual settings of the general profile. Functions as follows: - Tone settings: change the ring tone for incoming calls, alarm clock, phone on/off, phone sliding, message and keypad tone. - Volume: adjust the volume of ring tone and keypad tone. - Alert type: ring, vibration, vibration and ring, ring after vibration. - Ring type: single repeat and ascending. - Extra tone: warning error camp on connect. - Incoming Call Alert: ring once, ringing or ascending. - Answering Mode: coner answer and any key. Meeting The same as the general profile. Outdoor The same as the general profile. Indoor The same as the general profile. Earphone 44 User’s manual Automatically activate the profile when earphone is plugged in. The rest is the same as the general profile. Bluetooth The same as the general profile 3.12 Extra Calculator Press the key 0-9 for the input of numbers and the # key for that of the decimal point. Press the key up, down, left and right for the input of the mathematical symbol of +、–、x、÷. Press the Right Soft Key to clear the last entry. Press the Right Soft Key to “Exit” calculator; and press the Left Soft Key to “Get” the result. *Note: the precision of the calculator is limited. There may be rounding errors, especially when a number can not be divided Stopwatch - Calculate the time which is taken. Flashlight - Select activate or deactivate for using flashlight. 3.13 Services Internet services Menu function: Homepage: log on to the homepage. The homepage is a WAP site you set in 45 User’s manual the connecting settings. If you haven’t set it, it will use the one set by the manufacturer. Bookmark: display the bookmarks available. Select it to connect to the website. History: keep the websites you surfed on record. Enter Address: enter any WAP website or other internet websites. Setting: make the setting of websites browsing. - Edit Setting Profile: select the Setting Profile among the 10 options provided. - Browsing Properties: parameter settings of browsing websites, including standby time and picture display. - Service Message: open or close service message. - Clear Buffer Memory: clear the buffer memory. Clear Personal Information: clear your personal information. Clear History: clear the history. - Certificate: check the certificates. Online functions - Jump to: jump to the directed address. - Right Soft Key (Back): back to the previous page - Homepage: back to the homepage - Refresh: refresh the page - Bookmark: display the bookmarks available. Select it to connect to the website, edit the addresses or names of bookmarks or delete the bookmarks. 46 User’s manual - History: check the websites you surfed on the record - Enter Address: enter directly the URL to go to the website - Set as Homepage: set the current page as the homepage - Save Picture: save the picture of the current page. - Service Inbox: check the service inbox for messages. - Settings: enter into the setting menu. - Exit: exit the WAP explorer and back to the main menu. *Note: GPRS service requires the support of the network and is only available after the service is put into operation. Account information GSM Data: Name: the name of the account. You can edit it. Number: the number of the account. User’s Account: the account number of dialing server (not WAP gateway). Password: the password of dialing server (not WAP gateway). Line Type: analog line or digital line. Speed: select the proper transfer speed. - Network Domain: IP address。 GPRS: Name: the name of the account. You can edit it. - GPRS Connect Node: enter APN. User’s Account: the account number of dialing server (not WAP gateway). 47 User’s manual Password: the password of dialing server (not WAP gateway). - Certification: choose the encryption method of the certification. STK STK is the additional service provided by network supplier. the function menu is different from each SIM card. 3.14 Bluetooth The phone is equipped with the Bluetooth technology, and supporting ear bud mode, text transferring mode and other modes. Bluetooth menu settings as follows: Activate: open or close Bluetooth. Search for hands-Free Device: search for the current Bluetooth hands-free devices. My device: the list of devices being connected. Device in Connection: devices being connected. Settings: include the settings, such as searchable setting, file transfer setting My Bluetooth: check the status of the Bluetooth. Establish a Bluetooth connection Activate the Bluetooth, select “Search for Hands-Free Device”, or enter into “My Device” - “Option” - “Search for New Device” to search for the Bluetooth device within the effective range. Enter the agreed password to establish a match between devices before data transfer. After connecting with the Bluetooth, the following functions are applicable to the connected devices. 48 User’s manual - Connecting: obtain the information resources from the connecting devices. - Device Name: change the device name of the other side. - Delete: delete the name of a selected device. - Delete All: delete all the records in the device list. - Service Record: check the service available. - Searching for new device: search for new devices within the effective range. *Note:1.By using the Bluetooth technology, the phone can get in connection with devices compatible with Bluetooth within 10 meters. However, the connection may be affected by barriers like wall or other electronic devices. 2.The use of Bluetooth may accelerate the consumption of battery power and shorten the battery life. It is advisable to turn Bluetooth off when not needed. 3.To ensure a smooth connection between the phone and other wireless technology supported devices, please use the accessory authorized by the device manufacturer. Please make sure with the manufacture if the device is compatible with the phone . 49 User’s manual Chapter 4 Input methods Input Methods General Introduction This phone supports English input methods. It provides input method such as Capital letter, small letter, numbers etc. Functions allow the inputs of characters include: Write and edit text message Write and edit names and numbers in the phonebook. Search for names of the numbers in the phonebook. Memo and alarm o’clock in the memo. Keypad Left Soft Key: is to confirm. Right Soft Key: is to clear a character or back. Numeric Keys(0--9): in the status of Pinyin input methods, means letters on the specific keys;In the status of English input methods, means letters on the specific keys. * Key: call out Symbols in any input method. 50 User’s manual Chapter 5 Troubleshooting Settings of certain functions fail Such functions are not supported by the network supplier or you haven’t applied for them. PIN locked Enter the password and PUK code supplied with the SIM card or contact the network supplier. PIN2 locked Enter the password and PUK2 code supplied with the SIM card or contact the network supplier. Call meter invalid The data transfer counter doesn’t work; please contact your network supplier. SIM card errors 1. The SIM card is dirty, clean it. 2. Reinstall the SIM card 3. The SIM card is damaged, change one. The Manufacture reserves the ultimate right for the interpretation of this 51 User’s manual manual. The Manufacture reserves the right for the changes in the technical standards without advanced notice. The Manufacture reserves the right for the changes in this manual without further notice. The Manufacture reserves the right for the changes in the technical specification without advanced notice. 52 User’s manual Chapter 6 Limited Warranty Mobistel Service Center in EUROPE (Mobistel GmbH) LIMITED WARRANTY Mobistel Service Center in Germany (Mobistel GmbH) will repair or at its option replace your product without charge, which proves to be defective in material or workmanship under normal use. The warranty period shall be from the date of original purchase. MODEL No. Warranty Battery and Warranty Period Accessories Period EL350Dual 24 Months 6months TO PROVE WARRANTY COVERAGE: The warranty is only valid when the warranty card is properly filled out, and upon presentation of the proof of purchase consisting of original sales receipt or copy of sales slip confirmation, indicating the date of purchase, dealer name, model, serial/IMEI number and product number. In order to claim the warranty service you must send the product free to M/s Firma Mobistel GmbH, the authorized service company in Germany, packed in a damage-proof manner. Mobistel Service Center in EUROPE Mobistel GmbH Rudolf-Diesel-Str. 18 65760 Eschborn Germany Phone : 49(0)6173 93 29 20 Fax : 49(0)6173 60 85 56 E-mail : [email protected] Warranty Conditions Mobistel Service Center in Germany(Mobistel GmbH)’s obligations are to the repair of the defective part, and at its discretion replacement of the 53 User’s manual product(service exchange unit) Warranty repairs must be carried out by a service company authorized from Mobistel Service Center in Germany (Mobistel GmbH). No reimbursement will be made for repairs carried out by non authorized person and warranty cover will not be valid for any repairs or damage caused by such repairs. Repair or replacement under the terms of this warranty does not give right to extension to or a new starting of the period of warranty. Repair or direct replacement under the terms of this warranty may be fulfilled with functionally equivalent service exchange units. The warranty is not applicable in cases other than defects in material, design and workmanship. The warranty does not cover the following: Periodic maintenance and repair or replacement of parts due to normal wear & tear Abuse or misuse, including but not solely limited to the failure to use this product for its normal purposes or in accordance with Mobistel instructions usage and maintenance Failure or damage of the product under pressure and from improper testing, operation, maintenance, installation, adjustment, unauthorized software applications or any alteration or modification of any kind. Defects or damage due to range, coverage, availability, grade of service, or operation of the cellular system by the cellular operator. Upgrading of software due to changes in network parameters The problems that arise as a result of use of the accessories not approved by Mobistel. Accidents, Acts of God or any cause beyond the control of Mobistel caused by lightning, water, fire, public disturbances and improper ventilation Damage of the battery caused by overcharging or failure to use in accordance with the specific instructions of care outlined in the product manual The model, serial/IMEI number and product number on the product has been altered, deleted, removed or made illegible. The batteries are charged by other than Mobistel approved battery chargers 54 User’s manual Any of the seals on the battery enclosure or cells are broken or show evidence of tampering, disclaimer : SIM card, stored data, Mobistel is not to be held responsible for ensuring that the SIM card is removed from any returned products, and for saving any stored data, for either in guarantee and out of guarantee products If a product any time after the warranty term or where this warranty does not apply due to the nature of the defect or fault, then Mobistel Service Center in Germany (Mobistel GmbH) may in its discretion carry out such repairs subject to customer paying Mobistel Service Center in Germany (Mobistel GmbH) its fees from such a repair. This warranty does not affect the consumers’ statutory rights against the dealer from their purchase/sales agreement. This warranty will be the purchasers’ sole and exclusive remedy and neither Mobistel nor its distributors shall be liable for any incidental or consequential damages for breach of any express or implied warranty of this product. 55 User’s manual Chapter 7 Declaration of CE Conformity Declaration of CE Conformity(R&TTE) We, Mobistel GmbH, declare that the product GSM Mobile Phone: EL350Dual to which this declaration relates, is in conformity with the following standards and/or other normative documents: EN50360:2001/IEC 62209-1 :2006, EN 60950-1:2001+A11:2004, EN301 489-1(V1.6.1), EN 301 489-17 (V1.3.1), EN300 328 V1.7.1 We hereby declare that all essential radio test suites have been carried out and that the above named product is in conformity to all the essential requirements of Directive 1999/5/EC. The conformity assessment procedure has been carried out according to the Article 10 and detailed in Annex (IV) of Directive 1999/5/EC A Technical Construction File and all other relevant technical documentation is field at the development house : Mobistel GmbH, Rudolf-Diesel-Str. 18, 65760 Eschborn, Germany TEL:+49(0)6173 608 395, FAX: +49(0)6173 608 556 Eschborn, Germany, Apr. 13th, 2010 -----------------------------------------------Place and date of issue Donguk Hwang Signature of authorized person 56 User’s manual