1
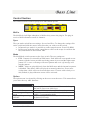
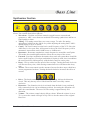
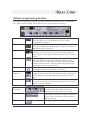
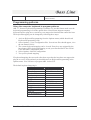
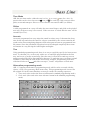
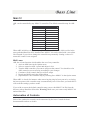
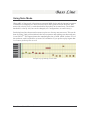
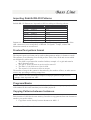
Bass Line
Features.....................................................................................................................................3
Introduction ..............................................................................................................................4
Installation PC..........................................................................................................................4
Installation Mac OS X .............................................................................................................4
Conventions and definitions....................................................................................................5
Architecture ..............................................................................................................................5
Layout .......................................................................................................................................6
Control Section.........................................................................................................................7
Midi In ..............................................................................................................................7
Sync ..................................................................................................................................7
Mode.................................................................................................................................7
Option...............................................................................................................................7
Pattern...............................................................................................................................8
Pattern selector.................................................................................................................9
Tempo...............................................................................................................................9
Synthesizer Section................................................................................................................10
Pattern programming Section................................................................................................11
Programming patterns............................................................................................................11
Using the computer keyboard to program patterns .....................................................11
Time Mode.....................................................................................................................13
Slides ..............................................................................................................................13
Accents ...........................................................................................................................13
Ties .................................................................................................................................13
Alternative programming mode....................................................................................13
Converting 303 Patterns to ABL (Using keyboard) ....................................................14
Midi CC ..................................................................................................................................15
Midi Learn......................................................................................................................15
Automation of Controls .........................................................................................................15
Configuration..........................................................................................................................16
Using Pattern Mode ...............................................................................................................17
Pattern Sequencing ........................................................................................................17
Pattern Sequencing without retrigger...........................................................................17
Using Note Mode ...................................................................................................................18
Importing Rebirth RB-338 Patterns ......................................................................................19
Freebee/Text pattern format ..................................................................................................19
Programs/Banks .....................................................................................................................19
Copying Patterns between Instances.....................................................................................19
Midi Output ............................................................................................................................20
Changing Skins ......................................................................................................................20
Thanks.....................................................................................................................................21
Appendix: Skin interface format...........................................................................................22
Appendix: Specifications.......................................................................................................23
Bass Line – User’s Manual
2
Features
Bass Line Emulation
High pass filter
Full Midi CC control with learning function
18dB (classic) or 24dB selectable filter
Analog tuning mode
Internal sequencer
Rebirth Pattern Import
Freebee/Lush pattern import/export
Two Midi modes
VST Host sync
Integrated distortion unit
New features (version 1.1):
New GUI with self illuminated buttons
Load/Save multiple MidiCC maps
Computer keyboard programming with user selectable remapping
View configuration files from Option menu
Two new pattern randomization functions
Two function buttons that can be assigned to any pattern transformation functions
Additional 18dB filter (pure18dB)
New features (version 1.5)
Improved oscillator emulation
Additional foldback distortion unit
Skin interface (two included skins)
Midi output (unsupported feature as this is very host dependant).
Knobs send MidiCC which enables ABL to be used as a virtual Midi controller
General model improvements
~70 included example patterns (Thanks Rob)
Improved registration process with cross platform license keys
Copy/Paste pattern can now be done between instances
Additional programming mode
Available for PC: VST and Mac OS X (Panther): VST and AU
Bass Line – User’s Manual
3
Introduction
Thank you for using AudioRealism Bass Line! The Bass Line is a monophonic
programmable synthesizer plug-in which can memorize and playback bass patterns in
sync with a host sequencer. The voice of the original Bass Line is well known and has
become standard studio equipment. The AudioRealism Bass Line is a digital recreation of
that instrument, offering every characteristic of the analog instruments while maintaining
all the benefits of digital algorithms. More benefits of moving into the digital realm are
for example unlimited (that the CPU can support) number of instances and control
automation allowing previously unheard effects with the well known voice.
AudioRealism Bass Line should be easy to use if you are familiar with other virtual
instruments or the original Bass Line.
Installation PC
1. Locate the executable Install_BassLine.exe and run.
2. The installer will suggest a path to install the plug-in into.
3. If the path is correct, click <Install> else browse to the path where you keep your
VST plug-ins and then click <Install>.
4. After starting the plug-in, enter the registration information that you received
Installation Mac OS X
1. Locate the executable Install_BassLine_Vst.sit or Install_BassLine_AU.sit
depending which one you have received.
2. The installer will suggest a path to install the plug-in into.
3. After starting the plug-in, enter the registration information that you received.
Currently the AudioUnit version is only supported for Panther.
Some hosts need to rescan the plug-is directory to make the new plug-ins visible from the
host. Consult your host documentation. In case of problems, please contact
[email protected].
Bass Line – User’s Manual
4
Conventions and definitions
1. AudioRealism Bass Line is often referred to as ABL in this document.
2. A Midi note/event is an entity that is sent from the host to the plug-in.
3. A note is an entity that the plug-in plays. It contains information about pitch,
slide, accent and time (rest or 16th ).
4. A pattern consists of a number of steps (1-64). Each step has a designated note.
5. A program consists of synth settings (like cutoff freq., resonance, waveform etc.)
6. A state contains the modes (like Midi and sync) of the plug-in, the step number
and configuration information.
7. A bank consists of a 16 programs, 128 patterns and current state. The bank can
usually be saved and loaded by the host as an .fxb file.
8. The configuration file Config.ini contains information about how the plug-in
should be initialized on start up.
9. The file MidiCC.ini contains information about the assigned MidiCC’s and is
saved automatically when the plug-in closes.
Architecture
The architecture of the original Bass Line synthesizer is rather simple. It has one voltage
controlled oscillator (VCO), one voltage controlled filter (VCF) and one voltage
controlled amplifier (VCA). The VCF and VCA are controlled by an envelope generator
(EG) with decay and modulation amount controls. All modules are controlled by a digital
sequencer. ABL emulates each of these modules down to component level where even
effects as hysteresis are taken into account.
Bass Line – User’s Manual
5
Layout
The AudioRealism Bass Line user interface is divided into three sections:
1. Control
2. Synthesizer
3. Pattern programming interface
Control
Synthesizer
Pattern interface
ABL is operated by using the mouse to change the different controls.
Knobs – Click the knob and drag the mouse. Dragging the mouse up or down in
linear mode turns the knob clockwise or counterclockwise. For more precise
settings hold down the <Shift> key while dragging the mouse. It is possible to
alter the knob mode (see Configuration section).
Buttons – Single click buttons
Switches – Click and drag right or left to slide into the desired position
Menus – Click the down arrow to reveal the menu
Value displays – Click the up or down arrows to change value. It is also possible
to click the value field and drag the mouse to rapidly change the value.
Bass Line – User’s Manual
6
Control Section
The control section is used to specify how ABL should operate.
Midi In
The Midi In led will light when there is Midi activity sent to the plug-in. The plug-in
receives Midi information on all 16 channels.
Sync
The sync mode switch has two settings: Internal and Host. To change the settings click
on the switch and slide the mouse in the direction you wish to set the switch.
In Internal sync mode it is possible to set the tempo between 50 and 250 BPM
In Host sync mode the tempo control has no effect as the tempo is read from the
host, and cannot be altered from ABL.
Mode
The Midi Mode switch operates as the Sync switch. The two settings are:
PTN - Patterns are selected from Midi notes. Each Midi note corresponds to one
pattern, with the lowest possible note being pattern 0 (zero) and the highest note
pattern 127. A note on message will start a pattern and a note off message will
stop the pattern.
NOTE - Notes are played directly from the Midi notes and the internal sequencer
is disabled. This allows ABL to be played as normal synthesizer. If two notes
overlap then a slide will occur between those notes. If a note with velocity over
100 (default) is played then an accent will be activated.
Option
The option menu is activated by clicking on the text or near the arrow. This menu allows
you to alter the way ABL functions.
Control
Activate Midi learn
Activate Midi output
Switch programming
mode
Keyboard Programming:
ON/OFF
Selecting this item will activate Midi learn and change
the item to Deactivate Midi learn.
Activates Midi output from ABL’s internal sequencer
Switch between Standard (ABL 1.0) and Alternative
(ABL 1.5) programming mode.
Selects whether ABL should respond to the computer
keyboard (VST only)
Emulation
Bass Line – User’s Manual
7
Switch to 24dB filter
The filter can be switched to 24dB/octave attenuation.
The number denotes the slope of the filter cutoff in
decibels per octave. The 18dB/octave filter (modeled
after the original Bass Line) has a brighter sound than
the 24dB filter. In ABL 1.1 there is an additional 18dB
filter (called Pure18dB). This filter has additional
brightness at low cutoff and can be selected to suit your
music.
Switch to non-exact tuning Switching to non-exact tuning makes the oscillator out
of tune, especially in the upper range of notes. This
simulates the way old analog synthesizers go out of
tune after warm up.
Activate highpass filter
The highpass filter is fixed to cut bass frequencies.
This is useful in situations where ABL is competing for
bass frequency room with other bass lines.
Switch to stable oscillator Switch oscillator model. ABL 1.5 has an improved
oscillator emulation.
Switch to foldback
ABL 1.5 has an additional distortion unit
distortion
Configuration
Load MidiCC map
Brings up a file selector where a MidiCC map can be
loaded.
Save MidiCC map
Saves the Midi controller map to a file.
View Configuration files This shortcut will open ABL’s configuration files via a
text editor (default Notepad.exe).
Reload Configuration
Reloads configuration and activates the settings.
Assign Function Button Either one or both of the two function buttons (See
Pattern programming section) can be assigned to pattern
transformation functions. While assigning the
corresponding function button will blink. The assignment
can be cleared by pressing the CLEAR button while a
function button is blinking. Note: This will also clear the
pattern!
Select Skin
Brings up a dialog where a new skin can be selected.
Note: All skins end with the extension .skn.
Set Default skin
Brings back the standard skin.
Registration/Info
About Bass Line
Presents registration and information about the plug-in.
Pattern
The pattern menu is used to alter the current pattern using following functions:
Bass Line – User’s Manual
8
Copy/Paste
Copy
Paste
Copies the pattern to the copy buffer.
Pastes the copy buffer over the current pattern.
Transpose
Transpose +12
Transposes the pattern up 12 semitones (one octave).
Transpose -12
Transposes the pattern down 12 semitones (one octave).
Transpose +1
Transposes the pattern up 1 semitone.
Transpose -1
Transposes the pattern down 1 semitone.
Note: An attempt to transpose out of range will set the notes to the highest/lowest pitch
that is possible.
Shift functions
Shift Left
Shifts pattern one step to the left.
Shift Right
Shifts pattern one step to the right.
The shift functions only affect the steps within the pattern length and work circularly.
Transform
All notes off
All accents off
All slides off
Randomize
Randomize pitches
Alter pattern
Sets all notes to rests.
Turns off all accents.
Turns off all slides.
Randomizes everything (pitch, transpose, accent, slide and
time mode).
Randomizes only the pitches
Shuffles the order of the steps without changing the notes
Import/Export
Import pattern
Export pattern
Import Rebirth 338 patterns
Import (Freebee) pattern from text format.
Export pattern to text format.
Imports Rebirth patterns into ABL patterns 0-63
Pattern selector
Click the arrows to change the pattern in increments, or click on the digits and drag the
mouse up or down to scroll patterns.
Tempo
Click the arrows to change the tempo in increments, or click on the digits and drag mouse
the up or down to scroll. Note: Tempo can only be changed in Internal sync mode (see
Sync).
Bass Line – User’s Manual
9
Synthesizer Section
Synthesizer settings are modified by clicking on the switch(es) or knobs and dragging the
mouse. The controls from left to right are:
Waveform - Click the waveform control to toggle between sawtooth and
squarewave. ABL’s waveforms are modeled from analog synthesizers and have a
liquid quality to them.
Tuning - The tuning control has a two octave range. To make fine tuning
adjustments, hold down the <Shift> key while adjusting the tuning knob. ABL’s
default tuning is set to A-220Hz.
Cutoff - The cutoff control sets the basic cutoff frequency of the VCF. Since the
ABL filter is a low pass filter, all frequencies above the cutoff frequency will be
attenuated. Attenuation can be 18dB/octave or 24dB/octave.
Resonance - Resonance emphasizes certain frequencies around the cutoff point.
This makes the sound brighter and also affects the envelope of the accent.
Envmod - Envelope modulation determines how much movement there should be
in the cutoff frequency. Envelope modulation is bipolar in ABL, thus it modulates
the cutoff positively and negatively with the basic cutoff as center point.
Decay - Decay control sets the speed of the envelope. Turning the knob clockwise
will increase decay time, while turning counterclockwise will shorten the decay
time
Accent - The accent control sets the amount of accent for those steps which have
accent programmed on them. Turning the knob clockwise increases the effect of
accents.
Drive - The knob controls the drive of the signal being fed into the distortion
circuit. This only has any effect if the distortion knob is not fully counter
clockwise.
Distortion - The distortion circuit is activated when the knob is not positioned
fully counterclockwise (in its minimum position). Increasing the distortion will
make the sound harsher. The most 303 like setting is approximately 20%
distortion.
Volume - The volume control simply affects volume. When the volume is set to
75% or more the sound will begin to clip. This is also the nature of the original
Bass Line.
Bass Line – User’s Manual
10
Pattern programming Section
The Pattern programming section consists of a number of buttons. Some of the buttons
have diodes linked to them. The diodes show the current state for the step.
Pattern Clear
Run/Stop
Steps
Auto Advance
Time Mode
Next / Step
indicator
Back
Clears the pattern. All pitches are set to middle C and the
notes are either set to on (default) or off (see section
Configuration settings).
The Run/Stop starts and stops the internal sequencer. This can
be used to audition the current pattern. When the sequencer is
running the diode will blink.
This control is used to set the number of steps in the pattern.
Click the arrows to increment or decrement the number of
steps, or click on the digits and drag the mouse up or down to
scroll.
Click to toggle between auto advance on or off. The diode
will present the current mode. When auto advance is on,
entering a pitch from the pitch keyboard will automatically
advance to the next step. Turning off the auto advance will
return step indicator to the first step.
When the diode is lit the note is on, else the note is a rest.
Clicking the button will toggle the time mode.
The digits indicate which step being edited. Clicking the Next
button advances to the next step. If the position is already on
or beyond the last step the indicator will return to the first
step.
The back button makes the step indicator go to the preceding
step. If the position is on first step the indicator will return to
the last step in the pattern.
Pitch
Keyboard
Effect Buttons
Functions
Bass Line – User’s Manual
The pitch keyboard is used to enter pitches
into the pattern. The diode which is lit
represents the pitch on the current step.
The Up/Down buttons transpose the pitch in
the respective direction. Accent activates an
accent on the current step. Slide activates a
slide on the step.
The function buttons can be assigned to any
11
pattern transformation functions (in the
Pattern menu).
Programming patterns
Using the computer keyboard to program patterns
ABL 1.1 features keyboard programming of patterns. To use this feature make sure the
keyboard programming is on in the option menu. Not all hosts support computer
keyboard input to plug-ins or certain keys are mapped to functions that control the host.
The keyboard mapping can be changed by following these steps:
1. Activate Keyboard Programming from the Options menu (which should read
Keyboard Programming: ON)
2. Select Options->View Configuration files. Several text files should appear, view
the one named Gui.ini
3. The current keyboard mapping can be viewed. If any keys are assigned by the
host change ABL's keyboard mapping to suit your taste and SAVE the Gui.ini.
Close the other Configuration files.
4. Select Options->Reload Configuration
5. Test your keyboard mapping
If keyboard mapping does not work after these steps then the host does not support the
plug-in to receive keyboard and you should deactivate Keyboard Programming in the
Options menu. You will have to program ABL via the GUI.
The default keyboard mapping is:
Function
Set note pitch
Start/Stop pattern
Pitch note down
Pitch note up
Toggle accent
Toggle slide
Go to next note
Go back one note
Toggle time mode
Toggle auto advance
Clear pattern
Note on
Tie preceding note
Note off
Bass Line – User’s Manual
Keyboard
q,2,w,3,e,r,5,t,6,y,7,u,i
<SPACE>
a
s
d
f
<RETURN>
<BACKSPACE>
p
<TAB>
x
b
n
m
12
Time Mode
ABL has two time modes: either the step is a 16th( ) or a rest( , mute for a 16 th). In
practice this can be viewed as note on( ) /note off( ) for each step. Only on notes affect
pitch, accent and transpose. However even off notes can sound in ABL (see Slides).
Slides
A slide programmed on a step will make the note sound longer, and glide to the pitch of
next step (if the next step is not rested). If the next note is rested then the note will be
extended (see Ties).
Accents
An accent programmed on a step alters the sound in various ways. It shortens the decay
time for the step and raises the cutoff to a degree controlled by the accent control in the
synth section. Interesting things happens when subsequent accents are programmed into
the pattern. Since the (simulated) capacitors haven’t discharged completely the accents
accumulate in a way driving the cutoff higher and higher.
Ties
Using standard programming mode, there is no way to explicitly specify ties between two
notes. To simulate a tie, create a step with a note on and slide programmed on the first
step, and a note off on the second step. Since the note is off on the second step, accent,
transpose and pitch will be disregarded for that step. To make the note even longer extend
it further by activating the slide on the second step. Example: Programming four notes
and slides on steps 1, 2 and 3 will produce a whole note.
with time modes set to
Alternative programming mode
ABL 1.5 supports an alternative programming mode, which can be accessed with the
Option->Switch Programming Mode menu entry. This programming mode is more like
the original 303 in the sense that there are now two modes for entering sequences:
1. Time mode (also used as the Note on/off button in standard programming mode)
2. Pitch mode (also used as the Auto Advance button in the standard programming
mode)
Example: CarbonSmall skin
Bass Line – User’s Manual
13
Using Pitch mode (P) the notes with effects can be entered in as in the standard way. In
Time mode(T) the Down( ), Up( ), and Accent(-) buttons double as 16th, tie and rest
respectively. Once one of these buttons have been pressed ABL will automatically go to
the next step. It will stop on the last step, to avoid overwriting the first steps of the same
pattern. Double clicking P or T will return ABL to the first step of the pattern.
In the original 303 the pitch notes are picked chronologically (that is, every 16 th note
picks the next note in the sequence). In ABL the note picked is on the corresponding step
in Pitch mode. Example: Enter Pitch Mode: C,D,E,F,A,G and Time Mode: , , , , , The 303 would play this back as long C and a long D. ABL will play this back as a long
C and a long F.
Converting 303 Patterns to ABL (Using keyboard)
ABL 1.1 features three keyboard shortcuts to aid in converting 303 patterns to ABL.
Time information from the 303 can be read and input using Note On (b), Tie (n) and Rest
(m) on the computer keyboard. For this correctly ABL needs to be in Auto Adv mode.
The pitches need to be entered on the corresponding Note On steps where the notes start
unlike the 303 where pitches are input chronologically. Assume you wish to convert a
pattern from 303 to ABL. The recommended conversion scheme is (using the default
keyboard mapping):
1. Make sure ABL is Keyboard Programming mode
2. Turn Auto Adv on by pressing <TAB> until the button lights up
3. Set the 303 to Time Mode
4. Press Next on the 303 and read the diods (16 th, tie and rest)
5. Press the corresponding keyboard shortcut in ABL (b,n or m)
6. Repeat 4-5 for all steps in the pattern
7. Press <TAB> twice to reset ABL to the first step
8. Set the 303 to Pitch Mode
9. Press Next on the 303 and read the pitch and note effects (accent, slide)
10. Write the pitch and note effects to ABL on the corresponding step which has the
Time Mode light on
11. Repeat 9-10 for all steps in the pattern
Bass Line – User’s Manual
14
Midi CC
ABL can be controlled by any Midi CC controller. The default controller map for ABL
is:
Control
Midi CC
Cutoff
74
Resonance
76
Envmod
77
Decay
78
Accent
79
Volume
7
Tuning
71
Waveform
70
Distortion
91
Drive
92
DistortionType 80
When ABL initializes, the controller map is read from MidiCC.ini which resides in the
same path that BassLine.dll is installed into. MidiCC.ini can be edited with a text editor
like Notepad if you wish to change the controller map manually. Setting a value of -1
means the control is not assigned.
Midi Learn
ABL has a learn function which enables the use of any controller.
1. Activate Midi learn in the Option menu
2. Select a control on ABL’s panel and adjust it a bit
3. Turn the Midi controller you want to assign to that control. You should see the
ABL control on screen moving according to your changes
4. Continue will all controls that you wish to assign
5. Deactivate Midi learn in the Option Menu
6. (Optional)Save the controller map by selecting Save MidiCC in the Option menu.
When ABL is closed (for instance when removing the plug-in from your mix, or closing
the host sequencer) the controller map is automatically saved. Next time you load ABL it
will recall the settings you have made.
If you wish to restore the default controller map, remove the MidiCC.ini file from the
directory where BassLine.dll resides. Warning: Make sure you remove only MidiCC.ini
and no other files.
Automation of Controls
Each of the synthesizer controls can be automated by the host. Consult the hosts’
documentation on how to do this.
Bass Line – User’s Manual
15
Configuration
ABL can be set up to your liking though the Control.ini file which resides in the same
directory as BassLine.dll. It’s a good idea to backup Control.ini before making any
changes to it. The valid Config.ini tags are:
Tag
FilterSlope
SyncMode
MidiMode
Tempo
Valid range/values
18 or 24
Internal or Host
Pattern or Note
5-250
ClearNotes
On or Off
GUIKnobMode
AccentVelocity
0 – Circular
1 – Relative
2 – Linear
0 – 127
Highpass
Firststep
On or Off
0 or 1
Tuning
ParameterSmoothing
Exact or Nonexact
On or Off
EnvmodKnob
0 – ABL 1.0
1 – ABL 1.1
EmulationMode
0 – ABL 1.0
1 – Freebee
2 – ABL 1.1
3 – ABL 1.5 (latest)
0 – off
1 – on
1 – 16
-1 – ALL, 1 – 16
0 – not disabled
1 – disabled
0 – Standard
1 – Alternative
MidiOutput
MidiOutputChannel
MidiInputChannel
MidiOutputDisable
ProgrammingMode
Bass Line – User’s Manual
Description
Sets the filter slope in dB
Sets the sync mode
Sets the Midi mode
Tempo of internal sequencer in
BPM
Determines whether notes are On
or Off after a Pattern Clear
Preferred knob mode on startup.
Note: this may be overridden by the
host.
Midi velocity to trigger accents
when using ABL in Note mode
Sets the highpass filter
Display the first step as 0 (Freebee)
or 1 (Rebirth style) in the step
indicator
Sets the tuning
The default parameter smoothing
can be turned off, introducing
potential zippering sounds
Envmod Knob response (v1.1
feature).
Default emulation mode is latest
Midi output is off by default
Default Midi output channel is 1
(AU only) Default is ALL
(AU only) Midi Output port can be
disabled
Default: Standard
16
If Config.ini has been altered or you wish to reset the settings of ABL, use Reload
Configuration in the Option menu.
Using Pattern Mode
Each Midi note (0-127) corresponds to an ABL pattern. Note on messages start playback
of the pattern, and note off message stops playback. Velocity information is not used in
this mode.
Pattern Sequencing
Pattern sequencing is done by using the draw/pen tool (or similar) in the host sequencer.
Simply draw in the keyboard grid how long each pattern should play.
Example:
Pattern sequencing
Assume all patterns are 16 steps long. Since the notes are not overlapping, the sequencer
will retrigger and each pattern will play back steps 1-4.
Pattern Sequencing without retrigger
It is possible to cut off a pattern in the middle by using overlapping notes.
Example:
Pattern sequencing: Overlapping notes
In this situation the C2 note is never released. Since C#, D and D# overlap this note the
sequencer will not retrigger and this will play back pattern C steps 1-4, C# steps 5-8, D
steps 9-12 and D# steps 13-16. This opens up possibilities to create new interesting
patterns from those in ABL’s memory.
There are two things to keep in mind when using overlapping patterns:
A retrigger of the sequencer occurs when a note on event is received, and no
pattern is currently playing. If more than two patterns are overlapped then ABL
will return to the highest pattern when a note off message is received. A good rule
is to never use more than two overlapping patterns to avoid confusion.
When switching from a pattern with greater length to a shorter one (example
going from 16 step pattern to a 4 step) the internal sequencer will start on the
remaining step. Example: if ABL is on step 13 and switches to a 4 step pattern,
the first step played in the new pattern will be 2, since the remainder of 13/4 is 1
(the second step counting from zero).
Bass Line – User’s Manual
17
Using Note Mode
When ABL is Note mode it functions as a normal Midi device and the internal sequencer
is disabled. Overlapping two notes will activate a slide (glide) between the notes, and
notes with velocity over a certain threshold will produce an accented note. The default
threshold is velocity 100, but can be changed (see Configuration, AccentVelocity).
Producing bass lines that sound accurate require use of many staccato notes. This can be
done by using 32nd grid resolution in the host sequencer and making sure that each note
is one half 16th. This approximates the standard gate time of ABL which is about 55% of
the total note, and is needed for accurate 303 emulation. If you prefer to play legato that
is of course perfectly fine as well.
Example of programming in Note mode
Bass Line – User’s Manual
18
Importing Rebirth RB-338 Patterns
Rebirth RB-338 Patterns are imported to ABL according to following scheme:
Rebirth Synth/Bank
ABL pattern
Synth 1 – Bank A
0-7
Synth 1 – Bank B
8-15
Synth 1 – Bank C
16-23
Synth 1 – Bank D
24-31
Synth 2 – Bank A
32-39
Synth 2 – Bank B
40-47
Synth 2 – Bank C
48-55
Synth 2 – Bank D
56-63
Patterns 64-127 are not affected by this operation. When importing the settings of the
ABL controls are set to match those of Rebirth 338 Synth 1. Tempo, volume and
distortion controls are not affected.
Freebee/Text pattern format
The import/export text format can be used to share patterns online via forums or email.
The structure is as following: Four fields per line. Pitch, Gate, Slide and Accent which
are delimited by white space.
The pitch is represented in a tracker-fashion, example c-3 or g#4 and must be
three characters wide.
The gate is 1(one) for note on or 0(zero) for note off.
The slide is 1 for slide on or 0 for no slide.
The accent is 1 for accent or 0 for no accent.
The number of steps in the pattern is determined by the number of lines, so make sure to
remove any preceding or trailing empty lines.
Note: There is no error checking on import so improper patterns might result in
garbage when imported into ABL.
Programs/Banks
Patterns and synth settings are saved with the bank. When you reopen your project ABL
will continue in the exact state that you saved the project in.
Copying Patterns between Instances
Each instance of ABL has its own memory. In order to copy patterns from one instance to
another, you need to either:
1. Copy/Paste works directly between instances in ABL 1.5
Bass Line – User’s Manual
19
2. Export the pattern using the Export function in the Option menu, then import the
pattern into the other instance.
3. Save the .fxb bank from the host sequencer, then Load the .fxb into the other
instance.
Midi Output
ABL’s sequencer can now send Midi to the host. The knobs of ABL will also transmit
CC messages. This means ABL can be used as a virtual Midi controller. Using Midi Out
requires a host that can receive Midi events, for example Cubase SX2 or Rax by Granted
Software which has a good implementation with Midi input filtering, meaning ABL can
drive a whole rack of different synths.
Due to the nature of the sequencer only note on/off and pitch messages are sent. There is
no way for to send slides or accents from the internal sequencer.
•
•
In the VST version the host needs to be able to listen and route Midi events. ABL
will be published as an additional Midi source.
In the AU version ABL creates an additional Midi port which the host can listen
to. The creation of the Midi Out port can be prevented by setting the
MidiOutputDisabled = 1 tag in Config.ini (see Appendix: New Config.ini and
Gui.ini tags).
Since this behavior of plug-ins sending Midi is rather new, we consider this an
unsupported feature, meaning the function there but not guaranteed to work.
Changing Skins
The appearance of ABL 1.5 can be altered by the user using the skin interface. In case a
skin becomes broken for some reason and the user cannot access the Gui, the panic
solution is to locate the Gui.ini or AuGui.ini file and simply removing this file. This will
set the original skin. Another way of restoring ABL is to reinstall the software.
Bass Line – User’s Manual
20
Thanks
I (Mike Janney) would like to take this opportunity to thank the following people for their
support and suggestions (no order):
Ronny Pries
Alex Hapted
Matthijs Jansen
Frank Chotai
Fredrik Andersson
Crister Ekstrand
Izmar Verhage
Marc te Vruchte
Thomas Sandberg
Kai Tracid
Rob E.
and all of you who have supported Freebee, thus making this possible.
Bass Line – User’s Manual
21
Appendix: Skin interface format
A skin is a set of bitmaps and a text file describing the locations and size of the bitmaps.
Each control or button of ABL’s interface can be a unique bitmap. Animation frames are
stacked vertically in the bitmaps. Two types of buttons are available, the standard
button/diod configuration, or the new self illuminated 4 state buttons which were
introduced in ABL 1.1. The skin interface supports transparency masking by allocating
one color to be the transparent color.
The Skin interface format is made up of lines in text format:
Tag “filename”, X,Y,Width,Height
•
•
•
•
Tag is the identifier for the control or property.
Filename must be enclosed in quotation marks (“). Filenames are always relative
to the directory in which the plug-in resides. Only Windows .bmp bitmaps are
supported.
X,Y is the offset into the plug-in window where the control should be drawn (for
BACKGROUND this must be 0,0)
Width, Height is the displayed region in the window (ie NOT the actual size of
the bitmap, as the number of images of the bitmap is calculated by taking bitmap
size and dividing by Height)
Example:
NOTEBUTTON3
"CarbonSmall\notebutton.bmp",
128, 143, 18,18
Note: There should be no comma (,) between the Tag and Filename!
Tag
NAME
Description
Name of the skin displayed in the Option
menu
TRANSPARENTCOLOR R,G,B color that specifies the color to be
transparent
BACKGROUND
Background image
ILLUBUTTON1-13
Self illuminating buttons for pitch
keyboard
ILLUBUTTON14
Pitchmode/Auto advance
ILLUBUTTON15
Run/Stop
ILLUBUTTON16
Time mode or Gate on/Gate off
ILLUBUTTON17
Down octave
ILLUBUTTON18
Up octave
ILLUBUTTON19
Accent
ILLUBUTTON20
Slide
ILLUBUTTON21
Increase number of steps
ILLUBUTTON22
Decrease number of steps
Bass Line – User’s Manual
22
ILLUBUTTON23
ILLUBUTTON24
Function button 1
Function button 2
Appendix: Specifications
Plug-In
PC: Standard VST instrument plug-in
Mac OS X: VST or AudioUnit
Sample rates supported: 44.1kHz, 48kHz and 96kHz
Architecture:
Monophonic
2 VCO’s
1 VCF
1 VCA
64 bit aliasing free signal processing
Memory
16 Programs (VST)
Internal Sequencer:
Pattern memory: 128 Patterns
1 to 64 Steps / Pattern
Effects per Step: Accent, Slide and transpose (up/down)
Time modes: 16 th and rest, tie
Tempo range: 25-250 BPM or 1-500 BPM in Host sync mode
Synthesizer:
Tone generator: 4 Octaves range
Two waveforms (Sawtooth and Square wave)
Filter type: Low pass resonant
Filter range: 0-22kHz resonance frequency
Filter slope: 18 or 24dB/octave
Envelope control: Modulation, Decay and Accent
Envelope Decay time approx 0.2 - 3.5 sec
Rebirth RB-338 is a product of Propellerheads Software, Sweden
VST PlugIn Interface Technology by Steinberg Soft- und Hardware GmbH.
The Audio Units logo and the Audio Units symbol are trademarks of Apple Computer Inc
Bass Line – User’s Manual
23