1
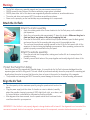
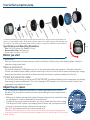
Your VorTech propeller pump
To remove the nozzle from the wet frame, remove the entire wet half of the pump from the aquarium and
place it on a non-metallic surface. Gently but firmly press down on the nozzle with your palm and twist counter clockwise. The nozzle should become free of the wet frame. It may then be cleaned of any obstructions.
Specifications and Operating Parameters
Flow: 1000-3,200 gallons/hour, Power: 6-30 watts,
Maximum Motor Temp: 50-60 degrees C
Aquarium Wall Thickness: 3/16” to 3/4”
Before you start
Preparation
Once you have chosen the location where you wish to install your VorTech pump, clean away any algae, calcified or
otherwise, using a razor blade.
Notes on placement
The VorTech creates over 3,200 gallons per hour of low velocity flow within your aquarium. Take care to place the
VorTech in a suitable location where corals are not directly in the line of flow. Place the pump sufficiently high enough
above a fine sand bed so that sand is not blown around by the output or undertow created by the VorTech.
Protect the pump from water
The VorTech’s motor housing and driver are NOT WATERPROOF. Any water allowed into these components can damage
them enough to require replacement. This kind of damage is NOT covered in the VorTech’s warranty. Protect these
components from splashes of any kind.
Adjust the pin spacer
The VorTech pump is designed to operate with a constant gap between both halves of
the device. The pin spacer is used to ensure the proper spacing for various aquarium wall
thicknesses.
• Make sure to measure your aquarium’s glass thickness using a ruler or contact the aquarium manufacturer in order to determine the exact thickness.
• To adjust for the proper aquarium thickness, pull the pin spacer from the motor housing.
Then align the VorTech’s power cord emerging from the motor with your aquarium’s wall
thickness to achieve the proper offset from your aquarium.
Note: 3/4” thick aquariums do not use the pin spacer at all.
1
IMPORTANT: When adjusting the pin spacer, be sure not to bend the pins as they are inserted into the
holes within the heat sink as this may permanently damage your VorTech. Bent pins WILL NOT be covered
under warranty.
Warnings
•
•
•
•
•
The VorTech utilizes very powerful magnets and can cause severe personal injury.
NEVER connect the two halves of this device without a proper spacer in-between.
NEVER place either half of this device near magnetically attractive surfaces or sensitive electronics.
The motor and driver can become HOT. Be cautious around these surfaces.
Never run the pump dry as the heat buildup may cause damage to its components.
Attach the VorTech
Attach the motor assembly
• Apply the rubber gasket at the chosen location for the VorTech pump, on the outside of
your aquarium.
• Apply the cord mounting tab approximately 2” above this location. Make sure the glass is
clean and free of any grease or dirt prior to applying this tab.
• Place the VorTech motor, with or without the pin spacer attached, upon the black gasket,
and secure the cord to the mounting tab using one of the provided wire-ties.
• The cord must be positioned pointing upwards so that if the VorTech were to fall off the
aquarium, it does not swing and damage your aquarium. When operating, make sure the
gasket is properly recessed within the pin spacer.
Attach the wetside assembly
• Place the wet side into the aquarium, making sure to allow ALL air to escape from the
propeller housing.
• Carefully connect both halves of the pump together and visually align both halves of the
pump.
Protect the Pump From falling
Due to the nature of the magnetically coupled design, it is possible for the VorTech to become dislodged from the
aquarium glass and fall to the ground. The cord should be positioned vertically above the pump with the mounting tab
directly above the motor to ensure that the motor does not move in the event of a decoupling of the magnets.
• The provided cord-mounting tab MUST be used to prevent damage to the motor or the surrounding environment.
Align the VorTech
• Turn the speed up to the maximum speed by using the speed control knob on the
driver.
• Plug the power supply into the driver. If vibration or noise is detected, carefully
•
adjust the propeller housing by moving it VERY slightly left, right, up or down, until
the noise/vibration is eliminated or minimized as much as possible.
After alignment has been ensured, turn the speed control knob to achieve the desired flow rate within your aquarium.
Important: If the VorTech is not properly aligned, a strong vibration will be heard. If the alignment is not corrected, this
can cause increased electrical consumption, excessive wear on the components, excessive heat and excessive noise.
2
Your VorTech Wireless Wave Driver
Wireless Wave Drivers are capable of controlling a VorTech
pump in a variety of different ways. Out of the box, any
MP40w model pump is capable of operating as a master
pump, a slave pump, or in autonomous mode. A master pump
broadcasts wireless signals and a slave pump receives these
wireless signals. On any aquarium, the aquarist can have
up to seven different master pumps broadcasting on unique
frequencies. Each master pump can be synced with an infinite
number of slave pumps.
Master Pump in:
- Pulse Mode ((blinkingg blue))
Slave Pumps in:
-Sync Mode (white)
-Anti Sync Mode
(
(orange)
g )
Master pumps broadcast signals in one of five modes:
Constant Speed Mode (green), Lagoon Random Mode (purple),
Reef-Crest Random Mode (yellow), Short Pulse (blue) and Long Pulse Mode (salmon). Slave pumps will receive this
broadcasted signal and process it in either Sync Mode (white) or Anti-Sync Mode (orange). In sync mode a slave pump
will behave exactly the same as the master pump. In anti-sync mode the slave pump will behave inversely to the master;
so when the master pump is at high speed, the slave will be at low speed and vice-versa. Any combination of these
modes can be used to create reef-like currents and waves within your aquarium.
This pump configuration could be
used to create a standing wave
within your aquarium.
Wave Motion Warning
The generation of waves within your aquarium places additional stress on the aquarium glass and joints. Not all
aquarium tanks are designed to withstand this stress, and failure of the glass and/or joints could result.
You are encouraged, before generating waves, to consult with your aquarium tank manufacturer to determine if the tank
construction is adequate to withstand the additional stress generated by the wave motion.
You are also encouraged to assure that your aquarium stand or furniture is adequately stable to withstand the additional
stress resulting from wave generation.
EcoTech Marine DISCLAIMS AND WILL NOT BE LIABLE FOR, damage to aquarium tanks or their surroundings, water
damage, or any other consequential damages resulting from wave generation. MAKE WAVES AT YOUR OWN RISK.
3
Advanced Features
Night Mode
Enter the following button sequence to set Night Mode at the precise time when you desire your pump to enter into Night Mode. The
pump’s internal timer will then enter Night Mode for 10 hours and return back to your previous mode for 14 hours.
Step 1)
Wait until the exact time that you wish night mode
hold
to begin.
Step 2)
Press and hold Mode and Set to enter Setup. The
LED will blink red/white/blue
Step 3)
Press and hold Mode and Set again to set Night
Mode. The LED will now switch to breathing white.
+
hold
+
Night mode will operate at a constant speed of 50% of the day mode speed.
Example 2
Example 1
Day Mode
Reef Crest
Random
g
Night Mode
Day Mode
Constant
Speed Mode
Short Pulse
Mode
Day Mode
g
Constant
Speed Mode
80% of
max speed
40% of
50% of
100% of
max speed
max speed
max speed
After programming Night Mode, the pump will enter Night Mode at the same time every day until the driver loses power. If the driver loses
power, Night Mode setting must be re-enabled. You can force a pump out of Night Mode by holding both Mode and Set. The pump will
automatically resume Night Mode at the original set time. Once you have forced a pump out of Night Mode, it can not be re-entered manually and you must wait until the original set time.
Pump Disconnect Calibration
Your VorTech can automatically shut down in the event of a pump disconnect. To set-up this mode, you must calibrate
your motor using the following sequence of operations:
Step 1) Go into Feed Mode
hold
Enter Feed Mode by holding the Mode button for 3 seconds. Feed Mode is indicated by a blinking white light.
Step 2) Remove pump from your tank
Remove the motor and wet side assembly and set aside separately. Motor will still
be running so set it in a safe place with pin spacer facing upwards. (Do not connect both halves of the pump!)
Step 3) Hold Mode and Set
Holding both buttons while in feed mode will change the light from a blinking
white to a cycling white and yellow, this indicates that you have entered Calibration Mode.
Step 4) Let the program run
The white and yellow cycling light will continue for about sixty seconds and then
the pump will restart.
Step 5) Re-attach the pump to tank
You have completed the Pump Disconnect Calibration and now have error codes
enabled
Remove
Pump
hold
+
Wait
60sec
Re-attach
4
General Operational Modes
Constant Speed Mode
When a pump is in Constant Speed Mode, the dial is used to set the operational speed. If this pump is a master, the associated slave
pumps will replicate the master weather in sync or anti-sync mode.
Lagoon Random Mode
When a pump is in Lagoon Random Mode, the dial is used to set the maximum operational speed, and the driver will automatically
randomize the pumps output to simulate a low energy lagoon reef environment. If this pump is a master, the associated slave pumps will
replicate the master in sync or anti-sync modes.
Reef-Crest Random Mode
When a pump is in Reef-Crest Random Mode, the dial is used to set the maximum operational speed, and the driver will automatically
randomize the pumps output to simulate a high energy reef-crest environment. If this pump is a master pump, the associated slave
pumps will replicate the master in sync or anti-sync modes.
% of
max
speed
0
15
Lagoonal Random Mode
30
Time (min)
45
60
Reef Crest Random Mode
Short Pulse Mode
When a pump is first entered into Pulse Mode, you must set the maximum pump speed by adjusting the dial. When the desired speed
is achieved, press the Set button to lock this speed. The LED will now begin to blink. This blinking LED represents the pulsing frequency.
Now adjust the dial to make the pump pulse faster or slower. To save this wave, press and hold Set until the LED flashes green/white
indicating that the wave is saved.
% of
max
speed
Long Pulse Mode
Time
When the pump is entered into swell mode, the maximum speed of the pump is set by adjusting the dial. When the desired speed is
achieved, press the Set button to lock this speed. The LED will now begin to blink, the blinking LED represents the swelling frequency.
Now adjust the dial to make the frequency increase or decrease. To save this wave, press and hold the Set button until the LED flashes
green/white indicating that the wave is saved.
% of
max
speed
Feed Mode
Time
To enter Feed Mode, press and hold the mode button for three seconds. The LED will now blink white indicating that the pumps are in
feed mode. Regardless of your system’s master/slave pump configuration, all pumps will enter feed mode when that mode is selected on
any one pump. The pumps will spin very slowly for ten minutes and then resume their prior operating conditions.
Battery Backup Mode
5
When a battery backup accessory is added to the VorTech pump, the pump will automatically switch to Battery Backup mode during a
power outage. The pumps will run at the minimum speed to maximize their run time during this critical period.
Firmware Upgrade
During the firmware upgrade process, turn off all Wireless Wave Drivers within 20 feet of the two that
you will be performing the upgrade process with. Also, move the two drivers that you will be using to
upgrade within 3 feet of each other.
On the VorTech Gen2 pump
On the VorTech Gen1 pump
Step 1: Prior to powering the unit
on, press and hold the Mode button
and continue to hold mode as you
power on the unit.
Step 2: Continue to hold the Mode
button down while the LED is Red
for approximatley 10 seconds
Step 3: When the LED toggles
between Red and Yellow, the driver
is set as the Upgrade Master driver.
Release the Mode button
Once the upgrade process is
started through the Slave Driver,
the Master will flash its LED
quickly in the following colors:
Red, Green, Red, Blue.
Powered
Off
Mode
Upgrade
Master
Sending
New Firmware
Step 1: Prior to powering the unit
on, press and hold the Mode and
Set buttons and continue to hold
them as you power the unit on.
Step 2: Continue to hold the Mode
and Set buttons down while the
LED is Red for approximatley 10
seconds.
Step 3: When the LED toggles
between Red and White, the driver
is set as the Upgrade Slave driver.
Release both the Mode and Set
buttons.
Step 4: Press and hold the Set
button for approximatley 10 seonds
to start the Firmware Upgrade
process.
Step 5: The process is started
when the LED flashes White and
Blue very quickly. Release the Set
button.
Powered
Off
Mode
Set
Upgrade
Slave
Set
Reciving
New Firmware
The entire upgrade process takes approximately three minutes. The upgrade is still in progress while the Master driver flashes red, green, red, blue
quickly and the slave driver flashes blue and white quickly. The process is complete when both drivers flash a LED code with half second flashes.
Note: If both WWD’s already have the same firmware revision, the upgrade process will not occur, and the Master will show the Upgrade Completed
Successfully LED code.
The final status of your upgrade can be determined from the LED code on the Master Driver:
Upgrade Completed Successfully: Both Drivers now have the same Firmware.
Upgrade Failed: Communication Error.
Upgrade Failed: The Master Driver’s Firmware is older than the Slave Driver’s Firmware.
The current version of Firmware on your Wireless Wave Driver can be determined when you power it
up by reading the following color combinations:
Bootloader
indicator
Major revision
number: Count
each green blink
Minor revision number: Count each blue blink
Startup complete blink
6
Programming Multiple Pumps
A pump group consists of one master pump and at least one slave pump. There can only be one master pump per group which can
include an unlimited number of slave pumps.
In order to set a pump as a master or a slave, the aquarist must first enter the MP40w’s configuration mode. Within configuration
mode one can do one of three different things:
•
•
•
reset the pump’s memory
set the pump as a master
set the pump as a slave
Masters and slaves must be set as groups and each group must be programed separately. It is imperative that the following steps are
preformed in order and exactly as described. It is possible to have up to seven groups in one area each with a unique master pump.
Step 1: Clear Driver Memory
The internal memory of each unit must be cleared before setting
up a group.
hold
hold
hold
+
Pump
Resets
Step 2: Enter Configuration Mode
hold
All pumps in a group must then be set into configuration mode before
the assignment of slave or master status. This configuration must
be performed with the drivers in close proximity to ensure proper
assignment. The drivers will blink red, white and blue in this mode.
Step 3: Assign the Master
+
tap
Set the master pump by pressing the mode button. The LED will
then blink blue and green.
Step 4: Assign the Slaves
tap
Set all the slave pumps by pressing the set button on each driver. The
LED will then blink blue and yellow.
NOTE: If any slave blinks blue and red, it was too far away from the
master driver and could not communicate properly.
Step 5: Reset the Master
hold
Hold the mode button on the master pump after completing ALL
the master/slave assignments.
Pump
Resets
Step 6: Begin Normal Operation
Use the controls on the Master Pump to operate all pumps in the group. Slave pumps can only be set to sync or anti-sync modes.
Step 7: Program Subsequent Groups
Now that the first group is programmed, repeat steps 1-5 on the next group of pumps, if so desired.
7
NOTE: The subsequent pump groups must be programmed near the original group. For example, if running two different groups in
separate areas of your house, the second group must be programmed within 5 feet the first group to ensure proper communication.
Maintenance
Wear of the drive shaft
The VorTech pump features a wear component in the form of the drive shaft. This part is designed with a special
engineering grade plastic which extends the part’s lifetime. The plastic drive shaft can be expected to last for years,
depending on the speed, frequency, and alignment of the pump.
Cleaning your VorTech
The VorTech may need thorough cleaning of the components periodically to keep it running optimally. This can be
accomplished by disassembling the wet half of the pump and gently brushing the components with a soft brush under
running water. Soaking these parts in a mild acid solution such as vinegar may be necessary if there is an extreme
amount of calcium buildup. Do not use strong acids as this may damage the components.
Troubleshooting
Break-in
The VorTech pump is engineered to adapt to its aqueous environment. During the first week of use, your pump may run
noisier or stall. The noise should quiet dramatically over night and any stall conditions can safely be reset by manually
cycling the power to your pump.
Operational Range
The wireless signal range is roughly 10 feet when drivers are within a direct line of site. Masters and slaves must all
be set and operating near one another to avoid signals being missed. If a pump generates a red/blue error message,
this means that the master and slave pumps were not close enough to one another when they were setup. Depending
on other electromagnetic interference or other variables, wireless range can vary between 2 and 10 feet. The wireless
signal will not pass through water.
Error Codes
Over Temperature Condition
In the event of a motor overheating, the pump will automatically shut down
for a period to allow for cooling. Once the motor has cooled, the driver will
automatically restart and resume normal operation. You may experience an
overheating error from a misalignment.
ErrorCodes:
OverTemp
Over
Temp
Condition
Stall
Stall
Condition
MiscError
Stall Condition
In the event of a motor stall, the pump may have stopped for a few possible reasons. You should first check that there
is not something blocking the propeller from spinning. Next, check to make sure the magnets are not rubbing on either
the pin spacer or the frame cover.
Miscellaneous Error
This error could be attributed to a communication error between pumps or an unidentified error in the wave driver. Move
the drivers closer together and minimize any physical obstructions in between the drivers.
8
Warranty
EcoTech Marine warrants to the original purchaser only that the VorTech propeller pump will be free from defects in material and workmanship under normal use for
a period of (1) year from the date of original purchase if the product is installed and used properly and consistent with the User Manual. The VorTech propeller pump
consists of a wet side operating unit that will be fully submerged in the aquarium and a motor and driver that must not be exposed to water at any time. EcoTech
Marine’s warranty shall not apply: (i) to any damaged VorTech propeller pump that has been subjected to accident, misuse, neglect, alteration, acts of God, improper
handling, improper transport, improper storage, improper use or application, improper installation, improper testing or unauthorized repair, (ii) to any VorTech propeller pump where the motor and/or driver have been exposed to water or (iii) to cosmetic problems or defects that result from normal wear and tear under ordinary
use, and do not affect the performance or use of the product. EcoTech Marine’s warranty applies only to a product that is manufactured by or for EcoTech Marine
and identified by the EcoTech Marine trademark, trade name or product identification logo affixed to the product. If you notice a problem with your VorTech propeller pump, do not attempt to repair it yourself. Any attempts at self repair shall void this limited warranty. EcoTech Marine shall not be held liable for damage to
any aquarium, aquarium life forms, or other personal objects due to improper use of the device. If the product develops a covered defect within the one-year period,
EcoTech Marine will, at its option, either repair or replace the VorTech propeller pump without charge, provided that the VorTech propeller pump is returned during
the warranty period.
The VorTech pump operates at high temperatures and produces forces within the aquarium that can cause extreme loading and fatigue. Due to this, caution must be
used when installing this device on any aquarium. Because the construction of aquariums varies from each manufacturer and the operating conditions of each individual aquarist is different, there is a possibility that the VorTech propeller pump may cause damage to your aquarium. Please contact your aquarium manufacturer to
determine if your aquarium is properly built and recommended for VorTech pumps. If you notice any damage to your aquarium, including but not limited to crazing,
cracking, bending, scratching, etc, immediately discontinue the use of the VorTech propeller pump. EcoTech Marine will not be liable for any damage caused to
your aquarium resulting from the use of the VorTech propeller pump.
To obtain warranty service or technical support, please contact EcoTech Marine’s customer service department at (610) 954-8480. You will receive instructions on
how to return the product for repair or replacement. To take advantage of this Limited Warranty you will be required to supply an original point of purchase receipt.
ECOTECH MARINE DISCLAIMS ALL OTHER WARRANTIES WHETHER ORAL OR WRITTEN, EXPRESS OR IMPLIED, TO THE FULLEST EXTENT
ALLOWED BY APPLICABLE LAW. NO IMPLIED WARRANTY OF FITNESS FOR A PARTICULAR PURPOSE OR MERCHANTABILITY SHALL APPLY
EXCEPT AS REQUIRED BY APPLICABLE LAW. ECOTECH MARINE DOES NOT AUTHORIZE ANY PERSON OR BUSINESS ENTITY, INCLUDING ITS
AUTHORIZED DEALERS, TO CREATE FOR IT ANY OBLIGATIONS, LIABILITIES, OR OTHER WARRANTIES IN CONNECTION WITH THIS PRODUCT.
ALL WARRANTIES ARE VOID IF THERE IS DAMAGE TO THE VORECH PROPELLER PUMP THAT IS NOT A RESULT OF A DEFECT IN THE MATERIALS OR WORKMANSHIP. THE SOLE AND EXCLUSIVE REMEDY FOR ALL CLAIMS THAT YOU MAY HAVE ARISING OUT OF OR IN CONNECTION
WITH YOUR USE OF THIS PRODUCT, WHETHER MADE OR SUFFERED BY YOU OR ANOTHER PERSON AND WHETHER BASED IN CONTRACT
OR TORT, SHALL BE REPAIR OR REPLACEMENT OF THE PRODUCT. IN NO EVENT WILL ECOTECH MARINE BE LIABLE TO YOU OR ANY OTHER
PARTY FOR ANY DIRECT, INDIRECT, GENERAL, SPECIAL, INCIDENTAL, CONSEQUENTIAL, EXEMPLARY OR OTHER DAMAGES ARISING OUT
OF THE USE OR INABILITY OF TO USE THE PRODUCT (INCLUDING, WITHOUT LIMITATION, DAMAGES FOR LOSS OF BUSINESS PROFITS,
BUSINESS INTERRUPTION, LOSS OF INFORMATION OR ANY OTHER PECUNIARY LOSS, DAMAGE TO YOUR AQUARIUM OR ANY AQUARIUM
INHABITANTS), OR FROM ANY BREACH OF WARRANTY, EVEN IF ECOTECH MARINE HAS BEEN ADVISED OF THE POSSIBILITY OF SUCH
DAMAGES. IN NO CASE SHALL ECOTECH MARINE’S LIABILITY EXCEED THE AMOUNT YOU PAID FOR THE PRODUCT. IF YOU DISAGREE
WITH THESE TERMS AND CONDITIONS DO NOT USE THE VORTECH PROPELLER PUMP.
Some states do not allow the exclusion or limitation of incidental or consequential damages, so the above exclusions may not apply to you. EcoTech Marine’s warranty is governed by the laws of the Commonwealth of Pennsylvania, excluding its conflict of laws principles and excluding the provisions of the United Nations
Convention on Contracts for the International Sale of Goods. This warranty gives you specific legal rights, and you may also have other rights, which vary from state
to state.
Customer Support
9
[email protected]
(610) 954-8480
Sales inquiries please contact:
[email protected]
(800) 785-0338
FCC and CE Warnings:
Operation is subject to the following two conditions: (1) this device may not cause interference, and (2) this device must
accept any interference including interference that may cause undesired operation of the device.
Changes or modifications not expressly approved by EcoTech Marine could void the user’s authority to operate the VorTech
Wireless Wave Driver.
This product carries an ingress protection rating of IPX0 and must not be immersed in water.
Danger: To avoid possible electrical shock, special care should be taken since water is employed in the use of aquarium
equipment. For each of the following situations, do not attempt repairs yourself; return the appliance to the manufacturer
for service or discard the appliance.
DO NOT immerse in water. If the appliance falls into the water, DON’T reach for it! First unplug it and then retrieve it. If
electrical components of the appliance get wet, unplug the appliance immediately. (Non-immersible equipment only)
Carefully examine the appliance after installation. It should not be plugged in if there is water on parts not intended to be
wet.
Do not operate any appliance if it has a damaged cord or plug, or if it is malfunctioning or if it is dropped or damaged
in any manner. The power cord of this appliance cannot be replaced: If the cord is damaged, the appliance should be
discarded. Never cut the cord.
To avoid the possibility of the appliance plug or receptacle getting wet, position aquarium stand and tank to one side of a
wall mounted receptacle to prevent water from dripping onto the receptacle or plug. The “drip-loop” should be arranged
by the user for each cord connecting an aquarium appliance to a receptacle. A “drip-loop” is the1
q1 part of the cord
below the level of the receptacle, or the connector if an extension cord is used, to prevent water traveling along the cord
and coming in contact with the receptacle. If the plug or receptacle does get wet, DON’T unplug the cord. Disconnect
the fuse or circuit breaker that supplies power to the appliance, then unplug and examine for presence of water in the
receptacle.
Close supervision is necessary when an appliance is used by or near children.
To avoid injury, do not contact moving parts or hot parts such as heaters, reflectors, lamp bulbs, and the like.
Always unplug an appliance from an outlet and battery backup when not in use, before putting on or taking off parts, and
before cleaning.
Never yank cord to pull plug from outlet. Grasp the plug and pull to disconnect.
Do not use an appliance for other than intended use. The use of attachments not recommended or sold by the appliance
manufacturer may cause an unsafe condition.
Do not install or store the appliance where it will be exposed to weather or to temperatures below freezing.
Make sure an appliance mounted on a tank is securely installed before operating it. Read and observe all the important
notices on the appliance.
If an extension cord is necessary, a cord with a proper rating should be used. A cord rated for less amperes or watts than
the appliance rating may overheat. Care should be taken to arrange the cord so that it will not be tripped over or pulled.
Prior to servicing ensure the appliance is unplugged from the mains as well as the battery backup.
10