1
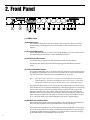
M I D I P R O G R A M M A B L E T U B E G U I T A R P R E A M P USER'S MANUAL HUSH ® licensed by May be covered by one or more of the following: U.S. Patents #4538297, 4647876, 4696044, 4745309, 4881047, 4893099, 5124657, 5263091, 5268527, 5319713 and 5333201. Other patents pending. Foreign patents pending. PRECAUTIONS NOTE: IT IS VERY IMPORTANT THAT YOU READ THIS SECTION TO PROVIDE YEARS OF TROUBLE FREE USE. THIS UNIT REQUIRES CAREFUL HANDLING. All warnings on this equipment and in the operating instructions should be adhered to and all operating instructions should be followed. Do not use this equipment near water. Care should be taken so that objects do not fall and liquids are not spilled into the unit through any openings. The power cord should be unplugged from the outlet when left unused for a long period of time. DO NOT ATTEMPT TO SERVICE THIS EQUIPMENT. THIS EQUIPMENT SHOULD BE SERVICED BY QUALIFIED PERSONNEL ONLY. DO NOT MAKE ANY INTERNAL ADJUSTMENTS OR ADDITIONS TO THIS EQUIPMENT AT ANY TIME. DO NOT TAMPER WITH INTERNAL ELECTRONIC COMPONENTS AT ANY TIME. FAILURE TO FOLLOW THESE INSTRUCTIONS MAY VOID THE WARRANTY OF THIS EQUIPMENT, AS WELL AS CAUSING SHOCK HAZARD. OPERATING TEMPERATURE Do not expose this unit to excessive heat. This unit is designed to operate between 32° F and 104° F (0° C and 40° C). This unit may not function properly under extreme temperatures. Copyright ©1995 Rocktron Corporation. All rights reserved. Contents 1. Introduction .................................................................................................................................. 1 2. Front Panel ................................................................................................................................... 2 3. Rear Panel .................................................................................................................................... 4 4. Connections ................................................................................................................................. 6 5. Operation ...................................................................................................................................... 8 A. Selecting a preset ............................................................................................................................... 8 B. Creating a new preset ......................................................................................................................... 8 C. Storing a modified preset to a different preset location ....................................................................... 9 D. To copy a preset to a new location ................................................................................................... 10 E. Setting the HUSH® Threshold .......................................................................................................... 11 F. Selecting a Power-up preset ............................................................................................................. 12 G. Using the Piranha with a Rocktron All Access in REMOTE mode ................................................ 13 6. Special Functions ...................................................................................................................... 15 A. Factory Reinitialization ..................................................................................................................... 15 B. MIDI Preset Dump ............................................................................................................................ 16 C. MIDI Preset Load .............................................................................................................................. 17 D. Continuous Controller Mode .............................................................................................................. 18 .............................................................................................................................................................. 18 SPECIFICATIONS ................................................................................................................................ 19 1. Introduction Congratulations on your purchase of the Rocktron Piranha High Voltage Tube Preamp! The Piranha was designed to provide programmability with a user-friendly interface. With the front panel controls set up similar to an amplifier, it isn't necessary to page through endless menus to find a specific parameter - just turn the knobs on the front panel and press the STORE button to save a sound! The Piranha is powered by dual 12AX7 tubes using a high voltage toroid transformer to ensure high headroom and dynamics. Rectified supply voltage for the tube heaters add to the quality design, while active EQ with superior-grade, low noise opamps affords a tremendous amount of tone versatility. The Piranha incorporates a parametric mid band ranging from 250Hz-7kHz to provide wide tone variations. The Piranha also provides a global mode, where a single parameter can be adjusted on all of the presets simultaneously. This means that a common parameter change doesn't require that each preset be individually adjusted. Besides great sound and versatility, the Piranha provides many other features, including: • • • • • • • • two distinct distortion modes - "Classic Tube" and "Modern Tube" a programmable stereo effects loop stereo outputs stereo XLR direct outputs with speaker simulation circuitry programmable HUSH® noise reduction front and rear input jacks MIDI dump/load capabilities Continuous controller mode, which allows the Piranha to send continuous control messages through the front panel controls For a thorough explanation of the Piranha and its functions, please read this manual carefully and keep it for future reference. After removing the Piranha from the box, save all packing materials in case it becomes necessary to ship the unit. 1 2. Front Panel (1) POWER switch (2) DISPLAY panels: The 2-character display on the left always displays the current preset number, while the 3character display on the right shows the current parameter value for the parameter being adjusted. (3) UP and DOWN buttons: The UP and DOWN buttons are used to scroll through Pirahna presets. These buttons are also used when setting the threshold level for the HUSH noise reduction. (4) STORE and HUSH buttons: The STORE button is used to store altered parameters into the Piranha memory. The HUSH button displays the current threshold setting for the HUSH noise reduction circuit. (5) LOOP and GLOBAL buttons: Pressing the LOOP button (L.E.D. on) switches the mono send, stereo return effects loop into the signal path. Switching the loop out (L.E.D. off) switches out any effects connected in the loop. The on/off status of the effects loop is programmable for each preset. Note: If the effects loop is not used (i.e. no effects are connected to the rear panel Loop Send and Returns), switching in the LOOP function can be used as a volume boost. The amount of volume boost is determined by the rear panel LOOP MIX control. Pressing the GLOBAL button (L.E.D. on) puts the unit in Global mode, which allows for all of the Piranha presets to be modified simultaneously when adjusting parameters. This feature is useful when a specific venue has a particular acoustic characteristic which requires the adjustment of all the presets. For example, turning the BASS control down 6dB while the GLOBAL button is lit will decrease the bass setting in all presets by 6dB. Any changes made while operating in Global mode will remain in effect only as long as the GLOBAL button is lit (i.e. exiting GLOBAL mode returns all Piranha presets to their original settings). (6) DISTORT and CLEAN buttons: These buttons determine the current operating mode (clean or distortion) of the Piranha. The button currently lit indicates which mode the Piranha is currently operating in. Pressing the CLEAN button (L.E.D. on) switches the Piranha to Clean mode. A wide variety of tones can be generated by varying the programmable Gain control from 0 (super clean) to 70 (moderate rhythm distortion). The Input Level control can also be used when specifying the maximum amount of gain attainable in the clean mode. 2 Pressing the DISTORTION button (L.E.D. on) switches the Piranha to the Distortion mode. The Piranha provides two distortion modes - Classic Tube and Modern Tube. The DISTORTION button is used to swicth between each mode. When the DISTORTION button is lit (but not flashing) the Piranha is in the Classic Tube distortion mode. This mode provides tones ranging from smooth, slightly overdriven rhythm tones (at lower Gain control settings) to full tube high gain (at higher Gain control settings). Pressing the DISTORTION button again switches the Piranha to the Modern Tube distortion mode. (The DISTORTION button will flash quickly in Modern Tube mode.) Like the Classic Tube mode, this mode also provides a wide range of tones, but also incorporates distortion characteristics reflective of modern hard rock guitar sounds. (7) BASS level control: This control adjusts the amount of low band information in the Piranha output for the current preset. Turning this control one step (or one "click") will display the current value for the BASS level control without changing the current value. (8) MID -/+ control: This control adjusts the amount of mid band information in the Piranha output for the current preset. Turning this control one step (or one "click") will display the current value for the MID level control without changing the current value. (9) MID FREQ control: This control determines the mid band frequency that the MID -/+ control will adjust. (10) TREBLE level control: This control adjusts the amount of high band information in the Piranha output for the current preset. Turning this control one step (or one "click") will display the current value for the TREBLE level control without changing the current value. (11) GAIN level control: This control adjusts the amount of gain applied to the input signal for the current preset. Turning this control one step (or one "click") will display the current value for the GAIN level control without changing the current value. (12) LEVEL control This control is used to adjust the output level of the current preset. Turning this control one step (or one "click") will display the current value for the LEVEL control without changing the current value. (13) OUTPUT LEVEL control: The OUTPUT LEVEL control increases or decreases the overall output level of the Piranha independent of the LEVEL control. (14) INPUT DRIVE control: This control is an adjustable gain stage which feeds the input of the tube stages, and allows for input level adjustment when switching between guitars which provide different output levels (i.e. switching from a guitar with passive single-coil pickups to a guitar with active humbucking pickups). The INPUT DRIVE control also determines the maximum amount of distortion that a preset can have, as higher levels of input drive will result in a higher potential distortion level. Conversely, presets can also be globally "cleaned up" by reducing the input drive level. (15) INPUT jack: This standard unbalanced jack is used to provide input to the unit. For convenience, the Piranha provides both front and rear panel mounted input jacks. 3 3. Rear Panel (1) INPUT jack: This standard unbalanced jack is used to provide input to the unit. For convenience, the Piranha provides both front and rear panel mounted input jacks. (2) LOOP SEND jack: This standard 1/4" mono jack provides a post-distortion output to the input of the first device in the effects chain. (3) LOOP MIX control: This control determines the amount that the effected (loop) signal is mixed with the dry (direct) signal. It can be set from 100% dry (no effect signal) to 100% wet (no direct signal). (4) LEFT LOOP RETURN jack: This standard 1/4" mono jack accepts the left output from the last device in the effects loop chain. (5) RIGHT LOOP RETURN jack: This standard 1/4" mono jack accepts the right output from the last device in the effects loop chain. (6) LEFT OUTPUT jack: This standard ¼" mono jack provides output for the left channel of the Piranha. When using the Piranha in a mono application, either output jack may be used. (7) RIGHT OUTPUT jack: This standard ¼" mono jack provides output for the right channel of the Piranha. When using the Piranha in a mono application, either output jack may be used. DIRECT OUTPUT Connectors (8) and (9) LEFT and RIGHT DIRECT OUTPUT jacks: These balanced XLR connectors provide direct preamp output that can be connected to the inputs of a mixing console. Use of this feature eliminates the need for transporting equipment (amplifiers, speaker cabinets, microphones, mic stands, etc.) for a studio session. Although the Piranha's DIRECT OUTPUTS are compensated to provide the sound produced by a miked speaker cabinet, judicious use of the TREBLE control is recommended, as excessive treble will result in an increased "fuzziness" to the preamp sound. Try using the mid band to enhance the highs instead. Pin 1 = Ground Pin 2 = Positive Pin 3 = Negative 4 In the same manner, it is also recommended that the treble is kept down on the mixing console. If enhancement of the highs is needed, try boosting the mid band from 2-3kHz while cutting the treble to eliminate any excessive "fuzz" effects. In addition to these tips, also try adding a small amount of reverb as well, as this will simulate the natural depth of a speaker cabinet. (10) MIDI CHANNEL selection switch: This DIP switch is used to select the MIDI channel that the Piranha responds to. To select a specific MIDI channel, configure the switches based on the figure below. NOTE: When a new MIDI channel is selected, it is necessary to turn the unit off and back on for the new MIDI channel to be recognized. (11) MIDI IN/REMOTE jack: This 7-pin DIN connector must be connected to the MIDI OUT connector of the transmitting MIDI device, or to the MIDI THRU connector of the preceding device (if the Piranha is within a chain of MIDI devices), via a standard 5-pin MIDI cable. A Rocktron All Access ™ footswitch can be used in "Remote" mode with the Piranha to act as a dedicated remote for the unit - where All Access switches are dedicated to perform specific Piranha functions. A 7-pin MIDI cable must be used to connect the All Access MIDI OUT connector to the Pirahna MIDI IN/REMOTE connector when the remote feature is used. (12) MIDI OUT/THRU jack: This standard 5-pin DIN connector passes on the MIDI information that is received at the MIDI IN jack to other MlDI-compatible devices via a MIDI cable. It also outputs MIDI data when performing a memory dump. Note: Inherently in MIDI there is a limit to the number of devices which can be chained together (series connected). With more than three devices, a slight distortion of the MIDI signal can occur (due to signal degradation) which can cause an error in MIDI signal transmission. Should this problem arise, a MIDI box can be used which connects directly to the MIDI device which transmits MIDI information and has multiple connectors for the multiple devices receiving MIDI. MIDI cables should not exceed 50 feet (15 meters) in length. (13) POWER connector: This module provides a connection for the power cord and also houses the main fuse of the unit. 5 4. Connections Using the Piranha with guitar amplifiers: 6 Using the Piranha directly into a mixing console: 7 5. Operation A. Selecting a preset To select a preset on the Piranha, use the UP and DOWN buttons to scroll through the successive presets - each preset selected is recalled automatically. 23 - - B. Creating a new preset Use the UP and DOWN buttons to select a preset to modify. (The preset will be recalled automatically.) 23 - - 12 - - - Use the front panel knobs to adjust the parameters until the desired sound is achieved. (The store button will blink after any preset parameter has been changed from its stored value.) 8 Press the STORE button twice to save the changes made in the current preset location. (Note: Completing this step will copy over the preset stored in the current location.) 12 300 C. Storing a modified preset to a different preset location Repeat steps 1 and 2 described in "B. Creating a new preset". Press the STORE button once (the STORE button will blink faster). 55 450 Use the UP and DOWN buttons to select the preset location to store the new preset into. (Note: Skip this step if the changes are to be stored in the current preset location.) --25 - - * * * * To cancel any storing function, press the GLOBAL button twice. * * * * Press the STORE button once again to save the modified preset in the selected preset location. (The preset currently stored in this location will be written over.) 51 - - 9 D. To copy a preset to a new location Use the UP and DOWN buttons to select the preset to copy. 77 - - - Press the STORE button two times. 77 - - Use the UP and DOWN buttons to select the new preset location. 65 - - - * * * * To cancel any storing function, press the GLOBAL button twice. * * * * Press the STORE button once to store the preset in the selected location. 65 - - 10 E. Setting the HUSH® Threshold HUSH is Hush Systems’ patented single-ended noise reduction system. The low level expander of the HUSH system operates like an electronic volume control. HUSH utilizes a voltage-controlled amplifier (VCA) circuit which can control the gain between the input and the output from unity to 30, 40 or even 50dB of gain reduction. When the input signal is above the user preset threshold point, the VCA circuit remains at unity gain. (This means that the amplitude of the output signal will be equal to that of the input signal.) As the input signal level drops below the user preset threshold point, downward expansion begins. At this point the expander acts like an electronic volume control and gradually begins to decrease the output signal level relative to the input signal level. As the input signal drops further below the threshold point, downward expansion increases. A drop in the input level by 20dB would cause the output level to drop approximately 40dB (i.e., 20dB of gain reduction). In the absence of any input signal, the expander will reduce the gain so that the noise floor becomes inaudible. The HUSH included in the Piranha also incorporates patented V.I.R. (Variable Integrated Release) circuitry, which intelligently tracks the guitar signal. Long, sustained notes are allowed to decay naturally without being cut off, while quick, muted notes release quickly without a trail of noise following. The HUSH threshold is adjustable via the UP and DOWN buttons, and is programmable for each preset (press STORE twice to save the selected threshold). When set at its lowest threshold setting (-70), the HUSH circuit is not active. Press the HUSH button to display the current HUSH setting. 65 -42 Use the UP and DOWN buttons to change the current HUSH threshold value. To set the threshold properly, listen to the noise floor with the threshold set at its lowest setting (-70) while not playing. Increase the threshold value until the noise is no longer audible. (Use caution, as setting this value too high will cause the downward expander to attenuate the output too quickly and not allow the signal to decay as long as it should.) 65 -55 Press the STORE button two times to save any changes made to the HUSH parameter. 11 F. Selecting a Power-up preset The Piranha allows you to select a specific preset which is always recalled when the unit is turned on. Use the UP and DOWN buttons to select the preset to be recalled each time the Piranha is turned on. 22 - - - Without making any parameter changes, press the STORE button three times to store the current preset as the Power-up preset. 22 - - - 12 G. Using the Piranha with a Rocktron All Access™ in REMOTE mode A Rocktron All Access™ can act as a dedicated remote control for the Piranha - allowing direct access to specific Piranha features from the footswitch at any time. Connect the MIDI OUT on the All Access to the rear panel MIDI IN/REMOTE connector on the Piranha. Setting up the Piranha for remote operation When the Piranha is turned off, set the rear panel MIDI Channel selection switch to MIDI channel "1" as shown below. (The Piranha must be set to MIDI channel 1 to respond to the All Access remote function.) (All switches in the "up" position selects MIDI channel "1".) 1 Note: 2 3 4 Changing the MIDI Channel status to any MIDI channel other than channel 1 will defeat remote mode operation. 13 Setting up the All Access for remote operation Refer to the All Access™ user's manual for detailed information on editing the All Access™. Set the Operating Mode to "REMOTE". Set the Bank Size to "10". Reinitialize only the controller information for the instant access switches and pedals using a reinitialization code of "231". Set the Operating Mode to "REMOTE". When operating in Remote mode with a Piranha, switches 1-10 act as normal preset switches, while switches 11-14 provide specific functions, as illustrated below. 14 6. Special Functions Some Piranha functions are available which require special instructions to access. These functions include Factory Preset Reinitialization, Continuous Controller mode and MIDI Preset Dump/Load, and are discussed in this section. A. Factory Reinitialization The Factory Reinitialization function allows for all Piranha presets to be restored to their original condition as shipped from the factory. ! WARNING ! This procedure will erase all user-modified presets and replace them with the original factory presets. Turn the unit off. With the unit turned off, press and hold the DOWN and CLEAN buttons. While holding the DOWN and CLEAN buttons, turn the unit on. All Piranha presets will be reinitialized to their original factory status. Note: When Preset Reinitialization is initiated, the STORE button will blink. After preset reinitialization is complete, the Piranha will complete its normal power-up routine and recall preset number 1. * * * * To cancel the Factory Reinitialization procedure, press the GLOBAL button twice. * * * * 15 B. MIDI Preset Dump The Piranha presets can be dumped to a sequencer via system exclusive messages. Connect a standard MIDI cable from the MIDI OUT of the transmitting Piranha to the MIDI IN on the receiving sequencer. Note: Do not allow connection from the MIDI OUT of the receiving sequencer back to the MIDI IN of the transmitting Piranha. Make sure the "SYSX RECORD" function is enabled on the sequencer, and start the sequencer recording. While holding the HUSH button in, press the CLEAN button to initiate the data dump to the sequencer. 16 C. MIDI Preset Load The Piranha presets can be loaded from a sequencer via system exclusive messages. Connect a standard MIDI cable from the MIDI IN of the receiving Piranha to the MIDI OUT on the transmitting sequencer. Note: Do not allow connection from the MIDI IN of the transmitting sequencer back to the MIDI OUT of the receiving Piranha. Send the real-time sysx track from the sequencer or data storage device. The STORE button on the Piranha will blink to indicate that the dump is in progress. If the dump is accepted, the Piranha will display "1". If an error occurs during transmission, the Piranha will display "E0". If this occurs, try dumping the data again. If errors still occur, the data being dumped may be corrupted. Note: When receiving a bulk load, it is important that the data loaded to the Piranha is not transmitted faster than it was originally dumped from the Piranha. If information is sent to the Piranha too fast, an error will occur. When dumping information from a data storage device, it is necessary to perform the dump in sequence mode rather than sysx mode. Sequence mode will dump the information back to the Piranha at the same speed that it was received from the Piranha. 17 D. Continuous Controller Mode When set to operate in Continuous Controller mode, the Piranha's front panel controls can be used to control other MIDI products in real time. To use the Continuous Controller mode, set the parameter(s) on the receiving unit(s) to respond to the controller number for the given Piranha front panel knob (shown below). For example, if the Reverb Level parameter on a Rocktron Intellifex was set to respond to controller 18, the front panel BASS control on the Piranha could be used to adjust that Intellifex parameter. While holding the HUSH button, press the GLOBAL button to initiate the Continuous Controller mode. The front panel GLOBAL and STORE LEDs will blink to indicate that Continuous Controller mode is currently active. Note: Continuous Controller mode can also be accessed by sending the Piranha controller number 50. The front panel knobs transmit the following controller numbers and value ranges: Note: Program changes can not occur when operating in Continuous Controller mode. * * * * To cancel the Continuous Controller mode, press the GLOBAL button twice. * * * * 18 SPECIFICATIONS Input Impedance Maximum Input Level Input Jack Maximum Output Level Output Impedance Output Jacks Direct Output Jacks 470KΩ +20dBu ¼" mono +20dBu less than 150Ω ¼"mono XLR MIDI IN 7-pin DIN MIDI OUT 5-pin DIN Power Consumption Dimensions 1.75 amps 19" x 7" x 1¾" Rocktron Corporation 2870 Technology Drive Rochester, MI 48309 Customer Service: (810) 853-3055 Fax Number: (810) 853-5937 19