1
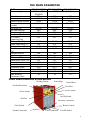
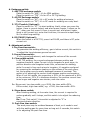
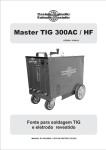
EasyTig
Operation Manual
TIG AC/DC Series
Inverter Welding Machine
Model: Easytig 200AC/DC Easytig
300AC/DC Easytig 315AC/DC
Hong Kong EasyWeld Limited
1
CONTENTS
- Introduction
3
- Warning
4
- Main Parameter
6
- Installation and Operation
7
- Caution & Pre-cautions
10
- Maintenance
12
- Troubleshooting
13
2
Introduction
The EasyTig series of Welders is a revolutionary new approach to Welding
technology. Easyweld introduced a more efficient way to manufacture top
quality machines while keeping the cost of operation and repairs lower. This was
accomplished using several new approaches to the mainstream technology. One
of these methods is our proprietary plug & play main circuit boards which allows
ease of repair, reducing the downtime to only hours rather than days, while also
reducing repair costs averaging less than $75! The TIG AC/DC Series uses
special safety redundant circuitry with built in auto-protection and self adjusting
circuitry to keep your machine running in a safe threshold. This helps protect
your machine from over-voltage, power spikes, burn-outs and shorting.
Warranty
The machine is insured against damage upon shipping. If you machine is
damaged in any way when you receive it, you must retain all shipping materials
and packing. Call our customer service department and report the damage
immediately.
There is a 1 year warranty on all internal electronic parts. The torch, power cord,
clamps, air regulator, hoses, case & paint and consumables and cables are not
covered under warranty. You must use dry gas in your machine and keep it
indoors away from rain and moisture.
This machine is designed to operate from 200-240VAC/380VAC at 50-60Hz Only.
Operating outside of limits will void warranty.
Warranty coverage covers repair or replacement of damaged machine or
damaged circuit board. Warranty does not cover shipping from the customer but
does cover return shipping within the Cont. United States. If you are going to
return a machine to us for repairs, it must be well packed and insured.
Customers who own machines that require warranty coverage should contact
our warranty department by email at [email protected] to obtain a return
authorization code.
Customers who own an out-of-warranty machine that require repairs should
contact us for an estimate.
WARNING!
You may be faced with dangers during the course of welding, so please be
careful and read the manuals carefully before working.
3
CAUTIONS:
•A certain switch is needed to protect the machine from electricity-leaking.
•Please use welding tools of good quality.
•The workers should be qualified for welding.
Electric-shock: it may be fatal to life.
• Install the earth cable to the standard.
• No touching electric parts with bare hands, wet hands or wet clothes.
• Make sure that you and working piece are in insulation circumstances.
• Make sure that your working is in safety.
Smoke: it may be harmful to your health.
• Keep your head out of the smoke.
• When welding, make sure the air is flowing to avoid breathing in the
smoke.
Arc-emission---may be harmful to your eyes and skin
• Wear suitable welding mask and clothes to protect your eyes and skin.
• Use suitable screen or curtain to keep the look-ups from the emission.
• The welding splash may cause fire, so make sure that there are no
flammable things nearby the working place.
Noises—too much noise may be harmful to your hearing.
• Please wear something to protect your ears from the noises.
• Warn the look-ups of the hidden harm the noise may cause.
Break-down: ask the professional for help
• If you have any problems in setting up or operating, please first consult this
manual.
• If you still can not understand after reading this manual, please contact
your supplier or manufacturer to get professionals’ help.
A BRIEF INTRODUCTION TO THE PRODUCTS
TIG AC/DC series is our newly-developed products, whose main character is that
it can not only weld non-rusty steel, alloy steel and carbon steel and other
nonferrous metals with DC function, but also it can weld aluminum and alloy
aluminum with AC function. For instance, for welding skateboard and bicycle
made of aluminum. The total power exchange rate of the machines is over 85%,
and they are energy-saving. The main types are 200 AC/DC, 300 AC/DC and
315 AC/DC.
4
The use and development of inverter technology in welding benefits from the
invention of high power electronic spare parts, esp. IGBT, the employ of which
greatly reduces the volume and weight of main parts, e.g. transformer and
anti-electricity, thus making our machines able to work under HF 20KHZ. We
also employ PWM and CPU-control to make the welding current stable, accurate
and easy to adjust; and the machines convenient to operate, and avoid the
disturbance of electric magnetism.
AC/DC welders are made with inverter technology, and they are lighter, smarter
and more efficient as compared with traditional ones; while compared with
imported ones, they are cheaper, and have stronger electric net. The most
characteristic one is the use of twice inverter technology and output of pure
square wave, which makes the arc straighter, heat more concentrating,
anti-clearance stronger and wider clearance, etc to make sure the high quality
of the machines.
AC/DC series are equipped with foot switch, thus liberating the workers’ hands,
and they can adjust the current with their foot freely. As a result, at the very
beginning or wire-adding, we can speed up the current; while at the end slow
down the current in order to form a good welding line. In a word, the use of foot
switch helps raise the welding efficiency and reduces the welding difficulty as
well as make sure of the welding quality. If you need pulse welding, we have
foot-control switch with the function of pulse welding.
Inverter welders are also equipped with TIG torch, and cable of suitable length,
hose and water-cooling connector. Besides, there are also other spare parts for
torch, such as ceramic nozzle, collet body, short cap and long cap. The size and
quantity of them can see in the enclosed packing list. If you need more spare
parts, you can order separately
Cautions!
This equipment is used mainly in technology. Under room temperature, this
equipment may have wireless emission, please pay attention to it when
working.
5
THE MAIN PARAMETER
TYPE
Power voltage
Rated input current
Power capacitance
Rated output current
Range of output
current
Arc force (A)
No-load voltage
Working voltage
Pre-flow (S)
AC output
frequency(Hz)
Clean width (%)
Slope-downtime (5)
Tail-gas time (5)
Air-occupy proportion
(%)
Remote control
Arc-leading
Efficiency (%)
Rated duty cycle (%)
Power factor
Insulation class
Protection class
Weight (kg)
Size (mm)
Max welding
thickness (mm)
TIG 200AC/DC
AC220V±15%
50/60HZ
20A
4.5 KVA
200A
20~200A
TIG 300AC/DC
TIG 315AC/DC
AC380V±15% 50/60Hz
19A
8.5KVA
300A
20~300A
19A
8.9KVA
315A
20~315A
0~100
56V
18V
0-2
60
0~100
45V
23V
0-2
60
0~100
45V
23V
0-2
60
20-80
0-5
2-10
10-90
20-80
0-5
2-10
10-90
20-80
0-5
2-10
10-90
Yes
HF vibration
85
60
0.93
B
IP21
32
562X465X467
10
Yes
HF vibration
85
60
0.93
B
IP21
38
562X465X467
14
yes
HF vibration
85
60
0.93
B
IP21
38
562X465X467
15
Panel board functions & instructions
Welding Current
Down Slope
Overheat Protection
Current Meter
Post-Flow
AC/DC Switch
Power Switch
Arc/Tig Switch
Pre-Flow
Electrode Connection
Remote Control
Clean Switch
Ground Connection
Torch Connection
Two-Pin Socket
6
A. Exchange switch:
1. ARC/TIG exchange switch:
Place the switch on “ARC”; it’s for MMA welding;
Place the switch on “TIG”, it’s for AC or DC Tig welding.
2. AC/DC Exchange switch:
Place the switch on “AC”; it’s in AC mode for welding aluminum;
Place the switch on “DC”; it’s in DC mode for welding non-rusty steel.
3. 2T/4T switch (Optional):
Place the switch on “2T”, its short welding. that’s, when you press the
button, there is current output, and when press it again, it stops; as for
“4T”, when you first press it, there is current out, and press it again,
there is still current out; press the third time, the current output stops.
So it’s called long welding.
4. DC/PULSE (Optional):
When the switch is at DC TIG, press it at PULSE, and there is DC pulse
current out.
B. Adjustment switch:
1. Pre-flow time switch:
To guarantee the welding efficiency, gas is before current, this switch is
to adjust the time between gas and current.
2. Current time switch:
It’s for current adjustment, and changes the volume of the current.
3. Clear width switch:
In AC TIG welding, the current exchanges between positive and
negative directions, when Current is from tungsten to work piece, its
positive direction and tungsten heats little, convenient for welding;
while if current is from work piece to tungsten, it’s negative and good
for removing the oxidization coating on the surface of the work piece,
but the tungsten may be easily damaged because of overheat. This
switch is for adjusting the current time between positive and negative.
When it’s at the middle ,the proportion is 50% ;at the maximum is 80%;
at the minimum ,20%.If in clockwise direction, the positive current time
turns longer and negative one shorter; and vice versa.
Re: Big current, low clear width; e.g.>200A, the clear width<30%.
Little current, high clear width; e.g. <100A, the clear width>50%.
4. Slope-down switch:
After finishing welding, at the crater time, the current is required to
reduce gradually until it stops, and this switch is to adjust the reducing
time.
Re: If use “foot switch”, this switch is adjusted to “0” in
counterclockwise direction.
5. Post-flow time switch:
The work piece may be oxidized because of heat, so it needs to cool
with the welding gas for some time as long as b 0 seconds, this switch
is for adjusting the post-flow time.
7
6. Arc force adjustment:
If you adjust this switch at MMA, then it can change the welding
characteristic of the little current.
7. Base current:
At DC TIG pulse, this button can adjust the volume of the valley
current.
8. Pulse frequency switch:
At DC TIG, and place the DC/PULSE at PULSE, this switch can adjust the
pulse frequency (0.5-300HZ).
9. Air-occupying proportion:
Change the air-occupying proportion at DCTIG pulse.
C. Pilot light function:
Pilot light for over-heat protection:
If the machine works continuously for long time under big current, its
inner parts may get burned as a result of over-heat. To avoid this, we
set the pilot light, when it’s on, please stop working, but do not turn off
the machine, and it can recover after 2 or 3 mm.
INSTALLATION
TIG welders are equipped with power voltage complement and when the power
voltage ranges between ±15%, it can still work.
When using long output cable, to reduce voltage-decreasing, we suggest you
choose cables with wider section; but if the cable is too long, it may cause
abnormal in the working system, so we recommend you use the given length.
1. Make sure the ventilating mouth is not blocked or covered lest the
cooling system invalid.
2. Connect well the C02 source. The gas supply includes gas bottle, gas
hose and gas regulator, the connection of the hose should be connected
with hose clamp or other things lest gas-leaking or air-in.
3. Connect the case to earth with cables whose section is no less than
6mm2, from the back of the welding machine to earth screw to
earth-connecting equipment.
4. Plug the air-plug of the back circuit cable to on the air-socket “+” and
whirl the switch in clockwise direction tightly; the other terminal of the
earth clamp is tied to the work piece.
5. Tie the power plug to the concerned socket, and make sure that the
power supply is AC 380V with a tolerance error of the given range.
6. Set up the water-cooling torch according to the given map, tie the
copper screw at one end of the torch to the one-knob on the panel
8
board, and tighten it in clockwise direction.
7. Connect the two-cored air plug of the foot switch respectively to the
two-cored and three-cored sockets on the panel board.
After finishing all the work above, you can start welding.
OPERATION
1. Turn on the power switch, the fan begins to work.
2. Turn on the gas switch; adjust the gas to rated standard. (See parameter)
3. According to the oxidization degree of the work piece, adjust the switch for
clean width to change the positive and negative current rate.
4. Turn on the switch on the welding torch, and the electromagnetic valve works;
you will hear the sound of HF electricity-releasing. Meanwhile, there is gas
coming out of the torch mouth. Attention: If it’s the first time to weld, please
hold the switch for seconds before welding; don’t begin welding until all the
air in the gas road is made out. After you finish welding, there will be still
being gas out for seconds. This is designed for protecting the welding point,
so please stay in the welding place for seconds before removing the torch.
5. According to practical use, choose the foot switch. If the foot switch is in use,
please turn the current to the minimum, and the current volume is under the
control of the foot switch.
6. According to practical use, adjust the time of “pre-flow”, “post-flow” and
“slope-down”.
7. Keep the distance between the tungsten and work piece between 2mm to
4mm, push the torch switch, then HF electricity-releasing will come out
between the welding tungsten and work piece; after the arc-leading, the
splash may disappear at once, then you can start work.
9
INSTRUCTIONS TO DC TIG:
1. Make “AC/DC” to “DC” place.
2. PULSE/DC switch, if you put it at PULSE, you can adjust the buttons for Base
current adjustment. Set pulse adjustment or clear width adjustment to
achieve the welding efficiency that you need.
3. Turn on the power switch, the fan inside the machine begin to work.
4. Turn on the gas switch; adjust the gas to rated standard. (See parameter)
4. Same as ACTIG welding instructions 5. 6. 7. 8.
CAUTIONS
Any plug-in or plug-out of cable or connection during the welding is forbidden,
because such operation may cause harm to either body safety or the
equipment.
Cautions & Pre-cautions
Environment
1)
2)
3)
4)
5)
The operation should be in a comparative dry environment, the air humidity
no more than 90%.
The around temperature should be between -10°C and 40°C.
Avoid working under the sun or in the rain, do not let in water or rain.
Avoid working under the circumstance of dust or air with corrosive gas.
Avoid doing C02 working under the condition of strong air flow.
10
Safety tips
TIG welders are equipped with over-voltage and over-current and over-thermal
protection circuit, when the output voltage, output current and inner
temperature is over the rated ones, the machine will stop working automatically.
But over-use (e.g. over-voltage) may damage the welding machine, so pay
attention to the following tips:
1) Make sure of good ventilation
TIG welders are large technical welding machines. It has huge current
through it when working, and natural air flow can not satisfy its cooling
need, so we put two embodied fans to cool it and makes it work normally.
The operator should make sure the fan not blocked or covered, and the
distance between the welder and surroundings shouldn’t be less than
0.3m.The users should always pay attention to the flowing condition of the
machine, because it is very important for the working quality and working
year of the machine.
2) No over-load!
The users should pay second attention to the allowed max loading current
(comparative load cycle), and make sure the welding current not surpass
the allowed max. Over-current may obviously shorten the working year of
the machine, and even may fire the machine to pieces.
3) No over-voltage!
The power voltage is listed in the “Main Parameter” table; generally, the
automatic compensating circuit may make sure the current is in rated range.
If the voltage surpasses the allowed value, the machine may be damaged.
The operator should be familiar with it and take certain actions to prevent
it.
4) Every welder has an earth screw, and earth connecting mark. Please choose
a cable whose section is more than 6mm2 before operation and make the
case firm earth —connecting to avoid accidents which may be caused by
electricity-leaking.
5) If the working time of the welder surpasses the standard load cycle, the
machine may suddenly enter protection condition and stop working, which
shows that the machine has been over the standard load cycle, and
over-heating works the thermal —control switch, thus making the machine
stop working. Meanwhile, the red pilot light on the panel board is on. Under
this circumstance, you needn’t pull off the plug, so that the fan can
continue working, thus cooling the machine. When the red light is off, the
temperature decreases to the standard range, then you begin to weld
again.
11
MAITENANCE
WARNING:
All maintenance and checking work should be carded out
under the circumstance of light off .Make sure the power plug is pulled off
before you open the case.
1) Use clear and dry compressed air to remove the dust in certain period, if the
machine is working under heavy-polluted environment, clear it daily.
2) The pressure of the compressed air should be in a suitable level lest it
damages the little parts in the machine.
3) Check the inner circuit connection in the welding machine, and make sure
the connections are right and firm (esp. plug-in or parts) ; if there is rust or
loose, use the sand-paper to rub off the rust or oxidized coating and
re-connect it firmly.
4) Avoid water or water gas into the inner of the machine, if happens, please
first dry it, and then measure the insulation situation with Omen meter.
(Including the joints and joint vs. case) .Do not continues until you make
sure there is no abnormal phenomenon.
5) If the machine is not used for long time, please put it into the original box
and keep it in dry condition.
PRE-CHECKING
WARNING
Blind experiment and incautious checking may cause trouble for formal repair
and make the breakdown area bigger. And the inner bare parts of the machine
have voltage that may cause dangers if it has power supply, so any direct or
indirect touch may cause accidents of electric shock, and heavy shock may
even cause death!
Caution: During the maintenance period, if not authorized, any
personal wrong repair to the welders may cause the maintenance
invalid.
12
Checking breakdown
Cautions: The operators are supposed to have enough knowledge of electric-gas and
common sense of safety, and concerning certificates are needed. We suggest you contact us
before operation and meanwhile get permission.
BREAKDOWN
1.No reflection after turn-on
2. The regulator indicates no
sound of releasing
electricity, no show of
breakdown.
3. Have HF
electricity-releasing, but no
current output.
POSSIBLE CAUSES
1. No power supply or
short of phase
2. Power cable in break
circuit
3. Assistant power off in
the phase
1. Something wrong with
the switch
2. Releasing nozzle in
short circuit
3. Air-socket wrongly set
up
1. Earth cable not well
connected
2. Torch cable in short
circuit.
SOLUTION
1. Check the power supply.
2. Open the case to check the voltage
3. Contact the supplier or specialist.
1. Use screw knife to make the two- cored
air socket short circuit.
2. Adjust the distance between
electric-releasing nozzles.
3. When using torch or foot switch, the
concerned plug should be in the two-cored
socket.
1. Check the earth cable.
2. Check or renew the torch.
1. Hand-control and foot
1. When using foot switch, the exchange
switch in wrong place.
switch should be in “on” place.
cannot adjust,
2. Potentiometer in the
2. Renew the potentiometer.
foot switch broken.
1. Renew the slight switch.
5. Hand-control normal, while 1. Slight switch in foot
switch broken.
2. Renew 1K sliding potentiometer.
foot switch abnormal.
2. Sliding potentiometer in
the foot switch broken.
6. Abnormal pilot light on
1. Spontaneous
1. Turn off the machine, and restart after
the light on.
over-current protection.
2. Too much dust causes
2. Open the case; use the compressed air to
short circuit.
clear the dust.
3. Some parts in the
3. Contact professionals or suppliers.
machine broken.
1.
Choose
the wrong
1. Choose AC button in AL welding.
7. Can not remove the
welding button.
2. Make clear width high or remove the
oxidized coating in
2. Clear width too low.
oxidized coating.
3. Damage the MOSFET in 3. Contact professional.
AL-welding
second inverter.
8. Current normal, but no gas 1. Have sound of
out
electromagnetic valve
a. Gas nozzle blocked up
a. Clear the blockings.
b. gas hose broken
b. Repair and change Tig torch
2. No sound of
electromagnetic valve
a. Valve damaged
a. Change the valve.
b. Valve-controlled circuit b. Ask professional to repair the board.
in trouble
Adjust the clear width in counterclockwise
Clear
width adjust too
9. Tungsten terribly damaged
much
Better tie the cable screw to the work table
Earth cable not well
10. Earth cable too hot
connected
If you still can not solve the problem after consulting the above table, then please contact the
sales agency or concerning department.
4. Have current output, but
13