1
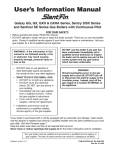
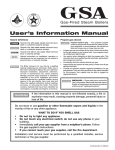
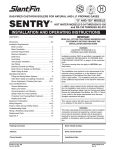
GWA & GSA Gas-Fired Boilers – Gas Conversion Instructions
GWA & GSA
Gas-Fired Boilers
Gas Conversion
Kit Instructions
Hazard definitions
Hazards that will cause severe personal injury,
death or substantial property damage.
Hazards that can cause severe personal injury,
death or substantial property damage.
Hazards that will or can cause minor personal injury
or property damage.
Special instructions on installation, operation or
maintenance that are important but not related to
personal injury or property damage.
This conversion kit must only be installed by a
qualified heating installer/service technician in
accordance with these instructions and all applicable
codes and requirements of the authority having
jurisdiction. The qualified installer/service technician
performing this work assumes responsibility for this
conversion.
4
Part Number 670 06 1005 00
INSTALLER — Read these instructions
completely before beginning the installation. If
the information in these instructions is not followed
exactly, a fire, explosion, carbon monoxide
emission or other hazardous conditions can result,
causing severe personal injury, death or substantial
property damage.
When calling or writing about the boiler— Please
have the boiler model number from the boiler rating
label and the CP number from the boiler jacket.
USER — Please read the following. Failure to
comply could result in severe personal injury, death
or substantial property damage.
• These instructions are for use only by your
qualified heating installer/service technician.
• Please see the User’s Information Manual for your
reference.
• We recommend regular service by a qualified
service technician, at least annually.
Part Number 670 06 1005 00
GWA & GSA Gas-Fired Boilers – Gas Conversion Instructions
GWA & GSA Gas-Fired Boilers – Gas Conversion Instructions
Parts
Conversion instructions
Table 1 Natural to propane kit contents
Part description
Boiler model number
Conversion kit, natural to propane
GWA052 through GWA175
GWA210 and GWA245
GSA075 through GSA175
GSA200 and GSA250
Kit consists of:
Pilot burner assembly, consists of:
Pilot burner
Main burner with pilot bracket
Propane gas pilot orifice
Propane gas valve set for 10" w.c.
½" x ½", Honeywell VR8200
¾" x ¾", Honeywell VR8300
Thermocouple
Pilot tubing
Main burner orifices
1.3 mm
1.55 mm
International Comfort
Products
part number
510811808WT
510811809WT
510811900WT
510811901WT
Verify contents of kit are correct size and fuel type for your boiler. Failure to install parts that are correct size and fuel type
will result in severe personal injury, death or substantial property damage.
For your safety, turn off electrical power supply and turn off external gas supply valve before attempting to work on the
boiler. Failure to do so can cause severe personal injury, death or substantial property damage.
Replace gas parts
Finish the installation
1. Disconnect wires, gas inlet piping, pilot gas tubing and
thermocouple from gas valve on boiler.
1. Connect gas piping — Follow “Install gas piping” in Boiler Manual.
2. Remove and discard the existing gas valve.
3. Affix new labels:
• Attach conversion label next to boiler rating label.
• Place new lighting instruction label over old label inside
jacket.
3. Remove access panel.
4. On gas manifold, mark location of main burner with attached
pilot assembly. Remove and discard:
• main burner with attached pilot assembly
• thermocouple
• 1/8" pilot gas tubing
On GWA052 and GWA070 do not discard pilot
pressure regulator, fittings and 1/4" tubing.
GWA052 through GWA175
GSA075 through GSA175
GWA210 and GWA245
GSA200 and GSA250
5. Remove all remaining burners.
You must replace both the existing pilot burner and
gas valve with the pilot burner and gas valve provided
in the conversion kit. Failure to use the correct
components will result in severe personal injury,
death or substantial property damage.
GWA052 through GWA175 — qty: 10
GWA210 and GWA245 — qty: 14
GSA075 through GSA175 — qty: 7
GSA200 and GSA250 — qty: 10
Gas valve manufacturer’s instructions
Conversion kit instructions
Conversion label, natural to propane
Lighting instructions label
6. Remove and discard all main burner orifices in gas manifold.
Replace with main burner orifices provided (see Table 1 on
page 2), using pipe dope sparingly only to male ends. Use pipe
dope compatible with propane gases. Do not overtighten orifices
(maximum 50 in.-lb. torque).
Use only pipe dope compatible with propane gas,
even if boiler is to be operated on natural gas. Failure
to comply could result in severe personal injury, death
or substantial property damage.
You must replace all burner orifices with the correctlysized conversion kit orifices. Failure to do so will result
in severe personal injury, death or substantial
property damage.
2. Connect wiring — Wire gas valve per wiring diagram on boiler.
4. Verify parts installation — Verify that the following parts have
been installed per instructions.
• Gas valve
• Pilot assembly, pilot tubing and thermocouple
• Main burner orifices
5. Operate boiler
Before placing boiler in operation, check boiler and
its gas connection for leaks, as described in:
• GWA Boiler Manual, page 13
• GSA Boiler Manual, page 12
a. Follow lighting instructions on boiler or in Boiler Manual for
proper start-up.
b. Check burner flames per “Start-up” section in Boiler Manual.
c. Follow “Checkout procedure” in Boiler Manual.
Figure 1
GWA052 and GWA070 pilot pressure
regulator installation
7. Install new 1/8" pilot gas tubing and thermocouple to new pilot
assembly.
8. Install new main burner with attached pilot assembly in location
marked on gas manifold.
9. Check main burners to make sure they are clean. Install all
remaining burners.
When replacing, main burners must be seated firmly
in slots in rear support with openings in burners face
up. Failure to properly seat burners will cause severe
personal injury, death or substantial property damage.
10. Install new gas valve with arrow on body in direction of gas
flow.
11. Connect new pilot tubing and thermocouple to new gas valve.
Refer to gas valve manufacturer’s instructions, if necessary,
for proper location of connections.
On GWA052 and GWA070 be sure to reconnect
pilot pressure regulator as shown in Figure 1.
12. Replace access panel.
2
Part Number 670 06 1005 00
Part Number 670 06 1005 00
3
GWA & GSA Gas-Fired Boilers – Gas Conversion Instructions
GWA & GSA Gas-Fired Boilers – Gas Conversion Instructions
Parts
Conversion instructions
Table 1 Natural to propane kit contents
Part description
Boiler model number
Conversion kit, natural to propane
GWA052 through GWA175
GWA210 and GWA245
GSA075 through GSA175
GSA200 and GSA250
Kit consists of:
Pilot burner assembly, consists of:
Pilot burner
Main burner with pilot bracket
Propane gas pilot orifice
Propane gas valve set for 10" w.c.
½" x ½", Honeywell VR8200
¾" x ¾", Honeywell VR8300
Thermocouple
Pilot tubing
Main burner orifices
1.3 mm
1.55 mm
International Comfort
Products
part number
510811808WT
510811809WT
510811900WT
510811901WT
Verify contents of kit are correct size and fuel type for your boiler. Failure to install parts that are correct size and fuel type
will result in severe personal injury, death or substantial property damage.
For your safety, turn off electrical power supply and turn off external gas supply valve before attempting to work on the
boiler. Failure to do so can cause severe personal injury, death or substantial property damage.
Replace gas parts
Finish the installation
1. Disconnect wires, gas inlet piping, pilot gas tubing and
thermocouple from gas valve on boiler.
1. Connect gas piping — Follow “Install gas piping” in Boiler Manual.
2. Remove and discard the existing gas valve.
3. Affix new labels:
• Attach conversion label next to boiler rating label.
• Place new lighting instruction label over old label inside
jacket.
3. Remove access panel.
4. On gas manifold, mark location of main burner with attached
pilot assembly. Remove and discard:
• main burner with attached pilot assembly
• thermocouple
• 1/8" pilot gas tubing
On GWA052 and GWA070 do not discard pilot
pressure regulator, fittings and 1/4" tubing.
GWA052 through GWA175
GSA075 through GSA175
GWA210 and GWA245
GSA200 and GSA250
5. Remove all remaining burners.
You must replace both the existing pilot burner and
gas valve with the pilot burner and gas valve provided
in the conversion kit. Failure to use the correct
components will result in severe personal injury,
death or substantial property damage.
GWA052 through GWA175 — qty: 10
GWA210 and GWA245 — qty: 14
GSA075 through GSA175 — qty: 7
GSA200 and GSA250 — qty: 10
Gas valve manufacturer’s instructions
Conversion kit instructions
Conversion label, natural to propane
Lighting instructions label
6. Remove and discard all main burner orifices in gas manifold.
Replace with main burner orifices provided (see Table 1 on
page 2), using pipe dope sparingly only to male ends. Use pipe
dope compatible with propane gases. Do not overtighten orifices
(maximum 50 in.-lb. torque).
Use only pipe dope compatible with propane gas,
even if boiler is to be operated on natural gas. Failure
to comply could result in severe personal injury, death
or substantial property damage.
You must replace all burner orifices with the correctlysized conversion kit orifices. Failure to do so will result
in severe personal injury, death or substantial
property damage.
2. Connect wiring — Wire gas valve per wiring diagram on boiler.
4. Verify parts installation — Verify that the following parts have
been installed per instructions.
• Gas valve
• Pilot assembly, pilot tubing and thermocouple
• Main burner orifices
5. Operate boiler
Before placing boiler in operation, check boiler and
its gas connection for leaks, as described in:
• GWA Boiler Manual, page 13
• GSA Boiler Manual, page 12
a. Follow lighting instructions on boiler or in Boiler Manual for
proper start-up.
b. Check burner flames per “Start-up” section in Boiler Manual.
c. Follow “Checkout procedure” in Boiler Manual.
Figure 1
GWA052 and GWA070 pilot pressure
regulator installation
7. Install new 1/8" pilot gas tubing and thermocouple to new pilot
assembly.
8. Install new main burner with attached pilot assembly in location
marked on gas manifold.
9. Check main burners to make sure they are clean. Install all
remaining burners.
When replacing, main burners must be seated firmly
in slots in rear support with openings in burners face
up. Failure to properly seat burners will cause severe
personal injury, death or substantial property damage.
10. Install new gas valve with arrow on body in direction of gas
flow.
11. Connect new pilot tubing and thermocouple to new gas valve.
Refer to gas valve manufacturer’s instructions, if necessary,
for proper location of connections.
On GWA052 and GWA070 be sure to reconnect
pilot pressure regulator as shown in Figure 1.
12. Replace access panel.
2
Part Number 670 06 1005 00
Part Number 670 06 1005 00
3
GWA & GSA Gas-Fired Boilers – Gas Conversion Instructions
GWA & GSA
Gas-Fired Boilers
Gas Conversion
Kit Instructions
Hazard definitions
Hazards that will cause severe personal injury,
death or substantial property damage.
Hazards that can cause severe personal injury,
death or substantial property damage.
Hazards that will or can cause minor personal injury
or property damage.
Special instructions on installation, operation or
maintenance that are important but not related to
personal injury or property damage.
This conversion kit must only be installed by a
qualified heating installer/service technician in
accordance with these instructions and all applicable
codes and requirements of the authority having
jurisdiction. The qualified installer/service technician
performing this work assumes responsibility for this
conversion.
4
Part Number 670 06 1005 00
INSTALLER — Read these instructions
completely before beginning the installation. If
the information in these instructions is not followed
exactly, a fire, explosion, carbon monoxide
emission or other hazardous conditions can result,
causing severe personal injury, death or substantial
property damage.
When calling or writing about the boiler— Please
have the boiler model number from the boiler rating
label and the CP number from the boiler jacket.
USER — Please read the following. Failure to
comply could result in severe personal injury, death
or substantial property damage.
• These instructions are for use only by your
qualified heating installer/service technician.
• Please see the User’s Information Manual for your
reference.
• We recommend regular service by a qualified
service technician, at least annually.
Part Number 670 06 1005 00