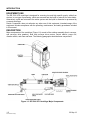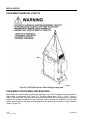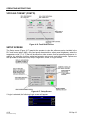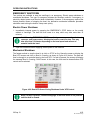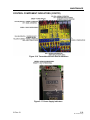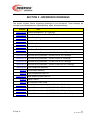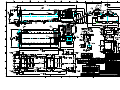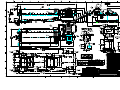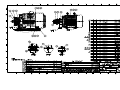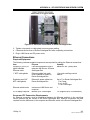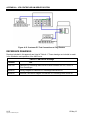
1
DE-7200 Centrifuge Variable Frequency Drive Issued 30 Oct 09 Rev 01 Jan 14 Maintenance & Operation Manual DISCLAIMER Derrick Corporation has taken care to ensure that all of its maintenance and operation manuals are accurate. However, we offer no guarantees or warranties in this regard. Our manuals are provided only as a guide to assist with the maintenance and operation. Derrick Corporation takes no responsibility for any losses, damage, or injuries that may occur as a result of using any of our manuals. It is ultimately the operator’s responsibility to ensure that the operation, repair, and maintenance of equipment complies with all applicable national and local regulations, including safety regulations. THIS MANUAL IS PROVIDED BY DERRICK CORPORATION ON AN “AS IS” BASIS AND DERRICK CORPORATION EXPRESSLY DISCLAIMS ANY AND ALL WARRANTIES, EXPRESS OR IMPLIED, INCLUDING WITHOUT LIMITATION WARRANTIES OF MERCHANTABILITY AND FITNESS FOR A PARTICULAR PURPOSE. IN NO EVENT SHALL DERRICK CORPORATION BE LIABLE FOR ANY DIRECT, INDIRECT, INCIDENTAL, PUNITIVE, OR CONSEQUENTIAL DAMAGES OF ANY KIND WHATSOEVER WITH RESPECT TO THE MANUAL AND EQUIPMENT. Derrick Equipment Company 15630 Export Plaza Drive Houston, Texas 77032 Phone: 281.590.3003 Toll Free: 1.866.DERRICK Fax: 281.442.6948 www.derrickequipment.com UNIT NUMBER IS KEY TO DERRICK SERVICE All inquiries to Derrick must include the equipment unit number. The stainless steel unit number tag attached to each piece of Derrick equipment is your key to efficient service and support. Typical Derrick Unit Number This unique number gives vital information to Service personnel who use it to identify the correct parts when filling orders, provide accurate responses to service questions, track documentation, and trace the equipment’s history or configuration. In short, the unit number provides the critical information needed to ensure that Derrick customers receive the best possible service. The unit number consists of a two-character alphabetic prefix that identifies the equipment type and a series of numeric characters that signify the sequence of the machine’s manufacture. For example, unit number MA000001 would be the first screening machine manufactured by Derrick. Alphabetic prefixes currently in use are: MA - Screening Machine AD - Desilter and Desander DG - Degasser AG - Mud Agitator CF - Centrifuge SF - Screen Frame To ensure that it will remain intact over many years of rigorous service, the heavy-gage tag is riveted to a structural member such as the shaker support structure. It is not to be confused with any other identifier on the machine such as a vibrator motor serial number. For convenient availability, the unit number is also recorded in the Operation and Maintenance manual shipped with the equipment. When contacting Derrick for any equipment question or need, always have the unit number in your possession. It’s the best way to get the most efficient service from our dedicated Service and Engineering personnel. ABOUT THIS MANUAL In this electronic manual, all sections and paragraphs listed in the CONTENTS are linked to the corresponding text. Navigate the electronic manual as follows: 1. To view any desired information, display the CONTENTS page and move the cursor to the desired paragraph or section title. 2. To display the desired information, click on the listing when the pointing finger appears over the text. 3. When finished viewing the text, press Alt + left arrow key to return to the CONTENTS page. 4. If desired to return to the same information, press Alt + right arrow. To locate a different item, repeat steps 1 and 2. 5. Blank pages are included to facilitate accurate two-sided printing on a standard copier. To print any individual section, simply enter the PDF page number range at the top of the screen (not the page number at the bottom of each page). This document contains proprietary information of Derrick Corporation. It is intended solely for the information and use of parties operating and maintaining the equipment described herein. Such proprietary information may not be used, reproduced, or disclosed to any other parties for any other purpose without the expressed written permission of Derrick Corporation. Continuous improvement is a policy of Derrick Corporation. All instructions and procedures are subject to change without notice. CONTENTS Section Page 1 - Introduction ............................................................................................. 1-1 Date 15 Feb 12 Overview ................................................................................................. 1-1 Safety ...................................................................................................... 1-1 Sound Emission ...................................................................................... 1-1 Equipment Use ........................................................................................ 1-2 Description .............................................................................................. 1-2 Mechanical Operation .............................................................................. 1-6 Control System ........................................................................................ 1-7 Product Support....................................................................................... 1-8 2 - Safety ....................................................................................................... 2-1 30 Sep 13 General ................................................................................................... 2-1 Warnings ................................................................................................. 2-1 Material Safety Data Sheets (MSDSs) ..................................................... 2-3 3 - Installation ............................................................................................... 3-1 General ................................................................................................... Safety ...................................................................................................... Top Cover Opening/Closing Procedures ................................................. Storage .................................................................................................... Installation Sequence .............................................................................. Required Clearances and Positioning ...................................................... Equipment Handling ................................................................................ Equipment Positioning and Mounting....................................................... Liquid and Solid Discharge Chutes .......................................................... Equipment Leveling ................................................................................. Lower and Secure Rotating Assembly ..................................................... Feed and Flush Connections ................................................................... Compressed Air ....................................................................................... Feed Pump .............................................................................................. Electric Power Connections ..................................................................... Bowl, Conveyor, and Feed Pump Connections ........................................ Tank Level Switch Connections ............................................................... Polarity Test ............................................................................................ Sensor Connections ................................................................................ Machine Startup ...................................................................................... 01 Jan 14 01 Jan 14 3-1 3-1 3-2 3-2 3-3 3-3 3-4 3-6 3-8 3-9 3-10 3-11 3-13 3-13 3-13 3-15 3-15 3-16 3-17 3-18 TOC-1 DE-7200VFDCentrifuge CONTENTS Section Page 4 - Operating Instructions ............................................................................ 4-1 Date 30 Sep 13 General .................................................................................................... 4-1 Software Version ..................................................................................... 4-1 Operating Safety ...................................................................................... 4-1 Top Cover Opening/Closing Procedures .................................................. 4-2 Purge System (Hazardous Environment Only) ......................................... 4-2 Initial Startup ............................................................................................ 4-3 Normal Startup......................................................................................... 4-6 Cold Climate Startup ................................................................................ 4-7 Operation ................................................................................................. 4-7 Bearing Temperatures ............................................................................. 4-12 Motor Torque Trend ................................................................................. 4-12 System Diagnostics ................................................................................. 4-13 Performance Status ................................................................................. 4-13 Alarm and Fault Messages ...................................................................... 4-14 VFD Status .............................................................................................. 4-15 Pump VFD Fault Status ........................................................................... 4-16 VFD Temperature Trends ........................................................................ 4-17 VFD Fault Reset ...................................................................................... 4-17 Setup Screen ........................................................................................... 4-18 Pump Setup Screen ................................................................................. 4-19 Clean Out ................................................................................................ 4-19 Normal Shutdown .................................................................................... 4-21 Automatic Shutdown ................................................................................ 4-21 Emergency Shutdown .............................................................................. 4-23 5 - Maintenance............................................................................................. 5-1 31 Dec 13 General .................................................................................................... 5-1 Top Cover Opening/Closing Procedures .................................................. 5-1 Preventive Maintenance .......................................................................... 5-2 Lubrication Chart ..................................................................................... 5-3 Gearbox Oil Level Check ......................................................................... 5-3 Gearbox Oil Change ................................................................................ 5-4 Drive Belt Replacement ........................................................................... 5-5 Purge System .......................................................................................... 5-7 Rotating Assembly Maintenance .............................................................. 5-11 Hardware Torque Specifications .............................................................. 5-15 Recommended Spare Parts ..................................................................... 5-15 TOC-2 DE-7200VFDCentrifuge 01 Jan 14 CONTENTS Section Page Date 5 - Maintenance (Cont’d) Troubleshooting ....................................................................................... 5-17 Alarm and Fault Messages ...................................................................... 5-25 VFD Alarm and Fault Cross References .................................................. 5-32 Control Component Indicators ................................................................. 5-33 6-7 - Not Used 8 - Reference Drawings ................................................................................ 8-1 01 Sep 11 9 - Installation and Maintenance Log .......................................................... 9-1 30 Oct 09 Appendix A - HMI Server System 01 Jan 14 15 May 13 TOC-3 DE-7200VFDCentrifuge SECTION 1 - INTRODUCTION OVERVIEW This manual provides instructions for installing and operating the DE-7200 Variable Frequency Drive (VFD) centrifuge (Figure 1-1). The manual is divided into several sections to assist the user in readily accessing the information. Instructions include description, theory of operation, safety, installation, and maintenance. Reference drawings are provided to facilitate parts location and ordering, as well as for understanding of equipment operation and assist in troubleshooting. The manual also contains technical documentation provided by outside suppliers. These documents cover components used in the centrifuge but not manufactured by Derrick. Figure 1-1 DE-7200 Variable Frequency Drive (VFD) Centrifuge SAFETY Section 2 of this manual contains relevant safety information for both operation and maintenance of this equipment. Be sure this information is read and understood by all personnel. DO NOT operate the equipment if defective or faulty mechanical or electrical components are detected. SOUND EMISSION Hearing protection is recommended when working on or near the centrifuge. Based on measurements taken for technically comparable machinery, the centrifuge emits the following airborne sound levels: • A-Weighted Machine Surface-Averaged Sound Pressure Level at 1m – 90.9 dBA • A-Weighted Machine Surface-Averaged Sound Power Level – 109.8 dBA • C-Weighted Instantaneous Peak Sound Pressure Level – 111.4 dBC 20 Sep 12 1-1 DE-7200VFDCentrifuge INTRODUCTION EQUIPMENT USE The DE-7200 VFD centrifuge is designed for removing low and high specific gravity solids from slurries. In one type of processing, solids are removed and the liquid is returned for recirculation. Alternatively, solids are returned to the active system and the liquid is discarded or processed by a second centrifuge. Derrick Corporation does not authorize any other use of this equipment. Intended usage of the equipment includes compliance with the operating, maintenance, and safety procedures included in this manual. DESCRIPTION Major components of the centrifuge (Figure 1-2) consist of the rotating assembly (bowl, conveyor, and conveyor drive gearbox), bowl and conveyor drive motors, control cabinet, purge unit, vibration switch, and case and base. The following paragraphs describe these components. Figure 1-2 DE-7200 VFD Centrifuge Major Components 1-2 DE-7200VFDCentrifuge 20 Sep 12 INTRODUCTION Rotating Assembly The rotating assembly consists of a cylindrically shaped, bowl, conveyor assembly, gearbox, and related components. The bowl consists of a straight cylinder with a conical section at the solid discharge end and a flat liquid bowl head at the opposite end. Openings are provided at both ends to permit liquid and solid discharges. The bowl ends are supported by roller bearings having grease fittings to facilitate periodic lubrication. Bowl Assembly The liquid bowl head at the liquid discharge end contains movable weir plates that permit manual adjustment of the liquid level remaining in the bowl during rotation. Notched locking plates adjacent to the weir plates facilitate precise adjustment. Although they are individually adjustable, all plates must be set at the same level. The liquid level or pond depth, along with other factors, helps determine the liquid content of the discharged solids. The conical bowl at the solid discharge end forms an upward sloping beach, where solids are dried and continuously discharged through the solid discharge ports. Replaceable inserts line the solid discharge ports to minimize the rate of wear due to abrasive action. Conveyor The conveyor assembly is a hollow, cylindrical auger that receives the inlet slurry into its interior, disperses it through feed nozzles to the bowl assembly, and transports the solids to the solids discharge outlets. An electric motor connected to the input shaft of a three-stage planetary gearbox turns the conveyor in the same direction as the bowl but at a higher rate of speed. The outer housing of the gearbox is secured to the bowl, while the output shaft is directly connected to the conveyor. The differential speed setting on the control panel determines the conveyor speed in relation to the bowl speed. This relationship remains consistent; as bowl speed is varied, the conveyor speed varies commensurately but maintains the differential relationship. For example, a bowl speed of 2000 RPM and a conveyor differential speed of 10 results in the conveyor rotating at a rate of 2010 RPM. The feed tube at the liquid discharge end directs inlet slurry into the interior of the conveyor, which rapidly disperses the material through feed nozzles into the bowl. Replaceable inserts line each of the six feed nozzles to minimize wear due to abrasive action. A roller bearing supports the conveyor at the liquid bowl head, while at the solid end the conveyor is supported by the bearings that are integral to the conveyor drive gearbox. Conveyor Drive Gearbox The conveyor drive gearbox is a three-stage planetary gearbox that rotates the conveyor at a faster speed than the bowl assembly. The gearbox is mounted on, and consequently driven by, the bowl assembly, Input and output shafts of the gearbox are supported by internal bearings. The conveyor drive motor is coupled to the gearbox input shaft by a flexible coupling, which permits compliance with slight alignment variations. The gearbox contains a gear system that transfers rotation from the motor and bowl to the conveyor’s output shaft. The input shaft end of the gearbox is supported by the solid end main bearing, while the output end is secured to the bowl. The gearbox ratio of 49:1 turns the conveyor at a proportionally faster rate than the bowl assembly. The control system ensures that the conveyor’s rotational speed varies directly with bowl speed, maintaining a consistent differential relationship for solids conveyance. During an overload condition, excessive solids in the conveyor may overburden the motor or gearbox, causing motor torque to increase and resulting in an overload alarm. If the conveyor’s 20 Sep 12 1-3 DE-7200VFDCentrifuge INTRODUCTION pre-set torque limit is reached, the control system automatically reduces the feed rate to enable the conveyor to clear the excess solids. When the centrifuge is operating at the reduced feed rate, the Operation screen displays a message to inform the operator of the modified status. Unless the over-torque condition is removed, the centrifuge will be shut down automatically. Conveyor Drive Gearbox (Cont’d) If a sudden overload torque condition occurs, the conveyor drive clutch mechanically disengages the conveyor drive motor to protect the gearbox (Figure 1-3) from damage. Following disengagement, the centrifuge must be shut down and the clutch manually reset as follows: • Align both clutch halves at one of the marks on the actuation ring and body. • Insert a screwdriver blade between the actuation ring and adjustment nut in two places 180° apart, and press ring back into engagement position. Disengagement Re-Engagement Figure 1-3 Conveyor Drive Clutch Operating Principles Drive Motors The centrifuge is configured to operate on a designated AC voltage supplied in three-phase, 50Hz or 60Hz. The machine is operated by two inverter-duty, three-phase, explosion-proof electric motors. A 150HP bowl drive motor is connected to the bowl assembly by a sheave and series of drive belts, while a 60HP electric motor is directly coupled to the gearbox input shaft by a clutch coupling. A protective guard covers the sheaves, drive belts, and conveyor drive clutch coupling for personnel protection. Control Cabinet All electric power distribution and control system components required for centrifuge operation are installed in the control cabinet. Incoming power energizes the VFDs that supply the varying output power for operation and control of the bowl, conveyor, and pump drive motors. A step-down transformer adjusts incoming power to the 115 to 120Vac power required for operation of the PLC and operator control panel. The transformer also energizes the 24Vdc power supply that produces the required DC power for operation of control system components. An Ethernet communication network permits two-way data transfer between the PLC, VFDs, and operator control panel. The cabinet air conditioner maintains a suitable environment for efficient operation of the VFDs and other power and control components. The air conditioner is a conventional refrigeration unit consisting of a compressor, condenser, and evaporator. The PLC uses the temperature input provided by an RTD sensor to cycle the air conditioner on and off as required to maintain the interior temperature within a range of 85°F to 95°F (29°C to 35°C). When the temperature rises to 1-4 DE-7200VFDCentrifuge 20 Sep 12 INTRODUCTION the upper setpoint, the compressor and condenser motors are cycled on to provide cooling. Upon reaching the low temperature setting, the air conditioner is shut down. The evaporator fan operates continuously whenever the cabinet is energized to maintain a continuous flow of conditioned air over cabinet components. Purge System (Hazardous Environment Only) For operation in a hazardous environment, the control cabinet is equipped with a purge system. The purge system ensures that the cabinet interior remains free of potentially hazardous gases by filling the cabinet with filtered air and maintaining positive pressure to exclude ambient gases. During startup, before power is permitted to enter the cabinet, the cabinet purge system initiates a 16-minute rapid purge cycle at 16CFM. When the rapid purge cycle is completed, the purge system automatically closes a switch that supplies power to the cabinet. Following the rapid purge, the purge system maintains a positive pressure inside the cabinet to exclude any potentially hazardous gases. Minimum pressure and purge flow sensors will shut down power if the purge system is not maintaining satisfactory pressure in the cabinet. For further details of purge system operation, refer to Section 4. Vibration Switch The vibration switch (Figure 1-4) is a safety device designed to protect personnel and equipment by shutting down the centrifuge in case of excessive vibration. Normally, the switch contacts are held closed by a magnetic latch. However, strong vibration or a shock of 2 Gs will overcome the magnetic latch, causing the switch armature to break away from the normally closed position, providing an input to the PLC. A reset button on the side of the switch must then be manually pressed to close the contacts and re-engage the magnetic latch. WARNING! EXCEEDING THE 2 G SETTING CAN CAUSE INJURY TO PERSONNEL OR DAMAGE TO EQUIPMENT. DO NOT RAISE THE SETTING. The vibration switch is mounted on the centrifuge base in an orientation that is most affected by out-of-balance vibration of the bowl assembly. Clogging of the conveyor or worn bearings may produce sufficiently high vibration to trip the switch. Figure 1-4 Vibration Switch Case and Base When the top cover is closed, the case provides a sealed, protective enclosure that fully surrounds the bowl assembly. The liquid discharge chute and solid discharge chute are installed at the bottom of the lower case half. Mating baffles installed inside the top and bottom case halves separate the solid and liquid phases. Bolts secure the top and bottom halves together; a gasket in the bottom case half seals the two halves. 20 Sep 12 1-5 DE-7200VFDCentrifuge INTRODUCTION The case is bolted onto the welded steel base assembly, which contains mounting provisions for the bearing pillow blocks. The base assembly supports the centrifuge components and contains hollow rubber vibration isolators that engage with centering pins attached to the mounting platform. MECHANICAL OPERATION The centrifuge receives slurry at the liquid discharge end of the machine. For best performance, the slurry should be screened to 74 microns in vibrating screening machines before being fed to the centrifuge. The slurry flows through a feed tube into the rotating bowl, where centrifugal force separates liquid from the solids. Liquid flows out the liquid discharge connection, while solids are conveyed to the solid discharge where a chute should be installed to receive the material. G forces produced by the high-speed rotation of the cylindrical bowl separate solids from the feed slurry. Centrifuge performance is based on three variable factors: • G force exerted on the fluid - Gravitational force pulling fluid against the outside wall of the centrifuge • Retention time in the centrifuge - The longer the slurry remains in the centrifuge the smaller the particle that can be separated • Differential speed of conveyor - The faster the conveyor rotates, the wetter the solids and the more solids that can be discharged All three factors may be manipulated to alter the liquid and solids discharge. The G force is adjusted by varying the bowl RPM. Retention time is controlled by adjusting the weir plates on the liquid bowl head to change the pond depth (liquid level), and the conveyor differential speed (difference between the bowl and conveyor speeds) may be adjusted on the operator control panel. Bowl speed and differential speed are adjusted on the operator control panel, which continuously displays current operating conditions. All parameters other than pond depth may be changed quickly and easily while the centrifuge is operating. These adjustments permit the operator to optimize efficiency in response to varying feed conditions. Another method of altering the discharge results is to change the feed rate. For best performance, the slurry should be screened to 74 microns in vibrating screen machines before passing it to the centrifuge for processing. During centrifuge operation, slurry is pumped through the feed tube into the center of the rotating conveyor (Figure 1-4), where it splashes against the feed accelerator. The slurry is accelerated to the bowl speed and then dispersed out six feed nozzles on the periphery of the conveyor cylinder into the bowl, which rotates at a slower speed than the conveyor. As the slurry flows in the channels between the conveyor flights, the heavy particles settle at an accelerated rate due to the G force imposed by the rotating bowl. Sand particles settle almost instantly; then the finer, lighter particles settle. Particles that cannot be settled under the present settings will be discharged with the liquid through the adjustable weirs on the liquid bowl head. Liquid exiting the liquid bowl head is directed through the liquid discharge outlet. The settled solids form a cake inside the bowl and are transported by the conveyor toward the narrow end of the bowl (beach). As the solids travel across the beach, their free liquid film is lost due to centrifugal squeezing and drainage, and they are discharged at high velocity through the solid discharge ports on the bowl. 1-6 DE-7200VFDCentrifuge 20 Sep 12 INTRODUCTION Figure 1-4 Centrifuge Operation CONTROL SYSTEM Centrifuge operation is supervised by a programmable logic controller (PLC) that interfaces with the variable frequency drives (VFDs) supplying power to the bowl, conveyor, and feed pump drive motors. Monitoring and control of the centrifuge may be performed locally or remotely. The environmentally hardened PLC also offers short-term data storage and a high degree of operating flexibility. The operator control panel mounted on the control cabinet facilitates communication with the VFDs and provides real-time access to system operating characteristics. Through the control panel, the operator may start the centrifuge, enter and adjust speed and torque limits for bowl and conveyor, set feed rate, shut down the machine, and perform a variety of monitoring and control functions. Various inputs including main bearing temperatures, bowl speed, bowl and conveyor torques, cabinet interior temperature, and vibration are transmitted to the PLC, which then responds with corresponding outputs to govern centrifuge operation. Critical status information is displayed on the control panel, as well as alarm and fault messages that inform the operator of any anomalies. In case of a serious malfunction, the PLC automatically shuts down the centrifuge and displays an explanatory message for the cause of the shutdown. In addition, the operator may shut down the centrifuge at any time due to an emergency. The feed pump is controlled by the PLC, which raises and lowers feed rate to accommodate the maximum flow and torque limits set by the operator. Flow rate is increased within the set limit until the torque limit setting is reached. Generally, for maximum throughput flow priority governs centrifuge operation. However, the PLC defaults to torque priority upon reaching the torque limit setting. Once torque priority is entered, the system will remain in torque priority even if feed conditions cause the torque to fall, until flow priority is re-selected by the operator. The system’s flexibility permits the PLC to raise the feed rate automatically to the set limit unless the torque limit is reached by either the bowl or conveyor drive motor. Consequently, if feed slurry properties change, causing the torque to rise, the PLC reduces the feed rate to stay under the torque limit. The operator control panel displays which priority (flow or torque) is currently in force. 20 Sep 12 1-7 DE-7200VFDCentrifuge INTRODUCTION PRODUCT SUPPORT Derrick Corporation offers 24-hour per day, 7-day per week product support. Product support includes screen replacement / ordering information and repair / replacement parts and service for the entire product line. Refer to the following table for the parts / service center nearest you. PARTS SALES & SERVICE LOCATIONS Colorado Grand Junction - 970.241.2417 Louisiana Broussard - 877.635.3354 New York - Corporate Headquarters Buffalo - 716.683.9010 Oklahoma Oklahoma City - 405.208.4070 Texas Houston (Oilfield Headquarters) - 866.DERRICK (337.7425) 281.590.3003 North Texas (Bridgeport) - 405.208.4070 South Texas (Corpus Christi) - 361.299.6080 West Texas (Midland) - 405.397.4089 East Texas, Arkansas, and Louisiana - 281.546.1166 Wyoming Casper - 307.265.0445 North Dakota Williston - 701.572.0722 CONTACT INFORMATION Location Derrick Corporation 590 Duke Road Buffalo, New York 14225 USA 1-8 DE-7200VFDCentrifuge Telephone Facsimile (FAX) 716.683.9010 716.683.4991 E-Mail / Website General Service Manager [email protected] 20 Sep 12 SECTION 2 - SAFETY GENERAL This section contains a summary of WARNINGS used in this manual and a list of material safety data sheets (MSDSs) applicable to the equipment. The centrifuge has been designed to perform the stated functions safely. WARNINGS All persons responsible for operation and maintenance of this equipment must read and understand all safety information in this manual prior to operating and/or maintaining the equipment. The safety warnings listed below are included in applicable procedures throughout this manual. Work Area WARNING! ALWAYS BE AWARE OF WORK AREA HAZARDS TO PROTECT AGAINST SLIPS, TRIPS, AND FALLS WHEN WORKING ON OR NEAR THIS EQUIPMENT. WARNING! LOUD NOISE! WEAR HEARING PROTECTION AT ALL TIMES WHEN WORKING ON OR NEAR THIS EQUIPMENT. WARNING! VISION HAZARD! SAFETY GLASSES MUST BE WORN AT ALL TIMES WHEN WORKING ON OR NEAR THIS EQIPMENT TO PREVENT SERIOUS EYE INJURY OR PERMANENT LOSS OF VISION. Electrical Hazards DANGER! HIGH VOLTAGE! SHUT DOWN, LOCK OUT, AND TAG OUT ELECTRIC POWER, AND ENSURE THAT EQUIPMENT HAS STOPPED ROTATING BEFORE WORKING ON THIS EQUIPMENT. IF THE INPUT POWER IS SPLIT, BE SURE THAT PHASING IS CORRECT BEFORE APPLYING POWER TO CENTRIFUGE. DANGER! USE EXTREME CAUTION WHEN OPERATING CENTRIFUGE WITH PURGE SYSTEM BYPASSED. DANGEROUSLY HIGH VOLTAGE WILL BE PRESENT IN CONTROL CABINET IF DOOR IS OPENED WHILE POWER IS APPLIED. WARNING! DRIVE MOTOR MUST BE OPERATED AT THE DESIGNATED SUPPLY VOLTAGE. 30 Sep 13 2-1 DE-7200VFDCentrifuge SAFETY WARNING! ELECTRICAL CONNECTIONS MUST BE MADE IN ACCORDANCE WITH ALL APPLICABLE NATIONAL AND LOCAL CODES. FAILURE TO COMPLY MAY RESULT IN AN UNSAFE CONDITION THAT COULD INJURE PERSONNEL OR DAMAGE EQUIPMENT. ENSURE THAT ALL ELECTRICAL AND CONDUIT CONNECTIONS ARE SECURE. Equipment Handling WARNING! TO ENSURE PROPER BALANCE AND ORIENTATION WHEN UNIT IS RAISED AND PREVENT DAMAGE TO COMPONENTS, ATTACH LIFTING SLING ONLY AT DESIGNATED LIFT POINTS. DO NOT ATTEMPT LIFTING BY ATTACHMENT TO MOTOR OR ANY OTHER LOCATION. WARNING! BE SURE THAT HANDLING DEVICES HAVE SUFFICIENT LIFTING CAPACITY TO SAFELY HANDLE THE WEIGHT OF THE EQUIPMENT. WARNING! WHEN USING AN OVERHEAD LIFTING DEVICE, USE ALL FOUR LIFTING POINTS PROVIDED. WARNING! DO NOT REMOVE SHIPPING BRACKETS UNTIL EQUIPMENT HAS BEEN POSITIONED AT FINAL INSTALLATION SITE. WARNING! WHILE OPENING AND CLOSING THE CENTRIFUGE COVER, PERSONNEL MUST ENSURE THAT ALL BODY LIMBS AND ANY OTHER ITEMS ARE CLEAR OF THE COVER GAP. TWO HANDS MUST BE USED, WITH BOTH HANDS ON THE COVER HANDLES AT ALL TIMES. DERRICK RECOMMENDS HAVING A HOIST AVAILABLE IF ADDITIONAL ASSISTANCE IS DESIRED DURING THE OPENING/CLOSING PROCEDURE. Operation WARNING! ALL OPERATING AND MAINTENANCE PERSONNEL MUST READ AND UNDERSTAND ALL SAFETY INFORMATION IN THIS MANUAL BEFORE WORKING WITH THE EQUIPMENT. WARNING! BE SURE THAT TOP COVER IS CLOSED AND SECURED AND ALL PERSONNEL ARE CLEAR BEFORE STARTING MACHINE. WARNING! BEFORE STARTING CENTRIFUGE, BE SURE THAT ALL SHIPPING BRACKETS HAVE BEEN REMOVED AND BEARING PILLOW BLOCKS ARE PROPERLY TIGHTENED. WARNING! ALWAYS ALLOW MACHINE TO COAST TO A COMPLETE STOP BEFORE OPENING TOP COVER OR REMOVING GUARDS. WARNING! DO NOT OPERATE CENTRIFUGE IF EXCESSIVE NOISE OR VIBRATION DEVELOPS. ALWAYS CONFIRM THAT VIBRATION SWITCH AND OTHER SAFETY DEVICES ARE FUNCTIONAL. 2-2 DE-7200VFDCentrifuge 30 Sep 13 SAFETY WARNING! WHILE OPENING AND CLOSING THE CENTRIFUGE COVER, PERSONNEL MUST ENSURE THAT ALL BODY LIMBS AND ANY OTHER ITEMS ARE CLEAR OF THE COVER GAP. TWO HANDS MUST BE USED, WITH BOTH HANDS ON THE COVER HANDLES AT ALL TIMES. DERRICK RECOMMENDS HAVING A HOIST AVAILABLE IF ADDITIONAL ASSISTANCE IS DESIRED DURING THE OPENING/CLOSING PROCEDURE. Maintenance DANGER! HIGH VOLTAGE! SHUT DOWN, LOCK OUT, AND TAG OUT ELECTRIC POWER, AND ENSURE THAT EQUIPMENT HAS STOPPED ROTATING BEFORE WORKING ON THIS EQUIPMENT. WARNING! WHILE OPENING AND CLOSING THE CENTRIFUGE COVER, PERSONNEL MUST ENSURE THAT ALL BODY LIMBS AND ANY OTHER ITEMS ARE CLEAR OF THE COVER GAP. TWO HANDS MUST BE USED, WITH BOTH HANDS ON THE COVER HANDLES AT ALL TIMES. DERRICK RECOMMENDS HAVING A HOIST AVAILABLE IF ADDITIONAL ASSISTANCE IS DESIRED DURING THE OPENING/CLOSING PROCEDURE. DANGER! EXPLOSION HAZARD! BE CERTAIN THAT SURROUNDING ATMOSPHERE IS CLEAR OF ALL POTENTIALLY EXPLOSIVE GASES BEFORE OPENING CONTROL CABINET DOOR. Storage WARNING! CENTRIFUGE MAY BE DAMAGED BY STORING IN A HIGH HUMIDITY ENVIRONMENT (GREATER THAN 50% RH). EQUIPMENT MUST BE STORED IN A LOW-HUMIDITY ENVIRONMENT. MATERIAL SAFETY DATA SHEETS (MSDS’S) Material Safety Data Sheets (MSDSs) advise personnel of the properties and any possible hazards associated with these materials. Emergency first aid procedures, special precautions, emergency telephone number, and other relevant data are contained in the MSDSs. These documents are prepared by the product manufacturers, which have sole responsibility for accuracy of the information. The MSDSs listed below apply to products used in the manufacture of the Derrick equipment. Where shown, dates are current as of the publication date of this manual. The latest MSDSs may be obtained from the product manufacturer. 30 Sep 13 2-3 DE-7200VFDCentrifuge SAFETY MSDS’S (CONT’D) MATERIAL DESCRIPTION - WHERE USED MSDS / Date Paints PPG Dimetcote 302H Green 302F0250 Resin - Top Coat 1302H-5A / 04-11-10 PPG Dimetcote 302H Clear 302G0910 Cure - Top Coat 1302H-B / 01-21-10 PPG PSX 700 Neutral Tint Resin - Undercoat PX700T3 / 02-28-08 PPG PSX 700FD Cure - Undercoat PX700FD-B / 01-11-07 Lubricants Shell Albida EP2 - Main & Conveyor Bearings 57089L / 06-18-09 Exxon Mobil SHC 629 - Conveyor Drive Gearbox Mobil SHC 629 / 01-13-09 Exxon Mobil Polyrex EM - Bowl & Conveyor Drive Motors Polyrex EM / 06-01-05 Sealant Loctite 243 Anti-Seize Lubricant - Fasteners 2-4 DE-7200VFDCentrifuge 76764 / 05-27-09 30 Sep 13 SECTION 3 - INSTALLATION GENERAL This section describes the recommended installation procedure for the DE-7200 VFD centrifuge. The centrifuge is shipped fully assembled. For safety during shipment, however, the rotating assembly is supported by shipping brackets. It must be lowered onto the base and then its bearing pillow blocks secured to the base. SAFETY Read and understand ALL safety information presented in this manual before installing and operating this equipment. Refer to Section 2 for a summary of Warnings addressing installation, operation, and maintenance of this equipment. Before beginning the installation, review the equipment handling procedures in this section. Failure to observe proper equipment handling procedures may result in serious personal injury or death and/or damage to the equipment. WARNING! TO ENSURE PROPER BALANCE AND ORIENTATION WHEN UNIT IS RAISED AND PREVENT DAMAGE TO COMPONENTS, ATTACH LIFTING SLING ONLY AT DESIGNATED LIFT POINTS. DO NOT ATTEMPT LIFTING BY ATTACHMENT TO ANY OTHER LOCATION. WARNING! BE SURE THAT HANDLING DEVICES HAVE SUFFICIENT LIFTING CAPACITY TO SAFELY HANDLE THE WEIGHT OF THE EQUIPMENT. LOWER THE CENTRIFUGE GENTLY INTO PLACE, AS JARRING MAY CAUSE DAMAGE. WARNING! DO NOT REMOVE SHIPPING BRACKETS UNTIL CENTRIFUGE HAS BEEN POSITIONED AT FINAL INSTALLATION SITE. WARNING! WHILE OPENING AND CLOSING THE CENTRIFUGE COVER, PERSONNEL MUST ENSURE THAT ALL BODY LIMBS AND ANY OTHER ITEMS ARE CLEAR OF THE COVER GAP. TWO OPERATORS MUST BE USED, WITH BOTH HANDS ON THE COVER HANDLES AT ALL TIMES. DERRICK RECOMMENDS HAVING A HOIST AVAILABLE IF ADDITIONAL ASSISTANCE IS DESIRED DURING THE OPENING/CLOSING PROCEDURE. 01 Jan 14 3-1 DE-7200VFDCentrifuge INSTALLATION TOP COVER OPENING/CLOSING PROCEDURES The proper procedures for opening and closing the top cover of the centrifuge must always be followed. Two operators using both hands are required to open the cover. Derrick recommends having a hoist available if additional assistance is desired during the opening/closing of the centrifuge cover. To open and close the cover, proceed as follows: 1. Shut down, lock out, tag out electric power to centrifuge, and allow rotating assembly to coast to a full stop. 2. Remove bolts securing cover to base. 3. Have two operators using both hands grip the cover handles securely to ensure full control of the cover throughout the opening and closing process. 4. As the cover is raised, ensure that body limbs of all personnel and any other items remain clear of the cover gap at all times. 5. Raise the cover to the fully opened position, and insert a 1/2” (12.7mm) hardened steel pin through one hinge to lock the cover open. 6. After performing the activity that required the cover to be opened, reverse steps 2 through 5 to close the cover. During the closing procedure, ensure that both operators are capable of controlling the cover’s descent and that all body limbs and other items remain clear of the gap. STORAGE If the centrifuge will be stored for more than 6 months before installation, the control cabinet, rotating assembly, and motors should be preserved as described in the following paragraphs. Control Cabinet For protection against weather and dust, the cabinet should be covered with a tarpaulin (tarp) and stored indoors under the following environmental conditions: Temperature - 50°F to 86°F (10°C to 30°C) Relative Humidity - 20% to 50% If cabinet will remain in storage for an extended period prior to initial startup, proceed as follows: 1. Power up the cabinet every 6 months and maintain power for 1 to 2 hours. 2. To maintain low humidity inside the cabinet, either place a replaceable desiccant or small heating source (such as an incandescent light bulb) inside the cabinet. Rotating Assembly and Motors For protection against weather and dust, the centrifuge should be covered with a tarp and stored indoors under the following environmental conditions: Temperature - 50°F to 86°F (10°C to 30°C) Relative Humidity - 20% to 50% The following procedures apply to long-term storage of the centrifuge: 1. Lower the rotating assembly onto the base as described later in this section. 2. Leave main drive V-belts un-tensioned. 3. Every 3 months, manually rotate the bowl assembly at least 20 times, while restraining conveyor motor from rotating; then re-grease main and conveyor bearings. 4. Manually rotate bowl and conveyor motor shafts 5 to 10 revolutions every 3 months of storage. If stored more than 1 year, re-grease motor bearings before initial startup. 5. If motors are equipped with internal heaters, power should be applied and heaters energized. 3-2 DE-7200VFDCentrifuge 01 Jan 14 INSTALLATION INSTALLATION SEQUENCE Following is the sequence of steps for installing the centrifuge. The sequence presented may vary depending on the user’s facilities and previous experience with this type of equipment. 1. Read and understand all safety information in Section 2 before installing and operating this equipment. 2. Read and understand the equipment handling procedures in this section before lifting and positioning the equipment. 3. Position and level equipment at installation site. 4. Remove shipping components, and lower and secure the rotating assembly bearing pillow blocks to the base. 5. Adjust drive belt (refer to Section 5). 6. Connect liquid discharge line. 7. If discharge duct is to be used, connect duct to solids discharge chute. 8. Install flexible joint, feed tube, and piping connections for slurry feed, polymer injection, fresh liquid cleanout, and sampling port. 9. Select and install feed pump. 10. Connect electric power supply to the equipment, and connect bowl motor, conveyor motor, and feed pump motor to terminal blocks inside control cabinet. 11. Connect sensor cable to sensor junction box. 12. For explosion-proof cabinet, connect compressed air supply source to purge unit. 13. Refer to Section 4 for startup and operating procedures. REQUIRED CLEARANCES AND POSITIONING Sufficient space should be provided around the equipment to facilitate access for maintenance, inspection, and adjustment. Typical operation and maintenance functions include the following activities: 1. Access and operate the system control panel. 2. Open and close the control cabinet door (Figure 3-1). 3. Open and close top cover. 4. Grease rotating assembly bearings. 5. Check and fill gearbox. 6. Connect and disconnect feed and liquid discharge lines. 7. Remove and install feed tube. 01 Jan 14 3-3 DE-7200VFDCentrifuge INSTALLATION REQUIRED CLEARANCES AND POSITIONING (CONT’D) Figure 3-1. Required Opening Clearances for Cabinet Door and Electrical Panel EQUIPMENT HANDLING WARNING! TO ENSURE PROPER BALANCE AND ORIENTATION WHEN UNIT IS RAISED AND PREVENT DAMAGE TO COMPONENTS, ATTACH LIFTING SLINGS ONLY AT DESIGNATED LIFT POINTS. DO NOT ATTEMPT LIFTING BY ATTACHMENT TO ANY OTHER LOCATION. WARNING! BE SURE THAT HANDLING DEVICES HAVE SUFFICIENT LIFTING CAPACITY TO SAFELY HANDLE THE WEIGHT OF THE EQUIPMENT. WARNING! DO NOT REMOVE SHIPPING BRACKETS UNTIL EQUIPMENT HAS BEEN POSITIONED AT FINAL INSTALLATION SITE. WARNING! WHEN USING AN OVERHEAD LIFTING DEVICE, USE ALL FOUR LIFTING POINTS PROVIDED. WARNING! WHILE OPENING AND CLOSING THE CENTRIFUGE COVER, PERSONNEL MUST ENSURE THAT ALL BODY LIMBS AND ANY OTHER ITEMS ARE CLEAR OF THE COVER GAP. TWO OPERATORS MUST BE USED, WITH BOTH HANDS ON THE COVER HANDLES AT ALL TIMES. DERRICK RECOMMENDS HAVING A HOIST AVAILABLE IF ADDITIONAL ASSISTANCE IS DESIRED DURING THE OPENING/CLOSING PROCEDURE. The centrifuge and control cabinet are shipped fully assembled and installed on shipping skids. A label indicating the weight of each unit was affixed to the machine. Refer to the general arrangement drawing in Section 8 for equipment weights and other technical data. 3-4 DE-7200VFDCentrifuge 01 Jan 14 INSTALLATION While the centrifuge and control cabinet are still mounted on the shipping skids, they may be transported on the ground using a forklift. After the equipment is removed from the shipping skid, an overhead lifting device is required. Four reinforced lifting lugs are built into the centrifuge frame to allow attachment of an overheadlifting device (Figure 3-2). Lifting points are labeled “LIFT HERE ONLY”. DO NOT attempt lifting equipment by attaching slings or similar lifting aids to the bowl or conveyor drive motor or other non-designated portions of the unit. Four lifting lugs are also provided at the top of the control cabinet for lifting the unit into place (Figure 3-3). Lift points are labeled “LIFT HERE ONLY”. DO NOT attempt lifting equipment by attaching slings or similar lifting aids to any other location on the cabinet. Figure 3-2. Lifting Arrangement - DE-7200 Centrifuge 01 Jan 14 3-5 DE-7200VFDCentrifuge INSTALLATION EQUIPMENT HANDLING (CONT’D) Figure 3-3. DE-7200 Control Cabinet Lifting Arrangement EQUIPMENT POSITIONING AND MOUNTING Base plates are required when installing the centrifuge. Lay out the installation site and locate the base plates in accordance with Figure 3-4. The base plates have 1-9/16” x 1-9/16” (40mm x 40mm) centering posts. They may be either bolted or welded to the mounting platform to properly position and prevent movement of the centrifuge. When lowering the centrifuge onto the base plates, ensure that the centering posts engage with the opening at the bottom of each vibration isolator (Figure 3-5). 3-6 DE-7200VFDCentrifuge 01 Jan 14 Figure 3-4. Centrifuge Installation Site Layout INSTALLATION 01 Jan 14 DE-7200VFDCentrifuge 3-7 INSTALLATION EQUIPMENT POSITIONING AND MOUNTING (CONT’D) Figure 3-5. Centrifuge Mounting LIQUID AND SOLID DISCHARGE CHUTES Observe the design considerations shown in Figure 3-6 when fabricating the liquid and solid discharge chutes. To determine dimensions and mounting hole arrangements, refer to general arrangement drawing in Section 8. Figure 3-6. Liquid and Solid Discharge Chutes 3-8 DE-7200VFDCentrifuge 01 Jan 14 INSTALLATION Liquid Discharge The liquid discharge collector may be bolted directly to the centrifuge case; however, the piping connection should have a flexible joint. When fabricating the discharge piping, follow the dimensional and piping requirements shown in Figure 3-6. Since liquid exiting the centrifuge is not pressurized, the piping must be pitched to facilitate gravity drainage. Solid Discharge Chute A three-sided solid discharge extension may be bolted to the discharge flange. The chute may not be connected to any other component or structure; it must be supported or suspended independently of the centrifuge. The chute should be designed with a sufficiently steep angle to facilitate self cleaning. If this is not possible, a means should be included to continually remove solids from beneath the centrifuge. A curtain or belting should surround three sides of the discharge chute to contain spray and mist. EQUIPMENT LEVELING The centrifuge must be properly leveled for satisfactory operation. The equipment must be leveled along the length and width of the unit (Figure 3-7). A 2-foot or torpedo level is recommended. Non-compressible shims should be used as required to level the machine. Figure 3-7. Centrifuge Leveling 01 Jan 14 3-9 DE-7200VFDCentrifuge INSTALLATION LOWER AND SECURE ROTATING ASSEMBLY Note! Do not discard the rubber strips between bearing pillow blocks, cover, and base after removal. These strips must be re-installed whenever the machine is moved to prevent damage to the rotating assembly bearings during transit. Following final positioning and leveling of the centrifuge, shipping blocks inserted between the bearing pillow blocks and the base, as well as between the case and base, must be removed. The shipping blocks prevent damage to the rotating assembly bearings during transit and should be retained for future installation if the centrifuge is transported. 1. Remove all bolts securing top cover along both sides, but do not remove bolts on both ends of cover. 2. Remove bolts securing bearing pillow blocks to base and bolts securing upper halves of pillow blocks to lower halves (Figure 3-8). Figure 3-8. Lowering and Securing Rotating Assembly 3-10 DE-7200VFDCentrifuge 01 Jan 14 INSTALLATION 3. Install two jack bolts in top half of each pillow block, and thread bolts through lower halves. 4. Turn jack bolts clockwise to lift pillow blocks sufficiently to permit removal of all shipping blocks, and remove blocks. 5. Clean mounting surfaces of lower pillow block halves and base, and then apply a light coating of grease or corrosion inhibitor to both surfaces. 6. Ensure that alignment pin holes in base are clean and unobstructed by inserting a tapered reamer that matches the maximum diameter of the holes. 7. Insert four alignment pins into corresponding holes. 8. While turning jack bolts equally in a counterclockwise direction to slowly lower pillow blocks onto base, use alignment pins to properly position pillow blocks before they contact base. Remove jack bolts after pillow blocks are in full contact with base and mounting holes are aligned. 9. Insert two pillow block assembly bolts through top half of each pillow block, and tighten bolts into bottom half of pillow block evenly in accordance with applicable torque specification in Section 5. 10. Use a brass hammer to fully seat alignment pins in bearing pillow blocks and base. Do not tighten nuts on alignment pins. 11. Insert pillow block retaining bolts with washers and lockwashers through pillow block holes, and tighten bolts incrementally to torque specified in Section 5. 12. Install and tighten all bolts along both sides of case cover. 13. Adjust drive belt tension in accordance with Preventive Maintenance in Section 5. 14. Engage coupling half with overload clutch, leaving about a 3/16” (5mm) gap, and tighten bolts. 15. Install and secure guards over belt and shaft. FEED AND FLUSH CONNECTIONS Vibration isolation is required to prevent damage to the centrifuge and piping system in case of centrifuge imbalance. Consequently, a flexible connection is required. The feed assembly (Figure 3-9) supplied with the centrifuge has a flex joint to accept the customer’s mating flange and feed and flush piping. The customer must supply a 2.50” raised face 150lb ANSI flange to mate with the feed assembly flange. Refer to general arrangement drawing in Section 8 for liquid and solid discharge chute connection flange dimensions and bolt patterns. A source of fresh liquid is required for flushing the centrifuge prior to shutdown. To connect the flush line, install a “T” fitting in the feed line with shutoff valves to permit selection of either the feed line or the flush line (Figure 3-10). The shutoff valves are required to prevent flush liquid from flowing back into the customer feed. A cleanout connection is also provided on the top case cover near the solid discharge end (Figure 3-11). Liquid should be fed through this connection with the centrifuge running to periodically remove accumulated solids. 01 Jan 14 3-11 DE-7200VFDCentrifuge INSTALLATION FEED AND FLUSH CONNECTIONS (CONT’D) Figure 3-9. Feed Assembly Figure 3-10. Feed Line Connections Figure 3-11. Top Cover Flush Fitting 3-12 DE-7200VFDCentrifuge 01 Jan 14 INSTALLATION COMPRESSED AIR Explosion-proof control cabinets require a source of clean, preferably instrument quality, filtered, dry compressed air or nitrogen at 60 to 115 PSI at 20SCFM for operation of the control cabinet purge system. The supply line must have a minimum diameter of 3/4” (20mm). The supply must be clean, non-flammable, and from a non-hazardous area. The cleanliness requirements are as follows: Solid particles: 0.5µm <particle size 1µm, max. 1000 particles/m3 Humidity: -40°C* pressure dewpoint Oil content: 0.01mg/m3 concentration total oil * For applications where ambient temperature, T amb 0°C, the air supply should be Class 2.1.1 with humidity -70°C pressure dewpoint FEED PUMP The customer is required to supply a positive-displacement feed pump for delivering slurry to the centrifuge. A progressing cavity pump having a fixed ratio gearbox and 30 HP maximum inverterduty pump drive motor is recommended. The motor must be capable of operating in the 180 to 2700RPM, 6 to 90Hz speed range and also meet all other application requirements including voltage, frequency, and area of classification. The pump size, motor, and gearbox ratio must be chosen to deliver the maximum desired flow at a pump rotor speed (determined by the manufacturer) to be low enough to prevent accelerated wear of the rotor and/or stator. The pump must be connected to the centrifuge’s control system as described under Electric Power Connections, so that its operation can be supervised by the centrifuge. ELECTRIC POWER CONNECTIONS DANGER! HIGH VOLTAGE! SHUT DOWN, LOCK OUT, AND TAG OUT ELECTRIC POWER, AND ENSURE THAT EQUIPMENT HAS STOPPED ROTATING BEFORE WORKING ON THIS EQUIPMENT. IF THE INPUT POWER IS SPLIT, BE SURE THAT PHASING IS CORRECT BEFORE APPLYING POWER TO CENTRIFUGE. Connection Options A fused disconnect primary power supply is required for this equipment. The fused disconnect and interconnecting wiring to the equipment must be suitably sized and in accordance with National Electrical Code (NEC) standards and all other applicable state and local codes. Additional wiring requirements are as follows: 1. The fused disconnect device shall have sufficient interrupting capacity to clear the maximum fault current capability of the power supply system. 2. The GND connections in the control cabinet and sensor system junction box must be connected to a known ground. 3. One of the lugs on the centrifuge base must be connected to earth/electrical ground. Connect the facility’s three-phase electric power supply to the control cabinet in accordance with the appropriate view in Figure 3-12. Non-hazardous area control cabinet connections are made inside the control cabinet; hazardous area connections are made in the electrical panel attached to the right side of the cabinet. 01 Jan 14 3-13 DE-7200VFDCentrifuge INSTALLATION Note that power may be connected with either a single heavy-gage cable or split between two smaller, lighter cables. The smaller-gage cables used for the split-input connections are generally easier to handle. If the input is split (Figure 3-13), be sure to group conductors of the same phase/color. Cable size depends on machine voltage requirements and cable length. Refer to applicable electrical schematic diagram in Section 8 for cable sizing requirements. Non-Hazardous Area Control Cabinet Hazardous Area Control Cabinet Figure 3-12. Electric Power Connections Figure 3-13. Split Input Power Connections 3-14 DE-7200VFDCentrifuge 01 Jan 14 INSTALLATION BOWL, CONVEYOR, AND FEED PUMP MOTOR CONNECTIONS The bowl and conveyor drive motors require three-phase VFD power and ground connections. Power is derived through connections to terminal blocks inside the control cabinet. Similarly, the customer’s feed pump motor must be connected to the centrifuge control system for control of its operation. Connect the bowl, conveyor, and feed pump motors to terminal blocks in the bottom left side of the control cabinet as shown in Figure 3-14. The control system can operate a feed pump drive motor of up to 30HP. Figure 3-14. Electric Power Connections to Bowl, Conveyor, and Pump Motors TANK LEVEL SWITCH CONNECTIONS Tank level switches may be connected to the pump and bowl VFDs to prevent the pump from being started when fluid in the tank falls below a predetermined level. Two normally open float switches can be used to detect high and low tank levels. The switches may be placed at the desired levels to permit the pump to operate under automatic PLC control within the designated window set by the switch positions. The only requirement is to place the high level switch above the low level switch. For hazardous locations, refer to the electrical schematic diagram in Section 8 for intrinsic barrier kit information. During centrifuge operation, whenever the tank level is above the low switch position, the pump is enabled by the closed low level switch. When the tank level rises sufficiently to close the high level switch, the pump will cycle on and then off once the low level switch opens. The low level switch is connected to the feed pump VFD through terminal block TB1 (Figure 315), which is located to the left of the Ethernet switch. Depending on cabinet wiring, either terminals 1 and 2 or 7 and 8 are used for the connections. The high level switch is connected to the bowl VFD either through terminals 3 and 4 or 9 and 10. 01 Jan 14 3-15 DE-7200VFDCentrifuge INSTALLATION TANK LEVEL SWITCH CONNECTIONS (CONT’D) Figure 3-15. Typical Tank Level Switch Connections POLARITY TEST WARNING! BE CERTAIN THAT MOTORS ROTATE IN CORRECT DIRECTION. INCORRECT POLARITY OF CONVEYOR MOTOR WILL CAUSE CONVEYOR TO ROTATE AT AN INCORRECT SPEED, WHICH WILL RESULT IN PROCESSING PROBLEMS. In the following procedure, polarity is critical. Be certain that all motors rotate in the correct directions. Simply checking to see if solids are discharged out the solid end DOES NOT ensure correct polarity! If conveyor motor is wired incorrectly, the conveyor may become plugged or flooded depending on the speed settings of the bowl and conveyor. Test for correct polarity of all connections as follows: 1. Apply power to centrifuge. 2. Run bowl at 20RPM with a conveyor differential speed of 5RPM. 3. Confirm direction of rotation for bowl, conveyor, feed pump, and air conditioner condenser motors as follows: a. Bowl - Counterclockwise viewed from fan end b. Conveyor - Clockwise viewed from fan end c. Feed pump - Per manufacturer’s data d. Air conditioner condenser fan motor - Clockwise viewed from fan end of motor 4. Correct reverse rotation by shutting down power and switching any two of the three power leads at the terminal block(s) inside the cabinet (refer to electrical schematic diagram in Section 8). 3-16 DE-7200VFDCentrifuge 01 Jan 14 INSTALLATION WARNING! CENTRIFUGE MUST BE OPERATED AT THE DESIGNATED SUPPLY VOLTAGE. DANGER! DANGER! HIGH VOLTAGE! SHUT DOWN, LOCK OUT, AND TAG OUT ELECTRIC POWER, AND ENSURE THAT EQUIPMENT HAS STOPPED ROTATING BEFORE WORKING ON THIS EQUIPMENT. IF THE INPUT POWER IS SPLIT, BE SURE THAT PHASING IS CORRECT BEFORE APPLYING POWER TO CENTRIFUGE. WARNING! ELECTRICAL CONNECTIONS MUST BE MADE IN ACCORDANCE WITH THE NATIONAL ELECTRICAL CODE (NEC) AND ALL APPLICABLE LOCAL CODES. FAILURE TO COMPLY MAY RESULT IN AN UNSAFE CONDITION THAT COULD INJURE PERSONNEL OR DAMAGE EQUIPMENT. ENSURE THAT ALL ELECTRICAL AND CONDUIT CONNECTIONS ARE SECURE. SENSOR CONNECTIONS A cable is supplied for sensor connections. One end of the cable is pre-wired to the plug supplied with the centrifuge, and the opposite end must be connected to terminals inside the sensor junction box as shown in Figure 3-16. After completing the wiring, plug the cable into the receptacle on the upper left side of the control cabinet. Figure 3-16. Sensor System Junction Box Connections 01 Jan 14 3-17 DE-7200VFDCentrifuge INSTALLATION MACHINE STARTUP Refer to Section 4 for initial startup and operating procedures for the centrifuge. WARNING! DO NOT ATTEMPT TO OPERATE MACHINE WITH SHIPPING BRACKETS INSTALLED. 3-18 DE-7200VFDCentrifuge 01 Jan 14 SECTION 4 - OPERATING INSTRUCTIONS GENERAL The procedures in this section are for use only by trained personnel who are qualified to operate high-speed rotating equipment. Initial and normal startup, operation, shutdown, and emergency shutdown procedures are included. Following the startup and operation procedures, detailed information on the control screens is provided to assist the operator and technician in understanding centrifuge operation and fully utilizing its capabilities. The centrifuge is designed to be operated only for the purpose specified at the time of purchase. Operation in any other application requires consultation with Derrick engineering. SOFTWARE VERSION The operating procedures in this section apply to DE-7200 VFD centrifuges having software Version 3.1.6 installed. The software version is shown on the Setup screen shown below: Although operating procedures are generally identical, an earlier software version may cause some screens to appear slightly different from those shown on the following pages. OPERATING SAFETY WARNING! ALL OPERATING AND MAINTENANCE PERSONNEL MUST READ AND UNDERSTAND ALL SAFETY INFORMATION IN THIS MANUAL BEFORE WORKING WITH THE EQUIPMENT. WARNING! BE SURE THAT COVER IS CLOSED AND SECURED AND ALL PERSONNEL ARE CLEAR BEFORE STARTING MACHINE. WARNING! BE SURE THAT ALL SHIPPING COMPONENTS HAVE BEEN REMOVED AND BEARING PILLOW BLOCKS ARE PROPERLY TIGHTENED. WARNING! ALWAYS ALLOW MACHINE TO COAST TO A COMPLETE STOP BEFORE OPENING COVER OR REMOVING GUARDS. WARNING! DO NOT OPERATE CENTRIFUGE IF EXCESSIVE NOISE OR VIBRATION DEVELOPS. ALWAYS CONFIRM THAT VIBRATION SWITCH AND OTHER SAFETY DEVICES ARE FUNCTIONAL. WARNING! WHILE OPENING AND CLOSING THE CENTRIFUGE COVER, PERSONNEL MUST ENSURE THAT ALL BODY LIMBS AND ANY OTHER ITEMS ARE CLEAR OF THE COVER GAP. TWO OPERATORS MUST BE USED, WITH BOTH HANDS ON THE COVER HANDLES AT ALL TIMES. DERRICK RECOMMENDS HAVING A HOIST AVAILABLE IF ADDITIONAL ASSISTANCE IS DESIRED DURING THE OPENING/CLOSING PROCEDURE. 30 Sep 13 4-1 DE-7200VFDCentrifuge OPERATING INSTRUCTIONS TOP COVER OPENING/CLOSING PROCEDURES The proper procedures for opening and closing the top cover of the centrifuge must always be followed. Two operators using both hands are required to open the cover. Derrick recommends having a hoist available if additional assistance is desired during the opening/closing of the centrifuge cover. To open and close the cover, proceed as follows: 1. Shut down, lock out, tag out electric power to centrifuge, and allow rotating assembly to coast to a full stop. 2. Remove bolts securing cover to base. 3. Have two operators using both hands grip the cover handles securely to ensure full control of the cover throughout the opening and closing process. 4. As the cover is raised, ensure that body limbs of all personnel and any other items remain clear of the cover gap at all times. 5. Raise the cover to the fully opened position, and insert a 1/2” (12.7mm) hardened steel pin through one hinge to lock the cover open. 6. After performing the activity that required the cover to be opened, reverse steps 2 through 5 to close the cover. During the closing procedure, ensure that both operators are capable of controlling the cover’s descent and that all body limbs and other items remain clear of the gap. PURGE SYSTEM (HAZARDOUS ENVIRONMENT ONLY) During startup, the control cabinet purge system drives out all gases from the cabinet interior and then maintains positive pressure within the control cabinet to prevent entry of any potentially explosive gases. Purge system operation begins when the system senses sufficient air pressure inside the cabinet. Initially, the purge unit performs a 16-minute rapid purge cycle at 16 CFM. During the rapid purge cycle, the purge system prevents application of electric power to the cabinet. At the end of the rapid purge cycle, the purge system closes the main electrical contactor, allowing electric power to flow to the cabinet. The centrifuge may then be started. After the rapid purge cycle, the purge system maintains positive pressure within the cabinet to prevent entry of hazardous gases, automatically compensating for pressure loss due to cabinet leakage. If at any time a loss of cabinet pressure is detected, the main contactor opens immediately, disconnecting power. If a shutdown occurs during centrifuge operation, the purge system performs another 16-minute rapid purge before power is restored to the cabinet. Purge System Bypass DANGER! EXPLOSION HAZARD! BE CERTAIN THAT SURROUNDING ATMOSPHERE IS CLEAR OF ALL POTENTIALLY EXPLOSIVE GASES BEFORE OPENING CONTROL CABINET DOOR. If the control cabinet is located in a non-hazardous environment, the purge system may be turned off. A high risk of fire and/or explosion will result if purge system is bypassed in a hazardous area. Also, with the purge system bypassed, the centrifuge will remain energized if the control cabinet door is opened. Consequently, use extreme caution when operating the equipment or performing any procedure with purge system bypassed. If the control cabinet is moved to a hazardous environment, the bypass must be removed and satisfactory purge system operation confirmed. 4-2 DE-7200VFDCentrifuge 30 Sep 13 OPERATING INSTRUCTIONS DANGER! USE EXTREME CAUTION WHEN OPERATING CENTRIFUGE WITH PURGE SYSTEM BYPASSED. DANGEROUSLY HIGH VOLTAGE WILL BE PRESENT IN CONTROL CABINET IF DOOR IS OPENED WHILE POWER IS APPLIED. To bypass the purge system, proceed as follows: 1. Be certain that control cabinet is in a non-hazardous environment; then shut down, lock out, and tag out electric power to centrifuge. 2. Remove bolts securing electrical panel door at right side of cabinet, and open door. 3. Locate intrinsic barrier at upper right side of electrical panel, and install a jumper across terminals 1 and 4 to disable the purge system (Figure 4-1). 4. Label jumper “Purge Bypass”. 5. To restore purge system operation, remove the “Purge Bypass” jumper, and close and secure electrical panel door. Confirm proper operation of the purge system. Figure 4-1. Purge System Bypass INITIAL STARTUP Perform the initial startup procedure when the centrifuge is being started for the first time following installation or after the machine has been relocated. 1. Check that all tools, documents, and shipping brackets have been removed, and there are no obstructions to operation. 2. Verify that all personnel are clear of equipment. 3. Confirm that all operators and maintenance personnel have read and understand all operating and safety information in Section 2. 4. Verify that equipment has been installed properly, all shipping brackets have been removed, and bearing pillow blocks have been tightened to specified torque per Section 3. 5. For explosion-proof cabinet, turn on compressed air to purge system. 30 Sep 13 4-3 DE-7200VFDCentrifuge OPERATING INSTRUCTIONS INITIAL STARTUP (CONT’D) 6. Apply electric power to centrifuge. The following screen will appear (on explosion-proof cabinet, displayed after purge cycle is completed): 7. Without the centrifuge running, perform the following safety checks to confirm that connections are correct between control cabinet and centrifuge: • Operate emergency stop buttons on junction box and control cabinet, and check for Emergency Stop alarm message on control panel. • Pull out emergency stop buttons to clear alarm message. • Tap vibration switch housing horizontally with a rubber or rawhide mallet, and check for High Vibration Fault message on control panel. • Press reset button on vibration switch to clear alarm message. 8. Select Cent. Status to display the Status screen below. Select Test A/C, and check that air conditioner fan rotates in the direction indicated by the label. If not, reverse any two fan motor leads. 9. Verify that machine is ready for operation. Correct any deficiencies before proceeding with startup procedure. If condition is satisfactory, click in the upper right corner to return to the Home screen. 10. Select Setup and then click on Pump Setup to view pump operating information: 11. Configure pump parameters as follows: a. Input data from the pump and pump motor nameplates. Note! Correct pump data is critical to achieving the desired feed rate to the centrifuge. 4-4 DE-7200VFDCentrifuge 30 Sep 13 OPERATING INSTRUCTIONS b. Select Download to update VFD settings with new motor data. This will cause pump to autotune at the next startup. c. Select Disable for Tank High and Low Level inputs, if they will not be used. d. When finished making required changes, click “X” in upper right corner to return to Setup screen. Select Home to return to Home screen. 12. Select Operation to display the following screen: 13. Using up and down arrow buttons, initially set Bowl Input RPM at 20 RPM, and set Conveyor Input RPM at 5 RPM. 14. Select START to confirm that bowl and conveyor motors rotate in the direction indicated by labels. 15. Correct reverse rotation by shutting down power and switching any two of the three motor leads (not incoming power leads) at the terminal block(s) inside the cabinet (refer to Section 3 and electrical schematic diagram in Section 8). 16. After confirming correct motor rotational directions, enter desired Bowl Speed of at least 750RPM, and enter desired Differential Speed; select START to begin centrifuge operation. Screen will display actual Bowl Speed, Differential Speed, and Torque %. When bowl speed reaches 750RPM, PUMP START/STOP at right side of screen will change to Autotune. 17. Select Start Autotune to tune pump drive motor to VFD. While autotuning is underway, the following screen will appear: 18. Allow about 60 seconds for autotuning. 19. Enter a GPM, and select START to turn on pump. Check that pump is rotating in the direction indicated on rotation label. If not switch any two of the three pump leads. 30 Sep 13 4-5 DE-7200VFDCentrifuge OPERATING INSTRUCTIONS NORMAL STARTUP Note! If Centrifuge is Heated, Before Starting Centrifuge Follow COLD CLIMATE STARTUP Instructions Later in This Section to Ensure Proper Bearing Lubrication. 1. Without electric power applied, open cover and rotate bowl assembly manually to check that the bowl turns freely and no rubbing is felt. 2. Close cover, tighten all cover bolts to required torque (refer to Section 5), and ensure that all guards are in place. 3. Verify that all personnel are clear of centrifuge and all guards are in place before applying electric power to equipment. 4. For explosion-proof cabinet only, turn on compressed air to begin the cabinet purge cycle. 5. Apply electric power to centrifuge. The following screen will appear (on explosion-proof cabinet, displayed after purge cycle is completed): 6. With Home screen displayed, select Operation to display the following screen: 7. Using up and down arrows, set Bowl and Conveyor Input RPMs at desired speeds: Bowl - 750RPM minimum; Conveyor - 1RPM minimum. 8. Two options are available for controlling the feed pump. If automatic control by the PLC is desired, enter Torque %. The pump GPM will then be varied automatically based on bowl and conveyor torque percentages. Enter Flow GPM for operator setting of pump GPM. Note that even with Flow selected, the PLC will vary the pump GPM or even shut down pump if excessive torque is sensed. The Max GPM field always dictates the highest possible flow rate, even when centrifuge is operating in Torque mode. 9. Select START to turn on centrifuge. Note that Bowl and Conveyor speeds will gradually rise until settings are reached, and Torque % for bowl and conveyor will rise. If pump drive motor data has been changed since previous startup, select Autotune to tune motor to VFD. 10. When bowl speed has reached speed setting, select Pump START to start feed pump, and slowly introduce feed to centrifuge. 4-6 DE-7200VFDCentrifuge 30 Sep 13 OPERATING INSTRUCTIONS Note! Pump will not start until actual bowl speed is within 120RPM of setting. 11. Adjust feed rate, Bowl speed, and/or Conveyor speed as required to optimize centrifuge operation. Select Data screens at any time to review and monitor centrifuge operating characteristics, including air conditioner status, elapsed operating time, and VFD data. Note! Depending on conveyor differential speed setting, at bowl speeds above 300RPM conveyor motor may rotate in opposite direction. COLD CLIMATE STARTUP In below-freezing ambient conditions where steam, portable heaters, or other means is used to raise the temperature of the centrifuge, re-lubrication of bearings may be necessary prior to startup. If bearing housings reach a temperature of 200°F (93°C), grease may liquefy and drain from bearings. This will result in dry running the bearings upon startup. To prevent this condition, proceed as follows: 1. After applying heat and prior to startup, pump 15 shots of grease into each main bearing. 2. Refill conveyor bearings until grease is observed exiting the appropriate drain hole. 3. After machine is started, pump an additional five shots of grease into each main bearing. 4. Monitor bearing temperatures for the first 2 hours of centrifuge operation. Note! It is Normal for Temperatures to Rise for 15 to 30 Minutes After Greasing and Then Return to Normal. OPERATION The properties of the inlet slurry and desired separation should be known in advance. This information can be used to set and change bowl speed, conveyor differential speed, and feed rate (unless set for automatic control) as required during centrifuge operation. The centrifuge control panel indications, as well as the condition of the inlet slurry, must be monitored to ensure that desired effluent clarity and solids dryness are achieved. Rising conveyor torque indicates that one or more operating parameters should be lowered to reduce torque. Conversely, falling conveyor torque shows that speed can be raised and/or feed rate increased. Operating parameters should be adjusted, as required, to optimize centrifuge operation and prevent automatic shutdown due to excessive bowl or conveyor torque. The Operation screen (Figure 4-2) permits the operator to view current operating information for the bowl, conveyor, and pump and adjust the parameters as required to meet changing conditions. Through this screen, the operator may view and set bowl and conveyor RPMs and torque percentages, set feed pump flow rate, and view bearing temperatures. Adjustments of the conveyor and bowl speeds may be performed using up and down arrows or by entering actual numbers on the popup numeric keypad. In addition, options are provided for stopping the centrifuge, displaying VFD operation screens, and selecting Status, Clean Out, Faults, Alarms, and Home screens. The following parameters affect centrifuge operation: Feed rate, pond depth, bowl speed, and conveyor speed. 30 Sep 13 4-7 DE-7200VFDCentrifuge OPERATING INSTRUCTIONS OPERATION (CONT’D) Adjustment of one parameter may produce the desired clarity of liquid effluent and solids dryness. Or the desired performance may be achieved by further adjustment. It is important to understand the interdependence of the operating parameters. Changing one characteristic results in other effects that may warrant additional adjustments. Except for pond depth, these parameters can be adjusted while the centrifuge is operating. The operator may then view the results of one change before making additional adjustments. The following paragraphs describe the effect of changing each parameter. A T S T A R T U P R U N N I N G Figure 4-2. Operation Screens Feed Rate and Torque Settings The maximum feed rate and torque limit are entered at the upper right of the Operation screen as shown in Figure 4-2. The desired mode is selected by clicking on the number shown in the cell. The keypad appears, allowing the operator to enter the desired flow rate or torque percentage. The background in the selected cell turns green to signal the governing mode. If flow priority mode is selected, the system automatically increases feed rate up to the maximum setting as long 4-8 DE-7200VFDCentrifuge 30 Sep 13 OPERATING INSTRUCTIONS as the torque remains below the set limit. If the slurry is low in viscosity and density, operation will continue in the flow priority mode. However, conveyor torque may rise if solids volume increases, as the conveyor may become burdened in moving the increased solids volume at the present feed rate and bowl speed. When the torque reaches the torque limit setting, the system automatically switches to torque priority mode, and the background of the Input Torque % Limit cell becomes green. The feed rate is then reduced to permit the torque to fall. The system will remain in the torque priority mode once entered. To switch back to flow priority mode, the operator must click on the flow rate number, and enter a lower flow rate that will not cause an over-torque condition to re-occur. For more information on the flow priority and torque priority modes, refer to Section 1. Bowl Speed The faster the bowl speed, the faster solids are settled through the pond to the outer wall of the bowl. A faster bowl speed for a given feed rate results in dryer solids discharge. To reduce wetness, the slurry must remain in the bowl longer, subjecting it to the settling process for a longer duration before being conveyed out the solids discharge. Conversely, reducing bowl speed may be desirable for thick, heavy slurry to extract only high-density materials or larger particles. Both the bowl speed setting and actual bowl speed are shown on the control panel. The torque percentage of the bowl is also displayed. This information is useful in optimizing bowl speed to produce the desired solids dryness and processing speed. Conveyor Differential Speed With correct wiring polarity, the conveyor responds properly to settings made on the Operation screen. Changing the conveyor differential speed adjusts the solids discharge rate. Generally, a slower differential speed will produce drier solids but reduces the solids discharge rate. Increasing conveyor speed reduces drying time, leading to wetter discharged solids. Reducing conveyor speed results in drier solids discharge. However, excessively slow conveyor speed permits solids to accumulate in the bowl, possibly causing an overload condition. The drying time is reduced by increasing the conveyor differential speed, which will increase the wetness of the solids. Reducing the conveyor differential speed raises the settling time, which will produce drier solids. Both the conveyor speed setting and actual conveyor speed are shown on the control panel. In addition, the conveyor torque percentage is shown to assist in optimizing conveyor speed to produce the desired solids dryness and processing speed. Since the conveyor differential speed is controlled by the PLC relative to the bowl speed setting, wiring polarity of electrical components is critical. Depending on settings, electrical polarity determines actual speed and direction of conveyor motor for any bowl speed setting. For example, with a bowl speed setting of 2000RPM and conveyor differential speed set at 60, the conveyor motor will rotate in reverse at -1120RPM. The correct bowl-to-conveyor speed relationship depends on correct wiring polarity. If polarity is reversed, the same bowl speed setting of 2000RPM described above would result in an actual conveyor differential speed of about 17 rather than the setting of 60. Pond Depth Pond depth can only be adjusted with the centrifuge fully stopped and disabled. For this reason, pond depth is usually adjusted last. The factory pond depth setting is usually satisfactory when used in conjunction with feed rate, bowl speed, and conveyor speed adjustments. However, if desired results cannot be achieved by other means, the pond depth may require re-setting. 30 Sep 13 4-9 DE-7200VFDCentrifuge OPERATING INSTRUCTIONS Pond Depth (Cont’d) Six adjustable weir plates are provided on the liquid bowl head to facilitate setting the pond depth; all ports must be set identically. A deeper pond depth (move weir plates toward 380mm) increases settling time by permitting more liquid to remain in the bowl. However, a deeper pond depth also reduces the beach area at the solids discharge end of the bowl, which will result in a wetter solids discharge. The weir plates may be adjusted to provide a liquid depth ranging from 380mm to 460mm (Figure 4-3). This numerical range represents the inside diameter of the fluid ring. As shown, the beach length will vary from 36.2mm to 234.7mm, depending on weir opening. Raising the liquid depth reduces the beach length, and lowering the depth lengthens the beach. For example, to obtain the lowest liquid level the weir plates are set at the bottom notch on the weir gage plate. At this setting, the resulting liquid level is 380mm, and the corresponding beach length is 206.4mm. By moving the weir plates upward to the top notch, however, the liquid level rises to 460mm and liquid fully covers the beach. Figure 4-3. Pond Depth Versus Beach Length 4-10 DE-7200VFDCentrifuge 30 Sep 13 OPERATING INSTRUCTIONS To adjust pond depth, proceed as follows: WARNING! DO NOT OPEN COVER OR ATTEMPT ANY ADJUSTMENT OR MAINTENANCE ON THE CENTRIFUGE UNLESS THE BOWL IS AT A COMPLETE STANDSTILL. 1. Shut down, lock out, and tag out the centrifuge using the Normal Shutdown procedure described later in this section. 2. Remove access plate from the inlet side of the case cover. 3. Loosen screws securing the weir plates (Figure 4-4), move the weir plates to the required weir opening size, and re-tighten screws to torque specified in Section 5. 4. Set all six weir plates to the same diameter. 5. Re-install access plate on case cover. Figure 4-4. Weir Plate Adjustment Differential Speed/Conveyor Torque Generally, a faster conveyor speed results in lower conveyor torque, as solids are discharged faster and usually wetter. Reducing conveyor speed must be done slowly and cautiously, allowing steady-state to be reached before further reduction. Slower conveyor speeds permit solids to remain in the bowl longer, which can permit solids to accumulate in the bowl if the input rate exceeds the discharge rate. Therefore, the torque must be monitored to prevent overload. Operator settings for maximum flow and torque limit determine operating limits for the centrifuge. In flow priority mode, if feed conditions cause the flow rate setting to result in a higher torque than the Input Torque % Limit setting, the control system will automatically switch from flow priority to torque priority mode. The centrifuge will then continue operating in torque priority mode until the operator resets to flow priority mode by clicking on the Input Max GPM cell of the Operation screen and changing the flow rate. At certain conveyor speeds the drive motor must reverse direction to accommodate the differential speed relationship with the bowl. If this occurs, the centrifuge control system automatically assumes control of the feed pump to reduce its flow rate. The message, Automatic Flowrate, appears on the Operation screen to alert personnel that the feed pump is under automatic control. When the reduced feed rate is reached, a 20-second timer is started. This delay protects the conveyor drive from overload as the motor changes direction. Upon expiration of the timed interval, the new conveyor differential speed is applied. The pump feed rate returns to the previous rate when the new differential speed is reached. Manual control of the feed pump is then restored. This action releases the feed pump from automatic control and clears the Automatic Flowrate message from the screen. 30 Sep 13 4-11 DE-7200VFDCentrifuge OPERATING INSTRUCTIONS BEARING TEMPERATURES Bearing temperature trends may be viewed in graphical form on the Bearing Temperature screen (Figure 4-5). Temperatures are updated at one-minute intervals, and scroll buttons are provided to facilitate examination of trends. Solid and liquid end temperatures are displayed at the right side of the screen. The Motor Torque screen is also accessible from the Bearing Temperature screen. The operator may return to the Operation or Home screen using the buttons at the lower right of the screen. Figure 4-5. Bearing Temperature Screen MOTOR TORQUE TREND Bowl and conveyor torque trends may be viewed in graphical form on the Motor Torque trend screen (Figure 4-6). Torque charts are updated at a pre-set one minute interval, and scroll buttons are provided to facilitate examination of trends. Bowl and conveyor torques are displayed at the right side of the screen. The Bearing Temperature screen is also accessible from the Motor Torque screen. The operator may return to the Operation or Home screen using the buttons at the lower right of the screen. Figure 4-6. Motor Torque Trend Screen 4-12 DE-7200VFDCentrifuge 30 Sep 13 OPERATING INSTRUCTIONS SYSTEM DIAGNOSTICS Built-in system diagnostics continually analyze the control system for malfunctions. The Diagnostics screen (Figure 4-7) aids in troubleshooting by displaying any fault in the critical areas of the centrifuge. The current operational status of the Bowl, Conveyor, and Pump VFDs, as well as the speed and temperature sensors are displayed on this screen. Analog readings in mA are displayed at the bottom of the screen for main bearing temperature sensors and bowl speed sensor. The screen is accessible from the Home screen. Figure 4-7. Diagnostics Screen PERFORMANCE STATUS Current performance information is shown on the Centrifuge Status screen (Figure 4-8). Parameters displayed include bearing temperatures, bowl and clutch speeds and sensor condition, status of safety devices (vibration switch, emergency stop, and bowl overspeed), air conditioner operation, and operating hours. Operating status of the air conditioner is also shown Exiting this screen returns to the previous screen. Safety shutdowns are denoted by color change from green to red and display of a word explaining cause of shutdown. Figure 4-8. Centrifuge Status Screen 30 Sep 13 4-13 DE-7200VFDCentrifuge OPERATING INSTRUCTIONS ALARM AND FAULT MESSAGES If an alarm or fault occurs, a banner will appear at the bottom of the Operation screen (Figure 4-9) to alert the operator of a malfunction. Alarm messages signify that the prevailing condition must be corrected or the centrifuge may be shut down automatically. Fault messages inform the operator that a failure requiring automatic shutdown has occurred. If desired, the operator may display the present and past alarms and the status of each alarm. The Alarm screens permit the operator to review and acknowledge alarms individually or collectively. Refer to Section 5 for alarm messages and their causes and corrective actions. Alarms are listed with status, date and time received, and description. Buttons are provided at the bottom of the screen to facilitate scrolling through the alarms (Figure 4-10). Provisions are included for sorting alarms in the order of occurrence, and buttons are included for returning to the Operation or Home screen. Figure 4-9. Alarm Screens 4-14 DE-7200VFDCentrifuge 30 Sep 13 OPERATING INSTRUCTIONS Figure 4-10. Alarm Screen Buttons VFD STATUS Status screens (Figure 4-11 through 4-13) are selected from the Operation screen. Each VFD status screen permits the operator to view various operational characteristics of the VFD such as present alarms or faults, power, voltage, and current outputs; motor and component speeds; direction of motor rotation; VFD temperature; and motor torque. If a Fault Code appears, refer to the VFD Alarm and Fault Cross References table at the rear of this section for the definition. Figure 4-11. Bowl VFD Screen 30 Sep 13 4-15 DE-7200VFDCentrifuge OPERATING INSTRUCTIONS VFD STATUS (CONT’D) Figure 4-12. Conveyor VFD Screen Figure 4-13. Pump VFD Screen PUMP VFD FAULT STATUS The three most recent pump faults are shown on the Pump VFD Fault Status screen (Figure 414). The screen shows the fault number, time of occurrence, and description of the most recent fault. The fault code and time of occurrence are shown for the second and third most recent faults. 4-16 DE-7200VFDCentrifuge 30 Sep 13 OPERATING INSTRUCTIONS Figure 4-14. Pump VFD Fault Status Screen VFD TEMPERATURE TRENDS The historical temperature trends of all three VFDs are shown on the Temperature Trend screen (Figure 4-15). This screen is accessible from the Bowl VFD screen. Figure 4-15. VFD Temperature Trend Screen VFD FAULT RESET The Fault Reset screen (Figure 4-16) informs the operator of the readiness of each VFD—Faulted or No Fault—and permits resetting a faulted VFD. The screen may be selected from either the Home, Clean Out, or Operation screen. After a bowl or conveyor VFD fault, be sure that the centrifuge has come to a complete stop before attempting to re-start. 30 Sep 13 4-17 DE-7200VFDCentrifuge OPERATING INSTRUCTIONS VFD FAULT RESET (CONT’D) Figure 4-16. Fault Reset Screen SETUP SCREEN The Setup screen (Figure 4-17) permits the operator to view the software version installed in the PLC and control panel (HMI), view feed pump characteristics, adjust panel brightness, select the temperature units (°C or °F) that will be shown on other screens, and set personal preferences. In addition, by selecting Login an authorized operator may access restricted screens. Options are also provided to select the Pump Setup, Diagnostics, Home, or Login screens. Figure 4-17. Setup Screen If Login is selected, the following Login screen will appear: 4-18 DE-7200VFDCentrifuge 30 Sep 13 OPERATING INSTRUCTIONS By entering “User1” for user name and password “1-1-1-1” on the Login screen, the operating range screen is displayed (Figure 4-18). The user may then set the maximum and minimum limits for the following parameters: • Bowl speed • Conveyor differential speed • Pump GPM Figure 4-18. Operating Range Screen PUMP SETUP SCREEN Pump parameters are input and viewed on the Pump Setup screen (Figure 4-19), which is accessed from the Setup screen. Information keyed in from the pump and drive motor operating specifications is used by the control system to calculate pump flow rate relative to motor speed and autotune the pump motor to its controlling VFD. Accurate information for the specific pump in use is critical for proper operation. Typically, a flow curve is required to obtain the pump output per revolution parameter. Figure 4-19. Pump Setup Screen CLEAN OUT The Clean Out screen (Figure 4-20) is used to set parameters for operating the bowl and/or conveyor to remove accumulated process material that is impeding rotation. With this screen displayed, the operator selects the desired bowl and conveyor RPMs for the cleanout process. During cleanout, the actual RPMs and torque percentages are displayed below the setpoints. 30 Sep 13 4-19 DE-7200VFDCentrifuge OPERATING INSTRUCTIONS CLEAN OUT (CONT’D) Figure 4-20. Clean Out Screen Provision is included for selecting the automatic or manual cleanout options. When the cleanout process has timed out or was stopped by the operator, the Operation screen or the Faults screen may be displayed. If automatic reduction of the pump speed is unable to clear out solids from the conveyor, the torque will continue to rise and the centrifuge will shut down. The clean out procedure should then be used to clear out the impacted solids and return the centrifuge to operational status. The following paragraphs explain the two cleanout options: automatic and manual. Automatic Cleanout When the automatic option is selected, the system will perform a cleanout cycle for a pre-set duration. The bowl operates at 300 RPM, while the conveyor operates in the forward direction at a speed that varies from 8 to 30 RPM. If excessive resistance is encountered during the cleanout, the system will stop and alert the operator that the automatic cleanout has been unable to clear the centrifuge. Operator intervention is then required to repeat the automatic cleanout operation. Manual Cleanout Note! The manual cleanout should be used only if multiple automatic cleanout attempts are unsuccessful. When the manual cleanout option is selected, the operator may elect to jog the conveyor in forward and reverse with the bowl set at zero RPM. If desired, however, the operator may choose to operate the bowl as well as the conveyor. Reverse rotation of the conveyor is governed by a timer that terminates reverse operation after a pre-set interval. The primary purpose of the manual cleanout mode is to permit jogging the conveyor in an effort to remove impacted material. 4-20 DE-7200VFDCentrifuge 30 Sep 13 OPERATING INSTRUCTIONS NORMAL SHUTDOWN The normal shutdown procedure is to be used for controlled stopping of operation. Normal shutdown is performed for routine activities such as cleaning, lubrication, inspection, or adjustment. Note! Proper shutdown and flushing of the bowl can prevent high vibration at the next startup. Step 1 2 Procedure Stop the feed pump. Open supply of fresh flushing liquid to remove all solids from conveyor and bowl. Continue flushing for 3 to 5 minutes after feed pump has been shut down. Regardless of shutdown duration, the conveyor operates at a pre-set differential speed while the bowl decelerates to a stop. This process cleans the bowl during the shutdown. As the speed gradually drops during the shutdown period, the solids chute can also be flushed. While bowl is rotating, attach a hose to fitting on the hinge side of the case (Figure 3-11) to wash the exterior of the rotating assembly and interior of the case assembly. 3 Select STOP on Operation screen to shut down centrifuge. When bowl speed falls to less than 200RPM, conveyor gearbox drive motor automatically shuts down. 4 For cabinet with purge system, maintain air supply to cabinet purge unit to keep cabinet pressurized. AUTOMATIC SHUTDOWN The centrifuge has built-in safety features to protect the equipment. These features will result in automatic shutdown of the centrifuge before damage occurs. The following paragraphs describe these automatic shutdowns. Excessive Vibration Excessive vibration of the centrifuge will cause the vibration switch to interrupt electric power to the centrifuge run relay, shutting down the machine. Such excessive vibration may occur during startup or normal operation due to slumping of the wall cake or other unbalanced condition of the bowl. The machine may be re-started by pressing the reset button on the vibration switch and then using the Normal Startup procedure above. If the machine continually trips during normal startup, flush the bowl with fresh water while running the automatic cleanout routine. Main Bearing Temperatures Temperature sensors are installed on the liquid and solid end main bearings and connected to the PLC. Bearing temperatures are continuously displayed on the Operation screen. An alarm message is displayed on the control panel when either bearing temperature exceeds 225°F (107°C). If temperature rises to 250°F (120°C), a fault message appears and the centrifuge is shut down. Excessively high bearing temperatures usually indicate bearing failure, which can result from inadequate or excessive lubrication, contamination, or severe wear. Contact Derrick Service department for assistance. 30 Sep 13 4-21 DE-7200VFDCentrifuge OPERATING INSTRUCTIONS Excessive Bowl Speed A sensor that detects the rotating speed of the bowl provides an input to the PLC that produces a continuous display of actual bowl speed on the Operation and Bowl VFD screens. A fault message is displayed and the centrifuge is immediately shut down if speed rises to 3100RPM. To re-start the centrifuge, allow the bowl to coast to a complete stop, check for and remove the cause of excessive speed as described in Section 5. After correcting defect(s), re-start the machine using the Normal Startup procedure above, and re-check bowl speed. Conveyor Clutch Trip A sensor detects the rotating speed of the torque limiting clutch half installed on the gearbox shaft. The sensor provides an input to the PLC that continuously displays actual clutch speed on the Status and Conveyor VFD screens. If the differential speed between the conveyor drive motor and clutch reaches 50RPM, the clutch speed sensor provides an input to the PLC immediately causing a clutch trip alarm message to be displayed on the control panel. A fault message is then displayed, and the centrifuge is shut down. To reset the clutch following a trip: 1. Shut down, lock out, and tag out centrifuge, and allow the bowl to coast to a complete stop. 2. Remove four bolts and washers securing shaft guard to centrifuge base, and remove shaft guard to expose clutch. 3. Align the scribe marks on the actuation ring and clutch body (Figure 4-21). 4. Insert two levers (screwdrivers) between the actuation ring and clutch body. 5. Press actuation ring back into engagement. 6. Reinstall and secure shaft guard. 7. Clear all faults, correct any defect(s), and perform Cleanout procedure in this section. 8. Re-start machine using Normal Startup procedure, and re-check clutch speed as shown on the Conveyor VFD screen. Figure 4-21. Resetting Clutch Following Trip 4-22 DE-7200VFDCentrifuge 30 Sep 13 OPERATING INSTRUCTIONS EMERGENCY SHUTDOWN Two options are available to stop the centrifuge in an emergency: Electric power shutdown or mechanical shutdown. The type of emergency dictates the shutdown method. If emergency is electricity related, power must be shut down immediately. However, if the emergency requires the fastest possible means of stopping the bowl, the alternative mechanical shutdown procedure should be used to bring the bowl to a stop more quickly. Electric Power Shutdown 1. Immediately interrupt power by pressing the EMERGENCY STOP button on the control cabinet or centrifuge. The bowl will then coast to a stop, which may take more than 15 minutes. Note! Pressing EMERGENCY STOP immediately removes power from the bowl, conveyor, and pump motors, allowing the bowl to coast to a stop. This may take more than 15 minutes depending on the bowl speed and amount of material inside the bowl. 2. Open the fused disconnect supplying electric power to the machine. Mechanical Shutdown The fastest method to stop the bowl is to click on STOP on the Operation screen or display the Bowl VFD screen and click on Bowl Is Coasting, as shown in Figure 4-22, below. The bowl will then be brought to a controlled stop by the bowl VFD. If a fault is present, the screen will display the message Bowl Is Coasting; Fault Present. In this case, the fault must be cleared before VFD control can be selected. Figure 4-22. Bowl VFD Screen During Shutdown Under VFD Control Note! If a fault is present, controlled stoppage of the bowl motor is not possible until the fault is cleared. 30 Sep 13 4-23 DE-7200VFDCentrifuge SECTION 5 - MAINTENANCE GENERAL This section describes preventive and corrective maintenance procedures for the DE-7200 VFD centrifuge. Obvious procedures are omitted. Before beginning any centrifuge maintenance, shut down, lock out, and tag out equipment. DANGER! HIGH VOLTAGE! SHUT DOWN, LOCK OUT, AND TAG OUT ELECTRIC POWER, AND ENSURE THAT EQUIPMENT HAS STOPPED ROTATING BEFORE WORKING ON THIS EQUIPMENT. SAFETY GLASSES MUST BE WORN AT ALL TIMES WHILE PERFORMING ANY MAINTENANCE PROCEDURE. FAILURE TO WEAR SAFETY GLASSES MAY RESULT IN SERIOUS EYE INJURY OR PERMANENT LOSS OF VISION. WARNING! WHILE OPENING AND CLOSING THE CENTRIFUGE COVER, PERSONNEL MUST ENSURE THAT ALL BODY LIMBS AND ANY OTHER ITEMS ARE CLEAR OF THE COVER GAP. TWO OPERATORS MUST BE USED, WITH BOTH HANDS ON THE COVER HANDLES AT ALL TIMES. DERRICK RECOMMENDS HAVING A HOIST AVAILABLE IF ADDITIONAL ASSISTANCE IS DESIRED DURING THE OPENING/CLOSING PROCEDURE. TOP COVER OPENING/CLOSING PROCEDURES The proper procedures for opening and closing the top cover of the centrifuge must always be followed. Two operators using both hands are required to open the cover. Derrick recommends having a hoist available if additional assistance is desired during the opening/closing of the centrifuge cover. To open and close the cover, proceed as follows: 1. Shut down, lock out, tag out electric power to centrifuge, and allow rotating assembly to coast to a full stop. 2. Remove bolts securing cover to base. 3. Have two operators using both hands grip the cover handles securely to ensure full control of the cover throughout the opening and closing process. 4. As the cover is raised, ensure that body limbs of all personnel and any other items remain clear of the cover gap at all times. 5. Raise the cover to the fully opened position, and insert a 1/2” (12.7mm) hardened steel pin through one hinge to lock the cover open. 6. After performing the activity that required the cover to be opened, reverse steps 2 through 5 to close the cover. During the closing procedure, ensure that both operators are capable of controlling the cover’s descent and that all body limbs and other items remain clear of the gap. 31 Dec 13 5-1 DE-7200VFDCentrifuge MAINTENANCE PREVENTIVE MAINTENANCE Preventive maintenance consists of inspection, cleaning, and lubrication. These routine procedures will ensure maximum life and trouble-free operation. While the maintenance schedule presented in this section should remain flexible, modifications should be based on experience with operating the equipment at your facilities. A maintenance log should be kept to help establish a preventive maintenance schedule, as well as to monitor and adjust the schedule as necessary throughout the equipment’s life. When establishing a preventive maintenance schedule, consider duty cycle, ambient temperature, and operating environment. The recommended preventive maintenance schedule is presented in the table below. PREVENTIVE MAINTENANCE SCHEDULE Action Interval Inspect feed connection for leaks, and tighten connection flange hardware as required. Each shift Inspect liquid discharge connection for leaks. Tighten connection to prevent leakage. Each shift Remove feed tube, clean interior of pipe, and reinstall. 40 hrs Remove accumulated solids from interior and exterior of case. 40 hrs or as needed Remove belt cover, inspect belt for damage, and check/adjust tension. Every 160 hrs Inspect clutch coupling spider for wear. Every 160 hrs Grease main bearings. * Grease conveyor bearing until grease vents through relief valve. (If vent plug is installed, remove plug from conveyor bearing journal, inject grease, and then reinstall vent plug.) * Grease bowl and conveyor drive motors. * Check/change conveyor drive gearbox oil. * * Refer to Lubrication Chart for applicable lubricants, quantities, and intervals. 5-2 DE-7200VFDCentrifuge 31 Dec 13 MAINTENANCE LUBRICATION CHART No. Location Amount Interval Type Application Notes 1 Main bearings 6 cm3 (3 strokes) 40 Hrs Shell Albida EP2 Centrifuge running Manual grease gun 2 Conveyor bearing Inject grease until it exits outlet port 500 Hrs Shell Albida EP2 Centrifuge stationary Manual grease gun 3 Bowl drive motor 4 5 Conveyor drive motor Conveyor drive gearbox 0.5 Oz (10 shots) 5 qts (4.9 liters) Standard Temp Centrifuge stationary Chevron SRI NLGI 2 SRI-2 Quarterly Arctic Temp Centrifuge stationary Shell AeroShell 7 2500 Hrs Mobil SHC 629 First oil change after 500 hrs. Change oil with centrifuge stationary; check level when warm (see Checking Gearbox Oil Level below) GEARBOX OIL LEVEL CHECK 1. Ensure that centrifuge is level, and gearbox is warm. 2. Shut down centrifuge, and lock out and tag out electric power. WARNING! WHILE OPENING AND CLOSING THE CENTRIFUGE COVER, PERSONNEL MUST ENSURE THAT ALL BODY LIMBS AND ANY OTHER ITEMS ARE CLEAR OF THE COVER GAP. TWO OPERATORS MUST BE USED, WITH BOTH HANDS ON THE COVER HANDLES AT ALL TIMES. DERRICK RECOMMENDS HAVING A HOIST AVAILABLE IF ADDITIONAL ASSISTANCE IS DESIRED DURING THE OPENING/CLOSING PROCEDURE. 3. Remove screws securing top cover to centrifuge, and open cover as described at the beginning of this section. 31 Dec 13 5-3 DE-7200VFDCentrifuge MAINTENANCE GEARBOX OIL LEVEL CHECK (CONT’D) 4. Rotate gearbox until the housing marks are at top dead center (Figure 5-1). Note! Placing a straight edge between grease fitting and housing markings will help align marks at top dead center. 5. Remove fill and vent plugs, and check that oil level is at fill plug opening. If level is low, replenish with recommended oil. 6. Re-install fill and vent plugs, and tighten securely. 7. Close and secure top cover. Figure 5-1. Gearbox Oil Level Check GEARBOX OIL CHANGE 1. Shut down centrifuge, and lock out and tag out electric power. WARNING! WHILE OPENING AND CLOSING THE CENTRIFUGE COVER, PERSONNEL MUST ENSURE THAT ALL BODY LIMBS AND ANY OTHER ITEMS ARE CLEAR OF THE COVER GAP. TWO OPERATORS MUST BE USED, WITH BOTH HANDS ON THE COVER HANDLES AT ALL TIMES. DERRICK RECOMMENDS HAVING A HOIST AVAILABLE IF ADDITIONAL ASSISTANCE IS DESIRED DURING THE OPENING/CLOSING PROCEDURE. 2. Remove screws securing top cover to centrifuge, and open cover as described at the beginning of this section. 3. Place a suitable container capable of receiving 5 quarts (4.9 liters) of oil beneath gearbox. 4. Rotate gearbox until one drain plug is at bottom of gearbox. 5. Remove vent and fill plugs at top of gearbox to facilitate draining. 6. Remove drain plug at bottom of gearbox to drain oil. 7. After fully draining gearbox, reinstall and tighten drain plug. 8. Rotate gearbox until fill and vent plugs are positioned as described in Gearbox Oil Level Check. 5-4 DE-7200VFDCentrifuge 31 Dec 13 MAINTENANCE 9. Re-fill gearbox with correct product and quantity listed in Lubrication Chart. 10. Re-install fill and vent plugs, and tighten securely. 11. Close and secure top cover. DRIVE BELT REPLACEMENT DANGER! HIGH VOLTAGE! SHUT DOWN, LOCK OUT, AND TAG OUT ELECTRIC POWER, AND ENSURE THAT EQUIPMENT HAS STOPPED ROTATING BEFORE WORKING ON THIS EQUIPMENT. SAFETY GLASSES MUST BE WORN AT ALL TIMES WHILE PERFORMING ANY MAINTENANCE PROCEDURE. FAILURE TO WEAR SAFETY GLASSES MAY RESULT IN SERIOUS EYE INJURY OR PERMANENT LOSS OF VISION. Before beginning any centrifuge maintenance, shut down, lock out, and tag out equipment. The drive belts should be tensioned periodically and replaced if inspection reveals damage or deterioration. To tension and/or replace the belts, proceed as follows: WARNING! ALWAYS ALLOW ROTATING ASSEMBLY TO COAST TO A COMPLETE STOP BEFORE REMOVING BELT GUARD. 1. Shut down, lock out, and tag out electric power to the centrifuge. 2. Remove belt guard. 3. Loosen mounting screws securing torque limiter clutch half to conveyor drive motor shaft (Figure 5-2), and slide clutch half toward motor until end of motor shaft is visible. 4. Loosen bolts securing bowl drive motor to base, turn tensioning bolt to loosen belts, and remove belts from bowl and motor sheaves by maneuvering out between conveyor drive motor and conveyor shaft. 5. Install new belts onto bowl drive motor and bowl sheaves. 6. Turn tensioning bolt to apply tension to belt. Apply sufficient belt tension to permit a 1/2” (13mm) deflection when pressed with a 17 lb (75 N) force at the midpoint of the belt (Figure 53). Correct tension will prevent slippage without overloading bearings. After correct tension is set, tighten motor base retaining bolts to secure motor. 7. Slide drive motor clutch half back into engagement with gearbox half, and set gap between clutch halves at about 0.1875” to 0.250” (4.8mm to 6.4mm), and then position clutch axially so that midpoint of spider is aligned with proximity switch. 8. Tighten mounting screws in motor clutch half to 184 ft lbs (250 Nm). 9. Install and secure belt guard. 31 Dec 13 5-5 DE-7200VFDCentrifuge MAINTENANCE DRIVE BELT REPLACEMENT (CONT’D) Figure 5-2. Conveyor Drive Clutch Figure 5-3. Drive Belt Tensioning 5-6 DE-7200VFDCentrifuge 31 Dec 13 MAINTENANCE PURGE SYSTEM Bypassing Purge System The purge unit may be bypassed when necessary to apply electric power to the centrifuge while the control cabinet door is open, but this should be done only after verifying that the centrifuge is in a non-hazardous area. After completing the work, the purge system must be restored to operation and satisfactory operation confirmed. Refer to Section 4 for the purge system bypass procedure. DANGER! HIGH VOLTAGE! USE EXTREME CAUTION WHEN OPERATING CENTRIFUGE WITH PURGE SYSTEM BYPASSED. DANGEROUSLY HIGH VOLTAGE WILL BE PRESENT IN CONTROL CABINET IF DOOR IS OPENED WHILE POWER IS APPLIED. EXPLOSION HAZARD! BE CERTAIN THAT SURROUNDING ATMOSPHERE IS CLEAR OF ALL POTENTIALLY EXPLOSIVE GASES BEFORE OPENING CONTROL CABINET DOOR. SAFETY GLASSES MUST BE WORN AT ALL TIMES WHILE PERFORMING ANY MAINTENANCE PROCEDURE. FAILURE TO WEAR SAFETY GLASSES MAY RESULT IN SERIOUS EYE INJURY OR PERMANENT LOSS OF VISION. Inspection and Test Procedures Periodic inspection and test procedures, supplemented by any additional requirements imposed by local codes, are recommended. The following tests should be performed at least every 6 to 24 months depending on site conditions. Visual Inspection and Checks 1. Inspect condition of relief valve and spark arrestor. Remove all debris and corrosion. 2. Check/drain air supply filters on cabinet exterior. 31 Dec 13 5-7 DE-7200VFDCentrifuge MAINTENANCE Visual Inspection and Checks (Cont’d) 3. Check condition of the purge unit air filter element, and clean or replace as necessary. 4. At least every two years, check the following additional items: a. There are no unauthorized modifications. b. Quality of the air supply is correct (refer to Compressed Air in Section 3). c. Approval labels are legible and undamaged. d. Power to the centrifuge is shut down upon loss of air pressure. Initial Purge Time Setting The initial purge time is factory-set to 16 minutes. If purge time varies excessively, the timer system inside the purge unit may be adjusted to restore the correct interval. The time intervals marked on each valve are additive. In the photo below, the timer shows that total purge time available is 38 minutes (16+8+8+4+2). If testing reveals that purge time has varied from the 16minute setting, the purge time should be changed by opening or closing one or more valves. When making an adjustment, note that valves are either open or closed; no intermediate setting is possible. 5-8 DE-7200VFDCentrifuge 31 Dec 13 MAINTENANCE Leakage Compensation Test A Magnahelic gage and hose kit available from Derrick is required to monitor cabinet pressure. The leakage compensation valve adjustment should be checked for deviation from factory setting as follows: 1. Connect Magnahelic gage to test point shown below. 2. Open the supply regulator to between 60 and 115 psi (4 and 8 barg) to start the purge flow. 3. Check that the internal logic gage reads 30 psi (2 bar). 4. At this time the ALARM/PRESSURIZED indicator should be green and the PURGING indicator should be amber. If the amber indicator remains off, the flow through the relief valve is below the minimum for which the flow sensor has been calibrated. Check the air supply pressure at the inlet to the control unit while purging is taking place. It must be above the minimum specified pressure. 5. The purge timer will start as soon as the PURGING indicator turns amber. Check that the time delay between the PURGING indicator turning amber and the application of power to the control cabinet is not less than the minimum time required for purging the cabinet. Times in excess of the minimum are permitted, and a tolerance of +20% is normally acceptable. If the time is too short it must be increased accordingly. 6. After power has been applied via the control unit the purging valve will close, and the air flow into the cabinet will be controlled by the leakage compensation valve. 7. SLOWLY open the leakage compensation valve, and allow cabinet pressure to rise until the relief valve opens. Check that the relief valve opens at or below 7” ±0.8” WC (17.4 mbarg ±2 mbarg). 8. Repeat the relief valve test several times. 31 Dec 13 5-9 DE-7200VFDCentrifuge MAINTENANCE Minimum Pressure Sensor Setting The setting of the minimum pressure sensor should be checked as follows: 1. Note the position of the leakage compensation valve knob by marking knob with a pencil at the 12:00 o'clock position. 2. Slowly lower the cabinet pressure by closing the leakage compensation valve further, counting the number of turns from the normal working pressure position. Note the pressure at which the alarm/pressurized indicator changes from green to red, and check that this pressure is not lower than 0.3” WC (0.75 mbar). Check also that the ALARM electrical contacts function properly. 3. As soon as the ALARM/PRESSURIZED indicator turns red, the system will begin re-purging, and the enclosure power will be switched off. 4. While the cabinet is re-purging, return the leakage compensation valve to its normal working pressure position so that at the end of purging the cabinet pressure should immediately settle down at the correct normal pressure. Leakage Compensation Valve Adjustment 1. If a considerable quantity of air continues to flow out the relief valve after power has been applied, the leakage compensation valve is open too far causing the air flow to hold the relief valve open continuously. To correct this condition, slowly close the leakage compensation valve. The cabinet pressure will start to fall as the flow decreases but eventually the relief valve will close, and the cabinet pressure will rise again. At this point, the relief valve may start to open intermittently as the cabinet pressure rises to the point where it exceeds the relief valve opening pressure. When the relief valve opens, the pressure will fall quickly to the point where the relief valve re-closes and the cabinet pressure starts to rise again. 2. If the relief valve is opening intermittently, the leakage compensation valve is open slightly too far. When the relief valve opens, the cabinet pressure falls quickly to the point where the relief valve re-closes and the cabinet pressure starts to rise again. Continue to close the leakage compensation valve until the cycling stops and the cabinet pressure starts to fall. Carefully adjust the leakage compensation valve until the cabinet pressure is stable. This pressure will be the normal working pressure and should be about 7” WC (17.4 mbarg). 3. If, at the end of purging, cabinet pressure falls below the minimum pressure sensor setting, the system will re-start a new purge cycle. This indicates excessive leakage from the cabinet. In this case, check the cabinet for leakage, and reduce or eliminate the leaks. After sealing cabinet, at the end of purging the cabinet should remain pressurized and the relief valve action will occur as described in step 1 or 2, above. Proceed with adjustments described in the preceding steps. Note! When air conditioner goes off, the relief valve may vent momentarily. This is normal. Pressure Sensor Calibration If it is decided that the minimum pressure sensor requires recalibration, it must be returned to Derrick for this service. 5-10 DE-7200VFDCentrifuge 31 Dec 13 MAINTENANCE Cleaning Purge Unit Filter Do not use solvents on any part of the filter assembly installed inside the purge unit. To clean the filter element, unscrew and remove the filter bowl and then unscrew and remove filter element. Clean filter element in soapy water or replace element. ROTATING ASSEMBLY MAINTENANCE Maintenance of the rotating assembly is limited to removal, cleaning, inspection, and replacement of wear inserts. Excessive noise or vibration during centrifuge operation may indicate defective main or conveyor bearings. If such conditions are evident, the bearings should be checked for high temperature and excessive noise. The rotating assembly must be replaced if defective main or conveyor bearings are found, or if internal damage to the rotating assembly is found or suspected. The damaged rotating assembly should be returned to Derrick for overhaul. Rotating Assembly Removal To remove the rotating assembly, proceed as follows: WARNING! TO AVOID SERIOUS PERSONAL INJURY BE SURE EQUIPMENT IS LOCKED OUT, TAGGED OUT, DE-ENERGIZED, AND HAS STOPPED ROTATING BEFORE PERFORMING MAINTENANCE AND/OR ADJUSTMENTS. 1. Turn off feed, shut down centrifuge, and lock out and tag out electric power to the centrifuge. Allow rotating assembly to coast to a full stop. 2. Disconnect feed pipe from feed tube flange. 3. Remove screws securing belt guard to case, and lift and remove guard. WARNING! WHILE OPENING AND CLOSING THE CENTRIFUGE COVER, PERSONNEL MUST ENSURE THAT ALL BODY LIMBS AND ANY OTHER ITEMS ARE CLEAR OF THE COVER GAP. TWO OPERATORS MUST BE USED, WITH BOTH HANDS ON THE COVER HANDLES AT ALL TIMES. DERRICK RECOMMENDS HAVING A HOIST AVAILABLE IF ADDITIONAL ASSISTANCE IS DESIRED DURING THE OPENING/CLOSING PROCEDURE. 4. Remove screws securing case cover to case, and open case cover as described at the beginning of this section. 5. Loosen screws securing torque limiter clutch half to conveyor drive motor shaft (Figure 5-4), slide coupling half toward motor until end of motor shaft is visible, and remove spider. 31 Dec 13 5-11 DE-7200VFDCentrifuge MAINTENANCE Rotating Assembly Removal (Cont’d) Figure 5-4. Conveyor Torque Limiter Clutch 6. Loosen nuts securing bowl drive motor to base, turn tensioning bolt to release tension, and remove belts from bowl sheave. 7. Remove liquid and solid end temperature sensors (Figure 5-5) from main bearing pillow blocks. Figure 5-5. Solid End Temperature and Speed Sensors 8. Disconnect speed sensor cable from speed sensor. 9. Remove bolts and Belleville washers securing pillow blocks to base at liquid and solid ends (Figure 5-6), and remove alignment pins from pillow blocks. 5-12 DE-7200VFDCentrifuge 31 Dec 13 MAINTENANCE 10. Attach a hoist capable of lifting at least 4000 lbs (1800 kg) to rotating assembly. 11. Properly balance the hoisting straps to ensure that the assembly remains horizontal during lifting, and slowly hoist rotating assembly until clear of base. 12. Lower rotating assembly onto a cradle that is capable of supporting its weight. Figure 5-6. Bearing Pillow Block Cleaning and Inspection 1. Wash mud and debris from interior and exterior of bowl assembly, and blow dry with filtered compressed air. Remove any corrosion to facilitate inspection. 2. Inspect wear inserts for obvious wear. If significant damage is found, replace inserts using Kit G0009149. To help preserve dynamic balance, inserts are always replaced in pairs that are opposite to each other. 3. Inspect solid discharge wear inserts and weir plates on head wall of bowl assembly for cracks, fractures, or other damage, and replace if obviously damaged using Kit G0009149. 4. Inspect bowl exterior for corrosion, excessive wear, or other damage that may affect performance. Contact Derrick if excessive corrosion or wear is found. 5. Check main bearings for roughness, noise, or rubbing. If bearing damage is found, replace rotating assembly in accordance with procedures in this section. Return defective rotating assembly to Derrick for overhaul. 6. Inspect pillow blocks for corrosion, distortion, nicks, cracks, burrs, fractures, or other defects. Repair any minor defects, or replace if serious defects or cracks are found. 7. Determine wear of conveyor flights as follows: a. Remove inspection plug from bowl extension, and insert vernier caliper through hole and into contact with conveyor flight (Figure 5-9). b. The dimension indicates the radial wear of the flights. For example, a dimension of 24.2mm indicates radial wear of 5mm. c. If radial wear exceeds 6mm, the rotating assembly should be returned to Derrick for overhaul. 31 Dec 13 5-13 DE-7200VFDCentrifuge MAINTENANCE Cleaning and Inspection (Cont’d) A (mm) 19.2 20.2 21.2 22.2 23.2 24.2 25.2 26.2 27.2 28.2 29.2 Radial Wear (mm) 0 1 2 3 4 5 6 7 8 9 10 Figure 5-9. Conveyor Flight Wear Measurement Installation 1. Using a suitable hoist capable of lifting at least 4000 lbs (1800 kg), lift rotating assembly from cradle and lower onto base with pillow blocks in close alignment with mounting holes. 2. Use a brass hammer to fully seat alignment pins in bearing pillow blocks and base; do not tighten nuts on alignment pins. 3. Orient Belleville washers with concave side down, and slide onto bolts. Insert bolts through pillow block holes, and tighten in stages to torque specified in Hardware Torque Specifications. 4. Install and tension drive belts between motor and bowl sheaves in accordance with Drive Belt Replacement. 5. Insert spider into gearbox clutch half, and slide motor clutch half back into engagement with gearbox half. Set gap between clutch halves at about 0.1875” to 0.250” (4.8mm to 6.4mm), and tighten mounting screws in motor clutch half to 184 ft lbs (250Nm). 6. Install and secure belt guard over motor and bowl assembly sheaves. 7. Close case cover, and secure with screws, tightening from center of cover outward in both directions. 8. If main bearings have been replaced, grease main bearings in accordance with lubrication chart in Preventive Maintenance and the following steps: a. Apply electric power, start centrifuge, and adjust bowl speed to 500RPM. b. While watching bearing temperature, inject new grease into pillow block until grease flows from the outlet port on the bottom half of the pillow block. 9. Connect feed piping to feed component flange. 10. Apply electric power, and start up centrifuge (refer to Section 4). Carefully monitor performance, and check for any unusual noise. 5-14 DE-7200VFDCentrifuge 31 Dec 13 MAINTENANCE HARDWARE TORQUE SPECIFICATIONS Use only hardware that is approved by Derrick Corporation. The use of potentially inferior, nonDerrick approved hardware may result in serious injury to personnel and/or damage to equipment. Additionally, any warranty in force, whether written or implied, may be voided by use of unapproved hardware. Contact Derrick Corporation with questions pertaining to hardware type and usage associated with Derrick centrifuges. WARNING! USE OF INFERIOR, NON-DERRICK APPROVED HARDWARE MAY RESULT IN SERIOUS INJURY TO PERSONNEL AND/OR DAMAGE TO EQUIPMENT. Recommended seating torque specifications for the various types and sizes of hardware used on the centrifuge are shown below. Use the following procedure when tightening hardware: 1. Use only a calibrated torque wrench. 2. When tightening more than one bolt, alternate tightening between bolts. 3. Always approach the final torque in several stages. HARDWARE TORQUE Type Location Torque Ft lbs In lbs Nm M12 Bowl and backdrive gearbox motors to base 41 496 56 M10 Weir plate to liquid bowl head 24 283 32 M12 Top cover to case 24 283 32 M10 Sheave to mounting flange on backdrive gearbox 24 283 32 M24 Main bearing pillow block to base 502 6018 680 M12 Feed tube to pillow block 55 650 75 M16 Top and bottom halves of main bearing pillow block 144 1726 195 M14 Clutch coupling half to conveyor motor shaft 184 2208 250 RECOMMENDED SPARE PARTS The spare parts list below contains the parts required to support a single DE-7200 centrifuge for two years. The components most susceptible to wear are included; however, all potential part replacements cannot be predicted. The complete spare parts inventory should be based on the user’s experience with similar equipment. When establishing a spare parts inventory, consider duty cycle, ambient temperature, and operating environment. 31 Dec 13 5-15 DE-7200VFDCentrifuge MAINTENANCE RECOMMENDED SPARE PARTS (CONT’D) Part No. Description Consumable 2-Yr Qty No 4 Base - 16601-00-001 G0007725 Taper Pin Bowl - 16603-00-001 G0008986 Gear Oil Yes 5 Gal G0007763 Bolt, Hex Head No 12 G0007729 Washer, Flat No 12 Case & Cover - 16602-00-001 G0007759 Seal Tape Yes 1 16929-01 Rubber Seal No 1 Set G0007767 Gas Cylinder No 2 16995-01 Wear Plates No 1 Set Belt Guard - 16605-00-001 G0007756 Bolt, Hex Head No 4 G0012501 Flat Washer No 4 Feed Component Assembly - 16606-00-001 G0012473 Feed Tube Yes 1 G0009232 Flex Joint, ANSI Pattern Yes 1 Miscellaneous Drive Components - 16621-00 G0007964 Drive Belt Yes 5 G0008994 Overload Clutch/Coupling No 1 Miscellaneous Parts - 16674-00 G0008185 Grease Cartridge Yes 20 Tubes G0008181 Grease Gun No 1 Electrical Parts List - 16593-00 G0007265 RTD Sensor, Bearing, 5”, 316SS, 140” Wire No 1 G0007861 Speed Sensor No 1 5-16 DE-7200VFDCentrifuge 31 Dec 13 MAINTENANCE Part No. Description Consumable 2-Yr Qty Control Cabinet - 16472-00-002 G0007698 Fuse, 60A, Class J No 3 G0008792 Fuse, 3A, Class CC No 3 G0003493 Fuse, 15A, Class CC No 3 G0007225 Fuse, 150A, Class J No 2 G0007632 Fuse, 225A, Class T No 3 G0002910 Fuse, 2.5A No 2 G0002911 Fuse, 7A No 1 G0002301 Air Filter Element, DX Yes 1 G0002302 Air Filter Element, BX Yes 1 G0008005 Door Latch No 4 G0008349 PLC Battery Yes 1 G0009286 Intrinsic Barrier, Vibration Switch No 1 G0007918 Intrinsic Barrier, RTD Sensor No 1 17244-02 Intrinsic Barrier, Speed Sensor No 1 Electrical Control Panel - 16607-00 G0002926 Secondary Fuse, 1.25A No 1 G0004195 Primary Fuse, 0.5A No 2 G0009286 Intrinsic Barrier No 1 TROUBLESHOOTING Malfunctions due to operating error or other problem can result in unnecessary machine downtime and should be corrected as soon as possible. The troubleshooting procedures presented in this section will assist technicians in isolating and correcting malfunctions. Troubleshooting Procedure Fault analysis should proceed logically from the simplest cause to the more complex. The most difficult problem is an unexpected shutdown or inability to start. Always eliminate obvious causes of malfunction before proceeding to more complex possibilities. Since more than one cause may be responsible for a malfunction, the technician must proceed methodically to eliminate all possible causes and take all corrective actions at each step of the troubleshooting process. Where changes to operating procedures are the best course of action, appropriate recommendations are included. In general, an unexpected centrifuge shutdown is due to an interruption of electric power that has turned off the drive motors. Safety components are installed in key areas of the centrifuge electrical control system to shut down the bowl and conveyor motors if safety parameters such as motor temperature, vibration, or conveyor torque are exceeded. The power interruption may be due to one or more factors, including a local power failure. 31 Dec 13 5-17 DE-7200VFDCentrifuge MAINTENANCE TROUBLESHOOTING (CONT’D) In case of control system malfunction, with electric power shut down, locked out, and tagged out check that PLC connectors are fully seated in their receptacles. Correct as necessary before proceeding with further troubleshooting. Troubleshooting Chart The troubleshooting chart consists of failure modes, possible cause(s), and recommended course(s) of action. All electrical continuity checks in this procedure are performed without electric power supplied to the centrifuge. Lock out and tag out equipment before attempting to perform any continuity check. WARNING! CONTINUITY CHECKS MUST BE PERFORMED WITHOUT ELECTRIC POWER APPLIED TO CENTRIFUGE. LOCK OUT AND TAG OUT ELECTRIC POWER BEFORE ATTEMPTING CONTINUITY CHECKS. In addition to the troubleshooting information, the technician should refer to the schematic diagrams at the rear of this section and to the appropriate schematic and wiring diagrams in Section 8 and description and theory of operation in Section 1 for additional assistance in troubleshooting. TROUBLESHOOTING DE-7200 VFD CENTRIFUGE Possible Cause Isolation Procedure & Corrective Action Failure Mode 1: Acceptable Liquid, Cake Too Thin Insufficient solids in feed Increase weir opening (refer to Section 4). Reduce differential speed. Drop in feed pump rate Increase feed rate. Check feed pump; if required, check wear and replace worn parts. Check pump shaft seal, and correct any defects. Select RESET on Fault Reset screen to reset flow rate. Failure Mode 2: Poor Liquid Quality, Acceptable Cake Bowl speed too low Increase bowl speed. Reduce feed rate. Excessive amount of solids in feed Reduce quantity of solids in feed or add dilution stream if possible. Change in feed characteristics Reduce quantity of solids in feed or generally optimize machines settings, i.e. adjust bowl speed, differential speed, and weir opening. Conveyor flights worn excessively Measure clearance through inspection port (Figure 5-9). Replace rotating assembly if excessive wear is found (refer to Rotating Assembly maintenance). 5-18 DE-7200VFDCentrifuge 31 Dec 13 MAINTENANCE TROUBLESHOOTING DE-7200 VFD CENTRIFUGE Possible Cause Isolation Procedure & Corrective Action Failure Mode 3: Excessive Vibration Excessive buildup of solids in bowl and/or conveyor. Perform cleanout procedure (refer to Preventive Maintenance). Bowl assembly main bearings defective. Replace rotating assembly (refer to Rotating Assembly Maintenance). Bowl assembly unbalanced due to excessive wear or deformed conveyor flights Inspect conveyor flights through solid discharge openings Replace rotating assembly if excessive flight wear or damage is found. Failure Mode 4: No Solid Discharge, Untreated Feed Material Exits Liquid Discharge Outlet Buildup of solids between flights; solids not being transported to discharge but are discharged with liquid Shut down feed pump and bowl assembly drive motor, but keep conveyor motor running and admit rinse water into machine. If solids emerge before bowl fully stops, re-start centrifuge. Open top cover, and insert hose into liquid and solids discharge openings and flush bowl interior with water (preferably hot water). If flushing is unsuccessful in clearing the blockage, replace rotating assembly (refer to Rotating Assembly Maintenance). Failure Mode 5: High Power Consumption, Machine Clogged Solids accumulated within case Open top cover, and thoroughly clean case interior, bowl exterior, and solids discharge chute. Failure Mode 6: Machine Clogged Upon Starting After a Brief Shutdown Excessive solids volume in feed due to sedimentation in supply line Perform cleanout procedure (refer to Preventive Maintenance). Prevent future repetition by clearing feed line immediately after shutting down machine. Failure Mode 7: Machine Shutdown Due to Excessive Power Consumption During Startup Discharge chute clogged Clear discharge chute of all accumulated solids. Failure Mode 8: Excessively High Main Bearing Temperature Insufficient lubrication Lubricate bearings (refer to Preventive Maintenance). Excessive grease Remove grease fitting, and direct jet of filtered compressed air to remove grease. Failure Mode 8: Excessively High Main Bearing Temperature (Cont’d) Incorrect grease Lubricate with recommended grease (refer to Preventive Maintenance). Defective bearings Replace rotating assembly (refer to Rotating Assembly Maintenance). 31 Dec 13 5-19 DE-7200VFDCentrifuge MAINTENANCE TROUBLESHOOTING DE-7200 VFD CENTRIFUGE Possible Cause Isolation Procedure & Corrective Action Failure Mode 9: Purge System Purges Correctly, But Alarm Goes On At End Of Purge Interval And Purge Cycle Is Repeated Actual cabinet pressure below setting of minimum pressure sensor Check cabinet for leakage and correct any defects. Leakage compensation valve setting to low, causing repurge to occur Increase cabinet pressure by turning leakage compensation valve adjustment counter-clockwise. Contact Derrick for assistance if problem is not corrected. Failure Mode 10: Purging Indicator Does Not Become Amber During Purging Low air pressure Check that air supply line is at least 3/4” (12mm). Replace line if undersize. Check for stable air pressure of 60-115psi (4-8barg). Raise air pressure if low. Excessive leakage from cabinet Check for leakage at cabinet door gasket and at all potential sources of leakage. Maximum permissible leakage is 2.5cfm. Correct as required. Tube between relief valve and flow sensor not air tight Check that coupling nuts are tight and tube is undamaged. Correct as required. Failure Mode 11: Purge System Fails To Turn On Power After Purge Time Has Elapsed No power to system Check and correct power loss. Main power contactor turned off Switch on contactor. Blown fuse Check and replace fuse(s) if blown. Incorrect purge time Check timer setting, and reset to minimum available purge time. Re-check system operation at new setting. If system functions properly, return purge time to original setting. If system fails to close switch, contact Derrick for assistance. Failure Mode 12: Purge System Relief Valve Remains Open Or Opens Intermittently Leakage compensation valve out of adjustment causing high cabinet pressure Adjust leakage compensation valve by turning adjustment clockwise to reduce pressure. Debris on relief valve disk, allowing air leakage Remove relief valve cover, and clean valve disk as required. If necessary to remove disk and spring from relief valve, mark location of disk before removal to ensure proper installation. If cleaning disk fails to eliminate problem, contact Derrick for assistance. 5-20 DE-7200VFDCentrifuge 31 Dec 13 MAINTENANCE TROUBLESHOOTING DE-7200 VFD CENTRIFUGE Possible Cause Isolation Procedure & Corrective Action Failure Mode 13: Air Conditioner Evaporator Fan Fails to Go On Poor electrical connection Shut down, lock out, and tag out electric power to centrifuge. Open control cabinet door, and locate fan at upper right. Remove eight screws securing fan to air conditioner housing, and separate fan from housing. While supporting fan, check that fan plugs are securely connected and that all leads are secure in connectors. Correct as required; continue troubleshooting if leads are secure. Fan motor bearings binding or seized With fan separated from air conditioner housing, unplug and remove fan. Check that fan rotates freely and no rubbing is detected. Replace fan if rubbing or binding is found. High temperature switch in motor winding defective Using an ohmmeter, check for continuity across two light gray motor leads of fan connector (Figures 5-10 and 5-13). If meter indicates an open circuit, verify that leads are securely connected; correct as needed. If connections are secure, replace fan. 31 Dec 13 5-21 DE-7200VFDCentrifuge MAINTENANCE TROUBLESHOOTING (CONT’D) Figure 5-10. Air Conditioner Electrical Schematic Diagram 5-22 DE-7200VFDCentrifuge 31 Dec 13 MAINTENANCE Figure 5-11. Air Conditioner Electrical Schematic Diagram - 230Vac RTD Sensing 31 Dec 13 5-23 DE-7200VFDCentrifuge MAINTENANCE Figure 5-12. Air Conditioner Electrical Schematic Diagram - 24Vdc RTD Sensing 5-24 DE-7200VFDCentrifuge 31 Dec 13 MAINTENANCE Figure 5-13. Air Conditioner Electrical Components Locations ALARM AND FAULT MESSAGES Intervention is required if a control panel message appears to alert the operator that an anomaly has occurred. Alarm messages signify that the prevailing condition must be corrected or the centrifuge may be shut down automatically. Fault messages inform the operator that a failure requiring automatic shutdown has occurred. Refer to the following table for alarm and fault messages and their causes and corrective actions for assistance in analyzing messages. ALARM AND FAULT MESSAGES Cause Corrective Action F1000 - Bowl Exceeded Maximum Speed, Shutdown Incorrect or loose connection at speed sensor or defective speed sensor Check speed sensor connection (refer to Section 3). Replace sensor if defective. Bowl VFD malfunction If problem persists, contact Derrick Service for assistance. 31 Dec 13 5-25 DE-7200VFDCentrifuge MAINTENANCE ALARM AND FAULT MESSAGES Cause Corrective Action F1001 - Bowl High Torque Alarm, Reduce Feed Rate Bowl torque exceeds pre-set limit Reduce feed rate and/or reduce bowl speed. F1002 - Bowl High Torque Fault and Shutdown, Perform Cleanout and Reduce Feed Rate Bowl torque exceeds pre-set limit After bowl has stopped rotating, perform cleanout procedure to remove solids buildup, and re-start centrifuge at reduced feed rate. F1010 - Bowl VFD Communications Error Communication lost between bowl VFD and PLC Confirm that green LED next to Ethernet cable on Ethernet switch is lighted, indicating that hub is functional. Check connections between bowl VFD and PLC, and correct any defects. Replace bowl VFD communication module, if no other defect is found. F1011 - Bowl VFD Alarm, Ref Troubleshooting Section of User Manual Bowl VFD alarm Identify alarm from operator control panel. Perform indicated corrective action. F1012 - Bowl VFD Fault and Shutdown, Ref Troubleshooting Section of User Manual Bowl VFD fault Identify fault from operator control panel. Perform indicated corrective action. F1013 - Bowl VFD Ground Warn Alarm, Ref Troubleshooting Section of User Manual Bowl VFD has detected high current leakage to ground Check condition of cable and all connections between bowl VFD and bowl motor, and correct any defects. F1014 - Bowl VFD In Phase Loss Alarm, Ref Troubleshooting Section of User Manual Bowl VFD has detected unbalance or partial loss of input three-phase power Check wiring between VFD and supply source; correct defect(s). Check supply power, and correct any defects. F1015 - Bowl VFD Power Loss Alarm, Ref Troubleshooting Section of User Manual Incoming power loss or low voltage supply Check incoming power and correct any defect(s). F1016 - Bowl VFD Undervoltage Alarm, Ref Troubleshooting Section of User Manual Incoming power loss or low voltage supply 5-26 DE-7200VFDCentrifuge Check incoming power and correct any defect(s). 31 Dec 13 MAINTENANCE ALARM AND FAULT MESSAGES Cause Corrective Action F1017 - Bowl VFD Drive OL Alarm, Ref Troubleshooting Section of User Manual Feed rate causing overload Reduce feed rate or reduce bowl speed. Bowl drive motor drawing excessive current Replace motor if defective. F1021 - Bowl Motor Thermal Overload Check Bowl Motor Temperature and Thermistor Bowl drive motor shut down due to high temperature or defective thermistor in motor winding Check motor temperature. Allow motor to cool, and then check for continuity across thermistor leads. If open circuit is found, replace motor. Bad connection(s) Check connections at TB2-7 and 8, at transmitter/intrinsic barrier, and at conveyor VFD. Correct as required. Replace motor if no defects are found. F2000 - Conveyor Clutch Tripped, Allow Centrifuge to Stop Completely, then Reset Clutch Conveyor torque has exceeded pre-set limit causing clutch to trip Allow bowl to come to a complete standstill, and then reset clutch as described under Automatic Shutdown in Section 4. F2001 - Conveyor High Torque Alarm, Reduce Feed Rate Conveyor torque exceeds pre-set limit Reduce feed rate and/or increase differential speed. F2002 - Conveyor High Torque Fault and Shutdown, Perform Cleanout and Reduce Feed Rate Conveyor torque exceeds pre-set limit After bowl has stopped rotating, perform cleanout procedure to remove solids buildup, and re-start centrifuge at reduced feed rate and/or higher differential speed. F2010 - Conveyor VFD Communications Error Communication lost between conveyor VFD and PLC Confirm that green LED next to Ethernet cable on Ethernet switch is lighted, indicating that hub is functional. Check connections between conveyor VFD and PLC, and correct any defects. Replace conveyor VFD communication module, if no other defect is found. F2011 - Conveyor VFD Alarm, Ref Troubleshooting Section of User Manual Conveyor VFD alarm 31 Dec 13 Identify alarm from operator control panel. Perform indicated corrective action. 5-27 DE-7200VFDCentrifuge MAINTENANCE ALARM AND FAULT MESSAGES Cause Corrective Action F2012 - Conveyor VFD Fault and Shutdown, Ref Troubleshooting Section of User Manual Conveyor VFD fault Identify fault from operator control panel. Perform indicated corrective action. F2013 - Conveyor VFD Ground Warn Alarm, Ref Troubleshooting Section of User Manual Conveyor VFD has detected high current leakage to ground Check condition of cable and all connections between conveyor VFD and conveyor motor, and correct any defects. F2014 - Conveyor VFD In Phase Loss Alarm, Ref Troubleshooting Section of User Manual Conveyor VFD has detected unbalance or partial loss of input three-phase power Check wiring between VFD and supply source; correct defect(s). Check supply power, and correct any defects. F2015 - Conveyor VFD Power Loss Alarm, Ref Troubleshooting Section of User Manual Incoming power loss or low voltage supply Check incoming power, and correct any defect(s). F2016 - Conveyor VFD Undervoltage Alarm, Ref Troubleshooting Section of User Manual Incoming power loss or low voltage supply Check incoming power, and correct any defect(s). F2021 - Conveyor Motor Thermal Overload Check Conveyor Motor Temperature and Thermistor Conveyor drive motor shut down due to high temperature or defective thermistor in motor winding Check motor temperature. Allow motor to cool, and then check for continuity across thermistor leads. If open circuit is found, replace motor. Bad connection(s) Check connections at TB2-5 and 6, at transmitter/intrinsic barrier, and at conveyor VFD. Correct as required. Replace motor if no defects are found. F3001 - Pump Shutdown or Will Not Start Due to Dry Run Protection Alarm Low tank level Check and re-fill feed tank sufficiently to close low level switch. F3002 - Flow Meter Flow Detection Error, Feed Pump has Shutdown Insufficient pump output detected 5-28 DE-7200VFDCentrifuge Check and re-fill feed tank sufficiently. Verify that control valves (if any) are open to allow material to flow. 31 Dec 13 MAINTENANCE ALARM AND FAULT MESSAGES Cause Corrective Action F3010 - Pump VFD Communications Error Communication lost between pump VFD and PLC Confirm that green LED next to Ethernet cable on Ethernet switch is lighted, indicating that hub is functional. Check connections between pump VFD and PLC, and correct any defects. Replace pump VFD, if no other defect is found. F3011 - Pump VFD Alarm, Ref Troubleshooting Section of User Manual Pump VFD alarm Identify alarm from operator control panel. Perform indicated corrective action. F3012 - Pump VFD Fault, Ref Troubleshooting Section of User Manual Pump VFD fault Identify fault from operator control panel. Perform indicated corrective action. F3013 - Pump VFD Ground Warn Alarm, Ref Troubleshooting Section of User Manual Pump VFD has detected high current leakage to ground Check condition of cable and all connections between pump VFD and pump motor, and correct any defects. F3014 - Pump VFD In Phase Loss Alarm, Ref Troubleshooting Section of User Manual Pump VFD has detected unbalance or partial loss of input three-phase power Check wiring between VFD and supply source; correct defect(s). Check supply power, and correct any defects. F3015 - Pump VFD Power Loss Alarm, Ref Troubleshooting Section of User Manual Incoming power loss or low voltage supply Check incoming power and correct any defect(s). F3016 - Pump VFD Undervoltage Alarm, Ref Troubleshooting Section of User Manual Incoming power loss or low voltage supply Check incoming power and correct any defect(s). F3017 - Pump VFD Drive OL Alarm, Ref Troubleshooting Section of User Manual Pump drive motor drawing excessive current 31 Dec 13 Replace motor, if defective, or remove other cause of excessive current draw. Perform autotune of pump motor/drive. 5-29 DE-7200VFDCentrifuge MAINTENANCE ALARM AND FAULT MESSAGES Cause Corrective Action F3021 - Pump Motor Thermal Overload Check Pump Motor Temperature and Thermistor Pump drive motor shut down due to high temperature or defective thermistor in motor winding Check motor temperature. Allow motor to cool, and then check for continuity across thermistor leads. If open circuit is found, replace motor. Bad connection(s) Check connections at TB2-3 and 4, at transmitter/intrinsic barrier, and at pump VFD. Correct as required. Replace motor if no defects are found. F3022 - Pump Bearing/Stator Thermal Overload Check Pump Bearing Temperature and Stator Pump drive motor shut down due to high bearing temperature or high temperature in stator winding Check motor bearing temperature. Allow motor to cool, and then check for continuity across stator thermistor leads. If open circuit is found, replace motor. Bad connection(s) Check connections at TB2-3 and 4, at transmitter/intrinsic barrier, and at pump VFD. Correct as required. Replace motor if no defects are found. F3030 - Pump Motor FLA Download to VFD Failed Pump motor FLA download was not successfully completed Repeat pump motor data download procedure. Verify that pump drive is on line and stopped. F3031 - Pump Motor Power Download to VFD Failed Pump motor power download was not successfully completed Repeat pump motor data download procedure. Verify that pump drive is on line and stopped. F3032 - Pump Motor Power Units Download to VFD Failed Pump motor power units download was not successfully completed Repeat pump motor data download procedure. Verify that pump drive is on line and stopped. F4001 - Centrifuge Start Disable - Allow Bowl to Stop Completely, View Alarm History for Additional Fault Conditions Restart aborted due to bowl rotation during restart attempt Wait for bowl to fully stop, check for and clear all faults, and verify that bowl is at complete standstill. Restart centrifuge. F4002 - Clean Out Over Torque Fault Excessive torque has caused clean out procedure to abort 5-30 DE-7200VFDCentrifuge Attempt to clear using Manual Cleanout procedure in this section. If unsuccessful, connect a liquid supply line to flush fitting to dilute process material, and reattempt Manual Cleanout. If still unsuccessful, with bowl at complete standstill, open cover and remove excessive process material. 31 Dec 13 MAINTENANCE ALARM AND FAULT MESSAGES Cause Corrective Action F4003 - Liquid End Main Bearing High Temperature Alarm Incorrect or loose connection at temperature sensor If reading is constantly about 392°F (200°C), check and correct connection (refer to Section 3 and electrical schematic diagram in Section 8). Insufficient bearing lubrication Lubricate bearings (refer to Preventive Maintenance). Excess grease Remove grease fitting, and direct jet of filtered compressed air into opening to remove grease. Incorrect grease Lubricate with recommended grease (refer to Preventive Maintenance). Defective bearing Contact Derrick Service department for assistance. F4004 - Liquid End Main Bearing High Temperature Fault and Shutdown Insufficient bearing lubrication Lubricate bearings (refer to Preventive Maintenance). Excess grease Remove grease fitting, and direct jet of filtered compressed air into opening to remove grease. Incorrect grease Lubricate with recommended grease (refer to Preventive Maintenance). Defective bearing Contact Derrick Service department for assistance. F4005 - Solid End Main Bearing High Temperature Alarm Incorrect or loose connection at temperature sensor If reading is constantly about 392°F (200°C), check and correct connection (refer to electrical schematic diagram in Section 8). Insufficient bearing lubrication Lubricate bearings (refer to Preventive Maintenance). Excess grease Remove grease fitting, and direct jet of filtered compressed air into opening to remove grease. Incorrect grease Lubricate with recommended grease (refer to Preventive Maintenance). Defective bearing Replace rotating assembly (refer to Rotating Assembly Maintenance). 31 Dec 13 5-31 DE-7200VFDCentrifuge MAINTENANCE ALARM AND FAULT MESSAGES Cause Corrective Action F4006 - Solid End Main Bearing High Temperature Fault and Shutdown Insufficient bearing lubrication Lubricate bearings (refer to Preventive Maintenance). Excess grease Remove grease fitting, and direct jet of filtered compressed air into opening to remove grease. Incorrect grease Lubricate with recommended grease (refer to Preventive Maintenance). Defective bearing Contact Derrick Service department for assistance. F7011 - Air Conditioner Compressor Motor Overload Fault Motor drawing excessive current Confirm proper operation of relays K20 and K30 and adequacy of three-phase power supply. Check all electrical connections. Correct any defects. F7012 - Air Conditioner Internal Fan Motor Overload Fault Motor drawing excessive current Confirm proper operation of relays K20 and K30 and adequacy of three-phase power supply. Check all electrical connections. Correct any defects. F7013 - Air Conditioner Refrigerant Pressure High or Low Fault Refrigerant pressure high or low Attempt to re-start centrifuge. Low pressure will cause immediate shutdown or failure to start; high pressure will permit brief operation and then automatic shutdown. If low pressure indicated, contact Derrick Service for assistance. If high pressure indicated, continue troubleshooting. Condenser motor rotation incorrect or motor defective Check rotation direction, and reverse, if necessary, by switching two leads. Condenser cooling fins clogged Use vacuum cleaner to remove all debris from fins. Condenser motor defective Check motor, and replace if defective. If problem persists, contact Derrick Service for assistance. F7021 - Electrical Enclosure High Temperature Alarm Control cabinet interior temperature has exceeded alarm setpoint Check status/operation of air conditioner; repair or replace if defective. Reduce load by decreasing bowl, conveyor differential speed, and/or pump feed rate. 5-32 DE-7200VFDCentrifuge 31 Dec 13 MAINTENANCE ALARM AND FAULT MESSAGES Cause Corrective Action F7022 - Electrical Enclosure High Temperature Fault and Shutdown Control cabinet interior temperature has exceeded alarm setpoint Check status/operation of air conditioner; repair or replace if defective. Reduce load by decreasing bowl, conveyor differential speed, and/or pump feed rate. Interior temperature of control cabinet too high, causing shutdown Check that air conditioner is operating; repair or replace, as indicated. Inspect cabinet interior, and remove cause of high temperature, if any. Re-start centrifuge after removing cause of high temperature. F7031 - Enclosure Temperature Sensor Error Control cabinet interior temperature sensor not functioning Check sensor and connection. Correct any wiring defects, and replace sensor if defective. F8001 - Emergency Stop Switch Activated, Shutdown EMERGENCY STOP initiated Remove cause for emergency stop, pull out EMERGENCY STOP, and then re-start centrifuge. F8002 - Emergency Stop Switch or Belt Guard Sensor Trip EMERGENCY STOP initiated or belt guard removed or not secure Check and secure belt guard, pull out EMERGENCY STOP, and then re-start centrifuge. F8003 - High Vibration Fault and Shutdown, Correct Problem and Press Reset Button Rotating assembly unbalanced or mechanical looseness Rotating assembly overloaded or clogged, bearing failure, conveyor wear, or loose pillow block bolts producing out-of-balance condition. Remove cause of excessive vibration and re-start centrifuge. F8004 - High Vibration Switch or Bowl Cover Sensor Trip Case cover not secure Check and secure cover, and re-start centrifuge. Rotating assembly unbalanced or mechanical looseness Rotating assembly overloaded or clogged, bearing failure, conveyor wear, or loose pillow block bolts producing out-of-balance condition. Remove cause of excessive vibration and re-start centrifuge. F9010 - Control Program Downloaded from Memory Card to Controller Re-loading of PLC program from memory card completed Start centrifuge, and resume operation. F9011 - Controller Internal Battery Low, Replace PLC battery low 31 Dec 13 Replace battery. 5-33 DE-7200VFDCentrifuge MAINTENANCE ALARM AND FAULT MESSAGES Cause Corrective Action F9012 - External Communication Loss, Switched to Local Control Profibus not working, remote control is disabled and control has automatically switched to local Check and correct any defects in Profibus connections, and attempt to re-start in Remote operating mode. F9021 - Signal Loss - Bowl Speed Sensor Intrinsic Barrier Minimum analog signal from transmitter/intrinsic barrier not received by PLC Check all connections at transmitter/intrinsic barrier; replace transmitter if all connections are secure. F9022 - Signal Loss - Bowl Speed Sensor or Cable Incorrect or loose connection at speed sensor or defective speed sensor Check sensor connections; replace sensor if defective. Defective speed sensor transmitter/intrinsic barrier Check and replace transmitter/intrinsic barrier, if defective. Pump VFD fault Identify fault from operator control panel. Perform indicated corrective action. F9031 - Signal Loss - Clutch Speed Sensor Intrinsic Barrier Minimum analog signal from transmitter/intrinsic barrier not received by PLC Check all connections at transmitter/intrinsic barrier; replace transmitter if all connections are secure. F9032 - Signal Loss - Bowl Speed Sensor or Cable Incorrect or loose connection at speed sensor or defective speed sensor Check sensor connections; replace sensor if defective. Defective speed sensor transmitter/intrinsic barrier Check and replace transmitter/intrinsic barrier, if defective. Pump VFD fault Identify fault from operator control panel. Perform indicated corrective action. F9041 - Signal Loss - Liquid End Bearing Temp Intrinsic Barrier Minimum analog signal from transmitter/intrinsic barrier not received by PLC Check all connections at transmitter/intrinsic barrier; replace transmitter if all connections are secure. F9051 - Signal Loss - Solid End Bearing Temp Intrinsic Barrier Minimum analog signal from transmitter/intrinsic barrier not received by PLC 5-34 DE-7200VFDCentrifuge Check all connections at transmitter/intrinsic barrier; replace transmitter if all connections are secure. 31 Dec 13 MAINTENANCE ALARM AND FAULT MESSAGES Cause Corrective Action F9099 - Centrifuge Sensor I/O Cable Has Been Removed, Reconnect I/O Cable to Run Centrifuge Sensor cable is disconnected from control cabinet receptacle Plug in connector at upper left of cabinet, and then re-start centrifuge. VFD ALARM AND FAULT CROSS REFERENCES In addition to alarm and fault messages that may appear on the operator control panel, in case of equipment malfunction alarm and fault numbers may appear directly on the VFD screens. An alarm is a condition that, if neglected, may stop the drive. A fault is a condition that stops the drive. The following tables list these alarm and fault numbers and the corresponding text. This information is useful for operators and Derrick personnel to diagnose equipment malfunctions. To expedite troubleshooting, record the code number before calling for service and then relay this information to the service engineer. ALARM CROSS REFERENCE No. Alarm No. Alarm No. Alarm 1 Precharge Active 14 Load Loss 27 Speed Ref Cflct 2 UnderVoltage 15 Ground Warn 28 Ixo Vlt Rang 3 Power Loss 17 Dig In ConflictA 29 Sleep Config 4 Start At PowerUp 18 Dig In ConflictB 30 TB Man Ref Cflct 5 Analog In Loss 19 Dig In ConflictC 31 PTC Conflict 6 IntDBRes OvrHeat 20 BiPolar Conflict 32 Brake Slipped 8 Drive OL Level 1 21 Motor Type Cflct 33 AdjVoltRef Cflct 9 Drive OL Level 1 22 NP Hz Conflict 34 Home Not Set 10 Decel Inhibt 23 MaxFreq Conflict 49 Torq Prove Cflct 11 Waking 24 VHz Neg Slope 50 Prof Step Cflct 12 Motor Thermistor 25 IR Volts Range 52 PI Config Cflct 13 In Phase Loss 26 FluxAmpsRef Rang 31 Dec 13 5-35 DE-7200VFDCentrifuge MAINTENANCE FAULT CROSS REFERENCE No. Fault No. Fault No. Fault 2 Auxiliary Input 38 Phase U to Grnd 81-85 Port 1-5 DPI Loss 3 Power Loss 39 Phase V to Grnd 87 IXo VoltageRange 4 UnderVoltage 40 Phase W to Grnd 88 Software Fault 5 OverVoltage 41 Phase UV Short 89 Software Fault 7 Motor Overload 42 Phase VW Short 90 Encoder Quad Err 8 Heatsink OvrTemp 43 Phase UW Short 91 Encoder Loss 9 Trnsistr OvrTemp 48 Params Defaulted 92 Pulse In Loss 12 HW OverCurrent 49 Drive Powerup 93 Hardware Fault 13 Ground Fault 51 Flt QueueCleared 100 Parameter Chksum 15 Load Loss 52 Faults Cleared 101-103 UserSet Chksum 16 Motor Thermistor 55 Cntl Bd Overtemp 104 Pwr Brd Chksum1 17 Input Phase Loss 63 Shear Pin 105 Pwr Brd Chksum2 20 TorqProv Spd Band 64 Drive OverLoad 106 Incompat MCB-PB 21 Output PhaseLoss 69 DP Resistance 107 Replaced MCB-PB 24 Decel Inhibit 70 Power Unit 108 Anlg Cal Chksum 25 OverSpeed Limit 71-75 Port 1-5 Adapter 120 I/O Mismatch 28 See Manual 77 IR Volts Range 121 I/O Comm Loss 29 Analog In Loss 78 FluxAmpsRef Rang 122 I/O Failure 33 Auto Rstrt Tries 79 Excessive Load 130 Hardware Fault 36 SW OverCurrent 80 AutoTune Aborted 131 Hardware Fault CONTROL COMPONENT INDICATORS Various indicators are provided to display the operational status of components in the control cabinet. Figures 5-14 through 5-17 locate and define the indications shown on these components. Where applicable, corrective actions are included to assist the operator in fault analysis. Dangerously high voltage is present in the control cabinet. Since opening the control cabinet door and bypassing the cabinet purge system is required to check the indicators, only trained, qualified personnel should be permitted to perform these procedures. Use extreme caution to ensure that the surrounding atmosphere is free of hazardous fumes before opening the cabinet door and bypassing the purge system. HIGH VOLTAGE! ONLY TRAINED, QUALIFIED PERSONNEL SHOULD BE PERMITTED TO OPEN CONTROL CABINET DOOR WHILE POWER IS APPLIED. EXPLOSION HAZARD! BE CERTAIN THAT SURROUNDING ATMOSPHERE IS CLEAR OF ALL POTENTIALLY EXPLOSIVE GASES BEFORE OPENING CONTROL CABINET DOOR. 5-36 DE-7200VFDCentrifuge 31 Dec 13 MAINTENANCE Figure 5-14. VFD Indicators 31 Dec 13 5-37 DE-7200VFDCentrifuge MAINTENANCE Figure 5-15. PLC Indicators 5-38 DE-7200VFDCentrifuge 31 Dec 13 MAINTENANCE CONTROL COMPONENT INDICATORS (CONT’D) Figure 5-16. Transmitter/Intrinsic Barrier Indicators Figure 5-17. Power Supply Indicators 31 Dec 13 5-39 DE-7200VFDCentrifuge SECTION 8 - REFERENCE DRAWINGS This section contains Derrick engineering drawings for your equipment. These drawings are included to provide assistance in troubleshooting, repair, and parts ordering. Number Title 16590-00-003 General Arrangement - XP Centrifuge 16590-00-004 General Arrangement - Non-XP Centrifuge 16601-00-001 Base Parts List 16602-00-001 Case and Cover Parts List 16603-00-001 Bowl Parts List 16604-00-001 Conveyor Parts List 16605-00-001 Belt Guard Parts List 14394-00-007 Electrical Wiring Schematic - 460/480V 60 Hz Non-XP Centrifuge 14394-00-009 Electrical Wiring Schematic - 460/480V 60 Hz XP Centrifuge 14394-00-011 Electrical Wiring Schematic - 380/400V 50Hz XP Centrifuge 14394-00-012 Electrical Wiring Schematic - 575/600V 60 Hz XP Centrifuge 14394-00-013 Electrical Wiring Schematic - 380/400V 50Hz Non-XP Centrifuge 16606-00-001 Feed Component Assembly 16618-00 Junction Box Assembly 16621-00 Drive Components Parts List 16593-00-002 Base Sensor System Parts List 16798-00 Repair Tool Kit 16607-00 XP Electrical Control Panel 16472-00-002 Control Enclosure Assembly, 460/480V 60 Hz XP Centrifuge 16472-00-003 Control Enclosure Assembly, 380/400V 50 Hz XP Centrifuge 16472-00-004 Control Enclosure Assembly, 575/600V 60 Hz XP Centrifuge 16472-00-005 Control Enclosure Assembly, 460/480V 60Hz Non XP Centrifuge 01 Sep 11 1-1 DE-7200VFDCentrifuge D C B A QTY X 1 1 1 1 1 1 1 1 1 1 1 1 1 1 1 1 1 1 1 1 1 1 1 2 1 3 2 1 1 3 3 1 6 8 1 2 2 2 6 3 1 1 2 PART NUMBER 16472-01-002 16396-01-008 16400-01-003 16401-01-002 16402-01-001 16404-01-004 16404-02-004 16404-03-004 16404-01-003 16405-01 16597-01 16598-01 G0002881 16403-01 17006-01 15197-01-003 G0007573 G0007690 G0007689 G0007588 G0002603 G0002604 16607-02 G0008966 G0008891 G0008941 G0008942 G0007213 G0005309 G0007221 G0007698 G0007223 G0007998 G0008507 G0008562 G0009839 G0007214 G0007224 G0007225 G0007631 G0007632 G0007645 G0009286 17325-01 45 2 17244-02 46 47 48 49 50 51 52 53 54 55 56 57 58 59 60 61 62 63 64 65 66 67 68 69 70 71 72 73 74 75 76 77 78 79 80 81 82 83 84 85 86 87 88 89 90 91 92 93 94 95 96 97 98 99 100 101 102 103 104 105 106 107 108 109 110 111 112 113 114 115 116 117 118 119 120 121 122 123 124 125 1 1 1 1 1 1 2 1 1 1 1 1 1 1 1 1 1 1 1 1 2 2 1 1 1 2 1 1 2 3 1 1 1 8 2 1 1 G0007999 G0007231 G0007228 G0003552 G0003504 G0003494 G0002910 G0002911 G0007976 17006-02 G0008000 G0008001 G0008002 G0007338 G0007650 G0008010 G0007244 G0005325 G0007865 G0008006 IMP-116B-02X02 G0004679 G0003565 NPLE-50X200S-4 G0002300 G0002716 G0002714 G0009927 G0008003 G0008004 G0008009 15181-01-001 G0004364 G0008007 G0012883 G0007846 G0007848 7 DESCRIPTION ASSEMBLY COMPLETE ENCLOSURE ASSEMBLY DOOR ASSEMBLY COVER ASSEMBLY STAND ASSEMBLY COMPONENT PANEL (UPPER) COMPONENT PANEL (LOWER) COMPONENT PANEL (BOTTOM) COMPONENT MOUNT ASSY DISPLAY SCREEN MOUNT ENCLOSURE MOUNTING BRACKET AIR FILTER MOUNTING BRACKET AIR CONDITIONER, 12,000 BTU/HR 460/60/3 A/C SUPPORT ANGLE INDUSTRIAL MOUSE W/CABLE INLET CONE EXTENSION DRIVE, 150 HP 460VAC 60 HZ DRIVE, 60 HP 460VAC 60 HZ DRIVE, 30 HP 460VAC 60 HZ AIR CONDITIONER COOLING MOTOR FAN WHEEL, 8" BACKWARD CURVED INLET CONE EX-PROOF ENCLOSURE BLOCK,PWR DISTR-4 POLE (1)#4-500MCM BLOCK,PWR DISTR-3 POLE 2/0-#14 POWER DIST. BLOCK, INCOMING POWER DIST. BLOCK COVER GROUND LUG, INCOMING GROUND BUS BAR, INCOMING 7PT FUSE BLOCK, 60 AMP 3P CLASS J FUSE, 60 AMP CLASS J FUSE COVER, INDICATING DIN RAIL, 35MM X 5 1/2 TERMINAL BLOCK END BARRIER - 6mm TERMINAL BLOCK GREY 4PT TERMINAL BLOCK JUMPER FUSE BLOCK, 30 AMP 3P CLASS CC FUSE BLOCK, 200 AMP 1P CLASS J FUSE, 150 AMP CLASS J TYPE HSJ FUSE HOLDER, 400 AMP 1P CLASS T FUSE, 225 AMP CLASS T DIN RAIL, 35MM X 5 BARRIER, INTRINSIC SAFE-VIBR SWITCH+E-STOP BARRIER, INTRINSIC SAFE-RTD SENSOR-PROGRAMMED BARRIER, INTRINSIC SAFE-SPEED SENSOR-PROGRAMMED DIN RAIL, 35MM X 16 ETHERNET SWITCH, 6 PORT PLC, COMPACTLOGIX PROCCESSOR POWER SUPPLY, 24VDC, 5 AMP SURGE SUPPRESSOR, 120V 60HZ TRANSFORMER, 500VA, 460V PRI/120V SEC FUSE, TIME DELAY 2.5A 600VAC FUSE, TIME DELAY 7.0A 250VAC OPERATOR INTERFACE - 120VAC PROGRAMMED USB CABLE ASSEMBLY WIRE DUCT, 1/2 X 2 X 6 WIRE DUCT, 1/2 X 2 X 10 1/2 WIRE DUCT, 1/2 X 2 X 33 1/8 WIRE DUCT, 1/2 X 2 X 30 3/4 WIRE DUCT, 1/2 X 2 X 28 7/8 WIRE DUCT, 1/2 X 2 X 34 3/8 NAMEPLATE, EMERGENCY STOP BUTTON, EMERGENCY STOP PURGE UNIT W/RELIEF VALVE RELIEF VALVE (SERIAL # OF PURGE REQUIRED) 1/8 90 DEG STREET ELBOW, BRASS 1/8 X 3/16 HOSE BARB AIR FILTER, DX 1/2 X 2 PIPE NIPPLE, SST AIR FILTER, BX 1/2 X 1 1/2 PIPE NIPPLE, SST 1/2 90 DEG ELBOW, SST AIR REGULATOR 1/2 90 DEG STREET ELBOW, BRASS 1/2 X 1/2 HOSE BARB AIR HOSE DISPLAY SCREEN PROTECTIVE COVER O-RING, PROTECTIVE COVER 1/4-20 SEALING PAN HEAD SCREW 2 1/2" CORD FITTING CONNECTOR HOUSING INSERT TERMINAL, FEMALE 6 ITEM 126 127 128 129 130 131 132 133 134 135 136 137 138 139 140 141 142 143 144 145 146 147 QTY 1 1 1 2 2 1 2 1 1 1 1 1 1 1 1 1 1 1 1 1 1 1 PART NUMBER TBS2535 CRH-EL296 G0009972 G0008563 G0002711 G0008349 G0009324 G0009974 17420-01 G0009291 G0012168 G0012122 S4PE-EL-100 G0012167 G0012166 G0009864 G0009863 G0008571 G0008544 G0013391 G0009340 PP1290 5 4 DESCRIPTION CORD FITTING, 3/4" CORD FITTING, 90 DEGREE SENSOR CABLE TERMINAL BLOCK-4 COND. ORANGE 1/2" CORD FITTING PLC BATTERY TERMINAL BLOCK-4PT COND. YELLOW/GRN SENSOR, RTD A/C THERMOSTAT MOUNTING BRACKET A/C EVAPORATOR FAN (REPLACEMENT PART ONLY) COVER, WATER/DUST VALVE,CHECK 1" NPT FEMXFEM BRASS ELBOW,PIPE-1" FPT 90DEG 150# 304 SS NIPPLE, PIPE-1"XCLOSE SCHED40 304SS ARRESTOR, SPARK UNIV SST TUBE 6MM X 12" LONG ELBOW, 1/8" QUICK CONNECT TERMINAL BLOCK GROUND-GREEN 2 PT TERMINAL BLOCK BARRIER-ORANGE 2 PT 1/2" LOCKNUT 1/2" SEALING GASKET 1/2" INSUL. BUSHING 3 2 16 D 13 57 10 55 49 11 50 118 117 48 60 62 59 SPECIAL TOOL: PURGE PRESSURE MEASURING KIT-G0008378 43 45 06 101 34 63 44 42 81 134 133 82 76 58 138 139 74 73 72 69 03 137 86 71 35 136 140 77 36 116 115 37 13 40 61 C 14 07 02 05 27 130 26 41 28 08 88 29 24 30 32 25 31 108 74 64 66 21 76 22 20 56 53 75 67 65 113 68 51 132 12 47 79 15 52 B 13 1 G0007851 CONNECTOR COVER, HOUSING 8 1 1 2 35 28 13 G0008005 11881-01-025 17382-01-001 16627-01-001 G0007252 PAN-TM3S10-C G0003519 DOOR LATCH XP CABLE ASSEMBLY CORD ASSEMBLY, 20 AWG CABLE ASSEMBLY WIRE DUCT FASTENER MOUNT WIRE SADDLE, SMALL WIRE SADDLE, MEDIUM 1 1 1 1 1 2 2 6 2 1 1 1 2 8 4 G0007951 G0007952 G0007953 G0007954 G0007955 G0004970 G0007701 G0007633 G0007256 IMP-116B-04X04 CRH-ECD-284 G0008267 G0008892 G0008893 G0008890 ETHERNET CABLE X 8 1/2 (ETH SW-PLC) ETHERNET CABLE X 62 (ETH SW-PNL VIEW) ETHERNET CABLE X 84 (ETH SW-60HP) ETHERNET CABLE X 104 (ETH SW-150HP) ETHERNET CABLE X 178 (ETH SW-30HP) HANDLE,COVER LUG, CRIMP #6 AWG LUG, CRIMP #1 AWG LUG, CRIMP #2 AWG 1/4 90 DEG STREET ELBOW, BRASS 1/4 DRAIN PLUG 1/2 X 1/4 NPT HOSE BARB BLOCK,PWR DISTR-1 POLE 2/0-#14 W/ADDER COVER,DISTR BLOCK-FOR G0008891/8892 COVER,DISTR BLOCK-FOR G0008966 1 1 1 3 3 1 1 1 1 3 1 3 1 1 G0007995 G0002301 G0002302 G0008792 G0003493 G0007229 G0007230 G0002873 G0002874 SHPP-100 SHPP-150 SHPP-200 SHPP-250 G0007258 COMPACT FLASH MEMORY CARD AIR ELEMENT, DX (REPLACEMENT ONLY) AIR ELEMENT, BX (REPLACEMENT ONLY) FUSE, TIME DELAY-3.0 AMP CLASS CC FUSE, TIME DELAY-15 AMP CLASS CC PLC POWER SUPPLY PLC END BARRIER COVER, CONTROL TRANSFORMER FUSE PULLER, CONTROL TRANFORMER 1" NPT PLUG 1 1/2" NPT PLUG 2" NPT PLUG 2 1/2" NPT PLUG REDUCER, 3" TO 2" NPT 23 12 11 10 9 86 8 13 45 54 45 7 UPDATED DESCRIPTION OF ITEM 45, OMITTED ITEM 95, WAS G0009727, CHANGES PER ELECT. ENG. DEPT. ITEM 35 QTY WAS 7, ITEM 44 WAS G0007918, ITEM 80 WAS G0012883, ITEM 89 WAS G0004444, ITEM 90 WAS G0004418, ITEM 121 WAS QTY 2, ITEM 128 WAS G0009272, ITEM 129 QTY WAS 8, ITEM 130 QTY WAS 1, ITEM 132 QTY WAS 3, ADDED ITEMS 141-147, REMOVE ITEMS 83,84,85,87 ITEM 02: 16396-01-008 WAS 16396-01-003 ITEM 95 WAS G0002967; 111 WAS G0002966; QTY ITEM 129 WAS 3; UPDATED DESCRIPTION OF 89,90;108 MODIFIED ITEMS 29 (WAS G0007610), 34 (WAS G0007012), 35 (WAS G0007216), 36 (WAS G0007237), 54 (WAS G0008825), 128 (WAS G0007868), 130 (WAS G0008572), 131 (WAS G0008544), 132 (WAS G0008571) AND 133 (WAS G0009973). CHANGED QTY ON ITEMS 90 (WAS 2), 129 (WAS 3) AND 132 (WAS 1). ADDED ITEMS 136-140 ITEM 16 WAS 15197-01-001 PER DRR#2563; ADDED ITEMS 133, 134, & 135; ITEM 73 WAS G0009927; ITEM 71 & 71 QTY WAS 1; ITEM 74 QTY WAS 2 ADDED ITEMS 117-132; ITEM 43 WAS G0007232; ITEM 44 WAS G0007233; ITEM 45 WAS G0007234. 6 114 70 5 129 4 3 2 91 17 18 ITEM 54 WAS G0007245; ITEM 24 WAS G0008261; ITEM 25 WAS G0008262; ITEM 26 WAS G0007210; ITEM 27 WAS G0007211; ITEM 109 WAS G0008264; ITEM 110 WAS G0008265; ITEM 111 WAS G0008266; ITEM 91 WAS 16627-01; ITEM 80 WAS G0003529. ITEM 15 WAS 16609-01; ITEM 55 WAS G0007863; ITEM 22 WAS 16622-01. ADDED ITEMS 112 THRU 116.ADDED NOTE ITEM 03 WAS 16400-01-001; QUANTITY WAS 5 ON ITEM 88. ITEM 30 WAS G0007217; ITEM 31 WAS G0007218; ADDED ITEMS. DESCRIPTION REVISION HISTORY 1 REV 89 GEOMETRIC CHARACTERISTIC SYMBOLS 38 80 39 105 19 107 09 FLATNESS c STRAIGHTNESS ROUNDNESS CYLINDRICITY PARALLELISM PERPENDICULARITY ANGULARITY RUNOUT POSITION CONCENTRICITY SYMMETRY TOLERANCES UNLESS SPECIFIED DEC MM (2) PLACE DEC. +/- .0100 +/- .254 (3) PLACE DEC. +/- .0050 +/- .127 (4) PLACE DEC. +/- .0002 +/- .005 106 13 REF WS 14394-00-009 ANGLES.............+/- .1 7 6 5 4 3 WS JWC 9/16/13 BJR 10/23/13 EJR DMM 10/8/12 7/10/12 JMB 4/11/12 BKS 8/5/11 DJK 5/5/2011 CCS 2/4/2010 CCS 12/18/2008 CCS CCS CCS 11/3/2008 5/12/2008 8/23/2007 CCS 8/13/2007 BY CK'D DATE THE DESIGNS AND INFORMATION CONTAINED ON THIS DRAWING OR COPIES REMAIN THE EXCLUSIVE PROPERTY OF DERRICK CORPORATION BUFFALO, NEW YORK U.S.A. AND ARE NOT TO BE REPRODUCED WITHOUT THE WRITTEN PERMISSION OF DERRICK CORPORATION. THE INFORMATION CONTAINED ON THIS DRAWING SHALL ONLY BE USED BY CUSTOMERS OR PROSPECTS OR THEIR AGENCIES IN THE ARRANGEMENT OR INSTALLATION OF DERRICK EQUIPMENT, OR BY VENDORS IN QUOTING ON OR IN THE SUPPLY OF PARTS OR ASSEMBLIES TO DERRICK, OR BY OTHERS FOR THE SPECIFIC REASON OUTLINE IN THE TRANSMITTAL WHETHER WRITTEN OR VERBAL. DRAWN R fjmonroe 4/11/2007 CHECKED CCSMITH QA 5/9/2007 DERRICK CORPORATION TITLE A CONTROL ENCLOSURE ASSEMBLY DE-7200 EX-PROOF 460/480/60/3 MFG APPROVED +/- .1 2 REV SIZE FC DWG NO D Y 16472-00-002 SCALE 1:10 DO NOT SCALE DRAWING 8 1 13 SHEET 1 1 OF 1 CENT,MAN,C-RM 8 ITEM 01 02 03 04 05 06 07 08 09 10 11 12 13 14 15 16 17 18 19 20 21 22 23 24 25 26 27 28 29 30 31 32 33 34 35 36 37 38 39 40 41 42 43 44 D C B A QTY X 1 1 1 1 1 1 1 1 1 1 1 1 1 1 1 1 1 1 1 1 1 1 2 1 1 6 2 2 6 1 1 2 2 1 1 1 1 1 1 1 1 1 1 1 1 1 1 1 1 1 1 2 2 1 1 1 2 1 1 2 3 1 1 1 8 8 1 2 2 1 1 1 1 1 1 1 1 1 1 1 1 2 2 1 3 2 2 7 2 1 3 2 2 2 2 3 1 1 3 3 3 1 1 1 1 1 35 28 13 2 8 4 1 1 1 1 4 1 1 1 1 1 1 7 DRAWING NUMBER 16472-01-003 16396-01-003 16400-01-003 16401-01-002 16402-01-001 16404-01-004 16404-02-004 16404-03-004 16404-01-003 16405-01 16597-01 16598-01 G0002881 16403-01 15197-01-003 G0009358 G0009359 G0009360 G0007588 G0002603 G0002604 16607-01 G0008941 G0007213 G0005309 G0007998 G0008507 G0007214 G0007224 G0007631 G0007645 G0009286 17325-01 17244-02 G0007999 G0007231 G0007228 G0003552 G0003504 G0008800 G0002911 G0007976 G0008000 G0008001 G0008002 G0007338 G0007650 G0008010 G0007244 G0005325 G0007865 G0008006 IMP-116B-02X02 G0004679 G0003565 NPLE-50X200S-4 G0002300 G0002716 G0002714 G0009927 G0008003 G0008004 G0008009 15181-01-001 G0004364 G0008007 G0008005 G0009753 G0002711 16627-01-001 G009767 G0007846 G0007848 G0008571 G0008544 17382-01-001 G0007851 DESCRIPTION ASSEMBLY COMPLETE ENCLOSURE ASSEMBLY DOOR ASSEMBLY COVER ASSEMBLY STAND ASSEMBLY COMPONENT PANEL (UPPER) COMPONENT PANEL (LOWER) COMPONENT PANEL (BOTTOM) COMPONENT MOUNT ASSEMBLY DISPLAY SCREEN MOUNT ENCLOSURE MOUNTING BRACKET AIR FILTER MOUNTING BRACKET AIR CONDITIONER, 12,000 BTU/HR 460/60/3 A/C SUPPORT ANGLE INLET CONE EXTENSION DRIVE, 150 HP 380VAC 50HZ DRIVE, 60 HP 380VAC 50HZ DRIVE, 30 HP 380VAC 50HZ AIR CONDITIONER COOLING MOTOR FANWHEEL, 8" BACKWARD CURVED INLET CONE EX-PROOF ENCLOSURE POWER DIST. BLOCK, INCOMING GROUND LUG, INCOMING GROUND BUS BAR, INCOMING DIN RAIL, 35MM X 5 1/2 TERMINAL BLOCK END BARRIER FUSE BLOCK, 30 AMP 3P CLASS CC FUSE BLOCK , 200 AMP 1P CLASS J FUSE HOLDER, 400 AMP 1P CLASS T DIN RAIL, 35MM X 5 BARRIER, INTRINSIC SAFE-VIBR SWITH + E-STOP BARRIER, INTRINSIC SAFE-RTD SENSOR-PROGRAMMED BARRIER, INTRINSIC SAFE-SPEED SENSOR DIN RAIL, 35MM X 16 ETHERNET SWITCH, 6 PORT PLC, COMPACTLOGIX PROCESSOR POWER SUPPLY, 24VDC 5 AMP SURGE SUPPRESSOR, 120V 60HZ TRANSFORMER, 500VA, 400V PRI/115V SEC FUSE, TIME DELAY-7.0A 250VAC OPERATOR INTERFACE-120VAC - PRPOGRAMMED WIRE DUCT, 1 1/2 X 2 X 6 WIRE DUCT, 1 1/2 X 2 X 10 1/2 WIRE DUCT, 1 1/2 X 2 X 33 1/8 WIRE DUCT, 1 1/2 X 2 X 30 3/4 WIRE DUCT, 1 1/2 X 2 X 28 7/8 WIRE DUCT, 1 1/2 X 2 X 34 3/8 NAMEPLATE, EMERGENCY STOP BUTTON, EMERGENCY STOP PURGE UNIT W/RELIEF VALVE RELIEF VALVE (SERIAL # OF PURGE REQUIRED) 1/8 90 DEG STREET ELBOW, BRASS 1/8 X 3/16 HOSE BARB AIR FILTER, DX 1/2 X 2 PIPE NIPPLE, SST AIR FILTER, BX 1/2 X 1 1/2 PIPE NIPPLE, SST 1/2 90 DEG ELBOW, SST AIR REGULATOR 1/2 90 DEG STREET ELBOW, BRASS 1/2 X 1/2 HOSE BARB AIR HOSE DISPLAY SCREEN PROTECTIVE COVER O-RING, PROTECTIVE COVER 1/4-20 SEALING PAN HEAD SCREW DOOR LATCH PLUG, M63 1/2" CABLE FITTING CABLE ASSEMBLY 2/O-4C GEXOL CABLE, GEXOL 16 AWG-6C (6FT) ASSY W/ XP GLAND CONNECTOR HOUSING INSERT TERMINAL, FEMALE TERMINAL BLOCK GOUND-GREEN 2 PT TERMINAL BLOCK BARRIER-ORANGE 2 PT CORD ASSY. 20 AWG CONNECTOR COVER, HOUSING IMP-116B-04X04 CRH-ECD-284 G0008267 17006-01 17006-02 G0008891 G0008892 G0008966 G0008942 G0012883 G0008563 G0008562 G0009324 G0009477 G0009476 G0009357 G0001651 G0007227 16894-01-002 G0009356 17306-01 G0009354 G0009530 G0008792 G0003493 G0007951 G0007952 G0007953 G0007954 G0007955 G0007252 PAN-TM3S10-C G0003519 G0004970 G0008893 G0008890 G0009753 G0007229 G0007230 G0007995 G0009563 G0002301 G0002302 G0002873 G0002874 NPLE-75 COND G0009972 1/4 90 DEG STREET ELBOW, BRASS 1/4 DRAIN PLUG 1/2 X 1/4 NPT HOSE BARB INDUSTRIAL MOUSE W/CABLE CABLE ASSEMBLY BLOCK, POWER DISTR-3 POLE 2/0#14 BLOCK, POWER DISTR-3 POLE 2/0 #14 W/ADDER BLOCK, POWER DISTR-4 POLE (1)#4-500MCM POWER DIST. BLOCK COVER 2 1/2" CORD FITTING TERMINAL BLOCK-4 COND ORANGE TERMINAL BLOCK-4 COND GREY TERMINAL BLOCK-4 COND YELLOW/GREEN FUSE BLOCK, 100A 600V 3P CLASS T FUSE, 90 AMP 600V CLASS T FUSE, 200 AMP 600V CLASS J FUSE, TIME DELAY-3-2/10 AMP CLASS CC MODULE, DIODE-DOUBLE-100 AMP JUMPER, BUS FUSE, 250 AMP 600V CLASS T STAND OFF, FUSE HOLDER FUSE BLOCK, 200 AMP 600V 3P CLASS T FUSE, 125 AMP 600V CLASS T FUSE, TIME DELAY-3.0 AMP CLASS CC FUSE, TIME DELAY-15 AMP CLASS CC ETHERNET CABLE X 8 1/2 (ETH SW-PLC) ETHERNET CABLE X 62 (ETH SW-PNL VIEW) ETHERNET CABLE X 84 (ETH SW-60HP) ETHERNET CABLE X 104 (ETH SW-150HP) ETHERNET CABLE X 178 (ETH SW-30HP) WIRE DUCT FASTENER MOUNT WIRE SADDLE, SMALL WIRE SADDLE, MEDIUM HANDLE, COVER COVER, DISTR BLOCK-FOR G0008891/8892 COVER, DISTR BLOCK FOR G0008966 STOPPING PLUG M 63 PLC POWER SUPPLY PLC END BARRIER COMPACT FLASH MEMORY CARD LUG, CRIMP-1 AWG #10 STUD AIR ELEMENT, DX (REPLACEMENT ONLY) AIR ELEMENT, BX (REPLACEMENT ONLY) COVER, CONTROL TRANSFORMER FUSE PULLER, CONTROL TRANSFORMER COND NIPPLE SENSOR CABLE 6 ITEM 126 127 128 129 130 131 132 133 134 135 136 137 138 139 140 141 142 143 144 145 146 147 148 QTY 1 3 1 1 1 1 1 1 3 1 1 3 3 1 1 1 1 1 1 1 1 1 1 DRAWING NUMBER G0008349 G0008449 G0007258 TBS2535 CRH-EL296 G0009974 17420-01 G0009291 G0008813 G0009197 G0008807 G0008451 G0008455 G0009467 G0009466 G0009751 G0009752 G0009568 G0009864 G0009863 G0013390 G0009340 PP1290 5 4 DESCRIPTION PLC BATTERY (REPLACEMENT ONLY) ADAPTER/REDUCER 1"- M25 REDUCER, 3" TO 2" NPT 3/4" CORD FITTING CORD FITTING, 90 DEG SENSOR, RTD A/C THERMOSTAT MOUNTING BRACKET A/C EVAPORATOR FAN STOPPING PLUG M25 ADAPTER/REDUCER 1.5"- M40 STOPPING PLUG M40 ADAPTER/REDUCER 2"-M50 STOPPING PLUG M50 ADAPTER/REDUCER 2.5" - M63 STOPPI NG PLUG M63 ADAPTER/REDUCER 3" -M50 STOPPING PLUG M50 ADAPTER/REDUCER 3"-M63 TUBE 6MM X 12" LONG ELBOW, 1/8" QUICK CONNECT 1/2" LOCKNUT 1/2" SEALING GASKET 1/2" INSUL. BUSHING 15 1 44 D 40 61 90 89 46 91 10 41 39 82 38 34 132 32 33 131 06 SPECIAL TOOL-PURGE PRESSURE MEASURING KIT-G0008378 11 27 72 02 63 73 43 48 65 49 61 112 47 58 59 60 50 66 96 77 97 03 101 100 22 14 98 99 30 07 28 C 67 23 29 24 25 08 87 86 92 93 84 85 51 19 05 21 20 53 52 57 54 62 12 36 37 116 117 42 95 17 B 16 68 69 70 88 4 79 18 81 THE DESIGNS AND INFORMATION CONTAINED ON THIS DRAWING OR COPIES REMAIN THE EXCLUSIVE PROPERTY OF DERRICK CORPORATION BUFFALO, NEW YORK U.S.A. AND ARE NOT TO BE REPRODUCED WITHOUT THE WRITTEN PERMISSION OF DERRICK CORPORATION. THE INFORMATION CONTAINED ON THIS DRAWING SHALL ONLY BE USED BY CUSTOMERS OR PROSPECTS OR THEIR AGENCIES IN THE ARRANGEMENT OR INSTALLATION OF DERRICK EQUIPMENT, OR BY VENDORS IN QUOTING ON OR IN THE SUPPLY OF PARTS OR ASSEMBLIES TO DERRICK, OR BY OTHERS FOR THE SPECIFIC REASON OUTLINE IN THE TRANSMITTAL WHETHER WRITTEN OR VERBAL. REF WS 14394-00-011 DRAWN 80 ccs 09 4 3 2 6 R DERRICK CORPORATION 6/28/2010 CHECKED REV 7 2 13 1 8 3 5 ADDED WIRING SCHEMATIC NUMBER PER ELECTRICAL ENGINEERING DEPT. ITEM 33 WAS G0007918, ITEM 68 WAS G0004444, ITEM 74 WAS G0007852, ITEM 75 WAS G0007850, ITEM 76 WAS G000 9238, ITEM 78 WAS G0007849, ITEM 88 WAS G0008964, ITEM 89 WAS QTY 3, ITEM 127 WAS QTY 2, ITEM 134 WAS QTY 2, ADD ITEMS 144-148. ITEM 25 WAS G0007610;42 WAS G0008825;69 WAS G0004418 QTY 1; 71 WAS G0002967;QTY 90 WAS 1;101 WAS G0009353;115 WAS G0002966;124 WAS SHPP-100;125 WAS SHPP-150; 126 WAS SHPP-200; 127 WAS SHPP-250; 131 WAS G0009973; ADDED ITEMS 134-143 ITEM 15 WAS 15197-01-001 PER DRR# 2563; ADDED ITEMS 131, 132 & 133; ITEM 60 WAS G0008008; ITEM 58 & 61 QTY WAS 1; ITEM 59 QTY WAS 2 DESCRIPTION 4 3 WS JWC 9/16/2013 BJR 7/23/2013 DMM 7/2/2012 DJK 5/5/2011 BY CK'D TITLE QA A CONTROL ENCLOSURE ASSEMBLY DE-7200 EX-PROOF 380/400/3 MFG APPROVED FC DWG NO D Y 16472-00-003 SCALE DATE 2 REV SIZE 1:10 4 SHEET 1 1 OF 1 CENT, MAN, C-RM 8 ITEM 01 02 03 04 05 06 07 08 09 10 11 12 13 14 15 16 17 18 19 20 21 22 23 24 25 26 27 28 29 30 31 32 33 34 35 36 37 38 39 40 41 42 43 44 45 46 47 48 49 50 51 52 53 54 55 56 57 58 59 60 61 62 63 64 65 66 67 68 69 70 71 72 73 74 75 76 77 78 79 80 81 82 83 84 85 86 87 88 89 90 91 92 93 94 95 96 97 98 99 100 101 102 103 104 105 106 107 108 109 110 111 112 113 114 115 116 117 118 119 120 121 122 123 124 125 D C B A QTY X 1 1 1 1 1 1 1 1 1 1 1 1 1 1 1 1 1 1 1 1 1 1 2 1 1 3 1 4 3 1 1 2 2 1 1 1 1 1 1 1 1 1 1 1 1 1 1 1 1 1 1 2 2 1 1 1 2 1 1 2 3 1 1 1 8 8 7 2 2 1 1 1 1 1 1 1 1 1 1 1 1 2 2 1 3 2 2 3 2 2 1 2 1 2 2 2 1 1 3 6 3 8 4 3 6 1 1 1 1 1 1 1 1 1 1 1 1 1 2 6 2 1 1 7 PART NUMBER 16472-01-004 16396-01-003 16400-01-003 16401-01-002 16402-01-001 16404-01-004 16404-02-004 16404-03-004 16404-01-003 16405-01 16597-01 16598-01 G0002881 16403-01 15197-01-003 G0009350 G0009351 G0009352 G0007588 G0002603 G0002604 16607-03 G0008941 G0007213 G0005309 G0007221 G0007223 G0007998 G0008507 G0007214 G0007645 G0009286 17325-01 17244-02 G0007999 G0007231 G0007228 G0003552 G0003504 G0004986 G0002911 G0007976 G0008000 G0008001 G0008002 G0007338 G0007650 G0008010 G0007244 G0005325 G0007865 G0008006 IMP-116B-02X02 G0004679 G0003565 NPLE-50X200S-4 G0002300 G0002716 G0002714 G0009927 G0008003 G0008004 G0008009 15181-01-001 G0004364 G0008007 G0008005 G0008562 G0002711 16627-01-001 G0007846 G0007848 G0009864 G0009863 G0008571 G0007851 17382-01-001 IMP-116B-04X04 CRH-ECD-284 G0008267 17006-01 17006-02 G0008891 G0008892 G0008966 G0008942 G0012883 G0008057 G0007222 G0009183 G0008563 G0008544 G0009324 G0009481 G0009480 G0007227 16894-01-002 17306-01 G0009477 G0009476 G0007631 G0009353 DESCRIPTION ASSEMBLY COMPLETE ENCLOSURE ASSEMBLY DOOR ASSEMBLY COVER ASSEMBLY STAND ASSEMBLY COMPONENT PANEL (UPPER) COMPONENT PANEL (LOWER) COMPONENT PANEL (BOTTOM) COMPONENT MOUNT ASSEMBLY DISPLAY SCREEN MOUNT ENCLOSURE MOUNTING BRACKET AIR FILTER MOUNTING BRACKET AIR CONDITIONER, 12,000 BTU/HR 460/60/3 A/C SUPPORT ANGLE INLET CONE EXTENSION DRIVE, 150 HP 600VAC 60 HZ DRIVE, 60 HP 600VAC 60 HZ DRIVE, 30 HP 600VAC 60 HZ AIR CONDITIONER COOLING MOTOR FANWHEEL, 8" BACKWARD CURVED INLET CONE EX-PROOF ENCLOSURE POWER DIST. BLOCK, INCOMING GROUND LUG, INCOMING GROUND BUS BAR, INCOMING FUSE BLOCK, 60 AMP CLASS J FUSE COVER, INDICATOR DIN RAIL, 35MM X 5 1/2 TERMINAL BLOCK END BARRIER FUSE BLOCK, 30 AMP 3P CLASS CC DIN RAIL, 35MM X 5 BARRIER, INTRINSIC SAFE-VIBR SWITCH+E-STOP BARRIER, INTRINSIC SAFE-RTD SENSOR-PROGRAMMED BARRIER, INTRINSIC SAFE-SPEED SENSOR DIN RAIL, 35MM X 16 ETHERNET SWITCH, 6 PORT PLC, COMPACTLOGIX PROCESSOR POWER SUPPLY, 24VDC, 5 AMP SURGE SUPPRESSOR, 120V 60HZ TRANSFORMER, 500VA, 600PRI/120V SEC FUSE, TIME DELAY 7.0A 250 VAC OPERATOR INTERFACE - 120 VAC WIRE DUCT, 1 1/2 X 2 X 6 WIRE DUCT, 1 1/2 X 2 X 10 1/2 WIRE DUCT, 1 1/2 X 2 X 33 1/8 WIRE DUCT, 1 1/2 X 2 X 30 3/4 WIRE DUCT, 1 1/2 X 2 X 28 7/8 WIRE DUCT, 1 1/2 X 2 X 34 3/8 NAMEPLATE, EMERGENCY STOP BUTTON, EMERGENCY STOP PURGE UNIT W/RELIEF VALVE RELIEF VALVE (SERIAL # OF PURGE UNIT REQUIRED) 1/8 90 DEG STREET ELBOW, BRASS 1/8 X 3/16 HOSE BARB AIR FILTER, DX 1/2 X 2 PIPE NIPPLE, SST AIR FILTER, BX 1/2 X 1 1/2 PIPE NIPPLE, SST 1/2 90 DEG ELBOW, SST AIR REGULATOR 1/2 90 DEG STREET ELBOW, BRASS 1/2 X 1/2 HOSE BARB AIR HOSE DISPLAY SCREEN PROTECTIVE COVER O-RING, PROTECTIVE COVER 1/4-20 SEALING PAN HEAD SCREW DOOR LATCH TERMINAL BLOCK-GREY 1/2" CABLE FITTING CABLE ASSEMBLY CONNECTOR HOUSING INSERT TERMINAL, FEMALE TUBE 6MM X 12" LONG ELBOW, 1/8" QUICK CONNECT TERMINAL BLOCK 2PT GROUND GREEN/YEL CONNECTOR COVER, HOUSING CORD ASSY. 20 AWG 1/4 X 90 DEG STREET ELBOW, BRASS 1/4 DRAIN PLUG 1/2 X 1/4 NPT HOSE BARB INDUSTRIAL MOUSE W/CABLE CABLE ASSEMBLY BLOCK, PWR DISTR-3 POLE 2/0 #14 BLOCK, PWR DISTR-1 POLE 2/0 #14 W/ADDER BLOCK, PWR DISTR-4 POLE (1)#4-500MCM POWER DIST. BLOCK COVER 2 1/2" CORD FITTING TRANSFORMER, 350VA 480V PRI/120 SEC FUSE, 50 AMP CLASS J FUSE, TIME DELAY2.0A 600 VAC TERMINAL BLOCK-4 COND. ORANGE TERMINAL BLOCK END PLATE 2PT ORANGE TERMINAL BLOCK GROUND-YELLOW/GREEN 4PT FUSE HOLDER, 100A 600V 2P CLASS J FUSE, 100A/600V CLASS J MODULE, DIODE-DOUBLE 100 AMP JUMPER, BUS STAND OFF, FUSE HOLDER FUSE HOLDER, 100A 600V 3P CLASS T FUSE, 90 AMP 600V CLASS T FUSE HOLDER 400 AMP 1P CLASS T FUSE, 175 AMP CLASS T G0008893 G0008890 G0008792 G0009451 G0007229 G0007230 G0008349 G0007995 G0002873 G0002874 G0007951 G0007952 G0007953 G0007954 G0007955 G0002301 G0002302 G0007701 G0007633 G0007256 G0002966 TBS2535 COVER, DIST. BLOCK-FOR G0008891/8892 COVER DIST. BLOCK-FOR G0008966 FUSE, TIME DELAY 3.0 AMP CLASS CC FUSE, TIME DELAY 5.0 AMP CLASS CC PLC POWER SUPPLY PLC END BARRIER PLC BATTERY REPLACEMENT COMPACT FLASH MEMORY CARD COVER, CONTROL TRANSFORMER FUSE PULLER, CONTROL TRANSFORMER ETHERNET CABLE X 8 1/2 (ETH SW-PLC) ETHERNET CABLE X 62 (ETH SW-PNL VIEW) ETHERNET CABLE X 84 (ETH SW-60 HP) ETHERNET CABLE X 104 (ETH SW-150 HP) ETHERNET CABLE X 178 (ETH SW-30 HP) AIR ELEMENT, DX (REPLACEMENT ONLY) AIR ELEMENT, BX (REPLACEMENT ONLY) LUG, CRIMP #6 AWG LUG, CRIMP #1 AWG LUG, CRIMP #2 AWG CABLE GLAND 3/4" CORD FITTING 6 ITEM 126 127 128 129 130 131 132 133 134 135 136 137 138 139 140 141 142 143 QTY 1 1 2 35 28 13 3 1 3 1 1 1 1 1 1 1 1 1 PART NUMBER CRH-EL296 G0002967 G0004970 G0007252 PAN-TM3S10-C G0003519 SHPP-100 SHPP-150 SHPP-200 SHPP-250 G0007258 17420-01 G0009974 G0009291 G0009972 G0013391 G0009340 PP1290 5 3 2 1 13 15 D 82 109 108 37 11 46 38 39 36 32 SPECIAL TOOL-PURGE PRESSURE MEASURING KIT-G0008378 92 33 10 34 49 06 61 71 72 66 63 43 47 64 50 45 58 65 03 88 48 76 96 14 97 101 99 98 128 102 30 100 94 C 86 95 23 24 25 85 02 26 83 19 20 27 89 84 21 05 53 81 54 22 93 42 12 91 29 67 41 40 70 90 120 57 17 B 52 16 68 69 07 87 REF WS 14394-00-012 78 3 THE DESIGNS AND INFORMATION CONTAINED ON THIS DRAWING OR COPIES REMAIN THE EXCLUSIVE PROPERTY OF DERRICK CORPORATION BUFFALO, NEW YORK U.S.A. AND ARE NOT TO BE REPRODUCED WITHOUT THE WRITTEN PERMISSION OF DERRICK CORPORATION. THE INFORMATION CONTAINED ON THIS DRAWING SHALL ONLY BE USED BY CUSTOMERS OR PROSPECTS OR THEIR AGENCIES IN THE ARRANGEMENT OR INSTALLATION OF DERRICK EQUIPMENT, OR BY VENDORS IN QUOTING ON OR IN THE SUPPLY OF PARTS OR ASSEMBLIES TO DERRICK, OR BY OTHERS FOR THE SPECIFIC REASON OUTLINE IN THE TRANSMITTAL WHETHER WRITTEN OR VERBAL. 79 18 80 09 08 DRAWN ccs R DERRICK CORPORATION 4/7/2010 CHECKED 3 2 1 8 4 DESCRIPTION CORD FITTING, 90 DEG ELBOW CABLE, GEXOL 16 AWG-16C (6 FT) HANDLE, COVER WIRE DUCT FASTENER MOUNT WIRE SADDLE, SMALL WIRE SADDLE, MEDIUM 1" NPT PLUG 1 1/2" NPT PLUG 2" NPT PLUG 2 1/2" NPT PLUG REDUCER, 3" TO 2" NPT A/C THERMOSTAT MOUNTING BRACKET SENSOR, RTD A/C EVAPORATOR FAN (FOR REPLACEMENT) RTD SENSOR CABLE 1/2" LOCKNUT 1/2" SEALING GASKET 1/2" INSUL. BUSHING 7 6 REV 5 ADDED WIRING SCHEMATIC NUMBER PER ELECTRICAL ENGINEERING DEPT. WS REVISED FOLLOWING ITEMS: 25 (WAS G0007610), 29 (WAS G0007012), 33 (WAS G0007918), 42 (WAS G0008825), 68 (WAS G0004444), 69 (WAS G0004418), 73 (WAS G0007852), 74 (WAS G0007850), 75 (WAS G0009238), 77 (WAS G0007849), 87 (WAS G0008964), 91 (WAS QTY 6), 92 (WAS G0008572), 103 (WAS BJR G0007589), 107 (WAS QTY 3), 115 (WAS G0008122), 116 (WAS G0007952), 117 (WAS G0008123), 118 (WAS G0008121), 132 (WAS QTY 2), 138 (WAS G0009973). ADDED ITEMS 140-143 ITEM 15 WAS 15197-01-001 PER DRR# 2563; ADDED ITEMS 137, 138 AND 139; ITEM 60 WAS G0008008; DJK ITEM 58 & 61, QTY WAS 1; ITEM 59 QTY WAS 2 DESCRIPTION BY 4 3 TITLE JWC 9/17/2013 QA CONTROL ENCLOSURE ASSEMBLY DE-7200 EX-PROOF 575/600/60/3 MFG 7/23/2013 APPROVED 5/5/2011 CK'D A FC DWG NO D Y 16472-00-004 SCALE DATE 2 REV SIZE 1:10 3 SHEET 1 1 OF 1 CENT, MAN, C-RM 8 ITEM 01 02 03 04 05 06 07 08 09 10 11 12 13 14 15 16 17 18 19 20 21 22 23 24 25 26 27 28 29 30 31 32 33 34 35 36 37 38 39 40 41 42 43 44 45 46 47 48 49 50 51 52 53 54 55 56 57 58 59 60 61 62 63 64 65 66 67 68 69 70 71 72 73 74 75 76 77 78 79 80 81 82 83 84 85 86 87 88 89 90 91 92 93 94 95 96 97 98 99 100 101 102 103 104 105 106 107 108 109 110 111 112 113 114 115 116 117 118 119 120 121 122 123 124 125 7 6 Parts List D C B A 01 02 03 04 05 06 07 08 09 10 11 12 13 14 15 16 17 18 19 20 21 22 23 24 25 26 27 28 29 30 31 32 33 34 35 36 37 38 39 40 41 42 43 44 45 46 47 48 49 50 51 52 53 54 55 56 57 58 59 60 61 62 63 64 65 66 67 68 69 70 71 72 73 74 75 76 77 78 79 80 81 82 83 84 85 86 87 88 89 90 91 92 93 94 95 96 97 98 99 X 1 1 1 1 1 1 1 1 1 1 1 1 1 1 1 1 1 1 1 2 1 3 2 1 1 3 3 1 6 2 2 2 2 2 6 3 1 1 2 2 1 1 1 1 1 1 2 1 1 1 1 1 1 1 1 1 1 1 1 1 8 1 7 1 1 1 1 8 1 1 1 1 1 35 28 13 1 1 1 1 1 1 2 2 6 2 2 4 8 1 1 1 1 1 3 3 1 1 DRAWING NUMBER 16472-01-005 16396-01-003 16400-01-003 16402-01-001 16404-01-004 16404-02-004 16404-03-004 16404-01-003 16405-01 G0002881 16403-01 16609-01 15197-01-003 G0007573 G0007690 G0007689 G0007588 G0002603 G0002604 G0008966 G0008891 G0008941 G0008942 G0007213 G0005309 G0007221 G0007698 G0007223 G0007998 G0008507 G0009324 G0008563 G0007214 G0007224 G0007225 G0007631 G0007632 G0007984 G0009286 17325-01 17244-02 G0007999 G0007231 G0007228 G0003552 G0003504 G0003494 G0002910 G0002911 G0007976 17006-01 G0008000 G0008001 G0008002 G0007338 G0007650 G0008010 G0007244 G0005325 15181-01-001 G0004364 G0008007 G0007846 G0008562 G0009839 G0008571 G0008544 G0007851 G0008005 G0007848 16623-01 16623-02 16401-01 G0007246 G0007252 PAN-TM3S10-C G0003519 17006-02 G0007951 G0007952 G0007953 G0007954 G0007955 G0004970 G0007701 G0007633 G0007256 G0008892 G0008890 G0008893 G0002873 IMP-116B-04X04 16701-01 G0008267 G0007995 G0008792 G0003493 G0009974 17420-01 8 5 4 3 2 1 Parts List DESCRIPTION ASSEMBLY COMPLETE ENCLOSURE ASSEMBLY DOOR ASSEMBLY STAND ASSEMBLY COMPONENT PANEL (UPPER) COMPONENT PANEL (LOWER) COMPONENT PANEL (BOTTOM) COMPONENT MOUNT ASSEMBLY DISPLAY SCREEN MOUNT AIR CONDITIONER, 12,000 BTU/HR 460/60/3 A/C SUPPORT ANGLE CONTROL MOUSE COVER INLET CONE EXTENSION DRIVE, 150 HP 460VAC 60 HZ DRIVE, 60 HP 460VAC 60 HZ DRIVE, 30 HP 460VAC 60 HZ AIR CONDITIONER COOLING MOTOR FAN WHEEL, 8" BACKWARD CURVED INLET CONE PWR DISTR, BLOCK-4 POLE (1)#4-500MCM POWER DIST. BLOCK, OUTGOING-2/0 AWG-3 POLE POWER DIST. BLOCK, INCOMING (2) 500 MCM -3 POLE POWER DIST. BLOCK COVER 1 POLE GROUND LUG, INCOMING GROUND BUS BAR, INCOMING FUSE BLOCK, 60 AMP 3P CLASS J FUSE, 60 AMP CLASS J FUSE COVER, INDICATING DIN RAIL, 35MM X 5 1/2 TERMINAL BLOCK END BARRIER TERMINAL BLOCK GROUND-YELLOW/GREEN 4 PT TERMINAL BLOCK BARRIER-ORANGE 4 PT FUSE BLOCK, 30 AMP 3P CLASS CC FUSE BLOCK, 200 AMP 1P CLASS J FUSE, 150 AMP CLASS J TYPE HSJ FUSE BLOCK, 400 AMP 3P CLASS T FUSE, 225 AMP CLASS T DIN RAIL, 35MM X 5 BARRIER, INTRINSIC SAFE-VIBR SWITCH BARRIER, INTRINSIC SAFE-RTD SENSOR - PROGRAMMED BARRIER, INTRINSIC SAFE-SPEED SENSOR - PROGRAMMED DIN RAIL, 35MM X 16 ETHERNET SWITCH, 6 PORT PLC, COMPACTLOGIX PROCESSOR POWER SUPPLY, 24VDC, 5 AMP SURGE SUPPRESSOR, 120V 60HZ TRANSFORMER, 500VA, 460V PRI/120V SEC FUSE, TIME DELAY 2.5A 600VAC FUSE, TIME DELAY 7.0A 250VAC OPERATOR INTERFACE- PROGRAMMED INDUSTRIAL MOUSE/POINTER ASSY WIRE DUCT, 1/2 X 2 X 6 WIRE DUCT, 1/2 X 2 X 10 1/2 WIRE DUCT, 1/2 X 2 X 33 1/8 WIRE DUCT, 1/2 X 2 X 30 3/4 WIRE DUCT, 1/2 X 2 X 28 7/8 WIRE DUCT, 1/2 X 2 X 34 3/8 NAMEPLATE, EMERGENCY STOP BUTTON, EMERGENCY STOP DISPLAY SCREEN PROTECTIVE COVER O-RING, PROTECTIVE COVER 1/4-20 SEALING PAN HEAD SCREW CONNECTOR HOUSING TERMINAL BLOCK-GREY 4 PT TERMINAL BLOCK-JUMPER TERMINAL BLOCK GROUND-GREEN 2 PT TERMINAL BLOCK BARRIER-ORANGE 2 PT CONNECTOR COVER, HOUSING DOOR LATCH INSERT TERMINAL, FEMALE CLOSE OFF PLATE, 10GA X 4 X 9 1/2 CLOSE OFF PLATE, 10GA X 4 X 6 CONDENSER COVER ASSEMBLY TEE HANDLE WIRE DUCT FASTENER MOUNT WIRE SADDLE, SMALL WIRE SADDLE, MEDIUM CABLE ASSEMBLY (USB TO PS2 TO IDC) ETHERNET CABLE X 8 1/2 (ETH SW-PLC) ETHERNET CABLE X 62 (ETH SW-PNL VIEW) ETHERNET CABLE X 84 (ETH SW-60HP) ETHERNET CABLE X 104 (ETH SW-150HP) ETHERNET CABLE X 178 (ETH SW-30HP) HANDLE, COVER LUG, CRIMP #6 AWG LUG, CRIMP #1 AWG LUG, CRIMP #2 AWG POWER DIST BLACK- 2/0 AWG- 1P FINGER SAFE COVER FOR G0008896 FINGER SAFE COVER FOR G0008891 & G0008892 COVER,XFRMR-CLASS 9070 TYPE FSC-2 1/4 90 DEG STREET ELBOW, BRASS 1/4 NPT DRAIN PLUG 1/2 X 1/4 NPT HOSE BARB COMPACT FLASH MEMORY CARD FUSE, TIME DELAY-3 AMP CLASS CC FUSE, TIME DELAY-15 AMP CLASS CC SENSOR, RTD A/C THERMOSTAT MOUNTING BRACKET 7 ITEM QTY DRAWING NUMBER 100 1 G0009291 101 2 TBS 2535 102 1 CRH-EL296 103 1 G0009972 104 1 G0007229 105 1 G0007230 106 1 G0008349 107 1 G0002874 108 1 G0002967 109 3 SHPP-100 110 1 SHPP-150 111 3 SHPP-200 112 1 SHPP-250 113 1 G0007258 DESCRIPTION A/C EVAPORATOR FAN (REPLACEMENT ONLY) CORD FITTING 3/4" ELBOW 90 DEG 3/4" M-F SENSOR CABLE PLC POWER SUPPLY PLC END CAP PLC BATTERY (REPLACEMENT ONLY) COVER/PULLER,FUSE-CLASS 9070 TYPE FP-1 CABLE,GEXOL, 16 AWG- 6C(6FT) 1" NPT PLUG 1-1/2" NPT PLUG 2" NPT PLUG 2-1/2" NPT PLUG 3" NPT WITH 3"-2" REDUCER 73 D 99 13 46 45 74 02 44 52 71 98 84 12 58 55 61 38 63 59 70 62 30 60 09 54 50 31 32 72 10 57 68 11 03 06 36 C 37 34 23 35 22 24 27 25 20 28 07 33 96 97 26 89 90 21 04 88 69 17 41 39 42 43 47 18 48 19 B 51 49 53 05 ADDED WIRING SCHEMATIC REF NUMBER WS JWC ITEMS 64-67 WERE G0007852, G0007850, G0009238, G0007849 (SHOWN ON 16593-00-002), ITEM 40 WAS G0007918, ITEM 88 WAS QTY 1, ITEM 101 WAS G0002535 BJR JWC (TYPO), ADDED ITEMS 109-113 ITEM 20 WAS G0008261;21 WAS G0008262;22 WAS G0007210; 23 WAS G0007211;25 WAS G0007610;30 WAS G0007012; 31 WAS G0007216; 32 G0007237 QTY 1; 39 WAS G0007232 QTY 2; 40 WAS G0007233; 41 WAS G0007234 QTY 1; 50 WAS G0008825; 51 6 DMM JWC WAS G0003466;66 WAS G0007847; 78 WAS 16449-01; 88 WAS G0008263; 89 WAS G0008264 QTY 1; 90 WAS G0008265 QTY 2; 91 WAS G0008266; 96 WAS G0007981; 98 WAS G0009973; ADDED ITEMS 101-108 ITEM 13 WAS 15197-01-001 PER DRR# 2563; ADDED ITEMS 98, 99 & 100 5 DJK 4 ITEM 50 WAS G0007245. CCS ADDED ITEMS 95 THRU 97; UPDATED VIEWS. 3 CCS ITEM 01 WAS 16400-01-001; QUANTITY OF ITEM 69 WAS 5. 2 CCS ITEM 20 WAS G0007217; ITEM 21 WAS G0007218; ADDED ITEMS 88-94. 1 CCS REV DESCRIPTION BY CKD 56 29 14 15 8 9/16/13 7 7/23/2013 GEOMETRIC CHARACTERISTIC SYMBOLS 16 92 94 93 FLATNESS c STRAIGHTNESS ROUNDNESS CYLINDRICITY PARALLELISM PERPENDICULARITY ANGULARITY RUNOUT POSITION CONCENTRICITY SYMMETRY TOLERANCES UNLESS SPECIFIED DEC MM (2) PLACE DEC. +/- .0100 +/- .254 (3) PLACE DEC. +/- .0050 +/- .127 (4) PLACE DEC. +/- .0002 +/- .005 8 REF WS 14394-00-007 ANGLES.............+/- .1 5 4 3 5/5/2011 8/24/2010 5/13/2008 9/5/2007 8/14/2007 DATE THE DESIGNS AND INFORMATION CONTAINED ON THIS DRAWING OR COPIES REMAIN THE EXCLUSIVE PROPERTY OF DERRICK CORPORATION BUFFALO, NEW YORK U.S.A. AND ARE NOT TO BE REPRODUCED WITHOUT THE WRITTEN PERMISSION OF DERRICK CORPORATION. THE INFORMATION CONTAINED ON THIS DRAWING SHALL ONLY BE USED BY CUSTOMERS OR PROSPECTS OR THEIR AGENCIES IN THE ARRANGEMENT OR INSTALLATION OF DERRICK EQUIPMENT, OR BY VENDORS IN QUOTING ON OR IN THE SUPPLY OF PARTS OR ASSEMBLIES TO DERRICK, OR BY OTHERS FOR THE SPECIFIC REASON OUTLINE IN THE TRANSMITTAL WHETHER WRITTEN OR VERBAL. DRAWN fjmonroe R DERRICK CORPORATION 5/15/2007 CHECKED CCSMITH 5/17/2007 QA TITLE A CONTROL ENCLOSURE ASSEMBLY DE-7200 460/480/60/3 MFG APPROVED SIZE D +/- .1 SCALE DO NOT SCALE DRAWING 6 7/3/2012 2 REV FILECOPY DWG NO Y 1:10 8 16472-00-005 SHEET 1 1 OF 1 CENT, MAN,C-RM 8 ITEM QTY SECTION 9 - INSTALLATION AND MAINTENANCE LOG PURPOSE This section should be used by operating and maintenance personnel to record historical information gathered during the installation and operation of the Derrick equipment. If properly kept, the log will be useful for altering maintenance intervals and intercepting trends that may indicate the need for changing operating procedures. Each entry in the log should be dated for future reference and tracking. If required, additional pages may be added to the log by copying a blank page or simply inserting ruled paper at the rear of the section. Installation and Maintenance Notes: 30 Oct 09 9-1 DE-7200VFDCentrifuge INSTALLATION & MAINTENANCE LOG 9-2 DE-7200VFDCentrifuge 30 Oct 09 INSTALLATION AND MAINTENANCE LOG 30 Oct 09 9-3 DE-7200VFDCentrifuge INSTALLATION & MAINTENANCE LOG 9-4 DE-7200VFDCentrifuge 30 Oct 09 INSTALLATION AND MAINTENANCE LOG 30 Oct 09 9-5 DE-7200VFDCentrifuge INSTALLATION & MAINTENANCE LOG 9-6 DE-7200VFDCentrifuge 30 Oct 09 APPENDIX A - HMI SERVER SYSTEM DESCRIPTION This Appendix contains instructions for installing, connecting, and operating the HMI Server System, which consists of an HMI Server and Router Switchgear Box (Figure A-1). The system permits remote monitoring for the Derrick DE-7200 and DE-1000 Variable Frequency Drive (VFD) centrifuges. By connecting a customer-supplied PC or laptop computer to the server, the operator can monitor two to four centrifuges from a single location separate from the control cabinets. All monitoring features that can be displayed on the control cabinet operator panel are made available on the remote PC or laptop computer by means of a web-based interface. In addition, the system can be re-configured by Derrick to permit remote operation. HMI Server Router Switchgear Box Figure A-1. VFD Centrifuge HMI Server System Components 15 May 13 A-1 Appendix A-HMIServerSystem APPENDIX A - VFD CENTRIFUGE HMI SERVER SYSTEM INSTALLATION All safety procedures included in the Operation and Maintenance manual are to be followed when installing the HMI Server System components. Installation is performed in the following sequence: • Install server in safe area on a desktop or wall. • Install Router Switchgear Box on a suitable wall in hazardous area. Note! If desired, Router Switchgear components mounting plate may be removed from the explosion-proof box and installed in a non-explosion proof enclosure in a safe area. • • • • Connect Ethernet cables between server and pc or laptop. Install 1” NPT cable gland in each control cabinet. Connect Ethernet cables between routers and centrifuge control cabinets. Connect electric power to circuit breaker in Router Switchgear Box. HMI Server Installation The HMI Server may be placed on a desktop or mounted to a wall in a non-hazardous area. Mounting brackets and rubber feet are supplied with the server to facilitate wall or desktop installation (Figure A-2). Note that the wall mounting brackets have slotted holes to permit minor position adjustment during installation. Installing Rubber Feet for Desktop Mounting Installing Wall Mounting Brackets Figure A-2. Server Mounting Options Router Switchgear Box Installation Four mounting lugs are provided on the electrical enclosure for wall mounting. Select a mounting location that permits the front cover to be opened for accessing the interior components. Refer to drawing 17647-00 for box dimensions and mounting requirements. Electric Power Connections The HMI Server and Router Switchgear Box use 220/240Vac, single-phase, 50/60Hz electric power. Perform electric power connections as follows: 1. Install a 1” NPT explosion-proof cable gland in Router Switchgear Box to accept power cord. 2. Route 14 AWG (2.5mm) or larger power cable from the customer power source to the circuit breaker in the Router Switchgear Box (Figure A-3). Strip and secure cables to circuit breaker terminal. A-2 Appendix A-HMIServerSystem 15 May 13 APPENDIX A - VFD CENTRIFUGE HMI SERVER SYSTEM Figure A-3. Electrical Connections to Router Switchgear Box 3. Tighten nut properly on cable gland to ensure proper sealing. 4. Close and secure cover of Router Switchgear Box after completing connections. 5. Plug in HMI Server and PC power cords. Ethernet Connections Required Equipment The following customer-supplied components are required for making the Ethernet connections: Item Purpose Quantity Category 5 (CAT5) or Connections between control Maximum 328’ (100m) each higher shielded cabinets, HMI Server, & Router Ethernet cable Switchgear Box 1” NPT cable glands Ethernet cables from each 1 for each centrifuge control control cabinet to routers in cabinet Router Switchgear Box Explosion-proof 3/4” Ethernet & power cables into Up to 7 for Router Switchgear Box: NPT cable glands Router Switchgear Box 1 for Power 2 or 1 for PC 1-4 for Centrifuges Ethernet switch/router Interconnect HMI Server and 1 computer PC or laptop computer Monitor up to 4 centrifuges 1-3 (supports up to 3 connections) Server and PC Connection Requirements An Ethernet connection must be established between the Ethernet switches in the centrifuge control cabinets and the routers in the Router Switchgear Box. Ethernet connections are also required from the HMI server to the computer and Ethernet switch in the Router Switchgear Box. 15 May 13 A-3 Appendix A-HMIServerSystem APPENDIX A - VFD CENTRIFUGE HMI SERVER SYSTEM Control Cabinet Connections to Router Switchgear Box The following procedure describes the interconnection of control cabinets with the HMI Server. Refer to drawing 18309-00 for additional assistance in making the connections, and note that cables must be no more 328’ (100m) long. All cabling must be properly dressed, protected from chafing, and secured appropriately. 1. Remove the 1” NPT pipe plug from fitting at left upper left side of each control cabinet, and install a cable gland in its place. 2. Route a CAT5 cable through each cable gland to the Ethernet switch at the upper rear of the control cabinet, and connect cable to open port at upper left of switch (Figure A-4). 3. Install a customer-supplied 3/4” cable gland in a Router Switchgear Box opening for each centrifuge to be monitored. Figure A-4. Ethernet Switch Connection Port 4. Route free end of each CAT5 cable through a cable gland in Router Switchgear Box, and connect to open port of each router (Figure A-5). Figure A5. Ethernet Connections to Routers A-4 Appendix A-HMIServerSystem 15 May 13 APPENDIX A - VFD CENTRIFUGE HMI SERVER SYSTEM 5. Connect a CAT5 cable to Ethernet switch in Switchgear Box, and connect opposite end to LAN 1 port on HMI Server (Figure A-6). 6. Tighten nuts properly on all cable glands to ensure proper sealing. 7. Connect a CAT5 cable from LAN 2 port of HMI Server to Ethernet switch port. 8. Connect a CAT5 cable from LAN port of customer-supplied computer to second port of Ethernet switch. Figure A-6. HMI Server Connection Ports OPERATING HMI SERVER The HMI Server System permits continuous monitoring of up to four centrifuges from a single computer located in a non-hazardous area. A combination of DE-1000 and DE-7200 centrifuges may be monitored. All information displayed on the local Operation screen of each centrifuge may be viewed on the computer. System flexibility allows the operator to view all machines simultaneously or individually. Startup and Shutdown Both the HMI Server and Router Switchgear Box require 220/240Vac 50/60Hz power for operation. Units are turned on separately. Proceed as follows to turn on equipment: 1. Apply power to the HMI Server. PC will start up once power is applied. If PC does not start up, press power button or cycle power to PC. 2. Once HMI Server boots up, the Home screen is displayed. 3. To shut down HMI Server, simply press and release power button on Server. If Server is inaccessible, select Exit Runtime from the Setup screen. Next, select Shutdown PC on the DeskLock Launcher. Note! If Server is shut down, restart by cycling power or pressing power button. Wait at least 30 seconds before re-applying power to restart the unit. 4. Turn off power to Router Switchgear Box to shut down unit. Operation If an existing network infrastructure having a DHCP server is not available to connect to LAN 2 of the HMI Server, a four-port router with DHCP capability may be used. Alternatively, the LAN 1 interface may be used on the HMI Server PC to connect to the HMI Server. If desired to connect to the LAN 1 interface, a basic 10/100 Mbps Ethernet switch will be needed. The switch would be installed between the router box and the HMI Server PC (instead of a direct connection). Additional PCs would then connect to this new customer-supplied switch. 15 May 13 A-5 Appendix A-HMIServerSystem APPENDIX A - VFD CENTRIFUGE HMI SERVER SYSTEM Operation (Cont’d) IP Address If connecting to LAN 1, the static IP address of the PCs must be set to the following IP addresses: PC IP Address Subnet Mask PC 1 100.100.10.201 255.255.255.0 PC 2 100.100.10.202 255.255.255.0 PC 3 100.100.10.203 255.255.255.0 In addition, note that no other component may be on the network with an address between 100.100.10.1 to 100.100.10.199, as these are reserved for the HMI Server system. Addresses 100.100.10.200 to 100.100.10.255 are reserved for the customer’s use. The system may be operated from either the local HMI Server PC or a web-based program from another PC. Refer to Installation for connection information on both systems. Operation from either source is basically identical. When using the web-based program, a username and password are required. Depending on which LAN port is to be connected to the HMI Server, start the web-based program be entering the following information in the web browser: For LAN port 1 - http://100.100.10.101/FTVP For LAN port 2 - http://CentHMI0001/FTVP Note! CentHMI0001 is identical to PC serial number, i.e., CentHMI0001, CentHMI0002, CentHMI0003, etc. Web-Based Program To use the web-based program, enter the following username and password: Username - readonly Password - read After entering the HMI Server program, the HOME screen will appear. Make desired selection from Home screen to view a single centrifuge operation screen (Figure A-8) or view all centrifuge operation screens side by side. The operator may then select additional option(s) from the displayed screen. Figures A-7 through A-13 show the screens that are accessible through both the web- and PC-based systems. Figure A-14 shows the DeskLock screen options. A-6 Appendix A-HMIServerSystem 15 May 13 APPENDIX A - VFD CENTRIFUGE HMI SERVER SYSTEM Figure A-7. HMI Server Home Screen Figure A-8. Operation Screen - Centrifuge 1 Figure A-9. VFD Screen - Centrifuge 1 15 May 13 A-7 Appendix A-HMIServerSystem APPENDIX A - VFD CENTRIFUGE HMI SERVER SYSTEM Figure A-10. Pump Setup Screen Figure A-11. Support-Activation Screen Figure A-12. Alarms Screen Figure A-13. Cleanout Screen A-8 Appendix A-HMIServerSystem 15 May 13 APPENDIX A - VFD CENTRIFUGE HMI SERVER SYSTEM Figure A-14. DeskLock Screen Troubleshooting Network Connectivity The following IP addresses of all system components permit entry into the router configuration to verify that the router is communicating: Router 1 Router 2 Router 3 Router 4 HMI Server PC Activation PLC X1 WAN Port https://100.100.10.1 https://100.100.10.2 https://100.100.10.3 https://100.100.10.4 LAN Port #1 100.100.10.101 100.100.10.100 X2 LAN Port https://100.100.100.101 https://100.100.100.101 https://100.100.100.101 https://100.100.100.101 LAN Port #2 Assigned by DHCP Use the following Network Address Translation (NAT) data to verify that connections are correct and that communication is established between the PLC and routers: X1 WAN Port of Router X2 LAN Port of Router PLC 1 100.100.10.10 100.100.100.10 PLC 2 100.100.10.20 100.100.100.10 PLC 3 100.100.10.30 100.100.100.10 PLC 4 100.100.10.40 100.100.100.10 To assist in troubleshooting communication defects, a customer PC may be connected as shown in Figure A-15 to ping the routers to verify communication. 15 May 13 A-9 Appendix A-HMIServerSystem APPENDIX A - VFD CENTRIFUGE HMI SERVER SYSTEM Figure A-15. Customer PC Test Connections to Ping Routers REFERENCE DRAWINGS Drawings included in this appendix are listed in Table A-1. These drawings are included to assist in the installation and operation of the HMI Server. Table A-1. HMI Server Drawings Number Title 17647-00 Remote VFD Centrifuge HMI Server Kit With Activation for Two, Three, or Four Centrifuges 18308-00 Wiring Diagram for Remote VFD Centrifuge HMI Server Kit 18309-00 Ethernet Connection Diagram for Remote VFD Centrifuge HMI Server Kit A-10 Appendix A-HMIServerSystem 15 May 13