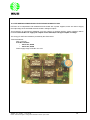
1
OPERATION & INSTALLATION
MANUAL
TM70
PUSHBUTTON TRANSMITTERS
T70/1 and T70/2 MODELS
TM70Bi V3.1 (03/09) 1121174.pdf
IKUSI reserves the right to modify this information without prior notification.
I N DEX
Pag.
1.- DECLARATION OF CONFORMITY (870 MHZ ISM BAND)…...……………………………………………….1
2.- DECLARATION OF CONFORMITY (433MHZ ISM BAND) ..........................................................................2
3.- SYSTEM DESCRIPTION ..............................................................................................................................3
4.- SAFETY INSTRUCTIONS ............................................................................................................................4
4.1.- WHAT YOU MUST DO .....................................................................................................................................4
4.2.- WHAT YOU MUST NOT DO ..............................................................................................................................4
4.3.- FCC RECOMMENDATIONS ..............................................................................................................................5
5.- INSTALLATION ............................................................................................................................................6
5.1- THE CB70 (BC70K) BATTERY CHARER .............................................................................................................6
5.2.- RECEIVER ....................................................................................................................................................7
5.3.- STARTING UP ................................................................................................................................................9
6.- USING THE SET .........................................................................................................................................11
7.- MAINTENANCE .........................................................................................................................................12
7.1.- WARRANTY .................................................................................................................................................12
7.2 - PRECAUTIONS.............................................................................................................................................12
7.3.- TROUBLESHOOTING ....................................................................................................................................13
ANNEX A - PROGRAMMING A SPARE TRANSMITTER ............................................................................................15
ANNEX B.- .PROGRAMMING THE MACHINE IDENTIFICATION IN LCD TRANSMITTERS ................................................16
8.-FREQUENCY CHANGE ..............................................................................................................................17
8.1.- SYSTEM DESCRIPTION ................................................................................................................................18
8.2.- DEFINITIONS ...............................................................................................................................................18
8.3.- BASE CHANNEL FREQUENCY CHANGE...........................................................................................................18
8.4.- WORKING CHANNEL FREQUENCY CHANGE ....................................................................................................19
ANNEX A - CHANNEL TABLE 433,050 - 434,790 MHZ ...........................................................................................20
ANNEX B - CHANNEL TABLE 869,70625 - 869,90 MHZ ..........................................................................................21
ANNEX C - CHANNEL TABLE 914,150 - 915,875 MHZ ............................................................................................22
9.- CAN OPEN INTERFACE………………………………………………...……………………………………….23
9.1.- INTRODUCTION ..........................................................................................................................................24
9.2.- CAN BUS CONNECTION ................................................................................................................................24
9.3.- DATA DICTIONARY .......................................................................................................................................25
9.4.- PDO ...........................................................................................................................................................26
9.5.- SIGNALING..................................................................................................................................................27
9.6.- TM70 CAN RECEIVERS.................................................................................................................................27
TM70Bi V3.1 (03/09) 1121174.pdf
IKUSI reserves the right to modify this information without prior notification.
i
10.- FIRST COME - FIRST SERVED OPERATION…………………………………………………………..…...30
10.1.- INTRODUCTION ........................................................................................................................................31
10.2.- TWO TRANSMITTERS SYSTEMS ..................................................................................................................31
11.- RANGE LIMITER ……………………………………………………………………………………….……......32
11.1.- SYSTEM DESCRIPTION ..............................................................................................................................33
11.2.- INFRARED SENSOR ...................................................................................................................................33
11.3.- INFRARED TRANSMITTER ...........................................................................................................................35
11.4.- INSTALLATION ...........................................................................................................................................36
11.5.- LA70 TECHNICAL CHARACTERISTICS ..........................................................................................................37
12.- PITCH & CATCH OPERATION ………………………………………………………………………….……..38
12.1.- INRTODUCTION ........................................................................................................................................39
12.2.- TWO TRANSMITTERS SYSTEMS ..................................................................................................................39
13.- TANDEM OPERATION..…………………………………………………………………………………….…..41
13.1.- INTRODUCTION ........................................................................................................................................42
13.2.- ONE MASTER TRANSMITTERS SYSTEMS ......................................................................................................43
13.3.- TWO MASTER TRANSMITTERS SYSTEMS .....................................................................................................44
14.- ANALOGUE FEEDBACK CALIBRATION…………………………………………………………….………45
14.1.- INTRODUCTION ........................................................................................................................................46
14.2.- CALIBRATION OF THE ANALOGUE FEEDBACK WITH LCD DISPLAY ...................................................................46
14.3.- LR71/LR72 AND IN0-10V ASSEMBLY...........................................................................................................48
15.- IN0450P OPTION ……………………………………………………………………………………….…….....49
15.1.- INTRODUCTION AND FUNCTIONAL DESCRIPTION .........................................................................................50
15.2.- IN0450P AND LR70 ASSEMBLY ..................................................................................................................51
16.- IN4D OPTION …………………………………………………………………………………………….………57
16.1.- INTRODUCTION AND FUNCTIONAL DESCRIPTION .........................................................................................58
16.2.- IN4D AND LR71/LR72 ASSEMBLY ................................................................................................................61
17.- A1P4RCAN OPTION…..…………………………………………………..………………………..…………...56
17.1.- INTRODUCTION & FUNCTIONAL DESCRIPTION ..............................................................................................57
17.2.- CONNECTIONS & JUMPERS CONFIGURATION ...............................................................................................57
18.- A2ICAN OPTION……...…..…………………………………………………..……………….………………....60
18.1.- INTRODUCTION & FUNCTIONAL DESCRIPTION ..............................................................................................61
18.2.- CONNECTIONS & JUMPERS CONFIGURATION ...............................................................................................62
19.-OPCION A2VCAN……...…..…………………………………………………..……………………….………...65
19.1.- INTRODUCTION & FUNCTIONAL DESCRIPTION ..............................................................................................66
19.2.- CONNECTIONS & JUMPERS CONFIGURATION ...............................................................................................67
19.3.- EXPANSIONS POWER SUPPLY ELECTRONIC BOARD POT70V4.......................................................................70
18.- T70/1 & T70/2 ATEX TRANSMITTERS ....................................................................................................71
18.1- MAIN CHARACTERISTICS .............................................................................................................................72
TM70Bi V3.1 (03/09) 1121174.pdf
IKUSI reserves the right to modify this information without prior notification.
ii
1.- DECLARATION OF CONFORMITY (870MHz ISM BAND)
DECLARACION DE CONFORMIDAD
CONFORMITY DECLARATION
KONFORMITÄTSERKLÄRUNG
DECLARATION DE CONFORMITE
DICHIARAZIONE DI CONFORMITA'
DECLARAÇAO DE CONFORMIDADE
VERKLARING VAN GELIJK VORMIGHEID
El Fabricante
The Manufacturer
Der Hersteller
Le Fabricant
Il Fabbricante
O Fabricante
De Fabrikant
Declara que el producto: Telemando IKUSI
Declares that the product: Remote Control IKUSI
Erklärt, dass das Produkt: Funkfernsteuerung
IKUSI
Déclare que le produit: Télécommande IKUSI
Dichiara che il prodotto: Radiocomando IKUSI
Declara que o produto: Radiocomando IKUSI
Cumple con las Directivas de Consejo:
Complies with the provisions of Council:
Erfüllt die Richtlinien des Rates:
Accompli les Directives du Conseil:
E´conforme alle Direttive del Consiglio:
Cumpre as Directivas del Consello:
Conform is met de richtlijnen van de Raad:
Normas armonizadas utilizadas:
Applied harmonized standards:
Angewendete harmonisierte Normen:
Normes harmonisées utilisées:
Norme armonizate utilizzate:
Normas harmonizados aplicados:
Volgens geharmoniseende normen:
02/07/2007
TM70Bi V3.1 (03/09) 1121174.pdf
IKUSI reserves the right to change this information without prior notice.
ANGEL IGLESIAS, S.A.
Paseo Miramón 170
SAN SEBASTIAN - SPAIN
NIF: A-20-036.018
Tel : (+34) 943 448800
Fax: (+34) 943 448819
www.ikusi.com
Verklaart dat het product: Radiobesturing IKUSI
TM70/1 - 870
TM70/2 - 870
98/37 EEC MACHINERY
99/5 EEC R&TT
ETSI EN 300220-1 V1.3.1
ETSI EN 300220-3 V1.1.1
ETSI EN 301489-1 V1.6.1
ETSI EN 301489-3 V1.4.1
EN 55022 : 1994
EN 61000-4-2 : 1995
EN 61000-4-3 : 1996
EN 61000-4-4 : 1995
EN 61000-4-5 : 1995
EN 61000-4-6 : 1996
EN 61000-4-11 : 1994
EN 61000-3-2 : 1995
EN 61000-3-3 : 2001
EN 60950-1 : 2001
EN 50178 : 1998
EN 60204-32 : 2001
EN 60529 : 2000
EN 13557 : 2004
EN-954-1 o EN 13849 : 2004
1
2. - DECLARATION OF CONFORMITY (433MHz ISM BAND)
DECLARACION DE CONFORMIDAD
CONFORMITY DECLARATION
KONFORMITÄTSERKLÄRUNG
DECLARATION DE CONFORMITE
DICHIARAZIONE DI CONFORMITA'
DECLARAÇAO DE CONFORMIDADE
VERKLARING VAN GELIJK VORMIGHEID
El Fabricante
The Manufacturer
Der Hersteller
Le Fabricant
Il Fabbricante
O Fabricante
De Fabrikant
Declara que el producto: Telemando IKUSI
Declares that the product: Remote Control IKUSI
Erklärt, dass das Produkt: Funkfernsteuerung
IKUSI
Déclare que le produit: Télécommande IKUSI
Dichiara che il prodotto: Radiocomando IKUSI
Declara que o produto: Radiocomando IKUSI
Cumple con las Directivas de Consejo:
Complies with the provisions of Council:
Erfüllt die Richtlinien des Rates:
Accompli les Directives du Conseil:
E´conforme alle Direttive del Consiglio:
Cumpre as Directivas del Consello:
Conform is met de richtlijnen van de Raad:
Normas armonizadas utilizadas:
Applied harmonized standards:
Angewendete harmonisierte Normen:
Normes harmonisées utilisées:
Norme armonizate utilizzate:
Normas harmonizados
aplicados:
Volgens geharmoniseende normen:
ANGEL IGLESIAS, S.A.
Paseo Miramón 170
SAN SEBASTIAN - SPAIN
NIF: A-20-036.018
Tel : (+34) 943 448800
Fax: (+34) 943 448819
www.ikusi.com
Verklaart dat het product: Radiobesturing IKUSI
TM70/1 - 433
TM70/2 - 433
98/37 EEC MACHINERY
99/5 EEC R&TT
ETSI EN 300220-1 V1.3.1
ETSI EN 300220-3 V1.1.1
ETSI EN 301489-1 V1.6.1
ETSI EN 301489-3 V1.4.1
EN 55022 : 1994
EN 61000-4-2 : 1995
EN 61000-4-3 : 1996
EN 61000-4-4 : 1995
EN 61000-4-5 : 1995
EN 61000-4-6 : 1996
EN 61000-4-11 : 1994
EN 61000-3-2 : 1995
EN 61000-3-3 : 2001
EN 60950-1 : 2001
EN 50178 : 1998
EN 60204-32 : 2001
EN 60529 : 2000
EN 13557 : 2004
EN-954-1 o EN 13849 : 2004
02/07/2007
TM70Bi V3.1 (03/09) 1121174.pdf
IKUSI reserves the right to change this information without prior notice.
2
3.- SYSTEM DESCRIPTION
The TM70/1 and TM70/2 push-button transmitter type, radio remote control systems are designed for
the remote control of hoists and cranes, and are particularly suitable for applications when the operator
needs to be able to choose the best location from which to carry out an operation.
The system consists of a transmitter for selecting commands and a receiver, which is connected to the
electrical system of the machine to be operated. The system also comes with a battery charger and two
rechargeable batteries.
The main specifications are as follows:
The TM70
Frequency band
869,700 to 870,000 MHz; ERP <5mW
433,050 to 434,040 MHz; ERP <1mW
434.040 to 434.790 MHz; ERP <10mW
902.000 to 928.000 MHz; ERP <1mW
100 ms
-20º to +70ºC
Response Time
Temperature range
The T70/1 and T70/2 Transmitters
Ingress protection
IP65 / NEMA-4
The R70/13 and R70/21 Receivers
Power supply
Consumption
Relays
STOP Relays
Protection
Electrical Security
48, 115, 230 Vac ± 10%, 50/60 Hz
Optional 12 or 24 Vdc
20 W
230 Vac/8 A
230 Vac/6 A
IP65 / NEMA-4
Class II (EN50178)
The CB70/BC70K battery charger
Power supply
230 Vac ± 10%, 50Hz;
optional 115 Vac, 60 Hz;
DC Range: from 10,5v to 35v
The BT06K battery
Voltage
Capacity
Charging temperature
Discharge temperature
Autonomy
4.8 V
750 mAh NiMH
0º to 45ºC
-20º to 50ºC
10 h (operating at 50%)
TM70Bi V3.1 (03/09) 1121174.pdf
IKUSI reserves the right to change this information without prior notice.
3
4.- SAFETY INSTRUCTIONS
These instructions must be read carefully in order to install and use the set properly
and to keep it in perfect working condition and to reduce the risks of misuse.
Do not use this set on machines in potentially explosive atmospheres.
Any use other than that specified in this manual is dangerous. The following
instructions must be strictly adhered to.
4.1 - WHAT YOU MUST DO
�
�
�
�
�
�
�
�
�
�
�
Strictly adhere to the instructions for installation contained in this manual
Make sure that professional and competent personnel carry out the installation.
Ensure that all site and prevailing safety regulations are fully respected.
Make sure that this manual is permanently available to the operator and maintenance personnel.
Keep the transmitter out of reach of unauthorised personnel.
Remove the transmission key when the set is not in use.
On starting each working day, check to make sure that the STOP button and other safety
measures are working.
When in doubt, press the STOP button.
Whenever several sets have been installed, make sure the transmitter you are going to use is the
right one. Identify the machine controlled on the label for this purpose on the transmitter.
Service the equipment periodically.
When carrying out repairs, only use spare parts supplied by IKUSI dealers.
4.2 - WHAT YOU MUST NOT DO
�
�
�
�
Never make any changes to the set, which have been studied and approved by manufacturer.
Never power the equipment other than with the specified power supply.
Never allow unqualified personnel to operate the equipment.
After use, never leave the equipment ON. Always use the contact key or the STOP button to avoid
accidentally activating manoeuvres.
� Do not use the set when visibility is limited.
� Avoid knocking or dropping the set.
� Do not use the set if failure is detected.
TM70Bi V3.1 (03/09) 1121174.pdf
IKUSI reserves the right to change this information without prior notice.
4
4.3 - FCC RECOMENDATIONS (Only valid for equipment that works in 915MHz ISM band)
This device complies with Part 15 of the FCC Rules. Operation is subject to the following two
conditions:
1. This device may not cause harmful interference, and
2. This device must accept any interference received, including interference that may cause
undesired operation.
Changes or modifications not expressly approved by the manufacturer could void the user's
authority to operate the equipment.
To comply with FCC RF exposure compliance requirements, this device and its antenna must
not be co-located with, or operating in conjunction with, any other antenna or transmitter.
This equipment has been tested and found to comply with the limits for a Class A digital device,
pursuant to Part 15 of the FCC Rules.
These limits are designed to provide reasonable protection against harmful interference when
the equipment is operated in a commercial environment.
This equipment generates, uses, and can radiate radio frequency energy and, if not installed and
used in accordance with the instruction manual, may cause harmful interference to radio
communications.
Operation of this equipment in a residential area is likely to cause harmful interference in which
case the user will be required to correct the interference at his own expense.
TM70Bi V3.1 (03/09) 1121174.pdf
IKUSI reserves the right to change this information without prior notice.
5
5.- INSTALLATION
5.1 - THE CB70 (BC70K) BATTERY CHARGER
The battery charger CB70 (or BC70K) has two charging compartments that can simultaneously
charge battery types BT06, BT12 (TM60 series) and BT06K, BT20K (TM70 series).
Connect the charger to the mains using the power source
and cable supplied. On installing the battery charger,
bear in mind that the batteries must be charged at
temperatures over 0ºC and that the power supply must
be left on all night.
Place the batteries in the charger. Please wait about 5
seconds between consecutive insertions of batteries in
their locations.
Each battery location has a green led indicator
associated.
Green led indications:
1) Green led blinking: it indicates that the battery is excessively unloaded ; when the led finishes
blinking it indicates that the normal loading operation mode has begun.
2) Green led permanently lightning: it indicates normal loading operation mode.
3) Green led extinguished: it indicates that the battery loading process has finished.
The capacity of the batteries decreases with use. Their life span is estimated to be 500 recharging
cycles, but this depends largely on the conditions of use, for which the following is recommended:
� Do not recharge the battery until it is completely flat. The transmitter indicates this moment.
� Always charge the batteries at temperatures between 0º and 45ºC (the batteries will not
become fully charged at temperatures exceeding 45ºC). Remember that the charger must not
be left in direct sunlight.
� Charge the batteries at least once every six months.
� Avoid short-circuits between the battery contacts. Do not carry charged batteries in toolboxes
or next to other metal objects (keys, coins, etc.).
� Always keep contacts clean.
� Never leave batteries in direct sunlight.
Warning: if the battery charger is powered with lower voltage than 10,3v DC, the green led
indicates battery in charging process, even if there is no battery placed in the charger.
•
•
Only use IKUSI manufactured batteries
The exhausted batteries must be disposed of or recycled safely according to local standards
•
The IKUSI - ATEX batteries (BT06K-ATEX and BT20K-ATEX), only can be re-charged with the
BC70KorCB70battery charger.
TM70Bi V3.1 (03/09) 1121174.pdf
IKUSI reserves the right to change this information without prior notice.
6
5.2.- RECEIVER
Make sure that the crane is stopped for the entire duration of the assembly process,
keep the work area free and wear protective clothing.
Park the crane and position stop-ends (if these are not available use appropriate
signs) at a suitable distance so that other cranes on the same runway do not hit it.
Check the power-supply voltage and turn off the mains switch.
Remember that the receiver has several voltage-powered circuits. Even when the
power has been cut off, there is still a risk of electrical shocks.
Find a suitable location for the receiver with easy access, in a place designated for reception of
the radio transmitter signal, and away from any intense radio electric disturbance sources.
Install the receiver cabinet using 4 elastic absorbers.
Figure 3. Receiver, external antenna and cable extension cables kit.
If necessary, it is possible to improve signal reception, by using the extension cables and external
antenna kit. This kit is applicable only for non-transmitting receivers.
TM70Bi V3.1 (03/09) 1121174.pdf
IKUSI reserves the right to change this information without prior notice.
7
Connect the power supply and the receiver outputs on the corresponding relay board plug-in
terminals. Do this following the outputs diagram, which is supplied with the set. This diagram
indicates the correspondence between the transmitter commands and the receiver outputs.
The STOP relays KSTOP1 and KSTOP2 are in series and must be connected to the main
contactor coil circuit.
The K2/START is activated once the start-up command is held down.
The K1/SAFETY relay is a safety relay, which is activated when certain commands predefined as
“active” on configuration of the set, (i.e. commands which give rise to manoeuvres), are activated.
Figure 4. Receiver’s electronic card
Remember to connect the ground cable.
Only use fireproof cables for connections.
Select the appropriate voltage on the receiver, (230, 115 or 48 Vac – 12 OR 14 Vdc)
TM70Bi V3.1 (03/09) 1121174.pdf
IKUSI reserves the right to change this information without prior notice.
8
5.3 - STARTING UP
Proceed with caution; the equipment may not be connected correctly which may lead
to unforeseeable movements on starting-up.
Once the receiver has been connected, disconnect the power supply to the motors, (for example,
by removing the fuses) and power on the receiver. First of all the LEDs will light on an instant to
test that all are all right, after this the receiver will enter into a ‘SCANNING’ mode and the following
LED’s will be lit in the receiver;
POW ER (1):
ON, indicates that the power supply is correct.
HARDOK (2):
ON, indicates the absence of faults on the boards.
SIGNAL (3):
OFF, in the case of the channels being signal free. Blinks ON when
there is a RF signal on the channels.
DATA (4):
OFF, when there is not another TM70 system active in the area. Blinks
ON in the opposite case.
ID (5):
OFF
CAN_RUN (6):
ON, Indicates that CAN communications with expansion boards are
OK.
CAN_ERR (7):
OFF
ORDER (8):
OFF
RELAY (9):
OFF
Figure 5. Signalling LEDs in the receiver.
1.- Label for crane identification.
Optional: LCD Display.
2.- LED.
3.- Manoeuvre button.
4.- Contact key.
5.- Start button.
6.- STOP button.
7.- Option: Range Limitation.
Figure 6. Command and signalling elements in the transmitter
TM70Bi V3.1 (03/09) 1121174.pdf
IKUSI reserves the right to change this information without prior notice.
9
Next, turn transmitter ON to OPERATION mode, as follows:
� Place a charged battery in the transmitter.
� Turn the contact key.
� Push and pull out the STOP button, (LED flashes orange-green). If the transmitter has LCD, it
displays the identification of the machine, as well as the battery level.
� Press the start button. The green LED should now light indicating that the transmitter is
transmitting.
On receiving a signal from the transmitter, the receiver enters in OPERATION mode; the following LED’s
will light up on the receiver:
POW ER:
ON, indicates that the power supply is correct.
HARDOK:
ON, indicates that defects have not been detected on the board.
SIGNAL: ON, indicates that it is receiving a RF signal at the working frequency.
DATA:
When ON indicates that the data received has a correct format.
ID:
When ON indicates that the receiver has recognised the transmitter’s identification code.
CAN_RUN:
ON, Indicates that communications with CAN expansion boards are OK.
CAN_ERR:
OFF
ORDER: ON, Indicates the activation of any digital manoeuvre
RELAY: ON, Indicates the activation of STOP relays
Now, the STOP relays KSTOP1 and KSTOP2 will be activated. The K2/START relay is activated once
the start button is pushed.
Press on any of the transmitter’s manoeuvre buttons and its corresponding relay will be activated. In
case of an active manoeuvre, the safety relay K1/SAFETY will also activate.
Check to make sure all the other manoeuvres work in this way.
Turn off the transmitter using the STOP button, and make sure that on doing so the relays are
deactivated and the DATA, ID and SIGNAL LED’s go out. They behave exactly as in ‘SCANNING’ mode.
Reconnect the power supply to the motors, move to the usual work position and check to see if all the
manoeuvres and the stop button are functioning correctly.
IMPORTANT REMARK:
IKUSI does not take responsibility of an incorrect installation, interferences produced by collision of
frequencies, nor of the management of the working frequencies in fixed facilities, where several radio
remotes systems, share or can share, the same zone or working area.
TM70Bi V3.1 (03/09) 1121174.pdf
IKUSI reserves the right to change this information without prior notice.
10
6.- USING THE SET
To ensure correct use of the equipment, follow the instructions below:
� Make sure the transmitter you are going to use is the right one, identifying the machine on the
identification label. In the case of transmitters with LCD display, you are able to edit the machine
identification label, (ANNEX B). It will allow to the operator to identify the machine before the starting of
the equipment.
� Attach the belt to the transmitter unit. Its use is recommended to prevent the equipment from falling.
� Introduce a charged battery, turn the contact key and activate the transmitter.
� To activate the system, you must first pull out the STOP button, the LED should then give an orangegreen pulse; then press the START button. If you find that the STOP button has already been pulled
out, it is necessary to push it in and then pull it out again, as this sequence will allow the check in of
the STOP circuit. If the unit has experienced a time-out auto-disconnection, it is not necessary to
repeat the STOP button procedure, simply push the START button for 1 second.
� The green LED should light up, indicating that the transmitter has started transmitting. From now on, if
any of the transmitter’s command buttons are pressed, the corresponding manoeuvre will be activated.
� To be able to start up the transmitter, all the command controls associated with active manoeuvres
must be in the neutral position (not activated). This is not the case for the selection functions.
� When 4 minutes have passed and no active manoeuvre command has been activated, the transmitter
automatically goes to STAND BY mode, indicated by green pulses each 3 seconds. To start it up once
more, press the start button.
� The transmitter is equipped with a circuit for monitoring the battery level. W hen this level drops below
a pre-established limit, the transmitter LED starts to flash in red; 5 minutes later the transmitter
switches off, and the machine’s main contactor is deactivated. During this time, the load has to be
located on a safe position. If the STOP button is activated during this time, transmitter will not start
again, unless battery is replaced.
�
�
�
�
�
In transmitters with LCD, the battery power level is indicated as follows:
3 segments: charge greater than 50%.
2 segments: charge between 50 and 10%.
1 segment:
charge between 10 and 5%.
Nothing:
charge lower than 5%.
� To switch off the transmitter, press the STOP button or turn off the contact key.
Remember that you are going to remote control a moving piece of machinery. The safety
instructions described in chapter 2 of this manual must be strictly adhered to.
TM70Bi V3.1 (03/09) 1121174.pdf
IKUSI reserves the right to change this information without prior notice.
11
7.- MAINTENANCE
7.1.- WARRANTY
IKUSI guarantees the TM70 remote control sets for a period of up to one year after the date of
delivery. This guarantee covers repairs and the replacement of defective pieces at our Technical
Service Department. Both the transmitter and receiver will be necessary if any repairs or
replacements need to be carried out.
The guarantee does not cover damage resulting from the following:
�
�
�
�
Transport.
Incorrect installation.
Repairs or alterations made to the equipment by personnel other than from IKUSI.
Obvious misuse or incorrect maintenance of the equipment.
Our Technical Service reserves the right to evaluate breakdowns and damage.
Under no circumstances will IKUSI be held responsible for hold-ups at work, accidents or
expenses incurred as a result of equipment malfunctioning.
7.2.- PRECAUTIONS
This equipment is designed for use in an industrial environment. However, we recommend you
follow the instructions below to extend the life span of your remote control set:
� Use the belt provided with the transmitter to prevent the transmitter from falling.
� Do not clean the transmitter with solvents or pressurised water. Use a damp cloth or soft
brush.
� Use and recharge the battery regularly.
� Check every day that the STOP pushbutton is working.
� Disconnect the receiver cables if soldering/welding work is going to be carried out on the
crane.
� Periodically check the condition of the transmitter rubber seals. Change these over if they
show signs of deterioration to ensure they remain watertight.
� Clean the battery contacts.
TM70Bi V3.1 (03/09) 1121174.pdf
IKUSI reserves the right to change this information without prior notice.
12
7.3 - TROUBLESHOOTING
The transmitter and receiver have status monitoring LED’s, which help to identify irregularities.
The most common signals are contained in the tables below:
TRANSMITTER
LED
MEANS
Solid green
Green pulses.
Red slow flashing
Red fast flashing
Red double flashing
Transmitter transmitting normally. OPERATION mode.
Transmitter ready for start-up. STAND BY mode.
Battery level low
Probably, EEPROM module is not plugged in.
Transmitter cannot start up because a manoeuvre command is
present.
Transmitter failure
Solid red
RECEIVER
In OPERATION mode the 7 LED’s must be lit as has been previously described in section 4.3
Starting. If this is so, press the transmitter manoeuvre buttons and observe the response of the
output relays. If the response is normal, the problem is not related to the remote control
equipment and the installation must be checked. If any of the relays is not activated, the problem
is associated with the remote control equipment. If this happens, observe the appearance of the
LED’s:
LED
LIT
POW ER
Power Supply OK
HARDOK
Board OK
SIGNAL
RF signal OK
FLASHING
--
OFF
Power Supply not OK
Slow: fault in the board
Fast: error in EEPROM
Fault in the board
RF signal detection in
SCANNING mode
The receiver is not receiving
RF signals
DATA
--
Is receiving the correct data
from a TM70
Signal received is not correct
ID
--
ID Code OK
ID not recognised
ORDER
Any digital
manoeuvre ON
--
No digital manoeuvre ON
RELAY
STOP relays ON
--
STOP relays OFF
There are also two LEDs in the receiver (only available in LR72 electronic card) which informa
about the status of the CAN-BUS. If the CAN connection is not working, check the status of the
LEDs:
TM70Bi V3.1 (03/09) 1121174.pdf
IKUSI reserves the right to change this information without prior notice.
13
LED
LIT
FLASHING
OFF
CAN_RUN
Operating status
Pre-operating status
CAN communication non
active
CAN_ERR
Communication OK
Communication error
CAN controller disconnected
If the problem is associated with the equipment, please send both the transmitter and the receiver
to the your Technical Assistance Service Agent, together with a description of the problem and
the status of the LED’s.
If the transmitter becomes so damaged that a spare has to be arranged, it can be quickly
substituted by following the instructions in ANNEX A.
Display error messages V 2.4:
Error message
"Tilt switch "
"Out of Range"
"W rong Crane "
"Error EEP"
"Error W rong
EEP"
"Error Copy
FLASH"
"Error Open File"
"Error File W rite"
"Error File Close"
"Error Open
Radio"
"Error W rite
Radio"
"Error OP &
Masc"
"Error Bad data
EEP"
"Error LAL not
open"
"Error Read LAL
err"
Cause
Inclinometer detected due to an incorrect position of the
transmitter
Transmitter out of range
Crane selector is in wrong position after a crane has been
selected previously
Error when trying to access the content of the EEPROM or the
internal memory. The content of the EEPROM cannot be copied
into the internal memory
EEPROM data corrupted
When duplicating EEPPROM modules a copy failure occured
during the new EEPROM updating process
Internal memory access failure
Error when writing EEPROM data into the flash memory or timeout
error occured when trying to access to the memory
Error when trying to close the internal memory access
The radio cannot be opened
Data cannot be written in the radio
When releasing the STOP pushbutton the signals and the masks
do not match indicating that some masked order is still activated.
EEPROM data corrupted
Error when trying to open the range limiter
Range limiter data cannot be read
TM70Bi V3.1 (03/09) 1121174.pdf
IKUSI reserves the right to change this information without prior notice.
14
ANNEX A - PROGRAMMING A SPARE TRANSMITTER.
In case of damage to the transmitter, it is quickly possible to restore
service, if a spare transmitter is available. To achieve this we have to
install into the spare transmitter the exact parameters of that to be
replaced.
These parameters are stored in an EEPROM memory module, EP70,
easily accessible from the exterior of the transmitter. Switch off the
damaged transmitter and extract the EP70 module by unloosening the
two screws, as shown, and then incorporate this module into the spare
transmitter.
In cases where the damage to the transmitter prevents removal of the
EP70 module, the spare transmitter can be programmed with the
memory module EP70 found inside the receiver.
To achieve this, proceed as follows:
1.
Being the spare transmitter off, remove its empty EP70 module as described above, and insert
the EP70 module from the receiver.
2.
Introduce a charged battery, turn on the
ON/OFF key, push and extract the STOP
button. The LED will pulse green for around
15 seconds.
3.
To copy its contents into the internal memory
of the transmitter press pushbutton 6 followed
by START, keeping both buttons pressed
together while LED blinks red. Once the LED
start to blink orange, release the pushbuttons
and LED will lit green. In the LCD display
models the words “Reading...” and “Reading
ok Change EEP” will be indicated. In case the
LED remains in red colour, (or the LCD
displays “Reading nok”), repeat the process.
4.
W hen the copying process has completed,
extract the EP70 and replace it into the
receiver. Insert the empty EP70 into the spare
transmitter and again press pushbutton 6.
The LED will flash orange, which indicates that the empty EP70 is being written with the stored
parameters In the LCD display models the words “W riting...” and “W riting ok” will be indicated. In
case the LED remains in red colour, (or the LCD displays “W riting nok”), repeat the process.
5.
Afterwards press the STOP. This completes the programming processes.
TM70Bi V3.1 (03/09) 1121174.pdf
IKUSI reserves the right to change this information without prior notice.
15
ANNEX B.- PROGRAMMING THE MACHINE IDENTIFICATION IN LCD TRANSMITTERS.
Transmitters with the LCD display option allow the operator to programme a machine identification label
of up to 24 text characters. This identification is displayed on transmitter starting-up.
This text must identify the machine with a name that is commonly known by the workmen. W hen first
starting the transmitter you can edit/introduce this text as follows:
1. Introduce a battery and turn the ON/OFF key to
ON.
2.
Push in and then extract the STOP button and you
will observe the LED pulse orange-green.
3.
Press pushbutton 4 followed by START button
and keep both pressed together during 3-4
seconds and then you will enter the “CONFIG
MODE”. Press pushbutton 4. (press TW ICE
pushbutton 4 if it only appears the option
“CONFIG MODE”).
4.
Move through the menu with pushbuttons 1 and 2
until reaching the EDIT LABEL menu. Press push
button 4.
5.
Once you have entered into EDITING mode, there
appears in the display the text "CRANE ??" in
which the first character blinks. From this point
you can edit the name of the machine by means of
the push buttons 1 to 4, whose functions are
described as follows:
LCD
LCD
� Pushbutton 1:
To move for the list of established characters in descending order.
� Pushbutton 2:
To move for the list of characters established in ascending order.
� Pushbutton 3:
To return to the previous character in the display.
� Pushbutton 4:
To validate the
following one, (towards the right hand)
published
character
and
move
6. Push START to store the edited text. LCD will show the message “SAVED” for 2 seconds.
7. You exit the EDITING mode by pressing the STOP.
TM70Bi V3.1 (03/09) 1121174.pdf
IKUSI reserves the right to change this information without prior notice.
16
to
the
8.- FREQUENCY CHANGE
FREQUENCY CHANGE
TM70
TM70Bi V3.1 (03/09) 1121174.pdf
IKUSI reserves the right to change this information without prior notice.
17
8.1 - SYSTEM DESCRIPTION
The TM70 radio system contains synthesized frequency radio modules in both transmitter and receiver
which are microprocessor controlled. This allows us to change the radio frequency via the transmitter
in a simple way and the receiver will automatically search for this new frequency.
8.2 - DEFINITIONS
ALLOW ED CHANNELS (CP): is a list of authorized channels, (maximum 70). These are factory
defined and are not modifiable.
BASE CHANNEL (CB): this channel is defined as the W orking Channel and these channels are
exportable; factory defined, it can be modified via the progamation mode. It is an inferior W orking
Channel.
W ORKING CHANNEL (CT): the working radio channel; it is defined as a displacement from the CB. In
the equipment that has this option, the CT is modifiable by the user via the transmitter, by means of a
command to carry out this effect.
EXPLORABLE CHANNELS (EC): they are the CT defined working channels, (maximum 16), that the
receiver is able to fast scan. The rest of the CP channels are also scanned although with a smaller
priority.
8.3 - BASE CHANNEL FREQUENCY CHANGE
The change of frequency is made via commands that in normal work mode will operate or move the
machine. It is very important to follow the programming sequence rigidly, as described below to avoid
any movements of the machine.
ENTERING PROGRAMATION MODE
In order to enter the progamation mode the following procedure must be followed:
�
Situate yourself in close proximity to the
receiver.
�
Turn the key to the on position and push in
the pull out the red stop. Girar la llave a la
posición de contacto.
�
Press the pushbutton (1) into the second
speed and then push the Start pushbutton
and hold both for 2 seconds. During this
time the LED will pulse red.
�
When entering the progamation mode, the
LED of the transmitter will flash orange for a
few moments. After a short pause, the LED
will indicate the Base Channel that is being
used by pulses of green or red in the
following manner:
�
tens by green colour pulses.
�
units by red colour pulses.
�
Thus for example, channel 42 would be
indicated by means of 4 green pulses, followed by 2 red pulses.
�
Next, the LED will again turn orange and the transmitter is now ready to await the introduction of
new data. At this point if you wish to leave the progamation mode, simply press the STOP.
TM70Bi V3.1 (03/09) 1121174.pdf
IKUSI reserves the right to change this information without prior notice.
18
PROGRAMMING A NEW BASE CHANNEL
� Once the Base Channel indication is completed and the LED is blinking orange, you may enter a new
channel from the permitted list (to see attach), by means of pressing the pushbutton (1) which will give
tens and pushbutton (2) the units. Each pulsation is signalized by the LED by means of an orange
blink.
� A few moments after last pulsation, the verification of the new channel is signalized by means of the
LED as described in the previous point. The LED will then blink orange to indicate that the new
channel has been sent to the receiver. W hen this signal transmission is completed the LED will return
to the orange colour.
� If the programming of the new Base Channel has been incorrect then try the process again.
� If the new channel programming has been successful then press the STOP. When re-starting the
transmitter the newly selected Base Channel will commence. The W orking Channel will coincide with
the Base Channel.
� If you try to select a Base Channel that is not included within the permitted range, then the LED will
flash red.
� If the Base Channel change has made with a range control system in place, then the receiver will
locate the new frequency by entering into a temporary TRACKING mode; once the new channel is
located this will be memorised and will then pass to OPERATION mode.
8.4 - WORKING CHANNEL FREQUENCY CHANGE.
Sometimes the transmitters have the possibility of changing the W orking Channel when in the
OPERATION mode to combat occasional interferences. There are two ways to change this channel which
are defined in EEPROM. These are as follows:
CHANGE OF CHANNEL PUSHBUTTON: each press of this pushbutton will advance the W orking
Channel though the frequencies specified in the EC list. W hen the highest channel on that list is reached
then the channel returns again to the Base Channel. Each time the W orking Channel is advance the LED
will blink green.
START PUSHBUTTON: by keeping this pushbutton pressed for a 2 second duration it will advance the
Working Channel this is indicated on the LED by a red flash each time the channel is changed.
TM70Bi V3.1 (03/09) 1121174.pdf
IKUSI reserves the right to change this information without prior notice.
19
ANNEX A: Channel table 433.050 – 434.790 MHz
Channel
01
02
03
04
05
06
07
08
09
10
11
12
13
14
15
16
17
18
19
20
21
22
23
24
25
26
27
28
29
30
31
32
33
34
35
MHz
Channel
MHz
433,050
433,075
433,100
433,125
433,150
433,175
433,200
433,225
433,250
433,275
433,300
433,325
433,350
433,375
433,400
433,425
433,450
433,475
433,500
433,525
433,550
433,575
433,600
433,625
433,650
433,675
433,700
433,725
433,750
433,775
433,800
433,825
433,850
433,875
433,900
36
37
38
39
40
41
42
43
44
45
46
47
48
49
50
51
52
53
54
55
56
57
58
59
60
61
62
63
64
65
66
67
68
69
70
433,925
433,950
433,975
434,000
434,025
434,050
434,075
434,100
434,125
434,150
434,175
434,200
434,225
434,250
434,275
434,300
434,325
434,350
434,375
434,400
434,425
434,450
434,475
434,500
434,525
434,550
434,575
434,600
434,625
434,650
434,675
434,700
434,725
434,750
434,775
NOTE: The RF power automatically adjusts to the allowed levels as follows:
� Channels 1 to 40: 1 mW
� Channels 41 to 70: 10 mW
TM70Bi V3.1 (03/09) 1121174.pdf
IKUSI reserves the right to change this information without prior notice.
20
ANNEX B: Channel table 869.70625 – 869.9 MHz
Channel
MHz
1
3
5
7
9
11
13
15
17
19
21
23
869.70625
869.73125
869.75625
869.78125
869.80625
869.83125
869.85625
869.88125
869.90625
869.93125
869.95625
869.98125
TM70Bi V3.1 (03/09) 1121174.pdf
IKUSI reserves the right to change this information without prior notice.
21
ANNEX C: Channel table 914.150 – 915.875 MHz
Channel
MHz
Channel
MHz
1
2
3
4
5
6
7
8
9
10
11
12
13
14
15
16
17
18
19
20
21
22
23
24
25
26
27
28
29
30
31
32
33
34
35
914.150
914.175
914.200
914.225
914.250
914.275
914.300
914.325
914.350
914.375
914.400
914.425
914.450
914.475
914.500
914.525
914.550
914.575
914.600
914.625
914.650
914.675
914.700
914.725
914.750
914.775
914.800
914.825
914.850
914.875
914.900
914.925
914.950
914.975
915.000
36
37
38
39
40
41
42
43
44
45
46
47
48
49
50
51
52
53
54
55
56
57
58
59
60
61
62
63
64
65
66
67
68
69
70
915.025
915.050
915.075
915.100
915.125
915.150
915.175
915.200
915.225
915.250
915.275
915.300
915.325
915.350
915.375
915.400
915.425
915.450
915.475
915.500
915.525
915.550
915.575
915.600
915.625
915.650
915.675
915.700
915.725
915.750
915.775
915.800
915.825
915.850
915.875
9.- CAN OPEN INTERFACE
TM70Bi V3.1 (03/09) 1121174.pdf
IKUSI reserves the right to change this information without prior notice.
22
CANopen INTERFACE
TM70
TM70Bi V3.1 (03/09) 1121174.pdf
IKUSI reserves the right to change this information without prior notice.
23
9.1 - INTRODUCTION
The TM70 system with CANopen interface is integrated in CANopen networks where it will work in slave
mode. It handles the Bus the state of the Pushbuttons of the TM70 transmitter, such that any external
device can react consequently.
The functionality of the system is according the CiA DS-301 v4.0.2. specification. The implemented profile
is described in CiA DS-401 v2.1 (Input/Output standard), where the pushbutton manoeuvres are
considered as digital inputs.
The implemented characteristics are:
� NMT Functioning: slave.
� NodeID: EEPROM configurable, from 1 to 127.
� Baud rate: EEPROM configurable. Supported speeds: 10, 20, 50, 100, 125, 250, 500, 800 and 1000
Kbps.
� Error control: it can work “Heartbeat” as well as “Node/life guarding”. EEPROM configurable.
� Number of PDO’s: 1 TPDO (manoeuvres state).
� EEPROM parameters recording: not supported.
9.2 - CAN BUS CONNECTION
In order to connect the CAN bus to the LR72 pcb, it contains a 5 poles connector (P4).
TM70Bi V3.1 (03/09) 1121174.pdf
IKUSI reserves the right to change this information without prior notice.
24
The LED signalling is the one recommended by the CiA (CAN in Automation) Organisation in its
document DR-303-1:
Bus Termination
Next to the connector, there is one jumper that allows to connect/disconnect the bus termination. It is
important for a correct bus operation that bus terminations are connected in both ends, and disconnected
in the intermediate nodes.
9.3 - DATA DICTIONARY
The dictionary objects supported by the TM70 are:
1000: DEVICE TYPE
1001: ERROR REGISTER
1002: STATUS REGISTER
1003: PREDEFINED ERROR FIELD
1003.0: number of errors
1003.x: standard error field
1005: COB-ID SYNC
1006: COMMUNICATION CYCLE PERIOD
1007: SYNCHRONOUS W INDOW LENGTH
1008: MANUFACTURER DEVICE NAME
1009: MANUFACTURER HARDW ARE VERSION
100A: MANUFACTURER SOFTW ARE VERSION
100C: GUARD TIME
TM70Bi V3.1 (03/09) 1121174.pdf
IKUSI reserves the right to change this information without prior notice.
25
100D: LIFE TIME FACTOR
1014: COB-ID EMCY
1015: INHIBIT TIME EMERGENCY
1017: PRODUCER HEARTBEAT TIME
1018: IDENTITY OBJECT
1018.0: number of entries
1018.1: Vendor ID
1018.2: Product Code
1018.3: Revision Number
1018.4: Serial number
1800: TRANSMIT PDO COMMUNICATION PARAMETER
1800.0: number of entries
1800.1: COB-ID
1800.2: Transmission type
1800.3: Inhibit time
1800.4: Event timer
1A00: TRANSMIT PDO MAPPING PARAMETER
1A00.0: number of entries
1A00.1: PDO mapping entry
1A00.2: PDO mapping entry
1A00.3: PDO mapping entry
1A00.4: PDO mapping entry
6000: DIGITAL INPUT 8 BITS
6000.0: number of entries
6000.1: start and stop buttons (start1, start2, stop)
6000.2: buttons 1-4 (M1-M8)
6000.3: buttons 5-8 (M9-M16)
6000.4: buttons 9, 10 and auxiliary inputs (M17-M20, A1, A2)
9.4 - PDO
The system is provided with a 4 byte configured transmission PDO:
st
nd
rd
th
1 byte
2 byte
3 byte
4 byte
Object 6000.1 Object 6000.2 Object 6000.3 Object 6000.4
Start1
M1
M9
M17
Start2
M2
M10
M18
Stop
M3
M11
M19
0
M4
M12
M20
0
M5
M13
A1
0
M6
M14
A2
0
M7
M15
0
0
M8
M16
0
The PDO transmission is configured by default as “event driven”, this is, it is sent every time there is a
change on any input.
TM70Bi V3.1 (03/09) 1121174.pdf
IKUSI reserves the right to change this information without prior notice.
26
9.5 - SIGNALLING
The receiver is furnished with two signalling LEDs, controlled according to CiA DR-303-3
recommendation:
CAN-RUN (green): indicates the system state inside the CANopen machine state:
- Blinking every 200 ms. In preoperational state.
- Solid green permanently in operational state.
- One blink every second in stop state.
CAN-ERR (red): indicates error if switched on; in normal conditions it must be switched off.
9.6 - TM70 CAN RECEIVERS
9.6.1 - Ref. 3302626 70GR902 RX-RCANNOCE / TECHNICAL SPECIFICATIONS:
70GR902 RX-RCANNOCE Ref. 3302626
Available frecuencies (ISM bands)
Power supply / Maximum consumption
Inputs / Outputs interface
Ingress protection
Antenna
Working frequency selection
Weight
Dimensions
EEPROM
Signaling
Connexions
STOP function
CAN BUS termination (120 Ohm)
Passive STOP time
Input protection
Output protections (STOP)
Operating mode temperatura range
Storage temperatura (24h)
Storage temperature –long periodsTM70 range supported transmitters
Available complete systems
Specifications
915MHz (FCC certified)
9-35v DC / 5W maximum
CAN:Standard CAN Open protocol 401 (CIA DS401)
IP67 / NEMA-6
External: NEARSON S325TR-015 or equivalent
Automatic: LBT (listen before talking)
430 gr.
Long = 151mm / W idth = 129mm (160mm with PG) /
Height = 61mm
Extractable EP70 module
MultiLED:
7 external LEDS (6 green + 1 bicoloured)
2 internal LEDS (CAN status: 1 red + 1 green)
Fast PLUG-IN plugs and 2 x M16 cable glands
1) Power supply cable gland: M16 / IP67
2) Inputs / Outputs interface cable gland: M16 / IP67
Cat. 1 EN-954-1 / 1 STOP relay: 250V / 6A maximum
STOP response time = 50 miliseconds
ON / OFF jumper (internal)
Programmable: 0,5 to 2 seconds (máx)
PTC / 0,3A fuse
VDR in contacts
-20ºC / +70ºC (-4ºF / 158ºF)
-25ºC / +75ºC (-13ºF / 167ºF)
-25ºC / +55ºC (-13ºF / 131ºF)
T70/1/2; T70/3/4; T70/5/6; T70/7/8
Ref. 3302XXX Equipo comp. TM70/X.CAN-C1-915
TM70Bi V3.1 (03/09) 1121174.pdf
IKUSI reserves the right to change this information without prior notice.
27
Connections scheme :
Receiver’s dimensions -in milimeters-:
It is also available the option Ref. IKUSI 3302620 “Fast fixation kit”, including a set
of 4 magnets and 4 shock absorbers
TM70Bi V3.1 (03/09) 1121174.pdf
IKUSI reserves the right to change this information without prior notice.
28
Maintenance and troubleshooting / LED’s signaling
RECEIVER’S LED SIGNALING
LED
POWER
COLOUR
GREEN
HARDOK
GREEN
RED
HARDOK
STATUS
Switch On if powered
Solid green LED if no error
detected
Blinking during start up
process
Solid red LED if one of these
errors appears:
Watchdog activated /
Oscillator breakdown /
wrong ROM checksum
Reset activated
Blinking fast : wrong EEPROM
checksum / Data corrupted /
CAN Bus error
SIGNAL
DATA
ID
RELAY
ORDER
Internal
LEDS
signaling
GREEN
GREEN
GREEN
GREEN
GREEN
REMARKS
Power supply OK
PROPOSED ACTION
Check the power supply
Receiver hardware OK
OK
Please wait to finish the
start up process
Electronic board hardware
breakdown
----------------
Replace the electronic
board
Reprogramme EEPROM
LED Off if no radio signal
detected (Squelch)
- LED On and the transmitter
switched Off indicates
occupied radio channel
Verify transmitter’s radio
- LED On and DATA
and battery
switched Off indicates radio
channel occupied by a non
IKUSI system
LED Off if a wrong frame is
received
Blinking if receiving good
frames
LED Off and SIGNAL LED
On: Radio breakdown
Replace radios
Switched Off and DATA LED
switched On: no valid ID
If the radio channel is not
busy: verify transmitter’s
selected ID or reset
receiver ID
Blinking if a correct ID is
received
STOP relay activated
----------------
SIGNAL; DATA and ID LED
On, indicates valid frames
from the transmitter. Correct
link.
OK
----------------
----------------
----------------
----------------
CAN-RUN (green): indicates the system state inside the CANopen machine state:
� Blinking every 200 ms. In preoperational state.
� Solid green permanently in operational state.
� One blink every second in stop state.
CAN-ERR (red): indicates error in the field-bus; if switched on; in normal conditions it
must be switched off.
TM70Bi V3.1 (03/09) 1121174.pdf
IKUSI reserves the right to change this information without prior notice.
29
10.- “FIRST COME – FIRST SERVED”
“FIRST COME – FIRST SERVED”
OPERATION
TM70
TM70Bi V3.1 (03/09) 1121174.pdf
IKUSI reserves the right to change this information without prior notice.
30
TM70 – “FIRST COME – FIRST SERVED” OPERATION
10.1 - INTRODUCTION
This option allows the operation of one crane individually by using two transmitters with two different
ID codes, which determine which transmitter is governing the crane at a certain time. For First come
– First served applications the receiver is required to scan the radio channels in order to receive
radio signals from different transmitters.
The First come – First served mode is defined by EEPROM, and the transmitters do not need to
have a selector. The First come – First served mode consists of a receiver which liberates the ID
code every time the receiver is switched off, and hence it starts searching for IDs defined in the
EEPROM ID code list. The first valid ID code found is selected, and locked on to it until the operator
releases the crane by pressing the Stop button. After a time defined in EEPROM (0.1 – 25 seconds,
default 4 seconds), the receiver liberates the ID to which it was locked and starts scanning IDs and
radio channels. The first transmitter switched on is the First transmitter to hold control of the crane,
and it will not let any other transmitter to have control of the crane until the transmitter is switched off.
A First Come – First Served operation with cranes is always delicate, given that the
receiver is FREE every time the STOP button is pressed or there is a radio link failure.
10.2 - TWO TRANSMITTER’S SYSTEMS
RECEIVER 1
ID1
ID2
F1
F1
F2
F2
ID2
ID1
TRANSMITTER 1
TRANSMITTER 2
Transmitters 1 and 2 have two different IDs and transmit in two different radio channels. Once the
receiver is switched off by any of the transmitters, after the liberation time defined in the EEPROM,
the receiver starts scanning for IDs and radio channels, looking for a frame with the start order
pressed.
A First come – First served system can have up to 32 different transmitters governing a single
receiver.
TM70Bi V3.1 (03/09) 1121174.pdf
IKUSI reserves the right to change this information without prior notice.
31
11.- RANGE LIMITER
RANGE LIMITER
TM70
TM70Bi V3.1 (03/09) 1121174.pdf
IKUSI reserves the right to change this information without prior notice.
32
11.1 - SYSTEM DESCRIPTION
TM70 radio remote control systems can be equipped with a range limitation option for overhead
cranes, through which, the system is able to determine if the transmitter is located outside of a zone,
defined as a working area, and deactivates the controls when these situations arise.
The system consists of one or more Infrared transmitters LA70, installed either in fixed positions or on
the controlled crane, oriented in such a way that it covers the targeted working zone. In these cases
the transmitters of the remote control sets are equipped with a sensor which receives the information
coming from the LA70 transmitter. This information is analysed by transmitter microprocessor, which,
in this way knows when the operator has left the working area. Consequently, outputs are deactivated.
Application examples:
11.2 - INFRARED SENSOR
As explained in the above, the sensor element is located in the remote control transmitter and its
function is to receive the infrared information coming from the LA70 transmitter. The location of this
sensor is the following:
The transmitter microprocessor receives the information from the sensor and checks the identity of the
crane. As soon as the sensor stops receiving the signal coming from the crane, the transmitter LED,
which was green, begins to flash in red, (in case of belly box transmitters, a buzzer also sounds), in
order to let the operator know that he has moved too far away. If this situation lasts longer than 4
TM70Bi V3.1 (03/09) 1121174.pdf
IKUSI reserves the right to change this information without prior notice.
33
seconds, all the active commands are cancelled, although communication is maintained with the
receiver. In this way the main contactor and the selection orders are maintained.
In order to return to the operating mode, all the worker has to do is move back into the working zone.
Movement orders must be disabled in order to restart movement. Once the transmitter enters the
working area, movement orders will not be ready to be used unless they have gone to zero. This is to
make movements start in first speed. If the remote control is provided with a Display, whenever the
transmitter is out of range, the message “Out of Range” will be displayed.
The remote control has got 4 modes of operation defined in the EEPROM:
1.- Range Limiter only at start up (Electronic Key): In order to make the transmitter work, it is
necessary that the transmitter is inside the starting zone, defined by the position of the infrared
transmitter.
2.- Range Limiter only in operation: The transmitter can be started anywhere, but the movement orders
will not work until the transmitter is inside the working zone.
3.- Range Limiter at startup and operation: The transmitter in order to work must be inside the working
zone always.
4.- Range Limiter only as an output Relay: This functionality makes the transmitter not to show In range
or Out of range situation in the transmitter itself. It will not mask any order. The information will be sent
to the receiver in order to process the information as an output relay or a condition to the relay table.
11.3 - INFRARED TRANSMITTER
This is the element installed in the crane, which generates the infrared modulated radiation with an
identity code, which permits the sensor its identification.
Emission angle in long travel direction is wider than those of cross travel direction. In this way, the
working area covered by a transmitter is similar in shape to an ellipse, whose dimensions depend on
the height of the bridge over the ground. Approximately, the diagonals of the ellipse according to the
height are the following:
h (m)
D (m)
d (m)
6
24
10
8
32
13
10
40
17
12
48
20
14
56
23
16
64
26
18
68
29
20
70
32
In cases in which it is believed that the area covered by one transmitter is not enough, more slave
transmitters can be installed.
TM70Bi V3.1 (03/09) 1121174.pdf
IKUSI reserves the right to change this information without prior notice.
34
11.4 - INSTALLATION
Make sure that the crane is switched off during the assembly operation. Clear the
work area and use security clothing.
Check the power supply and disconnect the power supply to the crane.
Do not forget to connect the earth cable.
Use flame resistant cables for the connections.
� Find a suitable place for the installation of the infrared transmitter, away from elements,
which could generate intense electrical disturbances and obstacles to the transmission of
light.
� Choose the correct power supply and connect it.
� Fit the jumper selector in master position.
� Select the code programmed in the EEPROM memory of the transmitter.
TM70Bi V3.1 (03/09) 1121174.pdf
IKUSI reserves the right to change this information without prior notice.
35
In cases in which the area covered by a transmitter is not sufficient, other LA70 transmitters can be
connected in series, programmed as slaves in the selector. In this case the code emitted corresponds
with the selector in the master transmitter.
The communication connection between transmitters must be done with shielded wires.
11.5 - TECHNICAL CHARACTERISTICS OF THE LA70
Infrared Transmitter
Power supply
48, 115, 230 Vac ± 10%; 50/60 Hz
Operating temperature
-20 a +65ºC
Protection
IP55
TM70Bi V3.1 (03/09) 1121174.pdf
IKUSI reserves the right to change this information without prior notice.
36
12.- “PITCH & CATCH” OPERATION
“PITCH & CATCH” OPERATION
TM70
TM70Bi V3.1 (03/09) 1121174.pdf
IKUSI reserves the right to change this information without prior notice.
37
TM70 – “PITCH & CATCH” OPERATION
12.1 - INTRODUCTION
This option allows the operation of one crane by two transmitters, through the selection of ID codes,
which determine the mode of operation. For this application, the SCAN option for the receivers is
required in order to receive transmitters in different channels.
This mode of operation consists of the use of a crane by two different transmitters. The first
transmitter governing the crane gets hold of the crane until it as switched off (in principle exactly as
the First come – First served mode of operation). In the event of pressing the STOP pushbutton, the
other transmitter is switched on and the START order is being pressed, the second transmitter gets
hold of the crane without falling the STOP relays. This way, users of the same crane with different
transmitters can pass each other the crane without falling the STOP relays. As the START
pushbutton must be pressed when transferring the crane if the START relay has got a connected
Horn, when the transfer is done an audible sound can be produced.
Pitch & Catch operation is always delicate, given that the receiver is FREE every time the
STOP button is pressed or there is a radio link failure.
12.2 - TWO TRANSMITTERS SYSTEMS
RECEIVER 1
ID1
ID2
F1
ID1
TRANSMITTER 1
TM70Bi V3.1 (03/09) 1121174.pdf
IKUSI reserves the right to change this information without prior notice.
F1
F2
F2
ID2
TRANSMITTER 2
38
Transmitters do not need selectors. The receiver is the one that Frees its ID code.
When a Pitch & Catch operation needs to be performed, the user of the transmitter that wants to
Catch the crane must ask the user holding the crane to release the crane. The procedure is the
following: The owner of the crane must press the STOP button while the user that wants to Catch the
crane must be pressing the START button. The receiver will free the ID code and will SCAN new ID
codes and new channels, if in the lapse of time of a passive STOP, it encounters the new ID it will
keep on going without falling the STOP relays.
In the event that the transmitter governing the crane stops while the second transmitter is switched
off, the system will STOP normally and will be free until one transmitter with a valid ID presses the
START button.
When a Pitch & Catch operation is finished, the first transmitter to press START will get hold of the
crane.
This mode of operation is personalised in the remote control EEPROM and must be done by IKUSI
personnel only.
TM70Bi V3.1 (03/09) 1121174.pdf
IKUSI reserves the right to change this information without prior notice.
39
13.- TANDEM OPERATION
TANDEM OPERATION
TM70
TM70Bi V3.1 (03/09) 1121174.pdf
IKUSI reserves the right to change this information without prior notice.
40
TM70 – TANDEM OPERATION
13.1 - INTRODUCTION
This option allows the operation of two cranes individually or in tandem by using one transmitter by
the selection of ID codes, which determines the mode of operation. For tandem applications both
receivers are required to scan the radio channels in order to receive radio signals from different
transmitters.
Once a mode has been selected, the access to the selected receiver or receivers will be blocked for
other transmitters, until they have not been liberated by the transmitter having the control. This
blocking is maintained even in case that the equipment is switched off.
When a selection is made with the transmitter disconnected, the transmitter will not start and shows
in the LED that the selection made is not correct with 0,4s red pulses. The transmitter must be
switched off and restart it with the selection with which it was switched off.
A Tandem operation with cranes is always delicate.
Remember that there are safety devices, (limit switches, anti collision guard systems, etc.),
which can affect and stop one of the cranes, while the other continues working.
st
In the tandem systems with LCD Display option, in the 1 line of the display will be shown the crane 1
nd
name and in the 2 line the crane 2 name. W ith the selector switch in position 1+2 both names will
be shown.
You can personalize the name of the 2 cranes following the description in ANNEX A in this manual.
The modified name of the crane in the transmitter will not be updated in the receiver
EEPROM. In order to do it, please copy the new information located in the transmitter
EEPROM into the receiver one.
TM70Bi V3.1 (03/09) 1121174.pdf
IKUSI reserves the right to change this information without prior notice.
41
13.2 - ONE MASTER TRANSMITTER SYSTEMS
RECEIVER 1
RECEIVER 2
F1
F2
ID2
ID1
F1
ID1
SLAVE
MASTER
F2
F2
F1
ID2
SLAVE
ID1
MASTER
The MASTER transmitter has got a crane selector “1 / 1+2 / 2”, while the SLAVE transmitter has only
got a release “R” push button.
When a TANDEM operation is needed, the operator of the MASTER transmitter must need that the
SLAVE transmitter operator must release the RECEIVER 2. In order to do it, it has to be pressed
simultaneously the release “R” push button and the START button. The transmitter will send to the
RECEIVER 2 the liberation order, remaining disconnected and ready to accept a new ID code.
At this stage, the position “1+2” may be selected in the MASTER transmitter and then press the
START button until the Green LED is switched on and it will send the new ID code. Both receivers, 1
and 2, will then be started and ready to TANDEM operation.
When TANDEM operation has finished, the MASTER transmitter must select position 1 again and
press the START button. By doing this, RECEIVER 2 is again ready to be used by the SLAVE
transmitter, and the MAESTRO transmitter only controls RECEIVER 1.
TM70Bi V3.1 (03/09) 1121174.pdf
IKUSI reserves the right to change this information without prior notice.
42
13.3 - TWO MASTER TRANSMITTERS SYSTEMS
RECEIVER 1
RECEIVER 2
F1
F2
F1
F2
ID2
ID1
ID2
ID1
F1
F2
F1
ID1
F2
ID2
MASTER I
MASTER II
In the event of push button systems in tandem operation, with two Master transmitters, both of them
will have a “1 / 1+2 / 2” selector and a release pushbutton “R”.
When one of the transmitters must work in tandem, the operator must require his workmate the use
of the crane. To liberate the crane the operator will have to press “R” and Start simultaneously in his
transmitter. The receiver in which, the operator was working will be liberated and ready to accept
another ID code within the list, and the transmitter gets disconnected.
Following this, the transmitter that is going to perform the tandem operation, the position “1+2” should
be selected and then press the Start button until the green LED light is switched on. Both receivers
will be connected with the transmitter.
When the operation has been finalised, the “R” and Start buttons must be pressed simultaneously, to
liberate both receivers, and be able to do new operations.
With console transmitters, the function “R” is included in a four step rotary selector “R / 1 / 1+2 / 2”.
The way of operation is the same in both cases.
TM70Bi V3.1 (03/09) 1121174.pdf
IKUSI reserves the right to change this information without prior notice.
43
14.- ANALOGUE FEEDBACK CALIBRATION
ANALOGUE FEEDBACK
CALIBRATION
TM70
TM70Bi V3.1 (03/09) 1121174.pdf
IKUSI reserves the right to change this information without prior notice.
44
TM70 – ANALOGUE FEEDBACK CALIBRATION
14.1 - INTRODUCTION
Systems with analogue feedback need to have the options Display and Analogue Feedback.
Systems with analogue feedback need at startup the calibration of the analogue input by the
distributor or the user. The following steps need to be done:
14.2 - CALIBRATION OF THE ANALOGUE FEEDBACK WITH LCD DISPLAY
Transmitters with display option, allow the operator the calibration of the analogue input through the
edition of a three digit value plus a comma and a measurement unit up to three characters.
The modified feedback calibration data will not be updated in the receiver EEPROM. In
order to do it, please copy the new information located in the transmitter EEPROM into the
receiver one.
At the remote control start up the Calibration must be done as follows:
1.
Insert a fully charged battery and turn ON the
contact key.
2.
Push and Pull the STOP pushbutton. An orange
blink will be seen on the LED followed by green
pulses.
3.
Place a known load on the crane in order to
introduce the First value in Calibration mode.
4.
Switch off the remote control and start the
system entering in CALIBRATION mode. In
order to do so, it is necessary to do the
following:
5.
Press push button number 4 up to second
speed and press START. Keep both
pushbuttons pushed for a couple of seconds
until it appears on the display CONFIG mode.
6. Press the push button number 4 to go inside the
MENU.
7. To move through the menu, use pushbuttons 1 & 2 until CALIBRATION menu is reached.
8. Press pushbutton 4.
TM70Bi V3.1 (03/09) 1121174.pdf
IKUSI reserves the right to change this information without prior notice.
45
9.
Once we are in CALIBRATION mode, we enter a submenu where we can select the following
pressing pushbuttons 1 & 2: VALUE 1, VALUE 2, UNITS. Pressing pushbutton 4 we enter the
selected menu.
� Pushbutton 1: To move through the character list in a descending order.
� Pushbutton 2: To move through the character list in an ascending order.
� Pushbutton 3: To return to the previous character on the display.
� Pushbutton 4: To validate the edited character and move to the next character.
10. Once the corresponding value to the suspending load has been assigned, the value in the display
will be of three digits plus a comma. Units must be edited such that the value represented and
the units are coherent. Validate the value inserted pressing START. VALUE 1 will be memorised.
11. Push pushbutton 1 to return to the previous menu in order to edit the UNITS. UNITS must have
no more than three characters per file -> 3+3.
12. Press STOP and restart the crane again. Replace the load with another known load.
13. Repeat the process again (steps 4 to 8) selecting VALUE 2 in the CALIBRATION menu.
14. Once finished the feedback calibration process, the system will be calibrated.
At this point the system is ready to work normally. Until calibration is performed, data appearing in the
display will be inconsistent.
Calibration generates a linear interpolation of the possible values. This means that it can be used with
all systems that generate a linear analogue outputs. For non linear systems the interpolation will not
produce a correct display value. Calibration allows to obtain negative values.
Example of calibration of a load cell:
st
Enter into the calibration mode and introduce the value corresponding to the hook without load (1
value).
Validate the value pressing START. Switch off the transmitter.
Start the system again and raise a known load.
nd
Switch off the transmitter and enter again to the calibration mode for the edition of the 2 value.
Press START to validate the value.
Press pushbutton 1 to edit the units.
Press START to validate the units.
Switch off the transmitter.
The equipment is already ready to work normally.
TM70Bi V3.1 (03/09) 1121174.pdf
IKUSI reserves the right to change this information without prior notice.
46
14.3- LR71/72 and 0-10V ASSEMBLY
IN0-10V (Ref. 2303755)
Cod-2303755
Cod-1131026(x4)
Cod-1135024(x2)
TM70Bi V3.1 (03/09) 1121174.pdf
IKUSI reserves the right to change this information without prior notice.
47
15.- IN0450P OPTION
IN0450P Option
TM70
TM70Bi V3.1 (03/09) 1121174.pdf
IKUSI reserves the right to change this information without prior notice.
48
15.1 - INTRODUCTION and FUNCTIONAL DESCRIPTION
The IN0450P electronic card can be conected to the LR70, 0-3V analogue input and it allows to
measure the frequency coming from a pulse generator operating between 0 - 450 Hz range.
This electronic card is a frequency voltage converter and it can be used, for example, as an
interface between an anemometer (sensor) that provides a pulsed signal, in order to show in the
transmitter’s display the speed of the wind, in real time mode, using the feedback option.
The card supplies a +12v DC voltage output to power the sensor.
Technical characteristics:
�
�
�
�
Maximum resolution: 8 bits.
Input frequency range: 0 – 450 Hz.
Galvanically isolated from the main logic board (LR70).
Operating temperature range: –20ºC a +70ºC
Signals and connections block diagram:
+12v DC
ENTRADA PULSOS
PULSED SIGNAL INPUT
GND
TM70Bi V3.1 (03/09) 1121174.pdf
IKUSI reserves the right to change this information without prior notice.
49
15.2 - IN0450P and LR70 ASSEMBLY
Cod. 1131026 (x4)
IN0450P
Cod. 1135024 (x2)
TM70Bi V3.1 (03/09) 1121174.pdf
IKUSI reserves the right to change this information without prior notice.
50
16.- IN4D OPTION
IN4D OPTION
TM70
TM70Bi V3.1 (03/09) 1121174.pdf
IKUSI reserves the right to change this information without prior notice.
51
16.1 - INTRODUCTION AND FUNCTIONAL DESCRIPTION
The IN4D electronic card provides 4 digital inputs interface to the TM70 receiver. This card can be
connected as an expansion -as single card- in the LR70 receiver card through P16 connector. The
IN4D card can also be used as a multi-digital input using the INCAN option (multiple IN4D inputs
option), as an alternative to the single one.
The IN4D card is basically a four digital to analogue signal converter. The four digital signals (IN1, IN2,
IN3 and IN4) are converted to a 0 to 3 volts analogue value, available in the LR70 (or in the INCAN
card). See figure 1.
The four digital inputs, IN1, IN2, IN3 and IN4 must have the following analogue values, in reference to
the pin 6 (GND) ; I3 connector:
� 0 to 4V is equivalent to a deactivated state or ‘0’ logic state.
� 8 to 28V is equivalent to an activated state or ‘1’ logic state.
+VI
I3
IN4D
I1
1
1
2
2
IN2
3
3
IN3
4
4
IN4
5
5
GND
6
6
IN1
Figure 1
See I3 connector: 1 to 6 pins.
Very important remark: Do not apply higher voltages than 28 volts, in order to prevent card’s
damage.
TM70Bi V3.1 (03/09) 1121174.pdf
IKUSI reserves the right to change this information without prior notice.
52
If there is no external voltage range available, the card provides through pin number 1 (+VI), a voltage
between 12 and 20 volts, to activate the inputs as shown in the figure 2.
I3
+VI
I1
IN4D
1
1
IN1
2
2
IN2
3
3
IN3
4
4
5
5
6
6
IN4
GND
Figure 2
Block diagram of the signals (see figure 3):
LR70
I3
+VI
IN1
IN4D
I1
P16
1
1
GND
2
2
+VI
3
1
2
IN2
3
3
3.3V
IN3
4
4
GND
4
IN4
5
5
GND
5
GND
6
6
IN
6
Figure 3
TM70Bi V3.1 (03/09) 1121174.pdf
IKUSI reserves the right to change this information without prior notice.
53
Electronic card top view (see figure 4).
I1
6
5
1
3
5
2
4
6
4
3
2
1
I3
Figure 4
TM70Bi V3.1 (03/09) 1121174.pdf
IKUSI reserves the right to change this information without prior notice.
54
16.2 - IN4D AND LR71/LR72 ASSEMBLY
Cod- 1131026(x4)
pin 1
Cod- 1135024(x2)
TM70Bi V3.1 (03/09) 1121174.pdf
IKUSI reserves the right to change this information without prior notice.
55
17. - A1P4RCAN OPTION
A1P4RCAN OPTION
TM70
TM70Bi V3.1 (03/09) 1121174.pdf
IKUSI reserves the right to change this information without prior notice.
56
17.1.- INTRODUCTION and FUNCTIONAL DESCRIPTION
The A1P4RCAN CAN expansion module provides to the TM70 receiver, 4 relays output and an analogue
output at the same time. The analogue output simulates a digital potentiometer with 64 steps available in
each semi-axis of the power supply. See the diagram block below (size ½ of LR72):
K1
K2
CAN
K3
K4
+V
11k2
VOUT
-V
GND
This CAN expansion provides to the user the following outputs :
An analogue output simulated by a digital potentiometer with 128 steps and galvanically isolated.
Free to use four relays outputs, K1, K2,K3 and K4.
These outputs are controlled by CAN BUS, writing in its addresses CANOpen frames. The CAN address of
the electronic card is conformed using the 7 jumpers of P1 connector. Jumper in position 1 corresponds with
the first bit of the CAN address. Thus, inserting several bridges it is possible to select different addresses
7
from «1 » until «127» (2 ), maximum.
Very important : The address « 0 » is not a valid address ; so the board allways must be fitted with at least
one jumper. W ith one jumper it is possible to configure 7 different addresses.
17.2.- RECEIVER ASSEMBLY and TELE-TEACHING OPTION
LR72 ELECTRICAL CONNECTION
This expansion is connected to the LR72 board using two connectors; 2 pins connector labeled RL4 for
power supply 8-30V (+VI and GND); 5 pins connector labeled RL3 for CAN Bus connection with the following
signals :
Pin
Name
Function
1
GNDCAN
Ground
2
CANL
CANL bus signal (CANLow signal)
3
SHLCAN
Shielding
4
CANH
CANH bus signal (CANHigh signal)
5
VCAN
Power Supply
TM70Bi V3.1 (03/09) 1121174.pdf
IKUSI reserves the right to change this information without prior notice.
57
RL1
RL2
1
GN
+V
5
RL3
RL4
RL3
+VI
GN
1
5
RL4
Cod. 1141684: TM70 1M abatable base
Cod. 1184005: UNEX 2221-0 clip
Cod. 1095040: CAN RC70 1 expansion cable
Cod. 1131030: M3x6 C/R DIN84 screw
Cod. 2303908: A1P4RCAN electronic board
RELAY OUTPUTS
The following connections are available for each relay: normally open (NO), normally closed (NC) and
common, in the RL1 connector as shown in the following table. Disposition of 4 manoeuvre relays of
250V/8A.
Pin
1
2
3
4
5
6
7
8
9
10
11
12
Function
K1 contact: normally closed
K1 common contact
K1 contact: normally opened
K2 contact: normally closed
K2 common contact
K2 contact: normally opened
K3 contact: normally closed
K3 common contact
K3 contact: normally opened
K4 contact: normally closed
K4 common contact
K3 contact: normally opened
TM70Bi V3.1 (03/09) 1121174.pdf
IKUSI reserves the right to change this information without prior notice.
58
ANALOGUE OUTPUT
The analogue output is connected through RL2 connector with the following signals (Imax=15mA):
Pin
1
2
3
4
Name
VOUT
GND
-V
+V
Function
Analogue Output
Potentiometer’s middle point
Negative power supply (Minimun: -50V)
Positive power supply (Maximun: 50V)
TELE-TEACHING (V3.1 OF SOFTWARE OR HIGHER VERSIONS)
Through Tele-Alignment can set the maximum and minimum values, the polarity inversion, acceleration or
deceleration ramp and curve type of the analogue output. To change to Tele-Alignment mode is necessary to
introduce a bridge in the jumper P5 (see Jumpers configuration). Only available for TM70 consol box from
3.1 software version or higher.
CANL CANH
+
VI GND
CAN ADDRESS
TELEALIGNMENT
Relay outputs
TM70Bi V3.1 (03/09) 1121174.pdf
IKUSI reserves the right to change this information without prior notice.
Analogue output
59
18.- A1P4RCAN OPTION
A2ICAN OPTION
TM70
TM70Bi V3.1 (03/09) 1121174.pdf
IKUSI reserves the right to change this information without prior notice.
60
18.1- INTRODUCTION & FUNCTIONAL DESCRIPTION
The A2VCAN electronic board gives to the modular TM70 systems an analogue output in current (PW M),
allow the government of electro-hydraulic proportional valves with input reference in current. The electronic
board contains two output stages galvanically each other separated and from the control common logic.
CAN bus
CANopen
Protocol
LR72
RECEIVER
LOGIC
BOARD
+ Vi
CONTROL LOGIC BOARD (uP)
A2ICAN
VPP1
GND1
VO1
VR1
VPP2
GND2
VO2
VR2
PWM1 VO1
PWM2 VO2
ISP
A2ICAN electronic board is an expansion of two analogue outputs controlled by the CANopen interface.
The A2ICAN electronic board implement, for integration into the TM70 system, an own resident software in
its microprocessor, that performs the following functions:
Communication with the LR72 electronic board through CANOpen protocol, using the standard
profile 401, input/output digital/analogue (CIA DS401 - CANopen Device Profile for Generic I/O
Modules).
Generates two analogue outputs in current according to the received instructions and the settings for
each output.
There are two types of response curves for each output:
Linear: response of the analogue output proportional to the input
Non-linear: the response of the analogue output is exponentially regarding the input. Variations of the
joystick inputs at the beginning of his movement will result in small changes of the output voltage,
while the same variations of the joystick input at the end of the movement will result in major
changes in the output voltage.
The choice of one or another profile is decided by a customization parameter P (customizable by EEPROM
or Tele-Alignment), which uses 0 for linear curve and 1, 2 or 3 for exponential curves from low to high grade.
It also can be programmed exit ramps on rise and/or fall per semiaxis. The form of response of the ramps is
under defined output type: linear or nonlinear.
The ramp speed is defined for each semiaxis by a parameter that can take a value between 0 and 15, by
default 0. Each of these values corresponds to a ramp time from minimum to maximum value given by the
following table:
TM70Bi V3.1 (03/09) 1121174.pdf
IKUSI reserves the right to change this information without prior notice.
61
0 -+ without ramp
1 -+ 0,1 s
2 -+ 0,2 s
3 -+ 0,3 s
4 -+ 0,4 s
5 -+ 0,5 s
6 -+ 0,6 s
7 -+ 0,8 s
8 -+ 1,0 s
9 -+ 1,2 s
10 -+ 1,5 s
11 -+ 1,7 s
12 -+ 2,0 s
13 -+ 2,5 s
14 -+ 3,5 s
15 -+ 5,0 s
Each output is a PW M signal with current feedback in which is possible the control and compensation of the
switching frequency and pulse width. It also implements a superimposed "dither" signal on the output, with
variable frequency and amplitude, to soften the response of certain hydraulic valves. The "dither" is available
only when the switching frequency of the PW M output is 5 kHz:
PW M Frequency range: 33,35,40,45 ... 1275 and 5000 Hz
Dither Frequency range: 33 ... 255 Hz
Dither Amplitude range: 0 ... 50%
Through Tele-Alignment can set the maximum and minimum values, the polarity inversion, acceleration or
deceleration ramp and curve type of the analogue output. To change to Tele-Alignment mode is necessary to
introduce a bridge in the jumper P6 (see Jumpers configuration). Only available for TM70 consol box from
3.1 software version or higher.
Other features of the PW M current outputs:
Power supply range of the expansion 8-30V, and of the outputs 5-35V.
Each output channel has 2 outputs only one of which will be connected, according to the sign of the
input. 2 PW M outputs are identical and independent.
The output resolution is 128 steps by semiaxis (256 max – 8 bit), corresponding to step 0 a null
output and step 127 to obtained from the permanent exit from the positive supply.
Max current = 5A (each output).
Outputs protected against short-circuit.
18.2- CONNECTIONS & JUMPERS CONFIGURATION
CONNECTIONS WITH THE LR72
The expansion connects to the LR72 electronic board through two connectors, one of 2 pin for power supply
(VI + and GND) and the other of 5 pin for the CAN bus with the following signals:
Power connector
Pin number
Function
GND
Ground
+VI
DC between 8 y 30V
CAN bus connector
Name
Function
VCAN
Power supply
CANH
CANH pin of the CAN bus
GNDCAN
Ground (Shielding)
CANL
CANL pin of the CAN bus
GNDCAN
Ground
OUTPUTS
Each analogue output has two serial relays that switch the output signal to one of two ways, the direct or the
inverse. If not activate any of the relays, both outputs (the direct and inverse) are disconnected.
TM70Bi V3.1 (03/09) 1121174.pdf
IKUSI reserves the right to change this information without prior notice.
62
OUTPUT PWM1
The connections of the output 1 are through 4 pole terminal plug, with the follow pin assignment:
Output 1 connector
Pin Name
Function
VPP1
Power of channel 1
GND1
Ground of channel 1
VO1
DIRECT analogue PW M output of channel 1
VR1
INVERSE analogue PW M output of channel 1
OUTPUT PWM2
The connections of the output 1 are through 4 pole terminal plug, with the follow pin assignment:
Output 2 connector
Pin name
Function
VPP2
Power of channel 2
GND2
Ground of channel 2
VO2
DIRECT analogue PW M output of channel 2
VR2
INVERSE analogue PW M output of channel 2
ISP (PROGRAMACION “IN CIRCUIT” / “IN SYSTEM”)
The expansion has a connector to record “In-System” (eg. Microprocessor software update). This connector
has 10 pins:
ISP connector
Pin name
ISP2
TX2
RX2
GND
RX1
TX1
ISP
VCC
MRNOT
+VI
Function
Input connected to the ground to place the microcontroller in recording mode
Not used
Receiving data signal
Ground
Receiving data signal
Transmisión data signal
Not used
Power supply output at 3,3 V
Reset input, active when it is connected to ground
Power supply output at 12 V (not stabilized, can vary between 8 y 22 V)
TM70Bi V3.1 (03/09) 1121174.pdf
IKUSI reserves the right to change this information without prior notice.
63
JUMPERS CONFIGURATION
Size ¼ of LR72
Connections with the LR72
P5: “Jumper” for configuration of the
CAN direction of the expansion.
“Jumper” = ON -+ “1” logic.
Programmable addresses: 1…63
max
P6: “Jumper” to enable or disable the
Tele-Alignment process.
Enabled Tele-Alignment = “jumper”
placed or ON.
P6
Disabled Tele-Alignment = “jumper”
eliminated or OFF.
P6
1 = VPP (channel power)
2 = GND (Channel ground)
3 = VO (DIRECT analogue PWM output)
4 = VR (INVERSE analogue PWM output)
TM70Bi V3.1 (03/09) 1121174.pdf
IKUSI reserves the right to change this information without prior notice.
64
19.- A2VCAN OPTION
A2VCAN OPTION
TM70
TM70Bi V3.1 (03/09) 1121174.pdf
IKUSI reserves the right to change this information without prior notice.
65
19.1- INTRODUCTION & FUNCTIONAL DESCRIPTION
The A2VCAN electronic board gives to the modular TM70 systems an analogue output in voltage option,
allow the government of variable frequency drives with voltage control, electro-hydraulic proportional valves
with input reference in voltage, etc. The electronic board contains two output stages galvanically each other
separated and from the control common logic.
CAN bus
CANopen
Protocol
LR72
RECEIVER
LOGIC
BOARD
+ Vi
CONTROL LOGIC BOARD (uP)
A2VCAN
VPP1
GND1
VO1
VR1
VPP2
VNN2
VO2
VR2
OUTPUT1 VO1
OUTPUT2 VO2
ISP
A2VCAN electronic board is an expansion of two analogue outputs controlled by the CANopen interface. Can
generate two analogue outputs (dependent on supply voltage) with a resolution of 10 bits (1024 steps).
The A2VCAN electronic board implement, for integration into the TM70 system, an own resident software in
its microprocessor, that performs the following functions:
Communication with the LR72 electronic board through CANOpen protocol, using the standard
profile 401, input/output digital/analogue (CIA DS401 - CANopen Device Profile for Generic I/O
Modules).
Generates two analogue outputs in voltage according to the received instructions and the settings for
each output.
There are two types of response curves for each output:
Linear: response of the analogue output proportional to the input
Non-linear: the response of the analogue output is exponentially regarding the input. Variations of the
joystick inputs at the beginning of his movement will result in small changes of the output voltage,
while the same variations of the joystick input at the end of the movement will result in major
changes in the output voltage.
The choice of one or another profile is decided by a customization parameter P (customizable by EEPROM
or Tele-Alignment), which uses 0 for linear curve and 1, 2 or 3 for exponential curves from low to high grade.
It also can be programmed exit ramps on rise and/or fall per semiaxis. The form of response of the ramps is
under defined output type: linear or nonlinear.
TM70Bi V3.1 (03/09) 1121174.pdf
IKUSI reserves the right to change this information without prior notice.
66
The ramp speed is defined for each semiaxis by a parameter that can take a value between 0 and 15, by
default 0. Each of these values corresponds to a ramp time from minimum to maximum value given by the
following table:
0 -+ without ramp
1 -+ 0,1 s
2 -+ 0,2 s
3 -+ 0,3 s
4 -+ 0,4 s
5 -+ 0,5 s
6 -+ 0,6 s
7 -+ 0,8 s
8 -+ 1,0 s
9 -+ 1,2 s
10 -+ 1,5 s
11 -+ 1,7 s
12 -+ 2,0 s
13 -+ 2,5 s
14 -+ 3,5 s
15 -+ 5,0 s
Through Tele-Alignment can set the maximum and minimum values, the polarity inversion, acceleration or
deceleration ramp and curve type of the analogue output. To change to Tele-Alignment mode is necessary to
introduce a bridge in the jumper P6 (see Jumpers configuration). Only available for TM70 consol box from
3.1 software version or higher.
Other features of the PW M current outputs:
Power supply range of the expansion 8-30V, and of the outputs 5-35V.
Max current = 10 mA (each output).
Outputs protected against short-circuit.
19.2- CONNECTIONS & JUMPERS CONFIGURATION
CONNECTIONS WITH THE LR72
The expansion connects to the LR72 electronic board through two connectors, one of 2 pin for power supply
(VI + and GND) and the other of 5 pin for the CAN bus with the following signals:
Power connector
Pin number
Function
GND
Ground
+VI
DC between 8 y 30V
CAN bus connector
Name
Function
VCAN
Power supply
CANH
CANH pin of the CAN bus
GNDCAN
Ground
CANL
CANL pin of the CAN bus
GNDCAN
Ground
OUTPUTS
The voltage outputs are generated from PW M pulses, and them filtered result in radiometric tension outputs
(dependent on supply voltage). The two outputs are electrically isolated respect to the logic and each other.
The control of relays is done via VREL1 and VREL2 signals. Also, it needs to be activated the common of
both relays by VCOMREL signal. W hen the relays are off, the output voltage VO1 and VO2 are the values of
reference voltage VR1 and VR2 connected at each output.
The output values range goes from 0 to 100% of power supplies VPP1 and VPP2 connected to each of the
outputs and have a resolution of 10 bits (1024 values).
TM70Bi V3.1 (03/09) 1121174.pdf
IKUSI reserves the right to change this information without prior notice.
67
OUTPUT 1 (VO1)
The connections of the output 1 are through 4 pole terminal plug, with the follow pin assignment:
Output 1 connector
Pin Name
Function
VPP1
Power of channel 1
GND1
Ground of channel 1
VO1
Analogue output of channel 1
VR1
Zero position signal signal to get through the output 1 when the relay is inactive
OUTPUT 2 (VO2)
The connections of the output 1 are through 4 pole terminal plug, with the follow pin assignment:
Output 2 connector
Pin name
Function
VPP2
Power of channel 2
GND2
Ground of channel 2
VO2
Analogue output of channel 2
VR2
Zero position signal signal to get through the output 2 when the relay is inactive
ISP (PROGRAMACION “IN CIRCUIT” / “IN SYSTEM”)
The expansion has a connector to record “In-System” (eg. Microprocessor software update). This connector
has 10 pins:
ISP connector
Pin name
ISP2
TX2
RX2
GND
RX1
TX1
ISP
VCC
MRNOT
+VI
Function
Input connected to the ground to place the microcontroller in recording mode
Not used
Receiving data signal
Ground
Receiving data signal
Transmisión data signal
Not used
Power supply output at 3,3 V
Reset input, active when it is connected to ground
Power supply output at 12 V (not stabilized, can vary between 8 y 22 V)
TM70Bi V3.1 (03/09) 1121174.pdf
IKUSI reserves the right to change this information without prior notice.
68
JUMPERS CONFIGURATION
Size ¼ of LR72
Connections with the LR72
P5: “Jumper” for configuration of the
CAN direction of the expansion.
“Jumper” = ON -+ “1” logic.
Programmable addresses: 1…63
max
P6: “Jumper” to enable or disable the
Tele-Alignment process.
Enabled Tele-Alignment = “jumper”
placed or ON.
P6
Disabled Tele-Alignment = “jumper”
eliminated or OFF.
P6
1 = VPP (channel power)
2 = GND (Channel ground)
3 = VO (Channel voltaje analogue output)
4 = VR (Zero position voltage, when K rely of
each channel is inactive.
TM70Bi V3.1 (03/09) 1121174.pdf
IKUSI reserves the right to change this information without prior notice.
69
19.3- EXPANSIONS POWER SUPPLY ELECTRONIC BOARD POT70V4
POT70V4 is an independent and isolated electronic board with 4 power supplies, which are used to supply
the output stage of the A2VCAN electronic board’s analogue outputs.
This expansion is mounted as datasheet; only the number of required DC/DCs (power supplies) will be
mounted. Each DC/DC can supply the outputs of two A2VCAN; 4 analogue outputs in voltage.
The energy for POT70V4 module is provided by the LR72 board.
Technical features:
Size ¼ of LR72
2 DC/DC available:
o 12V/0/-12V, 85mA
o 15V/0/-15V, 65mA
Power supply range of DC/DC: 9 to 18V
TM70Bi V3.1 (03/09) 1121174.pdf
IKUSI reserves the right to change this information without prior notice.
70
20.- T70/1 & T70/2 ATEX TRANSMITTERS
T70/1 & T70/2 ATEX TRANSMITTERS
TM70
TM70Bi V3.1 (03/09) 1121174.pdf
IKUSI reserves the right to change this information without prior notice.
71
20.1- MAIN CHARACTERISTICS
ATEX TRANSMITTER’S TECHNICAL CHARACTERISTICS
Transmitter type
T70/1 ATEX
T70/2 ATEX
Ingress protection
IP65 / NEMA-4
Battery life
>8h (50% duty cycle)
Operating temperature range
-20ºC +70ºC
Type of battery / Nominal charge
BT06K-ATEX / 500mAh
Battery charger compatibility
BC70K o CB70
Orange LED signalling
Replaced by a double signalling: green + red
DLA option (Display and Limit Range
Not available
option)
Feedback information option
Not available
Antenna
Internal
SIMM module –parameter’s set up-Extractable EP70 EEPROM
Maximum number of maneouvres
6 + START + STOP
10 + START +
STOP
Weight –including battery500 g
600 g
TM70Bi V3.1 (03/09) 1121174.pdf
IKUSI reserves the right to change this information without prior notice.
72
HEADQUARTER - SPAIN
IKUSI - Ángel Iglesias S.A.
Pº Miramón, 170
20009 San Sebastián, SPAIN
Tel.: +34 943 44 88 00
Fax: +34 943 44 88 20
[email protected]
www.ikusi.com
AUSTRALIA - NEW ZEALAND
IKUSI ANZ PTY LTD
Tel.: +61 3 9720 7022
Fax: +61 3 9720 7422
[email protected]
CHILE
INGENIERÍA IKUSI CHILE, LTDA.
Tel.: +56 2 335 9661
Fax: +56 2 233 7511
[email protected]
FRANCE
IKUSI FRANCE SARL
Tel.: +33 1 43 03 52 22
Fax: +33 1 43 03 52 42
[email protected]
MEXICO
IKUSI MÉXICO, S.A. DE C.V.
Tel.: +52 55 5663 8600
Fax: +52 55 5663 8684
[email protected]
GERMANY
IKUSI GmbH
Tel.: +49 8464602420
Fax: +49 8464602423
[email protected]
PORTUGAL
IKUSI ELECTRÓNICA, LDA.
Tel.: +351 22 947 8240
Fax: +351 22 947 8249
[email protected]
RUSSIA
IKUSI, LLC.
Tel.: +7 495 583 93 41
Fax: +7 495 586 17 71
[email protected]
UNITED ARAB EMIRATES
IKUSI MIDDLE EAST FZE
Tel.: +971 4 204 5606
Fax: +971 4 204 5610
[email protected]
COLOMBIA
IKUSI COLOMBIA, S.A.
Tel.: +57 1 638 63 54
Fax: +57 1 621 15 65
[email protected]
TM70Bi V3.1 (03/09) 1121174.pdf
IKUSI reserves the right to change this information without prior notice.
73