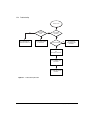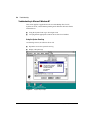
1
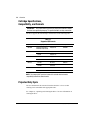
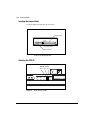
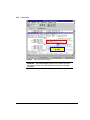
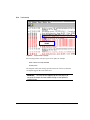
SLR Tape Drive
User Guide
Second Edition (January 1998)
Part Number 340622-002
Compaq Computer Corporation
Notice
The information in this publication is subject to change without notice.
COMPAQ COMPUTER CORPORATION SHALL NOT BE LIABLE FOR TECHNICAL OR
EDITORIAL ERRORS OR OMISSIONS CONTAINED HEREIN, NOR FOR INCIDENTAL OR
CONSEQUENTIAL DAMAGES RESULTING FROM THE FURNISHING, PERFORMANCE, OR
USE OF THIS MATERIAL. THIS INFORMATION IS PROVIDED “AS IS” AND COMPAQ
COMPUTER CORPORATION DISCLAIMS ANY WARRANTIES, EXPRESS, IMPLIED OR
STATUTORY AND EXPRESSLY DISCLAIMS THE IMPLIED WARRANTIES OF
MERCHANTABILITY, FITNESS FOR PARTICULAR PURPOSE, GOOD TITLE AND AGAINST
INFRINGEMENT.
This publication contains information protected by copyright. No part of this publication may be
photocopied or reproduced in any form without prior written consent from Compaq Computer
Corporation.
1997 Compaq Computer Corporation.
All rights reserved. Printed in the U.S.A.
The software described in this guide is furnished under a license agreement or nondisclosure agreement.
The software may be used or copied only in accordance with the terms of the agreement.
Compaq, Deskpro, Fastart, Compaq Insight Manager, Systempro, Systempro/LT, ProLiant, ROMPaq,
Qvision, SmartStart, NetFlex, QuickFind, PaqFax, ProSignia, registered United States Patent and
Trademark Office.
Netelligent, Systempro/XL, SoftPaq, QuickBlank, QuickLock are trademarks and/or service marks of
Compaq Computer Corporation.
Microsoft, MS-DOS, Windows, and Windows NT are registered trademarks of Microsoft Corporation.
Other product names mentioned herein may be trademarks and/or registered trademarks of their
respective companies.
Compaq SLR Tape Drive User Guide
Second Edition(January 1998)
Part Number 340622-002
iii
Contents
About This Guide
Text Conventions .................................................................................................................vii
Symbols in Text ................................................................................................................. viii
Symbols on Equipment....................................................................................................... viii
Rack Stability..................................................................................................................... viii
Getting Help....................................................................................................................... viii
Compaq Web Site........................................................................................................ viii
Telephone Numbers........................................................................................................ix
Chapter 1
Overview
Drive Capacity ................................................................................................................... 1-1
Drive Performance ............................................................................................................. 1-1
Data Compression .............................................................................................................. 1-1
Cartridge Specifications, Compatibility, and Formats ......................................................... 1-2
Projected Duty Cycle .......................................................................................................... 1-2
Kit Contents....................................................................................................................... 1-3
Chapter 2
Drive Installation
Requirements ..................................................................................................................... 2-1
Tools ........................................................................................................................... 2-1
Controller.................................................................................................................... 2-1
Software ...................................................................................................................... 2-1
Preparing the System.......................................................................................................... 2-2
Setting the Drive’s SCSI ID ............................................................................................... 2-2
Locating the Jumper Block .......................................................................................... 2-3
Selecting the SCSI ID.................................................................................................. 2-3
Installing the Drive ............................................................................................................ 2-4
Installing the Drive With Rails.................................................................................... 2-6
Installing the Drive Without Rails ............................................................................... 2-7
Installing the Power Cable Extender............................................................................ 2-8
Reassembling the System ................................................................................................... 2-9
Completing the Installation ................................................................................................ 2-9
Compaq SLR Tape Drive User Guide
iv
Chapter 3
Installing the Software Drivers
Obtaining the Drivers......................................................................................................... 3-1
Novell IntranetWare/NetWare ............................................................................................ 3-3
ASPI Support .............................................................................................................. 3-4
Microsoft Windows NT ...................................................................................................... 3-6
Microsoft Windows 95 ....................................................................................................... 3-7
SCO OpenServer................................................................................................................ 3-8
SCO UnixWare .................................................................................................................. 3-9
IBM OS/2 .........................................................................................................................3-10
SunSoft Solaris..................................................................................................................3-11
Banyan VINES..................................................................................................................3-12
Chapter 4
Operating and Cleaning the Drive
Operation ........................................................................................................................... 4-2
Front Panel Indicators ................................................................................................. 4-2
Front Panel Controls ................................................................................................... 4-3
Handling and Storing a Cartridge................................................................................ 4-4
Loading and Unloading a Cartridge............................................................................. 4-5
Retensioning a Cartridge ............................................................................................. 4-6
Using the Cartridge’s Write Protect Switch ................................................................. 4-7
Enabling Data Compression ........................................................................................ 4-7
Cleaning Guidelines........................................................................................................... 4-7
Cleaning Procedure ..................................................................................................... 4-7
Chapter 5
Troubleshooting
Quick Checklist.................................................................................................................. 5-2
Hardware Checks ........................................................................................................ 5-2
Software Checks.......................................................................................................... 5-2
Checking for Resource Conflicts ........................................................................................ 5-4
Completing the System Configuration Worksheet....................................................... 5-4
Checking Power to the Drive.............................................................................................. 5-6
Checking the Drive ............................................................................................................ 5-6
Compaq SLR Tape Drive User Guide
v
Troubleshooting continued
Checking Software ............................................................................................................. 5-7
Sense Codes ................................................................................................................ 5-7
Troubleshooting in Novell IntranetWare/NetWare....................................................... 5-7
Troubleshooting in Microsoft Windows NT................................................................. 5-8
Troubleshooting in SCO OpenServer..........................................................................5-12
Troubleshooting in IBM OS/2 ....................................................................................5-12
Troubleshooting in Banyan VINES ............................................................................5-13
Troubleshooting in ArcServe for NT...........................................................................5-14
Troubleshooting with ArcServe for NetWare ..............................................................5-17
Verifying Recent Changes.................................................................................................5-19
Correcting Intermittent Failures ........................................................................................5-20
Upgrading the Firmware ...................................................................................................5-21
Upgrading the Firmware with a Cartridge ..................................................................5-21
Upgrading the Firmware by using the Option ROMPaq.............................................5-22
For Further Assistance ......................................................................................................5-24
Appendix A
Regulatory Compliance Notices
Federal Communications Commission Notice ....................................................................A-1
Class B Equipment......................................................................................................A-1
Declaration of Conformity for Products Marked with FCC Logo, United States Only...A-2
Modifications ..............................................................................................................A-2
Cables .........................................................................................................................A-3
Canadian Notice (Avis Canadien) ......................................................................................A-3
Class B Equipment......................................................................................................A-3
European Union Notice ......................................................................................................A-3
Japanese Notice..................................................................................................................A-4
Australian Notice ...............................................................................................................A-4
Appendix B
Electrostatic Discharge
Grounding Methods ........................................................................................................... B-1
Compaq SLR Tape Drive User Guide
vi
Appendix C
Drive Configuration Options
Locating the Jumper Block.................................................................................................C-1
Identifying the Jumpers ...............................................................................................C-2
Selecting the SCSI ID ........................................................................................................C-3
Configuring the SCSI ID in a SCO OpenServer environment ......................................C-4
Enabling/Disabling Bus Parity ...........................................................................................C-4
Testing...............................................................................................................................C-4
Index
Compaq SLR Tape Drive User Guide
vii About This Guide
About This Guide
This guide is designed to be used as step-by-step instructions for installation,
and as a reference for operation, troubleshooting, and future upgrades.
Text Conventions
This document uses the following conventions to distinguish elements of text:
Keys
Keys appear in boldface. A plus sign (+) between two
keys indicates that they should be pressed
simultaneously.
USER INPUT
User input appears in a different typeface and in
uppercase.
FILENAMES
File names appear in uppercase italics.
Menu Options,
Command Names,
Dialog Box Names
These appear in initial capital letters.
COMMANDS,
DIRECTORY
NAMES, and DRIVE
NAMES
These always appear in uppercase
Type
When you are instructed to type information, type the
information without pressing the Enter key.
Enter
When you are instructed to enter information, type the
information and then press the Enter key.
Compaq SLR Tape Drive User Guide
viii About This Guide
Symbols in Text
These symbols may be found in the text of this guide. They have the
following meanings.
!
WARNING: Indicates that failure to follow directions in the warning
could result in bodily harm or loss of life.
CAUTION: Indicates that failure to follow directions could result in
damage to equipment or loss of information.
IMPORTANT: Presents clarifying information or specific instructions.
NOTE: Presents commentary, sidelights, or interesting points of information.
Getting Help
If you have a problem and have exhausted the information in this guide, you
can get further information and other help in the following locations.
Compaq Web Site
The Compaq Web Site has information on this product as well as the latest
drivers and Flash ROM images. You can access the Compaq Web Site by
logging on to the Internet at:
http://www.compaq.com.
Compaq SLR Tape Drive User Guide
ix About This Guide
Telephone Numbers
For the name of your nearest Compaq Authorized Reseller:
In the United States, call 1-800-345-1518
In Canada, call 1-800-263-5868
For Compaq technical support:
In the United States and Canada, call 1-800-386-2172
For Compaq technical support phone numbers outside the United States and
Canada, visit the Compaq Web Site at http://www.compaq.com.
Compaq SLR Tape Drive User Guide
1-1
Overview
Chapter 1
Overview
This chapter provides information on:
■
The capacity of the drive
■
Drive performance
■
Data compression
■
Cartridge Specifications, Compatibility, and Formats
■
Drive duty cycle
■
Kit contents
Drive Capacity
The Compaq SLR Drive is a streaming quarter-inch tape cartridge drive that
can read or write 8 GB of compressed data or 4 GB of uncompressed data. The
drive provides low-cost data protection for workstations and entry-level
servers.
Drive Performance
The maximum transfer rate of the Compaq SLR Drive is:
■
760 kB/second for compressed data
■
380 kB/second for uncompressed data
Data Compression
The drive employs the Lempel-Ziv data compression algorithm to compress
data by up to 2 times. This feature is enabled by default but the user may turn
off data compression through the applications software.
Compaq SLR Tape Drive User Guide
1-2
Overview
Cartridge Specifications,
Compatibility, and Formats
IMPORTANT: We recommend that you use only tapes purchased from vendors
that have been qualified by Compaq. The qualified vendors are Sony and Imation.
The drive supports the standard QIC formats listed in the following table .
Table 1-1
Supported QIC formats
QIC format
QIC-4GB
QIC-2GB-DC
QIC-1000
QIC-525
QIC-150
Cartridge Capacity
Imation Product
Sony Product
Magnus 4.0
QD9400
2.5 GB
Magnus 2.5
QD9250
2.0 GB
Magnus 2.0
1.2 GB
Magnus 1.2
1.0 GB
Magnus 1.0
525 MB
DC-6525
320 MB
DC-6320
250 MB
DC-6250
QD6250
150 MB
DC-6150
QD6150
8.0 GB (compressed) or
4.0 GB (uncompressed)
QD9120
QD6525
NOTE: The Compaq SLR Tape drive features full read and write backwardscompatibility between the above formats.
Projected Duty Cycle
The user should track the amount of time that the drive is in use so that
cleaning can be scheduled at the appropriate time.
See Chapter 4, “Operating and Cleaning the Drive” for more information on
cleaning the drive.
Compaq SLR Tape Drive User Guide
1-3
Overview
Kit Contents
This kit contains the following items:
■
A Compaq SLR Drive with rails installed
■
Additional mounting screws
■
A data cartridge
■
A cleaning cartridge
■
A Wide-to-Narrow SCSI adapter
■
A power cable extender
Compaq SLR Tape Drive User Guide
2-1
Drive Installation
Chapter 2
Drive Installation
This chapter provides instructions for installing the drive in:
■
The removable media bay of a workstation or server
■
An external storage unit
NOTE: For the remainder of this user guide, “system” will be used in place of
“workstation” and/or “server”.
Requirements
The user should be aware of the following installation requirements:
Tools
■
Torx T-15 screwdriver
■
Compaq SmartStart and Support CD
Controller
Compaq recommends equipping your system with either a 32-Bit Fast-SCSI-2
Controller or a more current device that provides full support for the Compaq
SLR Drive.
Software
See Chapter 3, “Installing the Software Drivers” to obtain information on what
software you need and where to obtain it.
Compaq SLR Tape Drive User Guide
2-2
Drive Installation
Preparing the System
To prepare your system prior to the installation:
1.
Perform a normal system shutdown.
2.
Turn OFF the system.
3.
Turn OFF all external peripheral devices attached to the system.
4.
Disconnect all power cords - first from the AC mains outlets then from
the system and the external peripheral devices.
5.
Disconnect the signal cables from the external peripheral devices.
Setting the Drive’s SCSI ID
Since each device on the same SCSI bus must have a unique ID, the user may
need to set the drive’s ID before installation.
IMPORTANT: Your drive has been configured by Compaq with SCSI ID = 6
selected. For more information on setting the drive’s SCSI ID in a SCO
OpenServer environment, see Appendix C, “Drive Configuration Changes”.
The drive’s SCSI ID is selected using a jumper block located at the rear of
the drive.
Compaq SLR Tape Drive User Guide
2-3
Drive Installation
Locating the Jumper Block
Locate the jumper block at the rear of the drive.
SCSI Connector
Jumper Block
Power Connector
Figure 2-1.
The Rear of the Compaq SLR Drive
Selecting the SCSI ID
SCSI ID Jumpers
SEL2 SEL1 SEL0
Figure 2-2. SCSI ID Selection Jumpers
Compaq SLR Tape Drive User Guide
2-4
Drive Installation
IMPORTANT:
Do not use SCSI ID = 7. This is reserved for SCSI controllers.
Table 2-1
Selecting the SCSI ID
SEL2
SEL1
SEL0
SCSI ID
OPEN
OPEN
OPEN
0
OPEN
OPEN
CLOSED
1
OPEN
CLOSED
OPEN
2
OPEN
CLOSED
CLOSED
3
CLOSED
OPEN
OPEN
4
CLOSED
OPEN
CLOSED
5
CLOSED
CLOSED
OPEN
6
CLOSED
CLOSED
CLOSED
7
NOTE: In the above table, “CLOSED” indicates that a jumper has been installed.
Installing the Drive
Refer to the documentation supplied with your system for specific instructions
on obtaining access to the removable media bay where you intend to install
your drive.
WARNING:
: To reduce the risk of electric shock or damage to the
equipment, disconnect power from the server by unplugging all power cords
from either the electrical outlet or the server.
Compaq SLR Tape Drive User Guide
2-5
Drive Installation
WARNING: Some Compaq servers are capable of producing
energy levels that are considered hazardous. To reduce the risk of
personal injury:
■
Do not attempt to defeat the safety interlocks that prevent
access to hazardous energy.
■
Do not repair accessories and options inside enclosed or
interlocked areas of the system. Repair should be performed
only by individuals who are qualified in servicing computer
equipment and trained to deal with products capable of
producing hazardous energy levels.
WARNING: To reduce the risk of electric shock or damage to your
equipment, do not disable the power cord grounding feature. This
equipment is designed for connection to a grounded (earthed) power
outlet. The grounding plug is an important safety feature.
CAUTION: Electrostatic discharge (ESD) can damage electronic
components. Be sure you are properly grounded before beginning this
procedure. See Appendix B, “Electrostatic Discharge” for more
information.
IMPORTANT: Your drive shipped with mounting rails attached. The removable
media bays of some systems are configured such that you will need to remove
these rails prior to installing the drive. Refer to the documentation supplied with
your system.
Compaq SLR Tape Drive User Guide
2-6
Drive Installation
Installing the Drive With Rails
Figure 2-3.
Typical Media Bay - Rails Required
1.
Obtain access to the removable media bay.
2.
Install the drive.
3.
Secure the drive. (The screws supplied with this kit may be used.)
4.
Connect a power cable and a SCSI signal cable to the drive.
Compaq SLR Tape Drive User Guide
2-7
Drive Installation
Figure 2-4. Installing Power and SCSI Cables
IMPORTANT: If available, use the last connector on the power cable. Since the
drive’s power receptacle is recessed, you will require an extender cable to use an
intermediate power cable connector. See “Installing the Power Cable Extender”
for more information.
Installing the Drive Without Rails
Figure 2-5.
Typical Media Bay - No Rails Required
Compaq SLR Tape Drive User Guide
2-8
Drive Installation
1.
Obtain access to the removable media bay.
2.
Remove the rails from the drive.
3.
Slide the drive into the bay.
4.
Secure the drive to the bay.
5.
Connect a power cable and a SCSI signal cable to the drive.
IMPORTANT: If available, use the last connector on the power cable. Since the
drive’s power receptacle is recessed, you will require an extender cable to use an
intermediate power cable connector. See “Installing the Power Cable Extender”
for more information.
Installing the Power Cable Extender
You must install the power cable extender supplied with this kit if you wish to
use one of the intermediate connectors on the power cable. The extender is not
required if you use the last connector on the power cable.
Figure 2-6. Installing the extender
Compaq SLR Tape Drive User Guide
2-9
Drive Installation
Reassembling the System
Reassemble the system by reversing the steps of the procedure for “Preparing
the System.”
Completing the Installation
To complete the installation of the drive:
1.
Install the appropriate software. See Chapter 3, “Installing the Software
Drivers” for more information.
2.
Clean the drive before using it for the first time. See Chapter 4,
“Operating and Cleaning the Drive,” for more information.
Compaq SLR Tape Drive User Guide
3-1
Installing the Software Drivers
Chapter 3
Installing the Software Drivers
This chapter contains guidelines for installing software drivers and includes
information on the following operating environments:
■
Novell IntranetWare/NetWare
■
Microsoft Windows NT
■
Microsoft Windows 95
■
SCO OpenServer
■
SCO UnixWare
■
IBM OS/2
■
SunSoft Solaris
■
Banyan VINES
Obtaining the Drivers
Unless the appropriate software drivers are inherent to the operating system,
you will need to install the following:
■
A tape device driver
■
A driver for the Compaq SLR Drive
■
A driver for the optional SCSI controller
See the user guide supplied with your applications software for any additional
requirements.
Compaq SLR Tape Drive User Guide
3-2
Installing the Software Drivers
If the appropriate drivers are not inherent to your operating system, you can
obtain them from one of the following sources:
■
The SmartStart and Support Software CD supplied with your system
■
The QuickFind database
■
Compaq’s web site on the Internet: http:\\www.compaq.com
■
The Compaq Forum on CompuServe
■
Other electronic media services
See the “About This Guide” section at the beginning of this guide for
electronic media addresses.
See the following sections of this chapter for information on drivers for
specific operating environments.
Compaq SLR Tape Drive User Guide
3-3
Installing the Software Drivers
Novell IntranetWare/NetWare
The following table provides information on identifying appropriate drivers for
Compaq SCSI controllers:
Table 3-1
Novell IntranetWare/NetWare
Controller
32-Bit Fast-SCSI-2 Controller or
or 32-Bit Fast-Wide SCSI-2 Controller
or Wide-Ultra SCSI Controller
Software Driver Information
Refer to the STORAGE.RDM file on the
Support Software for Novell Products
(NSSD) diskette, version 3.13 or later,
which was supplied with your system.
Either of the following drivers can be
used:
■
CPQS710.DSK
■
CPQSCSI.HAM - which supports
the NWPA specification
There are additional driver issues if you wish to use applications requiring
ASPI support. See the next section for more information.
Compaq SLR Tape Drive User Guide
3-4
Installing the Software Drivers
ASPI Support
Certain applications require the use of the Advanced SCSI Programming
Interface (ASPI). The information supplied with your application will specify
whether or not ASPI support is required.
Figure 3-1 shows which NLMs and device drivers are required for different
applications. For example, if you have installed a Compaq SLR Drive with a
32-Bit Fast-Wide SCSI-2 Controller and you wish to use a NetWare version
4.x ASPI application, you can load the following drivers:
■
CPQSCSI.HAM for the controller
■
NWPA.NLM for the drive (automatically loaded when you load
CPQSCSI.HAM)
■
NWASPI.CDM to provide the ASPI interface
NOTE: Either of the following ASPI drivers can be used:
■
CPQASPI.NLM, version 1.14 or higher
■
NWASPI.CDM, version 1.00n - which supports the NWPA specification
Compaq SLR Tape Drive User Guide
3-5
Installing the Software Drivers
Compaq ASPI
Support
Any ASPI
Compliant Application
Cheyenne ARCserve
Seagate Backup Exec
(Tape Backup Applications)
CPQSASPI.NLM
NWASPI.CDM
Application and Driver Level
CPQSXPT.DSK
NWPA.NLM
CPQS710.DSK
CPQSCSI.HAM
SCSI Controllers
Device Hardware Level
Figure 3-1.
Selecting drivers for your application
Compaq SLR Tape Drive User Guide
3-6
Installing the Software Drivers
Microsoft Windows NT
The following table provides information on identifying appropriate drivers for
Compaq SCSI controllers:
Table 3-2
Microsoft Windows 95
Controller
32-Bit Fast-SCSI-2 Controller
or 32-Bit Fast-Wide SCSI-2
Controller
Software Driver Information
Refer to W95READ.HLP for the list of controllers
supported on Microsoft Windows 95.
or Wide-Ultra SCSI Controller
IMPORTANT: If the SCSI controller to which your tape drive is attached was not
present during your initial Windows 95 installation, install the SCSI device driver
for the controller before installing the tape class driver.
Compaq SLR Tape Drive User Guide
3-7
Installing the Software Drivers
Microsoft Windows 95
The following table provides information on identifying appropriate drivers for
Compaq SCSI controllers:
Table 3-3
Microsoft Windows 95
Controller
32-Bit Fast-SCSI-2 Controller
or 32-Bit Fast-Wide SCSI-2 Controller
Software Driver Information
Refer to W95READ.HLP for the list of
controllers supported on Microsoft
Windows 95.
or Wide-Ultra SCSI Controller
IMPORTANT: If the SCSI controller to which your tape drive is attached was
not present during your initial Windows 95 installation, install the SCSI device
driver for the controller before installing the tape class driver.
Compaq SLR Tape Drive User Guide
3-8
Installing the Software Drivers
SCO OpenServer
The drivers required to support the Compaq SLR Drive under SCO UNIX are:
■
The SCO SCSI tape driver stp which is built into SCO OpenServer; see
the SCO System Administrator's Guide for information on how to
configure the driver
■
An appropriate SCSI controller driver
The following table provides information on identifying appropriate drivers for
Compaq SCSI controllers:
Table 3-4
SCO UnixWare
Controller
32-Bit Fast-SCSI-2 Controller
or 32-Bit Fast-Wide SCSI-2 Controller
or Wide-Ultra SCSI Controller
Software Driver Information
Refer to the appropriate README on the
Compaq Support Software CD.
The name of the driver is cha.
In addition, the appropriate version of the Compaq Extended Feature
Supplement (EFS) for SCO UnixWare is required:
■
For SCO Open Server 3, use Compaq EFS version 3.16 or later
■
For SCO OpenServer 5, use Compaq EFS version 5.16 or later
EFS for SCO OpenServer is available on both the Compaq SmartStart and
Support Software CD and on Compaq SmartStart CD and is installed and
configured automatically during a SmartStart installation.
IMPORTANT: See Appendix C, “Drive Configuration Changes” for information
on configuring the SCSI ID for SCO OpenServer.
Compaq SLR Tape Drive User Guide
3-9
Installing the Software Drivers
SCO UnixWare
The following table provides information on identifying appropriate drivers for
Compaq SCSI controllers:
Table 3-5
SCO UnixWare
Controller
32-Bit Fast-SCSI-2 Controller
or 32-Bit Fast-Wide SCSI-2 Controller
or Wide-Ultra SCSI Controller
Software Driver Information
Refer to the SCO UnixWare on-line
documentation on the Compaq
SmartStart and Software CD.
The name of the driver is cpqsc.
In addition, the appropriate version of the Compaq Extended Feature
Supplement (EFS) for SCO UnixWare is required. Use EFS version 2.16 or
higher for SCO UnixWare version 2.1x.
Compaq SLR Tape Drive User Guide
3-10
Installing the Software Drivers
IBM OS/2
The following table provides information on identifying appropriate drivers for
Compaq SCSI controllers:
Table 3-6
IBM OS/2
Controller
32-Bit Fast-SCSI-2 Controller
or 32-Bit Fast-Wide SCSI-2 Controller
or Wide-Ultra SCSI Controller
Software Driver Information
For IBM OS/2 version 2.x or higher, refer
to SCSI.RDM on the OS/2 Support
Software diskette from Compaq, version
2.15 or higher.
Compaq SLR Tape Drive User Guide
3-11
Installing the Software Drivers
SunSoft Solaris
The following table provides information on identifying appropriate drivers for
Compaq SCSI controllers:
Table 3-7
SunSoft Solaris
Controller
32-Bit Fast-SCSI-2 Controller
or 32-Bit Fast-Wide SCSI-2 Controller
or Wide-Ultra SCSI Controller
Software Driver Information
For Solaris 2.5.x, refer to the online
documentation on the Solaris 2.5.x OS
CD and Compaq Driver Update (CDU)
version 1.1 or higher.
For Solaris 2.6, refer to the Solaris 2.6
Installation Manual. The required driver
is CPQncr.
Compaq SLR Tape Drive User Guide
3-12
Installing the Software Drivers
Banyan VINES
The following table provides information on identifying appropriate drivers for
Compaq SCSI controllers:
Table 3-8
Banyan VINES
Controller
Fast-SCSI-2 Controller
or 32-Bit Fast-SCSI-2/P Controller
or 32-Bit Fast-Wide SCSI Controllers
or Wide-Ultra SCSI Controller
Software Driver Information
For VINES 7.x, refer to the
documentation supplied in Banyan
Supplemental Drivers for VINES 7.x,
version 2.1 or higher.
For VINES 6.x, refer to the
documentation supplied in the Banyan
Supplemental Drivers for VINES 6.x,
version 1.3 or higher.
These driver packages can be
downloaded from the Banyan web site
at http://www.banyan.com.
Compaq Peripheral Adapter Support
Software for Banyan Vines 6.x and 7.x,
version 2.05 or higher, is required. Refer
to README.SSD for more information.
Compaq SLR Tape Drive User Guide
4-1
Operating and Cleaning the Drive
Chapter 4
Operating and Cleaning the
Drive
This chapter contains guidelines for operating and cleaning the Compaq SLR
Drive and includes information on the following topics:
■
■
Operation
❏
Front panel indicators
❏
Front panel controls
❏
Handling and storing a cartridge
❏
Loading and unloading a cartridge
❏
Retensioning a cartridge
❏
Using the cartridge’s write protect switch
❏
Enabling data compression
Cleaning
❏
Cleaning guidelines
❏
Cleaning procedure
Compaq SLR Tape Drive User Guide
4-2
Operating and Cleaning the Drive
Operation
Front Panel Indicators
Cartridge Ejector
LED Indicator
Figure 4-1.
The Front Panel of the Compaq SLR Drive
There is a front panel LED display featuring green, amber, and red LEDs
which may be OFF, STEADY ON, or BLINKING ON. See Table 4-1 for more
information.
Table 4-1
Meaning of Front Panel LED Display
LED Display
Meaning
OFF
No cartridge is loaded.
STEADY GREEN
A cartridge is loaded.
BLINKING GREEN
The drive is busy - operating the capstan or stepper motor,
or transferring data.
continued
Compaq SLR Tape Drive User Guide
4-3
Operating and Cleaning the Drive
Meaning of Front Panel LED Display continued
LED Display
STEADY AMBER
Meaning
A media or hardware error has occurred.
To recover from this error the user should remove the
cartridge and reset the drive (either by using the
application software or by toggling the drive’s power OFF
then back ON.)
This error may indicate that the drive needs to be cleaned
or that the cartridge is defective.
BLINKING AMBER
The drive has detected an exhausted cleaning cartridge.
The user should remove and discard this cartridge.
STEADY RED
A fatal error has occurred.
This error typically indicates that there is a problem with
the drive. If this is a hard error, the user must replace the
drive.
BLINKING RED
This is associated with drive selftests which are beyond the
scope of this guide.
Front Panel Controls
The front panel includes the cartridge ejector button. (See Figure 4-1.) Use the
ejector button to remove cartridges from the drive.
NOTE: The drive does not eject cartridges automatically.
Compaq SLR Tape Drive User Guide
4-4
Operating and Cleaning the Drive
Handling and Storing a Cartridge
Data reliability is a function of many variables and may be improved by
suitable handling and storage. The user should follow these guidelines:
■
Do not drop cartridges.
■
Make sure that the air around the drive and the cartridge storage area is
clean.
■
Expose a cartridge to the actual operating environment for at least four
hours prior to use.
■
Do not expose a cartridge to high humidity for an extended period
unless the cartridge can be dried out for three or four days outside its
packaging box prior to use.
■
Reject worn or excessively noisy cartridges.
■
Reject cartridges which contain hard read or write errors.
■
Reject cartridges which repeatedly require large numbers of blocks per
track to be rewritten.
Compaq SLR Tape Drive User Guide
4-5
Operating and Cleaning the Drive
Loading and Unloading a Cartridge
Figure 4-2. Loading a Cartridge
To load a cartridge:
1.
Press the cartridge ejector button to open the front of the drive.
2.
Insert the cartridge. Ensure that the cartridge is correctly oriented. (See
Figure 4-2.)
3.
Push the cartridge until there is a click indicating that the cartridge is
locked in place.
To unload a cartridge:
1.
If the drive is still in use, wait for the current operation to finish.
2.
Press the cartridge ejector button to open the front of the drive.
3.
When the front of the drive opens, remove the cartridge.
4.
Manually close the front of the drive.
Compaq SLR Tape Drive User Guide
4-6
Operating and Cleaning the Drive
Retensioning a Cartridge
IMPORTANT:
Use your software application to retension a cartridge.
Retensioning a cartridge consists of a complete wind/rewind operation.
The user should retension a cartridge in the following situations:
■
Prior to writing to a cartridge
■
After a read error has been detected. In this situation, use the following
procedure:
❏
Clean the drive.
❏
Retension the cartridge.
❏
Repeat the read operation.
❏
If the read error is repeated, then the user should consider this to be
a hard error. This may indicate that there is a problem with the
cartridge: replace the cartridge and return to the beginning of this
procedure.
Compaq SLR Tape Drive User Guide
4-7
Operating and Cleaning the Drive
Using the Cartridge’s Write Protect Switch
Figure 4-3. The Write Protect Switch
Enabling Data Compression
Use your application software to enable or disable data compression.
Cleaning Guidelines
The drive should be cleaned in the following situations:
■
After the drive has been in operation for fifty hours or after the drive
has been powered up for seven days - whichever occurs first
■
After using a new cartridge
■
If the drive reports read or write errors
Cleaning Procedure
1.
Insert the cleaning cartridge into the drive. The drive automatically
loads the cartridge and cleans the drive’s head. During the operation,
the front panel display LED becomes blinking green.
2.
After a few seconds the cleaning operation is complete. The front panel
display becomes steady green.
Compaq SLR Tape Drive User Guide
4-8
Operating and Cleaning the Drive
3.
Manually unload the cleaning cartridge.
4.
Record the cleaning date on the cartridge’s label. Discard the cartridge
after 50 cleaning cycles.
IMPORTANT: If the drive detects an exhausted cartridge (a cartridge which
has been used fifty times), the front panel LED display becomes blinking amber.
Remove and discard the exhausted cleaning cartridge.
Compaq SLR Tape Drive User Guide
5-1
Troubleshooting
Chapter 5
Troubleshooting
This chapter provides guidelines for troubleshooting your Compaq SLR Drive
and includes information on the following topics:
■
Quick checklists for hardware and software
■
Checking for resource conflicts using the System Configuration
Worksheet
■
Checking power to the drive
■
Checking the drive
■
Checking software:
❏
To make sure that the appropriate drivers have been loaded
❏
To obtain more information on errors
■
Verifying recent changes to make sure that these are not the cause of
your trouble
■
Correcting intermittent failures
■
Upgrading the tape drive firmware using either a cartridge or a diskette
■
For further assistance
Compaq SLR Tape Drive User Guide
5-2
Troubleshooting
Quick Checklist
Listed below are some checks that can be used to identify problems associated
with your drive.
If these checklists fail to identify your problem, try the troubleshooting flowchart.
Hardware Checks
Check the following:
■
Does your system recognize the drive during POST?
■
Have you checked the drive’s front panel LED display?
■
Have you followed the suggested guidelines for drive cleaning?
■
Does the drive pass the appropriate Compaq diagnostics?
■
Has the drive has been configured correctly? If there are multiple drives,
does each have a unique SCSI ID?
■
Are the power and signal cables connected? Is the controller seated
correctly?
Software Checks
Check the following:
■
Have you checked your application to see if any errors have been
reported?
■
Have you checked for resource conflicts using the Compaq System
Configuration Utility?
■
Have the appropriate software drivers been installed?
NOTE: If you suspect that you have a software-related problem and have been unable
to identify the problem by carrying out these checks, try reinstalling the software.
Compaq SLR Tape Drive User Guide
5-3
Troubleshooting
Problem occurs
YES
YES
LED display
illuminated with cartridge
loaded
NO
See "CHECKING FOR
RESOURCE CONFLICTS"
See "CHECKING POWER
TO THE DRIVE"
NO
Drive Installed
successfully
YES
Problem intermittent
YES
See "CHECKING
FOR INTERMITTENT
PROBLEMS"
NO
See
"CHECKING THE DRIVE"
See "CHECKING THE
SOFTWARE"
See "VERIFYING RECENT
CHANGES"
Figure 5-1. Troubleshooting Flowchart
Compaq SLR Tape Drive User Guide
5-4
Troubleshooting
Checking for Resource Conflicts
Many of the problems that occur during installation are the result of resource
conflicts between the drive, the controller, and the other devices in your
system.
Complete the System Configuration Worksheet to identify then correct
resource conflicts. (See Figure 5-1)
Completing the System
Configuration Worksheet
1.
Run the Compaq System Configuration Utility and select Step 4.
2.
Record the switch settings for all option boards on the configuration
worksheet.
3.
Remove the appropriate covers or panels to obtain access to your option
boards; record the actual switch settings of each option board on the
configuration worksheet.
4.
Compare the settings recorded on the worksheet. If there are any
differences, set the board switches as recommended by the Compaq System
Configuration Utility.
Compaq SLR Tape Drive User Guide
5-5
Troubleshooting
Table 5-1
System Configuration Worksheet
Item
Notes
Operating System
Operating System Version
Software Available Base Memory
Tape Software Vendor
Tape Software Version
Compaq System Configuration Utility
Version (EISA-based Compaq servers only)
Recommended switch
settings
ADDR
IRQ
DMA
Actual option board
switch settings
ADDR
AIRQ
DMA
Compaq SLR Tape Drive User Guide
5-6
Troubleshooting
Checking Power to the Drive
If the tape drive is not operational, make sure that power is connected to the drive.
1.
Turn on your system and insert a tape cartridge.
2.
If the front panel LED display is not illuminated:
a.
Make sure that the power cable is connected to the drive and is
installed correctly.
b.
Remove the SCSI signal cable from the tape drive. If the LED
display is now illuminated , check for a defective or incorrectly
installed SCSI signal cable, or a defective controller
c.
Replace the tape drive.
Checking the Drive
If you have confirmed that power is connected to the drive and you still have a
problem, try the following:
1.
Verify that the SCSI cable is seated correctly.
2.
Determine if your software application has reported any errors.
NOTE: See the “Checking Software” section of this chapter for information on
investigating errors reported by software.
3.
Restart the system and re-run the application.
4.
Run the Compaq System Configuration Utility from the hard drive or
from diskette.
5.
Configure all boards in the system. Carry out the following checks:
a.
Verify that all installed EISA boards appear in the slot diagram.
Add any missing EISA boards.
b.
Verify that the switch settings shown by the Compaq System
Configuration Utility match the physical settings used on the
boards. Ensure that the board settings match the settings shown by
the utility.
Compaq SLR Tape Drive User Guide
5-7
Troubleshooting
6.
Examine the list of installed devices. If the tape drive is not shown, try
the following:
a.
Check the SCSI cable connections.
b.
Check the seating of the controller.
c.
If multiple tape drives are used, ensure that each tape drive has a
unique SCSI ID.
7. If the problem still exists, replace the cables, the tape drive, and finally
the controller.
Checking Software
This contains information on:
■
Checking errors (sense codes) reported by your software
■
Making sure that the appropriate software drivers have been installed
Sense Codes
The tape drive will report a sense code when it detects a hardware, firmware,
or media problem. A sense code consists of six hexadecimal characters, for
example: 03 31 00.
See below for information on how to display sense codes in specific software
environments.
Interpreting sense codes is beyond the scope of this guide. If your drive has
reported a sense code, contact Compaq on 1-800-OK-COMPAQ to obtain
suggestions for corrective action.
Troubleshooting in Novell
IntranetWare/NetWare
To obtain troubleshooting information, refer to the STORAGE.RDM file on the
Support Software for Novell products (NSSD) diskette supplied with your
system.
Compaq SLR Tape Drive User Guide
5-8
Troubleshooting
Troubleshooting in Microsoft Windows NT
This section applies to applications such as Arcada Backup Exec for NT,
SQLServer for NT, and NT Backup running under Windows NT and contains
information on:
■
Using the System Event Log to investigate errors
■
Verifying that the appropriate software drivers have been installed
Using the System Event Log
On detecting an error, the software driver will:
■
Report the error to the System Event Log
■
Display a Stop message
Figure 5-2. A typical Stop message
Compaq SLR Tape Drive User Guide
5-9
Troubleshooting
The following are examples of Stop messages:
■
‘The tape device reported an error on a request to read data from tape.
Error reported: Bad data.’
■
‘Tape device “Archive 1” reported an error on a request to write data to
tape. Error reported: Hardware error.’
■
‘The device, \Device\Tape0, is not ready for access yet.’
To obtain detailed information on an error reported to the System Event Log,
use the following procedure:
1.
Start the NT Event Viewer.
2.
Select the Log drop-down menu.
3.
Select System.
4.
Highlight the entry for the tape drive to obtain the appropriate Event
Detail display.
Figure 5-3.
A typical Event Viewer display
Compaq SLR Tape Drive User Guide
5-10
Troubleshooting
NOTE: The device selected in the above Event Viewer display is a DAT drive: make sure that
you select the 4/8 GB SLR Drive.
5.
Switch the Data buttons from Bytes to Words to make the display easier
to read.
6.
Record the last three six characters of the display: these specify the
sense code.
Change from
Bytes to Words
Sense Code
03 31 00
Figure 5-4.
A typical Event Detail display
NOTE: If the last six characters are 00 00 00, this indicates that no sense code
has been reported.
Compaq SLR Tape Drive User Guide
5-11
Troubleshooting
If you wish to save the System Event Log, use the following procedure:
1.
Select the Log drop-down menu from the Event Viewer.
2.
Select System.
3.
Select Save As from the Log drop-down menu.
4.
Enter a filename with a .EVT extension.
5.
Select OK.
Verifying the software drivers
To verify that the appropriate software drivers have been installed, use the
following procedure:
1.
To verify that the software driver for the SCSI controller has been
installed, use one of these methods:
❏
Run the Microsoft Windows NT setup program
❏
Use the Devices control panel applet
❏
Use the Tape Devices icon on the control panel
2.
If required, reinstall the software driver for the SCSI controller.
3.
To verify that the software driver for the Compaq SLR Drive has been
installed, use one of these methods:
4.
❏
Run the Microsoft Windows NT setup program
❏
Use the Devices control panel applet
❏
Use the Tape Devices icon on the control panel
If required, reinstall the software driver for the Compaq SLR Drive.
Compaq SLR Tape Drive User Guide
5-12
Troubleshooting
Troubleshooting in SCO OpenServer
Verify that the tape driver is configured in the kernel:
1.
2.
Determine if the driver is installed or identify the current tape
parameters using one of these methods:
❏
Use the Hwconfig command
❏
View the /USR/ADM/MESSAGES file
Install the driver in the kernel or modify the current tape parameters
using the Mkdev Tape command.
Troubleshooting in IBM OS/2
The appropriate software driver must be installed for the drive to function
correctly. If the drive does not function correctly:
1.
Reinstall the software driver.
2.
Verify that the appropriate statement was added to the CONFIG.SYS
file during the installation of the software driver. Add the statement if it
is missing.
3.
Restart your system if you make any changes.
IMPORTANT:
information.
Refer to your IBM OS/2 software documentation for more
Compaq SLR Tape Drive User Guide
5-13
Troubleshooting
Troubleshooting in Banyan VINES
Backup jobs in Banyan can be configured by the user to report error
information to the System Log.
NOTE: Banyan reports sense codes in decimal rather than hexadecimal.
See below for procedures for accessing the System Log:
■
From the Operator menu
■
From the Operate utility
Accessing the System Log from the
Operator menu
Follow this procedure:
1.
Select 10 to obtain the System Maintenance menu.
2.
Select 4 to obtain the Save/Display Server Log Reports
3.
Select 1 to specify Server Operating System.
4.
Select N to omit the consistency check.
5.
Press Enter to obtain the prompt.
6.
Press Return.
7.
Specify whether you wish to display or save the System Log.
Accessing the System Log from the
Operate utility
Follow this procedure:
1.
Select Manage Server Logs.
2.
Select 1 to specify Generate.
3.
Specify the System Log by:
Compaq SLR Tape Drive User Guide
5-14
Troubleshooting
a.
highlighting System Log, and
b.
pressing Enter
4.
Press F10.
5.
Enter the beginning and ending dates for the period you wish to
examine.
6.
Press Enter to omit the consistency check.
7.
Specify whether you wish to display or save the System Log.
Troubleshooting in ArcServe for NT
ArcServe for Microsoft Windows NT records useful information in these logs:
Table 5-2
ArcServe for NT Logs
Name of Log
Activity Log
(ARCSERVE.LOG)
Tape Engine Log
(TAPE.LOG)
Contents
This reports whether or not a backup has been
performed successfully.
If enabled by the user, this contains SCSI sense code
information.
To enable the collection of sense code information, use the following
procedure:
1.
Launch the ArcServe Server Admin utility.
2.
Select the Admin drop-down menu; select Configuration...\\.
3.
Select the Tape engine tab from the Configuration screen.
4.
Change the Message Level from None to Brief.
5.
Change the Message Output to either File Only or Both Screen and
File, as required.
6.
Select either the tape drive or All Devices in Device to Monitor.
Compaq SLR Tape Drive User Guide
5-15
Troubleshooting
Follow this procedure to view information in the Activity Log and the Tape
Engine Log:
1.
Launch the ArcServe Server Admin utility.
2.
Select the Manager icon.
3.
Select Quick Status.
4.
Select the appropriate tab to display either the Activity Log or the Tape
Engine Log.
Generic error report.
Figure 5-5. A typical Activity Log display
Compaq SLR Tape Drive User Guide
5-16
Troubleshooting
SPECIFIC SENSE CODE
03 31 00
Figure 5-6. A typical Tape Engine Log display
IMPORTANT: While troubleshooting a problem the user should review these
logs regularly. Delete or archive older information to keep the size of the logs
manageable.
Compaq SLR Tape Drive User Guide
5-17
Troubleshooting
Troubleshooting with ArcServe for NetWare
ArcServe for Novell NetWare records useful information in these logs:
Table 5-3
ArcServe for NetWare Logs
Name of Log
Activity Log
Contents
(ARCH$SVR.LOG)
This reports whether or not a backup has been
performed successfully.
Tape Server Log
This contains SCSI sense code information.
(TAPE$SVR.LOG)
Follow this procedure to view information in the Activity Log and the Tape
Server Log:
1.
Select Manager from the menu bar; select Reports.
2.
Select Activity Log.
3.
Review the Activity Log for any errors: these will typically be in red.
4.
Record the date and time the errors occurred.
5.
Select the Tape Server Log.
6.
Review the Tape Server Log at the times that the errors occurred to
obtain more information.
Compaq SLR Tape Drive User Guide
5-18
Troubleshooting
GENERIC ERROR
REPORT
Figure 5-7.
A typical Activity Log display
Error messages in the Activity Log are in two parts, for example:
E1014 Failed to format tape TESTTAPE1
Controller failure
The first part of the error message specifies what sort of error occurred; the
second part suggests the cause of the error.
IMPORTANT: The causes of errors suggested by the Activity Log may be
inaccurate. For example, time-outs and drive lockups are also reported as
controller failures.
Compaq SLR Tape Drive User Guide
5-19
Troubleshooting
SPECIFIC SENSE CODE
04 44 AF
Figure 5-8. A typical Tape Server log display
Verifying Recent Changes
If the drive was installed correctly but a problem has since occurred, verify any
recent changes to the system to ensure that these changes are not causing the
problem. Try the following:
1.
If the system configuration has changed, remove the change to see if it
affected the drive.
2.
If a board or option has been added, check its DMA, IRQ, and port
address settings for conflicts. Try removing the board or option.
3.
If a SCSI device has been added, check for SCSI ID conflicts. Check for
the appropriate SCSI termination.
Compaq SLR Tape Drive User Guide
5-20
Troubleshooting
Correcting Intermittent Failures
If the drive fails intermittently:
1.
Clean the drive.
2.
Run the Compaq Diagnostics Utility and the tape drive Diagnostics
Utility.
3.
If a drive operation begins correctly but then stops with an error:
a.
Try a different cartridge.
b.
If the error occurs on the same file or directory each time, remove
that file or directory from the backup list because it may be
corrupted. Correct any errors that you find with the file system.
c.
Check the revision level of the drive’s firmware by running Inspect
to determine if you are using the latest revision. If not, install the
latest firmware to see if this resolves the problem.
d.
Run System Configuration to check the DMA, IRQ, and port
address settings for conflicts. If there is a conflict, change the
particular setting or remove the conflicting device.
Compaq SLR Tape Drive User Guide
5-21
Troubleshooting
Upgrading the Firmware
Compaq occasionally releases upgraded firmware to correct specific problems
so you should make sure that your drive’s firmware is the latest revision. To
identify the revision level of your current firmware, follow this procedure:
1.
2.
Launch Compaq’s Inspect utility from one of these sources:
❏
The main menu of Compaq’s System Configuration utility
❏
Compaq’s Diagnostics program
Review the display. For example:
System Storage:
Wide SCSI Controller in slot 4, IRQ11
Embedded Wide SCSI Controller, IRQ10
Device .................................................. Internal ProLiant - REV JM14
Device .................................................. 4/8 GB SLR SCSI Tape
SCSI ID ................................................. 6
Revision ................................................ 0912FY/0912
3.
Record the revision level of the drive’s firmware.
To determine if your firmware is the latest revision, check one of these
sources:
■
1-800-OK-COMPAQ
■
Compaq’s web site on the Internet (See “About This Guide” for the
address.)
Upgrading the Firmware with a Cartridge
If you have determined that your drive’s firmware is not the latest revision, you
can obtain an Upgrade Cartridge from one of these sources:
■
A Compaq Authorized Service Provider
■
1-800-OK-COMPAQ
Compaq SLR Tape Drive User Guide
5-22
Troubleshooting
To upgrade your firmware with a cartridge, follow this procedure:
1.
Exit all applications before proceeding.
2.
Verify that the drive is not in use.
3.
Insert the cartridge into the drive.
4.
The upgrade process automatically takes place; the front panel LED display
shows steady green.
CAUTION: Do not interrupt the upgrade process. This can corrupt
the firmware.
5.
When the upgrade process is complete (after approximately three
minutes) the LED display shows blinking green
6.
Remove the cartridge.
Upgrading the Firmware
by using the Option ROMPaq
If you have determined that your drive’s firmware is not the latest revision, you
can use a ROMPaq diskette to update the firmware.
Compaq SLR Tape Drive User Guide
5-23
Troubleshooting
Creating a ROMPaq diskette
To create the diskette, follow this procedure:
1.
Boot your system from the Compaq SmartStart and Support Software
CD version 3.10 or higher.
2.
Select Create Support Software from the Compaq System Utilities
screen.
3.
Select the appropriate option for your system from the Diskette Builder
screen.
4.
Follow the instructions on the screen to create the diskette.
Upgrading the firmware
To carry out the upgrade, follow this procedure:
1.
Boot your system using the diskette.
2.
Select Enter from the Welcome screen.
3.
Select the drive from the list of programmable devices displayed on the
Select a Device screen.
4.
Select Enter from the Select a Device screen.
5.
Review the Select an Image screen:
Table 5-4
Select an Image screen
Item
Contents
Device to reprogram:
The name of the device
Current ROM revision:
The date of your current firmware
Select Firmware Images:
The date of the latest firmware on the
diskette
Compaq SLR Tape Drive User Guide
5-24
Troubleshooting
6. If appropriate, select Enter from the Select an Image screen.
7. Review the Caution screen:
Table 5-5
Caution screen
Item
Contents
Device to reprogram:
The name of the device
Current ROM revision:
The date of your current firmware
Select Firmware Images:
The date of the latest firmware on the
diskette
8. Determine whether or not to upgrade your firmware:
9.
❏
If the information on the Caution screen is appropriate, press
Enter to begin the upgrade
❏
If the information on the Caution screen is NOT appropriate, press
Esc to return to the Select an Image screen without upgrading the
firmware
The Reprogramming Firmware display indicates that your firmware is
being upgraded.
CAUTION: Do not interrupt the upgrade process. This can corrupt
the firmware.
10. The screen display indicates when the upgrade is complete.
11. Remove the diskette; reboot your system.
For Further Assistance
For Compaq technical support:
In the United States and Canada, call 1-800-386-2172
For Compaq technical support phone numbers outside the United States and
Canada, visit the Compaq Web Site at http://www.compaq.com.
Compaq SLR Tape Drive User Guide
A-1 Regulatory Compliance Notices
Appendix A
Regulatory Compliance Notices
Federal Communications
Commission Notice
Part 15 of the Federal Communications Commission (FCC) Rules and
Regulations has established Radio Frequency (RF) emission limits to provide
an interference-free radio frequency spectrum. Many electronic devices,
including computers, generate RF energy incidental to their intended function
and are, therefore, covered by these rules. These rules place computers and
related peripheral devices into two classes, A and B, depending upon their
intended installation. Class A devices are those that may reasonably be
expected to be installed in a business or commercial environment. Class B
devices are those that may reasonably be expected to be installed in a
residential environment (i.e., personal computers). The FCC requires devices
in both classes to bear a label indicating the interference potential of the device
as well as additional operating instructions for the user.
The rating label on the device shows which class (A or B) the equipment falls
into. Class B devices have an FCC logo or FCC ID on the label. Class A
devices do not have an FCC logo or ID on the label. Once the class of the
device is determined, refer to the following corresponding statement.
Compaq SLR Tape Drive User Guide
A-2 Regulatory Compliance Notices
Class B Equipment
This equipment has been tested and found to comply with the limits for a Class
B digital device, pursuant to Part 15 of the FCC Rules. These limits are
designed to provide reasonable protection against harmful interference in a
residential installation. This equipment generates, uses, and can radiate radio
frequency energy and, if not installed and used in accordance with the
instructions, may cause harmful interference to radio communications.
However, there is no guarantee that interference will not occur in a particular
installation. If this equipment does cause harmful interference to radio or
television reception, which can be determined by turning the equipment off
and on, the user is encouraged to try to correct the interference by one or more
of the following measures:
■
Reorient or relocate the receiving antenna.
■
Increase the separation between the equipment and receiver.
■
Connect the equipment into an outlet on a circuit different from that to
which the receiver is connected.
■
Consult the dealer or an experienced radio or television technician for
help.
Declaration of Conformity for Products
Marked with FCC Logo, United States Only
This device complies with Part 15 of the FCC Rules. Operation is subject to
the following two conditions: (1) this device may not cause harmful
interference, and (2) this device must accept any interference received,
including interference that may cause undesired operation. For questions
regarding this declaration, contact:
Compaq Computer Corporation
P. O. Box 692000, Mail Stop 510101
Houston, Texas 77269-2000
Or call (281) 514-3333
To identify this product, refer to the Series number found on the product.
Compaq SLR Tape Drive User Guide
A-3 Regulatory Compliance Notices
Modifications
The FCC requires the user to be notified that any changes or modifications
made to this device that are not expressly approved by Compaq Computer
Corporation may void the user's authority to operate the equipment.
Cables
Connections to this device must be made with shielded cables with metallic
RFI/EMI connector hoods in order to maintain compliance with FCC Rules
and Regulations.
Canadian Notice (Avis Canadien)
Class B Equipment
This Class B digital apparatus meets all requirements of the Canadian
Interference-Causing Equipment Regulations.
Cet appareil numérique de la classe B respecte toutes les exigences du
Règlement sur le matériel brouilleur du Canada.
European Union Notice
Products with the CE Marking comply with both the EMC Directive
(89/336/EEC) and the Low Voltage Directive (73/23/EEC) issued by the
Commission of the European Community.
Compliance with these directives implies conformity to the following
European Norms (in brackets are the equivalent international standards):
■
EN55022 (CISPR 22) - Electromagnetic Interference
■
EN50082-1 (IEC801-2, IEC801-3, IEC801-4) - Electromagnetic
Immunity
Compaq SLR Tape Drive User Guide
A-4 Regulatory Compliance Notices
■
EN60950 (IEC950) - Product Safety
Japanese Notice
Australian Notice
This customer equipment is to be installed and maintained by service
personnel as defined by AS/NZS 3260 Clause 1.2.14.3. Service Personnel.
Incorrect connection of connected equipment to the General Purpose Outlet
could result in a hazardous situation.Safety requirements are not fulfilled
unless the equipment is connected to a wall socket outlet with protective earth
contact.
Compaq SLR Tape Drive User Guide
B-1 Electrostatic
Appendix B
Electrostatic Discharge
To prevent damaging the system, be aware of the precautions you need to
follow when setting up the system or handling parts. A discharge of static
electricity from a finger or other conductor may damage system boards or
other static-sensitive devices. This type of damage may reduce the life
expectancy of the device.
To prevent electrostatic damage, observe the following precautions:
■
Avoid hand contact by transporting and storing products in static-safe
containers.
■
Keep electrostatic-sensitive parts in their containers until they arrive at
static-free workstations.
■
Place parts on a grounded surface before removing them from their
containers.
■
Avoid touching pins, leads, or circuitry.
■
Always be properly grounded when touching a static-sensitive
component or assembly.
Grounding Methods
There are several methods for grounding. Use one or more of the following
methods when handling or installing electrostatic-sensitive parts:
■
Use a wrist strap connected by a ground cord to a grounded workstation
or computer chassis. Wrist straps are flexible straps with a minimum of
1 megohm 10 percent resistance in the ground cords. To provide
proper ground, wear the strap snug against the skin.
■
Use heel straps, toe straps, or boot straps at standing workstations.
Wear the straps on both feet when standing on conductive floors or
dissipating floor mats.
■
Use conductive field service tools.
Compaq SLR Tape Drive User Guide
B-2 Electrostatic
■
Use a portable field service kit with a folding static-dissipating
work mat.
If you do not have any of the suggested equipment for proper grounding, have
an Authorized Compaq Reseller install the part.
NOTE: For more information on static electricity, or assistance with product
installation, contact your Authorized Compaq Reseller.
Compaq SLR Tape Drive User Guide
C-1 Drive Configuration Options
Appendix C
Drive Configuration Options
Your Compaq SLR SLR Drive has been configured by Compaq to meet the
requirements of the typical user. This chapter contains information on
changing the default configuration.
Most of the drive’s options are controlled internally. However, the user has
access to certain options via the jumper block located at the rear of the drive.
The options available to the user are:
■
Selecting the SCSI ID
■
Enabling/Disabling bus parity
■
Testing
Locating the Jumper Block
Locate the jumper block at the rear of the drive.
SCSI Connector
Jumper Block
Power Connector
Figure C-1.
Rear View of the Compaq SLR Drive
Compaq SLR Tape Drive User Guide
C-2 Drive Configuration Options
Identifying the Jumpers
SELECT
2 1 0
TPWR
PARITY
IN
TEST CONN
TEST
OUT
The layout of the jumper block is as follows:
Figure C-2.
Layout of the Jumper Block
Compaq SLR Tape Drive User Guide
C-3 Drive Configuration Options
Selecting the SCSI ID
Since each device on the same SCSI bus must have a unique ID, the user may
need to set the drive’s ID before installation.
IMPORTANT: The drive has been configured by Compaq with SCSI ID = 6 selected. Do
not use SCSI ID = 7: this is reserved for SCSI controllers
Use the following table to obtain the appropriate jumper settings:
Table C-1
Selecting the SCSI ID
SEL2
SEL1
SEL0
SCSI ID
OPEN
OPEN
OPEN
0
OPEN
OPEN
CLOSED
1
OPEN
CLOSED
OPEN
2
OPEN
CLOSED
CLOSED
3
CLOSED
OPEN
OPEN
4
CLOSED
OPEN
CLOSED
5
CLOSED
CLOSED
OPEN
6
CLOSED
CLOSED
CLOSED
7
NOTE: In the above table, “CLOSED” indicates that a jumper has been installed.
IMPORTANT: The drive reads the jumper block settings at power-on. For changes to
be effective, either the user must turn the drive OFF then back ON or the drive must
receive a SCSI Bus Reset.
Compaq SLR Tape Drive User Guide
C-4 Drive Configuration Options
Configuring the SCSI ID in a
SCO OpenServer environment
In the pre-configured kernel used to install SCO OpenServer, the following
SCSI IDs are automatically set:
■
Disk = 0
■
Tape = 2
■
CD-ROM = 5.
If required, the user may reconfigure the ID for the Compaq SLR Drive using
the mkdev tape command. To verify the ID, use the hwconfig command look
for the same %tape string or check the %tape string as it appears on the
console as the kernel starts up. The information will appear in a line such as
this:
%tape - - - type= S ha=0 id=2 lun=0 ht= ...
In the above example, “id=2” indicates that the drive’s SCSI ID = 2.
IMPORTANT: SCO OpenServer’s install kernel will only communicate with the first
SCSI controller in the system. Remove the generic tape at SCSI ID = 2 then install the
appropriate tape driver. Set the required SCSI ID, bus, and lun values.
Enabling/Disabling Bus Parity
Installing the PARITY jumper enables bus parity checking.
IMPORTANT: Compaq ships the drive with this jumper installed.
Testing
The TEST and TEST CONN jumpers enable selftest and off-line testing
capabilities which are beyond the scope of this guide.
Compaq SLR Tape Drive User Guide
Index -1
Power to the drive 5-6
Software 5-7
Cleaning
Scheduling 1-2
Cleaning cartridge, exhausted 4-3
Cleaning the drive
After installation 2-9
Guidelines 4-7, 5-2
Procedure 4-7
Compaq Web Site viii
Compatibility, cartridge 1-2
Compatibility, read/write 1-2
Compression 1-1
Contents of this kit 1-3
Controller, defective 5-6
Index
A
About This Guide vii
Activity Log 5-15, 5-17
Arcada Backup Exec for NT,
troubleshooting 5-8
ArcServe for Netware,
troubleshooting 5-17
ArcServe for NT, troubleshooting 514
B
D
Banyan VINES
Identifying software drivers 312
Installing Compaq Peripheral
Adapter Support software 312
Troubleshooting 5-13
Bus parity checking C-4
Data compression
Enabling 4-7
Duty cycle 1-2
E
Electrostatic Discharge B-1
Errors
Dealing with a fatal error 4-3
Interpreting the LED display 43
Recovering from errors 4-3
Extender, power cable, installing 28
C
Cables
Connecting to the drive 2-6
Capacity 1-1
Cartridge
Exhausted 4-8
Handling 4-4
Retensioning 4-6
Storage 4-4
Using the write protect switch
4-7
Checking
Drive 5-6
F
Firmware
Upgrading 5-21
Upgrading with a cartridge 5-22
Upgrading with a ROMPaq
diskette 5-22
Flowchart, troubleshooting 5-3
Compaq SLR Tape Drive User Guide
Index -2
Formats 1-2
Supported QIC formats 1-2
K
Kit contents 1-3
G
Getting Help viii
Grounding Methods B-1
H
http://www.compaq.com viii, 5-24
L
LED display 4-2, 4-3, 4-7, 4-8, 5-2,
5-6, 5-22
M
Media, recommended 1-2
Microsoft Windows 95
Identifying drivers 3-6, 3-7
When to install 3-6, 3-7
Microsoft Windows NT
Troubleshooting 5-8
Verifying drivers 5-11
I
IBM OS/2
Identifying software drivers 310
Troubleshooting 5-12
Identifying
Jumpers C-2
Inspect utility 5-21
Installation requirements
Controller 2-1
Software 2-1
Tools 2-1
Installing the drive
Completing the installation 2-9
Possible locations 2-1
Preparing the system 2-2
Reassembling the system 2-9
Setting the SCSI ID 2-2
With rails 2-6
Without rails 2-8
J
Jumper block 2-3
Identifying the jumpers C-2
Locating C-1
N
Novell IntranetWare/Netware
Identifying drivers 3-3
Supporting ASPI 3-4
Troubleshooting 5-7
NT Backup, troubleshooting 5-8
O
Operating the drive
Enabling data compression 4-7
Front panel LED display 4-2
Handling a cartridge 4-4
Retensioning a cartridge 4-6
Using the cartridge's write
protect switch 4-7
Using the ejector button 4-3
Using the front panel controls
4-3
Compaq SLR Tape Drive User Guide
Index -3
Setting with SCO OpenServer
2-2, 3-8
With SCO OpenServer C-4
SCSI ID, setting 5-7
Sense code 5-7
Software
Installation requirements 2-1
Installing software drivers 2-9
Verifying Microsoft Windows
NT drivers 5-11
Software drivers
Obtaining the drivers 3-2
Supported environments 3-1
SQLServer for NT, troubleshooting
5-8
Stop message 5-8
SunSoft Solaris
Identifying software drivers 311
Symbols
in text viii
Symbols in Text viii
System Configuration Worksheet,
using 5-4
System Event Log 5-8
System Log 5-13
P
Parity checking C-4
Performance 1-1
Power cable extender, installing 2-8
Q
Quick Checklist 5-2
R
Reliability of data 4-4
Removable media bay
No rails required 2-8
Obtaining access 2-4
Rails required 2-6
Resource conflicts, checking for 5-4
Retensioning a Cartridge 4-6
ROMPaq diskette
Creating 5-23
Using 5-23
S
SCO OpenServer
Configuring the SCSI ID 3-8
Identifying drivers 3-8
Installing the Compaq Extended
Feature Supplement 3-8
Troubleshooting 5-12
SCO UnixWare
Identifying software drivers 3-9
Installing the Compaq Extended
Feature Supplement 3-9
SCSI ID
Reserved 2-4
Selecting the jumpers 2-3
Setting 2-2, C-3
T
Tape Engine Log 5-15
Tape Server Log 5-17
Telephone Numbers viii
Testing
selftests C-4
Using an offline tester C-4
Text Conventions vii
Transfer rate 1-1
Troubleshooting
Compaq SLR Tape Drive User Guide
Index -4
Arcada Backup Exec for NT 58
ArcServe for Netware 5-17
ArcServe for NT 5-14
Banyan VINES environment 513
Checking for resource conflicts
5-4
Checking power to the drive 56
Checking software 5-7
Checking the drive 5-6
Correcting intermittent failures
5-20
Flowchart 5-3
Hardware checks 5-2
IBM OS/2 environment 5-12
Microsoft Windows NT
environment 5-8
Novell IntranetWare/NetWare
environment 5-7
NT Backup 5-8
SCO OpenServer environment
5-12
Software checks 5-2
SQLServer for NT 5-8
Using the Quick Checklist 5-2
Using the System Configuration
Worksheet 5-4
Verifying recent changes 5-19
Tape Engine Log 5-15
Tape Server Log 5-17
W
Write protect 4-7
U
Using
Activity Log 5-15, 5-17
Inspect utility 5-21
ROMPaq diskette 5-23
System Event Log 5-8
System Log 5-13
Compaq SLR Tape Drive User Guide