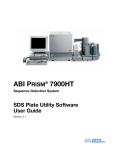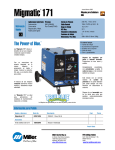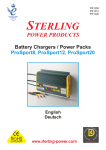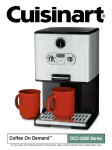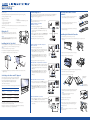
1
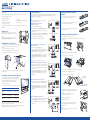
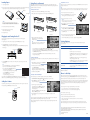
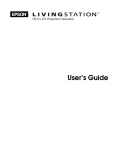
HDTV LCD Projection Television
Quick Setup
After unpacking your TV and its accessories, follow the steps here to get it set up and connected to your
home theater system.
You’ll also find quick instructions for using EPSON’s Photo on DemandTM system for viewing, printing,
and storing your digital photos in a flash.
Make sure you have these items:
• TV
• Set-top shelf with screws
• Remote control with 2 AA batteries
• Package of paper (20 sheets)
•
•
•
Ink cassette
CD-R/RW drive with USB cable and power cable
Documentation kit
Write down the TV’s serial number on the line below. It is located on a sticker on the back left side of the TV.
Inserting the Remote Control
Batteries
Connecting the TV
Here are instructions for connecting a digital TV (HDTV) receiver, DVD player, and external CD-R/RW drive
to your TV. For instructions on connecting other equipment, see your User’s Guide. Make sure your TV is
unplugged before connecting equipment to it.
1 Press in on the top of the battery cover on the back of the remote
control. Then slide the cover down and off the remote.
Note
+
Before connecting a digital TV receiver to the TV, be sure to read any
instructions that came with the receiver.
2 Insert the batteries as shown here, making sure the + and – ends
face the right way. Then push them down flat.
Digital TV (HDTV) Receiver With a
DVI-HDTV Connection
+
1 Turn off and unplug your digital TV receiver.
Serial number __________________________________________
3 Place the cover into the grooves and slide the cover all the way up
until it clicks into place.
2 Connect a DVI-HDTV cable to the DVI-HDTV Input connector on
the back of the TV and the DVI-HDTV OUT connector on your
digital TV receiver.
Lifting the TV
When lifting the TV, have two people grasp it as shown below,
using the two handles in back and the top of the frame in front.
Warning
The TV is very heavy. Two people are required to lift or move the TV to
avoid injury. Never move the TV and its stand together or the TV may
fall and cause injury or be damaged.
3 Connect a standard, red/white audio cable to the DVI-HDTV Input
R and L Audio connectors on the back of the TV and the R and L
Audio Out connectors on your digital TV receiver.
Audio cable
DVI-HDTV cable
1 Press and release the printer cover latch to open the cover.
4 Plug the digital TV receiver back into its power outlet.
2 Flip down the printer lock cover and turn the lock counterclockwise to loosen it. It spins freely when
it is unlocked.
Digital receiver
Installing the Set-Top Shelf
The set-top shelf provides a convenient support for a center surround sound speaker
or other component on top of the TV. The shelf can hold up to 11 lb (5 kg).
Caution
Installing the Printer Ink Cassette
Digital TV (HDTV) Receiver With Component
Video Connection
1 Turn off and unplug your digital TV receiver.
Don’t fold the shelf backwards on its hinge or it may break.
1 Fold the shelf into an upside-down L-shape with the shorter end on top.
2 Align the holes in the shelf with the holes on the back of the TV.
2 Connect a component video cable to any available set of Y (green),
PB (blue), and PR (red) connectors on the back of the TV and the
Y, PB, and PR connectors on your digital TV receiver.
3 Grasp the printer handle and pull the printer out as far as it goes.
3 Connect a standard, red/white audio cable to the corresponding
Component Input R and L Audio connectors on the back of
the TV and the R and L Audio Out connectors on your digital
TV receiver.
Component
video
cable
Audio
cable
4 Pull open the ink cover on the side of the printer.
Digital receiver
4 Plug your digital TV receiver back into its power outlet.
DVD Player With Component Video Connection
1 Connect the component video cable to any available set of Y (green),
PB (blue), and PR (red) connectors on the back of the TV and to
the corresponding color Component Video Out connectors on your
DVD player.
5 Remove the cassette from its package. Then remove the red paper strip from the end.
3 Using a Phillips-head screwdriver, secure the shelf to the TV with the four screws that came with it.
Tighten the screws.
Selecting a Location and TV Support
2 Connect a standard, red/white audio cable to the corresponding
Component Input R and L Audio connectors on the back of
the TV and the R and L Audio Line Out connectors on your
DVD player.
Component
video
cable
Select a suitable location for your TV and follow all of its safety instructions
to ensure it operates safely and effectively, as described in the User’s Guide.
You can use an optional EPSON TV stand to support your TV.
Order part number LS47STD (for the LS47P1) or LS57STD
(for the LS57P1) from your dealer.
If you use your own stand, make sure it can securely support the TV as follows:
Specification
Width of the base
(minimum)
LS47P1
47 inches (119 cm)
LS57P1
6 If the ink ribbon is slack, rotate the spindles to tighten it.
Audio
cable
7 Position the cassette as shown below, on the right.
Pointed plastic tab
should face up
DVD player
DVD Player With an S-Video Connection
1 Connect an S-Video cable to one of the S-Video connectors on the
back of the TV and the S-Video connector on your DVD player.
2 Connect a standard, red/white audio cable to the corresponding
Video Inputs R and L Audio connectors on the back or front
of the TV and the R and L Audio Line Out connectors on your
DVD player.
Covered ends of the
ribbon should face out
S-Video
cable
Audio
cable
8 Carefully align the cassette and its ribbon with the slot, then gently
push in the cassette until it clicks into place beneath the latch.
56 inches (142 cm)
Caution
Depth of the base
(minimum)
You must align the cassette and its ribbon with the slot or
you will damage it when you slide it in.
DVD player
16 inches (41 cm)
18 inches (46 cm)
External CD-R/RW Drive Connection
Weight capacity
(minimum)
331 lb (150 kg)
331 lb (150 kg)
Place the stand in a location that allows you access to the back of the TV and provides at least
12 inches (30 cm) of room for ventilation at the sides.
You may want to secure the TV to a wall or other support so it stays upright on its stand during
an earthquake or other situation. See your User’s Guide for details.
9 Flip up the ink cover and push it closed.
1 Connect the USB cable to the USB port on your external CD-R/RW
drive and the EXT. I/F connector on the back of the TV.
10 Slide in the printer until it stops.
2 Connect the CD-R/RW power cable to the drive and plug it into an
electrical outlet.
11 Push in on the printer lock as you turn it clockwise to tighten it.
If it doesn’t tighten, push the printer in further and try again.
External
CD-R/RW
drive
12 Flip up the lock cover.
Caution
USB
cable
Make sure to lock the printer securely and close the lock cover completely
or the printer won’t print.
Loading Paper
Using Photo on Demand
Storing Photos on a CD
1 Open the paper cassette lid.
Your TV’s Photo on Demand system lets you view photos on digital photo cards (also called memory cards) or
CD-R/RW discs, print the photos on its built-in printer, and store them on CDs. Follow the quick steps below or the
expanded instructions in your User’s Guide.
Before you save photos on a CD, make sure you’ve connected the external CD-R/RW drive that came with your TV,
plugged it in, and turned it on.
2 You can load up to 20 sheets of paper. Position the paper with the shiny side face up, with the wide bordered edge
facing the hinge of the cassette, and the narrow bordered end facing the open end of the cassette.
Make sure that your disc can be written to at 4X speed. Some high-speed discs don’t support 4X writiing, so check your disc
specifications before inserting it into the drive. See your User’s Guide for additional details on supported discs and formats.
Inserting a Photo Card
Wide border
1 Make sure the TV is turned on and the Power light is green and not flashing.
Narrow border
Note
2 Insert your photo card in the appropriate slot on the TV’s front panel. The Card light turns on.
1 Press the eject button on the drive to open the tray.
2 Place a new, blank CD-R/RW disc on the tray with the label
side facing up. Make sure the disc lays flat in the tray.
3 Press the eject button again to close the tray.
Shiny side up
Caution
Always use the eject button to open and close the tray. Pushing in
the tray may damage the drive and your disc.
Caution
Don’t remove the perforated borders on the paper before you print.
The paper may jam or the printer may malfunction when it loads the paper.
Don’t touch the shiny side of the paper or it will become discolored.
CompactFlash® card
SmartMedia® card
4 Press the 3 button on the remote control to open the
CD-R/RW Writer menu.
3 Close the cassette lid and press it until it clicks shut.
5 To write all of the photos on your digital photo card to
the CD, press Enter to select Write to CD-R/RW.
4 Slide the cassette into its slot, open end first.
Push it in until it clicks into place.
Memory Stick®
SD/MultiMediaCardTM
5 Close the printer cover.
Selected photo
Plugging In and Turning On the TV
Turn on your connected equipment and insert a tape or disc, if necessary, to check the TV’s operation
with the equipment.
1 Plug the TV’s power cord into a wall outlet or power strip. The Power light comes on orange.
Solving Problems
Note
The Power light flashes green while the TV warms up. After a few moments, the Power light stops flashing
and shines green.
Power button
Remote
control
•
•
•
•
7 You see a writing confirmation message while your photos
are written to the CD and the drive light flashes.
When it’s finished, the CD tray opens and you see a completion message. Press Enter.
3 After a few seconds, the Photo screen appears.
It displays the photos on your card and outlines
the first one in gold:
If the Photo viewer doesn’t come up automatically, press the
Photo View button on the TV panel or remote control.
2 Press the Power button on the TV panel or the remote control.
6 You see a confirmation message. Press Enter to select Yes
or press Exit to cancel.
To select a different photo, press the Prev. <, Next >, Select , or Select
button.
To enlarge a photo view, press the Enter button on the TV panel or remote control.
To zoom into the photo further, press the Photo Zoom + button until the image is up to 3 or 4 times larger.
Press Photo Zoom - to zoom out.
To rotate a photo, press the Rotate button on the remote control (when the photo isn’t zoomed).
Press it again to keep rotating.
If you have problems setting up your TV, see the suggestions here. For additional troubleshooting advice,
see your User’s Guide.
Problem
Solution
The power won’t come on.
Make sure your electrical outlet is working and isn’t controlled by a switch
or timer.
Check that the power cord is connected securely.
If the Power light is flashing orange, the TV is cooling down. When it stops
flashing and lights orange, you can unplug it or press the Power button to
turn it on.
Viewing a Slide Show
TV panel
If the Power light is flashing green, the TV is warming up. When it stops
flashing and lights green, the TV is ready.
You can view your photos automatically, for a few seconds each, by running a slide show. You can view all the photos or
just selected ones.
3 Press the TV/Video button on the remote control or the TV panel to select the source you want to look at
(TV, DVD, etc.).
1 Press the 2 button on the remote control. The Slide Show
menu on the left of the screen opens:
Note
You can press the TV/Video button 10 seconds after pressing the Power button.
You don’t have to wait for the Power light to stop flashing first.
If you see a blank screen with No Signal at the bottom:
• Turn on the source (VCR, DVD, etc.)
• Insert a disc or tape, if you’re viewing one, and press Play
• Press the TV/Video button to select the source
• Check the cable connections
• If it’s still not working, see your User’s Guide.
2 To view all your photos in a slide show, press Enter
to select View Slide Show.
The first photo is enlarged and appears on the screen.
It displays for 3 seconds, then the next photo is displayed.
If the Power light is red, you may have a problem with the TV, depending on
the state of the Lamp light. See your User’s Guide for details.
The buttons on the TV
panel don’t work.
When the TV is warming up or cooling down (the Power light is flashing),
you can’t use the buttons. When the Power light stays lit green or orange,
the buttons are operable.
The TV’s fan keeps running
when the TV is turned off.
The TV cools itself down using internal power even after you turn it off.
3 To end the slide show, press Exit.
No Signal
To turn off the TV, press the Power button. The Power light flashes orange as the TV cools down.
When the TV is cool, the Power light stops flashing and shines orange. Leave the TV like this or unplug it.
Where to Get Help
Selecting a Photo and Printing It
You can print one photo at a time from a digital photo card (memory card) or CD-R/RW.
1 Press Prev. <, Next
>, Select
, or Select
to highlight the photo you want to print.
2 Press the Print button on the TV panel or remote control.
You see the Print Settings screen:
Setting the Volume
To turn the TV speaker volume up or down, use the Vol. up and down button on the TV panel or remote control.
To mute the sound, press the Mute button on the remote control.
Mute button
3 To print one copy of the photo, press Enter.
To print multiple copies, press Next > until the number
in the Copies box is correct. Then press Enter. After a
moment, printing starts.
During printing, the Printer light flashes. When printing is
finished, the Printer light turns off.
Volume button
EPSON provides technical assistance through the World Wide Web 24 hours a day. From the Internet, you can
reach EPSON’s product support page at http://support.epson.com. After selecting your product, you can access
troubleshooting information, download product documentation, and receive technical advice through e-mail.
To use the EPSON PrivateLineSM Support service, call (800) 637-7661 and enter the PIN on the EPSON PrivateLine
Support card included with your documentation. This is the fastest way of speaking to a live representative, and it’s
free. This service is available 6 AM to 6 PM, Pacific Time, Monday through Friday, for the duration of your
warranty period.
You may also speak with a TV support specialist by dialing one of these numbers:
•
•
U.S.: (562) 276-4394, 6 AM to 6 PM, Pacific Time, Monday through Friday
Canada: (905) 709-3839, 6 AM to 6 PM, Pacific Time, Monday through Friday
Toll or long distance charges may apply.
4 To print additional photos, repeat these steps. You can send multiple photos for printing at one time,
up to 15 photos.
Before you call, please have the following information ready:
If you see a printing error message, select Yes to check for the problem. Then follow the on-screen instructions to
solve the problem and continue printing. For additional help, see your User’s Guide.
•
•
•
When you’re finished printing, remove the borders from the edges of your photo by bending them back and forth
and tearing them off.
Product name (EPSON Livingstation LS47P1 or LS57P1)
Product serial number (located on the back left side of the TV or on the front of this sheet)
Description of the problem
You can purchase supplies and accessories from your dealer or from EPSON. Call (800) 873-7766 or visit the
EPSON Store at www.epsonstore.com (U.S. sales only). In Canada, please call (800) 463-7766 for dealer referral.
EPSON is a registered trademark and Livingstation is a trademark of SEIKO EPSON CORPORATION. PrivateLine is a service mark and
Photo on Demand is a trademark of Epson America, Inc.
General Notice: Other product names used herein are for identification purposes only and may be trademarks of their respective owners.
EPSON disclaims any and all rights in those marks.
© 2003 by Epson America, Inc. 12/03
Printed in USA
CPD-17479