1
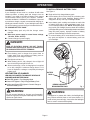
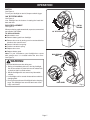
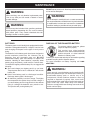
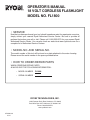
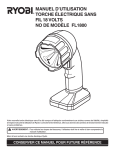
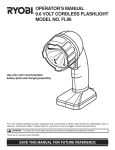
OPERATOR’S MANUAL
18 VOLT CORDLESS FLASHLIGHT
MODEL NO. FL1800
Your new cordless flashlight has been engineered and manufactured to Ryobi’s high standard for dependability, ease of
operation, and operator safety. Properly cared for, it will give you years of rugged, trouble-free performance.
WARNING: To reduce the risk of injury, the user must read and understand the operator's manual.
Thank you for buying a Ryobi flashlight.
SAVE THIS MANUAL FOR FUTURE REFERENCE
Page 1
TABLE OF CONTENTS
■
General Safety Rule ................................................................................................................................................ 2-3
■
Specific Safety Rules And/Or Symbols .................................................................................................................... 3-4
■
Symbols ...................................................................................................................................................................... 5
■
Operation ................................................................................................................................................................. 6-7
■
Maintenance ............................................................................................................................................................... 8
■
Parts Ordering / Service ........................................................................................................................................... 10
GENERAL SAFETY RULES
Personal Safety
WARNING:
■
Read and understand all instructions. Failure to follow
all instructions listed below, can result in electric shock,
fire and/or serious personal injury.
SAVE THESE INSTRUCTIONS
Work Area
■
■
Keep your work area clean and well lit. Cluttered
benches and dark areas invite accidents.
■
Do not operate power tools in explosive atmospheres, such as in the presence of flammable liquids, gases, or dust. Power tools create sparks which
may ignite the dust or fumes.
■
Keep bystanders, children, and visitors away while
operating a power tool. Distractions can cause you to
lose control.
■
■
■
■
Electrical Safety
■
■
Do not abuse the cord. Never use the cord to carry
the charger. Keep cord away from heat, oil, sharp
edges, or moving parts. Replace damaged cords
immediately. Damaged cords may create a fire.
■
A battery operated tool with integral batteries or a
separate battery pack must be recharged only with
the specified charger for the battery. A charger that
may be suitable for one type of battery may create a risk
of fire when used with another battery. Use battery only
with charger listed.
Use battery operated tool only with specifically
designated battery pack. Use of any other batteries
may create a risk of fire. Use only with battery pack listed.
Page 2
Stay alert, watch what you are doing and use common sense when operating a power tool. Do not use
tool while tired or under the influence of drugs, alcohol, or medication. A moment of inattention while
operating power tools may result in serious personal injury.
Dress properly. Do not wear loose clothing or jewelry. Contain long hair. Keep your hair, clothing, and
gloves away from moving parts. Loose clothes, jewelry, or long hair can be caught in moving parts.
Avoid accidental starting. Be sure switch is in the
locked or off position before inserting battery pack.
Carrying tools with your finger on the switch or inserting
the battery pack into a tool with the switch on, invites
accidents.
Remove adjusting keys or wrenches before turning
the tool on. A wrench or a key that is left attached to a
rotating part of the tool may result in personal injury.
Do not overreach. Keep proper footing and balance
at all times. Proper footing and balance enable better
control of the tool in unexpected situations. Do not use
on a ladder or unstable support.
Use safety equipment. Always wear eye protection.
Dust mask, nonskid safety shoes, hard hat, or hearing
protection must be used for appropriate conditions.
GENERAL SAFETY RULES
Tool Use and Care
■
■
■
■
■
■
Use clamps or other practical way to secure and
support the workpiece to a stable platform. Holding
the work by hand or against your body is unstable and
may lead to loss of control.
Do not force tool. Use the correct tool for your application. The correct tool will do the job better and safer
at the rate for which it is designed.
Do not use tool if switch does not turn it on or off. A
tool that cannot be controlled with the switch is dangerous and must be repaired.
Disconnect battery pack from tool before making any
adjustments, changing accessories, or storing the
tool. Such preventive safety measures reduce risk of
starting the tool accidentally.
Store idle tools out of reach of children and other
untrained persons. Tools are dangerous in the hands
of untrained users.
When battery pack is not in use, keep it away from
other metal objects like: paper clips, coins, keys,
nails, screws, or other small metal objects that can
make a connection from one terminal to another.
Shorting the battery terminals together may cause
sparks, burns, or a fire.
■
■
■
Maintain tools with care. Keep cutting tools sharp
and clean. Properly maintained tools, with sharp cutting
edges are less likely to bind and are easier to control.
Check for misalignment or binding of moving parts,
breakage of parts, and any other condition that may
affect the tool's operation. If damaged, have the tool
serviced before using. Many accidents are caused by
poorly maintained tools.
Use only accessories that are recommended by the
manufacturer for your model. Accessories that may
be suitable for one tool, may create a risk of injury when
used on another tool.
Service
■
■
Tool service must be performed only by qualified
repair personnel. Service or maintenance performed
by unqualified personnel could result in a risk of injury.
When servicing a tool, use only identical replacement parts. Follow instructions in the Maintenance
section of this manual. Use of unauthorized parts or
failure to follow Maintenance Instructions may create a
risk of shock or injury.
SPECIFIC SAFETY RULES AND/OR SYMBOLS
Hold tool by insulated gripping surfaces when performing an operation where the cutting tool may contact hidden
wiring. Contact with a "live" wire will make exposed metal parts of the tool "live" and shock the operator.
Additional Rules For Safe Operation
■
Know your power tool. Read operator's manual
carefully. Learn its applications and limitations, as
well as the specific potential hazards related to this
tool. Following this rule will reduce the risk of electric
shock, fire, or serious injury.
Important Rules for Battery Tools
■
■
Under extreme usage or temperature conditions,
battery leakage may occur. If liquid comes in contact
with your skin, wash immediately with soap and
water, then neutralize with lemon juice or vinegar. If
liquid gets into your eyes, flush them with clean
water for at least 10 minutes, then seek immediate
medical attention. Following this rule will reduce the risk
of serious personal injury.
USE ONLY THE CHARGER RECOMMENDED FOR
USE WITH YOUR FLASHLIGHT. Do not substitute any
other charger. Use of another charger could cause
batteries to explode causing possible serioous injury.
Batteries vent hydrogen gas and can explode in the
presence of a source of ignition, such as a pilot light. To
Battery tools do not have to be plugged into an
reduce the risk of serious personal injury, never use any
electrical outlet; therefore, they are always in
cordless product in the presence of open flame. An
operating condition. Be aware of possible hazards
exploded battery can propel debris and chemical. If
when not using your battery tool or when changing
exposed, flush with water immediately.
accessories. Following this rule will reduce the risk of
electric shock, fire, or serious personal injury.
Do not place battery tools or their batteries near fire
or heat. This will reduce the risk of explosion and
possibly injury.
Never use a battery pack that has been damaged or
Do not charge battery tool in a damp or wet location.
received a sharp blow. A damaged battery pack is
Following this rule will reduce the risk of electric shock.
subject to explosion. Properly dispose of a damaged
For best results, your battery tool should be charged
battery pack immediately. Failure to heed this warning
in a location where the temperature is more than 50°F
can result in serious personal injury.
but less than 100°F. Do not store outside or in vehicles.
Page 3
WARNING:
■
■
■
■
WARNING:
SPECIFIC SAFETY RULES AND/OR SYMBOLS
Important Safety Instructions For Charger
■
■
■
■
■
■
■
■
Save these instructions. This manual contains important safety and operating instructions for charger.
Following this rule will reduce the risk of electric shock,
fire, or serious personal injury.
Before using battery charger, read all instructions
and cautionary markings in this manual, on battery
charger, and product using battery charger. Following this rule will reduce the risk of electric shock, fire, or
serious personal injury.
To reduce risk of injury, charge only nickel-cadmium
type rechargeable batteries. Other types of batteries
may burst causing personal injury and damage.
Following this rule will reduce the risk of electric shock,
fire, or serious personal injury.
Do not expose charger to wet or damp conditions.
Following this rule will reduce the risk of electric shock,
fire, or serious personal injury.
Use of an attachment not recommended or sold by
the battery charger manufacturer may result in a risk
of fire, electric shock, or injury to persons. Following
this rule will reduce the risk of electric shock, fire, or
serious personal injury.
To reduce risk of damage to charger body and cord,
pull by charger plug rather than cord when disconnecting charger. Following this rule will reduce the risk
of electric shock, fire, or serious personal injury.
Make sure cord is located so that it will not be
stepped on, tripped over, or otherwise subjected to
damage or stress. Following this rule will reduce the risk
of serious personal injury.
An extension cord should not be used unless absolutely necessary. Use of improper extension cord could
result in a risk of fire and electric shock. If extension cord
must be used, make sure:
■
■
■
■
■
■
a. That pins on plug of extension cord are the
same number, size and shape as those of
plug on charger.
b. That extension cord is properly wired and in
good electrical condition; and
c. That wire size is large enough for AC ampere
rating of charger as specified below:
Cord Length (Feet)
25'
50'
100'
Cord Size (AWG)
16
16
16
Note: AWG = American Wire Gage
Do not operate charger with a damaged cord or plug.
If damaged, have replaced immediately by a qualified
serviceman. Following this rule will reduce the risk of
electric shock, fire, or serious personal injury.
Do not operate charger if it has received a sharp
blow, been dropped, or otherwise damaged in any
way; take it to a qualified serviceman. Following this
rule will reduce the risk of electric shock, fire, or serious
personal injury.
Do not disassemble charger; take it to a qualified
serviceman when service or repair is required. Incorrect reassembly may result in a risk of electric shock
or fire. Following this rule will reduce the risk of electric
shock, fire, or serious personal injury.
To reduce the risk of electric shock, unplug charger
from outlet before attempting any maintenance or
cleaning. Turning off controls will not reduce this
risk. Following this rule will reduce the risk of electric
shock, fire, or serious personal injury.
Disconnect charger from power supply when not in
use. Following this rule will reduce the risk of electric
shock, fire, or serious personal injury.
Save these instructions. Refer to them frequently
and use them to instruct others who may use this
tool. If you loan someone this tool, loan them these
instructions also. Following this rule will reduce the risk
of electric shock, fire, or serious personal injury.
SAVE THESE INSTRUCTIONS
Page 4
SYMBOLS
Important: Some of the following symbols may be used on your tool. Please study them and learn their meaning. Proper
interpretation of these symbols will allow you to operate the tool better and safer.
SYMBOL
NAME
DESIGNATION/EXPLANATION
V
Volts
Voltage
A
Amperes
Current
Hz
Hertz
Frequency (cycles per second)
min
Minutes
Time
Alternating Current
Type or a characteristic of current
---
Direct Current
Type or a characteristic of current
n0
No Load Speed
Rotational speed, at no load
.../min
Revolutions or Reciprocation Per Minute
Revolutions, strokes,
surface speed, orbits etc. per minute
Safety Alert Symbol
Indicates danger, warning or caution.
It means attention!!! Your safety is
involved.
Wet Conditions Alert
Do not expose to rain or use in damp
locations.
Hot Surface. Do Not Touch
This decal indicates HOT SURFACE.
DO NOT TOUCH. Keep all body parts
away from all hot surfaces.
The purpose of safety symbols is to attract your attention to possible dangers. The safety symbols, and
the explanations with them, deserve your careful attention and understanding. The safety warnings do
not by themselves eliminate any danger. The instructions or warnings they give are not substitutes for
proper accident prevention measures.
SYMBOL
MEANING
DANGER: Failure to obey a safety warning will result in serious injury to yourself or to others.
Always follow the safety precautions to reduce the risk of fire, electric shock and personal injury.
WARNING: Failure to obey a safety warning can result in serious injury to yourself or to others.
Always follow the safety precautions to reduce the risk of fire, electric shock and personal injury.
CAUTION: Failure to obey a safety warning may result in property damage or personal injury to
yourself or to others. Always follow the safety precautions to reduce the risk of fire, electric shock
and personal injury.
NOTE:
Advises you of information or instructions vital to the operation or maintenance of the equipment.
Page 5
OPERATION
CHARGING FLASHLIGHT
TO INSTALL/REMOVE BATTERY PACK
If your flashlight did not come in a cordless kit with other
cordless products, a battery pack and charger were not
included. If you need to purchase a battery pack, request
recommended battery pack part number 1322401,
1323303,130256001, 130224007 or 130255004. If you need
to purchase a charger, request recommended charging assembly part number 1423701. If your flashlight came with a
kit, use the battery pack and charger included with the kit.
See Figure 1.
■ Begin with a fully charged battery pack.
■ Orient battery pack so that raised rib on battery pack
aligns with groove inside flashlight. Battery pack is
designed to fit only one way in flashlight handle.
■ Insert battery pack, making sure latches on each side
of battery pack snap in place and battery pack is secure in flashlight before use. NOTE: When placing battery pack in your flashlight, be sure raised ribs on battery
pack aligns with groove inside flashlight handle and latches
snap into place properly. Improper insertion of battery
pack can cause damage to internal components.
TO CHARGE BATTERY PACK:
■ Charge battery pack only with the charger recommended.
■ Make sure power supply is normal house voltage,
120 volts, 60 Hz, AC only.
■ Connect charger to power supply.
■
To remove battery pack, locate latches on end of battery pack and depress to release battery pack from
your flashlight.
DANGER:
RISK OF ELECTRIC SHOCK. DO NOT TOUCH
UNINSULATED PORTION OF OUTPUT CONNECTOR
OR UNINSULATED BATTERY TERMINAL.
■
■
■
■
Place battery pack in charger then press down on
battery pack to be sure contacts on battery pack engage properly with charger contacts.
Red light should turn on.
When battery pack is fully charged, the red light will
turn off and the green light will turn on.
LATCH
After normal usage, 1 hour of charging time is required
to be fully charged. A minimum charge time of 1-1/2
hours is required to recharge a completely discharged
battery pack.
BATTERY
PACK
LED FUNCTION OF CHARGER
LED WILL BE LIGHTED TO INDICATE STATUS OF
CHARGER AND BATTERY PACK:
■ Red LED lighted = Fast Charging Mode
■ Green LED lighted = Fully Charged Battery Pack
■ Yellow and Green LED Lighted = Control Charge or
Defective Battery Pack.
DEPRESS LATCHES TO
RELEASE BATTERY PACK
WARNING:
Fig. 1
WARNING:
Do not operate flashlight or charger near flammable
liquids or in gaseous or explosive atmospheres. Internal
sparks can ignite fumes.
If wrapped or in contact with fabric, the flashlight lens
can produce sufficient heat to melt some fabrics. To
avoid serious personal injury, never allow the flashlight
lens to come in contact with anything.
Page 6
OPERATION
SWITCH
See Figure 2.
To turn your flashlight on and off, depress switch trigger.
180° ROTATING HEAD
See Figure 2.
Your flashlight has the feature of rotating the head 180°
back and forth.
BULB REPLACEMENT
See Figure 3.
When purchasing replacement bulb, request recommended
part number 780175002.
SWITCH
TRIGGER
180° ROTATING HEAD
TO REPLACE BULB:
■ Allow bulb to cool.
■ Remove battery pack from flashlight.
■ Remove lens cover by turning cover in counterclockwise
direction, then remove cover.
■ Remove old bulb from spring.
■ Position new bulb in spring.
■ Replace lens cover.
■ Replace battery pack.
Note: For your convenience, your flashlight has a spare
bulb storage area. It is located behind the lens cover.
See Figure 3.
Fig. 2
BULB STORAGE
AREA
WARNING:
Lens and bulb become hot during use:
• During or immediately after use, don't lay flashlight
flat on lens surface or place lens area in contact with
a plastic or fabric covered surface.
• Handle flashlight with care around any flammable
surface.
• Let flashlight cool for several minutes after use before
changing bulb.
• Do not use or permit use of flashlight in bed or sleeping
bags. This flashlight lens can melt fabric and a burn
injury could result.
BULB
LENS COVER
Fig. 3
Page 7
MAINTENANCE
DO NOT abuse power tools. Abusive practices can damage
tool as well as workpiece.
WARNING:
When servicing, use only identical replacement parts.
Use of any other part can create a hazard or cause
product damage.
WARNING:
WARNING:
Do not attempt to modify this tool or create accessories
not recommended for use with this tool. Any such alteration
or modification is misuse and can result in a hazardous
condition leading to possible serious personal injury.
Do not at any time let brake fluids, gasoline, petroleumbased products, penetrating oils, etc. come in contact
with plastic parts. They contain chemicals that can
damage, weaken or destroy plastic.
BATTERIES
DISPOSAL OF THE EXHAUSTED BATTERY
The battery pack for this flashlight is equipped with nickelcadmium rechargeable batteries. Length of service from
each charging will depend on the type of work you are
doing.
The batteries in this battery pack have been designed to
provide maximum trouble free life. However, like all
batteries, they will eventually wear out. DO NOT
disassemble battery pack and attempt to replace the
batteries. Handling of these batteries, especially when
wearing rings and jewelry, could result in a serious burn.
To obtain the longest possible battery life, we suggest the
following:
■ Store and charge your battery pack in a cool area.
Temperatures above 100°F or below 50°F will shorten
battery life.
■ Never store battery pack in a discharged condition.
Recharge battery pack if discharged.
■ All batteries gradually lose their charge. The higher
the temperature the quicker they lose their charge. If
you store battery pack for long periods of time without
using it, recharge the batteries every month or two.
This practice will prolong battery life.
To preserve natural resources, please
recycle or dispose of properly.
This product uses nickel-cadmium
batteries. Local, state or federal laws may
prohibit disposal of nickel-cadmium
batteries in ordinary trash.
Consult your local waste authority for information regarding
available recycling and/or disposal options.
For more information on battery recycling call 1-8008BATTERY.
Page 8
WARNING:
Upon removal, cover the battery pack's terminals with
heavy duty adhesive tape. Do not attempt to destroy or
disassemble battery pack or remove any of its
components. Nickel-cadmium batteries must be
recycled or disposed of properly. Also, never touch
both terminals with metal objects and/or body parts as
short circuit may result. Keep away from children.
Failure to comply with these warnings can result in fire
and/or serious injury.
NOTES
Page 9
OPERATOR'S MANUAL
18 VOLT CORDLESS FLASHLIGHT
MODEL NO. FL1800
• SERVICE
Now that you have purchased your tool, should a need ever exist for repair parts or service,
simply contact your nearest Ryobi Authorized Service Center. Be sure to provide all
pertinent facts when you call or visit. Please call 1-800-525-2579 for your nearest Ryobi
Authorized Service Center. You can also check our web site at www.ryobitools.com for a
complete list of Authorized Service Centers.
• MODEL NO. AND SERIAL NO.
The model number of this tool will be found on a plate attached to the motor housing.
Please record the serial number in the space provided below.
• HOW TO ORDER REPAIR PARTS
WHEN ORDERING REPAIR PARTS,
ALWAYS GIVE THE FOLLOWING INFORMATION:
•
MODEL NUMBER
•
SERIAL NUMBER
FL1800
RYOBI TECHNOLOGIES, INC.
1428 Pearman Dairy Road, Anderson, SC 29625
Post Office Box 1207, Anderson, SC 29622-1207
Phone 1-800-525-2579
www.ryobitools.com
972000-919
4-04