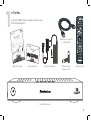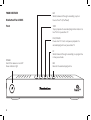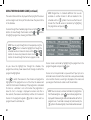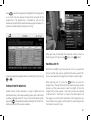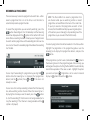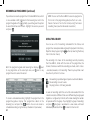
1
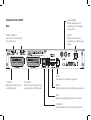
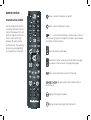
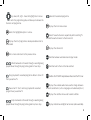
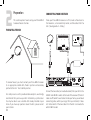
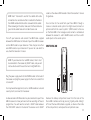
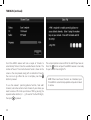
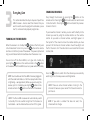
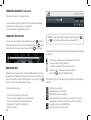
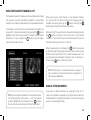
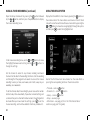
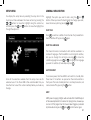
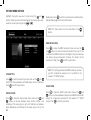
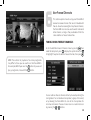
User Guide
Plaza HDR • S
freesat digital HD TV recorder
CONGRATULATIONS
on buying a Manhattan Plaza HDR•S freesat receiver.
This high performance unit lets you record and watch the best of
digital TV and radio from freesat.
You can only use the Plaza HDR•S with a suitable satellite dish,
and you must connect an HD-ready television to watch TV in High
Definition.
When installed and used correctly, this equipment should provide
many years of trouble-free entertainment in your home.
Please take the time to read this user guide carefully before
installing or using the unit, and keep it for future reference.
If you experience any difficulties connecting or using the Plaza
HDR•S, see the Troubleshooting section at the end of this guide
before contacting us.
Some of the key features of the Plaza HDR•S are:
150 freesat TV and radio channels
• Over
Subscription-free
reception
• Stunning High Definition
pictures
• Digital recording and playback
• Pause and rewind live TV of programmes
• On-screen channel list and channel browsing
• 8-day electronic programme guide
• Automatic programme reminders
• Programmable favourite channels list
• Digital text and interactive services
• BBC iPlayer and on-demand TV services
• Easy viewing of non-freesat channels
• Audio Description (AD)
• Subtitles
• Automatic setup
• Auto-update for new freesat channels
• Auto-standby for power saving
• HDMI connection
• SCART connection
•
HDMI, the HDMI Logo, and High-Definition Multimedia Interface
are trademarks or registered trademarks of HDMI Licensing LLC
in the United States and other countries.
2
FURTHER INFORMATION
FREESAT
You can get more information and help
from the freesat website at:
www.freesat.co.uk
MANHATTAN
You can get more information and help
from our website at:
www.manhattan-tv.com
or you can phone us on: 020 8450 0005
Manufactured under license from Dolby Laboratories.
Dolby and the double-D symbol are trademarks of Dolby Laboratories.
www.manhattan-tv.com
3
CONTENTS
1
2
3
4
In The Box
Your receiver
Remote control
Preparation
The satellite dish
Connecting your receiver
Switching on
Tuning in
Everyday Use
Turning on the receiver
Changing channels
Changing the volume
Browsing bar
Subtitles and Audio Description (AD)
Using the channel list
Regional channels
Using the programme guide
Interactive TV services
Pausing live TV
Recording a programme
Using the library
Playing a recorded programme
5
6
8
4
10
10
11
12
15
15
16
16
17
18
18
19
21
21
23
24
26
5
6
Advanced Use
The lock PIN
Display mode
TV/DTV
Changing the channel list
Using the favourite channel lists
Manual timer recording
Using the menu system
Setup menu
General menu section
Picture menu section
Sound menu section
Record menu section
System menu section
Information menu
On Demand TV
Setting up for On Demand TV
Watching On Demand TV
27
27
28
28
28
29
29
30
31
31
32
33
33
35
36
37
37
38
Non-Freesat Channels
39
Tuning in non-freesat channels
39
Watching non-freesat channels
40
Pausing and recording non-freesat channels 41
Appendix A Safety
Appendix B Troubleshooting
Appendix C Specifications
42
44
46
1
In The Box
In your Plaza HDR•S freesat+ receiver pack you should
find the following items:
HDMI cable to connect to
an HD-ready TV
Quick Start Guide
Main User Guide
Plug and transformer
Batteries for the
remote control
Remote control
Plaza HDR•S receiver
5
YOUR RECEIVER
Manhattan Plaza HDR•S
Front
RW
Winds backwards through a recording or upto 2
hours of live TV (if buffered)
STOP
Stops playback of a recorded programme. Returns to
live TV from paused live TV
PLAY/PAUSE
Pauses live TV. Starts and pauses playback of a
recorded programme or paused live TV
FF
Winds forwards through a recording or a programme
in live pause mode
POWER
Switch the receiver on and off.
Power indicator light
6
REC
Records the selected programme
Manhattan Plaza HDR•S
L and R AUDIO
Stereo audio output for
connecting to an analogue
audio system
Rear
LNB IN 1, LNB IN 2
Two inputs for connecting to
the satellite dish
S/PDIF
Optical audio output for
connecting to a digital audio
system
DC 12v
Connection for the power supply unit
TV SCART
Output for connection to a
non-HD television
VCR SCART
Output/input for connecting to
video recorder or DVD recorder
HDMI
Output for connection to an HD-ready television
USB
Socket for upgrading the receiver’s software
ETHERNET
Network socket for connecting to the Internet
7
REMOTE CONTROL
Manhattan Plaza HDR•S
Use the remote control within
a maximum distance from the
front of the receiver of 5m and
within an angle of 60°. Ensure
there is a clear line of sight
between the remote control
and the receiver. The operating
distance may vary depending
on the brightness of the room.
Power - switches the receiver on and off.
Mute - silences the receiver’s sound.
0, 1 … 9 - enter channel numbers, numeric values in the setup menus or a jump point in playback. Also enters your postcode
during the installation process.
Turns the volume up and down.
Switches to the next or previous channel. Moves one page
up or down in the channel list and programme guide.
Exits a menu and returns to normal TV viewing.
Red, green, yellow, blue –Chooses options
within menus.
Displays the programme guide.
Displays channel and programme information.
8
Up, down, left, right - move the highlight bar in menus
and in the programme guide, and allow you to browse the
channels and programmes.
Records the selected programme.
Displays the main menu screen.
Selects the highlighted option in a menu.
Selects favourite channels sequentially whilst watching TV
and adds favourite channels to the channel list.
Displays the list of programmes already recorded and set to
be recorded.
Displays the channel list.
Exits a menu and returns to the previous menu.
Switches between available screen display modes.
Winds backwards or forwards through a recording being
played. Moves through the programme guide in 2 hour steps.
Stops playback of a recorded programme. Returns to live TV
from paused live TV.
Pauses live TV. Starts and stops playback of a recorded
programme or paused live TV.
Switches back to the last channel watched.
Switches the TV SCART output between freesat and the TV’s tuner.
Displays the available audio menu used to change between
different soundtracks ( such as languages and audio description ).
Displays the subtitles menu used to select subtitles.
Jumps backwards or forwards through a recording being
played. Moves through the programme guide in 24 hour steps.
Displays interactive and digital text services (where available).
9
2
Preparation
This section explains how to set up your Plaza HDR•S
to receive freesat channels.
CONNECTING YOUR RECEIVER
Place your Plaza HDR•S receiver on a firm, level surface close to
the television, a mains electricity socket, and the cables from the
dish. (See Appendix A – Safety.)
THE SATELLITE DISH
To receive freesat, you must connect your Plaza HDR•S receiver
to an appropriate satellite dish, fixed in position and accurately
pointed at the 28.2° East satellite position.
For safety reasons and to provide reliable reception, we strongly
recommend that you have your dish installed by a professional.
You may be able to use a satellite dish already installed at your
home. If you have any questions about the dish, please consult
your installer.
10
Connect the two cables (or one double cable) from your dish to the
LNB IN 1 and LNB IN 2 sockets at the back of the receiver (if the dish
cables are fitted with a wall socket inside your home, you will need
connecting cables, which you can get from your installer). It does
not matter which of the two cables from the dish is connected to
which LNB IN socket.
HINT: Each “F-connector” used for the satellite dish cable
connections has a central wire that is inserted into the hole in
the LNB IN socket while the collar is screwed onto the socket.
When screwing on the collar, make sure that the central wire
goes into the socket hole and is not bent to one side.
Turn off your television and connect the HDMI cable supplied
between the HDMI socket at the back of your Plaza HDR•S receiver
and an HDMI socket on your television. There may be more than
one HDMI socket on your television. If you are not sure which to
use, check the television’s manual.
socket on the video or DVD recorder. Check the recorder’s manual
for guidance.
You can listen to the sound from your Plaza HDR•S through a
stereo or surround sound system. For digital sound, connect an
optical lead from the sound system’s S/PDIF socket to the one
on the Plaza HDR•S. For analogue sound, connect a suitable lead
between the receiver’s L and R AUDIO sockets and the L and R
audio inputs on the sound system.
SWITCHING ON
HINT: If your television has no HDMI socket, then it must
be connected to the receiver by SCART cable, and you will
not be able to watch freesat channels in High Definition.
Plug the power supply lead into the POWER socket at the back of
the receiver and plug the power supply into the mains socket that
is turned off.
You may have other equipment, such as a DVD recorder or surround
sound system, to connect to the receiver.
A video recorder or DVD recorder may be connected to your Plaza
HDR•S receiver to make permanent archive recordings of freesat
programmes. You will need to connect a SCART cable between
the VCR SCART socket on the back of the receiver and a SCART
Remove the battery compartment cover from the back of the
Plaza HDR•S remote control by pressing it gently while sliding it
off. Insert the two AAA batteries supplied, as shown on the inside
of the compartment, and replace the compartment cover.
11
SWITCHING ON (continued)
Turn on your TV set and choose the HDMI input (see your
television’s manual for guidance). Switch on the mains socket that
the Plaza HDR•S is connected to.
HINT: If you do not see this screen on your television, see
‘Troubleshooting’ on page 44.
TUNING IN
After a few seconds, the receiver’s first freesat installation screen
shown opposite will appear on the television screen:
12
When the first installation screen is displayed, use the
or
buttons to select between 16:9 Widescreen or the squarer 4:3
Traditional as the screen format of your television. Then press
button or the
button to highlight the HDMI Resolution
the
selection box, and use the
or
buttons to select the correct
resolution for your television. You should set the HDMI resolution
to the highest that your television can display (see your television’s
manual). If in doubt, set the resolution to 720p.
Press
or
to highlight the “Next” box and then press
to
display the next installation screen. If after doing this you lose the
picture on your screen press
to return to the first installation
screen using the default resolution of 720p (supported by all HDTVs).
When the signal lock shows “Successful”, you can continue to tune
in the receiver. Press
to proceed.
HINT: Setting the HDMI resolution has no effect on the
SCART output.
Enter your postcode using the number buttons on the remote control.
You do not need to enter a space. Press the button when you have
entered your postcode, and then press
again to proceed.
The signal check screen shows the strength and quality of the freesat
signal received from your satellite dish. The receiver scans the signal for
a few seconds and reports if the signal lock is successful. If the signal
lock shows “Failed”, you should check the satellite dish connection at
the back of the receiver (switch the receiver off and reconnect the cable
if necessary). If that connection is OK, consult your dealer or installer.
HINT: Enter your postcode with the number buttons by
pressing the correct button on the remote a number of
times to produce the required letter (printed on each
button), or number, in the same way as ‘texting’ with a
mobile phone. For example, for an ‘S’, you would press
button four times. If you make a mistake, the
the
button deletes the last character entered.
13
TUNING IN (continued)
Your Plaza HDR•S receiver will take a couple of minutes to
automatically find and store the available freesat channels. The
number of freesat TV and radio channels found is shown on the
screen as the scan proceeds, along with an indication of how far
the scan has to go. When the scan is complete, press the
button to proceed.
To use the receiver’s parental guidance function, hide adult
channels, lock online content or lock channels of your choice, you
need to create a PIN. Enter your choice of PIN by pressing the
required number button (0, 1 … 9) for each of the four PIN digits,
then press
to proceed.
14
The setup completion screen confirms the lock PIN you have set.
button and your Plaza HDR•S receiver is now ready
Press the
for you to watch freesat digital TV.
HINT: When new freesat channels are introduced, your
Plaza HDR•S is automatically updated and you do not need
to retune.
3
Everyday Use
This section describes the day-to-day use of your Plaza
HDR•S receiver – how to select the channels that you
want to watch, view the programme schedules, pause
live TV, and record and playback programmes.
TURNING ON THE RECEIVER
When the receiver is in standby the
symbol on the front panel
is illuminated red. To turn it on, press the
button on the remote
control or on the front panel of the receiver. The power symbol and
ring around it become illuminated blue when the receiver is on.
CHANGING CHANNELS
Step through the channels by pressing the
button on the
remote control. Pressing the button will select the next channel
in the channel list. Pressing the
button will select the previous
channel in the list.
If you know the channel’s number, you can switch directly to the
channel you want by using the number buttons on the remote
control. As you enter a channel number, each digit appears at
the top left of the screen to show the number button you have
pressed. All the freesat channel numbers have three digits and
the first channel is 101. The radio stations are stored from channel
number 700.
You can turn off the Plaza HDR•S, so it goes into standby, by
button on the remote control or the
button
pressing the
on the receiver. The Plaza HDR•S uses less power when in standby.
HINT: You should leave the Plaza HDR•S receiver plugged in
with the socket switched on, at all times (except when there
is lightening – see Appendix A). When you are not using the
button on the
receiver, put it in standby by pressing the
button on the front of the receiver.
remote control or the
HINT: The Plaza HDR•S receiver will automatically switch
to standby if it is not used for a long time. This feature can
be disabled – see the Advanced Use section of this guide.
Press the
button to switch from the channel you are currently
watching to the channel you were watching before.
HINT: There are some channel numbers missing in the
channel list because spaces are left for future channels to
join freesat.
HINT: If you enter a number that does not exist, the
channel will not change.
15
CHANGING CHANNELS (continued)
There are other ways to change channel:
• Use the browsing bar at the bottom of the screen (see below)
• Use the on-screen channel list (see page 18)
• Use the programme guide (see page 19)
CHANGING THE VOLUME
You can increase or decrease the volume by using the button on
the remote control. The sound is silenced by pressing the
button
and restored to its previous level by pressing the
button again.
HINT: You can also display the browsing bar by pressing
or
on the remote control while you are watching TV.
At the bottom left of the browsing bar these symbols are displayed
to indicate:
BROWSING BAR
Whenever you change channel, the Plaza HDR•S briefly displays a
browsing bar at the bottom of the screen that contains information
about the current channel and programme. You can press the
button at any time to display the bar again.
The browsing bar shows:
• the name and number of the channel
• the name of the programme you are watching
• the start and finish time of the programme
• the progress through the programme
• the date and time
16
the channel is locked (see the Advanced Use section)
the programme is being recorded
a reminder has been set for the programme
an HD version is available on another channel
(press the
button for further details)
At the bottom right of the browsing bar symbols are displayed to
indicate:
subtitles are available
Audio Description is available
Dolby Digital audio is available
parental guidance is advised as the programme contains
language or scenes that may not be suitable for children
the programme is in High Definition
the programme is one of a series
again to display
While the browsing bar is displayed, press
more information about the selected programme, including a
short summary and further details on the parental guidance and/
or the HD version available, if applicable. Pressing the
button
once more removes the extra information from the screen.
To remove the bar from the screen at anytime, press
or
If you want to turn on subtitles, first display the subtitles menu by
button and then use the
and
buttons to
pressing the
highlight the subtitles required and press . To turn off subtitles,
select “Off” from the subtitles menu and press
.
.
While the bar is displayed, press the
or
buttons to see what
is on another channel. To change to this channel, press
while
the bar is still displayed. You can also press the
button to see
details of the programmes coming up in the next 12 hours on the
channel currently displayed, and the button to go back again.
Some programmes have an extra soundtrack to tell people who are
blind or partially sighted what is happening on screen. Channels
with this audio description available show the
symbol in the
browsing bar.
To turn on audio description, press the
button to display the
available audio menu and then select “English Audio Description”.
SUBTITLES AND AUDIO DESCRIPTION
Many freesat programmes are broadcast with subtitles for people
who are deaf or hard of hearing. Channels with subtitles available
show the
symbol in the browsing bar.
HINT: Once turned on, subtitles and audio description
remain on for all channels until turned off.
17
USING THE CHANNEL LIST
Display the on-screen channel list by pressing the
button on
the remote control. This lists the channels on the left-hand side of
the screen, in number order, and displays a preview window of the
currently selected channel on the right-hand side of the screen.
You can return to watching TV at any time by pressing the
button.
HINT: Move a page at a time through the channel list by
using the and buttons.
TV and radio channels are stored in separate lists. Switch between
the TV and radio channel lists by pressing the or buttons. The
name of the list is displayed at the top of the screen. In addition,
a symbol next to each channel distinguishes the TV channels ( )
from radio stations ( ).
REGIONAL CHANNELS
With freesat, some channels, such as BBC1, broadcast regional
variations of their channels. The initial regional variation is chosen
according to the postcode that you entered when you installed the
Plaza HDR•S.
You can change to a different regional variation of a channel by
pressing the yellow button while the channel is highlighted. The
prompt to use the yellow button will only be displayed at the
bottom of the screen if a choice of regions is available.
HINT: You can also display the channel list by pressing the
button while watching TV.
Use the
or
buttons on the remote control to highlight a
channel then press
to view it in the preview window. Press
again to exit the channel list and watch the channel full-screen.
18
Choose the region that you want from the list by moving the
highlight bar through the list with the
and
buttons and then
pressing
to leave the region setting unchanged.
, or press
To access the guide, press the
button on the remote control.
Choose the section of the guide you want to look at – either all
channels or a specific channel genre – by pressing the
,
,
or buttons to highlight the section, and then
to select it.
HINT: You can skip the genre choice stage by pressing
the
button a second time, to jump straight to the
programme guide for all of the channels.
USING THE PROGRAMME GUIDE
The Plaza HDR•S programme guide displays details of all
programmes showing on freesat channels for the next week ahead.
The programme guide shows a table of the programmes, with each
page showing eight channels over a two-hour period. Information
on the highlighted programme is shown above the table and you
can read a full summary by pressing the
button. Press
or
again to remove the summary box.
19
USING THE PROGRAMME GUIDE (continued)
The current date and time is displayed at the top right of the screen
and an orange line at the top of the table shows the present time
in the schedule.
You look through the scheduled programmes using the
buttons to move through the channels and the and
to highlight programmes showing at different times.
HINT: Programmes in standard definition that are also
available on another channel in HD are labelled in the
symbol. You can see the time and
schedules with an
channel that the HD version is broadcast by highlighting
the programme and pressing
.
and
buttons
HINT: You can jump through the list more quickly using the
and
buttons to move the highlight bar through the
schedule two hours forward or back, and the
and
buttons to move a day forward or back. Use the and
buttons to move through the channels a page at a time.
As you move the highlight bar through the schedule, the
programme summary shown above the list changes to reflect the
programme highlighted.
to switch the receiver to the channel and programme
Press
highlighted. If the programme is on at the time, the receiver will
switch to that channel immediately. If the programme is scheduled
for later on, a reminder is set so that when the programme is
about to start, a message is displayed on-screen and, after a
few seconds, the receiver automatically switches to the relevant
channel. In the programme guide a
symbol is shown next to a
programme with a reminder set.
20
You can cancel a reminder by highlighting the programme in the
programme guide and pressing
again.
You can set as many reminders as you want but if you try to set a
reminder on one channel for the same time as one you have already
set on another channel, a warning is displayed on the screen and
you are given the choice to cancel one of the reminders.
HINT: You can also set, and reset, reminders for programmes
from the browsing bar – press
when a future programme is
displayed in the browsing bar and a reminder will be set for that
programme or, if a reminder is already set (and shown by the
symbol in the browsing bar), the reminder will be removed.
to record the programme highlighted. If the programme
Press
is on at the time, the receiver will record the remainder of the
programme. If the programme is scheduled for later on, the
receiver will automatically record the whole programme when it is
broadcast (see Recording a Programme on P23).
When you have finished with the interactive services, return to
watching normal TV by pressing
again or the
button.
PAUSING LIVE TV
Leave the programme guide and return to watching TV by pressing
or
.
INTERACTIVE TV SERVICES
Several freesat channels broadcast a range of digital text and
interactive services, such as news, weather, games, sports information
and video, alongside normal TV. You can use the interactive options
by pressing
or the red button while watching the TV channel. This
will display a menu of the services available.
With the Plaza HDR•S, you can pause live TV to, say, answer the
phone, and then later carry on watching from where you left off.
You can even rewind a live programme to watch a section again.
While watching live TV, press the
button to pause the
programme. In the top left corner of the screen the pause symbol
appears and the pause counter shows the length of time the
programme has been paused – how many minutes your viewing
is behind live TV. “Live Pause” is shown in the browsing bar and
the progress bar shows both the portion of the programme you
have watched (in orange) and the length of paused programme
that remains to watch in red.
21
PAUSING LIVE TV (continued)
Pressing the
or
buttons skips forwards or backwards
through the paused programme. You can set the length of the skip
from 10 to 60 seconds in the “Record” section of the Setup menu
(see the Advanced Use section). The default is to skip forwards 30
seconds and backwards 10 seconds, which makes it easy to skip
adverts. Press
while watching a paused programme to return
to watching live TV.
You can also rewind live TV without first pausing it, by pressing
the
button and then pressing
when you have reached the
part of the programme that you want to see again. You can only
rewind as far back as the last channel change or to the limit of the
live pause length. A thin red line on the progress bar shows how
far back you can rewind the programme.
When you want to continue watching TV, press
again to
restart your viewing from where you left off. You can now press
or
to skip any parts of the programme that do not interest
you, to catch up with the live programme, and/or press
or
to review any sections of the programme again.
Each time that you press the
or
button, the rewind or fast
forward speed increases – to 2x, 4x, 8x, 16x, 32x and 64x normal
speed. If you press the
or
button while the programme is
paused, it will advance or rewind in slow motion, changing to 1/8x,
1/4x, 1/2x normal speed with each press.
HINT: As well as the pause time, the pause counter at the top left
of the screen shows the current playback mode – paused, play, fast
forward, etc – and the current speed of rewind or fast forward.
22
HINT: You can set the limit of the live pause length up to two
hours (see the Advanced Use section).
HINT: When you change channel, the continuously stored
broadcast is deleted, so you cannot rewind to watch either the old
channel or the new channel, before the channel change took place.
RECORDING A PROGRAMME
There are two ways to record a programme to watch later – either
record a programme that is on at the time, or set the timer to
automatically record a programme later.
To record the programme you are currently watching, press the
button. Recording will start immediately and the browsing
symbol in the bottom left hand
bar will be displayed with the
corner. Once a recording has been started, you can change channel
to watch another programme and the recording will continue. You
can also start to watch a recorded programme before the recording
has finished.
You can stop the recording of a programme by pressing the
button while the browsing bar is displaying that programme’s
symbol). Press
or
if the bar is not
details (and the
already on-screen.
HINT: The Plaza HDR•S can record a programme from
one channel while you are watching another or record
programmes on two different channels at the same time.
If you try to record a third programme or watch a third
channel, the Plaza HDR•S will display a warning and options
of the actions you can take (eg to stop recording one of the
programmes so you can watch the third channel).
To record a programme that will be broadcast in the future, either
highlight the programme in the programme guide or use the
browsing bar to display that programme’s details, and press the
button.
If the programme is part of a series (indicated with a
symbol in
the browsing bar and in the programme guide full summary), you
will be given the option of setting the Plaza HDR•S to automatically
record future episodes of the series as well - highlight the option
you want and press
. Programmes set to series link record
display an symbol instead of an symbol.
You can also start and stop recording a channel from the browsing
bar, while watching another channel. When the browsing bar is
button
displaying the channel you want to record, press the
to start the recording (if that channel is not being recorded) or to
stop the recording (if that channel is being recorded and the
symbol is displayed).
23
RECORDING A PROGRAMME (continued)
If you choose to record a programme in Standard Definition, which
is also available in HD (indicated in the browsing bar and in the
programme guide with a
symbol), you will be given the option
to record the HD version instead - highlight the version you want
and press
.
HINT: You can set the Plaza HDR•S to record a programme
that is not in the programme guide (one that is on a nonfreesat channel or far into the future) using the manual
recording menu (see the Advanced Use section)
USING THE LIBRARY
You can see a list of recordings scheduled for the future, and
programmes already recorded and ready for playback in the library.
Open the library by pressing the
button (or selecting the library
item in the main menu).
next
Both the programme guide and browsing bar displays
to any programme set to record just once, and
next to any
programme set to series link record.
The recordings list shows all the recordings currently stored by
the Plaza HDR•S, listed with the name of the programme, the
channel, the date on which the recording was made, and its status
– recorded, viewed, or still recording. There may be symbols next
to each entry in the list to show:
the recording is protected against quick or automatic deletion
the recording is one of a series
the programme is still being recorded
To cancel a scheduled recording, highlight the programme in the
programme guide or display that programme’s details in the
browsing bar, and press the
button. You can also cancel a
scheduled recording using the library schedule list (see below).
24
A series of recordings (with the same title and recorded from the
same channel, but at different times or on different days) are grouped
together as a single entry in the list, with a label showing the number
of episodes within the group. If you highlight a group of recordings
and press
the group is expanded on a new screen, with each
individual episode listed. Press
to return to the main list.
previewed, you can continue to browse the other recordings in the
to stop preview playback and return the
recordings list. Press
preview window to live TV.
The preview window at the top of the screen continues to show the
channel you were tuned to before opening the library screen. Above
the recordings list is shown the space free for further recordings.
The panel at the top of the screen shows details of the recording
highlighted, including the symbols seen in the browsing bar. You can
highlight the different recordings listed using the
and
buttons.
A highlighted recording (or group) may be deleted (press the
red button) to make room for new recordings once it has been
watched. You can protect a recording (press the
button)
to prevent automatic deletion if the Plaza HDR•S runs out of
recording space, or accidental deletion with the red button (as an
on-screen confirmation is then required for deletion).
If your press
the highlighted recording begins playback in
symbol is
the preview window at the top of the screen and a
shown next to the programme name. While a recording is being
The library schedule list shows all programmes with a reminder set
or scheduled to be recorded. You can open the library by pressing
the
button (or selecting the library item in the main menu) and
then display the schedule list by pressing the or buttons.
The scheduled programmes are listed with the name of the
programme, the channel, the day on which the recording or
reminder will occur, and symbols to show:
the recorded programme will be protected from deletion
the recording is one of a series that will all be recorded
the programme is set for a reminder
the programme is set to be recorded
25
USING THE LIBRARY (continued)
Details of the programme highlighted, including the symbols seen
in the browsing bar, are shown at the top of the screen. You can
highlight the different scheduled programmes in the list using the
and
buttons.
Pressing the
button will set or reset the highlighted
programme for recording. Pressing
will set or reset the
highlighted programme for a reminder. If you reset a programme
for both recording and reminder, it will be deleted from the schedule
list. You can also press the red button to delete the highlighted
programme from the schedule list (an on-screen confirmation is
required). Once a programme has been deleted from the schedule
list, a reminder will not be given and the programme will not be
recorded.
Press the green button to change a single recording to a series
symbol) – this episode and all
recording (shown by the
successive episodes of the series will be automatically recorded.
Pressing the green button with a series recording highlighted will
change it to a single recording and further episodes will not be
recorded.
PLAYING A RECORDED PROGRAMME
To watch a recorded programme, open the library, by pressing
highlight the recording you want to view and press
.
,
If you have started to watch the recording before, you will be asked if
you want to carry on viewing from where you left it, or start viewing
.
from the beginning. Select the option required and press
26
During playback of a recording, the browsing bar shows ‘Now
Playing’ and the progress bar shows playback progress through
the programme in orange. The whole progress bar shows the
entire length of the scheduled recording with the portion recorded
but not yet viewed in red. The playback counter at the top left of
the screen shows the playback time elapsed from the beginning
of the recording.
HINT: If you start to watch a recorded programme before
recording has finished, the end of the red portion shows
the point in the programme currently being broadcast and
recorded.
While watching playback, you can use the browsing bar as usual,
to see what programmes are being broadcast or coming up on any
channel, and to set reminders or recordings.
You can fast forward or rewind through the recording with the
and
buttons. Each time that you press the
or
button, the rewind or fast forward speed increases – to 2x, 4x, 8x,
16x, 32x and 64x normal speed. If you press the
or
button
while playback is paused, it will advance or rewind in slow motion,
changing to 1/8x, 1/4x, 1/2x normal speed.
HINT: As well as the playback time, the playback counter
at the top left of the screen shows the current playback
mode – play, fast forward, rewind, and so on – and the
current speed of rewind or fast forward.
Pressing the
or
buttons skips forwards or backwards
through the recording. You can set the length of the skip from 10
to 60 seconds in the “Record” section of the Setup menu (see the
Advanced Use section).
To skip to a particular point in the recording, press
and the
playback counter will change to allow you to use the number
buttons to enter the time you want to skip to in hours and minutes
(H:MM). Press
once you’ve entered a time and
or
to
cancel.
You can temporarily halt playback by pressing the
stop playback and return to the library by pressing
4
Advanced Use
This section explains how to get the most out of your
Plaza HDR•S receiver.
THE LOCK PIN
Some of the Plaza HDR•S menu functions can be locked to avoid
accidental changes to the receiver’s setup, and you can lock
particular channels to prevent other family members, such as
children, from watching them.
To use a locked menu function or watch a locked channel, you need
to enter the four-digit PIN that you set when you first installed the
Plaza HDR•S. You can change the lock PIN, without re-installing
the receiver, as explained later in this section.
button, or
.
27
DISPLAY MODE
CHANGING THE CHANNEL LIST
Most freesat programmes are broadcast using a widescreen 16:9
format, designed for a widescreen TV. If you watch a widescreen
broadcast on a squarer 4:3 television, or a 4:3 broadcast on a
widescreen TV, the Plaza HDR•S provides a choice of how the
image is displayed. Pressing the
button will take you through
the three available options.
The channel list contains all the freesat channels that the Plaza
HDR•S found when it was first installed, and may include some
channels that you do not watch, do not want to include in the onscreen list, or do not want some members of your family to watch.
If you have set up your receiver for a 16:9 Widescreen TV, the
options are:
button to
If you want to alter the channel list, first press the
display the channel list screen. To remove a channel, highlight it
and press the red button to delete the channel. You need to confirm
your choice to ensure you don’t delete a channel accidentally.
• Auto - the broadcaster chooses the best display format.
• Widescreen - a 4:3 broadcast is stretched to fill the 16:9 screen.
• Pillarbox – a 4:3 broadcast is shown unaltered with black bars on
each side.
If you have set up your receiver for a 4:3 Traditional TV, the options are:
• Auto - the broadcaster chooses the best display format.
• Centre Cut-out - a 16:9 broadcast is cropped to show only the
centre of the image.
• Letterbox - a 16:9 broadcast is shown unaltered with black bars
above and below it.
TV/DTV
If your TV is connected to the Plaza HDR•S’s TV SCART socket,
button switches the channel displayed on the
pressing the
television between the signal from the aerial (TV) and digital
television from freesat (DTV). This button has no effect if your TV
is connected to the receiver’s HDMI socket.
28
You can lock a channel to prevent it being selected for viewing
without first entering the lock PIN. Highlight the channel and
press the green button to lock it. A
symbol is shown next to all
locked channels in the channel list. To unlock a channel, highlight
it in the channel list and press the green button. You will need to
enter the PIN to complete the process.
USING THE FAVOURITE CHANNELS LIST
The favourite channels list make it easier for you to choose the channel
that you want to watch, by limiting the selection to a few chosen
channels, such as those of a particular type, or that you watch the most.
It only takes a short time to set up the favourites list before it can
be used. First, display the channel list, by pressing the
button.
Highlight each channel that you want to include in the favourite
channels list, in turn, and press the
button. A star will appear
next to the channel in the list.
When you have put some channels in the favourite channels
list, you can limit the normal channel list to displaying just the
favourite channels by pressing the
button. Pressing the
button again restores the channel list to normal.
While watching TV, you can tune to a favourite channel by pressing
button to switch to the next channel in the favourite
the
channels list, or to the first channel in the favourites list if you are
currently watching a channel not in that list.
When the browsing bar is displayed, the
button may be used
to step the banner through your favourite channels, while staying
tuned to the current channel. This is useful to browse what is on
your favourite channels before changing to one. To change to a
when its details are shown.
channel, press
HINT: The channels in a favourite channels list appear in
the same order as in the normal channel list, regardless of
the order you added them.
MANUAL TIMER RECORDING
HINT: You can remove a channel from a favourite channels
list by following the same process – with the favourite
channel highlighted in the channel list, press
to delete
the star and remove the channel from the favourites list
If you want to record all editions of a programme that isn’t a
series but is broadcast repeatedly, or a programme outside of the
timetable listed in the programme guide, or a non-freesat channel,
you can set a recording manually.
29
MANUAL TIMER RECORDING (continued)
USING THE MENU SYSTEM
Open the library schedule list by pressing the
button followed
by the or button, and them press the yellow button to display
the manual recording menu.
Display the Plaza HDR•S’s main menu by pressing the
button on
the remote control. The menu choices are shown on the left hand
side, with an icon for each choice. Choose a menu item by pressing the
or
buttons to move the orange highlight through the options
to select the highlighted item.
and then press
In the manual recording menu, use the
and
buttons to move
the highlight between each setting and the and buttons to
change the settings.
Set the channel to record to any channel, including non-freesat
channels. Set the date for the recording, the time to start the recording
and the length of the programme to record. You can set the manual
recording to occur just once, each week, each month, every day, on
weekdays, or on weekends.
To set the channel, date, time and length, you can also use the number
buttons to key in the value directly. If you enter an invalid setting, such
as a date in the past or a channel that does not exist, the setting will not
be made. When you have made the settings, press
to set the
manual recording, and it will be added to the library schedule list.
30
Each of the first three main menu choices has the same effect as
pressing the corresponding button on the remote control:
• TV Guide – same as
button
• Channel Lists – same as
button
• Library – same as
button
• Setup – see next page
• Information – see page 36 (this is the “Information Menu”
section on page 36 of this guide)
SETUP MENU
GENERAL MENU SECTION
You display the setup menu by selecting the setup item in the
main menu. Choose between the menu sections by pressing the
or
buttons to move the highlight along the section bar,
and then press the
and
buttons to move the highlight bar
through the option list.
Highlight the option you want to alter using the
and
buttons. When you have finished making the changes you want,
or
.
leave the menu system by pressing
SUBTITLES
to switch on subtitles for all channels that provide them.
Press
Switch subtitles off by pressing
again.
SUBTITLE LANGUAGE
The freesat channels can broadcast with subtitles available in a
number of languages. The Plaza HDR•S is set to English subtitles,
to show the
but you can change this setting by pressing
subtitle language menu. Use
and
to highlight the language
you want for subtitles (if available) and press
.
AUTO STANDBY
Some of the selections available from the setup menu are for
advanced use of the Plaza HDR•S. We recommended that you
take the time to read this section carefully before you make any
changes.
To conserve power, the Plaza HDR•S will switch to standby after
three hours if no buttons are pressed on the remote control or
front panel. The Auto standby function is normally turned on, and
can be turned off by pressing the
button.
HDCP
HDCP prevents copying of digital audio and video from the HDMI output
of the receiver. By default it is turned on for all programmes, however you
can turn it off for programmes that have not been flagged as protected
by the broadcaster by pressing . Press
to turn it back on again.
31
PICTURE MENU SECTION
Highlight the option you want to alter using the
and
buttons. When you have finished making the changes you want,
leave the menu system by pressing
or
.
to confirm your choice. See Advanced Use Widescreen. Press
Display Mode (page 28) for more information.
HINT: This menu option has the same effect as the
button.
HDMI RESOLUTION
Press
to show the HDMI resolution menu and use the
and
buttons to choose the correct resolution for your TV. You
should set the HDMI resolution to the highest that your television
can display (see your television’s manual). If in doubt, set the
resolution to 720p. Press
to confirm your choice.
SCREEN TYPE
Press
to show the screen type menu and use the
and
buttons to choose between 16:9 Widescreen and 4:3 Traditional.
Press
to confirm your choice.
DISPLAY MODE
Press
to show the display mode menu and use the
and
buttons to choose between Auto, Centre Cut-Out, and
Letterbox, if the screen type is set to 4:3 Traditional, or between
Auto, Widescreen, and Pillarbox if the screen type is set to 16:9
32
HINT: This setting overrides the HDMI resolution set when
you first installed the receiver. It has no effect on the
receiver’s TV SCART output.
SCART MODE
Press
to show the SCART mode menu and use the
and
buttons to choose between Composite and RGB for the correct
output for a television connected to the receiver’s TV SCART
output. Press
to confirm your choice.
HINT: The RGB setting will usually produce the best quality
picture but a few televisions cannot accept this signal
(see your TV manual). This setting has no effect on the
receiver’s HDMI output.
to show the audio language menu. Use
and
to
pressing
move the orange highlight bar to the language you want and press
.
AUDIO DESCRIPTION
SOUND MENU SECTION
Highlight the option you want to alter using the
and
buttons. When you have finished making the changes you want,
leave the menu system by pressing
or
.
Press
to switch on audio description for all channels that
provide it. Switch audio description off by pressing
again.
DOLBY DIGITAL
Press
to switch on the Dolby Digital surround sound output
from the S/PDIF and HDMI sockets, for all programmes that
provide it (channels with Dolby Digital sound available show
the
symbol in the browsing bar). Switch off Dolby Digital by
pressing
again.
LIP-SYNC DELAY
If you find the sound and picture falling out of sync, you can delay
the sound output by a small amount to compensate. Press
to show the lip-sync delay bar on top of the normal TV picture,
and use the and buttons to alter the amount of audio delay.
Press
to confirm your choice and return to the sound menu.
AUDIO LANGUAGE
Some programmes are broadcast in a number of languages. The
Plaza HDR•S is set to English, but you can change this setting by
RECORD MENU SECTION
Highlight the option you want to alter using the
and
buttons. When you have finished making the changes you want,
leave the menu system by pressing
or
.
33
RECORD MENU SECTION (continued)
in the broadcast. The automatic setting starts the recording
according to timing data from the broadcaster. Press
to
confirm your choice.
ADD TO END OF REC
Press
to show the add to end of recording menu and use the
and
buttons to select how long after the scheduled time a recording
will end, to account for scheduling inaccuracies in the broadcast. The
automatic setting ends the recording according to timing data from the
broadcaster. Press
to confirm your choice.
DEFAULT REC MODE
LIVE PAUSE LENGTH
Press
to show the default recording mode menu and use
the
and
buttons to choose between always recording the
Standard Definition (SD) version of a programme, always recording
the High Definition (HD) version, or asking which version should be
recorded. Press
to confirm your choice.
to show the live pause length menu and use the
and
Press
buttons to select between 60 minutes and 120 minutes as the
length of time the receiver will record live TV. Press
to confirm
your choice.
SKIP FORWARDS TIME
HINT: A programme will only be recorded in HD if a High
Definition version is available.
Press
to show the skip forwards time menu and use the
and
buttons to select the length of the jump in a recording
from the
button. Press
to confirm your choice.
ADD TO START OF REC
SKIP BACKWARDS TIME
to show the add to start of recording menu and use the
Press
and
buttons to select how far in advance of the scheduled
time a recording will start, to account for scheduling inaccuracies
34
Press
to show the skip backwards time menu and use the
and
buttons to select the length of the jump in a recording
from the
button. Press
to confirm your choice.
AUTO DISK MANAGEMENT
If the HDR•S is running out of disk space it will automatically
delete old, unprotected recordings to make space for new ones.
to turn off automatic management. If the hard disk is
Press
full further programmes will not be able to be recorded. Press
to turn it back on again.
FORMAT HARD DISK DRIVE
Press
to format the receiver’s hard disk drive. To continue, you
will need to enter the lock PIN if parental guidance is turned on in
the System Menu section.
Highlight the option you want to alter using the
and
buttons. When you have finished making the changes you want,
or
.
leave the menu system by pressing
FREESAT INSTALLATION
Press
to retune all the freesat channels. If you retune freesat,
you will lose all channels from the favourite channels list, remove
any channel locks you have set, restore any deleted channels, and
reset the regional settings, TV type and lock PIN.
ADD NON-FREESAT CHANNELS
HINT: Formatting the hard disk drive will erase all of your
previously recorded programmes.
SYSTEM MENU SECTION
See the Non-freesat Channels section of this guide on page 39 for
full details of how you can add and watch non-freesat channels.
NETWORK CONFIGURATION
See the On Demand TV section of this guide on page 37 for full
details of how you can connect to and watch online services.
PARENTAL GUIDANCE
to turn on parental guidance. This prevents watching any
Press
programme broadcast before the watershed with a
parental
guidance warning without first entering your PIN. It also prevents
displaying the system menu or formatting the hard disk without
entering the PIN. To turn off parental guidance again press
and
enter your PIN.
35
HIDE ADULT CHANNELS
Press
to hide and prevent access to the freesat adult genre and
and enter your PIN.
channels. To show them again press
HINT: Do not operate this function unless you mean to delete all
channels, favourite channels, and the receiver’s configuration.
CHANGE PARENTAL PIN
Press
to show the lock PIN menu. Change the PIN used by first
entering the current PIN and then entering and confirming your
choice of new PIN.
SOFTWARE UPDATE VIA OAD
Press
to turn on or off the automatic software update.
SOFTWARE UPDATE VIA USB
To perform a software upgrade via USB, insert a USB stick with a
suitable upgrade file and press . Further instructions will accompany
any software upgrade downloadable from the Manhattan website.
CHECK FOR SOFTWARE UPDATE
Press
to immediately check if there is a software update available.
RESTORE FACTORY DEFAULT
Press
to revert all of the receiver settings to what they were when
you first got your receiver and to start the installation procedure
described in the Preparation section of this guide. Select between the
options of reverting all settings and formatting the receiver’s hard
disc, or just reverting the settings, and press
to start the process.
36
INFORMATION MENU
The information menu displays important information about your
Plaza HDR•S and is helpful in diagnosing any potential problems with
your receiver.
You display the information menu by selecting the information option in
the main menu. Choose between the information sections by pressing
the or buttons to move the highlight along the section bar.
HINT: We recommend that you have this screen displayed
on your TV if you need to phone the Plaza HDR•S helpline.
The General menu section contains:
• Basic information used to identify the receiver.
• The current region the receiver is set to (based on the postcode
input during installation).
• A phone number and website address for product support.
• Information about how much hard disk space you have available
for recording.
5
On Demand TV
This section explains how to set up the Plaza HDR•S
receiver to watch On Demand TV services, such as
the BBC iPlayer and ITV Player catch-up services. You
must have a broadband Internet connection in your
home to watch On Demand TV.
SETTING UP FOR ON DEMAND TV
Connect a network cable from the Ethernet network socket on the
back of the Plaza HDR•S receiver to either your broadband modem/
router or a network switch in your home network, as appropriate.
Consult your modem/router manual for guidance.
The Signal menu section is used to help align your satellite dish or
to troubleshoot a signal problem.
The Network menu displays your network settings. If it says “Not
Connected” this means you do not have a network connection.
Please see Section 5, “On Demand TV”, for more information about
network settings.
HINT: If the receiver has made a connection with your
modem or home network, one or both of the small green
and orange lights immediately above the Ethernet socket
will light and/or flicker.
button on the remote control, select the Setup item,
Press the
to display the system menu. Select Network
and then press
Configuration and press
to display the Network Configuration
menu. Check that the first menu item shows “DHCP” to
automatically configure the network connection.
37
SETTING UP FOR ON DEMAND TV (continued)
WATCHING ON DEMAND TV
You can switch to On Demand TV either through the interactive
services on a channel providing On Demand TV, or through an
online channel chosen by number or using the channel list or
programme guide.
If your broadband modem/router is not compatible with DHCP
(Dynamic Host Configuration Protocol), you will need to set the
addresses manually. Use the
or
buttons to change the
configuration to “static” and for each of the addresses in turn (IP
Address, Subnet Mask, Router Address, and DNS Address) press
to highlight the address and then enter the 12 figures to set
that address.
When you have set the four addresses, press
System menu.
to return to the
HINT: Consult the manual or supplier for your modem/
router or network for help choosing the correct addresses.
38
HINT: The On Demand TV channels are numbered from 900
and are in the On Demand section of the programme guide
When you switch to an On Demand TV channel, it may take a few
seconds longer to show the picture than a freesat satellite channel. You
will then need to progress through a series of menus, using the number
button,
buttons, the coloured buttons, , , and , and the
to find and start the programme you want to watch. You go through
these menus in a different way depending on the online broadcaster.
6
Non-Freesat Channels
This section explains how to set up your Plaza HDR•S
receiver to receive channels that are not included with
freesat. As well as receiving the many freesat channels,
the Plaza HDR•S can also be used to watch and record
other channels, as long as they are broadcast from the
same satellites as freesat and are free.
TUNING IN NON-FREESAT CHANNELS
Go to the Add Non-Freesat Channels menu by pressing
, then
select the Setup item, press to display the system menu, and
to highlight the option to add non-freesat channels, then press
.
HINT: The controls for playback of an online programme
may differ to those you are used to on the Plaza HDR•S.
button to pause and
For example, BBC iPlayer uses the
play a programme, instead of the
button.
You can add non-freesat channels either by manually entering the
tuning details for an individual transponder (a group of channels)
or by allowing the Plaza HDR•S to scan all the transponders for
non-freesat channels. Choose a manual scan or an automatic scan
by pressing the or buttons.
39
TUNING IN NON-FREESAT CHANNELS (continued)
WATCHING NON-FREESAT CHANNELS
If you choose a manual scan, you should enter the frequency
and symbol rate of the transponder to scan, using the number
buttons, and its polarization, modulation and broadcast system by
using the or buttons. You can move between the five items
using the
and
buttons. When you have entered the tuning
information, press
to start the scan.
Non-freesat channels and freesat channels are stored separately
in the receiver but you can switch between them quite easily.
When you are watching a non-freesat channel, the browsing bar
displays the Manhattan logo instead of the freesat logo.
HINT: The tuning information for non-freesat channels
may be printed in specialist magazines, or given on a
specific channel’s website.
If you choose an automatic scan, just press
to start the scan.
The Plaza HDR•S will take a few seconds to complete a Manual
Scan and several minutes to finish an automatic scan. While
it is scanning, the receiver displays the number of TV and radio
channels found so far. When it is finished, the receiver will display
a list of all the channels found.
You can choose to watch a non-freesat channel from this list by
moving the orange bar using the
and
buttons to highlight
the channel you want and pressing
, or return to watching TV
by pressing
or
.
40
While watching a non-freesat channel, you can step through the
other non-freesat channels by pressing the or buttons. You
cannot enter a four-digit channel number to switch to a non-freesat
button to switch to the channel
channel, but you can press the
you last watched, whether it was a freesat or non-freesat channel.
HINT: Non-freesat TV channels are stored from channel
number 3001 and non-freesat radio channels from 3500.
You can browse through the non-freesat channels and programmes
or
in the same way as you browse the freesat channels. Press
or
to display the browsing bar and then press the
or
buttons to see what is showing at the moment on any of the other
non-freesat channels, and to see the programmes on next.
HINT: The programme guide does not display non-freesat
channels but most non-freesat channels will display information
about the current and next programmes in the browsing bar.
To set a recording of a non-freesat channel in the future, use the
manual recording menu (see the Advanced Use section on page 27).
When you have some non-freesat channels stored, the channel list
displays both freesat and non-freesat channels. Go to the channel
list by pressing the
button. Now pressing or will take you
through the four channel lists available:
• freesat TV Channels
• freesat Radio Channels
• non-freesat TV Channels
• non-freesat Radio Channels
You can use the same channel list functions for any of the lists –
lock or delete a channel, or add it to your favourite channels list.
If you put both freesat channels and non-freesat channels in the
favourite channels list, you can switch from one to the other freely
and easily.
PAUSING AND RECORDING NON-FREESAT CHANNELS
You can pause a live non-freesat channel using the
just like a freesat channel.
button,
Most non-freesat channels will display information about the
current and next programmes in the browsing bar. You can set
any programme displayed to record, just like on a freesat channel.
41
Appendix A - Safety
POWER
The receiver’s external power supply should be plugged into a
230V to 240V AC, 50Hz supply.
CABLES
Make sure all cables are positioned so they are not likely to be
walked on, crushed or damaged by things placed on or against
them. Pay particular attention to the power cable where it goes
into the socket and where it comes out of the receiver’s external
power supply unit. Do not connect or adjust cables to the receiver
when it is plugged in.
TEMPERATURE AND MOISTURE
Do not use or leave the receiver in a hot, cold or humid (moist)
environment. Do not allow the receiver to get wet – from drips or
splashes – as this is dangerous. Do not place vases or other waterfilled objects on top of the receiver.
VENTILATION
Slots and openings in the receiver’s cover are for ventilation.
Do not cover or block them as this could lead to the receiver
overheating.
42
CLEANING
Unplug the receiver before you clean it with a lightly dampened
cloth. Do not use liquid or aerosol cleaners.
HEAT AND FLAMES
Do not place the receiver near to naked flames or sources of
intense heat, such as an electric fire. Make sure that no flames,
such as lighted candles, are placed on top of the receiver.
LIGHTNING
If there is a storm or lightning, unplug the receiver.
SERVICING
Make sure that anyone who services your receiver is qualified to do
so. Do not remove the cover yourself – you could get an electric shock.
REPLACEMENT PARTS
If your receiver needs repairing, make sure the person carrying out
the repair uses parts which are specified by us or which have the
same specifications as the original part. Other parts may cause a
fire, electric shock or other dangers.
ELECTRICAL SAFETY
PROTECTING THE ENVIRONMENT
Your receiver is supplied with an external 100V - 240V AC, 50Hz
power supply that connects by 12V DC plug to the receiver and by
UK mains plug adapter to the mains. Always connect the 12V DC
plug to the receiver before connecting the mains plug.
If the mains plug breaks or becomes damaged, do not use it. Do
not cut or open the adapter, as this will expose you to dangerous
high voltages present inside. The adapter is non-serviceable and
does not have any replaceable parts inside. If the power supply
is damaged, it must be replaced by the manufacturer, its service
agent, or suitably qualified persons in order to avoid a hazard.
If you one day find that your receiver or remote control needs
replacing, or are of no further use to you, do not throw them
out with your household waste. Under the Waste Electrical and
Electronic Equipment (WEEE) regulations, your local council must
provide a suitable recycling centre.
To reduce the risk of electric shock, do not remove screws from the
receiver or open it as it contains no user- serviceable parts. Please
leave all maintenance work to qualified personnel.
Do not throw batteries in the bin or on a fire. Make sure that you
dispose of batteries safely at a local recycling centre. You can also
recycle batteries at many supermarkets.
43
Appendix B – Troubleshooting
PROBLEM
POSSIBLE CAUSE
Power supply cable disconnected
Mains fuse blown
WHAT TO DO
Check the power supply cable.
Check fuse
Receiver not switched on
Switch on receiver. Check mains cable, switch and fuse.
HDMI/SCART cable disconnected
Check HDMI/SCART cable connection to receiver
and television.
Television not switched to HDMI/SCART input
Select television’s HDMI/SCART input.
Signal lock failed
Cable from the satellite dish
disconnected
Check the cable connections at receiver and dish.
Consult your installer if necessary.
Signal strength below 50%
Dish in the wrong position
Dish in the wrong position
Reinstall the dish. Consult your installer if necessary.
Reinstall the dish. Consult your installer if necessary.
Not accepting postcode
Broadcast error
Postcode tables are not being transmitted. Use red
Default Channels button to activate default tuning.
‘No signal’ message
Cable from the satellite dish
disconnected
Check the cable connections at receiver and dish.
Consult your installer if necessary.
Dish damaged or in the wrong position
Check the dish. Consult your installer if necessary.
Check HDMI/SCART cable connections at receiver
and television.
Select television’s HDMI/SCART input.
Choose the correct screen size to suit your TV.
Power light off
No set up screen
No picture or sound
Full picture not visible
44
HDMI/SCART cable disconnected
Television not switched to HDMI/SCART input
Mismatched screen format
PROBLEM
POSSIBLE CAUSE
Tuned to an SD channel
TV not capable of HD
TV connected by SCART
Receiver in standby
WHAT TO DO
Tune to an HD channel.
Connect the receiver to an HD-Ready TV.
Connect the TV with the HDMI lead.
Switch on the receiver.
Remote control not aimed at the
receiver correctly
Aim the remote control at the receiver.
Remote sensor on the front of the receiver is
obstructed
Check for obstructions in front of the receiver.
Auto Standby is on
Turn off the Auto Standby in the Set Up menu.
Wrong channel number used
Choose the channel from Channel List.
Channel locked
Enter the PIN. If you have forgotten the PIN, phone the
helpline on 020 8450 0005.
Can’t record a programme
Already recording two other programmes
The HDR-S can only record two channels
simultaneously. Stop one of the recordings to record
the programme.
No information for a channel
in the programme guide
Information on the channel not downloaded
You are on a non-freesat channel
Wait for the download.
Select a freesat channel.
No digital text or interactive
services
Services not available on chosen channel
Switch to a channel broadcasting interactive services.
No On Demand TV
No connection to Internet
Check broadband connection and network
configuration in system menu.
TV picture not HD
No response with remote
control
Receiver switches off after
3 Hrs
Cannot view a channel
45
Appendix C - Specifications
Standard
DVB-S/S2 Twin Tuners
Input frequency
950~2150MHz
Input connector
2 x F type, Female 75 ohm
LNB supply
13.0V / 18.0V (max.300mA), Short Circuit Protected
Digital signal input level
-20 to -65 dBm
Capacity
320 GB
HDMI output
Resolution 576i / 576p / 720p / 1080i /1080p
SCART output
TV (CVBS/RGB) & VCR (CVBS)
Aspect ratio
4:3, 16:9 & Letter Box
TV & VCR SCART output
Audio left and right
Optical S/PDIF output
Dolby Digital, Dolby Digital + & PCM
USB
Host
2.0 (5V@1A max) for software upgrade only
Internet Connectivity
Ethernet
RJ-45 10/100 Base-T (with green Link LED & yellow Data LED)
Power
Requirements
Mains input voltage
100-240VAC~ 50Hz
Power consumption
Max 25W (LNB with 200mA) & Standby less than 1W
Dimensions
Width, depth and height
Width: 280mm, x depth: 183mm, height: 41mm
Tuner
Hard Disk Drive
Video
Audio
46
Notes
47
HELPLINE
020 8450 0005
ONLINE
www.manhattan-tv.com
Find out more about freesat at
www.freesat.co.uk
Follow freesat on
www.twitter.com/freesat_TV
Like freesat on
www.facebook.com/freesat
v1.6