1
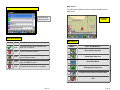
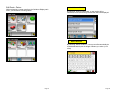
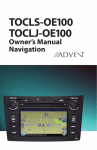
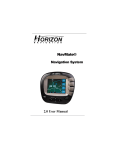
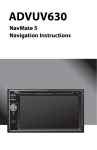
Preface
®
NavMate Navigation Software
User Manual
You have chosen a high-end Caliber™ personal navigation
system. Congratulations! Please enjoy using it. The NavMate
navigation software provides turn-by-turn route guidance while
traveling to your destination. Before operating, take a few
minutes to review the safety and operating instructions in this
manual so you can quickly and safely become familiar with your
NavMate software’s many features.
This User Manual explains the NavMate software’s functions, and
provides details on:
z Using the control buttons
z Entering destinations
z Understanding the different screens available on your
NavMate software
z Adjusting user preferences
Note: All users should read this manual prior to operating your
Caliber™ Personal Navigation device with NavMate software.
NavMate Software User Manual Ver. 3.136
Copyright© 2006 - All rights reserved.
This document and the software described in it are furnished
under license and may be used or copied only in accordance with
such license. Except as permitted by such license, the contents of
this document may not be disclosed to third parties, copied, or
duplicated in any form, in whole or in part, without the prior written
permission of Horizon Navigation, Inc.
The NavMate software, including its operation and use, is
covered by one or more of the following patents:
US Patents No. 5,262,775; 5,283,575; 5,291,412; 5,291,413; 5,291,414;
5,297,028; 5,303,159; 5,311,434; 5,339,246; 5,343,400; 5,345,382; 5,359,529;
5,374,933; 5,377,113; 5,390,123; 5,394,333; 5,402,120; 5,414,630; 5,430,655;
5,440,484; 5,477,220; 5,508,931; 5,515,283; 5,515,284; 5,550,538; 5,608,635;
5,712,788; 5,731,978; 5,862,509; 5,898,390; 5,902,350; 5,904,728; 5,910,177;
5,912,635; 5,922,042; 5,928,307; 5,938,720; 5,987,381; 6,058,390; 6,144,919;
6,147,626; 6,253,154; 6,259,987; 6,282,496; 6,298,305; 6,360,165; 6,456,931;
6,456,935; 6,470,268; 6,542,814; 6,552,656; 6,600,994; 6,622,086; 6,735,516;
D364,840; D397,046; D457,823; EP0987665A3.
The sale and/or licensing of the NavMate software and
associated materials do not include any licenses (implied or
otherwise) to patents or technology, unless specifically stated in
writing.
NavMate® is a trademark of Horizon Navigation, Inc. The Caliber
NavMate software and associated materials are protected by
copyright in the US and internationally.
Version 3.1
Page 2
End-User License Agreement
Table of Contents
This End-User License Agreement (EULA) is a legal agreement between you (either an
individual or a single entity) and HORIZON NAVIGATION, INC. for the operating software and
updates thereof that run the digital map database and associated hardware (collectively the
"Software"). By installing or using the Software, you agree to be bound by the terms of this
Agreement. If you do not agree to the terms of this Agreement, return the Software, along with
all other accompanying items in the form they were purchased, within fifteen (15) days after
such purchase to the authorized dealer from where the Software was purchased, for a full
refund of any fees paid. Use of the Software without acceptance of this Agreement is
unauthorized and not permitted.
1. License Grant. HORIZON NAVIGATION, INC. grants you a non-exclusive license to use your purchased
SAFETY INFORMATION AND PRECAUTIONS .......................... 6
SAFETY INFORMATION AND PRECAUTIONS .......................... 6
INTRODUCTION TO YOUR CALIBER-NAVMATE SOFTWARE 7
VEHICLE POSITION ...................................................................... 7
MAP AND INFORMATION DATABASE .............................................. 7
copy of the Software for your own internal purposes of accessing the digital map database and running the
associated hardware and not for service bureau time-sharing, or other similar purposes.
NAVMATE SOFTWARE OPERATION ......................................... 8
2. Limitations on Use. You are not permitted to copy, modify, decompile, disassemble, or reverse engineer
any portion of the Software without the expressed written permission from HORIZON NAVIGATION, INC.
QUICK START ............................................................................. 8
3. U.S. Government End Users. The Software is provided with Restricted Rights. Use, duplication, or
disclosure by the Government is subject to restrictions as set forth in subparagraph (c) (1) (II) of the Rights in
Technical Data and Computer Software clause at DFARS 252.227-7013 or subparagraphs (c) (1) and (2) of
the Commercial Computer Software-Restricted Rights at 48 CFR 52.227-19, as applicable. HORIZON
NAVIGATION, INC., 4701 Patrick Henry Dr. Suite1301 Santa Clara, CA 95054 USA.
4. Indemnity. You agree to indemnify, defend and hold free and harmless HORIZON NAVIGATION, INC.,
including its licensors, assignees, subsidiaries, affiliated companies, and the respective officers, directors,
employees, shareholders, agents, authorized dealers or sales agents, and representatives of each of them
from and against any liability, loss, injury, demand, cost, expense, or claim of any kind of character, including
but not limited to attorney's fees, arising out of (a) any use or possession of the Software, or (b) any breach of
any warranties or representations made by you in this Agreement or of your obligations under this Agreement.
5. Disclaimer of Warranty. HORIZON NAVIGATION, INC. does not make any warranties or representations,
either express or implied, with respect to the software, without limiting the foregoing, HORIZON
NAVIGATION, INC. expressly disclaims any implied warranties of quality, performance, merchantability,
fitness for a particular purpose or non-infringement. Some states do not allow the exclusion of implied
warranties, so some portion of the above exclusion may not apply to you.
6. Limitation of Liability. HORIZON NAVIGATION, INC. shall not be held responsible for any actual,
anticipated or speculative loss of profit or direct, indirect, incidental, special, or consequential damages,
including, without limitation, loss of revenue, data, or use incurred by you or any third party arising out of your
use or possession of the software, whether in an action in contract or tort or based on a warranty, even if
HORIZON NAVIGATION, INC. has been advised of the possibility of such damages.
7. Warnings. A. Copies of the digital map database reflect conditions as they existed at various points in time
before your receipt of such copies. Accordingly, copies of the digital database map may contain inaccurate or
incomplete data or information due to inaccurate or incomplete source materials, the passage of time, road
construction, changing conditions, and otherwise. B. Neither the Software nor the digital map database
include, analyze, process, consider or reflect any of the following categories of information, i.e., neighborhood
quality or safety; population density; availability or proximity of law enforcement, emergency, rescue, medical
or other assistance; construction work, zones, or hazards; road and lane closures; various legal restrictions
(such as vehicular type, weight, load, height and speed restrictions); road slope or grade; bridge height,
width, weight or other limits; road, traffic or traffic facilities safety or conditions; weather conditions;
pavement characteristics or conditions; special events; traffic congestion; or travel time.
8. Transfer. This Agreement, including all rights, obligations and representations may be transferred to
another individual or single entity, provided the same transfer includes the simultaneous transfer of the
associated hardware in which the Software is installed and further provided that such other individual or single
entity accepts all the terms of this Agreement. In the event such individual or single entity to which the
Software is transferred does not accept the terms of this agreement, then the License herein automatically
terminates. Further use of the Software is unauthorized and not permitted.
9. Governing Law. This Agreement shall be governed by the laws of the State of California, without giving
effect to its conflict of laws provisions.
USING YOUR NAVMATE SOFTWARE ..................................... 10
NAVIGATION MENUS .................................................................. 10
FUNCTION BUTTONS ................................................................. 11
LIST MODE, SPELL MODE, AND MOST RECENTLY USED .............. 12
MAP SCREEN ............................................................................ 14
DESTINATION SELECTION (GO TO …)................................... 15
ADDRESS/INTERSECTION ........................................................... 16
POINT OF INTEREST (POI) ......................................................... 18
FAVORITES ............................................................................... 21
ADDRESS BOOK ........................................................................ 22
PREVIOUS DESTINATION ............................................................ 23
BY USING MAP ......................................................................... 24
ROUTE CALCULATION AND GUIDANCE ................................ 26
ROUTE CALCULATION ................................................................ 26
PLEASE PROCEED … ................................................................ 26
ROUTE GUIDANCE ..................................................................... 26
TRUE VIEW (INTERSECTION ZOOM) ............................................ 27
MAP DISPLAY............................................................................ 28
CURRENT LOCATION SCREEN .................................................... 29
ARRIVAL SCREEN ...................................................................... 30
OFF-ROUTE AND ROUTE INTERRUPTIONS .......................... 30
EDIT FAVORITES MENU........................................................... 31
EDIT HOME OR OFFICE ADDRESS .............................................. 31
EDIT ADDRESS BOOK ................................................................ 32
SET-UP MENU ........................................................................... 33
NAVIGATION PREFERENCES....................................................... 33
DISPLAY OPTIONS ..................................................................... 34
LOCATION RESET ...................................................................... 37
Page 3
Page 4
SYSTEM MENU ..........................................................................38
PLANNED ROUTE ......................................................................40
CANCEL CURRENT ROUTE......................................................43
TRAIL BOOK ...............................................................................44
NAME........................................................................................45
TRAIL ........................................................................................45
DELETE TRAIL ...........................................................................46
FOLLOW TRAIL ..........................................................................47
CALIBER-NAVMATE DOWNLOADER .......................................49
FREQUENTLY ASKED QUESTIONS [FAQS] ............................54
Safety Information and Precautions
WARNING! Please read and follow the following safety
precautions - Failure to follow these instructions below may
significantly increase your risk of collision and/or personal
injury.
The Please Drive Safely Screen is displayed each time the
NavMate software is turned ON as a reminder and your
agreement to make use of the system’s navigational aids in a
safe manner.
Before using the NavMate software, read this entire manual.
Make sure that you are familiar with the system’s features and
know how to operate the system. Proper use of the NavMate
software includes the following guidelines:
The NavMate software is not a substitute for your personal
judgment. The route suggestions should never supersede any
local traffic regulation or your personal judgment and /or
knowledge of safe driving practices. Prior to completing any
maneuvers suggested by your NavMate software (for example, a
U-turn or a left turn), verify that you can legally and safely
complete the maneuver. Do not follow route suggestions if they
direct you to perform an unsafe or illegal maneuver, would place
you in an unsafe situation, or would route you into an area that
you consider unsafe.
While the vehicle is in motion, let the computer voice guide you.
Glance at the screen only when necessary and safe to do so. If
prolonged viewing is necessary, pull off the road to a safe
location.
Do not use the NavMate software to locate emergency services
(such as police, fire stations, hospitals, and clinics). The database
may not include all emergency service providers. Use your own
best judgment and ask for directions in these situations.
While the vehicle is in motion, only a passenger should operate
the NavMate software. The driver should not operate the system
unless the vehicle is parked in a safe location.
The NavMate software’s map database provides information on
suggested routes without regard to factors that may affect your
driving experience or the time required to arrive at your
destination. For example, the system does not reflect road
detours, closures or construction, some road characteristics (e.g.,
road surface, slope or grade, weight or height restrictions, etc.),
temporary traffic congestion, weather conditions, and similar
factors.
Page 5
Page 6
Introduction to Your Caliber-NavMate Software
NavMate Software Operation
Quick Start
NavMate software provides turn-by-turn visual and voice
assistance to direct you to your selected destination. The
software quickly calculates step-by-step directions to any
destination available on the included navigation map.
Follow these four easy steps and you are on your way.
The NavMate software uses Global Positioning System (GPS)
satellites, and a digital roadway map database to calculate and
display travel directions. The system's GPS antenna receives
signals from a constellation of 24 satellites orbiting the earth and
uses the strongest of signals, to determine your position to within
meters.
Before operating your NavMate software, please carefully
read and follow the instructions provided in the "Safety
Information and Precautions" section of this manual.
Step 1 -- Start up/Main Menu
After the NavMate software starts, you will see the reminder
warning to use your NavMate software safely and lawfully.
Vehicle Position
Warning
Screen
The NavMate software's computer considers vehicle speed and
heading changes, together with longitude and latitude
information, to accurately determine vehicle heading and position
on a digital map.
Signals from GPS satellites are used to determine the vehicle
location. Three (good) or greater than four (best) satellites must
be received to accurately determine location. The GPS reception
status is indicated by the GPS symbol on the map.
Map and Information Database
The map database used by your NavMate software was created
using high-resolution aerial and land based data collection.
Main Map
Screen
Car navigation maps are frequently updated. While the database
was judged to be as accurate as possible at the time of its
release, a map database can never be 100% accurate. Road
information that is maintained in the map databases, such as turn
restrictions or road names may change over time.
Step 2 -- Select Destination
You have many ways to select a destination. For this example,
let's find a nearby Airport.
Page 7
Page 8
Select by touching screen:
•
ICON button (F3) to activate main menu.
• Start Route Guidance
• Point of Interest
• State/Province - NOTE: The software remembers the last
State/Province, so this step is not necessary every time.
• By Category
• Airport
• Sort by Distance
• Select one of these and the system will calculate a route to
that destination using the criteria set in the Setup menu.
Step 3 -Map/Guide along
Route
Using Your NavMate Software
The best way to learn about this product is to explore it, while
observing the safety precautions discussed earlier. The methods
used are similar throughout all the functions.
Before operating your NavMate software, please carefully
read and follow the instructions provided in the "Safety
Information and Precautions" section of this manual.
Navigation Menus
The table below briefly describes the Main Menu options.
Proceed to the
highlighted route
and drive while the
system provides
audible and visual
guidance to your
destination.
Main Menu
Options
At-a-Glance
Step 4 -- Arrive at Destination
That's it! You've arrived at the selected destination.
Refer to the rest of this manual to become more familiar with the
many options available on your NavMate software.
Main Menu Option
Select this Option to...
Go to…
Pick a destination for routing.
Edit Favorites
Add or modify destinations in Address Book,
Home/Office Address and Trail Book.
Setup
Set preferences for routing and the display.
Home Address
Route to home address
Office Address
Route to office address
ALLIANCE CREDIT UNION
0.06 mi
OLD IRONSIDE DRIVE
0.06 mi
0:00:07
0:00:07
Page 9
Page 10
Function Buttons
The button icons at the bottom of the display are called function
buttons; they change labels and function depending on the
screen displayed.
Exit from Navigation
List Mode, Spell Mode, and Most Recently Used
There are 5 ways to select a destination. Some of the methods
allow scrolling through a list using the arrow keys (List Mode) or
by searching using an on screen keyboard (Spell Mode): Many of
the lists keep track of the last 5 most recently used (MRU)
selections; these frequently used MRUs are placed at the top of
the list in a different color and where you can quickly select them.
Zoom in the map to show a smaller area
List Mode
Zoom out the map to show a larger area
Center map on current vehicle location.
Display menu, jump to main menu.
Display map in 3D view.
Display map in 2D view.
After panning map, select current panned position.
Spell Mode
Select currently highlighted item.
Display spell mode.
Page up in displayed list.
Page down in displayed list.
Go back one step.
àű
Repeat voice instruction.
Page 11
Context-sensitive: by spelling the first few
characters in a list, then touch the Enter
<√> key – the system will quickly take
you to that portion of the list.
Page 12
Map Screen
Most Recently Used <MRU> portion of List
The table below explains the button functions available on the
Map Screen.
Most Recently
Used List Items
Main Map
Screen
Spell Mode Buttons
Button
Map Buttons
Mode
Press This Button to...
Spell
Select the currently input characters and
show a list of matches.
Spell
Delete last entered character.
F1
Spell
Switch keyboard from QWERTY layout to
special character layout.
F2
Spell
Switch keyboard from special character
layout to QWERTY layout.
Spell
Button
Press This Button to...
Show smaller map area.
Show larger map area.
Show Main Menu.
F3
Quit Spell Mode and return to List Mode.
Change type of map view.
F4
If no active route, select current location.
F5
Exit
F6
Page 13
Page 14
Destination Selection (Go To …)
To select a route, you must select <Go To> from the Main Menu.
Address/Intersection
If you know the street address or cross streets of your
destination, use the "Address/Intersection" selection. You must
select the State/Province where the destination is located.
NOTE: The system remembers the last State/Province selected,
so this step is not necessary every time.
Address/Intersection Selection
Destination > Address
You may select either the Postal Code or City Name or the Street
Name first.
•
Postcode – If you know the postcode, select this option to
quickly find the city. Note: The postcode search is limited
to the currently selected country. Postcode searching
may not be available in all areas.
•
City Name - If you know the city and street, select this
option. You could use the "Street Name" option instead,
but it is quicker and easier to use the "City Name" option
when you know both parts of the address.
•
Street Name - If you know the street name but you are
not sure of the city, select this option. You might use this
option, for example, if you were in a large metropolitan
area and a street continues through multiple cities and
you are not sure of which city is appropriate for the street.
The table below explains the button functions available on the
Destination Selection Menu.
Button
Press This Button to...
Return to map mode
F1
Return to main menu.
F3
Go back one step.
F6
Page 15
Page 16
àű
Select State or Province/City/Street List Mode Buttons
Button
Select City
Press This Button to...
Return to map mode
F1
Page up in displayed list.
F2
Return to main menu.
F3
Page down in displayed list.
F4
Switch to Spell Mode.
F5
Go back one step.
F6
If you selected the "City Name" option, continue by following the
prompts on the display screen to select a city first, then street,
then address number or intersection. If you selected the "Street
Name" option, follow the prompts to select a street name, then a
city, then a street address or intersection.
Point of Interest (POI)
The Point of Interest option is useful when you are going to a
public place or are looking for some type of facility such as a
gasoline station. After selecting the Point of Interest option, you
must select the State/Province where the destination is located.
NOTE: The system remembers the last State/Province selected,
so this step is not necessary every time.
POI Search Methods
Select Street
City and local area where
street is located
House numbers on that road
segment
Page 17
Page 18
àű
•
By Category - If you are interested in the closest POI of a
certain type for example the nearest ATM or Restaurant,
then select this option.
•
By Name - If you know the name of the Point of Interest
that you wish to locate, for example “DISNEYLAND”, and
then select this option.
POI Category
Some POI categories may not be available in some areas and not
all possible POIs may be listed for all categories. For example,
although the "Restaurant" category is very extensive, it is only as
current as the map database information. Several categories
restrict the search radius as well to minimize the search time.
Since businesses change over time, so will the accuracy of the
points of interest in your navigation map. To have the most
accurate map database, annual map database updating is
recommended.
POI Search Results
After selecting POI search criteria, you may select to list the
results sorted by distance or by name.
POI Name Speller
Straight-line
Distance
POI Address
POI Name
Page 19
Page 20
Favorites
Address Book
The Address Book is a convenient place to store frequently
visited destinations. To add, delete, or edit address book entries
see “Address Book Editing” section of this manual.
Address Book Entries
Home Address is a convenient way to route to your saved home
address directly.
Office Address is a convenient way to route to your saved office
address directly.
There are three additional ways to set your destination under
Favorites:
Address Book Selection Buttons
Button
Press This Button to...
Exit menu mode and return to map mode
F1
Page up in displayed list.
F2
Return back one menu level.
F3
Page down in displayed list.
F4
Display spell mode.
F5
Go back one step.
F6
Page 21
Page 22
Trail Book - You can route to trails you have created.
Latitude / Longitude - You can route to a destination by directly
inputting latitude and longitude values.
Previous Destination Selection Buttons
Button
F1
F2
F3
F4
Previous Destination
Previous destinations entered into your NavMate software are
automatically saved into the memory of the NavMate software.
This is helpful when you want to return to a recent destination,
such as a hotel where you may be staying. The Previous Origin
of the last calculated route is also stored for easy return to your
start point.
F6
Press This Button to...
Exit menu mode and return to map mode
Page up in displayed list.
Return back one menu level.
Page down in displayed list.
Go back one step.
By Using Map
You may select the destination by panning the map by touching
the screen or using the directional arrow key to move the cross
hairs around the map.
Select Destination from Map
Previous Destination Selection
Panning Crosshair
Page 23
Page 24
Press
to display location information about the current
panned location. Press ENTER to select the panned location as
the destination.
Route Calculation and Guidance
After selecting a destination, the system calculates a route based
on the route criteria set in the Setup Menu.
Route Calculation
The status bar indicates route calculation progress.
Route Calculation Progress
Please Proceed …
When route calculation is complete, the NavMate software will
instruct you to “Please proceed to the highlighted route” unless
you are already on the route. The highlighted route is indicated in
magenta.
Route Guidance
Once on the highlighted route, guidance information is provided
on the screen. Glance at the screen only when necessary and
safe to do so.
As you continue on the route, the guidance information is
continually updated to correspond with your progress to the
destination.
Page 25
Page 26
Guidance Display
Road name or sign
information
Distance and time to next turn
Map Display
The Map Display shows roads, road names, and cartographic
features like lakes and rivers. You can adjust the map scale, the
map orientation, map view, status information display, and the
distance units to your own preferences (See Setup section of this
manual).
Guidance Display
Straight- line to destination
Park
Vehicle symbol
ETA
Clock
Distance remaining to
destination
True View (Intersection Zoom)
Just before a turn point, the guidance display will show a close-up
or “true view” of the roads around the turn point.
“True View” –
Intersection Zoom
GPS
Status
Compass
Display
“Function
Button”
icons
Map
Scale
Click
Current location
to display Function buttons.
The GPS Status symbol may change colors indicating the
strength of the signal. The GPS symbol colors mean:
Page 27
•
Green - GPS signal is free from obstruction and is being
received regularly. At least four satellites are being
received.
•
Yellow - GPS signal is partially obstructed. Three
satellites are being received.
•
Red - GPS signal is unavailable. Two or fewer satellites
are being received.
Page 28
Current Location Screen
to display information about the current map
Press
location. Then select the location information box to add it to
address book, use it as a destination, re-set position, or save
location as HOME location.
Arrival Screen
The destination is shown on the Map Display screen with a yellow
circle. A voice message announces that you are approaching
your destination.
Arrival
Screen
Current
Location Screen
Off-Route and Route Interruptions
If you leave the current route, the NavMate software will
automatically recalculate the route. This feature may be disabled
if you prefer by turning “Auto Recalc Off” in the Setup menu.
If you leave the route to make a stop, the NavMate software
remembers your destination. After you re-start, the NavMate
software will ask if you want to continue your route.
Page 29
Page 30
Edit Favorites Menu
Add or modify destinations in Address Book, Home Address,
Office Address and Trail Book.
Edit Address Book
The “Address Book” option allows adding and editing address
book entries. Select “Edit Favorites” from the Main Menu then
select “Address Book”:
Edit Home or Office Address
The “Home
Address” option
allows adding or
replacing office
address book.
The “Office
Address” option
allows adding or
replacing office
address book
Page 31
Use Edit function to rename address book entries.
Page 32
•
Set-up Menu
You may customize the NavMate software to your own
preferences. Select Set-up option to adjust navigation
preferences, display options, and units (km or mi) settings. You
may also reset the vehicle position and do some basic system
diagnostics through the Setup Menu.
•
•
Simulation – When selected, the NavMate software will
“drive” the selected route even though the vehicle is not
moving. This can be used to preview a route, or show off
the system to friends.
Auto Recalc – When selected, the NavMate software will
automatically recalculate the route if you miss a turn or
when the current route is left.
Voice Guidance – When selected, the system will give
audible guidance.
Display Options
Display options allow you to set the map orientation and some of
the information items displayed.
Navigation Preferences
Navigation Preferences allows you to set the route calculation
and guidance options.
•
•
•
•
Shortest Time – Determines if the NavMate software
emphasizes finding the fastest or the shortest route.
Avoid Freeway – Determines if the NavMate software
avoids or uses freeways in the route calculation.
Avoid Tolls – Determines if the NavMate software uses
toll roads in the calculated route.
Use Ferries – Yes or No
Page 33
•
Heading Up – Determines if the map is always displayed
with North direction at the top of the screen or if map is
always adjusted so that vehicle symbol points toward the
top of the screen.
•
Display Clock – Yes or No
•
ETA on – Yes or No; time based
•
Display Status Bar – Yes or No
•
Display GPS Icon – Turn the display of the GPS
reception symbol on or off.
•
Display Scale Icon – Yes or No
•
Display Compass Icon – Yes or No
•
Display Next Maneuver – Turn symbol; Yes or No
•
Enlarged Intersection – Turn the “True View” on or off.
Page 34
User Input Settings
Distance Units Setting
Based on personal preference, the units used when displaying
and announcing the distance to turns may be set to Miles
(decimal miles, e.g. 0.3 miles.), Kilometers/meters, or
Miles/yards.
Day/Night Settings
You can select Auto, Day or Night color scheme.
Set Time
Point of Interest Icon Setup
Allows you to select POIs that will be displayed in different scales.
Page 35
Page 36
Language Settings
System Menu
You can choose from one of the languages/voices that are
displayed in the list. If the voice guidance language is loaded onto
your SD card, then both the voice and the on-screen text will be
the selected language; if not, then only the selected language text
will appear.
Allows you to view the current GPS reception status, adjust the
current vehicle symbol position, and it also provides information
on the current software and map version numbers.
GPS Diagnostics
Location Reset
You may reset the location of the vehicle symbol using the Set
Vehicle Position option.
Page 37
Displays the number of GPS satellites currently in view and how
many are currently being used. The GPS satellite time is
displayed (UTC) along with other information.
Page 38
Planned Route
GPS VP Reset
To view planned route on the current highlighted route, touch the
Yellow Maneuver Icon and the system will display the entire route
list.
Maneuver Icon
To reset the vehicle symbol based on the GPS determined
longitude and latitude, select GPS VP reset.
System Info
The version numbers for the system application software and
map database can be found under System Information.
Page 39
Page 40
Edit Route - Detour
While navigating a current route from the Guidance Display main
menu, you can select a Routing Detour.
Avoid Current Road
By selecting “Avoid Current Road”, a new routing will be
calculated, voice instructions given and the new route displayed
Detour Distance
By selecting “Detour Distance”, a new route will automatically be
recalculated based upon the length of Detour you select (1 to 3
miles)
Page 41
Page 42
Trail Book
Avoid Specific Road
By selecting “Avoid Specific Road”, you can select from a list of
roads to avoid or use Spell Mode to select a specific road to
avoid.
If you decide that you wish to drive “Off-Road”, you can keep
track of your route using the “Trail Book” function. Select <Edit
Favorites> <Trail Book> <Add> and choose a name for this new
trail. After confirming the name, start driving
Cancel Current Route
Cancel Route
Select this function to cancel the current route.
It’s as easy as 1 – 2 – 3 …
1 - Select Add function
2 - Choose a name for this trail; confirm the name
3 - Start driving
4 - Press “Push-Pin” icon
Page 43
to create new waypoints
Page 44
5 - Press Menu icon
complete the trail:
and select <Stop Trail> when you
Delete Trail
To remove a previously saved trail name from the system 1 - Select the “Delete Trail” function
2 - Choose the trail name you want to remove
3 – A system prompt will then ask you if you wish to confirm that
you really want it deleted from the system.
Name Trail
After selecting a saved trail, you can use the keyboard to rename
the trail.
Page 45
Page 46
Follow Trail
Next time when you go off-roading, you can follow the same trail
you created by …
1 - Selecting “Go To”, then
2 - Select “Favorites”, then
3 – Select “Trail Book”, then
4 - Select an existing trail.
Press Menu Icon
route.
then select “Stop Trail” to cancel
You can select to go to any points in a previously named trail as a
starting point. Upon your selection, the system will point you with
a red line to that starting location. You will follow the red line to
the starting point and start your trail blazing by following the
dotted line.
Page 47
Page 48
4) The DB Downloader program should start automatically.
If not, perform the following steps:
Caliber-NavMate Downloader
Version 3.1
a. Double left click the “My Computer” icon on your
desktop screen
The following steps describe how to copy selected map data or
change voice guidance languages from the Caliber-NavMate
Downloader DVD to your Caliber Navigation System’s flash
memory card. Before map data is downloaded to your flash
memory card, your existing navigation data i.e. Address Book and
Previous Destinations will be backed up to a folder called
“NavMate” on your PC. After downloading is complete, the
backed up data will be restored..
b. Double left click the DVD-ROM drive to display
the contents on the DVD.
c.
Double left click the file <db_downloader.exe> to
start the program.
DB Downloader Instructions:
1) Please make sure you have the following components on
your PC:
a. DVD-ROM drive
b. Flash Memory Card Reader-Writer that is
connectable to your PC – allowing access to your
Caliber Navigation System’s flash memory card
2) Connect the Flash Memory Card Reader-Writer to your
PC, according to the manufacturer’s directions for the
flash card reader unit.Power up your PC then insert the
Flash Card from your Caliber Navigation System
3) Load the DB Downloader DVD into your PC’s DVD-ROM
drive.
Page 49
Page 50
Left click the list indicator in “Database Area” then select the
area you want to download.
6) Left click the list indicator in “Destination” then select the
destination drive of your flash memory card
5) Left click the list indicator in “Language” then select voice
guidance language you prefer.
7) Left click GO to start. The following window will appear:
8) This program will backup your navigation data files on
your memory card to a folder called “NavMate” on your
hard disk first before it removes the navigation folder on
your memory card. Left click OK to continue.
Page 51
Page 52
Frequently Asked Questions [FAQs]
9) Now the program will start copying (downloading) files
from DVD to memory card.
10) The following window will appear when downloading is
complete:
When I first power on my new CALIBER GPS system, it
shows a location in San Jose, CA and does not recognize my
location - how can I change this? Answer – Please make sure
that you are outside and the system has a good visibility to the
open sky. .Sometimes it takes a minute a two to lock onto 3 or
more GPS satellites (you can see how many satellites are being
received by selecting the Main Menu – Settings – GPS
Diagnostics). As soon as the system locks onto 3 or more
satellites, the system will immediately change from the default
location (San Jose, CA) and display your location.
When I first power on my new CALIBER P-3600 system, the
touch-screen does not seem to work - how do I correct this?
Answer – Occasionally during shipping, conditions occur that
require that the P-3600 system be reset. Please follow these
easy-to-perform instructions to reset your system – afterwards,
your system will work properly and you should not have to do this
procedure again.
1) With the unit completely powered off, remove the SD Card
2) Power on the unit and wait until you see the Main Menu (4
buttons)
3) Touch the screen several times
4) Power Off the Unit completely off (no Red power light) and
Wait 10 seconds
5) Insert the SD Card
6) Power the unit back on
When I push the <Power> button on my CALIBER P-3600
system, the red light stays on - Why? Answer – The red light
stays on to show you that the system is in <Standby> mode;
while in this mode, the system is still drawing power from the
battery. When you push the power button again, the system will
quickly resume to the same place that you were at, when the
power button was first pushed.
11) Left click OK to exit this program.
Follow the instructions that you know to safely remove the flash
memory card from the memory card reader. Or, left click “Unplug
or Eject Hardware” icon on your PC - then select “OK” at the
<The ‘USB Mass Storage device’ device can now be safely
removed from the system.> prompt. Remove your memory card
from the memory card reader. Your flash memory card is now
ready for use; insert it back into your Caliber navigation system.
Page 53
•
To turn the system completely <Off> - hold the power
button down for two or more seconds; the power button
light will not be illuminated and the system will not draw any
power from the battery.
•
To place the system in <Resume> mode - quickly depress
the power button for less than one second; the power
button light will be <Red>.
Page 54
Is the map road detail data that shipped on my Caliber GPS
System the most current? Answer – Yes - As of December 1,
2006, the Caliber P-3600 systems have been shipped with the
most current and up-to-date NAVTEQ® road detail maps. As
updates become available, they will be posted on the Caliber
web-site.
Should I back up my Caliber-NavMate software including the
maps? Answer – Should for any reason the data on your flash
card is lost, the supplied Caliber-NavMate DVD-ROM may be
used to restore your map data. See the Caliber-NavMate
Downloader Instruction Manual.
If driving in Canada, how do I access Canadian map data?
Answer – The supplied Caliber-NavMate DVD-ROM may be
used in your PC with a flash card reader to load your Canada
map data. See the Caliber-NavMate Downloader Instructions.
How do I change to a different Voice Guidance language?
Answer – Use the supplied Caliber-NavMate DVD-ROM to
change a voice guidance language. See the Caliber-NavMate
Downloader Instruction Manual.
What Voice Guidance languages are supplied with my
CALIBER GPS navigation system? Answer – Most system
DVDs ship with 10 available languages; English-US <female>,
French Canadian, Spanish-Mexican, English-UK, French,
German, Italian, Spanish, Danish and Dutch
How many voice guidance languages can be downloaded to
the system at one time? Answer – When updating the preloaded flash card image, only one voice guidance language at-atime will be used.
What type of flash card should I buy for storing additional
maps? Answer – Caliber Personal Navigation Systems come
with a pre-installed memory card containing everything you need
to navigate in the country where you purchased the unit. If you
wish to build additional map data libraries (e.g. All USA + Canada
<2GB> or Canada-only <512MB>) we advise that you choose a
flash card of the same type that shipped with your system and
with enough memory to store your maps (as stated in database
list).
Page 55
What is the best place on the windshield to mount my
Caliber Personal Navigation System? Answer – Caliber is
committed to make your driving as safe as possible roads. Any
Caliber device should be placed in a position on your windshield
that does not block your view of the road, in any way, and that
enables an optimal usage of your device. Our advice is to mount
your Caliber product at the lowest possible position on your
windshield. Your Caliber device should not be placed directly
under your rear-view mirror.
My unit does not receive a GPS signal, what should I do?
Answer – Sometimes it takes a minute a two to lock onto 3 or
more GPS satellites (you can see how many satellites are being
received by selecting the Main Menu – Settings – GPS
Diagnostics). If you continue to have problems getting a GPS
satellite fix, please make sure that you are outside and the GPS
antenna has a good visibility to the open sky.
Some heat-reflecting windshields and built-in windshield heaters
block the GPS signal reception inside the car. Very often, such
heat-reflecting windshields have a hole behind the rear-view
mirror or the heat reflection is limited on the left (or right) side of
the windshield to let signals pass through. If you can not get a
signal after mounting the device, use the supplied GPS antenna
lead extension and mounting plate, then place your GPS antenna
on that position.
Alternatively, you can use an external GPS antenna or buy a
longer extension lead to extend the GPS cable and place the
GPS receiver in the back of your car (remember: your GPS
receiver should always have a free view of sky and that you have
free and clear view of the road).
Why do I sometimes find map or POI errors in Caliber
products? Answer – In order to obtain the correct map data,
Caliber and its map suppliers, rely on local government and other
local organizations throughout North America and the world to
supply us with the correct, relevant and most up to date
information for millions of roads, streets and lanes.
There are only a few map suppliers in the world that have
excellent map data, one of them being NAVTEQ. The map data
that Caliber uses is the best and most current data available on
the market. Over the course of time, roads are changed or new
roads are added; our map supplier has over 1,500 hundred
people driving through North America and analyzing satellite
images to register these changes. This process is time
Page 56
consuming and a logistical challenge. All map feedback form our
Caliber customers submitted via e-mail will also be passed on to
our digital map suppliers, who will then in many cases, physically
visit the location to understand and correct the situation.
What if I can’t find an address? Answer – Please make sure
you have correctly spelled your entry. If you do not know how an
address is spelled correctly, simply enter the parts of the address,
you know for sure (e.g. “Times”, “New York” for Times Square in
New York City). Then browse in the result list and look for the
address. Also, make sure that the city in which you are looking for
an address is correct. Sometimes the official postal address
differs from the address you are looking for. In that case, search
for an address nearby that you know of and browse on the map. If
you find the address on the map but you can not find it while
searching for it, please let us know via [email protected]
Please note: Caliber recommends that return items are shipped
through a carrier that offers shipment tracking as well as shipping
insurance. So that it is completely protected in the event that the
shipment is lost or damaged, please insure your unit for its
purchase price. If return items are not shipped through a carrier
that offers shipment tracking and the return items are not insured
for their full value, you will be responsible for any loss or damage
to the product during shipping.
Where can I get software updates? Answer – Please contact
us at [email protected] for information about software
updates.
If my questions are not answered in this manual, how do I
get in touch with your support department? Answer – Please
contact us at [email protected] or your retail store.
What is WAAS? Answer – WAAS stands for the "Wide Area
Augmentation System" ; it is an FAA-funded project designed to
improve the overall accuracy and integrity of GPS signals for
flying in instrument meteorological conditions, primarily during the
approach and landing phases of flight. It is a space-based system
that broadcasts integrity information and correction data as
determined by ground reference stations. At this time, the system
is still in the development stage. The goal is to provide reliable
signals with an accuracy of seven meters (21-22 ft), both
horizontally and vertically, 95+% of the time. Current tests show
the actual accuracy to be on the order of 2-3 meters. See
http://gps.faa.gov/Programs/WAAS/waas.htm for more
information.
If required, how do I arrange to get my Caliber unit repaired
in the USA or Canada? Answer – In order to get your Caliber
unit serviced, please contact our technical support department at:
E-Mail [email protected]
Phone: 949.480.1128
Caliber's technical support department is available M-F, 8:00-5:00,
Pacific Time (except holidays).
When calling technical support, please have available the serial
number of the unit, the return shipping address, and a daytime
telephone number. A Product Support Specialist will provide you
with a Return Material Authorization tracking number (RMA#) and
shipping instructions.
Page 57
Page 58