1
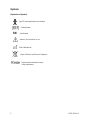
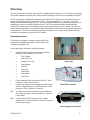
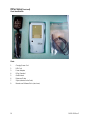
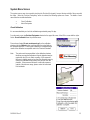
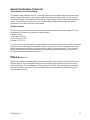
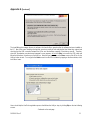
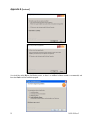
®
Standard
User’s Guide
2009 Reichert, Inc. Reichert is a registered trademark of Reichert, Inc.
The information contained in this document was accurate at time of publication. Specifications subject to change without
notice. Reichert, Inc. reserves the right to make changes in the product described in this manual without notice and
without incorporating those changes in any products already sold.
No part of this publication may be reproduced, stored in a retrieval system, or transmitted in any form or by any means,
electronic, mechanical, recording, or otherwise, without the prior written permission of Reichert, Inc.
2
16010-101 Rev. C
Table Of Contents
Warnings & Cautions ............................................................................................................................................................................. 4
Symbols................................................................................................................................................................................................... 6
Explanation of Symbols ............................................................................................................................................................ 6
Introduction ............................................................................................................................................................................................ 7
Disclaimer and Limitation of Responsibility .............................................................................................................................. 7
FCC Statement ......................................................................................................................................................................... 7
Copyright .................................................................................................................................................................................. 7
User Interface ........................................................................................................................................................................... 8
IOPac Setup ............................................................................................................................................................................................ 9
Unpacking Instructions ............................................................................................................................................................. 9
Parts Identification .................................................................................................................................................................. 10
Parts: ...................................................................................................................................................................................... 10
Instructions for Use.............................................................................................................................................................................. 11
Turning On and Off................................................................................................................................................................. 11
Start Measuring Central Corneal Thickness (CCT) Measurement ......................................................................................... 12
System Menu Screen ........................................................................................................................................................................... 13
Check Calibration ................................................................................................................................................................... 13
About Pachymeter .................................................................................................................................................................. 14
HotSync the IOPac ............................................................................................................................................................................... 14
Program Installation................................................................................................................................................................ 14
Cleaning ................................................................................................................................................................................................ 15
External Cleaning ................................................................................................................................................................... 15
Probe Cleaning ....................................................................................................................................................................... 15
Troubleshooting ................................................................................................................................................................................... 16
Frequently Asked Questions................................................................................................................................................... 16
General Specifications......................................................................................................................................................................... 17
Specifications.......................................................................................................................................................................... 17
Storage Conditions ................................................................................................................................................................. 17
Operating Conditions .............................................................................................................................................................. 17
Acoustic Output Powers ......................................................................................................................................................... 18
Definitions ............................................................................................................................................................................... 18
Tissue Exposure To Ultrasound Energy ................................................................................................................................. 19
Appendix A – Installing IOPac Support on a Windows PC (HotSync)............................................................................................. 20
Appendix B - Procedures for Reinstalling Missing IOPac Program Files....................................................................................... 23
End User Software License Agreement ............................................................................................................................................. 24
Reichert Warranty................................................................................................................................................................................. 25
16010-101 Rev. C
3
Warnings & Cautions
Reichert, Inc. (Reichert) is not responsible for the safety and reliability of this instrument when:
• Assembly, disassembly, repair, or modification is made by unauthorized dealers or persons
• Instrument is not used in accordance with this User’s Guide
WARNING: AN INSTRUCTION THAT DRAWS ATTENTION TO RISK OF INJURY OR DEATH.
WARNING:
UNITED STATES FEDERAL LAW AND EUROPEAN REGULATIONS REQUIRE THAT THIS DEVICE BE
PURCHASED ONLY BY A PHYSICIAN OR A PERSON ACTING ON BEHALF OF A PHYSICIAN. ONLY
OPERATORS TRAINED IN THE USE OF OPHTHALMIC INSTRUMENTS THAT CONTACT THE EYE SHOULD USE
THIS DEVICE. REICHERT, INC. CANNOT BE HELD RESPONSIBLE FOR ANY DAMAGE OR INJURY THAT
RESULTS FROM A FAILURE TO FOLLOW DIRECTIONS IN THE USER’S MANUAL. PLEASE ENSURE THAT
YOU ARE ENTIRELY FAMILIAR WITH THE CORRECT PROCEDURES FOR OPERATING THE INSTRUMENT
BEFORE USE!
WARNING:
IN ORDER TO PREVENT PATIENT-TO-PATIENT TRANSFER OF INFECTION, AFTER EACH USE DISINFECT THE
PROBE FOLLOWING ACCEPTED LOCAL CLINICAL PROCEDURES REGARDING THE USE OF
DISINFECTANTS. ANY CLINICALLY APPROVED CHEMICAL DISINFECTANT CAN BE USED. AFTER EACH
PATIENT, WE RECOMMEND WIPING THE PROBE WITH A COTTON SWAB SOAKED IN 70% ISOPROPYL
ALCOHOL, AND THEN IMMERSING THE PROBE TIP FOR 10 MINUTES IN 70% ISOPROPYL ALCOHOL OR AN
EQUIVALENT LOCALLY APPROVED DISINFECTANT. THE PROBE AND CABLE MAY BE IMMERSED IN
LIQUID, BUT THE CONNECTOR AND MAIN UNIT CANNOT BE IMMERSED IN ANY LIQUID. DO NOT STERILIZE
THE PROBE USING ETO, AUTOCLAVING, OR IRRADIATION. AFTER CLEANING, RINSE THE END OF THE
PROBE THOROUGHLY WITH STERILE DISTILLED WATER. DRY THE PROBE WITH A LINT FREE CLOTH OR
TISSUE. ALWAYS STORE THE PROBE WHEN NOT BEING USED IN THE PROVIDED HOLDER TO PROTECT IT.
DO NOT USE THE PROBE AS A STYLUS. DO NOT ATTEMPT TO USE THE IOPAC IF THERE IS ANY
INDICATION THE PROBE TIP, BODY, OR CABLE HAS BEEN DAMAGED AND/OR THEIR PHYSICAL INTEGRITY
HAS BEEN COMPROMISED. IF THE PROBE TIP HAS MADE CONTACT WITH ANYTHING BETWEEN
APPLANATIONS, REPEAT DISINFECTING PROCEDURE.
WARNING:
MEASUREMENTS SHOULD NOT BE ATTEMPTED WHEN OCULAR INTEGRITY IS QUESTIONABLE. THE
HANDHELD TRANSDUCER MUST TOUCH THE EYE DURING OPERATION. CONSEQUENTLY, THE OPERATOR
NEEDS TO EXHIBIT CARE IN MANIPULATING THE TRANSDUCER. FORCE SHOULD NOT BE EXERTED
AGAINST THE EYE – THE TRANSDUCER TIP ONLY NEEDS TO LIGHTLY TOUCH THE CORNEA.
WARNING:
TO ENSURE PATIENT ISOLATION FROM HIGH ELECTRICAL POTENTIAL, DO NOT USE THE IOPAC ON A
PATIENT WHEN THE INSTRUMENT IS CHARGING. IOPAC CHARGING MUST ONLY TAKE PLACE AT A
DISTANCE OF AT LEAST 1.5 M FROM THE PATIENT.
WARNING:
DO NOT USE ANY TRANSDUCER PROBE ON THE IOPAC OTHER THAN THE ONES SUPPLIED EXPRESSLY
FOR THIS PURPOSE. OTHER TRANSDUCERS MAY NOT GENERATE ACCEPTABLY LOW ULTRASOUND
ENERGY LEVELS.
WARNING:
CARE SHOULD BE EXERCISED WHEN HANDLING THE TRANSDUCER, TO AVOID BREAKING THE TIP AT THE
ELBOW (ANGLED TRANSDUCERS ONLY). EXTREME FORCE SHOULD NEVER BE APPLIED WHEN
REMOVING OR STORING THE TRANSDUCER IN ITS HOLDING CLIP.
CAUTION:
AN INSTRUCTION THAT DRAWS ATTENTION TO THE RISK OF DAMAGE TO THE PRODUCT.
CAUTION:
DO NOT INSTALL ANY ADDITIONAL SOFTWARE. ALTHOUGH THIS PRODUCT USES THE PALM OPERATING
SYSTEM, IT IS A DEDICATED PACHYMETER AND MUST NOT BE USED FOR ANY OTHER PURPOSE. THE
USE OF THIS DEVICE WITH ANY SOFTWARE OTHER THAN THAT SUPPLIED WITH THE PACHYMETER HAS
NOT BEEN VALIDATED. THE MANUFACTURER OR DISTRIBUTOR CANNOT BE HELD RESPONSIBLE FOR
ANY FAILURES RESULTING FROM THE USE OF UNAUTHORIZED SOFTWARE.
4
16010-101 Rev. C
CAUTION:
THE IOPAC IS A PRECISION ULTRASOUND-MEASURING INSTRUMENT. PROTECT THE INSTRUMENT
AGAINST DUST AND MOISTURE, AND AVOID PHYSICAL SHOCKS AND STRONG FORCES. DO NOT EXERT
EXCESS PRESSURE ONTO THE SCREEN.
CAUTION:
IT IS PRUDENT TO MINIMIZE THE PATIENT’S EXPOSURE TO ULTRASOUND ENERGY TO A LEVEL AS LOW
AS REASONABLY ACHIEVABLE (ALARA). WITH THE IOPAC, THERE ARE NO ADJUSTMENTS THAT ALTER
THE AMOUNT OF ULTRASOUND ENERGY EMITTED BY THE TRANSDUCER. HOWEVER, BY LIMITING SCANS
TO THE MINIMUM NEEDED TO OBTAIN DESIRED DIAGNOSTIC INFORMATION, THE PATIENT’S EXPOSURE
TO ULTRASOUND ENERGY WILL BE MINIMIZED. PREPARING THE PATIENT BEFORE SCANNING BY
ADVISING HIM OR HER ON WHAT TO EXPECT IS ONE WAY OF REDUCING THE NUMBER OF SCANS THAT
NEED TO BE PERFORMED. THE AMERICAN INSTITUTE OF ULTRASOUND IN MEDICINE (AIUM) HAS A
PUBLICATION “MEDICAL ULTRASOUND SAFETY” (1994) WHICH HAS MORE INFORMATION ON THIS TOPIC.
CAUTION:
THIS DEVICE HAS NOT BEEN TESTED IN CONJUNCTION WITH HF SURGICAL (E.G. ELECTROCAUTERY)
EQUIPMENT AND SHOULD NOT BE USED WITH SUCH EQUIPMENT.
CAUTION:
WHEN REMOVING THE PROTECTIVE CAP FROM THE TRANSDUCER BE CAREFUL NOT TO PULL TOO HARD.
LET SOME AIR UNDER THE LIP OF THE CAP BY LIFTING GENTLY WITH A FINGERNAIL AND IT SHOULD
COME OFF EASILY.
CAUTION:
ALWAYS ENSURE THE IOPAC IS CHARGED SUFFICIENTLY. USE ONLY THE SUPPLIED PALM CHARGER
PROVIDED WITH THE UNIT, OR A USB CABLE (SUCH AS THE ONE SUPPLIED WITH THE IOPAC)
CONNECTED TO A COMPUTER. WE RECOMMEND A MINIMUM CHARGE LEVEL OF 50%. THE IOPAC IS
BASED ON A PALM HANDHELD COMPUTER THAT USES A RECHARGEABLE BATTERY TO MAINTAIN
STORED DATA AND PROGRAMS. LIKE SIMILAR COMPUTERS, IF THE BATTERY BECOMES TOO DRAINED IT
WILL NOT BE ABLE TO FUNCTION. AT 40% BATTERY LEVEL THE IOPAC SOFTWARE APPLICATION WILL
NOT START, AND AT 20% THE IOPAC WILL NOT POWER ON UNTIL IT HAS BEEN CHARGED. TO ENSURE
THE IOPAC IS ALWAYS READY FOR USE, A GOOD GUIDELINE IS TO CHARGE IT OVERNIGHT AT LEAST
WEEKLY AND TO LEAVE IT ATTACHED TO A CHARGER WHEN NOT IN USE FOR LONGER PERIODS.
CAUTION:
PROTECT YOUR DATA BY ARCHIVING IT. GOOD PRACTICE IS TO PERFORM REGULAR HOT SYNC
OPERATIONS AS DESCRIBED IN APPENDIX A OF THIS MANUAL TO ARCHIVE YOUR DATA IN A SECURE
LOCATION ON YOUR PC.
CAUTION:
CHANGES OR MODIFICATIONS TO THIS EQUIPMENT, NOT EXPRESSLY APPROVED BY THE
MANUFACTURER, COULD VOID THE WARRANTY AND THE USER'S AUTHORITY TO OPERATE THE
EQUIPMENT.
16010-101 Rev. C
5
Symbols
Explanation of Symbols
Type BF Patient-applied parts are insulated.
Catalog Number
SN
Serial Number
Attention, See Instructions for use
Date of Manufacture
Waste of Electrical and Electronic Equipment
Conformity with mandatory European
Safety requirements
6
16010-101 Rev. C
Introduction
Congratulations on your purchase of the IOPac Standard pachymeter.
This User’s Guide is designed as a training and reference manual. We recommend you carefully read and follow the
steps in this guide to ensure optimum performance from your new instrument.
Please retain this guide for future reference and to share with other users. Additional copies can be obtained from your
authorized Reichert, Inc. dealer or contact our Customer Service department directly at:
Tel:
716-686-4500
Fax:
716-686-4555
E-mail: [email protected]
Disclaimer and Limitation of Responsibility
Reichert, Inc. assumes no responsibility for any damage, loss or claims which may result from a failure to follow
the instructions contained in this Technical Manual. Reichert, Inc. assumes no responsibility for any damage or
loss caused by deletion of data as result of malfunction, dead battery, or repairs. Be sure to make copies of all
important data on other media to protect against data loss. Reichert, Inc. assumes no responsibility for any
damage, loss or claims, which may result from the use of the IOP correction formulas or lookup table, whether
predefined in the software or customized by the user. The use of any specific IOP correction algorithm is
entirely the responsibility of the pachymeter operator.
IMPORTANT Please read the End User Software License Agreement with this product before using the accompanying
software program. Using any part of the software indicates that you accept the terms of the End User Software License
Agreement
FCC Statement
This device complies with part 15 of the FCC rules. Operation is subject to the following two conditions:
(1) This device may not cause harmful interference and (2) this device must accept any interference received, including
interference that may cause undesired operation.
Copyright
Graffiti®, HotSync®, the Palm® logo, and Palm OS® are registered trademarks, and Palm™ and Palm Powered™ are
trademarks of Palm, Inc. Canon PIXMA iP-90 (printer) is a trademark of Canon Corporation.
IOPac is a registered trademark of Reichert, Inc.
16010-101 Rev. C
7
Introduction (Continued)
User Interface
The IOPac is a Palm Powered device. For documentation on the Palm interface, Graffiti text entry system and other
general aspects of the Palm operating system please refer to the help file located on the Palm CD that is supplied with the
IOPac.
Data can be entered by either using the Graffiti interface or the internal keyboard. Tapping 123 located on the lower right
corner on the IOPac screen activates the numeric keyboard. Tapping ABC located on the lower left corner on the IOPac
screen activates the alphabetic keyboard.
You can access the Graffiti help when in the main screen of the IOPac program by swiping the stylus from the bottom of
the screen to the top of the screen.
icon. Tap to the left or right of the slider to adjust the
NOTE: You may adjust the screen contrast by tapping on the
contrast in small increments or drag the slider to change the contrast in large increments.
Time and Date
Text Entry Area
Alphabetic Keyboard
8
Contrast
Number Entry Area
Numeric Keyboard
16010-101 Rev. C
IOPac Setup
Great care has been taken to deliver your new IOPac Standard pachymeter safely to you. The container and packaging
was specially designed to transport this unit. Please retain this packaging for any future use if transportation is required.
This IOPac Pachymeter is intended for measuring corneal thickness of the human eye using ultrasound technology. It
features a 20 MHz probe capable of an accuracy of ±5 µ m. The measurement takes 1 – 2 seconds. A successful
measurement is announced by a high-pitch tone. An unsuccessful measurement (caused, for example, by the probe not
being placed correctly) is announced by a lower pitch tone. The IOPac incorporates multiple corrected Intraocular
Pressure (IOP) formulas, as well as the ability for the end user to create their own custom IOP formula. The IOPac is a
portable battery operated device, can store approximately 1000 exams internally and has printing capability via infrared to
an optional printer. The IOPac can also backup examination information to your computer via the provided USB cable
and features the popular and user friendly Palm OS interface.
Unpacking Instructions
The instrument is packaged in a shipping container to protect the
instrument from damage during shipment. Please read the User’s
Guide before operating the unit.
Please unpackage the instrument in the following manner:
1.
Open the box and remove the accessories from the foam
packaging. Refer to the figure “IOPac in Box.”
•
•
•
IOPac Standard
Ultrasound Probe
Charging Power Cord
•
•
•
•
•
•
Power Adapters
USB Cord
Palm Stylus
Graffiti Labels
Palm Software
User’s Guide
2.
Plug the Ultrasound Probe into the back of the IOPac. Refer
to the figure “IOPac Probe Connection.”
3.
Plug the Power Adapter into the charging port and let it charge
the IOPac’s internal battery for 12 uninterrupted hours. Refer
to the figure “IOPac Charging Port Connection.”
Note:
The battery icon at the top of the Home screen indicates how
fully charged the battery is. When the battery icon is all blue it
is fully charged.
Note:
IOPac in Box
Probe
IOPac Probe Connection
Charging Port
At a battery level of 40% and lower the IOPac software
application will not start, and at 20% the IOPac will not power on
until it has been charged.
IOPac Charging Port Connection
16010-101 Rev. C
9
IOPac Setup (Continued)
Parts Identification
1
5
4
2
6
3
Parts:
1.
Charging Power Cord
2.
3.
USB Cord
Power Adapters
4.
IOPac Standard
5.
Graffiti Labels
6.
Ultrasound Probe
7.
Stylus (attached to the Palm)
8.
Manuals and Software Disks (not shown)
10
16010-101 Rev. C
Instructions for Use
Turning On and Off
The power button is located on the front of the IOPac. Press it once to turn the instrument ON or OFF. The IOPac has
an inactivity timer set to 3 minutes after which it will shut off. Data will NOT be lost if the unit shuts off automatically.
Stylus
Power Button
When turning on the instrument for the first time the main screen will appear.
The main screen indicates Start Measuring. If the initial screen is not as indicated as below, then touch the house icon
at the lower left of the touch screen and then touch the IOPac icon and the screen below will be shown.
16010-101 Rev. C
11
Instructions for Use (Continued)
Start Measuring Central Corneal Thickness (CCT) Measurement
Preparation of the Patient
The patient should be in a seated position. It may be helpful to explain that they should relax and attempt not to blink as
the probe is going to gently contact their eye. A drop of ocular anesthetic should be placed in the eye or eyes that are
going to be measured. If the patient has dry eyes, a moisturizing drop may also be used.
Acquiring a Measurement
On the start up screen, Tap: Start Measuring.
CAUTION:
DO NOT USE THE ULTRASOUND PROBE AS A STYLUS. THIS WILL CAUSE DAMAGE TO THE PROBE AND
VOID THE IOPAC WARRANTY.
The Measuring screen shows both the right (OD) and left (OS) eyes. The instrument will default to the right (OD) eye.
You can switch the eye that you want to measure by tapping either the OD or OS box at the top of the screen.
To start measuring, tap: Start. You will hear a beeping sound to let you know the
Pachymeter is taking measurements. You may stop measurement acquisition
early by tapping the Stop button. Tapping the Cancel button will cancel
measuring and bring you back to the main screen.
Place the tip of the probe on the center of the cornea. Once the probe is
perpendicular to the cornea the Pachymeter will acquire up to 8 (eight)
measurements. A successful measurement is signaled by a high tone. An
unsuccessful measurement (caused, for example, by the probe not being placed
correctly) is signaled by a lower pitched tone.
After a set of measurements is made the eye selection will
automatically switch and will be highlighted in blue. To
change selection, tap on the appropriate column box to
select the left or right eye and follow the above procedure.
A mean thickness in microns and standard deviation
(shown in brackets) will appear after completion of the
measurements.
Review the measurements of both eyes. You can eliminate any measurement
from the mean and standard deviation calculations by tapping on the check
mark in the box next to the measurement reading that you want to eliminate.
The mean and standard deviation will update accordingly.
To retake a measurement, select the eye (OD or OS) that you want to retake,
and tap the Start button.
12
16010-101 Rev. C
System Menu Screen
The system menu screen is accessed by touching the “Reichert Pachymetry” menu at the top and left of the screen with
the stylus. When the “Reichert Pachymetry” menu is selected, the following options are shown. The details of each
menu selection are indicated below:
•
•
Check Calibration
About Pachymeter
Check Calibration
It is recommended that you check the calibration approximately every 14 days.
From the main screen, tap Reichert Pachymeter located on the upper left corner of the IOPac screen with the stylus.
Select: Check Calibration from the pull down menu.
Place a drop of water (Do not use ultrasonic gel) on the calibration
phantom, tap the Calibrate button, and then place the probe lightly on
the calibration phantom. A tone signals calibration is complete and the
results of the calibration are reported next to the “Phantom Standard”
Note:
The probe must be perpendicular to the calibration phantom
therefore some manual adjustment of probe alignment may be
required for the IOPac to obtain a reading. If the measured
thickness is slightly greater or less than the allowable range, try
redoing the calibration while exerting less pressure onto the
phantom. If the measured thickness consistently measures
outside of the tolerance range, please contact an authorized
Reichert dealer.
16010-101 Rev. C
13
System Menu Screen (Continued)
About Pachymeter
This screen shows the software and firmware versions, and the device serial number.
HotSync the IOPac
Program Installation
The Pachymeter software can be re-installed using the HotSync (as described in the Palm operating manual on the
supplied CD ROM, and in the Appendix A) utility of the Palm. Refer to Appendix B for installing the program.
14
16010-101 Rev. C
Cleaning
External Cleaning
WARNING:
DO NOT IMMERSE THE CONNECTOR OR THE MAIN UNIT IN ANY LIQUID OR DAMAGE TO THE UNIT WILL
OCCUR.
Clean the external surfaces of this instrument using a clean, soft cloth moistened with a mild detergent solution (1 cc of
liquid dish soap to one liter of clean, filtered water (filtered below 5 microns)).
Probe Cleaning
WARNING:
IN ORDER TO PREVENT PATIENT-TO-PATIENT TRANSFER OF INFECTION, AFTER EACH USE DISINFECT THE
PROBE FOLLOWING ACCEPTED LOCAL CLINICAL PROCEDURES REGARDING THE USE OF
DISINFECTANTS. ANY CLINICALLY APPROVED CHEMICAL DISINFECTANT CAN BE USED.
WARNING:
DO NOT ATTEMPT TO USE THE IOPAC IF THERE IS ANY INDICATION THE PROBE TIP, BODY, OR CABLE
HAS BEEN DAMAGED AND/OR THEIR PHYSICAL INTEGRITY HAS BEEN COMPROMISED OR INJURY TO THE
CORNEA MAY OCCUR.
CAUTION:
DO NOT USE THE PROBE AS A STYLUS OR DAMAGE TO THE PROBE MAY OCCUR.
CAUTION:
DO NOT STERILIZE THE PROBE USING ETO, AUTOCLAVING, OR IRRADIATION OR DAMAGE TO THE PROBE
WILL OCCUR.
CAUTION:
IF THE PROBE TIP HAS MADE CONTACT WITH ANYTHING BETWEEN APPLANATIONS, REPEAT THE
CLEANING PROCEDURE.
Clean the probe using the following steps:
1.
Wipe the complete probe with a cotton swab soaked in 70% isopropyl alcohol.
2.
3.
Immerse the probe tip for 10 minutes in 70% isopropyl alcohol or an equivalent locally approved disinfectant.
Rinse the end of the probe thoroughly with sterile distilled water.
4.
5.
Dry the probe with a clean, lint-free, cloth or tissue.
Store the probe in its provided holder on the unit when it is not in use so that it is safely stored.
16010-101 Rev. C
15
Troubleshooting
Frequently Asked Questions
Q: The unit will not power up.
A: Always ensure the IOPac is charged sufficiently. USE ONLY THE SUPPLIED PALM CHARGER PROVIDED WITH
THE UNIT, or a USB CABLE (such as the one supplied with the IOPac) CONNECTED TO A COMPUTER. We
recommend a minimum charge level of 50%. The IOPac is based on a Palm handheld computer that uses a
rechargeable battery to maintain stored data and programs. Like similar computers, if the battery becomes too drained it
will not be able to function. To ensure the IOPac is always ready for use, a good guideline is to charge it overnight at least
weekly and to leave it attached to a charger when not in use for longer periods.
Q: I have been tapping on the cornea with the probe and I cannot get measurements?
A: The IOPac has a unique design that takes multiple measurements very quickly. Just contact the cornea with the probe
tip and hold it in place until all 8 measurements have been made. The IOPac is not designed to work by tapping.
Q: Why can’t I get a reading when I’m checking calibration?
A: Calibration normally works best by filling the phantom orifice with water and placing the probe tip against the phantom
before initiating the measurement. Additionally, try shifting the angle of the probe during calibration; the face of probe tip
may not be lying flat on the phantom surface. For the 45 degree probe, it is often more effective to hold the probe by its
elbow.
Q: I cannot get a reading on an eye?
A: The most likely cause of this issue is a loose probe connection. Try pushing on the gold connector on the back of the
Pachymeter. If that does not work, try unplugging it and checking that both the connector and unit are undamaged and
then reinsert the connector. Also confirm that the patient does not have dry eyes. It may be necessary to place a drop of
artificial tears on the eye before the measurement.
Q: What happens if I disrupt the printing by blocking the IR beam or displacing the IOPac?
A: The IOPac is fairly tolerant of beam disruption. If an object or the field of view changes and disrupts the printing,
readjust the IOPac to have a clear line of sight to the printer’s IR port.
Q: The Pachymeter software is hung up and won’t respond. What do I do?
A: In rare circumstances it is possible to crash the Palm Operating system. To recover from a system hang, insert a
narrow blunt object such as an unfolded paperclip or toothpick into the hole marked ‘reset’ on the back of the unit until it
presses the reset button at the bottom of the hole. The Pachymeter screen should go blank followed by the Palm booting
screen. This will cause a soft reboot and your database and program should not be effected.
Q: How do I locate the Pachymeter software if it does not automatically load on startup?
A: To locate the IOPac icon, tap the Home icon at lower-left corner of the screen and look for the IOPac icon. Tap this
Home icon repeatedly to cycle through all program categories until the IOPac icon is found. If this icon still appears to be
missing, tap the upper left corner of the Home screen to activate the menu and select Info. Look for IOPac in the Info list,
scrolling down if necessary. If it does not appear in the Info list, try reloading the application using the HotSync feature.
Follow the directions in Appendix A of this Manual.
Q: The calibration guide hole is dirty, how should I clean it?
A: Using a Q-tip or similar soft tipped device dipped in alcohol gently swab the hole. Ensure that the flat calibration
surface at the bottom of the hole is clean. Be sure not to exert excess force onto the phantom while cleaning.
Q: Why does the unit display a reading when not in contact with the patient's eye?
A: If the tip of the probe is wet, the unit will measure the thickness of the drop of water on the tip. To avoid this, ensure
the tip is dry after cleaning or disinfecting.
16
16010-101 Rev. C
General Specifications
The IOPac displays thickness measurements to the nearest 1 µ m, and the expected accuracy of readings is ±5 µm over
the measurement range of 300 to 1000 µ m. This assumes that the actual speed of sound in the cornea corresponds with
that used in the measurements. The IOPac uses a speed of 1640 m/s, which is the most commonly accepted value for
corneal tissue. The accuracy of the reported measurements will be correspondingly affected if the actual speed of sound
differs, but one should expect less than 3% variation.
Specifications
Class II medical device per FDA classification
Class IIa medical device per European MDD 93/42EEC
Class II medical device per Canadian MDR SOR/98-282
Measurement range:
Accuracy:
Overall size:
Weight:
Probe tip diameter:
Probe ultrasound frequency:
Probe geometry:
300 to 1000 µ m
±5µ m
170 x 90 x 40 mm
200 g
2 mm
20 MHz
Angled or Straight Tip
The IOPac is type BF, which means that the transducer applied to the patient is isolated from the supply mains by
insulation such that the patient leakage current is less than the requirements of IEC60601-1.
The IOPac does not have or require any potential equalization (grounding) conductor.
Storage Conditions
Temperature
Humidity
5°C to 45°C
10%-90% relative humidity, non condensing
Operating Conditions
Temperature
Humidity
16010-101 Rev. C
10°C to 35°C
20%-80% relative humidity, non condensing
17
General Specifications (Continued)
Acoustic Output Powers
Acoustic Output
MI
ISPTA.3
(mW/cm2)
ISPPA.3
(W/cm2)
Global Maximum Value
0.155±0.014
3.72±0.98
12.2±2.0
0.040±0.010
0.040±0.010
Pr.3 (MPa)
0.70±0.07
Wc (mW)
Associated
Acoustic
Parameters
fc (MHz)
20.2±1.4
20.2±1.4
20.2±1.4
zsp (cm)
0.3
0.3
0.3
x-6
0.11
0.11
y-6
0.11
0.11
Beam Dimensions
(cm)
PD (ms)
0.07
0.07
PRF (Hz)
4600
4600
EBD (cm)
Operator Controls
Az
0.2
El
0.2
There are no operator controls that alter the acoustic output power
Uncertainties in the above values are reported as ± 1 standard deviation. The derated intensities were derived from those
measured in water based on the measured center frequency of the acoustic signal (fc, MHz) and the distance from the
transducer to the point at which the intensity was measured (d, cm) using the formula: Derated Intensity = Measured
Intensity *e-0.069*fc*d
In compliance with IEC61157 the peak rarefaction acoustic pressure (pr) is less than 1 MPa; the output beam intensity
(Iob) is less than 20 mW/cm2; and the spatial-peak temporal average derived intensity (Ispta) is less than 100 mW/cm2.
Definitions
ISPTA.3 - derated spatial-peak temporal-average intensity (milliwatts per square centimeter).
ISPPA.3 - derated spatial-peak pulse-average intensity (watts per square centimeter).
MI - Mechanical Index.
pr.3 - derated peak rarefactional pressure (megapascals) associated with the transmit pattern giving rise to the value
reported under MI.
Wo - ultrasonic power (milliwatts). For the operating condition giving rise to ISPTA.3, Wo is the total time-average power.
For the operating condition giving rise to ISPPA.3, Wo is the ultrasonic power associated with the transmit pattern giving rise
to the ISPPA.3 value.
fc - center frequency (MHz). For MI and ISPPA.3, fc is the center frequency associated with the transmit pattern giving rise
to the global maximum value of the respective parameter.
zsp - axial distance at which the reported parameter is measured (centimeters).
x-6, y-6 - are respectively the in-plane (azimuthal) and out-of-plane (elevational) -6 dB dimensions in the x-y plane where
zsp is found (centimeters).
PD - pulse duration (microseconds)
PRF - pulse repetition frequency (Hz)
EBD - entrance beam dimensions for the azimuthal and elevational planes (centimeters).
18
16010-101 Rev. C
General Specifications (Continued)
Tissue Exposure To Ultrasound Energy
The ultrasound energy emitted by the IOPac is of low intensity and will have no adverse effects on the patient and/or
operator. However, the operator is still cautioned to perform examinations using the principle of ALARA (As Low As
Reasonably Achievable). All examinations should be done so that the patient receives as little ultrasound radiation as
possible. Do not hold the probe against the eye or other tissue with the system activated except when making a
measurement. Do not make unnecessary measurements.
Ultrasonic Intensities
The IOPac has only one mode, and ultrasonic intensity settings are not under the control of the operator. Thus, the
values below are the values to be expected for a typical transducer.
In Water In the Eye
I SPTA, mw/cm2 5.14 5.13
I SPPA, W/cm2 10.23 10.22
MI(unitless) 0.171 0.170
Since the IOPac is a contact instrument, the energy will always be attenuated by the tissue when used as recommended.
However, since the focal length (point of maximum intensity) is very short (1 mm), and thus penetration into the eye is
limited, the water values are effectively the same as the tissue values, for all practical purposes. If more accuracy is
desired, the intensity in the eye at the transducer focus (corresponding to maximum intensity) may be calculated
according to the formula recommended by the FDA:
It=Iw x e(-0.069 x f x z)
where It is the estimated in situ intensity, Iw is the measured intensity in water at the focus of the transducer, f is the
ultrasonic frequency, and z is the distance from the face of the probe to the transducer focus, which is the point of
measurement (1mm). The nominal frequency of these transducers is 20 MHz. The actual frequency of a particular
transducer may vary from this value. The tissue calculations above were done with the measured frequency of the
transducer used for the tests.
16010-101 Rev. C
19
Appendix A – Installing IOPac Support on a Windows PC (HotSync)
It is good practice to backup or “synchronize” files from the Pachymeter’s memory to a PC to prevent loss of data due to
accidental deletion or unforeseen failures. To do this requires a PC with a Palm HotSync service. This includes a
HotSync Manager, an Install Tool and an IOPac support folder to hold backup files uploaded from the Pachymeter.
New IOPac owners should generally install these services shortly after receiving their IOPac Pachymeter by running the
Palm Installation Wizard on the supplied CD and installing the Palm Desktop.
Note: Experienced users who already have a version of the Palm Desktop installed on their PC to support other
handheld devices may want to skip re-installation and simply create a new user named IOPac via the Tools Users…
menu item.
Once the Palm Desktop software is installed, files may be transferred between the PC and the IOPac using HotSyncing.
What is HotSyncing
Users that have used Palm handheld devices (PDAs) will likely already be familiar with the process of ‘hotsyncing’.
Palm defines this as:
“the ability to synchronize data between one or more Palm OS Handhelds and Palm Desktop software. To synchronize
your data connect the HotSync cable to your computer and your handheld…”
At the heart of the IOPac Pachymeter is a Palm PDA. A HotSync service running on the PC should be used regularly to
backup software from the Pachymeter memory to the PC in case of loss of the Pachymeter database.
HotSyncing involves connecting the Pachymeter and the PC with the supplied USB cable, tapping the HotSync
icon on the Pachymeter and waiting while files on the Pachymeter are automatically synchronized with those
on the PC.
Installing HotSync Support on the PC
On newer Windows machines, the Palm installation autorun program will start automatically when the installation CD is
put into the CD drive. If this does not occur, simply use Explorer to open the CD and click on autorun.exe – then ‘Click To
Install’.
Proceed through the license acceptance screen.
When prompted for the installation location, it is best to
accept the default C:\Program Files\Palm folder as this
is the one referred to in the instructions in this manual.
It is important to select the correct user name when
asked. All IOPac Pachymeters have the user name
IOPac. Either select or create this as the user name
when prompted for a user name by the Install Wizard.
Then select the “Synchronize your handheld with Palm Desktop software” option, in the next screen.
- Continued on the next page -
20
16010-101 Rev. C
Appendix A (Continued)
The Install Wizard encourages the user to perform a first time HotSync operation after the software has been installed on
the PC. New IOPac users should go through this exercise as a way of both verifying the User Name they entered and
checking that the USB connection between the IOPac and the desktop computer is functioning correctly. Therefore,
when the “Synchronize your device and computer” screen appears, do not click Skip, but connect the USB cable and
follow the instructions to perform your first HotSync. Note that you need to be on the Home screen of the IOPac for the
HotSync button to work. You can get to the Home screen from the IOPac software by tapping on the Home button, which
looks like a house.
Users should skip the final Palm registration process that follows the HotSync step, by clicking Skip on the two following
screens.
- Continued on the next page 16010-101 Rev. C
21
Appendix A (Continued)
You should also select Skip on the following screen, as there is no additional software needed or recommended, and
then select Quit to exit the installation program.
22
16010-101 Rev. C
Appendix B - Procedures for Reinstalling Missing IOPac Program Files
IOPac Pachymeters come from the factory with all necessary pachymetry software pre-installed on the device. IOPac
owners usually consider re-installing the software files on the Pachymeter for one of two reasons:
To update to a newer IOPac version
To recover files lost due to accidental deletion
The IOPac comes from the factory with all necessary pachymetry software pre-installed in memory.
To reinstate missing Pachymeter files:
1. On a PC with the Palm Desktop software installed, launch the Palm Quick Install program. This may
be found as a shortcut on the PC Desktop, or via Window’s Start->Programs->Palm-> menu.
2. Insert the CD-ROM that came with the IOPac. Open the folder CD_drive:\IOPac\Programs. Select
the ten files in this folder and drag them onto the Palm Quick Install window.
3. Exit the Palm Quick Install program. If displayed, acknowledge the message saying that the file will
be installed during the next HotSync.
4. Perform a HotSync between the PC and the IOPac.
5. After a successful HotSync, tap the Home button on the IOPac. Six IOPac (Eye Icons) along with
one IOPac Language (Globe Icon) will appear on the Palm desktop. Select the IOPac Langauge
(Globe Icon) by tapping on the icon with the stylus. Select your preferred language and tap <ok>.
6. The PDA desktop will now show only the IOPac (Eye Icon) for the selected language.
7. To change the language, simply select the IOPac Language Icon and select desired language, there is
no need to re-load the software again.
16010-101 Rev. C
23
End User Software License Agreement
CAREFULLY READ THE FOLLOWING TERMS AND CONDITIONS BEFORE USING THIS PRODUCT. IT CONTAINS SOFTWARE, THE USE OF
WHICH IS LICENSED BY REICHERT, INC. TO YOU, THE ORIGINAL END USER, FOR YOUR USE ONLY AS SET FORTH BELOW. IF YOU DO
NOT AGREE TO THE TERMS AND CONDITIONS OF THIS AGREEMENT, DO NOT USE THE SOFTWARE. USING ANY PART OF THE
SOFTWARE INDICATES THAT YOU ACCEPT THESE TERMS.
Software included with this product that are not products of Reichert, Inc. are licensed to you by the software provider. Refer to the license
contained in the provider’s product for the terms of use before using such products.
LICENSE: Reichert, Inc. grants you a nonexclusive license to use the accompanying software program(s) (the “Software”) subject to the terms and
restrictions set forth in this License Agreement. You are not permitted to lease or rent (except under separate mutually agreeable terms set forth in
writing), distribute or sublicense the Software or to use the Software in a time-sharing arrangement or in any other unauthorized manner. Further, no
license is granted to you in the human readable code of the Software (source code). Except as provided below, this License Agreement does not
grant you any rights to patents, copyrights, trade secrets, trademarks, or any other rights in respect to the Software.
The Software is licensed to be used on any personal computer and/or any IOPac, provided that the Software is used only in connection with IOPac.
With respect to the Desktop Software, you may reproduce and provide one (1) copy of such Software for each personal computer or IOPac on which
such Software is used as permitted hereunder. With respect to the Device Software, you may use such Software only on one (1) IOPac. Otherwise,
the Software and supporting documentation may be copied only as essential for backup or archive purposes in support of your use of the Software
as permitted hereunder. You must reproduce and include all copyright notices and any other proprietary rights notices appearing on the Software on
any copies that you make.
Notwithstanding any other provision of this License Agreement, this License Agreement shall not be deemed to apply to the Adobe® Acrobat®
Reader software, Palm Inc. software or any other applications software licensed to you by third parties that is included on the same media as
Reichert, Inc. Software (“Other Software”) if the Other Software provides that the use of the Other Software is subject to the terms and conditions of
the third party’s license agreement.
NO ASSIGNMENT; NO REVERSE ENGINEERING: You may transfer the Software and this License Agreement to another party if the other party
agrees in writing to accept the terms and conditions of this License Agreement. If you transfer the Software, you must at the same time either
transfer all copies of the Software as well as the supporting documentation to the same party or destroy any such materials not transferred. Except
as set forth above, you may not transfer or assign the Software or your rights under this License Agreement.
Modification, reverse engineering, reverse compiling, or disassembly of the Software is expressly prohibited. However, if you are a European Union
(“EU”) resident, information necessary to achieve interoperability of the Software with other programs within the meaning of the EU Directive on the
Legal Protection of Computer Programs is available to you from Reichert, Inc. upon written request.
EXPORT RESTRICTIONS: You agree that you will not export or re-export the Software or accompanying documentation (or any copies thereof) or
any products utilizing the Software or such documentation in violation of any applicable laws or regulations of the United States or the country in
which you obtained them.
TRADE SECRETS; TITLE: You acknowledge and agree that the structure, sequence and organization of the Software are the valuable trade
secrets of Reichert, Inc. and its suppliers. You agree to hold such trade secrets in confidence. You further acknowledge and agree that ownership
of, and title to, the Software and all subsequent copies thereof regardless of the form or media are held by Reichert, Inc. and its suppliers.
TERM AND TERMINATION: This License Agreement is effective until terminated. You may terminate it at any time by destroying the Software and
documentation together with all copies and merged portions in any form. It will also terminate immediately if you fail to comply with any term or
condition of this License Agreement. Upon such termination you agree to destroy the Software and documentation, together with all copies.
GOVERNING LAW: This License Agreement shall be governed by the laws of New York State excluding their conflicts of law principles. The United
Nations Convention on Contracts for the International Sale of Goods (1980) is hereby excluded in its entirety from application to this License
Agreement.
LIMITED WARRANTY; LIMITATION OF LIABILITY: All warranties and limitations of liability applicable to the Software are as stated on the Limited
Warranty Card or in the product manual accompanying the Software. Such warranties and limitations of liability are incorporated herein in their
entirety by this reference.
SEVERABILITY: In the event any provision of this License Agreement is found to be invalid, illegal or unenforceable, the validity, legality and
enforceability of any of the remaining provisions shall not in any way be affected or impaired and a valid, legal and enforceable provision of similar
intent and economic impact shall be substituted there for.
ENTIRE AGREEMENT: This License Agreement sets forth the entire understanding and agreement between you and Reichert, Inc., supersedes all
prior agreements, whether written or oral, with respect to the Software, and may be amended only in a writing signed by both parties.
24
16010-101 Rev. C
Reichert Warranty
This product is warranted by Reichert, Inc. against defective material and workmanship under normal use for a period of one year
from the date of invoice to the original purchaser. (An authorized dealer shall not be considered an original purchaser.) Under this
warranty, Reichert’s sole obligation is to repair or replace the defective part or product at Reichert’s discretion.
This warranty applies to new products and does not apply to a product that has been tampered with, altered in any way, misused,
damaged by accident or negligence, or which has had the serial number removed, altered or effaced. Nor shall this warranty be
extended to a product installed or operated in a manner not in accordance with the applicable Reichert instruction manual, nor to a
product which has been sold, serviced, installed or repaired other than by a Reichert factory, Technical Service Center, or authorized
Reichert Dealer.
Lamps, bulbs, charts, cards and other expendable items are not covered by this warranty.
All claims under this warranty must be in writing and directed to the Reichert factory, Technical Service Center, or authorized
instrument dealer making the original sale and must be accompanied by a copy of the purchaser’s invoice.
This warranty is in lieu of all other warranties implied or expressed. All implied warranties of merchantability or fitness for a particular
use are hereby disclaimed. No representative or other person is authorized to make any other obligations for Reichert. Reichert shall
not be liable for any special, incidental, or consequent damages for any negligence, breach of warranty, strict liability or any other
damages resulting from or relating to design, manufacture, sale, use or handling of the product.
PATENT WARRANTY
If notified promptly in writing of any action brought against the purchaser based on a claim that the instrument infringes a U.S. Patent,
Reichert will defend such action at its expense and will pay costs and damages awarded in any such action, provided that Reichert
shall have sole control of the defense of any such action with information and assistance (at Reichert’s expense) for such defense,
and of all negotiation for the settlement and compromise thereof.
PRODUCT CHANGES
Reichert reserves the right to make changes in design or to make additions to or improvements in its products without obligation to
add such to products previously manufactured.
CLAIMS FOR SHORTAGES
We use extreme care in selection, checking, rechecking and packing to eliminate the possibility of error. If any shipping errors are
discovered:
1.
Carefully go through the packing materials to be sure nothing was
inadvertently overlooked when the unit was unpacked.
2.
Call the dealer you purchased the product from and report the
shortage. The materials are packed at the factory and none
should be missing if the box has never been opened.
3.
Claims must be filed within 30 days of purchase.
CLAIMS FOR DAMAGES IN TRANSIT
Our shipping responsibility ceases with the safe delivery in good condition to the transportation company. Claims for loss or damage
in transit should be made promptly and directly to the transportation company.
If, upon delivery, the outside of the packing case shows evidence of rough handling or damage, the transportation company’s agent
should be requested to make a “Received in Bad Order” notation on the delivery receipt. If within 48 hours of delivery, concealed
damage is noted upon unpacking the shipment and no exterior evidence of rough handling is apparent, the transportation company
should be requested to make out a “Bad Order” report. This procedure is necessary in order for the dealer to maintain the right of
recovery from the carrier.
16010-101 Rev. C
25
Notes
26
16010-101 Rev. C
Notes
16010-101 Rev. C
27
Reichert, Inc.
3362 Walden Ave
Depew, NY 14043
USA
Toll Free 888-849-8955
Phone: 716-686-4500
Fax: 716-686-4545
email: [email protected]
www.reichert.com
Reichert GmbH
Hubertstrasse 2
D-82229 Seefeld
Germany
Tel: +49 8152 993530
Fax: +49 8152 993535
ISO-9001/13485 Registered
May 2009
28
16010-101 Rev. C