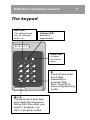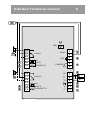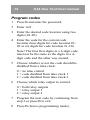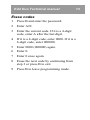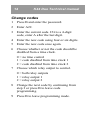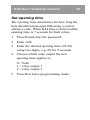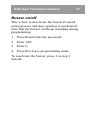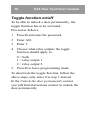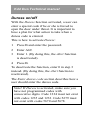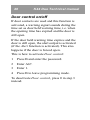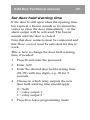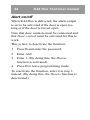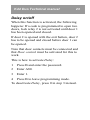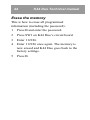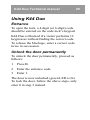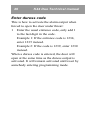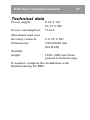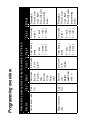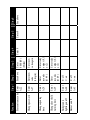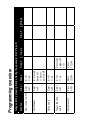
1
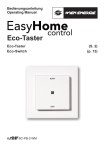
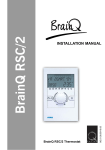
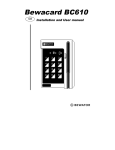
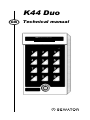
K44 Duo GB Technical manual Copyright © June 2001 Bewator AB, Solna, Sweden. Material from the K44 Duo Technical manual may only be copied with the consent in writing of Bewator. Bewator reserves the right to alter both the content of the manual and the design of the product. Document number: 80719-3 Bewator AB are part of the Swedish Bewator Group AB, which develops and markets a complete security product range that includes access control and alarm. Sales, installation and servicing are handled by a national dealer network. Actions (such as unauthorised manipulation, copying etc.), must not be taken with the software contained in the products and systems. Such actions are regarded as copyright violation and may result in imprisonment or fines and may likewise lead to an obligation to pay damages and compensation for using the software. K44 Duo Technical manual 3 What is K44 Duo? .................................. 4 The keypad............................................. 7 Wiring ..................................................... 8 Programming ....................................... 10 Buzzer and LEDs............................... 10 Choose password .............................. 11 Change password .............................. 11 Program codes .................................. 12 Erase codes....................................... 13 Change codes.................................... 14 Set opening time................................ 15 Background lighting on/off ................. 16 Buzzer on/off...................................... 17 Toggle function on/off ........................ 18 Duress on/off ..................................... 19 Door control on/off ............................. 20 Set door held warning time ................ 21 Alert on/off ......................................... 22 Delay on/off........................................ 23 Erase the memory ............................. 24 Using K44 Duo..................................... 25 Entrance ............................................ 25 Unlock the door permanently ............. 25 Enter duress code.............................. 26 Technical data ..................................... 27 Programming overview....................... 28 4 K44 Duo Technical manual What is K44 Duo? K44 Duo is a compact code lock with two relay outputs. This makes K44 Duo capable of controlling two doors – or one door and an optional function, e.g. a light switch. Either a four- or a six-digit code can be used to open connected doors. All programming is done from the keypad. Open two doors using one code The advantage of using two relay outputs is that two functions can be activated at the same time, using only one code. For example, the code can open the lock and turn on a light switch at the same time. Another setup is to connect the code lock to two doors. One code is programmed to operate both doors, while the other only opens one of the doors. If the code is programmed to open both doors, you can set K44 Duo so that the other door does not open until the first door has been opened and closed (see the Delay section). For each code, choose whether to activate both relay outputs, only one or only the other. K44 Duo Technical manual 5 Disable the codes whenever needed K44 Duo offers the possibility to disable codes at certain times. For example, the cleaning staff’s access to the building can be limited to certain hours, while tenants/staff can have access to the door 24 hours a day. By connecting two time clocks to K44 Duo, three different time zones can be used to control the codes: one controlled by time clock 1, one controlled by time clock 2 and one that is valid 24 hours a day, i.e. no time control. Duress or alert K44 Duo is equipped with an output that can be activated for one of the following reasons: • A user enters a duress code (see the Duress on/off section) or • The door held warning time expires or the door is forced open (see the Alert on/off section) Choose which alternative to use. Then connect e.g. a burglar alarm or similar to the output. 6 K44 Duo Technical manual Zero opening To make entrance easier, e.g. during office hours, connect an external contact. Then use the contact to activate or deactivate zero opening, i.e. opening the door by pressing the zero button on the keypad. Note that this is only applies to relay output 1. Unlock the door permanently If the Toggle function is activated, the code can be used to unlock the door. The door remains open until a valid code is entered once again (see the Toggle on/off section). Door bell If needed, a door bell can be connected to K44 Duo. To ring the bell, the visitor presses the button labelled with a bell on the code lock’s keypad. K44 Duo Technical manual The keypad Red LED For optional use, e.g. to indicate alarm on. Yellow LED Indicates keypresses. Green LED Lit when the lock is open. 1 2 3 4 5 6 7 8 9 0 B =A Functions as a door bell and starts the sequence telling K44 Duo what you want to program, e.g. A21 to program codes. B Press B and enter the 6-digit password to program K44 Duo. Press B to leave programming mode. 7 8 K44 Duo Technical manual Wiring The numbers refer to the diagram on the right. 1 2 3 4 5 6 7 8 9 10 11 Power in, terminal nos 1(+) and 2. 12-24 V. Input for extra LED (red), terminal nos 3 and 4. 10-35 V DC. Tamper switch, terminal nos 5 and 6. Closed when the housing is closed. Code disabling from external time clock. Input 1: Close terminal nos 8 and 7. Input 2: Close terminal nos 9 and 7. Output for alert or duress. Use E7 relay. Connect between terminal nos 10 and 1(+). Contact for zero (0) opening. Close terminal nos 11 and 7. Output for Door bell (buzzer). Use E7 relay. Connect between terminal nos 12 and 1(+). Input for door contacts. The contact is closed when the door is closed. Terminal nos 13 and 15 (19 and 21 respectively). Exit button. The door opens on closing terminal nos 14 and 15 (20 and 21 respectively). Electric locking device. Dashed line refers to locks with failsafe function. SW1 push button. Used when choosing password and erasing memory. K44 Duo Technical manual 9 15 11 SW1 24 23 22 10 9 8 LOCK 1 21 20 EXIT 1 19 CONTACT 1 0V 18 10 9 8 12-24V LED TAMPER 1 2 3 4 5 6 1 2 7 8 9 EXIT 2 ”0” 10 11 CONTACT 2 12 0V 17 16 15 LOCK 2 14 13 0V 1 2 3 4 5 6 7 10 K44 Duo Technical manual Programming Before you start programming K44 Duo, make a note of the codes to be used, to what timing group they should belong and which relay output they should control. At the back of this manual you will find a chart designed for this purpose. Look at the chart as you program K44 according to the instructions below. Buzzer and LEDs During programming you will be guided by the buzzer and the LEDs. In programming mode before a function is chosen: Green and yellow LED flashes. During programming: Yellow LED goes out. Green LED is lit. Correct instruction: Confirmed by a rising signal consisting of two quick beeps. Faulty instruction: Confirmed by a falling signal consisting of two quick beeps. Note! During programming mode, if a button is not pressed within 20 seconds, the code lock goes back to normal operation. K44 Duo Technical manual 11 Choose password The first thing to do before you can start programming is to choose a password. 1 Press and hold the SW1 button on the code lock’s circuit board. Both LEDs are lit. 2 Enter a 6-digit password. 3 Make a note of the new password in the chart at the back of the manual. Change password 1 Press B and enter the current password. 2 Enter A27. 3 Enter the new password. A warning tone is heard. 4 Enter the new password once again. 5 Press B to leave programming mode. 6 Make a note of the new password in the chart at the back of the manual. 12 K44 Duo Technical manual Program codes 1 Press B and enter the password. 2 Enter A21. 3 Enter the desired code location using two digits (01-30). 4 Enter the code for the current code location (four digits for code location 0120 or six digits for code location 21-30). Note! The four first digits in a 6-digit code must not be the same as the digits in a 4digit code and the other way around. 5 Choose whether or not the code should be disabled from a time clock. 0 = no time control 1 = code disabled from time clock 1 2 = code disabled from time clock 2 6 Choose which relay output to control. 0 = both relay outputs 1 = relay output 1 2 = relay output 2 7 Program the next code by continuing from step 3 or press B to exit. 8 Press B (leaves programming mode). K44 Duo Technical manual Erase codes 1 Press B and enter the password. 2 Enter A22. 3 Enter the current code. If it is a 4-digit code, enter A after the last digit. 4 If it is a 4-digit code, enter 0000. If it is a 6-digit code, enter 000000. 5 Enter 0000 (000000) again. 6 Enter 0. 7 Enter 0 once again. 8 Erase the next code by continuing from step 3 or press B to exit. 9 Press B to leave programming mode. 13 14 K44 Duo Technical manual Change codes 1 Press B and enter the password. 2 Enter A22. 3 Enter the current code. If it is a 4-digit code, enter A after the last digit. 4 Enter the new code using four or six digits. 5 Enter the new code once again. 6 Choose whether or not the code should be disabled from a time clock. 0 = no time control 1 = code disabled from time clock 1 2 = code disabled from time clock 2 7 Choose which relay output to control. 0 = both relay outputs 1 = relay output 1 2 = relay output 2 8 Change the next code by continuing from step 3 or press B to leave code programming. 9 Press B to leave programming mode. K44 Duo Technical manual 15 Set opening time The opening time determines for how long the lock should remain open following a correct entrance code. When K44 Duo is delivered the opening time is 7 seconds for both relays. 1 Press B and enter the password. 2 Enter A28. 3 Enter the desired opening time (01-99) using two digits, e.g. 09 for 9 seconds. 4 Choose which relay output the new opening time applies to: 0 = both 1 = relay output 1 2 = relay output 2 5 Press B to leave programming mode. 16 K44 Duo Technical manual Background lighting on/off This is how to turn off the keypad’s background lighting, if needed. 1 Press B and enter the password. 2 Enter A60. 3 Enter 0. 4 Press B to leave programming mode. To reactivate background lighting, press 1 in step 3 instead. K44 Duo Technical manual 17 Buzzer on/off This is how to deactivate the buzzer if sound on keypresses and door opening is not desired. Note that the buzzer will keep sounding during programming. 1 Press B and enter the password. 2 Enter A65. 3 Enter 0. 4 Press B to leave programming mode. To reactivate the buzzer, press 1 in step 3 instead. 18 K44 Duo Technical manual Toggle function on/off To be able to unlock a door permanently, the toggle function has to be activated. Proceed as follows: 1 Press B and enter the password. 2 Enter A81. 3 Enter 1. 4 Choose what relay outputs the toggle function should apply to. 0 = both 1 = relay output 1 2 = relay output 2 5 Press B to leave programming mode. To deactivate the toggle function, follow the above steps, only enter 0 in step 3 instead. In the Unlock the door permanently section you will find instructions on how to unlock the door permanently. K44 Duo Technical manual 19 Duress on/off With the Duress function activated, a user can enter a special code if he or she is forced to open the door under threat. It is important to have a plan for what action to take when a duress code is entered. This is how to activate Duress: 1 Press B and enter the password. 2 Enter A69. 3 Enter 1. (By doing this, the Alert function is deactivated). 4 Press B. To deactivate the function, enter 0 in step 3 instead. (By doing this, the Alert function is reactivated). The Enter duress code section describes how a user should enter the duress code. Note! If Duress is activated, make sure you have not programmed codes with consecutive digits. Code 1234 must not exist with codes 1235 and 1233. Code 5679 must not exist with codes 5670 and 5678. 20 K44 Duo Technical manual Door control on/off If door contacts are used and this function is activated, a warning signal sounds during the time set as door held warning time, i.e. when the opening time has expired and the door is still open. If the door held warning time expires and the door is still open, the alert output is activated (if the Alert function is activated). This also happens if the door is forced open. This is how to activate Door control: 1 Press B and enter the password. 2 Enter A67. 3 Enter 1. 4 Press B to leave programming mode. To deactivate Door control, press 0 in step 3 instead. K44 Duo Technical manual 21 Set door held warning time If the door is still open when the opening time has expired, a buzzer sounds as to remind the visitor to close the door immediately – or the alarm output will be activated. The buzzer sounds until the door is closed. Note that door contacts must be connected and that Door control must be activated for this to work. This is how to change the door held warning time, if needed: 1 Press B and enter the password. 2 Enter A29. 3 Enter the desired door held warning time (01-99) with two digits, e.g. 09 for 9 seconds. 4 Choose to which relay outputs the new door held warning time should apply: 0 = both 1 = relay output 1 2 = relay output 2 5 Press B to leave programming mode. 22 K44 Duo Technical manual Alert on/off When K44 Duo is delivered, the alarm output is set to be activated if the door is open too long or if the door is forced open. Note that door contacts must be connected and that Door control must be activated for this to work. This is how to deactivate the function: 1 Press B and enter the password. 2 Enter A69. 3 Enter 1. (By doing this, the Duress function is activated). 4 Press B to leave programming mode. To reactivate the function, enter 0 in step 3 instead. (By doing this, the Duress function is deactivated). K44 Duo Technical manual 23 Delay on/off When this function is activated, the following happens: If a code is programmed to open two doors, lock relay 2 is not activated until door 1 has been opened and closed. If door 2 is opened with the exit button, door 2 has to be opened and closed before door 1 can be opened. Note that door contacts must be connected and that Door control must be activated for this to work. This is how to activate Delay: 1 Press B and enter the password. 2 Enter A80. 3 Enter 1. 4 Press B to leave programming mode. To deactivate Delay, press 0 in step 3 instead. 24 K44 Duo Technical manual Erase the memory This is how to erase all programmed information (including the password): 1 Press B and enter the password. 2 Press SW1 on K44 Duo’s circuit board. 3 Enter 112186. 4 Enter 112186 once again. The memory is now erased and K44 Duo goes back to the factory settings. 5 Press B. K44 Duo Technical manual 25 Using K44 Duo Entrance To open the lock, a 4-digit (or 6-digit) code should be entered on the code lock’s keypad. K44 Duo is blocked if a visitor performs 12 keypresses without finding the correct code. To release the blockage, enter a correct code twice in succession. Unlock the door permanently To unlock the door permanently, proceed as follows: 1 Press B. 2 Enter the entrance code. 3 Enter 1. The door is now unlocked (green LED is lit). To lock the door, follow the above steps, only enter 0 in step 3 instead. 26 K44 Duo Technical manual Enter duress code This is how to activate the alarm output when forced to open the door under threat: 1 Enter the usual entrance code, only add 1 to the last digit in the code. Example 1: If the entrance code is 1234, enter 1235 instead. Example 2: If the code is 1239, enter 1230 instead. When a duress code is entered, the door will open at the same time as the duress output is activated. It will remain activated until reset by somebody entering programming mode. K44 Duo Technical manual 27 Technical data Power supply: 8-24 V AC 10-35 V DC Power consumption: 75 mA. Maximum load over the relay contacts: 2 A 28 V DC Dimensions: Suitable height: 140x80x40 mm (HxWxD) 1200-1400 mm from ground to bottom edge If needed, complete the installation with flushmounting kit BB3. Step 1 Enter A21 Enter A22 Function New entrance code Change entrance code Enter old code. 4-digit code: Enter code + A Enter code location (2 digits). Code locations 21-30 = 6-digit codes. Step 2 Enter relay output 0 = both 1 = relay 1 2 = relay 2 Enter timing group 0 = none 1 = group 1 2 = group 2 Next code: Proceed from step 2. Exit: Press B (back to programming mode). 0 = both 1 = relay 1 2 = relay 2 0 = none 1 = group 1 2 = group 2 Enter new code (twice) Step 6 Next code: Proceed from step 2. Exit: Press B (back to programming mode). Step 5 Enter relay output Step 4 Enter timing group Step 3 Enter code (4 or 6 digits) Always start by pressing B and entering the password. Exit: Press B. Programming overview Step 1 Enter A22 Enter A27 Enter A28 Enter A29 Enter A60 Enter A65 Function Erase entrance code Change password Change opening time Change door held warning time Background lighting on/off Buzzer on/off Step 2 0 = off 1 = on 0 = off 1 = on Enter seconds (01-99) Enter seconds (01-99) Enter new code (6 digits) See above Enter relay output (0, 1 or 2) Enter relay output (0, 1 or 2) Enter new code again Enter 0000 (00) (twice) Step 3 Step 4 Enter 0 Step 5 Enter 0 Step 6 See above Step 1 Enter A67 Enter A69 Enter A80 Enter A81 Press SW1 Function Door control on/off Alert/Duress Delay on/off Toggle function on/off Erase memory Enter 112186 0 = off 1 = on 0 = off 1 = on 0 = alert on, duress off 1 = duress on, alert off 0 = off 1 = on Step 2 Enter 112186 Enter relay output (0,1 or 2) Step 3 Step 4 Always start by pressing B and entering the password. Exit: Press B. Programming overview Step 5 Step 6 4 6 Password: Loc Code 01 02 03 04 05 06 07 08 09 10 11 12 13 14 15 16 17 18 19 20 21 22 23 24 25 26 27 28 29 30 Timing group None ❏ 1 ❏ 2 ❏ None ❏ 1 ❏ 2 ❏ None ❏ 1 ❏ 2 ❏ None ❏ 1 ❏ 2 ❏ None ❏ 1 ❏ 2 ❏ None ❏ 1 ❏ 2 ❏ None ❏ 1 ❏ 2 ❏ None ❏ 1 ❏ 2 ❏ None ❏ 1 ❏ 2 ❏ None ❏ 1 ❏ 2 ❏ None ❏ 1 ❏ 2 ❏ None ❏ 1 ❏ 2 ❏ None ❏ 1 ❏ 2 ❏ None ❏ 1 ❏ 2 ❏ None ❏ 1 ❏ 2 ❏ None ❏ 1 ❏ 2 ❏ None ❏ 1 ❏ 2 ❏ None ❏ 1 ❏ 2 ❏ None ❏ 1 ❏ 2 ❏ None ❏ 1 ❏ 2 ❏ None ❏ 1 ❏ 2 ❏ None ❏ 1 ❏ 2 ❏ None ❏ 1 ❏ 2 ❏ None ❏ 1 ❏ 2 ❏ None ❏ 1 ❏ 2 ❏ None ❏ 1 ❏ 2 ❏ None ❏ 1 ❏ 2 ❏ None ❏ 1 ❏ 2 ❏ None ❏ 1 ❏ 2 ❏ None ❏ 1 ❏ 2 ❏ Relay 1❏ 2❏ 1❏ 2❏ 1❏ 2❏ 1❏ 2❏ 1❏ 2❏ 1❏ 2❏ 1❏ 2❏ 1❏ 2❏ 1❏ 2❏ 1❏ 2❏ 1❏ 2❏ 1❏ 2❏ 1❏ 2❏ 1❏ 2❏ 1❏ 2❏ 1❏ 2❏ 1❏ 2❏ 1❏ 2❏ 1❏ 2❏ 1❏ 2❏ 1❏ 2❏ 1❏ 2❏ 1❏ 2❏ 1❏ 2❏ 1❏ 2❏ 1❏ 2❏ 1❏ 2❏ 1❏ 2❏ 1❏ 2❏ 1❏ 2❏