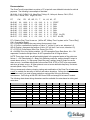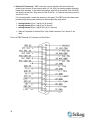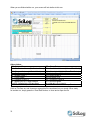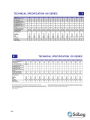
1
™
ChemTec
Operations Manual
ChemTec Applications:
Bioreactor / Fermentor
Programmable Mass Flow Metering
Programmable Volume Flow Metering
Diafiltration Metering
pH Maintenance / Titration
SciLog Manual, Software & Applications Copyrighted
Rev E2B, 12/09, Firmware Version 0.20F, P/N 300-030
(This Page Intentionally Left Blank)
2
3
Precautions:
READ this manual
BEFORE operating or
servicing this
equipment.
FOLLOW these
instructions carefully.
SAVE this manual for
future reference.
DO NOT allow untrained
personnel to operate,
clean, inspect, service
or tamper with this
equipment.
ALWAYS DISCONNECT
this equipment from the
power source before
cleaning or performing
maintenance.
CALL SCILOG for parts,
information and
service.
4
PRÉCAUTIONS:
LISEZ ce manuel AVANT de
faire fonctionner ou
d’entretenir cet équipement.
SUIVEZ attentivement ces
instructions.
CONSERVEZ ce manuel
pour
future référence.
NE LAISSEZ PAS du
personnel non qualifié
utiliser, nettoyer, inspecter,
entretenir, réparer ou
manipuler cet équipement.
DÉBRANCHEZ TOUJOURS
cet équipement de la source
de courant avant de
nettoyer ou d’exécuter
l’entretien.
APPELEZ SCILOG pour
pièces détachées,
renseignements et
entretien.
5
Table of Contents
Precautions .................................................................................................................... 4 Table of Contents .......................................................................................................... 6 Standards: ..................................................................................................................... 8 Installation & Start-Up: ................................................................................................. 8 Maintenance & Cleaning:.............................................................................................. 8 Introduction: .................................................................................................................. 8
ChemTec Maintenance ............................................................................................... 10 ChemTec System Specifications: .............................................................................. 12 Installation of the USB Driver: ................................................................................... 14
Start-up: “Volume Flow Metering into a Bioreactor or Fermentor” ........................ 15 Start-up: “Mass Flow Metering into a Bioreactor or Fermentor” ............................ 20 Start-up: “Simple pH Maintenance of a “Base” reaction” ....................................... 25
Part A: ChemTec Hardware ........................................................................................ 29 1.0 ChemTec Pump Heads: Overview ....................................................................... 29 1.1 PumpSense™: Pump Overload Protection ........................................................ 29 1.2 Pump Head/Motor Options: Summary ............................................................... 30 2.0 Front Panel: Data Entry & Display ....................................................................... 32 3.0 Back Panel: Interface Options .............................................................................. 33 4.0 SciLog I/O Adapter Module (Optional Accessory) ................................................ 36 4.1 Analog Input Signals: ........................................................................................ 36 4.2 Contact Closures (max. 2 Amperes): ................................................................ 36
Part B: ChemTec Software ......................................................................................... 38 1.0 Overview: Main Menu.......................................................................................... 38 2.0 MASS FLOW: How to generate a MASS FLOW program. ................................... 41 2.1 MASS FLOW Mode: Setup / Alarms / Program Editing .................................... 43 2.2 Mass Flow Mode: Execute Display.................................................................... 44 2.3 Front Panel: Lock-out: ....................................................................................... 44 3.0 VOLU FLOW: How to generate a VOLUME FLOW program. .............................. 46 3.1 VOLU FLOW: How to Re-Calibrate the flow rate curves. .................................. 47 3.2 VOLU FLOW: Setup / Alarms / Program Editing ............................................... 49 4.0 Diafiltration Mode: Edit ......................................................................................... 51 4.1 Diafiltration Mode: Alarms / Limits ..................................................................... 53 4.2 Diafiltration Mode: Execute Display. .................................................................. 53 5.0 pH CONTROL MODE: Edit .................................................................................. 55 5.1 pH CONTROL Mode: Alarms / Limits ................................................................ 57 5.2 pH CONTROL Mode, Execute Display .............................................................. 57 6.0 ANALOG Mode: ................................................................................................... 58 7.0 Manual Mode:....................................................................................................... 58 8.0 SETUP Mode: ...................................................................................................... 60 8.1 Setup: Scale ...................................................................................................... 61 8.2 Setup: Clock ...................................................................................................... 63 8.3 Setup: Test Mode: ............................................................................................. 64 8.4 Setup: Ethernet ................................................................................................. 65 8.5 Setup: Printer .................................................................................................... 66 6
8.6 Setup: Analog .................................................................................................... 67 8.7 Setup: Pressure Sensor .................................................................................... 68 8.7 Setup: Pressure Sensor, Calibration ................................................................. 69 8.8 Setup: Pump...................................................................................................... 70 8.8 Setup: Pump:..................................................................................................... 71 9.0 Data Acquisition: .................................................................................................. 72 9.1 ChemTec SciDoc Data Collection Software: ..................................................... 73 9.2 Uploading/Downloading of Programs ................................................................ 78 9.3 Win95/98 HyperTerminal Settings: .................................................................... 79 ChemTec Program Statements: ................................................................................. 80 ChemTec Program Examples: ................................................................................... 81
ChemTec™ Metering Applications............................................................................. 82 1.0 Bioreactor Feed Application: General Information ................................................ 82 2.0 Linear, Volumetric Bioreactor Feed: ..................................................................... 83 3.0 Exponential Feed: Mass Flow, Example #1 ......................................................... 85 4.0 Exponential Feed: Mass Flow, Example #2 ......................................................... 87 5.0 Preparative Chromatography: Step Gradients ..................................................... 89 6.0 Preparative Chromatography: Linear Gradients ................................................... 91
Appendix “A” ............................................................................................................... 93 Tandem™ Pump Head Installation and Maintenance ................................................ 93
Appendix “B” ............................................................................................................... 96
RH Series Pump Head Installation and Maintenance ................................................ 96
Appendix “C” ............................................................................................................. 105 Magnetic Gear Pump Head Installation and Maintenance ....................................... 105 7
Standards:
The ChemTec™ conforms to the following standards:
EN 61326-1:2006, Class B
EN 6100-3-2:2006
EN 6100-3-3:1995 +A1:2001 +A2:2006
EN 61010-1 Issued: 2001/03/01
UL 61010-1 Issued: 2004/07/12 Ed.2
And is certified to: CAN/CSA-C22.2 No 61010-1 Ed.2
Installation & Start-Up:
Installation of the ChemTec™ System must be carried out only by trained
personnel in accordance with the relevant regulations and this operations
manual.
Make sure that the technical specifications and input ratings of the ChemTec™ are observed.
See “ChemTec™ Specifications”.
The protection provided by this equipment may be impaired if the ChemTec™ is used in a
manner inconsistent with this manual or for purposes not specified by the manufacturer.
Maintenance & Cleaning:
The ChemTec™ is practically maintenance free. The SciPres™ disposable sensors used with
the system come pre-calibrated from the factory and require no maintenance. The Tandem™
peristaltic pump head should periodically have tubing debris cleaned from it, but requires no
lubrication.
To remove dust, dirt and stains, the outer surfaces of the ChemTec™ may be wiped using a
soft, non-fluffing cloth moistened with water. If required, you may also use a mild detergent or 2propanol.
The SciPres™ disposable sensors may be sanitized with 0.1 Molar NaOH, or 2-propanol. They
may be autoclaved up to twice, and newer units with grey rings around the cable connector may
be gamma irradiated.
Introduction:
You will find the ChemTec™ System easy to use. The state-of-the-art hardware and software
design of the ChemTec™ allows you to control measure and document your filtration
processes. With proper maintenance, the ChemTec™ System will provide many years of
excellent service and performance.
8
Please read the following instructions carefully!
Inspections: Unpack the ChemTec and accessories carefully from the carton. Cross-check the
contents against your purchase order to verify that all parts are included and undamaged.
Please do the inspection now, even if the ChemTec is not used immediately. Many carriers
must receive damage claims within seven days of delivery. Please retain all packing material so
unit may be shipped safely, if necessary.
SciLog Customer Service:
If you need assistance, please call: 1-800-955-1993 or 1-608 –824-0500
SciLog Customer Service personnel will be able to serve you more efficiently if you have the
following information:
• Serial number (back panel) and model name of the equipment.
• Installation procedure you used.
• Concise list of symptoms.
• List of operating procedures and conditions you were using when problem arose.
Warranty Repair: Units covered under warranty will be repaired and returned to you at no
charge. If you have any questions about applicability, please contact SciLog.
Non-warranty Repair: For out-of-warranty repair, contact the SciLog Customer Service
Department. A SciLog representative will discuss service options with you and can assist in
making arrangements to return the equipment, if necessary.
Repair Procedure: Before returning any SciLog equipment for repair or service, contact SciLog
to obtain an RGA Number. To return a piece of equipment:
Carefully pack the unit to prevent damage in transit. Check with SciLog regarding the proper
method of shipment. No responsibility is assumed by SciLog for damage caused by improperly
packaged instruments. Indicate the RGA Number on the carton and on the packing slip. Always
insure for the replacement value of the unit.
Include a description of the symptoms, your name, return address, phone number, RGA number
and purchase order to cover repair costs, return and shipping charges, if your institution
requires it. Ship to:
SciLog Inc.
8845 S. Greenview Drive.; Suite 4
Middleton, WI 53562-2562
9
ChemTec Maintenance
A factory cleaning, testing and recalibration should be performed to your ChemTec at least once
a year.
Fill Out this Form & Fax it to SciLog at FAX: 608-824-0509.
SciLog will send you a loaner pump for one week if you request it.
This price includes the cost of next day shipping & insurance to send
the loaner to you.
$350/week
Use the packing material from the loaner & send your pump to:
SciLog Inc.
8845 S. Greenview Dr, Suite 4
Middleton, WI, 53562
SciLog will disassemble, clean and lubricate the pump head,
$350
change the seals if appropriate, test, recalibrate and generate a Performance Validation for your
ChemTec. If your pump needs a new motor or pump head, then we will contact you & get your
approval before replacing them. A new motor is $425; a new piston head is $695; a new
peristaltic Tandem head is $255. Most of the time, cleaning and recalibration is all that is
needed to insure many years of service. Price includes the cost of SciLog shipping your pump
back.
Once you receive your cleaned/repaired ChemTec, use the packing material to repack the
loaner and send it back to SciLog.
Assuming no replacement parts are required,
Total Cost, including Loaner and Shipping:
Please Check all of the following that are appropriate:
___ Yes, I need my ChemTec cleaned and recalibrated.
___ Yes, I need a loaner ChemTec sent to me.
PO# ________________ or Credit Card# _________________
Credit Card Expiration Date _______________
Send the Loaner and/or Repaired / Cleaned ChemTec to:
Company: __________________________________________
Address: __________________________________________
__________________________________________
Contact: __________________________________________
Contact Phone #: ______________
Contact Fax #: ________________
Contact Email: _______________________________
Call SciLog Customer Service at 800-955-1993 with any questions.
10
$700
(This Page Intentionally Left Blank)
11
ChemTec System Specifications:
Mechanical:
¾
¾
¾
¾
Dimensions: Width: 5.75 in (14.6cm); Height: 8.5 in (212.6); Depth: 11in (27.9)
Weight: 14 lbs (6.4kg)
Enclosure: Aluminum / Steel; Corrosion Resistant, Recessible Handle
Accommodates a range of motor / pump heads combinations, including:
•
•
•
Peristaltic pump heads, TANDEM model 1081 and 1082, either with 8, 160, or 600
RPM motors.
Piston pump heads, FMI model RH1, RH0 or RH00, either with 160, 600 or 3400
RPM motors.
Magnetic gear pump heads, Micropump models 040, 120, 184, 187, 200 & 201,
with 3400 RPM motors.
¾ Pressure Sensors: Accommodates one SciPres ™ Disposable pressure sensor using
the P1 Port. P2 and P3 ports may be used as alternates. Pressure is used for
monitoring and alarms. The user selects P1, P2 or P3 as the pressure source.
¾ Pressure Displayed with a resolution of 0.1 psi; choice of bar, psi, kpa.
¾ Pressure Range: The default pressure range of the sensors is 0-60psi, and is
calibrated at the factory. Most peristaltic pumps generate pressures up to 40 psi. If you
have need for higher pressures, contact SciLog Customer Service for assistance.
Electrical:
¾ Power: 90 - 264 V , 47-63 Hz, 75 VA, listed Class 2 switching power supply; double
fused: 1A-T, 250V (CE: IR35A 250V ).
¾ Operational Range: 4 to 40° C.
¾ Motor: Choice of four motors: 8, 160, 600 and 3400 RPM at 24V
, 3.8 Amperes,
Variable Pump Speed optically encoded, servo-controlled motors.
¾ Encoder: 100 lines/rev. for 600-RPM motor. 120 lines per/rev. for all other motors.
¾ I/O Ports:
o “Printer”, Female DB9 connector for data collection with Printer or PC.
o “S1”, Male DB9 connector for RS-232 connection to an electronic scale.
o “S2”, Male DB9 connector, Not utilized on ChemTec. Do not remove the cover.
o “S3”, Male DB9 connector, Not utilized on ChemTec. Do not remove the cover.
o “External I/O”, Female DB37 connector used for remote On/Off control of ChemTec
via footswitch, or for Analog interface with 4-20 ma sources, A1, A2, A3.
o “V”, Female DB15 connector. Used for control of 6-way stream selection valve.
o “Temperature”, 2 pin Conxall connector for SciTemp™ disposable Temperature
Sensor.
o “P1, P2, P3”, RJ11 connectors used for SciPres disposable Pressure Sensors.
o “USB”, USB-A connector, used for RS-232 data collection with a PC.
o “Ethernet”, RJ-45 connector, used for Modbus TCP/IP connection with system.
(when available)
¾ Display: Two line LCD, 20 characters each, back-lit.
¾ Data Entry: Membrane keyboard with auditory feedback.
12
ChemTec Software:
Main menu with the following six operational modes:
¾ Mass Flow Mode: Programmable gravimetric metering, which requires an electronic
balance.
¾ Volume Flow Mode: Programmable volumetric metering.
¾ Perfusion Mode: Maintains weight of Reaction vessel, and requires an electronic
balance. Can be additive or subtractive.
¾ pH Control: Provides control of pH Maintenance and/or End Point Titration via
connection to pH meter with 4-20 ma output.
¾ Analog: Provides direct proportional control of motor speed based upon an external 420 mA signal.
¾ Manual: Simple pump control; no alarms.
¾ Setup: Selection of user preferences and interface options.
Documentation Software for PC:
SciDoc Excel Spreadsheet with custom macros and WinWedge interface software for data
compilation. Sent to you ready to use.
¾ Complete process analysis with graphing of data.
¾ Real-time verification and documentation of process parameters.
¾ Includes graph of:
o
o
Pump Rate (PR) and Pressure (P1) vs. Time
Additional graphs can be made by the end user.
Display, Print out and Excel Abbreviations:
MT = Military Time, HH:MM:SS
RT = Run Time, 00:00:00 at START
CW = Cumulative Weight, gm
P1 = Pressure at Sensor 1, psi, bar or kpa
P2 = Pressure at Sensor 2, psi, bar or kpa
P3 = Pressure at Sensor 3, psi, bar or kpa
AL = Alarm, e.g. CV Cumulative Volume Alarm
HP=4, High Pressure Alarm is “Pmaintain”
LP=1, Low Pressure Alarm is “OFF”
PR=3, Pump Rate Alarm is “PUMP STOP”
T = Temperature, ⁰C
A2 = Analog Signal 2
13
PR = Pump Rate, ml/min
CV = Cumulative Volume, ml
C1 = Collection Rate, gr/min
CW = Clockwise Pump Direction
CCW =Counter Clockwise Pump Direction
ST = Pump Status, START, RUN, etc.
CV=1, Cumulative Volume Alarm is “OFF”
EP=2, End of Program Alarm is “ALERT ONLY”
VP = Valve “V” Position
WP = Valve “W” Position
A1 = Analog Signal 1
A3 = Analog Signal 3
Installation of the USB Driver:
Upon connecting the ChemTec to the PC via a USB cable, the following “New Hardware
Wizard” window appears. Select ‘No, not at this time” and click “Next”. The second screen
appears:
Insert the CD containing the ChemTec Operating Manual into the PC, choose “Install the
software automatically” and click “Next”. The following screen appears:
Choose “Continue Anyway”, and the driver will finish loading, allowing you to communicate to
the ChemTec via the assigned Com Port.
By opening Windows Device Manager and clicking on the + for Ports, you can determine the
Com Port assigned to the ChemTec. It will be listed as “USB SciExpert”. (COM8 as shown)
14
Start-up: “Volume Flow Metering into a Bioreactor or Fermentor”
Equipment: The following items are needed to get started:
SciLog P/N
Description
Quantity
200-CHEM-1181
ChemTec, CP-120 w/ 1081 Tandem Peristaltic
Head, 160rpm Motor
Silicone Tubing, Platinum Cured, #16
Printer Kit, includes Printer, Cable, 6 rolls Paper
Appropriate Media Reservoir
Appropriate Bioreactor or Fermentor
1 pc
400-116
080-095A
25 ft (1 pkg)
1 kit
1 pc
1 pc
Hardware Setup:
1. Unpack all the components, visually identify and inspect for damage.
2. At the Reaction bench, place the Media reservoir to the far left. Moving to the right on the
bench, place the ChemTec, and then the Bioreactor or Fermentor. Leave some space
between these items to allow for cables and tubing.
3. Connect the printer interface cable between the rear of the printer and the “Printer”
connector on the rear of the ChemTec. This cable does not have its ends labeled, as it is
the same on both ends and may be reversed. Place the printer in a convenient location.
4. Plug in and power-up all the equipment.
5. Cut approx. 6-8 ft. of the #16 tubing and connect it to the Media reservoir. Route the tubing
from the reservoir to the ChemTec, open the head by rotating the lever 180 degrees
counter-clockwise, and place the tubing over the upper set of rollers. Confirm that the
tubing is under the centering springs and close the head by rotating the lever back to its
original position. Connect the remaining end to the Bioreactor or Fermentor. This completes
the hardware and tubing configuration.
Program Editing and Execution:
At this point, please consider the parameters of the reaction being fed and determine if the type
of metering that is needed. This can be done at a constant rate, a linear rate, or an exponential
rate. Several user-definable alarms may be utilized to monitor the process; the pumping rate,
the cumulative volume, the measured pressure, and when the end of the program has been
achieved. All the alarms may be set to “Off” (disabled), “Beep Only” (an audible alarm), and
“Pump Stop” (stops the pump and sounds the audible alarm).
Volume Flow: Setup:
Press the “EXIT” button several times to reach the top of the menu:
Mode Selct
MASS FLOW
Up
Down
Select
A
B
C
Press “A” to scroll up until the following appears:
Mode Selct
VOLU FLOW
Up
Down
Select
A
B
C
15
Press “C” to Select, and this screen now appears:
- VOLU FLOW Exec
Edit
A
B
Setup
C
Pressing “C” for Setup gives provides access to the following parameters:
•
CUMULATIVE VOLUME: Alarm will occur when a user-definable cumulative volume limit
has been metered. Press “C” to Select, then use “A” and “B” to increase or decrease the
amount, up to a total of 99,999 ml. (depending on the calibration curve), then press “C” to
Select the amount. This sets the limit for the Volume Alarm below.
•
VOLUME ALARM: Set the appropriate option for the above alarm limit, OFF, Alarm Only,
or Pump Stop. Use “Pump Stop” if this is a critical alarm. Press “C” to select, “A” and “B”
to scroll thru the selections, and “C” again to select.
•
END OF PROGRAM: Set the appropriate alarm option to be alerted when the program has
come to an end.
•
PRESSURE ZERO: Used to “Zero” the signal from the SciPres disposable pressure
sensors. Press “P1” and with no pressure in the system, press “Zero”. As there is a built in
calibration curve for the sensors, this “zeroing” to remove any offset caused by the
electronics or hydraulic pressure in the system is all that is needed.
•
CLEAR TOTALS: Use this to clear the cumulative volume values.
•
PUMP TUBING: Use this option to select the tubing in use. This will access the related
internal calibration curve. This curve can be re-calibrated, see the Re-Cal section of this
manual.
Volume Flow: Edit /Execute:
The ChemTec will dispense volumetrically over time intervals and at rates that are user
specified in a program that is either generated from the front panel, or uploaded from a PC.
The ChemTec will only store one Volume Flow program at a time. When generating or editing a
Volume Flow program, all program statements that are to be implemented during a specific
timing block or interval must precede the TIME statement for that timing block.
All programs contain a START statement, and an END statement that cannot be deleted. A
simple Volume Flow program follows, and how the statements are implemented from the
keypad is described.
From the earlier screen, press “B” to select Edit instead of Setup.
- VOLU FLOW Exec
Edit
Setup
A
B
C
The following display is shown. The buttons on the keypad are represented.
000 START
000
Next
Delete
Last
16
On the display, the first set of 000’s indicates the statement number, then the program
statement , and the final set of 000’s shows the number of statements in the existing program.
The “A” key moves to the Next statement in the program, the “B” key will Delete the displayed
statement, and the “C” key will moves to the previous (Last) statement in the program. In order
to replace a statement with a different one, press “B” to Delete the incorrect statement, then
press “C” to go back to the Last statement, and enter the new statement.
The keys input of the following program statements:
This key inputs a RUN statement, instructs the ChemTec to turn on the pump motor. It
is also used to execute a program in response to the message “Press RUN when
Ready” at the beginning of a run.
Press this key, and select the desired volume flow rate. Be sure the rate chosen does
not exceed the rated capacity of the installed pump head/motor/tubing combination. Use
the “A” and “B” keys to set the rate, and the “C” key to select it.
Press this key to define the direction of the pump. This acts as a toggle switch, and
allows selection of either clock-wise (CW) or counter clock-wise (CCW).
This key exits the mode and brings the ChemTec up one menu level.
This key will input a STOP statement, and instruct the ChemTec to stop the pump motor.
While the program is running, this key acts as an emergency stop button.
Use this key to input a TIME statement, use “A” and “B” keys to set the time in
hours:minutes, and then the “C” key to select it. Put at the end of a programming block
to indicate the length of time to execute the statements since the last TIME statement.
This enters a Sw BITS statement that allows programming of TTL switches 1-4 to
provide automated control of external devices.
This key provides access to three other programming statements:
Interpolation Rate: Puts in a linearly ramped pump rate over time specified by a TIME
statement. This is the final rate, and the initial rate is the previously programmed rate.
Rotary Valve: Allows programming of two 6-position valves, “V” and “W”. The
statement V1 would tell valve “V” to be in position #1.
Sample Count: Using this statement allows you to run the program repeatedly, up to
999 times. This only works at the end of a program, nested Counts aren’t allowed.
For the purposes of this document, there is a bioreactor that needs to be feed a nutrient solution
at the rate of 10ml/min for 2 hours, and then have that rate increase in a linear manner over the
next 8 hours to 60 ml/min., continue at that rate for 2 more hours, and then stop. Here’s the
program to input into the ChemTec:
000
001
002
003
004
005
006
007
008
009
010
17
START
RUN
CW
RATE 10ml/min
TIME 02:00
INTRP 60ml/min
TIME 08:00
RATE 60ml/min
TIME 02:00
STOP
END
When finished entering the program, press EXIT, and then “B” for Edit again, and you will see
the following screen:
000 START
009
Next
Delete
Last
A
B
C
Since the START and END statements cannot be entered manually, and can’t be deleted either,
they are not included in the line count shown here as 009, when one might think it should be
010 or 011. This represents the count of the lines that were actually entered.
After setting the above parameters, it’s time to prime the ChemTec. Press the EXIT key on the
front panel until the Mode Select screen is seen. From the Mode Select screen, use “A” or “B”
to go up or down to the “MANUAL” mode. The following is displayed:
Mode Selct
MANUAL
Up
Down
Select
A
B
C
Press “C” to Select, and the screen will change to the following:
- MANUAL Sw=0000
A
100.0%
CW
B
C
Press the “RUN” key and allow the ChemTec to run until all air is removed from the tubing
between the Media Reservoir and the Bioreactor. Press the “STOP” key to stop the pump.
Pressing the “EXIT” key returns one to the Mode Select screen. Use the “A” and “B” buttons to
scroll to the “VOLU FLOW” mode. Press “C” to Select it, and “A” to Execute and the following
screen will be displayed:
VOLU FLOW
10.00ml/m
Press RUN when Ready
When ready, Press the RUN key, and the following screen is displayed:
00:00:00
CV
0.0ml
A
B
RUN
PR 200.0
C
PR= Pump Rate (ml/minute), CW= Cumulative Volume, 00:00:00= Relative (Run) Time
(hrs:min:sec), RUN = Pump Status.
NOTE: The Cumulative Volume values will remain if the process is interrupted and restarted,
whether it is via an alarm, or the use of the STOP or EXIT keys. The Clear Totals option in the
Setup Menu, or when prompted after pressing “Exit” will allow you to reset these values.
This program demonstrates both a constant and linear feed rate. Refer to Section C of the
ChemTec manual for additional examples of programs that generate exponential feeds, time
delayed feeds, chromatography applications, and the use of the 6 position rotary valves.
18
Documentation:
The ChemTec outputs data to a printer or a PC at periodic user-definable intervals for archival
purposes. The following is an example of that data:.
09/10/09; 09:59; CHEM 0.11X; Volume Flow; Tubing=15; Units=psi; VOLU-FLOW= 20.0 ml/m;
Alarms; CV=1; EP=1; HP=1 Limits; CV= 0.0ml; HP=30.0
RT,
00:00:00,
00:00:30,
00:01:00,
00:01:30,
00:02:00,
00:02:13,
00:02:13,
00:02:30,
00:02:32,
CV,
0,
10,
20,
30,
40,
44,
44,
50,
51,
PR,
VP, WP, P1, T,
20.0,
20.0,
20.0,
20.0,
20.0,
20.0,
20.0,
20.0,
20.0,
0,
0,
0,
0,
0,
0,
0,
0,
0,
0,
0,
0,
0,
0,
0,
0,
0,
0,
A1, A2, A3, ST,
0.0, 24.2,
0.0, 24.0,
0.0, 23.9,
0.0, 23.8,
0.0, 23.6,
0.0, 23.6,
0.0, 23.6,
0.0, 23.5,
0.0, 23.5,
0,
0,
0,
0,
0,
0,
0,
0,
0,
0,
0,
0,
0,
0,
0,
0,
0,
0,
0,
0,
0,
0,
0,
0,
0,
0,
0,
START
RUN
RUN
RUN
RUN
PAUSE
START
RUN
EXIT
RT = Relative (Run) Time, hh:mm:ss. (Will be MT, Military Time if system set for “Time of Day”)
CV = Cumulative Volume.
PR = Pump Rate, displays the pump rate at that moment in time.
VP = V Position, represents the position of Valve “V” (will be 0 if not in use, otherwise 1-6)
WP = W Position, represents the position of Valve “W” (will be 0 if not in use, otherwise 1-6)
ST = STATUS, Pump Status (Start, Run, Pause, Run, Exit)
AL = ALARM, Print out of Alarm condition. AL=PR represents Pump Rate Alarm, AL = CV
represents Cumulative Volume Alarm, AL=EP represents End of Program Alarm.
NOTE: Three alarm levels are defined and displayed in the program header of the printout as
follows: 1 = Off (Deactivated); 2 = Alarm Only (Metering continues, auditory beep/5V output to
remote alarm occurs); 3 = Pump Stop (Stops the pump, auditory beep/5V output to remote
alarm occurs). Immediate data printout occurs when RUN, STOP or EXIT keys are pressed,
and when an alarm occurs. All other printouts occur at a user definable frequency in minutes:
seconds (Mode: Setup, Printer, Time).
SciLog recommends a factory cleaning, testing and recalibration of the ChemTec at least once
a year, to maintain the accuracy of the unit and reduce downtime. SciLog also has loaner units
available to rent if you need to keep production running while SciLog is performing
maintenance. Call SciLog at 800-955-1993 for an RGA and arrange for a loaner if needed.
The following chart shows tubing dimensions and the available flow rates based on
tubing and motor size:
MasterFlex Tubing
Tubing ID*: in
Tubing OD*: in
Tubing Wall*: in
13
14
16
25
17
18
15
24
35
0.030
0.157
0.063
0.060
0.189
0.063
0.125
0.251
0.063
0.190
0.314
0.063
0.250
0.376
0.063
0.310
0.439
0.063
0.190
0.376
0.093
0.250
0.439
0.093
0.310
0.500
0.093
Pump Rate Range*:
ml/min
CP-8
8RPM
CP-120 160RPM
CP-200
600RPM
* Nominal Values
Pump Head Model:
0.03 - 0.45 0.10 –1.63 0.43-6.38 0.9 - 12.6 1.14 -18.3 1.7 - 24.3 0.45 – 13 0.65 – 20 0.8 - 32
0.5 - 10 1.7 - 35.2 6.3 - 129 12.5 - 283 18.5 - 405 24.7 - 554 9 – 260 13 – 435 16 – 650
2 - 34
8.6- 132 29 - 533 49 -974 70 - 1048 103 - 1515 59-993 85-1348 111 - 2258
19
ml/min
ml/min
ml/min
TANDEM 1081
ml/min
ml/min
ml/min
ml/min
TANDEM 1082
ml/min
Start-up: “Mass Flow Metering into a Bioreactor or Fermentor”
Equipment: You will need the following items to get started:
SciLog P/N
Description
Quantity
200-CHEM-1181
ChemTec, CP-120 w/ 1081 Tandem Peristaltic
Head, 160rpm Motor
Mettler Toledo BBA422 Scale, 6000gm x.1gm
Silicone Tubing, Platinum Cured, #16
Cable, Interfaces ChemTec and Mettler Scale
Printer Kit, includes Printer, Cable, 6 rolls Paper
Appropriate Media Reservoir
Appropriate Bioreactor or Fermentor
1 pc
100-VIPER6
400-116
080-067PGS
080-095A
1 pc
25 ft (1 pkg)
1pc
1 kit
1 pc
1 pc
Hardware Setup:
1. Unpack all the components, visually identify and inspect for damage.
2. At the Reaction bench, place the Scale with the Media reservoir on it to the far left. Moving
to the right on the bench, place the ChemTec, and then the Bioreactor or Fermentor. Leave
some space between these items to allow for cables and tubing.
3. Connect the interface cable between the ChemTec and the scale paying close attention to
the labels on the cable and those on the rear of the ChemTec. The “Pump” end of the cable
is connected to the “S1” connector on the rear panel of the ChemTec. The “Balance” end of
the cable plugs into the output connector on the rear of the scale.
4. Connect the printer interface cable between the rear of the printer and the “Printer”
connector on the rear of the ChemTec. This cable does not have its ends labeled, as it is
the same on both ends and may be reversed. Place the printer in a convenient location.
5. Plug in and power-up all the equipment.
6. If the ChemTec and Scale were purchased together from SciLog, both will be configured to
communicate with each other. If purchased separately, contact SciLog Technical Customer
Service for instructions.
7. Cut approx. 6-8 ft. of the #16 tubing and connect it to the Media reservoir. Route the tubing
from the reservoir to the ChemTec, open the head by rotating the lever 180 degrees
counter-clockwise, and place the tubing over the upper set of rollers. Confirm that the
tubing is under the centering springs and close the head by rotating the lever back to its
original position. Connect the remaining end to the Bioreactor or Fermentor. This completes
the hardware and tubing configuration.
Program Editing and Execution:
At this point, please consider the parameters of the reaction being fed and determine if the type
of metering that is needed. This can be done at a constant rate, a linear rate, or an exponential
rate. Several user-definable alarms may be utilized to monitor the process; the pumping rate,
the cumulative volume, the measured pressure, and when the end of the program has been
achieved. All the alarms may be set to “Off” (disabled), “Beep Only” (an audible alarm), and
“Pump Stop” (stops the pump and sounds the audible alarm).
Press the “EXIT” button several times to reach the top of the menu. This display is seen:
Mode Selct
MASS FLOW
Up
Down
Select
A
B
C
20
Press “C” to Select, and this screen now appears:
- MASS FLOW Exec
Edit
A
B
Setup
C
Pressing “C” for Setup gives you access to the following parameters:
•
CUMULATIVE WEIGHT: Alarm will occur when a user-definable cumulative weight limit has
been metered. Press “C” to Select, then use “A” and “B” to increase or decrease the
amount, up to a total of 9999.9 gm., then press “C” to Select the amount. This sets the limit
for the Weight Alarm below.
•
WEIGHT ALARM: Set the appropriate option for the above limit alarm, OFF, Alarm Only,
or Pump Stop. Use “Pump Stop” if this is a critical alarm. Press “C” to select, “A” and “B”
to scroll thru the selections, and “C” again to select.
•
END OF PROGRAM: Set the appropriate alarm option to be alerted when the program has
come to an end.
•
PUMP RATE: This alarm will trigger when the selected pump rate cannot be maintained
over any 60-second interval. This will occur if the reservoir has become empty, the system
has sprung a leak, or if the pump rate selected is beyond the capacity of the pump
head/tubing combination. The pump will ramp up to 100% of pump speed for 30 sec. before
triggering the alarm. If this is a critical parameter, this alarm should be set to “Pump Stop”.
•
PRESSURE ZERO: Used to “Zero” the signal from the SciPres disposable pressure
sensors. Press “P1” and with no pressure in the system, press “Zero”. As there is a built in
calibration curve for the sensors, this “zeroing” to remove any offset caused by the
electronics or hydraulic pressure in the system is all that is needed.
•
CLEAR TOTALS: Use this to clear the cumulative volume values.
Mass Flow: Edit /Execute:
The ChemTec will dispense gravimetrically over time intervals and at rates that are user
specified in a program that is either generated from the keypad, or uploaded from a PC.
The ChemTec will only store one Mass Flow program at a time. When generating or editing a
Mass Flow program, all program statements that are to be implemented during a specific timing
block or interval must precede the TIME statement for that timing block.
All programs contain a START statement, and an END statement that cannot be deleted. A
simple Mass Flow program follows, and how the statements are implemented from the keypad.
From the earlier screen, press “B” to select Edit instead of Setup. The following display is
shown. The buttons on the keypad are represented.
000 START
000
Next
Delete
Last
21
On the display, the first set of 000’s indicates the statement number, and then the program
statement, and the final set of 000’s shows the number of statements in the existing program.
The “A” key moves to the Next statement in the program, the “B” key will Delete the displayed
statement, and the “C” key moves to the previous (Last) statement in the program. In order to
replace a statement with a different one, press “B” to Delete the incorrect statement, then press
“C” to go back to the Last statement, and enter the new statement.
The keys input the following program statements:
This key inputs a RUN statement, instructs the ChemTec to turn on the pump motor. It
is also used to execute a program in response to the message “Press RUN when
Ready” at the beginning of a run.
Press this key, and select the desired volume flow rate. Be sure the rate chosen does
not exceed the rated capacity of the installed pump head/motor/tubing combination. Use
the “A” and “B” keys to set the rate, and the “C” key to select it.
Press this key to define the direction of the pump. This acts as a toggle switch, and
allows selection of either clock-wise (CW) or counter clock-wise (CCW).
This key exits the mode and brings the ChemTec up one menu level.
This key will input a STOP statement, and instruct the ChemTec to stop the pump motor.
While the program is running, this key acts as an emergency stop button.
Use this key to input a TIME statement, use “A” and “B” keys to set the time in
hours:minutes, and then the “C” key to select it. Put at the end of a programming block
to indicate the length of time to execute the statements since the last TIME statement.
This enters a Sw BITS statement that allows programming of TTL switches 1-4 to
provide automated control of external devices.
This key provides access to three other programming statements:
Interpolation Rate: Puts in a linearly ramped pump rate over time specified by a TIME
statement. This is the final rate, and the initial rate is the previously programmed rate.
Rotary Valve: Allows programming of two 6-position valves, “V” and “W”. The
statement V1 would tell valve “V” to be in position #1.
Sample Count: Using this statement allows you to run the program repeatedly, up to
999 times. This only works at the end of a program, nested Counts aren’t allowed.
For the purposes of this document, there is a bioreactor that needs to be feed a nutrient solution
at the rate of 10gm/min for 2 hours, and then have that rate increase in a linear manner over the
next 8 hours to 50 gm/min., continue at that rate for 2 more hours, and then stop. Here’s the
program to input into the ChemTec:
000
001
002
003
004
005
006
007
008
009
010
22
START
RUN
CW
RATE 10gm/min
TIME 02:00
INTRP 50 gm/min
TIME 08:00
RATE 50gm/min
TIME 02:00
STOP
END
When finished entering the program, press EXIT, and then “B” for Edit again, and you will see
the following screen:
000 START
009
Next
Delete
Last
A
B
C
Since the START and END statements cannot be entered manually, and can’t be deleted either,
they are not included in the line count shown here as 009, when one might think it should be
010 or even 011. This represents the count of the lines that you actually entered.
After setting the above parameters, it’s time to prime the ChemTec. Press the EXIT key on the
front panel until the Mode Select screen is seen. From the Mode Select screen, use “A” or “B”
to go up or down to the “MANUAL” mode. The following is displayed:
Mode Selct
MANUAL
Up
Down
Select
A
B
C
Press “C” to select, and the screen will change to the following:
- MANUAL Sw=0000
A
100.0%
CW
B
C
Press the “RUN” key and allow the ChemTec to run until all air is removed from the tubing
between the Media Reservoir and the Bioreactor. Press the “STOP” key to stop the pump.
Pressing the “EXIT” key returns one to the Mode Select screen. Use the “A” and “B” buttons to
scroll to the “MASS FLOW” mode. Press “C” to Select it, and “A” to Execute and the following
screen will be displayed:
MASS FLOW
10.00gm/m
Press RUN when Ready
When you are ready, Press the RUN key, and the following screens will be displayed:
-SCALE INITIALIZATIONPlease Wait
REMOVING TARE WEIGHT
Please Wait
00:00:00
CW
0.0gm
PR
RUN
10.00
PR= Pump Rate (grams/minute), CW= Cumulative Weight (grams), 00:00:00 = Relative (Run)
Time (hrs:min:sec), RUN = Pump Status.
NOTE: The Cumulative Weight values will remain if the process is interrupted and restarted,
whether it is via an alarm, or the use of the STOP or EXIT keys. Use the Clear Totals option in
the Setup Menu, or when prompted after pressing “Exit” at the end of a run to clear this value.
This program demonstrates both a constant and linear feed rate. Refer to Section C of the
ChemTec manual for additional examples of programs that generate exponential feeds, time
delayed feeds, chromatography applications, and the use of the 6 position rotary valves.
23
Documentation:
The ChemTec will output data to a printer or PC at periodic user-definable intervals for archival
purposes. The following is an example of that data:
09/10/09; 13:42; CHEM 0.11X; Mass Flow; Tubing=15; Units=psi; Alarms; CW=1;PR=3;
EP=1; HP=1 Limits; CW= 0.0gm; HP=30.0
RT,
00:00:00,
00:00:30,
00:01:00,
00:01:30,
00:02:00,
00:02:30,
00:02:37,
00:02:37,
CW,
0.0,
11.1,
11.0,
17.5,
17.5,
17.5,
17.5,
17.5,
PR,
VP, WP, P1, T,
10.00,
10.00,
10.00,
10.00,
10.00,
10.00,
10.00,
10.00,
0,
0,
0,
0,
0,
0,
0,
0,
0,
0,
0,
0,
0,
0,
0,
0,
0.0,
0.0,
0.0,
0.0,
0.0,
0.0,
0.0,
0.0,
A1, A2, A3, ST,
24.2,
24.2,
24.2,
24.2,
24.2,
24.2,
24.1,
24.2,
0,
0,
0,
0,
0,
0,
0,
0,
0,
0,
0,
0,
0,
0,
0,
0,
0,
0,
0,
0,
0,
0,
0,
0,
START
RUN
RUN
RUN
RUN
RUN
STOP AL=PR,
EXIT AL=PR,
RT = Relative (Run) Time, hh:mm:ss. (Will be MT, Military Time if system set for “Time of Day”)
CW = Cumulative Weight.
PR = Pump Rate, displays the pump rate at that moment in time.
VP= V Position, represents the position of Valve “V” (will be 0 if not in use, otherwise 1-6)
WP=W Position, represents the position of Valve “W” (will be 0 if not in use, otherwise 1-6)
ST = STATUS, Pump Status (Start, Run, Pause, Run, Exit)
AL = ALARM, Print out of Alarm condition. AL=PR represents Pump Rate Alarm, AL = CW
represents Cumulative Weight Alarm, AL=EP represents End of Program Alarm.
NOTE: Three alarm levels are defined and displayed in the program header of the printout as
follows: 1 = Off (Deactivated); 2 = Beep Only (Metering continues, auditory beep/5V output to
remote alarm occurs); 3 = Stop pump (Stops the pump, auditory beep/5V output to remote
alarm occurs). Immediate data printout occurs when RUN, STOP or EXIT keys are pressed,
and when an alarm occurs. All other printouts occur at a user definable frequency in minutes :
seconds (Mode: Setup, Printer, Time).
SciLog recommends a factory cleaning, testing and recalibration of the ChemTec at least once
a year, to maintain the accuracy of the unit and reduce downtime. SciLog also has loaner units
available to rent if you need to keep production running while SciLog is performing
maintenance. Call SciLog at 800-955-1993 for an RGA and arrange for a loaner if needed.
The following chart shows tubing dimensions and the available flow rates based on tubing and
motor size:
MasterFlex Tubing
Tubing ID*: in
Tubing OD*: in
Tubing Wall*: in
13
14
16
25
17
18
15
24
35
0.030
0.157
0.063
0.060
0.189
0.063
0.125
0.251
0.063
0.190
0.314
0.063
0.250
0.376
0.063
0.310
0.439
0.063
0.190
0.376
0.093
0.250
0.439
0.093
0.310
0.500
0.093
Pump Rate Range*:
ml/min
CP-8
8RPM
CP-120 160RPM
CP-200
600RPM
* Nominal Values
Pump Head Model:
0.03 - 0.45 0.10 –1.63 0.43-6.38 0.9 - 12.6 1.14 -18.3 1.7 - 24.3 0.45 – 13 0.65 – 20 0.8 - 32
0.5 - 10 1.7 - 35.2 6.3 - 129 12.5 - 283 18.5 - 405 24.7 - 554 9 – 260 13 – 435 16 – 650
2 - 34
8.6- 132 29 - 533 49 -974 70 - 1048 103 - 1515 59-993 85-1348 111 - 2258
24
ml/min
ml/min
ml/min
TANDEM 1081
ml/min
ml/min
ml/min
ml/min
TANDEM 1082
ml/min
Start-up: “Simple pH Maintenance of a “Base” reaction”
Equipment: You will need the following items to get started:
SciLog P/N
Description
Quantity
200-CHEM-1181
ChemTec, CP-120 w/ 1081 Tandem Peristaltic
Head, 160rpm Motor
pH / ChemTec Interface Cable
Silicone Tubing, Platinum Cured, #16
Printer Kit, includes Printer, Cable, 6 rolls Paper
pH Meter & Probe with 4-20ma output
Appropriate Acid Solution Reservoir
Appropriate Reaction Vessel w/ stirrer
1 pc
080-091
400-116
080-095A
1 pc
25 ft (1 pkg)
1 kit
1 pc
1 pc
1 pc
Hardware Setup:
1. Unpack all the components, visually identify and inspect for damage.
2. At the pH bench, place the reagent reservoir to the far left. Moving to the right on the bench,
place the ChemTec, and then the Reaction Vessel and pH Meter with Probe. Leave some
space between these items to allow for cables and tubing.
3. Connect the printer interface cable between the rear of the printer and the “Printer”
connector on the rear of the ChemTec. This cable does not have its ends labeled, as it is
the same on both ends and may be reversed. Place the printer in a convenient location.
4. Connect the pH / ChemTec interface cable to the output of the pH Meter, and the DB37
connector on the rear of the ChemTec.
5. Plug in and power-up all the equipment.
6. Cut approx. 6-8 ft. of the #16 tubing and connect it to the Reagent reservoir. Route the
tubing from the reservoir to the ChemTec, open the head by rotating the lever 180 degrees
counter-clockwise, and place the tubing over the upper set of rollers. Confirm that the
tubing is under the centering springs and close the head by rotating the lever back to its
original position. Connect the remaining end to the Reaction Vessel. This completes the
hardware and tubing configuration.
Program Editing and Execution:
At this point, please consider the parameters of the titration/maintenance process and
determine how close the pH Setpoint must be maintained and the max flow rate desired for
reagent addition as the pH increases.
Several user-definable alarms may be utilized to monitor upper and lower pH limits, and the
reagent volume. Alarms and Limits may also be set for Pressure and Temperature in the
submenus for those items in Setup Mode. All the alarms may be set to “Off” (disabled), “Alarm
Only” (an audible alarm), and “Pump Stop” (stops the pump and sounds the audible alarm).
Press the “EXIT” button several times to reach the top of the menu:
Mode Selct
MASS FLOW
Up
Down
Select
A
B
C
Press “A” to scroll up until the following appears:
25
Mode Selct
PH CONTRL
Up
Down
Select
A
B
C
Press “C” to Select, and this screen now appears:
- PH CONTROL Exec
Edit
A
B
Alarm
C
Pressing “C” for Alarm provides access to the following parameters:
•
REAGENT VOLUME: Set the appropriate option for this alarm, OFF, Alarm Only, or Pump
Stop. Use “Pump Stop” if this is a critical alarm. Press “C” to select, “A” and “B” to scroll
thru the selections, and “C” again to select.
•
REAGENT LIMIT: This alarm will occur when a user-definable cumulative reagent volume
limit has been dispensed. Press “C” to Select, then use “A” and “B” to increase or decrease
the amount, up to a total of 9,999 ml. (depending on the calibration curve), then press “C” to
Select the amount. This sets the limit for the Reagent Volume Alarm above.
•
HIGH - PH: Set the appropriate option for the Hi-pH Alarm, OFF, Alarm Only, or Pump
Stop. Use “Pump Stop” if this is a critical alarm. Press “C” to select, “A” and “B” to scroll
thru the selections, and “C” again to select.
•
HIGH LIMIT: Set the Limit for the Hi-pH Alarm. The alarm will occur when the limit is
exceeded. Maximum and default setting: 14.0.
•
LOW - PH: Set the appropriate option for the Low-pH Alarm, OFF, Alarm Only, or Pump
Stop. Use “Pump Stop” if this is a critical alarm. Press “C” to select, “A” and “B” to scroll
thru the selections, and “C” again to select.
•
LOW LIMIT: Set the Limit for the Low-pH Alarm. The alarm will occur when the value drops
below the specified limit. Minimum and default setting: 0.0.
pH Control: Edit:
The ChemTec will automatically dispense an Acid or Base Reagent to a titration vessel as it
deviates from a user-defined Setpoint based upon the settings of the following list of
parameters:
¾ SETPOINT: A single pH value between 0.00 and 14.00 is entered. This is the pH that is
maintained by the ChemTec. For titrations, the Setpoint is the titration endpoint, e.g. pH =
7.00 for simple acid or base neutralization. Default = 7.0
¾ PUMP TUBING: Select a pump tubing size that can accommodate the desired pump rate.
Refer to the chart on the side of the ChemTec flow rate ranges with different tubing / motor
sizes.
¾ CLEAR TOTALS: Use this to clear the cumulative volume values before or after a run.
¾ PUMP RATE: This is the maximum desired reagent addition rate (default = 1.0 ml/m). As a
first approximation, select a pump rate that is approximately 10% of the expected titration
volume. The ChemTec slows down as the Setpoint is approached, and speeds as the
measurement gets further away. See: Delta.
¾ ENDPOINT DELAY: For pH maintenance, the Endpoint Delay should be set to 0 seconds.
With this setting the Setpoint can be maintained indefinitely within a 0.1pH unit range, i.e.
the smallest pH-BANDWIDTH.
26
For Endpoint titrations the Endpoint Delay should be set to something other than 0 seconds.
The Endpoint Delay represents the time period in seconds during which a constant Setpoint
must be maintained. If the pH has not sufficiently stabilized during the Endpoint Delay period
because of incomplete mixing, the pump may turn on again and deliver additional small
aliquots of reagent. The Endpoint Delay counter will be reset when the ChemTec turns on
during the Endpoint Delay period. The titration has been successfully completed with the
expiration of the Endpoint Delay.
¾ BANDWIDTH: The Bandwidth setting determines how far the solution pH can deviate from
the SETPOINT before the ChemTec starts delivering reagent.
¾ DELTA: Represents the pH range (default: DELTA = 1.00) during which the pump speed is
automatically reduced from the maximum PUMP RATE setting. The DELTA value should be
increased or the pump rate should be decreased if the SETPOINT is repeatedly exceeded
during titration. Example: with a Setpoint of 7.0, a Bandwidth of 0.1 and a Delta of 4.0, the
system will add at the maximum Pump Rate setting at a pH of 11.0 and decrease linearly to
the minimum flow rate as the Setpoint is approached. Addition will cease once pH drops
below 7.1 pH.
¾ REAGENT: Either ACID or BASE must be selected. This is the reagent that the ChemTec
will be pumping into the reactor.
pH Control: Execute:
Prior to executing the pH Control mode, it is necessary to set the Analog Input to match the
output of the pH Meter in use.
With the cable connected between the two, and the pH Meter set at 0.0 pH, or 4mA output,
enter pH Control Mode. Press Edit, scroll to “D1 Input 4 mA” and confirm that it is set to 0.0.
Press Select and scroll to “D1 Input 20mA” and confirm that it is set to 14.0. (If using a tighter
range meter with a 4-20 mA output, this is where the range would be changed.) With the Pump
Rate set at 0.0, place the pH probe into a standard buffer, and note the reading on the pH meter
and the ChemTec. It is not unusual for these readings to differ, and there is a Sensor Offset
value that can be set to allow for this difference. The desired Pump Rate can now be reset, and
the process is ready to start.
Pressing the “EXIT” on the ChemTec will return you to the Mode Select screen. Use the “A”
and “B” buttons to scroll to the “PH CONTRL” mode. Press “C” to Select it, and “A” to Execute
and the following screen will be displayed:
SETPOINT: 7.00
ACID
Press RUN when Ready
When you are ready, Press the RUN key, and the following screen is displayed:
00:00:00
PH
0.00
A
R
SET
0.0
7:00
Relative (Run) Time (hrs:min:sec) = 00:00:00 is displayed; R = Reagent Volume, calculated by
the internal calibration curve; PH= pH units, as measured by the pH Meter, A = Acid, will
display as B if a Base is chosen as the reagent; SET = pH Setpoint.
If all is working as expected for a “Acid” reaction acid is the reagent being added to bring the
solution back to a neutral Setpoint of 7.0 pH, when the pH exceeds 7.10 (Bandwidth=0.1) the
ChemTec will begin to slowly dispense the Acid Reagent. This speed will increase linearly to
the maximum Pump Rate that was set as the Delta value is approached. It will automatically
slow down as the pH returns toward 7.1 and stop when it drops below that value. With an
Endpoint Delay of 0.0, this will continue for as long as desired.
27
If this process to occur once and stop, as in an Endpoint Titration, set the Endpoint Delay to a
non-zero value in seconds. (Maximum = 180 seconds) As long as the pH stays within the
bandwidth setting for the length of the Delay, the process is considered complete when the
delay timer expires. If more addition occurs during this delay period, i.e. the solution, once
homogenous is back outside the Bandwidth setting, the delay timer is reset.
NOTE: The Reagent Volume values will remain if the process is interrupted and restarted,
whether it is via an alarm, or the use of the STOP or EXIT keys. The Clear Totals option in the
Edit Menu, or when prompted after pressing “Exit” will allow you to reset these values.
Documentation:
The ChemTec will output data to a printer or a PC at periodic user-definable intervals for
archival purposes. The following is an example of that data:
09/10/09; 14:52; CHEM 0.11X; Ph Control; CW; Tubing=15; Units=psi; ALARMS: RV=
3; HI=1; LO=1; P1=1; LIMITS: RV= 1.00; HI=14.00; LO= 0.00; HP=30.0; HT=35.0
RT,
PH,
RV, , , P1, T, , , , ST,
00:00:00,
00:00:30,
00:01:00,
00:01:30,
7.00,
7.00,
7.00,
7.00,
0.0, , ,
0.0, , ,
0.0, , ,
0.0, , ,
0.0, 24.6, , , , START
0.0, 24.6, , , , RUN
0.0, 24.6, , , , RUN
0.0, 24.5, , , , RUN
RT = Relative (Run) Time, hh:mm:ss. (Will be MT, Military Time if system set for “Time of Day”)
PH = pH units as measured by the pH Meter.
RV = Reagent Volume.
P1 = Pressure, psi.
T = Temperature, ⁰C
ST = STATUS, Pump Status (Start, Run, Pause, Run, Exit)
AL = ALARM, Print out of Alarm condition.
LO = Lo pH Alarm.
HI = Hi pH Alarm.
CW = Clockwise motor direction.
NOTE: Three alarm levels are defined and displayed in the program header of the printout as
follows: 1 = Off (Deactivated); 2 = Alarm Only (Metering continues, auditory beep/5V output to
remote alarm occurs); 3 = Pump Stop (Stops the pump, auditory beep/5V output to remote
alarm occurs). Immediate data printout occurs when RUN, STOP or EXIT keys are pressed,
and when an alarm occurs. All other printouts occur at a user definable frequency in minutes:
seconds (Mode: Setup, Printer, Time)
SciLog recommends a factory cleaning, testing and recalibration of the ChemTec at least once
a year, to maintain the accuracy of the unit and reduce downtime. SciLog also has loaner units
available to rent if you need to keep production running while SciLog is performing
maintenance. Call SciLog at 800-955-1993 for an RGA and arrange for a loaner if needed.
The following chart shows available flow rates based on tubing and motor size:
MasterFlex Tubing
Tubing ID*: in
Tubing OD*: in
Tubing Wall*: in
13
14
16
25
17
18
15
24
35
0.030
0.157
0.063
0.060
0.189
0.063
0.125
0.251
0.063
0.190
0.314
0.063
0.250
0.376
0.063
0.310
0.439
0.063
0.190
0.376
0.093
0.250
0.439
0.093
0.310
0.500
0.093
Pump Rate Range*:
ml/min
CP-8
8RPM
CP-120 160RPM
CP-200
600RPM
* Nominal Values
Pump Head Model:
0.03 - 0.45 0.10 –1.63 0.43-6.38 0.9 - 12.6 1.14 -18.3 1.7 - 24.3 0.45 – 13 0.65 – 20 0.8 - 32
0.5 - 10 1.7 - 35.2 6.3 - 129 12.5 - 283 18.5 - 405 24.7 - 554 9 – 260 13 – 435 16 – 650
2 - 34
8.6- 132 29 - 533 49 -974 70 - 1048 103 - 1515 59-993 85-1348 111 - 2258
28
ml/min
ml/min
ml/min
TANDEM 1081
ml/min
ml/min
ml/min
ml/min
TANDEM 1082
ml/min
Part A: ChemTec Hardware
1.0 ChemTec Pump Heads: Overview
The ChemTec pumps provide high precision, high accuracy metering capability. The different
ChemTec pump models utilize optically encoded, servo-controlled motors, ensuring a highly
reproducible pump performance.
The ChemTec offers a range of pump head options:
¾ CP models come with the TANDEM ™ dual channel peristaltic pump head which are
powered by an 8 (CP-8), 160 (CP-120) or 600 RPM (CP-200) motor. Two different TANDEM
pump heads are available. Either thin-walled; TANDEM model 1081 or thick-walled pump
tubing; TANDEM model 1082 may be used
¾ FM models come with a FMI rotating, reciprocating piston pump head, which are powered
by a 160 (FM-120), 600 (FM-200) or 3400 RPM (FM-520) motor. Several different FMI pump
heads are available covering a wide range of pump outputs.
¾ MP models come with a magnetically coupled, geared pump head (Micropump™) which are
powered by a 3400 RPM (MP-320) motor. Several different Micropump pump heads are
available. Consult Section 1.2 of this manual, which summarizes the pump head/motor
options in greater detail.
1.1 PumpSense™: Pump Overload Protection
When the installed pump head requires excessive torque because of pump tube failure or
“freezing” of the pump head, then the ChemTec control software will recognize this condition
and go into a stand-by mode, the pump motor is turned off and the following message is
displayed:
CHECK PUMP HEAD
Press Any Key
Before continuing with the process, remove the defective pump head and either clean the pump
head or replace it with a functional pump head. The PumpSense™ feature has been
implemented as a failsafe device to protect your pump head and motor control circuit from
permanent damage. Some examples of situations that may produce pump head failure are:
•
TANDEM™ Peristaltic Heads: Pump tubing can become frayed when overused. When this
happens, the pump tubing tends to wind itself around the pump rotor: To avoid this problem,
check the pump tubing daily, move the used tube section 3-4 inches toward the pump
discharge side. Use only high quality Silicone or PharMed pump tubing.
•
FMI Pump Heads: Main cause: Freezing of the piston because of crystallization of the
process fluid in the head: Disassemble and clean pump head if necessary. Flush all lines as
well as pump head for at least 2-3 minutes after each use with an appropriate solvent to
clean the pump head. Store the head by installing a short piece of tubing between the pump
inlet and outlet. Fill the tubing loop with distilled water or alcohol (IPA) and exercise the
pump once a month.
•
Micropump Heads: Main cause: Misalignment of driving magnet due to excessive fluid
viscosity, also freezing of spur gears because of crystallization of fluid inside the pump
head: Reduce pump speed and/or pressurize fluid reservoir when dealing with viscous
fluids. Disassemble and clean pump head if necessary. Flush all lines as well as pump head
for at least 2-3 minutes after each use to avoid drying out of the liquid inside the pump head.
Store the pump by installing a short piece of tubing between the pump inlet and outlet. Fill
the tubing loop with distilled water or alcohol (IPA).
29
1.2 Pump Head/Motor Options: Summary
Peristaltic Models:
ChemTec CP-120: Comes with a 160 RPM, optically encoded, servo-controlled motor and a
TANDEM™ Dual Channel Peristaltic Pump Head. Two pump head models are available,
TANDEM 1081 & 1082. Materials of Construction: Stainless Steel and Noryl high impact plastic,
four (4) roller design (stainless steel). Passive pump tube retention, two stainless steel forks
automatically engage pump tubing when the TANDEM pump head is closed. The TANDEM
Model 1082 (P/N: 080-1082) is compatible with thick-walled (0.093”) Masterflex tubing sizes 15,
24 & 35. Optionally, the TANDEM Model 1081 (P/N: 080-1081) is available and is compatible
with thin-walled (0.062”) Masterflex® pump tube sizes 13, 14, 16, 25 & 17. #18 tubing is not
recommended.
ChemTec CP-8: Comes with an 8 RPM, optically encoded, servo-controlled motor and a
TANDEM™ Dual Channel Peristaltic Pump Head providing an accurate, low pump rate
capability, otherwise has the same specifications and available options as the ChemTec CP120.
ChemTec CP-200: Comes with a 600 RPM, optically encoded, servo-controlled motor and a
TANDEM™ Dual Channel Peristaltic Pump Head providing an accurate, high pump rate
capability, otherwise has the same specifications and available options as the ChemTec CP120.
Additional Options: Two TANDEM pump heads can be mounted together. This piggy-back
arrangement requires special mounting hardware (P/N: 500-485), to provide a four-channel
pumping capability.
Refer to the following chart for flow rate guidelines with peristaltic tubing:
MasterFlex Tubing
13
14
16
25
17
18
15
24
35
Tubing ID*: in
Tubing OD*: in
Tubing Wall*: in
0.030
0.157
0.063
0.060
0.189
0.063
0.125
0.251
0.063
0.190
0.314
0.063
0.250
0.376
0.063
0.310
0.439
0.063
0.190
0.376
0.093
0.250
0.439
0.093
0.310
0.500
0.093
Pump Rate Range*:
CP-8
8RPM
CP-120 160RPM
CP-200
600RPM
* Nominal Values
Pump Head Model:
ml/min
ml/min
ml/min
0.03 - .45 0.10 –1.63 0.43-6.38
0.5 - 10 1.7 - 35.2 6.3 - 129
2 - 34
8.6- 132 29 - 533
ml/min
0.9 - 12.6
12.5 - 283
49 -974
ml/min
1.14 -18.3
18.5 - 405
70 - 1048
ml/min
ml/min
1.7 - 24.3 0.45 – 13
24.7 - 554 9 – 260
103 - 1515 59 - 993
30
TANDEM 1081
ml/min
ml/min
0.65 – 20 0.8 - 32
13 – 435 16 – 650
85 - 1348 111 - 2258
TANDEM 1082
Piston Head Models:
ChemTec FM-120: Uses a 160 RPM optically encoded, servo-controlled motor. The ChemTec
FM-120 has a FMI rotating, reciprocating piston pump head. Wetted parts: Ceramic piston and
cylinder with pump head body either made out of Kynar or Tefzel. Exception: RHOO pump head
model has stainless steel (1/8”ID) piston. “LF” designation refers to a “Low Flow/Low Dead
Volume” pump connection, utilizing ¼ - 28 HPLC fittings. All piston pump heads have a
maximum pressure rating of 100psi.
Pump Head Model:
RHOO, 0 – 0.025 ml/stroke
RHO, 0 – 0.050 ml/stroke
RH1, 0 – 0.10 ml/stroke
Max. RPM:
160 RPM
160 RPM
160 RPM
Pumping Range:
0.022 – 4.0 ml/min.
0.044 – 8.0ml/min.
0.088 – 16.0 ml/min.
The cited pumping ranges are based on the following assumptions: Maximum pump rate =
(Max. Stroke Volume) x (Max RPM); with the stroke vernier setting at 450. Minimum pump rate
= (Minimum Stroke Volume) x (Min RPM); stroke vernier setting at 50.
ChemTec FM-200: Uses a 600 RPM optically encoded, servo-controlled motor. The pump head
has the same features as the FM-120 above.
Pump Head Model:
RHOO, 0 – 0.025 ml/stroke
RHO, 0 – 0.050 ml/stroke
RH1, 0 – 0.10 ml/stroke
Max. RPM:
600 RPM
600 RPM
600 RPM
Pumping Range:
0.08 – 15.0 ml/min.
0.17 – 30.0 ml/min.
0.33 – 60.0 ml/min.
ChemTec FM-520: Comes with a 3400 RPM, optically encoded, servo-controlled motor. The
pump head has the same features as the FM-120 above.
Pump Head Model:
RHOO, 0 – 0.025 ml/stroke
RHO, 0 – 0.050 ml/stroke
RH1, 0 – 0.10 ml/stroke
Max. RPM:
3400 RPM
3400 RPM
3400 RPM
Pumping Range:
0.50 – 85.0 ml/min.
1.00 – 170 ml/min.
2.00 – 340 ml/min.
Magnetic Gear Models
ChemTec MP-320 Models: Uses a 3400 RPM, optically encoded, servo-controlled motor and a
magnetic gear pump head. Materials of construction: stainless steel body, gears are made from
Teflon, Graphite or Ryton, depending upon model. Pressure rating: 40 – 50 psi.
Pump Head Model:
Mag. 187, Graphite gears, 40psi,
Mag. 184, Graphite gears, 40psi,
Mag. 1840, Ryton gears, 40 psi,
Mag. 040, Teflon gears, 40 psi,
Mag. 120, Teflon gears, 50 psi,
Mag. 122, Teflon gears, 50 psi,
Mag. 200, Ryton gears, 50psi,
Mag. 201, Ryton gears, 50 psi,
31
Max. RPM:
3400 RPM
3400 RPM
3400 RPM
3400 RPM
3400 RPM
3400 RPM
3400 RPM
3400 RPM
Pumping Range:
5 – 60 ml/min
10 – 140 ml/min.
30 – 312 ml/min.
85 – 1075 ml/min.
174 – 2170 ml/min.
309 – 3100 ml/min.
150 – 1910 ml/min
290 - 3700 ml/min.
2.0 Front Panel: Data Entry & Display
The front panel consists of a user interface, which includes an alphanumeric display and a
membrane keypad to select operational modes and alarm settings. The display is a two line, 20
characters each, liquid crystal display (LCD). The display is backlit to allow easy viewing over a
wide range of lighting conditions.
The lower line on the LCD is used to signify the function of the “soft keys” marked “A”, “B” and
“C”. The “soft key” current labels are displayed in the lower line of the LCD. If you press these
keys, then the function displayed above it is performed.
The main keypad consists of eight “hard” keys whose function does not change. These keys are
used for basic control and programming of the ChemTec. The basic key definitions are:
Executes the selected operational mode and starts pump. (Run Command)
Interrupts current operational mode and stops pump. (Stop Command)
Sets pump Rate in ml/min, or gm/min, depending on Mode being implemented. (Rate
Command)
Used for Time Command.
Pump direction, counter-clockwise or clockwise. (CW or CCW Command)
Used to change between alternate displays in all modes. (Access to TTL 1-4 commands
in Mass and Volume Flow Modes)
Used to Exit current operational mode or menu level, stops pump.
Used for pump rate recalibration and keypad lock in Mass and Volume Flow Modes..
(Interpolate Rate, Rotary Valve, and Sample Count Commands in programmable
Modes.)
Two LED’s are also on the front panel, just to the left of the main keypad. These indicate the
current pump status. A green light indicates the pump is in motion; the red light indicates that
the pump has stopped.
32
3.0 Back Panel: Interface Options
The ChemTec back panel provides interfacing ports for:
¾ Printer Port: The ChemTec can be connected to a PC for data collection or to a SciLog
Printer via the female DB9 RS-232 port labeled “Printer”. You need a SciLog RS-232
cable (P/N 080-073) to connect to a PC for data archival, or a printer cable (080-096) to
make the connection between the printer and the ChemTec.
¾ Electronic Balance: Male DB9, labeled “S1”. (S2 and S3 are not utilized in the
ChemTec.)
¾ Foot Switch (P/N: 080-059): Male DB37, Labeled “External I/O”.
¾ SciPres Disposable Pressure Sensors: Three RJ11 telephone jacks, one for each
pressure sensor. Labeled “P1, P2, P3”. ChemTec uses only one sensor.
33
¾ SciTemp Disposable Temperature Sensor: Conxall 2 pin connector. Labeled
“Temperature”.
¾ Scale Ports: The male DB9 ports labeled “S1”, “S2” and “S3” are RS-232 ports for
electronic scales. For the ChemTec, only S1 is used. This port allows the user to
interface with a number of different electronic scales: i.e. Mettler, Ohaus, and Sartorius
top-loading scales. The following scale cables are required:
o
Mettler: PGS, PM, Viper Models
P/N: 080-067PGS
o
Ohaus: GT, “Precision Advanced” &
“Explorer” & “Voyager” Models
P/N: 080-066
o
Ohaus: IP Series High Capacity
P/N: 080-067
o
Ohaus: Adventurer Pro Series
P/N: 080-067PGS
o
Sartorius: Most Series Balances
P/N: 080-068
¾ In ChemTec Setup: Scale, select the scale manufacturer; the ChemTec will
automatically implement the correct communications parameters. Check that the
proper communications parameters are also implemented in the scale being used.
¾ Pressure Sensor Ports: RJ11 Telephone jacks for the SciPres Disposable Pressure
Sensors, labeled “P1”, “P2”, and “P3”. The SciPres disposable pressure sensors plug
into these jacks using the included cable. The ChemTec uses only one sensor, any of
the three may be chosen as the source location.
¾ Temperature Probe Port: The SciTemp Disposable Temperature Senor connects to
this port with a twist-lock connector cable. Temperature is measured in degrees Celsius.
¾ Valve V Port: Used in conjunction a 6-way Selector Valve (P/N: 080-510) in either Mass
Flow or Volume Flow Modes. Most often used for Preparative Chromatography.
¾ USB Port: Used for connection to a PC, providing a Com Port. Can be used for data
collection as an alternative to the Printer port. The driver is included on the CD that
contains this manual.
¾ Ethernet Port: Used for connection to the ChemTec via a LAN. IP Address, Subnet
Mask, and Gateway are configured in the Setup menu. The communication protocol is
Modbus TCP/IP, and a list of registers is in the appendix of this manual. (When
available.)
34
¾
External I/O Connector: DB37 connector used to interface with various devices,
allowing up to three 4-20 ma Analog inputs (A1, A2 & A3) for recording data or alarming
based upon that data. It also allows an interface with SciLog foot switch (P/N: 080-059)
and allows remote Start / Stop control of the ChemTec. It is also the connection point for
Valve W if in use.
For pin configuration, consult the drawing on this page. The DB37 port at the back panel
provides three analog input channels for devices providing loop power:
¾ Analog channel 1 (pin 7 signal, pin 25 ground)
¾ Analog channel 2 (pin 5 signal, pin 23 ground)
¾ Analog channel 3 (pin 2 signal SG3, pin 21 common)
¾ When a Footswitch or External Run / Stop Cable is desired, Pins 19 and 37 are
used.
Pin out of DB37 External I/O Connector on Rear Panel:
35
4.0 SciLog I/O Adapter Module (Optional Accessory)
The SciLog I/O Adapter Module (P/N: 080-100) is an optional accessory that greatly simplifies
interfacing with external devices. The I/O Adapter Module can be directly connected to the
External I/O Port (DB37 female connector) which is located on the back panel of the ChemTec.
On the SciLog I/O adapter Module are three rows of I/O ports available for interfacing with a
variety of different external devices, and only the top and bottom rows are active. The center
row is obsolete and no longer used. Note: Using the adapter precludes the use of Valve W for
Volume or Mass Flow control.
4.1 Analog Input Signals:
The upper row of ports is designated as Analog Channels. There are three Analog Channels
labeled as: CHNL 1, CHNL 2 and CHNL 3.
These three analog input channels can accommodate 4-20 mA inputs from chemical sensors,
detectors, analyzers or controllers. In Analog Mode, the output of these devices can be used to
proportionally control the ChemTec pump. In other modes, these signals can be monitored and
alarmed. The pin-out configuration is given below:
4-20 mA, current
Channel 1
Channel 2
Channel 3
“+” to SGNL
“ - “ to GND
“+”to SGNL
“ - “ to GND
“+” to SGL3
“ - “ to COM
NOTE: The above pin-out information assumes that loop power is supplied by the measuring
device. All pin-outs refer to the configuration of the SciLog I/O Adapter Module only!
All analog inputs must be checked for the correct polarity. Change polarity of analog input leads
if the pump does not respond to the analog signal.
4.2 Contact Closures (max. 2 Amperes):
The SciLog I/O Adapter Module also provides four contact closures relays on the bottom row
that can be used to control external devices. The four relays are turned on or off by the four TTL
switches available at the “External I/O” in the back of the ChemTec. By connecting the SciLog
I/O Adapter Module to ChemTec, any of the four contact closures can be individually controlled
in either Manual Mode or Mass and Volume Flow Modes.
Each of the four contact closures has three connections, Normally Open = NO, Common and
Normally Closed = NC.
Any of the contact closures can be manually controlled in the Manual Mode using the “Switch”
key. Alternatively, “SWBit” commands can be imbedded in the Mass Flow or Volu Flow
programs to automatically control external devices. NOTE: When using the Adapter Module,
only one rotary valve is accessible via the “Valve V” port.
Two types of relay controls are available:
A momentary (300msec pulse) contact closure can be implemented by selecting “Pulse” in
Setup: Switch Config. (In Setup: Pump menu, select Setup: Switch Config., then select
“Pulse”.) For example, the switch command “Sw = 0200” will momentarily close Relay #2
thereby generating a pulse.
A continuous contact closure can be implemented by selecting “Level” in Setup: Switch
Config. (In Setup: Pump menu, select Setup: Switch Config., then select “Level”.) In the
Level mode, the relay will remain open or closed until another “Switch” command changes the
status/state of the relay. For example, the switch command “Sw = 0200” will close Relay #2
which will remain closed until the switch command “Sw = 0000” is executed thereby opening
Relay #2.
36
1.0 MAIN MENU
Mode Selct MASS FLOW
UP DOWN SELECT
Mode Selct
SETUP
UP DOWN SELECT
Mode Selct
ANALOG
UP DOWN SELECT
Mode Selct PH CONTROL
UP DOWN SELECT
Mode Selct
MANUAL
UP DOWN SELECT
Mode Selct DIAFLTRN
UP DOWN SELECT
Mode Selct VOLU FLOW
UP DOWN SELECT
37
SELECT
SELECT
SELECT
SELECT
SELECT
SELECT
SELECT
-MASS FLOWEXEC EDIT
EDIT
SETUP
- SETUP - SCALE
UP DOWN SELECT
- ANALOG- CW
Sw=0000
-PH CONTROLEXEC
EDIT
SELECT
000 START
000
NEXT DELETE LAST
- SCALE - SCALE MANUF.
UP DOWN SELECT
SELECT
SCALE MANF: METLER
UP DOWN SELECT
0.00%
EDIT
ALARM
- SETUP - SETPOINT
UP DOWN SELECT
SELECT
SETPOINT
INCR DECR
7.00
SELECT
- MANUAL 100%
T= 0.00 P1=--.CW
-DIAFILTRATIONEXEC
EDIT PRIME
-VOLU FLOWEXEC EDIT
EDIT
EDIT
SETUP
EDIT: PUMP DIRECTION
UP DOWN SELECT
000 START
000
NEXT DELETE LAST
SELECT
PUMP DIRECTION: CW
UP
DOWN SELECT
Part B: ChemTec Software
1.0 Overview: Main Menu
The ChemTec main menu consists of seven (7) operational modes as shown in on the previous
page. Use the “Up” and “Down” keys to scroll through the main menu. Press the “Select” key
to enter a chosen operational mode, i.e. VOLU FLOW. By pressing the “Select” key the 1st
submenu level appears, providing access to “Exec” and “Edit”. In the Edit sub-mode, the
pump parameters are selected for the metering application.
MASS FLOW: In this programmable operational mode, the ChemTec meters solutions by
weight with high levels accuracy and precision. No pump calibration is required; the selected
mass flow rate is independent of environmental factors. The solution reservoir or the chemical
reactor is positioned on an electronic balance. By continually monitoring the balance output, the
ChemTec adjusts the pump speed to maintain a selected mass flow rate. The flows can be
constant, and can change in a stepped or interpolated manner. The ChemTec can be
interfaced with balances and scales from several manufactures: Mettler, Ohaus, and Sartorius.
It is preferable that this be purchased from SciLog so it may be properly configured and tested
as a system.
VOLU FLOW: The Volume Flow Mode programmable in the same manner as Mass Flow Mode.
The ChemTec output in this mode is based upon internal calibration curves that may be recalibrated for a particular pump head and/or pump tube combination. Once calibrated, the
ChemTec meters solution volumetrically at user-definable rates with excellent precision and
accuracy.
PERFUSION: (also referred to as Diafiltration) In this mode the ChemTec automatically meters
fresh media into a bioreactor in response to the continuous removal of cell-free permeate
containing the expressed protein. Interface with a balance placed under the bioreactor is
required. A Perfusion system usually also incorporates a PureTec and an ACCU, or additional
ChemTec. This mode may also be used in a subtractive manner to remove solution from a
vessel to maintain its weight.
pH: The ChemTec automates pH maintenance as well as end point titration in small to medium
volume reactor applications. The ChemTec is connected to a Process pH Transmitter (with 4-20
mA output). The ChemTec provides a user-definable pH-Setpoint and pH-Bandwidth, which the
ChemTec maintains by adding small increments of reagent, i.e. acid or base. The reagent
addition rate is automatically reduced as the pH-Setpoint is approached. The pH-Setpoint can
be maintained indefinitely within a 0.10 pH unit range, i.e. smallest selectable pH-Bandwidth.
ANALOG: This mode allows direct proportional control of the ChemTec motor speed from a 420 mA input signal. The direction and run/stop are available via the keypad, and this mode has
no data output.
MANUAL: Allows manual operation of the ChemTec, The following front panel keys are active
in MANUAL: RATE, TIME, CW/CCW (double arrow key) and the SWITCH keys. The RATE key
allows you change the pump speed, while the SWITCH key provides access to the four
programmable TTL switches, which can be used to control external devices, i.e. valves. This
mode also offers no data output.
38
SETUP: This operational mode allows selection of various user preferences and interface
options.
•
Setup: Scale submenu provides electronic balance options. Balances that can interface
with the ChemTec must have bi-directional serial communication, and NOT have internal
calibration or be “delta-range” models. Many Mettler, Ohaus, and Sartorius balances can be
used.
•
Setup: Clock submenu allows the user to set the time and date used in the display.
•
Setup: System Test submenu allows checkout of ChemTec outputs and requires purchase
of a special set of connectors to perform the test.
•
Setup: Test Mode provides an additional mode to test the I/O’s independently.
•
Setup: Ethernet is used to set the IP Address, Subnet Mask, and Gateway for Modbus
TCP/IP communications.
•
Setup: Printer is used for setting up the printer/PC communications parameters as well as
print time interval and the print delay.
•
Setup: Analog defines the ranges, alarms and limits for the three analog channels available
for data acquisition and reporting of 4-20 ma signals from detectors equipped with analog
outputs.
•
Setup: Temperature submenu provides for Temperature Alarm and Limit as well as the
input of an offset value if needed.
•
Setup: Press. Sensor is used to zero the pressure sensors, set the units (psi, bar, kpa),
and choose the source for the pressure control and alarm as well as enable the alarm and
set its limit.
•
Setup: Pump allows you to set various pump user preferences, most importantly the Motor
RPM.
•
Setup: Scale2 and Scale3 are not utilized in the ChemTec, and hence should not be
modified from “None”.
39
2.0 MASS FLOW: Edit
Mode Selct MASS FLOW
UP DOWN SELECT
SELECT
-MASS FLOWEXEC EDIT
SETUP
EDIT
000 START
000
NEXT DELETE LAST
NEXT
PRESS
001 RUN
NEXT DELETE
LAST
NEXT
PRESS
002 CW
NEXT
DELETE
LAST
NEXT
SELECT
003 V1
NEXT
DELETE
VALVE POSITION: V1
INCR
DECR SELECT
LAST
SELECT
ROTARY
VALVE
PRESS
INTRP ROTARY SAMPL
RATE VALVE
COUNT
NEXT
SELECT
004 RATE
1.00 gm/m
NEXT DELETE LAST
PRESS
MASS RATE
1.00 gm/m
INCR DECR SELECT
NEXT
PRESS
SELECT
005 TIME
NEXT DELETE
00:05
LAST
TIME
INCR
DECR
00:05
SELECT
NEXT
SELECT
006 INTRP
3.00 gm/m
NEXT DELETE LAST
MASS RATE
3.00 gm/m
INCR DECR SELECT
SELECT
INTRP
RATE
PRESS
INTRP ROTARY SAMPL
RATE VALVE
COUNT
NEXT
SELECT
007 TIME
NEXT DELETE
00:05
LAST
PRESS
TIME
INCR
DECR
00:05
SELECT
NEXT
SELECT
008 COUNT
NEXT DELETE
1
LAST
NEXT
009 END
NEXT DELETE
40
LAST
SAMPLE COUNT
1
INCR DECR SELECT
SELECT
SAMPLE
COUNT
PRESS
INTRP ROTARY SAMPL
RATE VALVE
COUNT
2.0 MASS FLOW: How to generate a MASS FLOW program.
SUMMARY: In the Mass Flow Mode, the ChemTec meters solutions gravimetrically, i.e. by
weight. Either the solution reservoir or the chemical reactor is positioned on an electronic scale.
By continually monitoring the scale output, the ChemTec adjusts the pump speed to maintain a
desired mass flow rate. The selected mass flow rate is maintained by the ChemTec during each
60 second interval. If the selected mass flow rate cannot be maintained during a 60 second
interval, e.g. the reservoir has run empty, the ChemTec will alert the user with an auditory signal
and stop the pump, provided such an alarm option was selected.
The ChemTec also has provisions for printing / documenting the metering data & alarms. The
printer (P/N: 080-095) can be connected to the ChemTec via the Port labeled “Printer”. The
Printer and/or USB ports may also be used to send data to a PC, using either the SciDoc data
collection software discussed later in the manual or HyperTerminal. Use Setup: Printer for
setting up the printer communications parameters and print time interval.
When executing the Mass Flow Mode, the ChemTec will display “SCALE INITIALIZATION //
Please Wait”. If balance communication fails, the ChemTec will display “SCALE ERROR // Hit
any key”. Check the cable connection as well as the communications parameters in the scale.
Also make sure the correct manufacturer in the Setup: Scale submenu has been selected.
When generating or editing a Mass Flow program, all program statements that are to be
implemented during a specific timing block or interval must precede the TIME statement for
that program block. For example, on the opposite page, the program statement: 001 RUN,
002 CW, 003 V1, and 004 RATE are all implemented at the beginning of the first timing block
defined by program statement 005 TIME: 00:05 (five minutes).
¾ CW, Pump Direction: This program statement is implemented by pressing the key with the
double arrows. This key functions like a toggle switch and selects either CW (clockwise) or
CCW (counter-clockwise) pump direction.
¾ RUN: This statement is implemented by pressing the key labeled “RUN”, it instructs the
ChemTec to turn on the pump motor.
¾ V1, Valve Position: This program statement is implemented by pressing the star (*) key
followed by selecting “Rotary Valve”. Six rotary valve positions for valve “V”, namely, V1
through V6, as well as, six rotary positions for a second valve “W”, W1 through W6, can be
selected.
¾ RATE, Pump Rate: Press RATE key then select the desired mass flow rate, make sure that
the selected mass flow rate does not exceed the capacity of the installed pump head /motor
combination.
¾ TIME, Timing Interval: Press TIME key, then select the desired timing interval in Hours:
Minutes. All preceding program statements are implemented at the beginning of this TIME
statement. Max Time is 59 hours: 59 minutes.
¾ INTRP, Interpolation, Pump Ramp: Press the star (*) key, then select “INTRP RATE”, this
program statement allows definition a linear pump ramp. The highest rate of the pumping
ramp is given by the “INTRP RATE”, the lowest rate of the pumping ramp is defined by the
preceding RATE statement. The length of the ramp is defined by a subsequent TIME
statement.
¾ COUNT: Press star (*) key, then select “SAMPL COUNT”, then select a value larger than 1 if
the program is to repeat, up to 999. This command may only be used at the end of the
program. Nested Count commands are not allowed.
¾ SWBits: The TTL outputs may be controlled as part of the program. Press the “SWITCH”
key and use the Left and 1/0 keys to set the state of these switches. 1234 is all high, 0000
is all low. (This is not shown in the sample program, and is rarely used.)
41
42
2.1 MASS FLOW Mode: Setup / Alarms / Program Editing
SUMMARY: The ChemTec allows you to define several alarm conditions, three of which are set
in this submenu.
The Cumulative Weight Alarm defines the maximum amount (in grams) of solution to be
metered by the ChemTec. For example, if the Cumulative Weight Alarm is set at 200 gm., then
the ChemTec will sound an alarm and stop the pump when 200gm. of solution have been
dispensed. The Pump Rate Alarm can be selected to either sound an alarm or stop the pump
action, when the user-defined pump rate cannot be maintained. This alarm condition can occur
when the solution reservoir has run dry or a leak has developed in the pump line.
The End of Program Alarm provides an auditory signal and stops the pump action, when the
user-defined program has ended.
Three options are available for each of the alarms. The alarm can be either Off, Alarm Only
(auditory signal only), or Stop Pump (auditory signal and pump stops).
The remaining alarms / limits, Hi Pressure, Hi Temperature, and Hi/Lo Analog are found in their
respective submenus as part of the Main Setup Mode menu.
Setup / Alarm Settings:
¾ Cumulative Weight Limit: Select the total weight of solution to be metered. Default = 0.0
¾ Clear Totals: Use to clear the cumulative values. This will be prompted for upon pressing
Exit at the end of a run.
¾ Pressure Zero: Use this interface to zero the pressure sensor if using one. Be sure there is
no pressure in the system when this is done.
¾ Rate Alarm: In the metering application circumstances may arise in which the selected
pump rate cannot be maintained. The Rate Alarm will alert when the selected pump rate
cannot be maintained over any given 60-second interval. This alarm will also be triggered
when the selected pump rate is beyond the pumping capacity of the system. In either case,
the ChemTec will ramp up to 100% of motor speed before triggering the Rate Alarm. Default
= Pump Stop.
¾ End of Program Alarm: Select the appropriate alarm option to be alerted when the mass
flow program has come to an end.
¾ Weight Alarm: Select the appropriate alarm option for the Cumulative Weight Limit. Select
one of three alarm options: Off, Alarm Only, or Pump Stop. If the Cumulative Weight Alarm
is of critical importance in the application, implement the “Stop Pump” alarm option.
Program Editing:
Insertion of Program Statements: A program statement can be inserted at any point in the
mass flow program by simply pressing a key or by selecting a pump function from the display.
The program statement associated with a particular key will be inserted ahead of the previously
displayed program statement.
Deletion of Program Statements: Except for the “START” and “END”, any displayed program
statement can be deleted by pressing the “Delete” key (“B”). By pressing this key, the displayed
statement is removed from your program. If you wish to insert a new statement in place of the
deleted statement, press “Last” (“C”) then insert the new statement by pressing the appropriate
keys.
43
2.2 MASS FLOW Mode
Execute Display
-MASS FLOWEXEC EDIT SETUP
EXEC
MASS FLOW 10.00 gm/m
Press Run when Ready
DOWN
SCALE INITIALIZATION
Please Wait
DOWN
A1
A3
REMOVING TARE WEIGHT
Please Wait
DOWN
00:00:00
CW 0.0
RUN
PR 10.00
0
0
SWITCH
SWITCH
A2
0
SWITCH
P1 0.0
T 24.3
2.2 Mass Flow Mode: Execute Display
Upon pressing EXEC the ChemTec will initialize the scale, and remove the tare weight. The
process begins at time 00:00:00 and the main display shows this Relative or Run Time, the
Status of the ChemTec, the Cumulative Weight and the Pump Rate. By pressing the “Switch”
button on the keypad, two alternate data screens are available. The first displays the Pressure
measured at by the SciPres Sensor (psi.) and the Temperature measured by the SciTemp
Sensor (⁰C). The second screen displays the measured value of the three available 4-20 mA
analog inputs based upon their settings in Setup: Analog.
2.3 Front Panel: Lock-out:
When executing a ChemTec MASS-FLOW, or VOLU-FLOW, program, a limited keyboard lockout feature is available to prevent accidental or unauthorized changes in pump status or
program.
Please note, this feature is accessible to you only after you have initiated your selected mode or
program, i.e. you have pressed the EXEC and RUN keys.
While the selected program or mode is being executed, press the star
button, the display
will show “PUMP UNLOCKED”, press key “A” labeled “LOCK” to lock the keypad. The display
will revert back to operational display and the keyboard will be locked out with the exception of
the star (*) key. Unlock the keyboard by pressing the star (*) key again then selecting “B”
labeled “UNLOCK”. The keyboard is again fully functional.
44
45
3.0 VOLU FLOW: How to generate a VOLUME FLOW program.
SUMMARY: In the Volume Flow Mode, the ChemTec accesses a set of built-in calibration
curves for a particular pump head and/or pump tube combination for a specific motor size. Once
the proper motor rpm and pump head and tubing have been chosen, the ChemTec pumps
solutions volumetrically at user-definable rates with dependable precision and accuracy. This
may also be re-calibrated using a simple process described later to increase the built-in
precision.
When generating or editing a Volume Flow program, like the Mass Flow program, all program
statements that are to be implemented during a specific timing block or interval must precede
the TIME statement for that timing block. For example, on the opposite page, the program
statement: 001 RUN, 002 CW, 003 V1, and 004 RATE are all implemented at the beginning of
the first timing block defined by program statement 005 TIME: 00:05 (five minutes).
¾ CW, Pump Direction: This program statement is implemented by pressing the key with the
double arrows. This key functions like a toggle switch and selects either CW (clockwise) or
CCW (counter-clockwise) pump direction.
¾ RUN: This statement is implemented by pressing the key labeled “RUN”, it instructs the
ChemTec to turn on the pump motor.
¾ V1, Valve Position: This program statement is implemented by pressing the star (*) key
followed by selecting “Rotary Valve”. Six rotary valve positions for valve “V”, namely, V1
through V6, as well as, six rotary positions for a second valve “W”, W1 through W6, can be
selected.
¾ RATE, Pump Rate: Press RATE key then select the desired volume flow rate, make sure
that the selected flow rate does not exceed the capacity of the installed pump head /motor
combination.
¾ TIME, Timing Interval: Press TIME key, then select the desired timing interval in Hours:
Minutes. All preceding program statements are implemented at the beginning of this TIME
statement. Max Time is 59 hours: 59 minutes.
¾ INTRP, Interpolation, Pump Ramp: Press the star (*) key, then select “INTRP RATE”, this
program statement allows definition a linear pump ramp. The highest rate of the pumping
ramp is given by the “INTRP RATE”, the lowest rate of the pumping ramp is defined by the
preceding RATE statement. The length of the ramp is defined by a subsequent TIME
statement.
¾ COUNT: Press star (*) key, then select “SAMPL COUNT”, then select a value larger than 1 if
the program is to repeat, up to 999. This command may only be used at the end of the
program. Nested Count comands are not allowed.
¾ SWBits: The TTL outputs may be controlled as part of the program. Press the “SWITCH”
key and use the Left and 1/0 keys to set the state of these switches. 1234 is all high, 0000
is all low. (This is not shown in the sample program, and is rarely used.)
46
3.1 VOLU FLOW: How to Re-Calibrate the flow rate curves.
SUMMARY: In Volume Flow Mode, the ChemTec accesses a set of built-in calibration curves
for a particular pump head and/or pump tube combination for a specific motor size. This may
also be re-calibrated using a simple process. This process is necessary for all modes except
Mass Flow if increased accuracy of metered volume is desired.
1. Confirm that the proper motor rpm and pump head and tubing have been chosen, this
assures that the correct flow rate curve is being used.
2. Enter a simple Volume Flow program, consisting of:
Start
Run
CW
Rate XX.X ml/min (This should be the desired metering rate, or the midpoint of the rates
planned on being implemented.)
Time 00:15
Stop
3. With nothing to impede the flow, Press Exec and Run to start the program while collecting
the metered fluid in a calibrated vessel, or a vessel on a balance. Allow the program to run
for 10 minutes if that’s practical, and then press “Stop”, followed by pressing the (*) “Star”
key.
4. A screen similar to this is displayed:
DV
Incr
250.0 AV
Decr
250.0
Select
5. DV = Dispensed Volume, or that which the ChemTec believes it has metered to this point.
AV = Actual Volume. Editing of this value is done using the “Incr” and “Decr” keys. Set it to
match the actual measured volume that has been collected.
Once properly adjusted, press “Select” and the built-in flow rate curve for that particular
motor / head / tubing combination has been successfully Re-Calibrated.
47
3.2 VOLU FLOW MODE
Setup / Alarm Limits Menu
-VOLU FLOWEXEC EDIT SETUP
SETUP
-SETUP- CUMUL.VOLUME
UP DOWN SELECT
SELECT
LIMIT:
INCR DECR
0.0 ml
SELECT
DOWN
-SETUP- PUMP TUBING
UP DOWN SELECT
SELECT
PUMP TUBING:
15
UP DOWN SELECT
DOWN
-SETUP- CLEAR TOTALS
UP DOWN SELECT
SELECT
CLEAR TOTALS?
YES NO EXIT
DOWN
-SETUP-PRESURE ZERO
UP DOWN SELECT
SELECT
PRESSURE:
ZERO
P1
P2
P3
DOWN
-SETUP- END OF PROG.
UP DOWN SELECT
SELECT
PROG. END:
UP DOWN
OFF
SELECT
VOLUME:
UP DOWN
OFF
SELECT
DOWN
-SETUP- VOLUME ALARM
UP DOWN SELECT
48
SELECT
3.2 VOLU FLOW: Setup / Alarms / Program Editing
SUMMARY: The ChemTec allows you to define several alarm conditions, two of which are set
in this submenu.
The Cumulative Volume Alarm defines the maximum amount (in ml or μl) of solution to be
metered by the ChemTec. For example, if the Cumulative Volume Alarm is set at 200 ml, then
the ChemTec will sound an alarm and stop the pump when 200ml of solution have been
dispensed. The End of Program Alarm provides an auditory signal and stops the pump action,
when the user-defined program has ended.
Three options are available for each of the alarms. The alarm can be either Off, Alarm Only
(auditory signal only), or Stop Pump (auditory signal and pump stops).
The remaining alarms / limits, Hi Pressure, Hi Temperature, and Hi/Lo Analog are found in their
respective submenus as part of the Main Setup Mode menu
Setup / Alarm Settings:
¾ Cumulative Volume Limit: Select the total volume of solution to be metered. Default = 0.0
¾ Pump Tubing: If using a Tandem peristaltic head, select the correct L/S tubing size that
matches that in use. This accesses the internal calibration curves.
¾ Clear Totals: Use to clear the cumulative values. This will be prompted for this upon
pressing the Exit key at the end of a run.
¾ Pressure Zero: Use this interface to zero the pressure sensor if using one. Be sure there is
no pressure in the system when this is done.
¾ End of Program Alarm: Select the appropriate alarm option to be alerted when the volume
flow program has come to an end.
¾ Volume Alarm: Select the appropriate alarm option for the Cumulative Volume Limit. Select
one of three alarm options: Off, Alarm Only, or Pump Stop. If the Cumulative Volume Alarm
is of critical importance in the application, implement the “Stop Pump” alarm option.
Program Editing:
Insertion of Program Statements: A program statement can be inserted at any point in the
volume flow program by simply pressing a key or by selecting a pump function from the display.
The program statement associated with a particular key will be inserted ahead of the previously
displayed program statement.
Deletion of Program Statements: Except for the “START” and “END”, any displayed program
statement can be deleted by pressing the “Delete” key (“B”). By pressing this key, the displayed
statement is removed from your program. If you wish to insert a new statement in place of the
deleted statement, press “Last” (“C”) then insert the new statement by pressing the appropriate
keys.
49
4.0 DIAFILTRATION MODE: Edit
Mode Selct DIAFILTRN
UP DOWN SELECT
SELECT
-DIAFILTRATIONEXEC EDIT PRIME
DOWN
SELECT
EDIT: PUMP DIRECTION
UP DOWN SELECT
PUMP DIRECTION: CW
UP DOWN SELECT
DOWN
SELECT
EDIT: PUMP TUBING
UP DOWN SELECT
PUMP TUBING:
15
UP DOWN SELECT
DOWN
SELECT
EDIT: ALARM LIMITS
UP DOWN SELECT
SELECT
LIMIT: RUN TIME ALM
UP DOWN SELECT
RUN TIME:
UP DOWN
08:00
SELECT
RUN TIME:
UP DOWN
OFF
SELECT
DOWN
SELECT
EDIT: ALARM ENABLE
UP DOWN SELECT
ENABLE: RUN TIME ALM
UP DOWN SELECT
DOWN
SELECT
EDIT: SLOW FACTOR
UP DOWN SELECT
SLOW FACTOR:
5.0
Incr Decr SELECT
DOWN
SELECT
EDIT: PREFILL
UP DOWN
PREFILL:
UP DOWN
SELECT
0.0
SELECT
DOWN
EDIT: METHOD
UP DOWN SELECT
SELECT
METHOD: ADDITION
UP DOWN SELECT
DOWN
EDIT: CLEAR COUNTERS
UP DOWN SELECT
50
SELECT
CLEAR TOTALS?
YES
NO
EXIT
SELECT
4.0 Diafiltration Mode: Edit
Summary: Diafiltration mode provides maintenance of a constant volume / weight of a retentate
reservoir of a TFF system while permeate is continuously removed from the reservoir. As the
weight on the scale is reduced, more solution is added to maintain the original weight value.
A balance or scale upon which the reservoir rests must be interfaced with the ChemTec in this
mode, and the pump will respond based on the resolution of the balance. The ChemTec is
almost always paired in the Diafiltration system with a PureTec, SciPro or SciPure as the TFF
recirculation system.
This can also be done in a method where solution is removed from the reservoir to maintain the
original weight.
Parameter selection:
¾ Pump Direction: Press select and choose between clockwise - CW (default) and counterclockwise - CCW.
¾ Pump Tubing: Select the tubing size in use. This selection will access the internal
calibration curve for that tubing size for the selected motor rpm. The Diafiltration Volume
value is based upon this calibration.
¾ Alarm Limits: Used to set limits for the following Alarms: Run Time and Diafiltration
Volume. These alarms are explained in the next section.
¾ Alarm Enable: Select the action of a particular Alarm: There are three choices, OFF
(disabled), Alarm Only (audible alarm, system continues to run), or Pump Stop (audible
alarm and the system stops). Choose settings for: Run Time, Diafiltration Volume, and
Reactor Weight Alarms. These alarms are explained in the next section.
¾ Slow Factor: Slow Factor affects the speed at which the pump reacts to changes on the
balance. 0.0 is the slowest response, 9.9 the fastest. Adjust as needed to avoid
overshooting at high flow rates. Default = 5.0
¾ Prefill: Used to add or remove weight at the beginning of a process. The ChemTec will
add or subtract that amount and possibly a bit more based the Slow Factor setting above,
and then maintain the new weight value. Note that this action occurs each time the process
is executed. Set to 0.0 to disable this feature. Default = 0.0
¾ Method: Choose between Addition and Subtraction. Addition adds solution to maintain the
weight value; Subtraction removes solution to maintain the value. Default = Addition.
¾ Clear Counters: Used to clear the cumulative Diafiltration Volume (DV) and Run Time
counters. Press select, and then Yes or No to: “Are Your Sure? “
51
52
4.1 Diafiltration Mode: Alarms / Limits
Summary: The Diafiltration Mode has a set of three alarms, two of which are user-defined.
Alarm Enable / Alarm Limit: There are a group of three user-definable alarms, two with
definable limits: Run Time, Diafiltration Volume, and Reactor Weight. The Enable menu allows
you to choose from three options for each alarm: Off (disabled), Beep Only (provides audible
alarm, pump still runs), or Stop Pump (system stops, beeps).
¾ Limit: Run Time Alarm: User defined processing “run” time. Set the desired time limit in
hours:minutes. The pump will beep or stop and beep when this limit is achieved depending
upon the Enable setting.
¾ Limit: Diafiltration Volume: User-defined diafiltration volume limit. Set the desired volume
and the ChemTec will beep or stop based on the Enable setting. The Pump Tubing setting
must be correct for this value to be accurate. The calibration of this value can be updated
using Volume Flow Mode. It is not based on the balance.
¾ Enable: Reactor Weight Alarm: This alarm occurs when the ChemTec is unable to
maintain the reactor weight within any given one minute period. This is a critical safety
alarm and should always be set at Stop Pump. This alarm has no related limit.
¾ Pressure and Temperature Alarms and Limits are available in their submenus as a
part of Mode Select: Setup.
4.2 Diafiltration Mode: Execute Display.
1. Press the Exec key.
2. The ChemTec will initialize the scale, and displays Relative Time (RT) in hh:mm:ss format,
the pump status, (RUN) the Reactor Weight, (RW) and the Diafiltration Volume (DV).
3. Press the Run key and the Reactor Weight is captured. The unit will then maintain the rate
by adding solution to the reactor as it is removed by another process. If the rate is
continuous, the rates will match quite quickly, maintaining the captured weight.
4. Additional displays are accessible via the “Switch” button that show the monitored
backpressure (P1) and Temperature (T) on the first screen, and the value of all three
available Analog Signals (A1, A2, A3) on the second. These Analog signals may be from
any sensor/transmitter, UV, Conductivity, etc. as long as it has a 4-20 ma output.
53
54
5.0 pH CONTROL MODE: Edit
Summary: To achieve optimal pH control, pump rate, pH-Setpoint, pH-Bandwidth, pH-Delta, as
well as Endpoint Delay must be carefully selected. The factory-set default values will provide
good pH control, however, depending on the reactor volume, the Max Pump Rate, pH-Delta and
Bandwidth can be further optimized.
If a particular set of parameters causes the pH-Setpoint to be exceeded, the pH-Delta should be
increased and/or the max ChemTec pump rate must be decreased, i.e. smaller increments of
acid or base are added to the reactor.
If using a peristaltic pump head, select the pump tubing that is used. For quantitative, high
accuracy pH control, a pump re-calibration is recommended before initiating pH maintenance or
titration. This flow rate calibration is accomplished in Volume Flow Mode.
¾ Setpoint: A single pH value between 0.00 and 14.00 is entered. This is the pH that is
maintained by the ChemTec. For process titrations, the Setpoint is the titration endpoint, e.g.
pH = 7.00 for simple acid /base neutralization.
¾ Pump Tubing: Select a pump tubing size that can accommodate the desired pump rate.
Refer to the chart on the side of the ChemTec for flow rate ranges with different tubing /
motor sizes. Default = 15.
¾ Pump Rate: This is the maximum reagent addition rate. Range depends upon motor/tubing
combination in use. Default = 1.0 ml/min.
¾ Endpoint Delay: The Endpoint Delay should be used with Endpoint titrations. The Endpoint
Delay represents the time period in seconds during which a constant Setpoint must be
maintained. If the pH has not sufficiently stabilized during the Endpoint Delay period
because of incomplete mixing, the pump may turn on again and deliver additional small
aliquots of reagent. The Endpoint Delay will be reset when the additions occur during the
Endpoint Delay period. The titration has been successfully completed with the expiration of
the Endpoint Delay.
For pH maintenance, the Endpoint Delay should be set to 0.0. With this setting the Setpoint
will be maintained indefinitely within a 0.1pH unit range, i.e. the smallest pH-Bandwidth.
¾ Sensor Offset: Represents the pH difference displayed on the pH Meter versus the pH
displayed by the ChemTec. Typically, a small offset is shown that can be eliminated by
increasing the Sensor Offset from +/- 0.5 pH units.
¾ D1 INPUT 4mA: Enter the low pH (typically pH = 0.0) that represents the low end of you pH
range. If you use the expanded scale on your pH meter, enter the low pH value of the
expanded scale that generates a 4mA pH-meter output.
¾ D1 INPUT 20mA: Enter the high pH value (typically pH = 14.00) that represents the high
end of your pH range. If you use the expanded scale on your pH meter, enter the high pH
value of the expanded scale that generates a 20mA pH-meter output.
¾ DELTA: Represents the pH range (default: DELTA = 1.00) during which the pump speed is
automatically reduced from the initial PUMP RATE setting. The DELTA value should be
increased or the pump rate should be decreased if the SETPOINT is repeatedly exceeded
during titration. Example: Setpoint 7.0, Delta 4.0 yeilds a max flow at pH 11.0 which
reduces until within Bandwidth of Setpoint.
¾ BANDWIDTH: The Bandwidth setting determines how far the solution pH can deviate from
the SETPOINT before the ChemTec starts delivering reagent.
¾ REAGENT: Either ACID or BASE must be selected.
55
5.1 pH CONTROL Mode: Alarm / Limits Menu
-PH CONTROLEXEC EDIT ALARM
ALARM
ALARM: REAG. VOLUME
UP DOWN SELECT
SELECT
-VOLUMEOFF
UP DOWN SELECT
DOWN
ALARM: LOW LIMIT
UP DOWN SELECT
SELECT
LOW LIMIT:
0.0
Incr
Decr SELECT
DOWN
ALARM:
LOW-pH
UP DOWN SELECT
SELECT
LOW PH:
UP DOWN
OFF
SELECT
DOWN
ALARM: HIGH LIMIT
UP DOWN SELECT
SELECT
HIGH LIMIT:
14.0
Incr
Decr SELECT
DOWN
ALARM: HIGH-pH
UP DOWN SELECT
SELECT
HIGH PH:
UP DOWN
OFF
SELECT
DOWN
ALARM: REAG. LIMIT
UP DOWN SELECT
SELECT
REAG LIMIT:
1.0
Incr
Decr SELECT
5.2 PH CONTROL MODE: Execute Display
Mode Selct PH CONTROL
UP DOWN SELECT
SELECT
-PH CONTROLEXEC EDIT ALARM
EXEC
SETPOINT:
7.00 ACID
Press RUN when Ready
RUN
00:00::00
PH 7.00
R
A SET
0.0
7.00
SWITCH
P1 0.0
T 25.0
56
SWITCH
5.1 pH CONTROL Mode: Alarms / Limits
¾ REAGENT VOLUME ALARM: Select either “Off” (Default), “Alarm Only”, or “Pump Stop”.
These are the three (3) options that can be selected. This setting is used in conjunction with
“REAGENT LIMIT” below. The REAGENT VOLUME LIMIT / ALARM is very useful when a
specific reagent volume is to be dispensed. The ChemTec will automatically stop once the
REAGENT VOLUME LIMIT has been reached if set to Pump Stop.
¾ LOW-pH LIMIT: Enter the value for the LOW-pH LIMIT. Default = 0.0. The alarm is
triggered when the pH drops below this value. This setting is used in conjunction with the
LOW-pH Alarm.
¾ LOW-pH ALARM: Select either “Off” (Default), “Alarm Only”, or “Pump Stop”.
¾ HIGH-pH LIMIT: Enter the value for the LOW-pH LIMIT. Default = 14.0. The alarm is
triggered when the pH rises above this value. This setting is used in conjunction with the
HIGH-pH Alarm.
¾ HIGH-pH ALARM: Select either “Off” (Default), “Alarm Only”, or “Pump Stop”.
¾ REAGENT LIMIT: Enter the reagent volume to be dispensed, i.e. 45 ml. When used
together with the REAGENT VOLUME ALARM, the ChemTec will stop automatically when
the reagent limit has been achieved.
¾ Pressure and Temperature Alarms and Limits are available in their submenus as a
part of Mode Select: Setup.
5.2 pH CONTROL Mode, Execute Display
1. Press EXEC and the Setpoint and Reagent chosen are displayed.
2. The ChemTec will initialize the process and displays Relative Time (RT) in hh:mm:ss format,
the Reagent Volume (R), the measured pH value (PH), the Reagent chosen (A for Acid, B
for Base), and the Setpoint value. (SET).
3. An additional display is accessible via the “Switch” button that shows the monitored
backpressure (P1) and Temperature (T).
57
6.0 ANALOG Mode:
Summary: Analog mode allows direct proportional control of the ChemTec motor as a percent
of motor speed from a 4-20 mA analog input signal on Analog Channel 1. The pump direction,
% of motor speed, and status of the TTL switches is displayed.
The following front panel keys are active in Analog Mode: RUN, STOP, CW/CCW, and
SWITCH.
The SWITCH key provides access to four TTL switches. Use 1/0 to change the state and the
LEFT button to change Bits from 1 – 4 to select the switch to change.
The unit can be controlled using this signal and the RUN and STOP buttons, or via an External
Run/Stop cable. (Requires setting Ext Run-Stop in Setup: Pump to Level.)
- ANALOG- CW
Sw =0000
0.00%
SWITCH
Sw -0000LEFT
1/0
SELECT
BIT 1
SELECT
7.0 Manual Mode:
Summary: This mode allows manual control of the ChemTec. The following front panel keys
are active in Manual Mode: RUN, STOP, RATE, CW/CCW, and SWITCH. The RATE key
allows you to change the pump speed, while the SWITCH key provides access to four TTL
switches.
The screen displays the Mode, the % of Motor speed that is set, the status of the TTL switches,
the Pressure if a sensor is in use, Temperature in ⁰C and the pump direction.
- MANUAL100.0%
T = 25.0 P1 = 0.0
CW
SWITCH
Sw -0000LEFT
1/0
58
BIT 1
SELECT
SELECT
8.0 SETUP
MODE SELECT SETUP
UP DOWN SELECT
SELECT
- SETUP - SCALE
UP DOWN SELECT
SELECT
- SCALE- SCALE MANF.
UP DOWN SELECT
SCALE MANF: METLER
UP DOWN SELECT
- CLOCK- TIME OF DAY
UP DOWN SELECT
TIME:
INCR
- TESTBeep/Led Test
REQUIRES TEST
FIXTURE AND CABLES!
DOWN
- SETUP - CLOCK
UP DOWN SELECT
SELECT
DECR
12:00
SELECT
DOWN
- SETUP – SYSTEM TEST
UP DOWN SELECT
SELECT
DOWN
- SETUP – TEST MODE
UP DOWN SELECT
SELECT
- TEST- 10%
CW CCW
00000
ETHERNET:
UP DOWN
ADDR1
SELECT
DOWN
- SETUP - ETHERNET
UP DOWN SELECT
SELECT
ETHERNET ADDR1: 192
INCR DECR SELECT
DOWN
SELECT
- SETUP - PRINTER
UP DOWN SELECT
- PRINT – PRINT TIME
UP DOWN SELECT
PRINT TIME:
UP DOWN
00:10
SELECT
ANALOG: LOW RANGE 1
UP DOWN SELECT
LO ANALOG1:
INCR DECR
0.0
SELECT
- SETUP -TEMPERATURE
UP DOWN SELECT
TEMPERATURE: OFFSET
UP DOWN SELECT
TEMP OFFSET:
0.0
INCR DECR SELECT
- SETUP-PRESS.SENSOR
UP DOWN SELECT
PRESSURE: RANGE
UP DOWN SELECT
PRESS RANGE:
60.0
UP DOWN SELECT
- SETUP - PUMP
UP DOWN SELECT
- PUMP – KEYPAD BEEP
UP DOWN SELECT
- SETUP - SCALE3
UP DOWN SELECT
SCALE MANF: NONE
UP DOWN SELECT
NOT USED IN CHEMTEC
- SETUP - SCALE2
UP DOWN SELECT
SCALE MANF: NONE
UP DOWN SELECT
NOT USED IN CHEMTEC
DOWN
- SETUP - ANALOG
UP DOWN SELECT
59
SELECT
KEY BEEP:
UP DOWN
ON
SELECT
8.0 SETUP Mode:
Summary: The Setup Menu consists of the following items; the following sections provide
further explanation:
Scale: Proper Scale communications are set by selecting the correct Scale Manuf. Scales
from Mettler, Ohaus or Sartorius may be used. Submenu allows setting of Scale Manuf., Units,
Alarm, and Tare. Default = “Metler”.
Clock: Set the time of day (military), day, month, and year. Print Enable allows choice of
Relative (Run) Time, or Time of Day for printout and display. In most cases the clock will be set
at the factory for the destination time zone. Default = Relative Time.
System Test: Allows testing of the ChemTec I/O’s, requires purchase of IQ/OQ Document.
Use Test Mode if needed for trouble shooting.
Test Mode: Allows independent testing of the ChemTec I/O’s. Motor, Keypad, Scale,
Pressure, Temperature, Valves, Analog, TTL switches.
Ethernet: Allows setting of the IP Address, Subnet Mask and Gateway values for Modbus
TCP/IP communication via the Ethernet Port.
Printer: Select communications parameters for SciLog printer (P/N 080-095) or PC. Default
settings are Print Time (Default = 10 sec.), Type (Seiko), Baud Rate (9600), Stop Bits (2),
Parity (None), Word Length (8), Print Delay (0 sec).
Analog: Allows setting of Hi and Lo Range, as well as Hi and Lo Limits, Alarms and Zeroing of
all three available 4-20 ma analog inputs.
Temperature: Select an Offset for the SciTemp Temperature sensor if needed.
Press. Sensor: Allows user to Zero all three SciPres pressure sensors. (Span is used for
factory calibration.) Source is used to select the desired sensor for related alarms and control
in all modes. Units: Choose from Psi (default), Bar, or Kpa. Range: Default is 60, can be set
lower, will require re-calibration of the input. Contact SciLog Customer Service for assistance..
Pump: Select the following user preferences: Keypad Beep: (On/Off), Switch Configuration:
(Level / Pulse), Switch Polarity: (Normal/Inverted), TTL1:On-Off: (Yes/No), Set Yes if
controlling another pump as a slave, set NO if controlling Rotary Selector Valve “W”. Motor
Start: (Hard / Soft-Ramp), Motor RPM: (3400, 600, 160, 8), Pump Head:
(Peristaltic/RH1/RH0/RH00), Pump Tubing: (13/14/16/25/17/18/15/24/35), Power Up:
(Mode/Menu/Run), External Run-Stop: (Pulse/Level), ASCII Feedback (On / Off), Factory
Reset: (Resets all variable parameters to their original factory defaults).
Scale2 and Scale3: Not utilized with the ChemTec. Must remain set to “None”. Do not
remove the covers.
60
8.1 Setup: Scale
- SETUP - SCALE
UP DOWN SELECT
SELECT
- SCALE- SCALE MANF.
UP DOWN SELECT
SCALE MANF: METLER
UP DOWN SELECT
DOWN
- SCALE- ALARM
UP DOWN SELECT
ALARM: PUMP STOP
UP DOWN SELECT
DOWN
- SCALE- TARE WEIGHT
UP DOWN SELECT
TARE WEIGHT: OFF
UP DOWN SELECT
DOWN
- SCALE- UNITS.
UP DOWN SELECT
UNITS:
UP DOWN
.01 GM
SELECT
¾ Scale Manuf: Select the appropriate value for the scale in use. Options: Ohaus,
Ohaus2, Ohaus3, Mettler, Metler2, Sartor, Sartor2. Default = Metler. Proper
configuration of the scales parameters is required, as well as correct interface cable.
o
o
o
o
o
Ohaus3: Adventurer Pro.
Ohaus2: Adventurer, Explorer, Explorer Pro.
Mettler: Viper, Series 4, IND560.
Metler2: Speedweigh, Panther.
Sartor2: Current default Sartorius setting, all series.
¾ Alarm: Triggered if communication with the scale is lost. Options: Pump Stop, Alarm
Only or Off. Default = Pump Stop.
¾ Tare Weight: Determines if the system tares the scale upon pressing Execute and Run
in the main operational modes. This is counterintuitive. Options: On, Off. Default =
OFF, which causes the system to tare the scale. ON will cause the tare to not occur.
¾ Units: Select from: .001 gm, .01 gm, 0.1 gm, Kg, T, Lbs, OzT, Oz, C, Dwt. Default =
.01 gm.
61
A Mettler Toledo BBA422 series scale is the most frequently purchased scale sent with
the system. If a different scale is required, please contact SciLog for configuration
information.
8.11 Mettler Toledo BBA/BBK 422 Scale Parameters:
To enter the Technical Setup mode, press and hold the “Print” key until the word CODE appears
on the display. Then press “Zero”, “Tare”, “Zero”, “Tare”, “Print”, and the word SCALE will
appear. You are at the top of the menu. Use the “Zero” and “Tare” buttons to scroll thru choices
on a level, and the “Print” button to select.
Menu Level 1
SCALE
Level 2
Display
Tare
Zero
Restart
Filter
Level 3
Unit1
Unit2
Selected Menu Item
g
g
AZM
OFF
Vibrat
Process
Stabili
Medium
Universal
Standard
(High)
(Dosing)
(Fast)
Fact
Min.Weig
Reset
APPLIC
TERMINL
COMMUNI
COM1
Mode
Paramet
Dial.old
Baud
Parity
H.Shake
9600
8 none
NO
Option
Def. Prn
DIAGNOS
END
NOTE: The Bold parameters are the only custom settings needed for communication with
SciLog systems. Those in ( ) are options. All others should remain at factory defaults. Consult
your scale manual for help navigating through the scale menu.
In Setup Mode, select “METLER”, see SETUP: SCALE: MANUF. By making this selection, the
system will implement the correct parameters for communicating with this scale. You will also
need SciLog P/N 080-067PGS Mettler Balance-Pump Interface Cable
Scales purchased with the system through SciLog will be configured
and tested together with the ChemTec as a system at the factory.
62
8.2 Setup: Clock
- SETUP - CLOCK
UP DOWN SELECT
SELECT
- CLOCK- TIME OF DAY
UP DOWN SELECT
TIME:
INCR
DECR
12:00
SELECT
DOWN
- CLOCK- PRINT ENABLE
UP DOWN SELECT
PRINT: RELATIVE TIME
INCR DECR SELECT
DOWN
- CLOCKYEAR
UP DOWN SELECT
YEAR:
INCR DECR
2009
SELECT
DOWN
- CLOCKUP DOWN
DAY
SELECT
DAY OF MONTH 12
INCR DECR SELECT
DOWN
- CLOCKMONTH
UP DOWN SELECT
MONTH:
INCR DECR
8
SELECT
Clock is used to set the Date and Time in the ChemTec real time clock, and control the
displayed and output time format.
¾ Time of Day: Press Select and use the Incr. and Decr. buttons to set the current time in
24 hour format. This should be preset by the factory prior to shipping.
¾ Print Enable: Controls displayed and output time. Choose between Relative Time and
Time of Day. Relative Time starts at 00:00:00 at the beginning of a processing run, and
Time of Day yields current time. Default = Relative Time.
¾ Year: Press Select and use Incr. and Decr. to set the current year.
¾ Day of Month: Press Select and use Incr. and Decr. to set the current day of the
month.
¾ Month: Press Select and use Incr. and Decr. to set the current month.
63
8.3 Setup: Test Mode:
- SETUP – TEST MODE
UP DOWN SELECT
SELECT
SCALE INTITIALIZATION
Please Wait
SCALE ERROR
Hit any key
STAR KEY
- TEST- 10%
CW CCW
00000
- TEST- PRESSURE
00.0
00.0
00.0
STAR KEY
STAR KEY
- TEST- KEYPAD
- TEST- TEMPERATURE
0.0
STAR KEY
- TEST- SCALE
0.00
0.00
0.00
STAR KEY
- TEST- ANALOG
0.0
0.0
0.0
STAR KEY
Sw – 1234 – BIT 1
LEFT
1/0
Select
STAR KEY
- TEST- VALVES
V1
W1
Test Mode provides the ability to test the inputs and outputs (I/O’s) of the ChemTec outside
of the normal operational modes. Upon pressing Select, the ChemTec will attempt Scale
Initialization. If it passes, the next Test appears. If it fails, press any key and the next Test
appears. Use the Star (*) button to move between tests.
¾ Motor: This tests the motor. Use the Rate/Pressure button to change the motor speed.
Use the Run / Stop buttons, and the CW / CCW keys to exercise the motor. The encoder
pulses/second is displayed.
¾ Keypad: This tests the keypad. Press the buttons in any order, and an appropriate
number is displayed. Left to right, top to bottom, they are numbered 1 through 0, the
Star key passes if it moves to the next test.
¾ Scale: If a scale is connected and is communicating properly, the value here will match
that of the scale. (There are three shown, due to the three interfaces, but only one is
used with the FilterTec.)
¾ Pressure: If SciPres Disposable Pressure Sensors are connected, they will display the
measured pressure, P1, P2, P3. By pressing the A, B, or C keys, the sensors may be
zeroed. If there is no sensor connected, --.- will be displayed.
¾ Temperature: If a SciTemp Disposable Pressure Sensor is connected, the measured
temperature in ⁰C will be displayed. If no sensor is connected, 0.0 is displayed.
¾ Valves: If Valve V or W is connected, press the A or B button to test them.
¾ Analog: Displays the analog value for Channels 1, 2 and 3 based upon input and Hi/Lo
range settings.
¾ TTL Switches: By using Left and 1/0 to change the BIT setting, the TTL outputs may be
tested. You must have a DMM connected to measure the voltage, it will be 0.0 if Switch
is set to 0, and 5.0 Vdc if set to 1. (display is 1234 if all are high, 0000 if all are low)
64
8.4 Setup: Ethernet
- SETUP - ETHERNET
UP DOWN SELECT
UP
SELECT
ETHERNET:
UP DOWN
ADDR1
SELECT
ETHERNET ADDR1: 192
INCR DECR SELECT
ETHERNET:
UP DOWN
ADDR2
SELECT
ETHERNET ADDR1: 168
INCR DECR SELECT
ETHERNET:
UP DOWN
ADDR3
SELECT
ETHERNET ADDR1: 0
INCR DECR SELECT
ETHERNET:
UP DOWN
ADDR4
SELECT
ETHERNET ADDR1: 191
INCR DECR SELECT
ETHERNET:
UP DOWN
MASK1
SELECT
ETHERNET MASK1: 255
INCR DECR SELECT
ETHERNET:
UP DOWN
MASK2
SELECT
ETHERNET GATE1: 192
INCR DECR SELECT
GATE2
SELECT
ETHERNET GATE2: 168
INCR DECR SELECT
GATE3
SELECT
ETHERNET GATE3: 0
INCR DECR SELECT
UP
UP
ETHERNET:
UP DOWN
GATE1
SELECT
UP
UP
ETHERNET:
UP DOWN
ETHERNET MASK4: 0
INCR DECR SELECT
UP
UP
ETHERNET:
UP DOWN
MASK4
SELECT
UP
UP
ETHERNET:
UP DOWN
ETHERNET MASK3: 255
INCR DECR SELECT
UP
UP
ETHERNET:
UP DOWN
MASK3
SELECT
ETHERNET MASK2: 255
INCR DECR SELECT
ETHERNET:
UP DOWN
GATE4
SELECT
ETHERNET GATE4:
1
INCR DECR SELECT
Ethernet allows setting of the IP Address, Subnet Mask and Gateway for the ChemTec.
This allows communicating with the ChemTec via Modbus TCP/IP when it becomes
available. Initially, if set properly for the company network, the user can ping the unit from
a command prompt. Consult the company Network Administrator for the proper settings. A
crossover cable can be used if connected directly to a PC, otherwise use a standard
network patch cable and a hub or switch.
¾ IP Address: The default IP Address for the ChemTec is 192.168.0.191. Use ADDR1
through ADDR4 to modify this address.
¾ Subnet Mask: The default Subnet Mask is 255.255.255.0. Use MASK1 through Mask4
to modify this address.
¾ Gateway: The default Gateway is 192.168.0.1. Use GATE1 through GATE4 to modify
this address.
65
8.5 Setup: Printer
- SETUP - PRINTER
UP DOWN SELECT
DOWN
SELECT
- PRINT – PRINT TIME
UP DOWN SELECT
PRINT TIME:
UP DOWN
00:10
SELECT
- PRINT – WORD LENGTH
UP DOWN SELECT
DOWN
- PRINT –
UP DOWN
TYPE
SELECT
DOWN
TYPE:
UP DOWN
SEIKO
SELECT
- PRINT – BAUD RATE
UP DOWN SELECT
BAUD RATE:
UP DOWN
9600
SELECT
PRINT DELAY:
UP DOWN
0
SELECT
DOWN
DOWN
- PRINT – STOP BITS
UP DOWN SELECT
WORD LENGTH: 8 BITS
UP DOWN SELECT
STOP BITS:
UP DOWN
1
SELECT
PARITY:
UP DOWN
NONE
SELECT
- PRINT – PRINT DELAY
UP DOWN SELECT
DOWN
- PRINT –
UP DOWN
PARITY
SELECT
Printer allows the setting of RS-232 communication parameters needed for connection to
a SciLog serial printer or to a PC for data collection.
¾Print Time: Controls how fast the ChemTec sends data points in Minutes: Seconds.
Maximum is 30:00 minutes; Minimum is 00:05 seconds. Default = 05:00 minutes.
¾Type: Allows use of two styles of small serial printers, Seiko, a thermal unit, and Starr, a
dot matrix. For all other printers, and PC communication, Seiko setting is used and is
the default.
¾Stop Bits: Select 1 or 2. Default = 1.
¾Parity: Select Even, Odd or None. Default = None.
¾Word Length: Select 7 or 8 Bits. Default = 8 Bits.
¾Baud Rate: Select 300, 600, 1200, 2400, 4800, 9600, or 38.4. Default = 9600
¾Print Delay: Used to slow down the output for printers with small buffers. Select 0 – 5
seconds. Default = 0 seconds.
66
8.6 Setup: Analog
- SETUP - ANALOG
UP DOWN SELECT
SELECT
ANALOG: LOW RANGE 1
UP DOWN SELECT
LO ANALOG1:
INCR DECR
0.0
SELECT
UP
ANALOG: LOW RANGE 2
UP DOWN SELECT
LO ANALOG1:
INCR DECR
0.0
SELECT
HI ANALOG1:
INCR DECR
200.0
SELECT
UP
ANALOG: HI RANGE 2
UP DOWN SELECT
HI ANALOG1:
INCR DECR
100.0
SELECT
ANALOG: 1
ZERO
SPAN
0.0
EXIT
UP
ANALOG: ZERO 2
UP DOWN SELECT
ANALOG: 2
ZERO
SPAN
0.0
EXIT
HI ANALOG1: OFF
INCR DECR SELECT
UP
ANALOG: HI ALARM 2
UP DOWN SELECT
HI ANALOG2: OFF
INCR DECR SELECT
HI ANALOG1:
INCR DECR
0.0
SELECT
UP
ANALOG: HI LIMIT 2
UP DOWN SELECT
HI ANALOG2:
INCR DECR
0.0
SELECT
LO ANALOG1: OFF
INCR DECR SELECT
UP
ANALOG: LO ALARM 2
UP DOWN SELECT
LO ANALOG2: OFF
INCR DECR SELECT
LO ANALOG1:
INCR DECR
0.0
SELECT
ANALOG: LO LIMIT 2
UP DOWN SELECT
ANALOG: ZERO 3
UP DOWN SELECT
ANALOG: 3
ZERO
SPAN
ANALOG: HI ALARM 3
UP DOWN SELECT
HI ANALOG3: OFF
INCR DECR SELECT
ANALOG: HI LIMIT 3
UP DOWN SELECT
HI ANALOG3:
INCR DECR
ANALOG: LO ALARM 3
UP DOWN SELECT
0.0
SELECT
LO ANALOG3: OFF
INCR DECR SELECT
LO ANALOG2:
INCR DECR
0.0
SELECT
ANALOG: LO LIMIT 3
UP DOWN SELECT
LO ANALOG3:
INCR DECR
Analog provides for configuration of the three available 4-20 mA Analog inputs. The Hi/Lo
Range values can be set, the signal can be calibrated via a Zero/Span function, and Hi/Lo
Alarms and Limits can be set for any or all three of the inputs.
¾ Lo Range 1: Set the value for the 4 mA input on Channel 1. Default = 0.0
¾ Hi Range 1: Set the value for the 20 mA input on Channel 1. Default = 200.0
¾ Zero 1: Provides for calibration of the Analog Channel 1 input. Provide a 4 mA signal
and press “Zero”. Provide a 20 mA signal and press “Span”. Press Exit to finish. The
device being interfaced or a source traceable to NIST should be used for this procedure.
¾ Hi Alarm 1: Choose the enable setting for a Hi Alarm on Channel 1. Select between
Off, Alarm Only and Pump Stop. Default = OFF
¾ Hi Limit 1: Set the Limit for Hi Alarm 1. The alarm is triggered when the value is
exceeded. Default = 0.0
¾ Lo Alarm 1: Choose the enable setting for a Lo Alarm on Channel 1. Select between
Off, Alarm Only and Pump Stop. Default = OFF
¾ Lo Limit 1: Set the Limit for Lo Alarm 1. The alarm is triggered when the value drops
below the limit after first exceeding it. Default = 0.0
¾ Note: Analog input channels 2 and 3 are the same, except the default for the Hi Range
is 100.0. Maximum range value for any channel is 9999.9.
67
0.0
EXIT
UP
UP
ANALOG: LO LIMIT 1
UP DOWN SELECT
100.0
SELECT
UP
UP
ANALOG: LO ALARM 1
UP DOWN SELECT
HI ANALOG3:
INCR DECR
UP
UP
ANALOG: HI LIMIT 1
UP DOWN SELECT
ANALOG: HI RANGE 3
UP DOWN SELECT
UP
UP
ANALOG: HI ALARM 1
UP DOWN SELECT
0.0
SELECT
UP
UP
ANALOG: ZERO 1
UP DOWN SELECT
LO ANALOG3:
INCR DECR
UP
UP
ANALOG: HI RANGE 1
UP DOWN SELECT
ANALOG: LOW RANGE 3
UP DOWN SELECT
0.0
SELECT
8.7 Setup: Pressure Sensor
- SETUP-PRESS.SENSOR
UP DOWN SELECT
SELECT
PRESSURE: RANGE
UP DOWN SELECT
PRESS RANGE:
60.0
UP DOWN SELECT
DOWN
PRESSURE: UNITS
UP DOWN SELECT
PRESSURE UNITS: PSI
UP DOWN SELECT
DOWN
PRESSURE: SOURCE
UP DOWN SELECT
PRESS SOURCE:
P1
UP DOWN SELECT
DOWN
PRESSURE: ZERO
UP DOWN SELECT
PRESSURE:
P1
P2
ZERO
P3
P1
PRESSURE: 1
ZERO
SPAN
0.0
EXIT
DOWN
PRESSURE: FILTER
UP DOWN SELECT
PRESS FILTER:
4
UP DOWN SELECT
Pressure Sensor is used to configure settings related to the SciPres Disposable Pressure
Sensors. The following can be configured; Range, Units, Source (control and alarms), Filter
(signal noise) and Zero/Span. The ChemTec uses only one sensor port, choice is made with
the Source setting below.
¾ Range: Set the overall pressure range, the Default is 60.0 psi, and is the maximum.
Changing this setting requires re-calibration of the sensor signals.
¾ Units: Select between Psi, Bar, and KPA. Default = Psi.
¾ Source: Controls the source pressure sensor for monitoring and alarms. Select
between P1, P2 or P3. Default = P1
¾ Zero: Used to “Zero” the sensors to establish the zero offset cause by the circuitry and
any inherent hydraulic pressure in your tubing beyond the pump head. Connect the
sensor, and remove any pressure from the system. Select the sensor, P1, P2 or P3 and
press “Zero”. You are prompted to confirm the action. “Span” should not be used on a
routine basis, as it sets the max input value. NOTE: Do not Zero P1, P2 or P3 unless a
sensor is connected. The display should read “--.-“ with no sensor connected. If it reads
0.0 in this state, connect the sensor and re-zero it.
¾ Filter: This feature filters out the pulsations in the pressure signal due to the peristaltic
nature of the pump head. This provides better control and easier to read values, as well
as improved graphed data. Select from 1 to 7, 1 = no signal filter, 7 = maximum filter.
Default = 4.
68
8.7 Setup: Pressure Sensor, Calibration
The ChemTec has built in calibration curves for the SciPres disposable pressure sensors that
are inherently very accurate for the installed default range of 0 – 60 psi, and there should be no
need for you to change it. If your metrology department insists that they calibrate them
periodically, the procedure follows.
To calibrate the ChemTec / SciPres Disposable Sensors:
1. Obtain a NIST traceable regulated source of compressed gas (i.e. air, nitrogen) and
pressure gauge.
2. Go to Mode Select; Setup; Pressure Sensor, then to Pressure: Range, and note the
range specified, change if desired. (Default is 60 psi.)
3. Press Exit and scroll to Pressure: Zero.
4. Choose P1.
5. With no pressure on the sensor, press Zero (“A” button).
6. Connect regulated pressure source to P1, and carefully increase to match range noted
in step 2.
7. Note: Pressurizing the SciPres Sensors beyond 60 psi can damage the sensor.
8. Press Span (“B” button).
9. Turn off pressure source, Press exit.
10. Repeat steps 5 – 8, choosing P2 and then P3.
11. You have now recalibrated (spanned) all 3 SciPres sensors. It is still advisable to zero
each sensor again with no pressure in the system, prior to running your tests via the
Edit: Press. Sensor menu in the operating mode of choice.
69
8.8 Setup: Pump
- SETUP - PUMP
UP DOWN SELECT
70
- PUMP – KEYPAD BEEP
UP DOWN SELECT
KEY BEEP:
UP DOWN
ON
SELECT
-PUMP- FACTORY RESET
UP DOWN SELECT
CLEAR ALL MEMORY?
YES
NO
EXIT
- PUMP - ASCII FEEDB
UP DOWN SELECT
ASCII FEEDBACK: ON
UP DOWN SELECT
- PUMP – EXT RUN-STOP
UP DOWN SELECT
EXT RUN-STOP: PULSE
UP DOWN SELECT
- PUMP – POWER UP
UP DOWN SELECT
POWER-UP:
UP DOWN
- PUMP – PUMP TUBING
UP DOWN SELECT
PUMP TUBING:
15
UP DOWN SELECT
- PUMP – PUMP HEAD
UP DOWN SELECT
PUMP HEAD: PERISTLTC
UP DOWN SELECT
- PUMP – MOTOR RPM
UP DOWN SELECT
MOTOR RPM:
UP DOWN
- PUMP – MOTOR START
UP DOWN SELECT
MOTOR START: HARD
UP DOWN SELECT
- PUMP – TTL1: ON-OFF
UP DOWN SELECT
TTL1 ON-OFF:
YES
UP DOWN SELECT
- PUMP – SW. POLARITY
UP DOWN SELECT
POLARITY: INVERTED
UP DOWN SELECT
- PUMP – SWITCH CONF
UP DOWN SELECT
SWITCH CONF: LEVEL
UP DOWN SELECT
MODE
SELECT
600
SELECT
ARE YOU SURE?
YES
NO
EXIT
8.8 Setup: Pump:
Setup: Pump provides configuration of global settings related to the pump. Generally, the
default values here do not need to be changed. Any changes required for a particular
system will be made at the factory, and would only need to be modified if a “Factory Reset”
is performed.
¾ Keypad Beep: Determines if the buttons “beep” when pressed. Default = ON.
¾ Factory Reset: Resets the system to the factory default settings for all menus.
Requires pressing “YES” to both the “Clear All Memory?” and “Are You Sure?” prompts.
¾ ASCII Feedback: Controls responses sent to a PC upon receipt of a remote command.
Default = ON.
¾ External Run-Stop: Controls action of the Footswitch connection, which is part of the
External I/O DB37 connector (pins 19 and 37). Choose Pulse for footswitch type
control where the contacts are closed and then opened. Choose Level for contact
closure control where closed = Run and open = Stop. Run key is disabled when this is
set to Level except in Manual Mode. Default = Pulse.
¾ Power-Up: Controls the action of the system upon power-up. Choose from Menu,
Mode, or Run. Menu = the system returns to the top of the Menu. Mode = the system
returns to the last Mode it was in. Run = the system returns to the last Mode it was in
and starts the process.
¾ Pump Tubing: If Pump Head is set to Peristaltic, all nine standard tubing sizes can be
chosen. Used with Motor RPM setting to determine proper calibration curve. Default =
15.
¾ Pump Head: Choose between Peristaltic, RH1, RH0, RH00, Mag 201, Mag 122, Mag
120, and Mag 040. Used to access the proper calibration curve. Default = Peristaltic.
¾ Motor RPM: Choose between 8, 160, 600 and 3400 rpm, matching the motor installed
in the system. This will be set at the factory. It will need to be reset after a Factory
Reset if other than the default. Default = 600.
¾ Motor Start: Controls how fast the motor starts. Hard is fast, Soft is slow. Default =
Hard.
¾ TTL 1 On-Off: Controls action of TTL Switch 1, used for Master/Slave control of another
system or device with TTL input control. Set to Yes, TTL 1 changes states from High to
Low when the system is told to run the motor. Set to No, it does not. Default = Yes.
¾ Switch Polarity: Controls the polarity of the TTL switches. Inverted = High when not
activated, Low when activated. Normal = Low when not activated, High when activated.
Default = Inverted to allow for proper Master/Slave control.
¾ Switch Configuration: Sets the action of the TTL switches. Choose between Level
and Pulse. Default = Pulse. Set to Level to allow for proper Master/Slave control.
71
9.0 Data Acquisition:
Summary: SciLog has available a software package called SciDoc that includes data collection
software and a Custom Excel spreadsheet that is automatically populated when any of the
modes are executed except Manual. It also has charts that are automatically populated as the
data is generated. See Section 9.1 below.
Either the Printer Port or USB Port may be used for data collection. The instructions for
installing the USB driver appear at the beginning of this manual. The ChemTec Printer Port is
required for use with a SciLog serial printer, and both Thermal and Dot Matrix are available. By
using both ports, the data can be simultaneously captured on a PC and a Printer.
When a PC is connected, all data generated in Mass Flow, Volu Flow, Diafiltration and pHControl modes can be sent to the PC for archiving. Manual and Analog Modes generate no data
output. Please use the SciLog SciDoc Data Collection Software described below. Alternatively,
a PC running “HyperTerminal”, a program that comes with Windows, may be used to capture
the data. The HyperTerminal settings are provided for you in section 7.2 entitled “PC
HyperTerminal Settings.” When interfacing with a PC you will need a separate RS-232 cable
(P/N: 080-073) or USB cable (P/N: 090-158).
Note: For a successful hook-up with your PC, the ChemTec and the PC must use the same
communications protocol. Make sure that the communication parameters in Setup: Printer are
the same as those listed in for HyperTerminal below or the default values.
The ChemTec is also equipped with a USB port that can be connected to your PC. You will find
the driver for this connection on the CD this manual came on. You will need to look in Device
Manager on your PC to determine the Com Port number assigned to the ChemTec.
The system is also equipped with an Ethernet Port. Settings for the Ethernet connection are
described in section 8.4. This is for communication via Modbus TCP/IP, and when the register
list is available, it will be added to the manual as an appendix.
72
9.1 ChemTec SciDoc Data Collection Software:
SciDoc is a software package that captures the data output of the ChemTec and places it in an
Excel spreadsheet. This spreadsheet also populates several graphs to aid you in the analysis
of your process. It consists of a copy of WinWedge32 from TalTech Inc. and a custom
spreadsheet with built in macros. It requires the use of a SciLog RS-232 cable, (P/N: 080-073)
or USB cable, (P/N: 090-158) to connect your FilterTec to an available Com Port on your PC.
Minimum system requirements for are Windows 98 and Excel 2000. WinWedge32 v3.4 is
included in the package and is Vista compatible. Installation instructions are included with the
package.
Once installed, click on the shortcut for the spreadsheet, and the following dialog box is
presented:
If you do not get this screen, you will need to change the Macro Security settings in Excel.
If it does not prompt to enable macros or does not prompt for the COM port, the security level is
too high.
1. If using a version of Office older than 2007, from the Excel menu bar, click on Tools,
Macros, and Security. Set it to Medium, close the spreadsheet and re-launch it.
2. If using Office 2007, from the Excel window, click on the Office logo in the upper left
corner. Then click on Excel Options in the lower left of this window. Highlight the Trust
Center, and click on Trust Center Settings in the lower left.
a. In this window you have two options:
i. Click on Trusted Locations, then Add new location, browsing to the
Winwedge folder where the spreadsheet is located and making it a
trusted location.
ii. Click on Macro Settings, and choose Enable all macros.
Choose the Com Port the ChemTec is connected to. Click on the OK button and WinWedge32
will start, showing itself as an icon in the system tray.
If you chose cancel on the Setup dialog box, WinWedge32 won’t be in the system tray, and you
will need to click on the “Com Port Setup” button to complete this task in order for data
collection to be possible. Once this is complete, you will have the next dialog box:
73
This dialog box allows the user to setup the spreadsheet to correctly deal with the data from
Mass Flow, Volume Flow, Diafiltration and pH Control Modes:
After pressing the ok button, the next dialog appears:
Enter the operator’s information and press OK.
74
After pressing OK, the empty datasheet appears:
When ready, press EXEC on the ChemTec, and then RUN after the balance has initialized.
The spreadsheet automatically captures the data at intervals defined by the Print Time setting in
the Setup: Printer sub menu. The columns and headers that are visible are dependent upon the
operational Mode of the ChemTec, and the mode selected on the Data Sheet setup screen. It is
important that they match, or some data may be hidden.
The data generated will automatically be placed in the cells of the spreadsheet, and the charts
populated with the same data. The text box in the upper left of the spreadsheet contains the
header information that is generated by the ChemTec. This will list the Operational Mode, the
date and time, all operating parameters, alarm settings and alarm limits.
The following chart is included for use, and they may be viewed by clicking on the appropriate
tab at the bottom of the worksheet:
Pump Rate (PR) vs. Time
Other charts may be created, or the existing charts may be modified if needed.
75
When you are finished with a run, your screen will look similar to this one:
Abbreviations:
RT = Relative Time
DV = Diafiltration Volume (Diafiltration Mode)
RV = Reagent Volume (pH Control Mode)
P1 = Pressure, psi
A1 = Analog Signal 1
ST = Pump Status
VP = Position of Valve V
AL = Alarm (HP) HP = High Pressure
(1=OFF, 2=Alarm Only, 3=Pump Stop)
CW = Clockwise Pump Direction
PR = Pump Rate
CV = Cumulative Volume (Volume Flow Mode)
CW = Cumulative Weight (Mass Flow Mode)
A2 = Analog Signal 2
A3 = Analog Signal 3
pH = pH Units, 0-14
WP = Position of Valve W
EP = End of Program,
HI = High pH, LO = Low pH
CCW = Counter Clockwise Pump Direction
Click on File-Save as: and choose an appropriate file name based on your needs. When ready
for another run, simply press the “Clear Data” button, or close and re-open the file.
76
Please note the following:
You may use the STOP key on the ChemTec front panel to interrupt the metering process. This
shows up in the data set by displaying the word STOP in the ST (Status) column of the Data
worksheet.
Using the EXIT key however and then pressing Exec and RUN again in the same data
collection run, will replace the header information in the text box at the top of the worksheet,
while continuing to add data to the bottom of the sheet. While the spreadsheet will pick up on
any change that has occurred, the initial header information will be lost. It is recommended that
you either save the data as mentioned above, or dispose of it by clicking on the “Clear Data”
button prior to pressing the Exec and RUN keys again to begin a new set of data.
To open the saved data at a later time and not lose any information, click on “Disable Macros”
when the spreadsheet is opened.
Please contact SciLog Inc. at 800-955-1993 if you require technical support for this software
package. We welcome your suggestions regarding this software as well.
While the ChemTec and all other SciLog Smart Pumps are 21CFR11 compliant, this
documentation software is not, and its results will need to be incorporated into your compliant
documentation system if your situation requires it.
77
9.2 Uploading/Downloading of Programs
You can use Win95/98 HyperTerminal for uploading or downloading of ChemTec programs.
Use the enclosed instructions for accessing the HyperTerminal in your PC and for selecting
Terminal mode parameters.
Once you have HyperTerminal open, reduce the HyperTerminal window to one half of its
original size. Open Note Pad (“Accessories” or “New Text Document” in HyperTerminal) and
reduce the Note Pad window to one half its size. Note Pad is used here as a text editor. Place
the HyperTerminal window in the upper half of the monitor and the Note Pad window in the
lower half of the monitor. Both are now displayed and are readily accessible.
Downloading a program from the ChemTec to the PC: place the cursor at the top of the
HyperTerminal screen and type the letter “D” to start downloading. You should see a
“Downloading” message on the pump display during transfer. The ChemTec program will
appear on the HyperTerminal window.
To edit the downloaded program, highlight all program steps with the mouse, then select “Copy”
from HyperTerminal, Edit. Place the cursor into the Note Pad screen and select “Paste” from
Note Pad. Edit. The ChemTec program will now appear in the Note Pad window. Edit the
program by deleting or adding program steps or changing the values of program parameters.
The modified program can now be sent to the ChemTec by using the “upload” instructions.
Uploading a program from the PC to the ChemTec is equally straight-forward: Create a
program in the in Note Pad, make sure the first line of the program is a upper case “U”; the last
line of the program must be “End”. Each program statement must be followed by a carriage
return (“Enter”). The list as whole must be followed by an extra carriage return, and it must be
included in the Uploaded text. For example:
U
START
CW
RUN
RATE 10.0
TIME 00:05
STOP
COUNT 001
END
Initiates Uploading
Starts Program
Pump turns clockwise
Pump motor turns On
Pump Rate: ml/min, gm/min.
Run Time: 5 minutes
Pump Motor stops
Program runs once.
End of Program
Highlight all program steps including the final extra carriage return. Select “Copy” in Note Pad,
Edit, then select “Paste to Host” in HyperTerminal, Edit. An “Uploading” message should be
seen on the ChemTec display during transfer. (If the program is short, look quick!)
•
If an Upload occurs while the ChemTec is in the “Exec, Edit, Alarm” screen, the program will
be loaded into the ChemTec but will not be executed.
•
If the Upload occurs while in the “Press RUN when Ready” screen, the ChemTec will start
the program once the upload is complete.
•
If the Upload occurs while a ChemTec program is running, the pump will stop, the scale (if
used) is re-initialized and the tare is activated. After the balance tares, the newly uploaded
program starts at the beginning.
78
9.3 Win95/98 HyperTerminal Settings:
ChemTec to PC: For PC Connections via the Printer Port a SciLog RS-232 Cable (P/N: 080073) is needed. When not using the SciLog printer, this allows process data to be “dumped” into
a PC for archiving. The list of settings below must match those in Setup: Printer of the FilterTec,
and Print Delay should be set to “0”. Alternatively, the USB port may be used. The driver for
the USB connection is on the CD this manual is on, and may be downloaded from
www.scilog.com.
The following terminal setting procedure is intended for PCs with a Window 98/XP software
installation: Press the START button in the lower left corner of your screen, select “Programs”
then select and open “Accessories”, select “Hyper Terminal”.
If using Vista, HyperTerminal Personal Edition can be downloaded from the internet at:
http://www.hilgraeve.com/hyperterminal.html
From the “Connection Description” screen, select an icon and enter a file name, i.e.
ChemTec. Press “Ok”
From the “Connect To” screen, select “Direct to Com 1” in the box labeled “Connect Using”
or the Com Port assigned to the FilterTec and Press “Ok”.
From the “Com 1 Property” screen, select the following parameters
Bits per Second:
Data Bits:
Parity:
Stop Bits:
Flow Control:
9600
8
None
1
None
Press “Ok”
Press “Ok” at the bottom of the “ChemTec Setup” screen.
A window with a blinking cursor will be presented, and the data stream from the ChemTec will
be displayed as it occurs.
79
ChemTec Program Statements:
The following control statements are used both in the Mass Flow and Volume Flow modes:
START
Starts program, automatically added as 1st program statement
CW
Clockwise motor direction, use “CW/CCW” key.
CCW
Counter-clockwise motor direction, use “CW/CCW” key.
RUN
Starts pump motor, use “RUN” key.
STOP
Stops pump motor, use “STOP” key.
RATE xx.x
Pump rate, g/min in Mass Flow, ml/min. in Volu Flow. Use “RATE” key.
TIME 00:00
Run Time, hours : minutes, last statement in timing block, all preceding
statements are executed at the beginning of timing block. Use TIME key.
Sw BITS 0000 Sets Status of TTL switches 1-4. Either a 0 or a 1. Allows programmed control
of external device or another pump. Use the “SWITCH” Key.
VALVE V1
Rotary Valve “V”, can select from position V1 through V6, use Star (*) key.
VALVE W1
Rotary Valve “W”, can select from position W1 through W6, use Star (*) key.
INTRP xx.x
Pump Ramp (Interpolation Function), defines highest pump rate of ramp. Use the
Star (*) key, and must be followed by a TIME statement defining the ramping
time interval.
COUNT
Defines how often the program will be repeated, typically COUNT = 1, i.e.
preceding program is run once. Use Star (*) key. Note: Nested Count commands
are not allowed. This only functions at the end of the program.
END
End of program, automatically added as last line in program.
80
ChemTec Program Examples:
The first example is a simple program. When executed, the program will run the system at 10
ml/min. for five minutes then stop. Enter this program in Volu Flow, Edit.
001
START
002
CW
003
RUN
004
RATE: 10 ml/min.
005
TIME: 00:05
006
STOP
007
COUNT:1
008
END
The same program can also be entered and executed in the Mass Flow mode. In this case the
RATE = 10 gm/min. When operating in the Mass Flow mode, a scale must be connected to the
ChemTec via the S1 scale port.
The next program shows the use of timing blocks and rate / ramp statements:
001
002
003
004
005
006
007
008
009
010
011
012
START
CW
RUN
RATE: 10 ml/min
TIME 00:05
INTRP: 50 ml/min
TIME: 00:05
RATE: 50 ml/min.
TIME 00:02
STOP
COUNT
1
END
Pump runs at 10 ml/m for 5 minutes.
Pump ramps from 10 to 50 ml/min in 5 min.
Pump runs at 50 ml/m for 2 minutes.
This program consists of 3 timing blocks. The pump initially runs at 10 ml/min. for 5 minutes
then ramps up to 50 ml/min over a 5-minute time interval and maintains a pump rate of 50
ml/min for 2 minutes.
By leaving out line 005 TIME 00:05, the system would immediately begin the ramp from 10 to 50
instead of running for five minutes before beginning the ramp.
81
ChemTec™ Metering Applications
1.0 Bioreactor Feed Application: General Information
Linear and exponential feeding strategies are very useful in many bioreactor applications. The
ChemTec allows the user to readily implement such nutrient metering strategies. The following
examples outline some general approaches; however, the specific pump rates and feeding
intervals must be experimentally determined and are dependent on the specifics of the process,
i.e. type of organism, rate of bio-mass growth, bioreactor size, etc. Once the optimal feeding
rate and feeding interval have been determined, the appropriate feeding strategy can be readily
automated with the ChemTec, utilizing either a volumetric or a mass-flow metering program.
Volumetric metering is recommended for applications in which the feeding intervals are
relatively short. Here, the pump tube wear of the peristaltic pump is the main limitation to
metering accuracy. Thus, longer feeding intervals may require frequent pump re-calibrations,
which are not only inconvenient but also affect overall metering accuracy. The actual pump rate
prior to re-calibration can be off by as much as 5%, depending on the extent of pump tube wear
and the time between re-calibrations.
In contrast, mass-flow metering has a number of advantages. The most important one lies in the
high precision and high accuracy levels (RSD < 0.2%) that can be achieved with mass-flow
metering without the need for pump re-calibrations. This advantage is further magnified when
dealing with feeding intervals that stretch over many hours, days or even weeks. However, in
order to achieve these long-term, superior precision and accuracy levels, the ChemTec requires
hook-up of an electronic, top-loading balance.
In the Mass-Flow Mode, the ChemTec metering rate is constantly monitored and, if required,
adjusted based upon feedback from an electronic balance or scale. The nutrient reservoir is
located on the balance; the pump rate is calculated and maintained based upon the reservoir
weight decrease during consecutive, 60-second intervals.
The resolution of the mass-flow rate is limited primarily by the resolution of the electronic
balance. For high-performance electronic balances, e. g Mettler PGS, the resolution is +/- 0.005
grams. Thus, the lowest mass-flow rate achievable with high performance balances is 0.03 to
0.04 grams per minute. In order to implement such low mass-flow rates, a ChemTec equipped
with an 8 RPM pump motor and a 1081 TANDEM pump head using #13 PharMed tubing is
recommended.
The ChemTec responds to three, user-selectable alarm conditions. The Cumulative Weight
(CW) or Cumulative Volume (CV) Alarm is triggered when the dispensed solution weight/volume
exceeds a user-definable limit. For example, if the Cumulative Weight Alarm has been set at
2000 grams, the ChemTec will automatically stop pumping and alarm when 2000 grams of
solution have been dispensed. Alternatively, the CW alarm can be selected to provide an
auditory alarm while pumping continues.
The Pump Rate (PR) Alarm is triggered when the selected mass-flow rate cannot be
maintained. This condition can occur when the solution reservoir is empty and air is pumped
into the bioreactor. The ChemTec recognizes this condition since no further weight changes are
detected. Alternatively, the ChemTec will also detect mass-flow rates that cannot be achieved
with the selected pump motor / tubing combination. This condition can occur when the selected
mass-flow rate requires a pump motor speed beyond 100%. The Pump Rate Alarm can be
selected to either stop the pump or simply provide an auditory Beep while pumping continues.
Before programming the ChemTec, check that the selected mass-flow rate can indeed be
implemented with the installed pump motor/tubing combination.
82
Please Note: The Pump Rate Alarm only functions in the Mass Flow Programs. Volume Flow
programs do not have the balance feedback available.
The End of Program (EP) Alarm stops the pump and provides an auditory Beep at the end of
the user-defined program. At selected time intervals, all of the ChemTec pump parameters can
be printed out or sent to a PC for data archiving, including cumulative weights, mass-flow rates,
and alarms.
Once a ChemTec program has been implemented and is running, the access to ChemTec front
panel can be disabled. Press the Star (*) key and select “Locked”, all front panel keys, except
the Star (*) key, are now disabled. This feature prevents accidental pump status/parameter
changes.
2.0 Linear, Volumetric Bioreactor Feed:
A SciLog customer provided the following data: A ChemTec was used to automate nutrient feed
into a bioreactor. During the initial growth phase, a linear nutrient ramp was implemented that
lasted four hours, followed by a very slow ramp during the remaining eleven hours:
Time, hrs
0.0
0.5
1.0
1.5
2.0
2.5
3.0
3.5
4.0
4.5
5.0
5.5
6.0
6.5
7.0
Rate, ml/min
35.60
43.21
50.66
57.83
66.04
73.65
81.26
88.87
96.48
96.55
96.62
96.69
96.75
96.83
96.89
Time, hrs
7.5
8.0
8.5
9.0
9.5
10.0
10.5
11.0
11.5
12.0
12.5
13.0
13.5
14.0
14.5
15.0
Rate, ml/min
96.96
97.02
97.10
97.16
97.23
97.29
97.37
97.43
97.50
97.56
97.65
97.65
97.65
97.65
97.65
97.65
A ChemTec CP-120 with a TANDEM 1081 peristaltic pump head (160 RPM pump motor) was
used for this feed application. PharMed pump tubing #16 was chosen which is capable of
generating flow rates from 4.6 ml/min. to 120 ml/min.
The following feed rate program was entered into EDIT of the Volu Flow mode:
000
001
002
003
004
005
006
007
008
009
010
83
START
CW
RUN
RATE = 35.60
INTRP = 96.48
TIME = 04:00
INTRP = 97.65
TIME = 11:00
STOP
COUNT = 1
END
When executing the above VOLU FLOW program, the ChemTec will generate an initial pump
rate of 35.60 ml/min, which is ramped up to 96.48 ml/min. over a four-hour period. This initial
ramp is followed by an almost constant pump rate, when actually; the pump rate of 96.48
ml/min. is increased to 97.65 ml/min. over an 11 hour period.
During the entire 15-hour operation of the ChemTec, no human intervention or supervision was
required. The ChemTec performance data was printed out at 15-minute intervals.
Figure 1 shows the time profile for the nutrient addition.
Figure 1
Pump Rate vs Time
120.00
Pump Rate, ml/min.
100.00
80.00
60.00
40.00
20.00
0.00
0.0
84
2.0
4.0
6.0
8.0
Time, hrs
10.0
12.0
14.0
16.0
3.0 Exponential Feed: Mass Flow, Example #1
A biotechnology company generated the following 75-hour, exponential feed. Utilizing a utility
pump hooked up to a process control device, 150 data points were required to define the
exponential feed strategy over this 75-hour period.
SciLog offered a simpler, alternative approach by generating an exponential feed based on six,
linear segments, each segment being 12.5 hours long. This approach reduced the required
number of data points from 150 to 7 without adversely affecting the feeding accuracy. The
following data set, which was derived from the original 150 point data set, was used to define
the six, linear feeding segments:
Time, hrs
0.0
12.5
25.0
37.5
50.0
62.5
75.0
Mass Flow Rate, gr/min.
0.37
0.50
0.69
0.94
1.28
1.75
2.39
A ChemTec CP-8 with a TANDEM 1081 peristaltic pump head (8 RPM pump motor) was used
for this feed application. PharMed pump tubing #16 was chosen which is capable of generating
pump rates from 0.4 ml/min. to 6.4 ml/min.
The following feed program was entered into EDIT of the Mass Flow mode:
000
001
002
003
004
005
006
007
008
009
START
CW
RUN
RATE = 0.37 g/m
INTRP = 0.50 g/m
TIME = 12:30
INTRP = 0.69 g/m
TIME = 12:30
INTRP = 0.94 g/m
TIME = 12:30
010
011
012
013
014
015
016
017
018
INTRP = 1.28 g/m
TIME = 12:30
INTRP = 1.75 g/m
TIME = 12:30
INTRP = 2.39
TIME = 12:30
STOP
COUNT = 1
END
When executing the above program, the ChemTec will generate an initial pump rate of 0.37
g/m, which is ramped up to 0.50 g/m during the first 12.5-hour segment. As shown in Figure 2,
the six linear segments provide an excellent fit. The largest deviation (error) from the original,
exponential feed rate is found in the last segment, which starts at 62.5 hours and ends at 75.0
hours. If necessary, the error associated with the last segment can be substantially reduced by
generating two segments each 6.25 hours long:
014
015
016
85
INTRP = 2.05 g/m
TIME = 6:15
INTRP = 2.39
017
018
019
TIME = 6:15
STOP
COUNT = 1
F ig u re 2
M ass F low , R ate vs. T im e
3
M ass flow
E xponential
Mass-Flow Rate, gm/min.
2.5
2
1.5
1
0.5
0
0
12.5
25
37.5
Tim e, hours
50
62.5
75
4.0 Exponential Feed: Mass Flow, Example #2
The following mass flow example represents an exponential feeding scheme with an initial time
delay of 11 hours. Such a time delay is desirable and necessary when the bioreactor has an
initial, large excess of nutrient. This high concentration of nutrient is converted into bio-mass
during the initial growth phase. The nutrient level drops during this phase and must be
subsequently replenished. At this point, the ChemTec starts metering fresh nutrient solution,
first at a constant rate, then at an exponentially increasing mass flow rate:
Time, hours
0.0
0.7
13.0
13.5
14.0
14.5
15.0
15.5
16.0
16.5
17.0
17.5
Mass Flow Rate, g/min
0.7
0.8
1.1
1.3
1.7
2.2
2.8
3.5
4.4
5.6
A ChemTec CP-8 with a TANDEM 1081 peristaltic pump head (8 RPM pump motor) was used
for this feed application. PharMed pump tubing #16 was chosen which is capable of generating
pump rates from 0.2 ml/min. to 6.0 ml/min. The following feed program was entered into EDIT of
the Mass Flow mode:
001
002
003
004
005
006
007
008
009
010
011
012
013
•
•
•
•
87
START
STOP
TIME = 11:00
RUN
CW
RATE = 0.70 g/m
TIME = 02:00
INTRP = 0.80 g/m
TIME = 00:30
INTRP = 1.10 g/m
TIME = 00:30
INTRP = 1.30 g/m
TIME = 00:30
014
015
016
017
018
019
020
021
022
023
024
025
026
INTRP = 1.70 g/m
TIME = 00:30
INTRP = 2.20 g/m
TIME = 00:30
INTRP = 2.80 g/m
TIME = 00:30
INTRP = 3.50 g/m
TIME = 00:30
INTRP = 4.40 g/m
TIME = 00:30
INTRP = 5.60 g/m
TIME = 00:30
COUNT = 1
The ChemTec will not be pumping for the first 11 hours although the program itself has
been initiated and is running.
After the initial waiting period of 11 hours, the ChemTec generates a constant mass flow
rate of 0.70 g/m for 2 hours.
Thereafter, the mass flow rate increases exponentially with time.
The program terminates with a pump rate of 5.6 g/m 17.5 hours after initiation of the
program.
88
T im e , h o u rs
18.0
17.0
16.0
15.0
14.0
13.0
12.0
11.0
10.0
9.0
8.0
7.0
6.0
5.0
4.0
3.0
2.0
1.0
0.0
Mass Flow Rate, gm/min
F ig u re 3
M a s s F lo w R a te v s . T im e
6
5
4
3
2
1
0
5.0 Preparative Chromatography: Step Gradients
The ChemTec is capable of automating preparative chromatography procedures: The ChemTec / valve
combination provides user programmable access to wash solution and buffers but also allows
redirection of column eluant and collection of LC fractions. Pump and valve actions are user
programmable from the front panel. Access to buffer solutions is possible on a user-definable schedule.
No external computer hook-up is required.
The ChemTec is equipped with the dual channel TANDEM 1081 peristaltic pump head and a 600RPM,
high-torque motor. The motor is optically encoded and servo-controlled, thus providing a highly
reproducible pump output. When used together with #16 PharMed pump tubing, the pump output
ranges from 29 to 533 ml/min per pump channel.
NOTE: If greater pump output is required, the 600RPM ChemTec model will generate pump rate from
103 to 1515 ml/min. when used with #18 PharMed tubing. However, carefully check the flow capacity
and limitations of your particular rotary valve. Use a high-flow rotary valve model that can
accommodate your selected pump rate range.
For a simple, step gradient application, the ChemTec controls two (2) rotary valves. Valve “V” provides
programmable access to sample solution, Buffer “A” or Buffer “B”. A second, six-port rotary Valve
“W” connects the LC column or detector output either to waste, sample return, or to four different
fraction collection bottles 1-4.
Enter the following program steps in the Volu-Flow Edit mode. NOTE: All of the selected time intervals
were chosen arbitrarily; in a real application these time intervals may be significantly different. For your
preparative chromatography application, select time parameters that meet your specific separation
requirements:
Edit: Program Steps
Comments:
1st Wash / Equilibration Cycle: Buffer “A” is pumped from buffer container (connected to “V1”), through
the pump, LC column and detector to the waste container (connected to “W1”)
000
001
002
003
004
005
006
START
RUN
CW
V1
W1
RATE = 100ml/min.
TIME = 00:05
Pump turned ON
Pump Direction: Clock-wise
“V” Valve Position 1; Buffer “A”
“W” Valve Position 1; Waste Bottle
Pump Rate = 100ml/min.
Pumping Time = 5.0 min.
Sample Introduction Cycle: Sample solution is pumped for two (2) minutes through the LC column into
a Sample Return Bottle. Note, the ChemTec pump rate is maintained at 100 ml/min. during this cycle. If
a different pump rate is desired, e.g. RATE = 50 ml/min., then the new RATE statement must be
inserted after step 006 and before step 009
007
008
009
89
V2
W2
TIME = 02:00
“V” Valve position 2; Sample Bottle
“W” Valve position 2, Sample Return Bottle.
Pumping Time = 2.0 min.
Edit: Program Steps
Comments:
2nd Wash / Equilibration Cycle: Buffer “A” is pumped through the Prep LC column into the Sample
Return Bottle. In this step, any sample not bound to the LC column will be washed off and pumped into
the Sample Return Bottle. The “W” Valve Position 2 as well as the pump rate is maintained during this
cycle.
010
011
V1
TIME = 05:00
“V” Valve position 1, Buffer “A”
Pumping Time = 5 min.
Step Gradient / Elution Cycle: The elution Buffer “B” is pumped through the LC column during this
cycle. It may be desirable to discard the initial volume since it contains a high percentage of Buffer “A”.
The first three program steps divert the initial volume to waste via “W1”. Thereafter the eluant is
collected via “W3” The ChemTec pump rate is maintained at 100 ml/min. during this cycle. If a different
pump rate is desired, e.g. RATE = 80 ml/min., then the new RATE statement must be inserted before
step 014. The elution time is defined by steps 014 and 016.
012
013
014
015
016
017
018
019
V3
W1
TIME = 02:00
W3
TIME = 10:00
STOP
COUNT = 1
END
“V” Valve position 3, Buffer “B”, Elution Buffer
“W” Valve position 1, Waste Bottle
Pumping Time, 2minutes, NOTE: Select your time interval
“W” Valve position 3, Collection Bottle #1
Pumping (Elution) Time 10 minutes,
Pump stops
As the value is 1, the program is not repeated.
End of Program
Multiple Fraction Collection: Using all of the available ports of the “W” valve, up to four different
fractions can be collected. A user-definable time interval is associated with each collected fraction. Use
valve positions W3, W4, W5 & W6 for collecting the different fractions.
Again, the first three program statements, 012 – 014, are used to divert the initial elution volume to
waste before collecting the fractions. All time parameters are user-definable and should be adjusted to
meet the requirements of the process.
012
013
014
015
016
017
018
019
020
021
022
023
024
025
90
V3
W1
TIME = 00:02
W3
TIME = 00:10
W4
TIME = 00:10
W5
TIME = 00:10
W6
TIME = 00:10
STOP
COUNT = 1
END
“V” Valve position 3, Buffer “B”, Elution Buffer
“W” Valve position 1, Waste Bottle
Pumping Time, 2minutes,
“W” Valve position 3, Collection Bottle #1
Pumping (Elution) Time 10 minutes,
“W” Valve position 4, Collection Bottle #2
Pumping (Elution) Time 10 minutes,
“W” Valve position 5, Collection Bottle #3
Pumping (Elution) Time 10 minutes,
“W” Valve position 6, Collection Bottle #4
Pumping (Elution) Time 10 minutes,
Pump stops
Program is executed only once.
End of Program
6.0 Preparative Chromatography: Linear Gradients
The ChemTec is capable of automating preparative, gradient chromatography procedures: To generate
a linear chromatography gradient, two ChemTec pumps are electronically tied together thus operating
synchronously as a system. In this arrangement, ChemTec #1 controls the “V” valve as well as the
initiation of ChemTec #2. The “W” valve in turn is connected to and controlled by ChemTec #2.
For linear gradient applications, ChemTec #1 provides programmable access to Sample and Buffer
“B”. ChemTec #2 provides access to Waste, Sample Return, as well as to four fraction collection
bottles 1-4. The ChemTec #2 also pumps Buffer “A” during the elution cycle.
During the gradient elution cycle, ChemTec #1 is programmed to ramp up its pump output (Buffer “B”),
while ChemTec #2 is programmed to ramp down (Buffer “A”) at the same rate. However, the combined
output of ChemTec 1 & 2 remains constant throughout the gradient elution cycle.
Both ChemTec units are equipped with a TANDEM 1081 peristaltic pump head and a 600RPM, hightorque motor. The motor is optically encoded and servo-controlled, thus providing a highly reproducible
pump-output. When used together with #16 PharMed pump tubing, the pump output ranges from 29 to
533 ml/min.
Enter the following program steps in the Volu-Flow Edit mode. NOTE: All of the selected time intervals
were arbitrarily chosen; in a real application these time intervals may be significantly different. For your
preparative chromatography application, select time parameters that meet your specific separation
requirements:
ChemTec #1 Program Steps
ChemTec #2 Program Steps
1st Wash / Equilibration Cycle
000
001
002
003
004
005
006
007
008
START
RUN
CW
V1 (Buffer “B”)
Sw = 0000
Sw = 1000 (Starts ChemTec #2)
Sw = 0000
RATE = 100ml/min.
TIME = 00:05
000
001
002
003
004
START
STOP
CCW
W1 (Waste)
TIME = 00:05
005
006
W2 (Sample Return)
TIME = 00:02
007
008
009
W2 (Sample Return)
TIME = 00:005
W3 (Collection Bottle #1)
Sample Introduction Cycle:
008
009
V2 (Sample Bottle)
TIME = 00:02
2nd Wash / Equilibration Cycle:
010
011
V1 (Buffer “B”)
TIME = 00:05
Continued on the next page.
91
ChemTec #1 Program Steps
ChemTec #2 Program Steps
Linear Gradient / Elution Cycle:
012
013
014
015
016
017
018
V1 (Buffer”B”)
RATE = 70.0ml/min.
INTRP = 30.0 ml/min
TIME = 00:30
STOP
COUNT = 1
END
009
010
011
012
013
014
015
RUN
RATE = 30.0 ml/min.
INTRP = 70.0 ml/min
TIME = 00:30
STOP
COUNT = 1
END
Note: All of the selected time intervals were arbitrarily chosen; in a real application these time intervals
may be significantly different. For your preparative chromatography application, select time parameters
that meet your specific separation needs and requirements.
When you select your particular time parameters, it is essential that you enter the identical time
parameters both in ChemTec #1 and ChemTec #2.
For example, the time parameter 015 TIME = 00:30 in ChemTec #1 is identical to the time parameter
012 TIME = 00:30 in ChemTec #2. To insure synchronous operation of ChemTec 1 & 2, the timing
intervals in both programs must be the same.
Please Note: For ChemTec #1 Lines 004 thru 006 in the program above to function properly, Setup;
Pump; TTL1 On/Off in ChemTec #1 must be set to NO. This allows the Sw Command to control TTL1.
92
Appendix “A”
Tandem™ Pump Head Installation and Maintenance
93
TANDEM™ Dual Channel Peristaltic Pump Head:
The TANDEM peristaltic pump head is specifically designed for use with the ChemTec system. The
TANDEM pump heads (models 1082 & 1081) will provide you with rugged reliability as long as common
sense maintenance and good quality pump tubing are used.
For continuous, heavy duty metering applications, the TANDEM 1082 (P/N: 080-1082) together with
either #24 or #15 (thick-walled, 0.093” tube wall-thickness) Silicone or PharMed pump tubing is
recommended.
The TANDEM pump head is driven by either an 8 RPM, 160 RPM, or 600 RPM high-torque motor. The
ChemTec pump motor is optically encoded and servo-controlled, thus the TANDEM pump head will
maintain a constant output over a wide range of metering conditions.
TANDEM Pump Head: Installation:
1. Identify the front and back of the TANDEM. Two 8-32 mounting cap screws, as well as the pump
shaft tang extend from the back of the TANDEM pump head.
2. Facing the front of the TANDEM, open the pump head by moving the black loading lever 180° to the
left. The upper and lower pump shoe will move in opposite directions, thereby exposing the inside
of the upper and lower pump shoe channels.
3. With the TANDEM pump head completely opened, locate the mounting holes for the two 8-32 cap
screws inside the lower pump channel.
4. On the front panel of the ChemTec, locate the mounting holes and the slotted pump head coupler.
5. Before fastening the TANDEM, align the two mounting screws and pump shaft tang of the TANDEM
with the holes and slotted coupler of the ChemTec front panel mounting plate.
6. Make sure the TANDEM pump shaft tang is properly seated in the mating slot of the pump head
coupler, before fastening the TANDEM to the front panel of the ChemTec.
TANDEM™ Peristaltic Pump Tubing / Rate Selection:
Select the appropriate pump head, pump motor and pump tubing combination from the table below.
MasterFlex Tubing
13
14
16
25
17
18
15
24
35
Tubing ID*: in
0.03
0.06
0.12
0.19
0.25
0.31
0.19
0.25
0.31
Tubing OD*: in
0.16
0.19
0.25
0.31
0.38
0.44
0.38
0.44
0.50
Tubing Wall*: in
0.06
0.06
0.06
0.06
0.06
0.06
0.09
0.09
0.09
ml/min
ml/min
ml/min
ml/min
ml/min
ml/min
ml/min
ml/min
ml/min
0.03 - 0.45
0.10 -1.63
0.43 - 6.38
0.9 - 12.6
1.14 -18.3
1.7 - 24.3
0.5 - 13
0.65 - 20
0.5 - 10
1.7 - 35.2
6.3 - 129
12.5 - 283
18.5 - 405
24.7 - 554
9.6 - 240
14 - 412
N/R
N/R
2 - 34
8.6- 132
29 - 533
49 -974
70 - 1048
103 - 1515
59-993
85-1348
111 - 2258
Pump Rate Range*:
CP-8
8RPM
CP-120
160RPM
CP-200
600RPM
* Nominal Values
Pump Head Model:
94
TANDEM 1081
TANDEM 1082
TANDEM™ Pump Tube Installation:
Open the TANDEM pump head by moving the black loading lever 180° to the left. If using the upper
pump channel, slip the tubing into the upper channel; this is over the pump roller cage. If the lower
pump channel is used, feed the tubing through the lower channel; this is under the pump roller cage.
Do NOT mount or dismount the pump tubing while the ChemTec is running.
NOTE: When using both upper and lower pump channels simultaneously, the same type of tubing
should be used in each channel.
Lock the tubing in place by pushing the loading lever 180° to the right. The tube retainer spring will
automatically place the correct tension on the pump tubing to prevent tube “walking”.
With the TANDEM pump head closed, lightly pull the two ends of the tubing in opposite directions and
away from the pump head. This pulling action insures that the pump tubing is taut and within the pump
channel.
TANDEM™ Pump Tube Replacement:
The pump tubing section located in the TANDEM pump head should be advanced at regular time
intervals if the ChemTec is heavily used. Only use high-quality SciLog or Masterflex™pump tubing.
NOTE: When advancing pump tubing, the used pump tube section must be moved to the pump
discharge side, i.e. dispensing side. The used pump tube section is weakened and tends to collapse
when placed on the suction side of TANDEM pump head.
95
Appendix “B”
RH Series Pump Head Installation and Maintenance
96
RH Series Piston Pump Heads: General Information
The ChemTec FM-120, FM-200 and FM-520 systems use rotating, reciprocating piston
pump heads of various sizes. In a reciprocating pump, the rotating piston moves back and
forth inside the cylinder, sucking in fluid at the inlet while compressing and releasing fluid at
the outlet. Flow rates for these pumps are varied by changing either the motor speed or the
stroke length. The RH series of piston heads are excellent for precise fluid metering.
These ChemTec systems provide true positive displacement metering. They can handle
pressures up to 100 psi. This style of pump head is appropriate for pumping of
suspensions, as well as corrosive / non-aqueous liquids and slurries, emulsions, thin
solvents, aqueous solutions and non-abrasive semi-solids. They are also capable of easily
handling viscous fluids up to 2000 centipoises. You may pump fluids up to 10,000 cps by
applying feed reservoir/line pressure to avoid cavitations.
Note: Piston pumps are not recommended for metering of biological fluids, or liquids
containing biological cells or cellular components. High local shear is generated in the fluid
along with strong mechanical agitation, which may destroy cells and fragment large
molecular weight components such as DNA or large protein molecules.
Materials of Construction:
RH series pump heads have cylinder bodies and fittings made of either Kynar or Tefzel.
The piston and cylinder liner are ceramic, except for the RH00 models, which use a
stainless steel piston with a sintered carbon cylinder liner. An “LF” designation refers to a
“Low Flow, low dead volume” pump connection, that utilizes ¼-28 HPLC nuts and ferrules
with 1/8” or 1/16” tubing instead of compression fittings designed for 1/4” OD tubing.
Installation:
The following are directions for dismounting and installing a new pump head on a ChemTec.
The ChemTec will come with the head already installed and ready to use.
1. Disconnect the power from the ChemTec.
2. Remove the two screws (6-32 x ½ RH) from underneath the ChemTec between and
just behind the front feet.
3. Remove the four screws (6-32 x 3/8” FH) from the face plate at the front of the
ChemTec.
4. Carefully remove the pump/motor subassembly from the ChemTec. Disconnect the
motor cable from the pc board making note of how it was connected before
completely removing it from the chassis.
5. Loosen the set screws on the head side of the coupler.
6. Using an offset screwdriver (It has a tip bent at right angles to the shaft), remove the
head mounting screws (8-32 x ½”) from the rear of the face plate, allowing the head
to be removed.
7. Reassemble the new head by reversing this process.
8. Test the ChemTec with the new head installed after making fluid connections to both
ports of the pump head. Do not let the pump head run dry without fluid for prolonged
periods.
97
Stroke Volume Adjustment:
The knurled Adjustment Ring on the RH series piston head controls the stroke length and
thus the output per motor revolution. This Adjustment Ring is factory set to “200”.
By turning the ring clockwise, the stroke length is reduced, and consequently by turning it
counterclockwise, the stroke length is increased.
Please do not turn the head clockwise further than a setting of “50” or counterclockwise
further than “450”.
Turning the Adjustment Ring past the 450 mark will eventually result in the ring falling off the
pump head.
Chemical Compatibility:
The RH series of pump heads are well known for their robustness and overall chemical
compatibility with many process fluids. The materials used in manufacturing are inert to
most chemicals, however the following exceptions must be observed:
•
In the model number of the head, the “T” in CTC refers to Tefzel, and the “K” in CKC
refers to Kynar.
•
For applications involving fluids above 90°F do not use heads with Tefzel cylinder
body material. Please use either Kynar, or consult with SciLog about the availability
of stainless steel heads for your application.
•
While Kynar has good chemical resistance to most fluids, Kynar heads must not be
used with Acetone, Ketones, or Esters.
•
When pumping Acetone, Toluene, MethylEthylKetone, Methanol, Ethanol, Hexyl
Alcohol, Isobutyl Alcohol, or Isopropyl Alcohol, pump heads with Tefzel cylinder
bodies must be used.
Viscosity Effects:
When pumping high viscosity liquids, you should always use large bore tubing (1/4” OD),
slow pump rates, and large stroke volumes. Set the knurled Adjustment Ring to the “400450” range.
The ChemTec FM-200 together with either a RH0 or RH1 can handle fluid viscosities up to
2000 cps. Viscosities of up to 10,000 cps can be pumped when the fluid reservoir and /or
feed line connected to the pump inlet port are pressurized to avoid cavitations.
98
99
100
101
102
103
104
Appendix “C”
Magnetic Gear Pump Head Installation and Maintenance
105
Magnetic Gear Pump Heads: General Information
The ChemTec MP-320 is equipped with a Magnetic Gear pump head and is recommended for metering
applications requiring pulse-free flow. These are external gear type heads in which the spur gears
rotate and intermesh inside the chamber, thereby creating a pressure differential between the inlet and
outlet ports of the pump.
An inline check valve (SciLog p/n 400-536 or equivalent) must be installed on the discharge side of the
pump head in order to avoid back-siphoning of solution between metering or dispensing cycles. The
check valve must be above the solution reservoir level.
Only clean fluids, with out particulates or abrasives, should be dispensed or pumping capacity will
decrease quickly. A gear replacement (Service) kit is available from SciLog.
The rotating gears of a magnetic gear pump head generate significant shear, thus shear-sensitive
solutions should not be metered/dispensed with this head. Use the Tandem Peristaltic pump head
instead.
Magnetic decoupling of the head can occur when the torque limit of the driving magnet has been
exceeded. Once this occurs, the driving magnet (the one attached to the motor shaft) turns by itself
while the driven magnet (inside the pump head) remains motionless. Magnetic coupling can be
restored by simply stopping the pump. The magnets will automatically re-align and re-couple.
Decoupling is an inherent feature of magnetic couplings, do NOT indicate a pump failure, and should
only occur when the magnet coupling torque limit has been exceeded. It often acts as a safety feature,
preventing inadvertent pump / motor overloads.
Avoid metering of liquids of a viscosity greater than 500 cps as this will cause the de-coupling
mentioned above. You will need to reduce the pump speed when metering fluids above 300 cps.
Magnetic gear heads have self-priming capabilities when they are new. The ability to self-prime is
dependent on the fluid being pumped, your operating system conditions, and the pump model being
used, and how long the pump has been in service. If the pump self-priming capability of the magnetic
gear pump heads in use has diminished or stopped due to wear, flooding the head will get the fluid
moving again as this capability is greatly increased when the gears are wet.
106
107
108
109
110
111
112
113
114
115
116
117