1
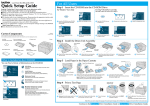
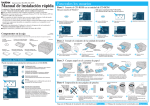
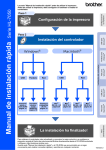
Laser Printer HL-1650/1670N
For all users
Quick Setup Guide
Read the "Safety Sheet" first to ensure that you use this printer safety.
Read this "Quick Setup Guide" before you set up the printer.
Before you can use the printer, you must set up the hardware and install the driver.
Identify the operating system on your computer (Windows® 95 / 98 / Me, Windows NT® 4.0,
Windows® 2000 or Macintosh®).
The interface cable is not a standard accessory. Some computers have both a USB and a
parallel port. Please purchase the appropriate interface cable for the interface you intend to
use (parallel, USB or Network).
Follow the instructions in this guide for your operating system and interface.
Step 1 Insert the CD-ROM into the CD-ROM drive
For Windows® users only
For Macintosh® users only
1
Insert the CD-ROM into the CD-ROM drive.
The opening screen will appear
automatically.
2
Select the language you want.
1
Insert the CD-ROM into the CD-ROM
drive.
2
Double-click the Initial Setup icon.
3
Click the Initial Setup icon.
4
You can view the Initial Setup
instructions.
3
Select the language you want.
4
You can view the Initial Setup
instructions.
Carton components
Carton components may differ from one country to another.
Save all packing materials and the printer carton. They should be used when shipping the printer.
CD-ROM
Drum unit assembly
(with toner cartridge included)
Documents
Printer
Step 2 Install the drum unit assembly
AC power cord
Front cover
Cover release
button
LJ5025001 Printed in China
What is included on the CD-ROM
1
You can get a variety of information from this CD-ROM.
Initial setup
See the complete setup
process from hardware setup
to driver installation on a
movie.
We recommend that you
follow these instructions when
you first setup the printer.
Windows®
Install Software (only for
Windows®)
You can install not only the
printer driver but also the
following utility items.
For all users
-Printer Driver
-Automatic E-mail Printing
Macintosh®
For administrators
-BRAdmin Professional
-Network Printer Driver Wizard
-Network Print Software
-Storage Manager
Manual
View the Printer User's Guide,
Network User's Guide and
other documentation.
Press the cover release button, and then open
the front cover.
Make Disk Sets (only for
Windows®)
©2000 Brother Industries, Ltd.
Windows® and Windows NT® are registered trademarks of Microsoft Corporation in the U.S. and other countries.
Macintosh® and iMac® are registered trademarks of Apple Computer, Inc.
All other brand and product names are trademarks or registered trademarks of their respective holders.
3
Unpack the drum unit assembly.
Rock it from side to side 5 or 6 times to
distribute the toner evenly inside the
assembly.
4
Install the drum unit assembly
into the printer.
Paper guide release lever
5
Close the front cover.
Up to here
Universal guide
release lever
Paper cassette
1
Pull the paper cassette completely
out of the printer.
2
While pressing the paper guide release lever, slide the adjusters to
fit the paper size. Check that they fit correctly into the slots.
Note: For Legal or 8.5 x 13 in. paper, press the universal guide
release lever as you extend the rear of the paper cassette.
Step 4 Print a test page
3
Load paper into the paper cassette.
Check that the paper is flat in the tray and below
the maximum paper mark.
READY
O
4
Re-install the paper cassette
into the printer.
Extend the tray
extension flap
PRINTING
Data
Data
Back
I
Back
Reprint
O
Printer Driver Installer (only
for Macintosh® with USB)
BR-Script PPD Installer (only
for Macintosh® with Network)
Remove the protective part.
Step 3 Load paper into the paper cassette
Brother Solutions Center
Introduction to the Brother
user support web page.
You can easily access it and
receive the latest drivers and
information for this printer.
Maintenance Tutorial
See the maintenance videos
for this printer.
We recommend that you view
the videos before getting
started.
2
I
Job cancel
Reprint
Set
Job cancel
Go
Set
Go
OFF ON
OFF ON
1
Make sure the printer power switch is off.
Connect the AC power cord to the printer.
Do not connect the interface cable.
2
Plug the AC power cord into an AC
outlet.
Turn the power switch on.
3
After the printer has finished warming up,
the READY message appears.
4
Press the Go switch. The printer prints a test page.
Check that the test page is printed correctly.
Note: When you want to set the control panel message language,
refer to the control panel section on the reverse side of this sheet.
Continue to the reverse side.
Follow the instructions for your interface cable and operating system.
For Parallel interface cable users (For Windows® users only)
Step 5 Connect the printer to your PC & Install the printer driver
O
O
I
I
OFF ON
OFF ON
1
Click "Connect the interface cable and
install the printer driver / utilities".
2
Select the parallel interface
cable.
3
Turn the printer power switch off.
4
Connect the interface cable to your PC, and
then connect it to the printer.
For USB interface cable users (For Windows® users only)
Step 5 Install the driver & Connect the printer to your PC
5
Turn the printer power
switch on.
Note: If "Add New Hardware Wizard"
appears, click the Cancel button.
6
Click the Next button.
7
Click the Finish button.
The setup is now complete.
For USB interface cable users (For Macintosh® users only)
Step 5 Install the Driver & Connect the Printer to your Macintosh®
O
I
OFF ON
Note: When the "Add New Hardware
Wizard" appears on your PC, click the
Cancel button.
1
Click "Connect the interface
cable and install the printer
driver / utilities".
2
Select the USB cable.
3
Click the Next button.
1
Double-click the Printer Driver Installer icon, and
then follow the instructions on the screen.
2
Make sure the printer power switch
is on.
4
Open the Chooser from the Apple® menu on the
Macintosh®.
5
Click the HL-1650/1670N icon and select it.
The setup is now complete.
3
Connect the USB interface cable to your Macintosh®, and
then connect it to the printer.
Note: Start installing the driver before
you connect the USB interface cable to
the printer. If you have already
connected it, remove it.
O
I
OFF ON
4
Click the OK button.
5
Make sure the printer power switch is
on.
6
Connect the USB interface cable to your PC, and then
connect it to the printer.
For Windows® 98/Me users: The setup is now complete.
For Windows® 2000 users: Go to Step 6.
Data LED : Orange
Control Panel
On
Blinking
Off
Data remains in the printer buffer.
Receiving or processing data.
No remaining data.
Switches
Step 6 Setting your PC printer port (For Windows® 2000 users only)
Go
Job Cancel
Reprint
Data
Back
Menu Set
Reprint
Job cancel
1
After your PC has restarted, click Start,
Setting and Printers.
2
Select the Brother HL-1650/1670N
series (copy2) icon.
3
Click on the File menu, and then
select Set as Default printer.
The setup is now complete.
For Network users
If you want to connect your printer using a Network cable, refer to the Quick Network Setup Guide.
After the administrator has made the required settings, install the driver referring to the "Installing the
Driver for Network users" section of the Quick Network Setup Guide.
For HL-1650 user: Install the optional Network board (NC-4100h) referring to Chapter 4 of the
printer.
Set
Go
For more information, see Chapter
3 "CONTROL PANEL" in the User's
Guide.
Back
Exit from the control panel menu, reprint settings and clear error messages.
Pause / Continue printing.
Stop and cancel the printer operation in progress.
Select the reprint menu.
Move forward and backward through menus.
Move forward and backward through selectable options.
Select the control panel menu.
Set the selected menus and the settings.
Go back one level in the menu structure.
Language Setting (Default setting is English)
1. Select the SETUP mode by pressing the + switch, and press the Set switch.
2. Check that the LANGUAGE message appears, and press the Set switch.
3. Choose your language by pressing the + or - switch, and press the Set switch. An asterisk mark ( )
*
appears at the end of the display.
(You can return to the READY status by pressing the Go switch.)