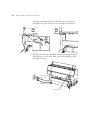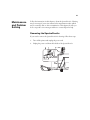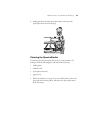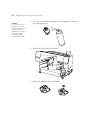
1
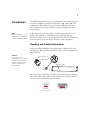
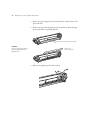
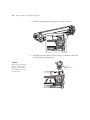
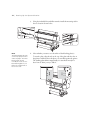
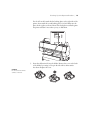
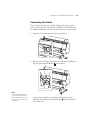
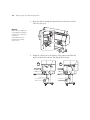
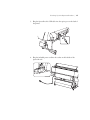
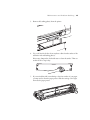
Setup and
Maintenance
All rights reserved. No part of this publication may be reproduced, stored in a retrieval system, or transmitted in
any form or by any means, electronic, mechanical, photocopying, recording, or otherwise, without the prior
written permission of Seiko Epson Corporation. The information contained herein is designed only for use with
these Epson printers. Epson is not responsible for any use of this information as applied to other printers.
Trademarks
EPSON, EPSON Stylus, and SpectroProofer are registered trademarks, and EPSON Exceed Your Vision is a
registered logomark of Seiko Epson Corporation.
EPSON Preferred is a service mark of Epson America, Inc.
X-Rite is a registered trademark of X-Rite, Inc.
General Notice: Other product names used herein are for identification purposes only and may be trademarks of
their respective owners. Epson disclaims any and all rights in those marks.
This information is subject to change without notice.
Legal Notices
Neither Seiko Epson Corporation nor its affiliates shall be liable to the purchaser of this product or third parties for
damages, losses, costs, or expenses incurred by purchaser or third parties as a result of: accident, misuse, or abuse of
this product or unauthorized modifications, repairs, or alterations to this product, or (excluding the U.S.) failure to
strictly comply with Seiko Epson Corporation’s operating and maintenance instructions.
Seiko Epson Corporation shall not be liable for any damages or problems arising from the use of any options or
any consumable products other than those designated as Original Epson Products or Epson Approved Products by
Seiko Epson Corporation.
© 2012 Epson America, Inc. 5/12
CPD-26531R1
3
Contents
Introduction . . . . . . . . . . . . . . . . . . . . . . . . . . . . . .5
Handling and Product Information . . . . . . . . . . . . . . . . . . . . . . . . . . . . . 5
Setting Up the SpectroProofer . . . . . . . . . . . . . .7
Unpacking and Assembly . . . . . . . . . . . . . . . . . . . . . . . . . . . . . . . . . . . . . 7
Installing the SpectroProofer . . . . . . . . . . . . . . . . . . . . . . . . . . . . . . . . . . 11
Connecting the Cables . . . . . . . . . . . . . . . . . . . . . . . . . . . . . . . . . . . . . . 15
Initializing the SpectroProofer . . . . . . . . . . . . . . . . . . . . . . . . . . . . . . . . 19
Maintenance and Problem Solving . . . . . . . . . .21
Removing the SpectroProofer . . . . . . . . . . . . . . . . . . . . . . . . . . . . . . . . . 21
Cleaning the SpectroProofer . . . . . . . . . . . . . . . . . . . . . . . . . . . . . . . . . . 23
Error Messages . . . . . . . . . . . . . . . . . . . . . . . . . . . . . . . . . . . . . . . . . . . . 27
Recertification . . . . . . . . . . . . . . . . . . . . . . . . . . . . . . . . . . . . . . . . . . . . . 29
Where To Get Help . . . . . . . . . . . . . . . . . . . . . . . . . . . . . . . . . . . . . . . . 29
Specifications. . . . . . . . . . . . . . . . . . . . . . . . . . . .31
Notices . . . . . . . . . . . . . . . . . . . . . . . . . . . . . . . . .33
Important Safety Instructions . . . . . . . . . . . . . . . . . . . . . . . . . . . . . . . . . 33
FCC Compliance Statement . . . . . . . . . . . . . . . . . . . . . . . . . . . . . . . . . . 33
Warranty . . . . . . . . . . . . . . . . . . . . . . . . . . . . . . . . . . . . . . . . . . . . . . . . 34
3
4 | Contents
-4
5
Introduction
The EPSON SpectroProofer® is an optional in-line color measuring system
that can be installed on the EPSON Stylus® Pro 7890, 7900, 9890, and
9900 printers. When driven by the latest software RIP front-ends, the
SpectroProofer can automate virtually any color management process in
your workflow.
Note:
The SpectroProofer is not
supported on the EPSON
Stylus Pro 7700 and 9700.
Follow the instructions in this guide to install the SpectroProofer in your
printer. This guide also provides maintenance and troubleshooting
information. Once you’ve set up the SpectroProofer, follow the instructions
that came with your color measuring software to use the equipment.
Handling and Product Information
Exercise care when handling the spectrophotometer, calibration tile, and
backing plates. If they become scratched or soiled, your color measurements
may be affected.
Caution:
Do not touch the
spectrophotometer lens; it
can be easily scratched.
Avoid touching the white
surface of the tile and
backing plates.
Spectrophotometer
lens
Backing plate
Calibration tile
Note that the spectrophotometer and tile come as a numbered set; they have
been calibrated to work together. If you purchase two or more products, be
sure you use the same numbered pieces together.
Label on
spectrophotometer
5
Label on tile
6 | Introduction
6
7
Setting Up the
SpectroProofer
Follow the steps in this section to install the SpectroProofer in your printer.
Before using the SpectroProofer for the first time, you must also initialize it
as described on page 19.
Unpacking and Assembly
Unpack the SpectroProofer and make sure you have all the parts shown
below:
Note:
The 44" model is shown.
These instructions also
apply to the 24" model.
SpectroProofer
main unit
Save the original box and
packing materials in case
you need to ship the
equipment.
Caution:
Be sure to check the box
and packaging material
thoroughly for any missing
items; pieces may have
shifted during shipment.
Backing plates
(24" kit)
Mounting rails, bolts, and Allen wrench
Power cord
(varies by region)
7
OR
Backing plates
(44" kit)
Spectrophotometer
(ILS20EP or ILS20EPUV)
USB cable
Calibration tile
and holder
Cable hooks
8 | Setting Up the SpectroProofer
1. Remove any tape and protective material from the outside surface of the
SpectroProofer.
2. Remove any tape from the paper presser, shown below. Raise the paper
presser and remove its packing material.
Paper presser (under packing material)
Caution:
Check for packing material
all around and under the
paper presser.
Remove the
packing material
3. Remove any packing tape from the carriage.
8
Setting Up the SpectroProofer | 9
4. Remove the packing material from the cables on the carriage.
5. Slide the carriage a little to the left and then remove its plastic retainer.
Note:
Save the retainer along
with other packing
materials.
1
Slide
left
Remove
retainer
2
6. Slide the carriage back to the right, then lower the paper presser.
2
9
1
10 | Setting Up the SpectroProofer
7. Slide the carriage against the paper presser to lock it in place.
8. Insert the spectrophotometer into the carriage so it clicks into place and
then insert the two alignment pins.
Caution:
Make sure the alignment
pins are flush with the
carriage, otherwise the
SpectroProofer may not
work properly.
Insert
alignment pins
here
10
Setting Up the SpectroProofer | 11
9. Connect the cables on the carriage to the spectrophotometer.
Warning:
Be careful not to dislodge
the spectrophotometer
from its seated position
when installing the cables.
Installing the SpectroProofer
Before installing the SpectroProofer, make sure the printer has the latest
firmware installed. Follow the instructions for upgrading firmware using the
LFP remote panel in your User’s Guide or Printer Guide.
1. Turn off the printer and unplug it from the AC outlet.
2. Remove the cover plate from the printer as shown.
11
12 | Setting Up the SpectroProofer
3. Using the included bolts and Allen wrench, install the mounting rails in
the two locations shown below.
Note:
The backing plates provide
a uniformly opaque surface
under the paper. The white
backing plate should
normally be used. Use the
black backing plate if your
paper has a watermark on
the reverse side.
4. Select whether you want to use the white or black backing plate(s).
To attach a plate, align the tabs at the top of the plate with the slots on
the printer, and then release the plate so it rests flush against the printer.
The backing plate adheres magnetically; it is attached correctly if it
doesn’t move when you try to slide it.
12
Setting Up the SpectroProofer | 13
For the 44" model, attach the first backing plate on the right side of the
printer, then attach the second backing plate to its left. Make sure the
plates hook together as shown. Ensure that both plates rest flush against
the printer and don’t move when you try to slide them.
5. Insert the calibration tile into the holder. Remove the cover on the back
of the holder by rotating it. Drop in the tile with its white surface
face-down. Replace the cover.
Caution:
Do not touch the white
surface of the tile.
13
14 | Setting Up the SpectroProofer
Caution:
Make sure the holder is
attached correctly,
otherwise the
spectrophotometer will
jam.
6. Attach the tile holder to the printer. Insert the two tabs on the bottom of
the holder into the slots on the printer. Then press the holder flush
against the printer so its latch clicks into place. (The two tabs on the left
side of the holder will rest on top of the backing plate installed in
step 4.)
7. Install the SpectroProofer in the printer by sliding it onto the mounting
rails.
Warning:
The SpectroProofer is
heavy. Two people are
required to lift it.
14
Setting Up the SpectroProofer | 15
Connecting the Cables
The 44" SpectroProofer has a secondary USB port that can be used to
connect the optional Auto Take-up Reel (available for the EPSON Stylus
Pro 9890 and 9900 only). The 24" SpectroProofer does not have this port.
1. Open the cover on the right side of the SpectroProofer.
2. Plug the square end of the SpectroProofer’s USB cable (included) into
the square port marked with the printer symbol.
Auto Take-up Reel
SpectroProofer
Note:
To install the SpectroProofer,
you must disconnect the
Auto Take-up Reel from the
option port on the back of
the printer.
If you’ve also installed the optional Auto Take-up Reel, plug its
USB cable into the flat port marked with the take-up reel symbol
(44" model only).
15
16 | Setting Up the SpectroProofer
3. Route the cable(s) through the channels and over the hook as shown.
Then close the cover.
Warning:
Make sure the cables are
routed properly. Improper
routing of the cables can
restrict the
spectrophotometer's
head movement and
cause errors.
4. Attach two cable hooks to the right leg of the printer stand. Place the
cable(s) in the hooks as shown, and snap the hooks closed.
1
2
16
Setting Up the SpectroProofer | 17
5. Plug the SpectroProofer’s USB cable into the option port on the back of
the printer.
6. Plug the included power cord into the socket on the left side of the
SpectroProofer.
17
18 | Setting Up the SpectroProofer
7. Attach the remaining cable hook to the inside left leg of the printer
stand. Place the power cord in the hook, and snap the hook closed.
1
2
8. Plug the power cord into a grounded electrical outlet and then plug the
printer back into its AC outlet. Make sure the SpectroProofer’s green
status light comes on.
SpectroProofer
power cord
Printer power cord
Status light
18
Setting Up the SpectroProofer | 19
Initializing the SpectroProofer
The SpectroProofer must be aligned before you use it for the first time. You
only need to perform this procedure once. You don’t need to repeat the
alignment if you remove and re-install the SpectroProofer.
Note:
The SpectroProofer does
not have a power switch. It
is on when it is plugged in
and receiving power.
1. Confirm that the SpectroProofer is powered on by checking its green
status light. The SpectroProofer must be powered on before you turn on
the printer, or it won’t be recognized.
2. Turn on the printer.
The first time you turn on
the printer with a new
SpectroProofer attached, a
"Device not Aligned"
message will display on
the printer's LCD screen.
3. Load 24-inch or 44-inch roll paper in your printer, depending your
model. Follow the paper loading instructions in your User’s Guide or
Printer Guide.
Note:
It is important that the
media specified on the
printer's LCD screen
matches the media
installed in the printer
before initiating the
SpectroProofer device
alignment. See the User’s
Guide or Printer Guide for
recommended media and
settings.
4. Select OPTIONS SETUP, SpectroProofer, DEVICE ALIGNMENT
and EXECUTE, and then press the OK button on the printer’s control
panel.
The printer automatically prints out and measures an adjustment
pattern. This process takes about one minute to complete.
5. When the alignment is complete, READY is displayed on the printer’s
control panel.
6. Confirm that the control panel displays White (or Black) for the
Backing Color and Successful for the Calibration Status. If not, then
repeat the installation steps to make sure that the spectrometer ILS head
is correctly connected to its cables and properly seated flat in its holder.
Your SpectroProofer is now properly installed. See the manual that came
with your RIP or color measuring software for instructions on using the
SpectroProofer.
19
20 | Setting Up the SpectroProofer
20
21
Maintenance
and Problem
Solving
Follow the instructions in this chapter to clean the SpectroProofer. Cleaning
may be necessary if you notice unusual color measurement results, which
may be caused by dust or other contamination. This chapter also tells you
how to respond to error messages and how to contact Epson for help.
Removing the SpectroProofer
If you need to remove the SpectroProofer for cleaning, follow these steps.
1. Turn off the printer and unplug the power cord.
2. Unplug the power cord from the left side of the SpectroProofer.
21
22 | Maintenance and Problem Solving
Note:
The 24” model has only
one cable. The 44” model
may have a second cable
connected to the port for
the optional take-up reel.
3. Open the cover on the right side of the SpectroProofer and disconnect
the cable(s).
Warning:
The SpectroProofer is
heavy. Two persons are
required to lift it.
4. Slide the SpectroProofer out of the printer.
Caution:
Be careful not to scratch
the spectrophotometer
lens when handling the
unit or setting it down.
5. Set the SpectroProofer on a flat surface to avoid damaging the lens.
22
Maintenance and Problem Solving | 23
6. Unplug the cables from the spectrophotometer, and remove the
spectrophotometer from the carriage.
Cleaning the SpectroProofer
You may need to clean the SpectroProofer if you notice unusual color
readings. Check the following parts and clean them if necessary:
•
backing plates
•
calibration tile
•
spectrophotometer lens
•
paper presser
1. Follow the instructions on page 21 to turn off the printer, remove the
SpectroProofer from the printer, and remove the spectrophotometer
from the carriage.
23
24 | Maintenance and Problem Solving
Caution:
Do not touch the lens
directly, or you could
scratch its coating. Use
only compressed air
designed for cleaning
optics; other kinds
can leave behind a
contaminating residue.
2. Use a can of compressed air designed for optical equipment to clean the
spectrophotometer lens.
3. Remove the tile holder from the printer.
4. Remove the calibration tile from the holder.
24
Maintenance and Problem Solving | 25
5. Remove the backing plate(s) from the printer.
6. Use a soft, lint-free cloth to clean any dust or dirt from the surface of the
calibration tile and backing plate(s).
If necessary, dampen the cloth with water to clean the surface. Then use
another cloth to wipe it dry.
7. If you noticed that ink is transferring to the front surface of your paper,
you may need to clean the paper presser. Slide the carriage to the right,
then raise the paper presser.
2
1
25
26 | Maintenance and Problem Solving
8. Clean the paper presser using a soft, lint-free cloth dampened with a
mild detergent. Then use another cloth to wipe it dry.
9. Lower the paper presser, then slide the carriage against it to lock it in
place.
2
1
26
Maintenance and Problem Solving | 27
Error Messages
If a problem occurs with the SpectroProofer, you may see a message on the
printer’s LCD screen. Check the following list for an explanation and
instructions for solving the problem:
Message
Explanation
Response
ILS20EP DISCONNECTED
The spectrophotometer
(ILS20EP/ILS20EPUV) is not
connected correctly.
Turn the printer off, reinstall the
spectrophotometer, and turn the printer
back on.
The spectrophotometer
(ILS20EP/ILS20EPUV) is not
connected correctly.
Select YES to continue printing without
using the SpectroProofer. Or select NO,
turn the printer off, reinstall the
spectrophotometer, and turn the printer
back on.
DEVICE ALIGNMENT
ADJUSTMENT NOT
COMPLETE
The initial settings have not
been made for the
SpectroProofer.
See page 19.
SProofer DISCONNECTED
The SpectroProofer is not
connected to the printer
correctly.
Turn the printer off, then connect the
SpectroProofer and turn the printer back on.
The SpectroProofer is not
connected to the printer
correctly.
Select YES to continue printing without
using the SpectroProofer. Or select NO,
turn the printer off, connect the
SpectroProofer, and turn the printer back on.
The SpectroProofer is not
connected correctly.
Turn the printer off and check to make sure
the SpectroProofer is connected correctly.
Turn the printer back on. If the error appears
again, contact Epson as described on
page 29.
REFER TO THE MANUAL
AND CONNECT ILS20EP TO
SpectroProofer
ILS20EP DISCONNECTED
DO YOU CONTINUE?
CONNECT THE
SpectroProofer TO THE
PRINTER AND RESTART
THE PRINTER
SProofer DISCONNECTED
DO YOU CONTINUE?
SpectroProofer ERROR
Error No. 01
27
28 | Maintenance and Problem Solving
Message
Explanation
Response
SpectroProofer ERROR
The paper presser is not
working correctly because:
Turn the printer off, then remove the
SpectroProofer. Check for any loose or
obstructing packing materials.
Error No. 13
• The backing plate is not
attached correctly.
• There is something between
the backing plate and the
presser.
• The environmental
conditions are not correct.
SpectroProofer ERROR
Error No. 15
The carriage is not working
correctly because:
• There is something blocking
the carriage.
• The backing plate is not
attached correctly.
• The white calibration tile
holder is not installed
correctly.
• The environmental
conditions are not correct.
SpectroProofer ERROR
Make sure the backing plate is installed
correctly. Reinstall the SpectroProofer and
turn the printer back on.
Make sure your operating environment
meets the specifications (see page 31).
If the error appears again, contact Epson as
described on page 29.
Turn the printer off, then remove the
SpectroProofer. Check for any loose or
obstructing packing materials.
Make sure the backing plate and the white
tile holder are attached correctly. Reinstall
the SpectroProofer and turn the printer back
on.
Make sure your operating environment
meets the specifications (see page 31).
If the error appears again, contact Epson as
described on page 29.
Note the error number and contact Epson as
described on page 29.
Error No. 12, 14, D5, D6, 65
28
Maintenance and Problem Solving | 29
Recertification
The ISO Standards Committee recommends that all spectrophotometers be
recertified each year. This recertification process is not covered under
warranty or maintenance agreement.
If maintained properly, your EPSON SpectroProofer is expected to perform
within specifications for the rated life of the product. The SpectroProofer’s
life counter can be accessed by printing a status sheet from the printer’s
control panel (see your User’s Guide or Printer Guide for details).
For customers requiring annual ISO re-certification, Epson offers an
“exchange for new” program in which Epson will advance ship a new ILS
spectrophotometer head and calibration tile at the customer’s request. It is
then the customer’s responsibility to return the used ILS head and its
associated calibration tile back to Epson.
This exchange program is offered at the customer’s expense and can be
initiated by contacting Epson Customer Support at (562) 276-1305. Please
be prepared to provide the model type of your existing ILS (ILS20EP or
ILS20EPUV).
Where To Get Help
Epson provides technical support and information on the installation,
configuration, and operation of professional printing products through the
EPSON PreferredSM Limited Warranty Plan. Dial (888) 377-6611, 6 AM to
6 PM, Pacific Time, Monday through Friday. Days and hours of support are
subject to change without notice.
Tip: If you experience
difficulty with the
toll-free line or your
Unit ID number, call
(562) 276-1305.
Before you call, make sure you have your Unit ID number, which is
included with the EPSON Preferred Limited Warranty Plan that came with
your printer. (The Unit ID number is required to access toll-free support.)
You’ll also need your printer and SpectroProofer serial numbers and proofs
of purchase.
Visit Epson’s support website at epson.com/support (U.S.) or
www.epson.ca/support (Canada) and select your product for solutions to
common problems. You can download drivers, firmware, and
documentation, get FAQs and troubleshooting advice, or e-mail Epson with
your questions.
29
30 | Maintenance and Problem Solving
30
31
Specifications
General
Temperature
Operation: 50 to 95°F (10 to 35°C)
Storage (packed): –4 to 140°F (–20 to 60°C);
less than 120 hours at 140°F (60°C); less than 1
month at 104°F (40°C)
Storage (unpacked): –4 to 104°F (–20 to 40°C);
less than 1 month at 104°F (40°C)
Humidity
Operation: 30 to 80% without condensation
Storage (packed): 5 to 85% without condensation
Storage (unpacked): 5 to 85% without
condensation
Quality range
Temperature: 68 to 78.8°F (20 to 26°C)
Humidity: 35 to 65%
Weight
(without
spectrophotometer)
44" SpectroProofer:
Approx. 29.8 lb. (13.5 Kg)
Dimensions
44" SpectroProofer:
60.0 (W) × 7.8 (D) × 10.5 (H) in.
1295 (W) × 199 (D) × 267(H) mm
24" SpectroProofer:
Approx. 19.8 lb. (9.0 Kg)
24" SpectroProofer:
31.0 (W) × 7.8 (D) × 10.5 (H) in.
787 (W) × 199 (D) × 267 (H) mm
Spectrophotometer
Product model
X-Rite® ILS20EP, ILS20EPUV
Measurement geometry
condition
0° / 45° ANSI / ISO 5.4
Measurement aperture
3.55 mm diameter
Source of light
Tungsten lamp 2850°K
Spectrum
Measurement: 16 points
Output: 31 points
Angle of field
2° / 10°
Source of light type
A, C, D50, D55, D65, D75, F2, F7, F11, F12
Spectrum wavelength area 400 to 700 nm
31
32 | Specifications
Spectrophotometer (continued)
Measurement range
0 to 150% R (reflection)
Repetition precision
Max 0.2 dE cmc (white tile)
Max 0.8 dE cmc (black tile)
Instrument error
Ave 0.5 dE cmc (12BCRA tile ILS20EP standard)
Ave 1.0 dE cmc (12BCRA tile ILS20EP standard)
Electrical
Rated voltage
AC 100 to 240 V
Input voltage range
AC 90 to 264 V
DC output
5.5 V 1.0 A
(for ILS20EP/ILS20EPUV)
Rated frequency range
50 to 60 Hz
Input frequency range
49.5 to 60.5 Hz
Rated current
44" SpectroProofer:
24" SpectroProofer:
0.3 A/100 V
0.25 A/100 V
Power consumption
44" SpectroProofer:
Approx. 10.5 W
Approx. 5.0 W in
Ready Mode
Approx. 3.5 W in
Sleep Mode
24" SpectroProofer:
Approx. 8.5 W
Approx. 5.0 W in
Ready Mode
Approx. 3.5 W in
Sleep Mode
Standards and approvals
Safety
UL60950-1
CAN/CSA-C22.2 No.60950-1
EMC
FCC Part 15 Subpart B Class B
CAN/CSA-CEI/IEC CISPR 22 Class B
32
33
Notices
Important Safety Instructions
Read all of these instructions before using your product. Also be sure to follow all warnings
and instructions marked on the product.
•
Do not block or cover the openings in the product’s cabinet.
•
Do not insert objects through the slots. Take care not to spill liquid on the product.
•
Use only the type of power source indicated on the product’s label.
•
Use only the power cord that comes with the product. Use of another cord may result in
fire or electric shock.
•
This product has its own power system, separate from and in addition to the printer’s
power system. There is a risk of electric shock unless all the power cables are unplugged
prior to maintenance.
•
Except as specifically explained in your documentation, do not attempt to service the
product yourself.
•
Unplug the product and refer servicing to qualified service personnel under the
following conditions: The power cord or plug is damaged; liquid has entered the
product; the product has been dropped or the cabinet damaged; the product does not
operate normally or exhibits a distinct change in performance.
•
The product is heavy and unwieldy. Have two people unpack or carry the product.
FCC Compliance Statement
For United States Users
This equipment has been tested and found to comply with the limits for a Class B digital
device, pursuant to Part 15 of the FCC Rules. These limits are designed to provide reasonable
protection against harmful interference in a residential installation. This equipment generates,
uses, and can radiate radio frequency energy and, if not installed and used in accordance with
the instructions, may cause harmful interference to radio or television reception. However,
there is no guarantee that interference will not occur in a particular installation. If this
equipment does cause interference to radio and television reception, which can be determined
by turning the equipment off and on, the user is encouraged to try to correct the interference
by one or more of the following measures:
•
Reorient or relocate the receiving antenna.
•
Increase the separation between the equipment and receiver.
•
Connect the equipment into an outlet on a circuit different from that to which the
receiver is connected.
•
Consult the dealer or an experienced radio/TV technician for help.
33
34 | Notices
WARNING
The connection of a non-shielded equipment interface cable to this equipment will invalidate
the FCC Certification of this device and may cause interference levels which exceed the limits
established by the FCC for this equipment. It is the responsibility of the user to obtain and
use a shielded equipment interface cable with this device. If this equipment has more than one
interface connector, do not leave cables connected to unused interfaces. Changes or
modifications not expressly approved by the manufacturer could void the user’s authority to
operate the equipment.
For Canadian Users
This Class B digital apparatus complies with Canadian ICES-003.
Cet appareil numérique de la classe B est conforme à la norme NMB-003 du Canada.
Warranty
EPSON Preferred Limited Warranty Plan for the Epson
SpectroProofer Spectrophotometer Device
Terms and Conditions—Limited Warranty for Commercial Products
What Is Covered: Epson America, Inc. (“Epson”) warrants to the first end-user customer that
the EPSON SpectroProofer spectrophotometer device covered by this limited warranty
statement, if purchased and used in the United States or Canada, will conform to the
manufacturer’s specifications and will be free from defects in workmanship and materials for a
period of one year from the date of original purchase (proof of purchase required).
What Epson Will Do To Correct Problems: Should the device prove defective during the
limited warranty period, please call the toll-free EPSON Preferred support line identified on
page 29 in this manual. This line will be answered during Epson’s regular support hours
(currently 6:00 AM to 6:00 PM Pacific Time, Monday through Friday). When you call, please
be prepared to provide the service technician with Proof of Purchase information including
the unit serial number and original date of purchase. The service technician will provide
telephone diagnostics to determine whether your unit needs repair.
If service is required, the technician will provide detailed instructions for the service program
utilized. A device that is less than 30 days old will qualify for replacement with a new device.
For a device 30 or more days old you may receive an exchange unit or parts refurbished to the
Epson standard of quality. At Epson’s option, an exchange unit (new or refurbished) may be
another model of like kind and quality. Exchange units and parts assume the remaining
warranty period of the original device covered by this limited warranty.
When service involves the exchange of a unit or its parts, the items replaced become the
property of Epson. Please see below for highlights of the service program offered.
Whole Unit Exchange Program: Under this exchange program Epson may replace the main
components of the device or the entire unit. In order to process a Whole Unit Exchange, you
must secure return of the defective product by providing Epson with a valid credit card
34
Notices | 35
number with sufficient credit to cover the price of the replacement product. You will be billed
at the Manufacturer’s Suggested Retail Price for the device if the defective product is not
returned to Epson within 10 business days of shipment of the replacement product from
Epson. If the unit is returned damaged because you have not properly packed or shipped it,
you will be billed for the damage. Upon verification of security, Epson will ship the
replacement unit promptly, typically via next business day delivery for most business
locations. Shipments to more remote locations and to residential addresses, and shipments to
Canada, may be shipped for later delivery. For calls completed prior to 1:00 PM Pacific Time
the exchange unit will usually ship the same day. For calls completed after 1:00 PM Pacific
Time the exchange unit will usually ship on the following business day.
It is your responsibility to unpack, re-install components of the device and set up the
exchange product at your location. It is also your responsibility to properly repack the
defective product in the exchange unit box and return it to Epson within 10 business days
using any instructions provided by Epson.
NOTE: In case shipment of the device for service becomes necessary, to prevent
un-repairable damage to the device, it should be packaged in its original box and packaging
materials.
What This Warranty Does Not Cover:
This warranty does not cover:
1) Any damage caused by misuse, abuse, improper installation, neglect, failure to maintain,
improper packing or shipping, disasters such as fire, flood, lightning, improper electrical
currents, software problems, or interaction with non-Epson products.
2) Any damage from service performed by other than an Epson Authorized Servicer.
3) Service when the device is used outside the U.S. and Canada.
4) Service where the device label, logo, rating label, or serial number has been removed.
5) Any damage to used, refurbished, or reconditioned products.
6) Reimbursement of materials or services required for reprinting the output as a result of
incorrect calibration of the SpectroProofer device.
7) Any damage caused by using improper packaging materials or improper packaging and
shipping. Under the Whole Unit Exchange Program you may be billed for these damages.
This warranty is not transferable. If a claimed defect cannot be identified or reproduced in
service, you will be held responsible for costs incurred.
DISCLAIMER OF WARRANTIES: THE WARRANTY AND REMEDY PROVIDED
ABOVE ARE EXCLUSIVE AND IN LIEU OF ALL OTHER EXPRESSED OR IMPLIED
WARRANTIES INCLUDING, BUT NOT LIMITED TO, THE IMPLIED
WARRANTIES OF MERCHANTABILITY, FITNESS FOR A PARTICULAR PURPOSE
AND NON-INFRINGEMENT. UNLESS STATED HEREIN, ANY STATEMENTS OR
REPRESENTATION MADE BY ANY OTHER PERSON OR FIRM ARE VOID.
Remedies: Your exclusive remedy and Epson’s entire liability for a material breach of this
Agreement will be limited to a refund of the price paid for the Epson products covered by this
Agreement. Any action for breach of warranty must be brought within 15 months of the date
of original purchase. Epson is not liable for performance delays or for nonperformance due to
35
36 | Notices
causes beyond its reasonable control. Except as provided in this written warranty, neither
Epson nor its affiliates shall be liable for any loss, inconvenience, or damage, including direct,
special, incidental or consequential damages, including lost profits, cost of substitute
equipment, downtime, claims of third parties, including customers, or injury to property,
resulting from the use or inability to use the Epson products, whether resulting from a breach
of warranty or any other legal theory. Some jurisdictions do not allow limits on warranties or
remedies for breach in certain transactions. In such jurisdictions, the limits in this paragraph
and the preceding paragraph may not apply.
In Canada, warranties include both warranties and conditions.
Governing Laws: Any disputes arising out of this Agreement will be settled by arbitration to
be conducted in Los Angeles, California, in accordance with the commercial Arbitration
Rules of the American Arbitration Association, and judgment upon the award rendered by the
arbitrator(s) may be entered in any court having jurisdiction thereof. This Agreement shall be
construed in accordance with the laws of the State of California, except the arbitration clause
that shall be enforced pursuant to the Federal Arbitration Act.
36