1
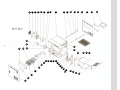
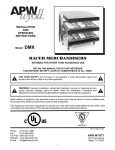
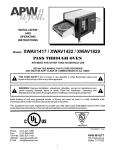
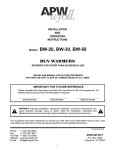
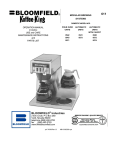
INSTALLATION AND OPERATION INSTRUCTIONS WARRANTY POLICY & PROCEDURES SERVICE CENTER DIRECTORY FOR BT-15 SERIES HORIZONTAL RADIANT CONVEYOR TOASTER McDonald’s R MANUFACTURED EXCLUSIVELY FOR McDONALD'S R BY APW WYOTT FOODSERVICE EQUIPMENT COMPANY 729 THIRD AVENUE DALLAS, TEXAS 75226 (214) 421-7366 FAX (214) 565-0976 TABLE OF CONTENTS GENERAL INFORMATION AND TROUBLESHOOTING Page 2 HORIZONTAL RADIANT CONVEYOR TOASTER BT-15 SERIES Page 2 Electrical Specifications Page 2 Installation Page 2 Operating Instructions Page 3 Cleaning & Maintenance Page 3 Parts List w/Exploded View Page 4-5 Troubleshooting Guide Page 6 Wiring Diagram Page 7 Warranty Page 8 P/N 67196 7/05 1 GENERAL INFORMATION Model Number Overall Dimensions Electrical GENERAL INSTALLATION 1. Always clean equipment thoroughly before first use. (See general cleaning instructions.) 2. Check rating label for your model designation & electrical rating. 3. Locate equipment on level counter and plug into a grounded outlet so that the plug is accessible. (See individual description for electrical loads.) 4. On units bearing the CE marking, the appliance must be connected by an earthing cable to all other units in the complete installation and then to an independent earth connection. Net/Shipping Weight BT-15 18-1/2" H x 18-5/16" W x 21-1/4" D (47 cm x 46.6 cm x 54 cm) 208V. 4150 W. 20.0A.60Hz 240V. 4150 W. 17.3A.60Hz 230V. 3890 W. 16.9A.50Hz 58lbs/65lbs (26.4kg/29.5kg) INSTALLATION - BT SERIES A. UNPACK UNIT 1.Remove unit from shipping carton, unwrap loose parts and remove any packing tape. 2.Refer to the list below and account for the following parts: a. (4) Legs - wrapped, internal package b. Bread Slide - shipped in place c. Bread Drawer - shipped in place d. Reflector/Crumb Tray shipped in place e. Superfeeder - wrapped, internal package f. Instruction Manual-wrapped, internal package g. Feeder support - wrapped, internal wrapped General Cleaning Instructions 1. NEVER clean any electrical unit by immersing it in water. Unplug unit before surface cleaning. 2. Always clean equipment thoroughly before first use. Clean unit daily. Except where noted on charts: Use warm, soapy water. Mild cleaners & PLASTIC scouring pads may be used to remove baked-on food & water scale. 3. Unplug all units before cleaning or servicing. All service should be performed by APW WYOTT authorized service agency. 4. NEVER use a water jet to clean this unit. B. ASSEMBLY NOTE: CAUTION: DO NOT OPERATE THE TOASTER WITHOUT THE LEGS INSTALLED. GENERAL TROUBLESHOOTING Always ask & check: 1. Is the unit plugged in? 2. Check circuit breaker. 3. Is power switch on? 4. Check rating label. Are you operating unit on proper voltage? 5. If the supply cord is damaged, it should be replaced by an identical supply cord by an authorized service agency. 6. Is cooling fan clean and free from obstruction? 1. Refer to the illustration and check the Reflector / Crumb Tray is in the right position. CAUTION: DO NOT OPERATE THE T O A S T E R WITHOUT THE REFLECTOR / CRUMB TRAY IN POSITION UNDER THE CONVEYOR CHAIN. 2. Check that the bread drawer is positioned flat on toaster base and pushed to the rear until it stops. (Note: Bread Drawer is installed or removed by lifting the front handle at an angle so that the rear edge of the drawer slides under the two front internal studs on right and left sides of toaster walls.) Check that the Bread Slide is situated internally so that the "tabs" on each side are resting behind the two rear internal studs on right and left sides of toaster walls. The front edge of the Bread Slide rests on top of the two front internal studs on right and left sides of the toaster walls. The Bread Slide should be covering the rear portion of the bread drawer. If the above checks out, and you still have problems, call an APW WYOTT authorized agency. BT-15 SPECIFICATIONS P L E A S E R E A D PA G E 2 - " G E N E R A L INFORMATION," BEFORE YOU CONTINUE. Electrical Information - Models BT-15 Twist Lock or Pin Sleeve. Each unit is equipped with a 6 foot, Pin & sleeve plug, 30A 208-240V or Twist lock. 2 3. Attach the superfeeder on the rod and pins located in front of the conveyor belt. b. Temperature: TOP HEAT - The MIN. setting will help produce the lightest- top toast The MAX. setting will help produce the darkest toast. BOTTOM HEAT - The MIN. setting will help produce the lightest bottom - toast. The MAX. setting will help produce the darkest bottom toast. Off turns the heating elements off. C. INSTALLATION 1. Place the toaster on approved toaster table and insure that the unit's vents are not blocked. Air must circulate under and through vents provided on the bases left side and at the rear of the unit. A minimum clearance of one (1") (2.6 CM) is required on the bases both sides and rear of the unit. Overhead clearance should allow heat to be dispelled adequately. Insure cooling fan is unobstructed. C. CLEANING AND MAINTENANCE CLEANING - DAILY OPERATING INSTRUCTIONS 1. Turn all heat controls off and allow toaster to cool. Turn the conveyor speed up to "5". NOTE: TOASTER DOES NOT COMPLETELY SHUT OFF WHEN HEAT CONTROLS ARE OFF. FRONT (3) THREE ELEMENTS WILL REMAIN ON. 2. Using a plastic abrasive pad, wipe the conveyor belt in a back and forth motion (side to side or front to back) to remove baked on product. Wipe the conveyor in the same manner with a hot damp cloth. 3. Turn the main power switch off. 4. Remove the reflector/crumb tray and/or the feeder by lifting slightly and pulling forward. Dispose of the crumbs and wash in hot soapy water. Dry tray and replace in toaster. 5. Remove the bread drawer by lifting up and pulling out of toaster. Dispose of the crumbs and wash drawer in soapy water. Wipe the excess crumbs from inside of the toaster with a hot damp rag. Place the Tray back into the toaster. 6. Wipe the exterior surfaces of the toaster with a hot damp rag. A. PREPARATION / WARM-UP 1. Main Power: Turn toaster on by pressing the Main Power switch to the right (1). Turn the toaster off by pressing the Main Power switch down to the left (0). 2. Temperature: Set the Top Heat knob to MAX. and the Bottom Heat knob to MIN. set ting (mid range) for warm-up. (Power to the top rear (6) and bottom heating elements is off when these knobs are in the off position. Top front (3) elements remain on). 3. Speed: Set the Conveyor Speed knob to the 6 setting for warm-up. 4. Warm-up Time: Warm-Up Time is approximately 20 min. Toaster Control Suggested Setting Top Heat Control Between #8 & #9 Bottom Heat Control #2 Bagel Speed Control #5 Muffin Speed Control #2 NOTE: The conveyor belt and drive motor do not require lubrication. GENERAL INFORMATION B. USE / SPECIAL FEATURES 1. Product: Place product on the wire feeder. It will automatically be drawn through the toaster at a speed determined by the Conveyor Speed setting. NOTE: Do not apply condiments before toasting. 1. Heating & Toasting Recommendations: The darkness or lightness of the toasting is determined by the speed and temperature. a. Speed 1 is slowest setting and will help produce the darkest toast. "9" is the fastest setting and will help produce the lightest toast. 3 BT-15 CONVEYOR TOASTER MCD's 05/21/2004 CONTROL PANEL CENTER TOP PANEL FAN GUARD WASHER ELEMENT TOP 69V, (208V)9E, 300W ELEMENT TOP 80V, (240V) 9E, 300W TOP WIRE GUARD ADAPTER BUTTER PAN BRACKET THERMOSTAT 345°F ELEMENT RACK ASSEMBLY FRONT SHAFT 69104-EGO 83222 REFLECTOR, CRUMB TRAY BREAD SLIDE BREAD DRAWER TRAY ELEMENT 208V, 1400W BOTTOM ELEMENT 240V, 1400W BOTTOM DRIVE MOTOR, 240V, 60Hz, 208V DRIVE MOTOR 230V, 50Hz TOP INFINITE CONTROL, 240V TOP INFINITE CONTROL, 208V KNOB, INFINITE CONTROL TOGGLE MAIN POWER SWITCH ROCKER MAIN POWER SWITCH AIR DIVERTER KNOB, SPEED CONTROL CONTROL PLATE LABEL PLUG, PIN AND SLEEVE PLUG, TWIST LOCK STRAIN RELIEF COOLING FAN 208-240V CORD, COOLING FAN SINGLE PIECE TERMINAL BLOCK SEGMENTED TERMINAL BLOCK END SPROCKET, 16T 3/8 BORE SPROCKET, 13T 5/16 BORE (208V9E) SPROCKET, 1 OT 5/16 BORE (240V9E) DRIVE CHAIN 61 LINKS (208V9E) DRIVE CHAIN 60 LINKS (240V9E) BEARING BOTTOM INFINITE CONTROL 240V A BOTTOM INFINITE CONTROL 208V A SPACER CONVEYOR BELT BACK SPACER LEG CHROME LEG RUBBER FOOT 82836 SHEET METAL FEEDER LEFT SIDE COVER 4 FUSE HOLDER CIRCUIT BREAKER FISH PAPER INDICATOR LAMPS SWITCH, SPEED SELECTOR INFINITE CONTROL BRACKET BRACKET, BUTTER PAN POWER CORD SUPPORT BUTTER PAN BRACKET ELEMENT COVER PARTS NOT SHOWN PIN BUTTER PAN BRACKET WIRING HARNESS 7/8 HOLE BUSHING 6-32 KEPS NUT 8-32 HEX NUT 10-24 SPEED NUT #10 EXTERNAL LOCKWASHER 3/8 FLAT WASHER 1-1/2 WASHER WELD PIN 8-18 X 3/8 TRUSS HEAD SCREW 8-32 X 1/2 SS SCREW #8 X 1/2 SHEET METAL SCREW FUSE COVER CANADA FUSE COVER LOCK TAB CANADA INSULATION ELEMENT 37 28 32 18 19 12 43 44 36 26 3 2 24 38 45 41 34 16 50 40 5 52 17 39 30 46 22 8 1 7 51 33 23 21 42 29 20 47 13 9 25 11 48 15 35 10 5 6 31 14 4 27 49 D. CONVEYOR TOASTER TROUBLE-SHOOTING GUIDE THE PROBLEM THE CAUSE THE SOLUTION Won't toast ................................,....... a. Wrong control setting. a. b. Wrong selector switch position. Check control settings, and allow 20 min. for warm up. c. Wrong speed setting. b. Check recommended position. d. Excessive cupping of bread c. Check control setting and reduce e. Product is too moist. d. Use fresher bread. Get better a. Only part of bun surface is a. Improper control settings toasted - other part is pale in b. Use fresher bread. Get better c. Locate product on conveyor surface. speed if necessary. cutting from baker. Toast unevenly.................................. color and dry. cutting from baker. b. Excessive cupping of bread c. Product located too far to side of a. No power at wall receptacle a. b. Plug disconnected b. Check plug c. Loose power connection c. Check connections d. Main switch d. Check that switch is on and a. Infinite controls and or stand-by a. Check switch and control settings b. Loose control connections b. Check control, panel connections c. Faulty control surface between end links. conveyor. Unit dead - no power......................... Check fuse or breaker panel operative. Unit won't heat ................................. controls off Toast is lighter under peak loads....... on control panel c. Replace control d. Burned out element d. Replace element a. Control settings a. See control setting chart b. b. Hi moisture or cold product c. Temperature inside toaster is Try another product source. Allow product to warm to 73°F (23°C). being quenched Adjust controls up and or speed down. c. Add spacing between product (approx. 1 in.) A continuous flow of product without spacing will cause quenching or loss of heat flow. Conveyor won't move........................ a. Speed control off. a. Check control setting (1-9). b. Fuse blown. b. Check fuses on back of unit. c. Linkage is binding - and c. Check conveyor linkage for bent conveyor motor won't turn. links. d. Drive chain too close or too tight. d. Adjust drive chain. e. Loose connection between e. Check circuit switch to conveyor f. Conveyor burned out. g. Speed control burned out. h. Drive chain loose or off drive switch and conveyor motor. Sprocket. 6 motor for loose or broken connection. f. Replace motor. 7 APW WYOTT EQUIPMENT LIMITED WARRANTY APW Wyott Foodservice Equipment Company warrants it's equipment against defects in materials and workmanship, subject to the following: This warranty applies to the original owner only and is not assignable. Should product fail to function in its intended manner under normal use within the limits defined in this warranty, at the option ofAPW Wyott such product will be repaired or replaced byAPWWyott or itsAuthorized ServiceAgency.APWWyott will only be responsible for charges incurred or service performed by its Authorized Service Agencies. The use of other than APW Wyott Authorized Service Agencies will void this warranty and APW Wyott will not be responsible for such work or any charges associated with same. The closestAPWWyottAuthorized ServiceAgent must be used. This warranty covers products shipped into the 48 contiguous United States, Hawaii, metropolitan areas ofAlaska and Canada. There will be no labor coverage for equipment located on any island not connected by roadway to the mainland. Warranty coverage on products used outside the 48 contiguous United States, Hawaii, and metropolitan areas of Alaska and Canada may vary.Contact the internationalAPWWyott distributor,dealer,or service agency for details. Time Period One year parts, one year labor, effective from the date of purchase by the original owner. TheAuthorized Service Agency may, at their option, require proof of purchase. Parts replaced under this warranty are warranted for the un-expired portion of the original product warranty only. Exceptions *Gas/Electric Cookline Models GCB, GCRB, GF, GGM, GGT, GHP-H, EF, EG, EHP Three (3) Year Warranty on all component parts, except switches and thermostats. (2 additional years on parts only.No labor on second or third year.) *Broiler Briquettes, Rock Grates, Cooking Grates, Burner Shields, Fireboxes 90 Day Material Only No Labor *Heat Strips Models OH & FD Two (2)YearWarranty on element only No labor second year. *Glass Windows, Door Seals, Rubber Seals, Light Bulbs 90 Day Material Only No Labor. In all cases, parts covered by extended warranty will be shipped FOB the factory after the first year. Portable Carry In Products Equipment weighing over 70 pounds or permanently installed will be serviced on-site as per the terms of this warranty. Equipment weighing 70 pounds or under, and which is not permanently installed, i.e. with cord and plug, is considered portable and is subject to the following warranty handling limitations. If portable equipment fails to operate in its intended manner on the first day of connection, or use, atAPWWyott's option or itsAuthorized ServiceAgency,it will be serviced on site or replaced. From day two through the conclusion of this warranty, portable units must be taken to or sent prepaid to the APW Wyott Authorized Service Agency for in-warranty repairs. No mileage or travel charges are allowed on portable units after the first day of use. If the customer wants on-site service, they may receive same by paying the travel and mileage charges. Exceptions to this rule: (1) countertop warmers and cookers, which are covered under the Enhanced Warranty Program, and (2) toasters or rollergrills which have in store service. Exclusions The following conditions are not covered by warranty: *Equipment failure relating to improper installation, improper utility connection or supply and problems due to ventilation. *Equipment that has not been properly maintained, calibration of controls, adjustments, damage from improper cleaning and water damage to controls. *Equipment that has not been used in an appropriate manner, or has been subject to misuse misapplication, neglect, abuse, accident, alteration, negligence, damage during transit, delivery or installation, fire, flood, riot or act of god. *Equipment that has the model number or serial number removed or altered. If the equipment has been changed, altered, modified or repaired by other than a qualified service technician during or after the warranty period, then the manufacturer shall not be liable for any damages to any person or to any property, which may result from the use of the equipment thereafter. This warranty does not cover services performed at overtime or premium labor rates. Should service be required at times which normally involve overtime or premium labor rates, the owner shall be charged for the difference between normal service rates and such premium rates.APWWyott does not assume any liability for extended delays in replacing or repairing any items beyond its control. In all cases the use of other thanAPWWyottAuthorized OEM Replacement Parts will void this warranty. This equipment is intended for commercial use only.Warranty is void if equipment is installed in other than commercial application. Water Quality Requirements Water supply intended for a unit that has in excess of 3.0 grains of hardness per gallon (GPG) must be treated or softened before being used. Water containing over 3.0 GPG will decrease the efficiency and reduce the operation life of the unit. Note: Product failure caused by liming or sediment buildup is not covered under warranty. THE FOREGOING WARRANTY IS IN LIEU OF ANY AND ALL OTHER WARRANTIES EXPRESSED OR IMPLIED INCLUDING ANY IMPLIED WARRANTY OR MERCHTABILITY OR FITNESS FOR PARTICLUAR PURPOSES AND CONSTITUTES THE ENTIRE LIABILITY OF APW WYOTT. IN NO EVENT DOES THE LIMITED WARRANTY EXTEND BEYOND THE TERMS HEREIN. 1/05 8