1
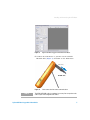
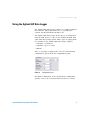
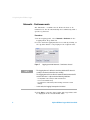
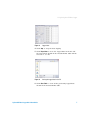
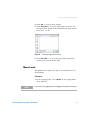
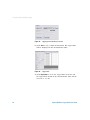
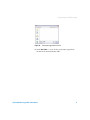
Agilent GUI Data Logger
Software for U1731C,
U1732C, and U1733C
Handheld LCR Meter
Quick Start Guide
Agilent Technologies
Notices
© Agilent Technologies, Inc. 2011
Warranty
No part of this manual may be reproduced in
any form or by any means (including electronic storage and retrieval or translation
into a foreign language) without prior agreement and written consent from Agilent
Technologies, Inc. as governed by United
States and international copyright laws.
The material contained in this document is
provided “as is,” and is subject to change,
without notice, in future editions. Further,
to the maximum extent permitted by the
applicable law, Agilent disclaims all warranties, either express or implied, with
regard to this manual and any information
contained herein, including but not limited
to the implied warranties of merchantability and fitness for a particular purpose.
Agilent shall not be liable for errors or for
incidental or consequential damages in
connection with the furnishing, use, or
performance of this document or of any
information contained herein. Should Agilent and the user have a separate written
agreement with warranty terms covering
the material in this document that conflict
with these terms, the warranty terms in
the separate agreement shall control.
Manual Part Number
U1731-90089
Edition
First Edition, March 1, 2011
Agilent Technologies, Inc.
5301 Stevens Creek Blvd.
Santa Clara, CA 95051 USA
Safety Notices
Technology Licenses
The hardware and or software described in
this document are furnished under a license
and may be used or copied only in accordance with the terms of such license.
Restricted Rights Legend
U.S. Government Restricted Rights. Software and technical data rights granted to
the federal government include only those
rights customarily provided to end user customers. Agilent provides this customary
commercial license in Software and technical data pursuant to FAR 12.211 (Technical
Data) and 12.212 (Computer Software) and,
for the Department of Defense, DFARS
252.227-7015 (Technical Data - Commercial
Items) and DFARS 227.7202-3 (Rights in
Commercial Computer Software or Computer Software Documentation).
II
CAUTION
A CAUTION notice denotes a hazard. It calls attention to an operating procedure, practice, or the likes
of that, if not correctly performed
or adhered to, could result in damage to the product or loss of important data. Do not proceed beyond a
CAUTION notice until the indicated
conditions are fully understood and
met.
WA R N I N G
A WARNING notice denotes a
hazard. It calls attention to an
operating procedure, practice, or
the likes of that, if not correctly
performed or adhered to, could
result in personal injury or death.
Do not proceed beyond a WARNING notice until the indicated
conditions are fully understood
and met.
Agilent GUI Data Logger Quick Start Guide
Table of Contents
Introduction 1
System requirements
1
Installing and Connecting the LCR Meter
2
Using the Agilent GUI Data Logger 5
Automatic - Continuous mode 6
Automatic - Up to x count mode 8
Manual mode 9
Removing the Agilent GUI Data Logger 12
Uninstalling from the Windows Start menu 12
Uninstalling from the Windows Add/Remove Programs
Agilent GUI Data Logger Quick Start Guide
12
III
THIS PAGE HAS BEEN INTENTIONALLY LEFT BLANK.
IV
Agilent GUI Data Logger Quick Start Guide
Introduction
Introduction
The U1731C, U1732C, and U1733C handheld LCR meter
models are equipped with a bi- directional (full duplex)
communication capability that eases data storing from the
LCR meter to your PC.
The required accessory for this communication capability is
the U5481A IR- USB cable and the Agilent GUI Data Logger
for Agilent Handheld LCR Meter (U1730C) application
software, which is available for free on the Agilent website
(www.agilent.com/find/hhTechLib).
NOTE
The U5481A IR-USB cable functions as a serial RS-232 port that connects
the LCR meter to the USB port of your PC.
System requirements
Before installing the Agilent GUI Data Logger application
software, ensure that your PC meets the following minimum
system requirements.
® IV or higher
Processors
1.6 GHz Pentium
32-bit OS
platforms
Windows
Memory
512 MB or higher (recommended)
Hard disk space
1 GB free disk space at runtime
Supported
models
Agilent U1731C, U1732C, and U1733C
Prerequisite
Microsoft .NET Framework version 3.5[1]
® XP, Windows® Vista, or Windows® 7
PL-2303 USB-Serial Driver
[1] Available with any of the following redistributable packages on the Microsoft® website:
Microsoft® .NET Framework version 3.5 Redistributable Package, or
Microsoft® .NET Framework version 4.0 Redistributable Package.
Agilent GUI Data Logger Quick Start Guide
1
Installing and Connecting the LCR Meter
Installing and Connecting the LCR Meter
NOTE
You are recommended to disconnect the U5481A IR-USB cable before
installing the software.
1 Download the Agilent GUI Data Logger for Agilent
Handheld LCR Meter (U1730C) application software from
www.agilent.com/find/hhTechLib.
2 Click
to begin the installation. The required drivers
and Microsoft .NET Framework are automatically installed
if they are not detected on your PC.
Figure 1
Agilent GUI Data Logger InstallShield Wizard
3 Click Start > All Programs > Agilent > Data Logger for Agilent
Handheld LCR Meter (U1730C) to run the Agilent GUI Data
Logger. Or alternatively, you can click the Agilent GUI
Data Logger shortcut icon on your desktop.
Figure 2
2
Agilent GUI Data Logger shortcut icon
Agilent GUI Data Logger Quick Start Guide
Installing and Connecting the LCR Meter
Figure 3
Agilent GUI Data Logger for Handheld LCR Meter
4 Connect the LCR meter to your PC via the U5481A
IR- USB cable (Figure 4) and turn on the LCR meter.
To PC (host)
IR-USB cable
Figure 4
NOTE
Cable connection for remote communication
The U5481A IR-USB cable is an optional accessory. You can purchase the
cable at your nearest Agilent Sales Office.
Agilent GUI Data Logger Quick Start Guide
3
Installing and Connecting the LCR Meter
5 In the Communication panel, configure the LCR meter’s
communication settings.
i Select Auto (Figure 5) to allow the Agilent GUI Data
Logger to automatically search for a connected LCR
meter.
ii Select Manual (Figure 5) to manually update the Agilent
GUI Data Logger’s communication settings.
Select the communication Port that your LCR meter is
connected to. Clicking Update port will update the port
selections that are available on your PC.
Match the Baud Rate, Parity, and Data Bits settings
(Figure 5) to the settings of the connected LCR meter.
Figure 5
Communication panel
6 Click Connect. If the Agilent GUI Data Logger’s
communication settings matches with the LCR meter’s
communication settings, the Meter Connected notification
will be shown in the status bar.
7 If the connection fails (Meter Disconnected notification),
check that the U5481A IR- USB cable is connected
securely to the LCR meter and that the LCR meter is
turned on.
NOTE
4
The RS232 port is not meant for hot plugging or hot swapping.
Disconnecting the U5481A IR-USB cable when it is in use will crash the
Agilent GUI Data Logger.
Agilent GUI Data Logger Quick Start Guide
Using the Agilent GUI Data Logger
Using the Agilent GUI Data Logger
The Agilent GUI Data Logger software is a simple graphical
user interface (GUI) that allows you to perform basic
controls and measurements through a PC.
The Agilent GUI Data Logger allows data to be transferred
from the LCR meter to a PC via the U5481A IR- USB cable
cable with data storing options. Three types of logging mode
are available in the Agilent GUI Data Logger software:
• Automatic - Continuous
• Automatic - Up to x count
• Manual
Prior to selecting a logging mode, select the measurement
configuration options from the Configuration panel.
Figure 6
Configuration panel
For further explanation of the measurement configuration
options, refer to the U1731C/U1732C/U1733C User’s Guide.
Agilent GUI Data Logger Quick Start Guide
5
Using the Agilent GUI Data Logger
Automatic - Continuous mode
The Automatic - Continuos mode allows the data to be
transferred to the PC automatically and continuously with a
specific log interval.
Procedures:
1 In the Logging panel, select Automatic - Continuous in the
Logging Mode drop down list.
2 Set the desired Logging Interval in seconds by clicking on
the up/down button or by keying in the required value.
Figure 7
NOTE
Logging panel with Automatic - Continuous selected
• The Logging Interval is defined as the delay within the PC when it is
sending a command to fetch the latest reading.
• The Logging Interval’s best effort for communication between the PC
and the LCR meter is subjected to the following conditions:
• It is dependant on PC activity for USB communications.
• It is not a true realtime-stamp.
• It is subjected to software delays when sending commands to obtain
readings.
• In this mode, the Logging Count option is disabled.
3 Click Start to start the data logging. The logged data will
be displayed in the measurements table.
6
Agilent GUI Data Logger Quick Start Guide
Using the Agilent GUI Data Logger
Figure 8
Logged data
4 Click Stop to stop the data logging.
5 Click Export Data to store the logged data in the PC. All
the logged data shown in the measurements table will be
saved as a .csv file.
Figure 9
Storing the logged data in the PC
6 Click Clear Table to clear all the previously logged data
shown in the measurements table.
Agilent GUI Data Logger Quick Start Guide
7
Using the Agilent GUI Data Logger
Automatic - Up to x count mode
The Automatic- Up to x count mode allows the data to be
transferred to the PC at a specific logging count and log
interval set by you.
Procedures:
1 In the Logging panel, select Automatic - Up to x count mode in
the Logging Mode drop down list.
2 Set the desired Logging Interval in seconds and Logging
Count by clicking on the up/down button or by keying in
the required value.
Figure 10
Logging panel with Automatic - Up to x count selected
3 Click Start to start the data logging. The logged data will
be displayed in the measurements table.
Figure 11
8
Logged data
Agilent GUI Data Logger Quick Start Guide
Using the Agilent GUI Data Logger
4 Click Stop to stop the data logging.
5 Click Export Data to store the logged data in the PC. All
the logged data shown in the measurements table will be
saved as a .csv file.
Figure 12
Storing the logged data in the PC
6 Click Clear Table to clear all the previously logged data
shown in the measurements table.
Manual mode
The Manual mode allows the data to be transferred to the
PC manually.
Procedures:
1 In the Logging panel, select Manual in the Logging Mode
drop down list.
NOTE
In this mode, the Logging Interval and Logging Count option are disabled.
Agilent GUI Data Logger Quick Start Guide
9
Using the Agilent GUI Data Logger
Figure 13
Logging panel with Manual selected
2 Click Start to log a single measurement. The logged data
will be displayed in the measurements table.
Figure 14
Logged data
3 Click Export Data to store the logged data in the PC. All
the logged data shown in the measurements table will be
saved as a .csv file.
10
Agilent GUI Data Logger Quick Start Guide
Using the Agilent GUI Data Logger
Figure 15
Storing the logged data in the PC
4 Click Clear Table to clear all the previously logged data
shown in the measurements table.
Agilent GUI Data Logger Quick Start Guide
11
Removing the Agilent GUI Data Logger
Removing the Agilent GUI Data Logger
The software can be removed either from the Windows Start
menu or by using the Windows Add/Remove Programs.
Uninstalling from the Windows Start menu
To remove the software from the Windows Start menu,
proceed as follows:
1 Select Start (Windows taskbar) > All Programs > Agilent >
Uninstall Data Logger for Agilent Handheld LCR Meter (U1730C).
Figure 16
Uninstall Data Logger for Agilent Handheld LCR Meter
2 The Windows Installer dialog box will appear and prompt
you to confirm the complete removal of the application.
3 Click Yes to proceed. To cancel the uninstallation, click
No.
4 Follow the instructions on the screen to complete the
removal process.
12
Agilent GUI Data Logger Quick Start Guide
Removing the Agilent GUI Data Logger
Uninstalling from the Windows Add/Remove Programs
To remove the software by the Windows Add/Remove
Programs, proceed as follows:
1 Select Start (Windows taskbar) > Control Panel to open the
Control Panel window.
2 Double- click Add or Remove Programs. The Add or Remove
Programs window will appear containing a list of
currently installed programs.
3 Browse the list of currently installed programs to search
for the Data Logger for Agilent Handheld LCR Meter (U1730C) as
shown below.
Figure 17
Remove Data Logger for Agilent Handheld LCR Meter
4 Click Remove to uninstall the selected application.
5 The Add or Remove Programs dialog box will appear and
prompt you to confirm the complete removal of the
application. Click Yes to proceed. To cancel the
uninstallation, click No.
6 Follow the instructions on the screen to complete the
removal process.
Agilent GUI Data Logger Quick Start Guide
13
Removing the Agilent GUI Data Logger
THIS PAGE HAS BEEN INTENTIONALLY LEFT BLANK.
14
Agilent GUI Data Logger Quick Start Guide
www.agilent.com
Contact us
To obtain service, warranty or technical
assistance, contact us at the following
phone or fax numbers:
United States:
(tel) 800 829 4444
(fax) 800 829 4433
Canada:
(tel) 877 894 4414
(fax) 800 746 4866
China:
(tel) 800 810 0189
(fax) 800 820 2816
Europe:
(tel) 31 20 547 2111
Japan:
(tel) (81) 426 56 7832 (fax) (81) 426 56 7840
Korea:
(tel) (080) 769 0800 (fax) (080) 769 0900
Latin America:
(tel) (305) 269 7500
Taiwan:
(tel) 0800 047 866
(fax) 0800 286 331
Other Asia Pacific Countries:
(tel) (65) 6375 8100 (fax) (65) 6755 0042
Or visit Agilent World Wide Web at:
www.agilent.com/find/assist
Product specifications and descriptions in
this document are subject to change
without notice. Always refer to Agilent
Web site for the latest revision.
© Agilent Technologies, Inc., 2011
First Edition, March 1, 2011
U1731-90089
Agilent Technologies