1
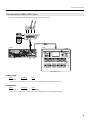
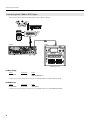
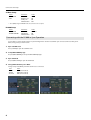
R-1000 Remote Control Reference
The R-1000 supports remote control from the V-Mixer. This document describes connections, settings and
the operations on the V-Mixer.
For the compatible software versions of the V-Mixer series, refer to “Compatible Versions“(p. 2).
Copyright © 2011 ROLAND CORPORATION
All rights reserved. No part of this publication may be reproduced in any form without the written
permission of ROLAND CORPORATION.
* Roland and REAC are either registered trademarks or trademarks of Roland Corporation in the United States and/or
other countries.
1PS
Connection and Setup
Compatible Versions
The following versions of the V-Mixer series are compatible with the R-1000 remote control. If the software version of your VMixer is earlier, you cannot remote control the R-1000.
•
•
•
•
M-480
M-400
M-380
M-300
Ver.1.100 or later
Ver.2.300 or later
Ver.1.300 or later
Ver.1.100 or later
Remote Controllable Operations
The following operations of the R-1000 can be remotely controlled from the V-Mixer. Remote control operations should be
performed on the popup screens.
CONTROL popup (p. 7)
•
•
•
•
•
Start/stop playback
Start/stop recording
Fast forward/rewind
Set A point and B point during A/B repeat playback
Jump to the location where the playback was started (CALL)
• Selection of playback mode
SETUP popup (p. 12)
• Track status setup
• Virtual preamp setup
PATCHBAY popup (p. 14)
• Input/output patchbay setup
SONG popup (p. 17)
• Load song/delete song/edit song name/save project
MARKER popup (p. 22)
• Add marker/delete marker/edit marker name
Connecting your V-Mixer with the R-1000
You can connect the R-1000 to the REAC ports of the V-Mixer. Setup of the V-Mixer differs depending of the port where the R1000 is connected. Refer to the following pages for the setup processes.
• REAC A port (p. 3)
• REAC B port (p. 4)
• SPLIT/BACKUP port (p. 5)
* If you are connecting an external clock source and performing sync operation of the R-1000, refer to “Connecting with the R-1000 in Sync
Operation” (p. 6).
2
Connection and Setup
Connecting the R-1000 to REAC A port
You can connect the R-1000 to the REAC A port of your V-Mixer as below.
fig.connect-A-port.eps
REAC
Slave
Unit
S-1608
M-480
R-1000
REAC Master/Slave Unit
C
A
A
REAC Master Unit
V-Mixer Setup
Menu
• REAC CONFIG
Parameter
Value
REAC SETUP
FOH
* If the R-1000 is synchronizing to an external clock, set the REAC SETUP value to [FOH A (External Clock)].
R-1000 Setup
Menu
• REAC CONFIG
Parameter
Value
REAC SETUP
SOUNDCHECK
* If the R-1000 is synchronizing to an external clock, set the REAC SETUP value to [EXT.CLOCKwithV-MIXER].
3
Connection and Setup
Connecting the R-1000 to REAC B port
You can connect the R-1000 to the REAC B port of your V-Mixer as below.
fig.connect-B-port.eps
REAC
Slave
Unit
S-1608
M-300
R-1000
REAC Master/Slave Unit
C
B
A
REAC Master Unit
V-Mixer Setup
Menu
• REAC CONFIG
Parameter
Value
REAC SETUP
FOH
MONITOR/BROADCAST
* If the R-1000 is synchronizing to an external clock, set the REAC SETUP value to [FOH B (External Clock)].
R-1000 Setup
Menu
• REAC CONFIG
Parameter
Value
REAC SETUP
SOUNDCHECK
* If the R-1000 is synchronizing to an external clock, set the REAC SETUP value to [EXT.CLOCKwithV-MIXER].
4
Connection and Setup
Connecting the R-1000 to SPLIT/BACKUP port
You can connect the R-1000 to the SPLIT/BACKUP port of your V-Mixer as below.
This connection is possible with M-480, M-400 or M-380.
MIDI connection is necessary when you connect the R-1000 to the SPLIT/BACKUP port.
fig.connect-split-port.eps
REAC
Slave
Unit
S-4000S-3208
MIDI
MIDI
M-380 A
SPLIT
BACKUP
R-1000
REAC Master/Slave Unit
A
REAC Master Unit
5
Connection and Setup
V-Mixer Setup
Menu
• REAC CONFIG
• MIDI
Parameter
Value
REAC SETUP
RECEIVE Sys Ex
SEND Sys Ex
MIDI OUT/THRU
FOH
ON
ON
OUT
* Select [MIDI] using the MIDI/RS-232C select switch on the rear panel.
R-1000 Setup
Menu
• REAC CONFIG
• REMOTE CONTROL
Parameter
Value
REAC SETUP
MTC OUTPUT
MIDI OUT/THRU
REC ONLY
ON
OUT
Connecting with the R-1000 in Sync Operation
It is possible to connect the R-1000 that is synchronizing with an external clock. When you connect such R-1000 with your VMixer, change setup as shown below.
1. Open SYSTEM screen
Press [SYSTEM] to open the SYSTEM screen.
2. Call up REAC CONFIG popup
Use [F2 (REAC CONFIG)] to call up the REAC CONFIG popup.
3. Open SETUP tab
Use [F1 (REAC SETUP)] to open the SETUP tab.
4. Change REAC SETUP of your V-Mixer
Change setup of the REAC port where the R-1000 is connected.
Port
• REAC A
• REAC B
• Both A/B
fig.REAC-SETUP.eps
6
Value
FOH A (External Clock)
FOH B (External Clock)
FOH A (External Clock)
Remote Controlling REC/PLAY
Call up the R-1000 CONTROL popup
To call up the R-1000 CONTROL popup hold down [SHIFT] button and press [DISP] button in the USB MEMORY RECORDER section.
For the details of R-1000 CONTROL popup, refer to the following pages.
* The shapes or locations of buttons in USB MEMORY RECORDER section differ depending on the V-Mixer models.
fig.shift-disp.eps
+
Use the V-Mixer buttons to move the cursor and press the [ENTER] button to operate the various settings.
fig.cursor-enter.eps
If [Use RECORDER sect buttons] in PREFERENCE is checked, you can call up this popup with single press of the [DISP] button in the USB MEMORY
RECORDER section.
7
Remote Controlling REC/PLAY
R-1000 CONTROL popup - Part Names and Functions
fig.R-1000control-popup.eps
1
2 3
4
5
7
8
9
6
1.
SETUP button
Calls up track status setup screen (p. 12).
2.
Connection port
This shows the REAC port where the R-1000 is connected.
3.
REC/PLAY control buttons
These control start/stop of recording or playback. Refer to “About REC/PLAY control buttons” (p. 9) for details.
4.
Track Status
These show REC/PLAY statuses of tracks 1-48.
5.
CONTROL TARGET
This selects the port where the target R-1000 unit is connected.
6.
Function buttons
You can remote control the operations of the R-1000 using the function buttons of the V-Mixer. Refer to “About Function Buttons”
(p. 10) for details.
7.
Time display
This shows current song name and current position. You can select a playback mode in this section. Refer to “About Time Display”
(p. 9) for details.
8.
MARKER button
This calls up the marker setup screen (p. 22).
9.
PREFERENCE
• MARKER control
If this is checked, the functions of REC/PLAY control buttons are changed as below.
[|<<] and [>>|] change to [|<] and [>|].
[F1 (|<<)] and [F2 (>>|)] change to [F1 (|<)] and [F2 (>|)].
Press [|<] or [F1 (|<)] to jump to the marker location immediately before the current position.
Press [>|] or [F2 (>|)] to jump to the marker position immediately after the current location.
• Use RECORDER sect buttons
Check this to change functions of buttons in USB MEMORY RECORDER section. You can use these buttons to remote control the R-1000 if this is
checked. Refer to “Remote Control the R-1000 Using the V-Mixer Buttons” (p. 11).
8
Remote Controlling REC/PLAY
About REC/PLAY control buttons.
fig.transport.eps
1
2
3
4
5
1.
|<<
This makes the current position jump to the beginning of the current song. If the current position is located at the beginning of
the song, this switches to the previous song. Press and hold down this button to move the current position backward (rewind).
2.
>>|
This switches the current song to the next one. Press and hold down this to move the current position forward (fast forward).
3.
Start/Stop
This starts or stops the song playback. If you press this while the recording is paused, the recording will start. This lights up during
recording or playback.
4.
REC
If you are in STOP mode, this button will set the R-1000 to REC standby (pause). It will blink while in standby. Press it again to
cancel the standby (pause) status. If pressed while recording, the recording will divide into a new piece of material.
5.
A/B repeat
When A/B repeat is off, the first pressing of this button sets the A mark and causes the button to flash. When pressed again, it will
set the B mark and turn on the A/B repeat (loop) function. When the A/B repeat is looping, this button will steadily lit.
About Time Display
fig.time-display.eps
1
2
3
4
5
1.
Play mode
This switches the play mode in the order below.
fig.play-mode.eps
One Shot
Loop
Sequential
Sequential Loop
Marker Loop
2.
Current position
This shows the current position.
3.
Song name
This shows the current song name. Select this with the cursor and press [ENTER] to call up the R-1000 SONG popup.
4.
Marker information
This shows the number of the marker immediately before the current position and total number of markers added to the current
song. While the R-1000 is recording, this shows remaining time.
5.
Disk Performance Meter
This indicates the load level of reading and writing from/to the removable storage.
9
Remote Controlling REC/PLAY
About Function Buttons
The REC/PLAY buttons are assigned to the function buttons (F1-F8) of the V-Mixer.
fig.function-buttons.eps
F1
F2
F3
F4
F5
F6
F7
F8
F1 |<<
This makes the current position jump to the beginning of the current song. If the current position is located at the beginning of
the song, this switches to the previous song. Press and hold down this button to move the current position backward (rewind).
* If [MARKER control] in PREFERENCE is checked, this makes the current position jump to the marker position immediately before the current
position.
F2 >>|
This switches the current song to the next one. Press and hold down this to move the current position forward (fast forward).
* If [MARKER control] in PREFERENCE is checked, this makes the current position jump to the marker position immediately after the current
position.
F3 Start/stop
This starts or stops the song playback. If you press this while the recording is paused, the recording will start. This lights up during
recording or playback.
F4 REC
If you are in STOP mode, this button will set the R-1000 to REC standby (pause). It will blink while in standby. Press it again to
cancel the standby (pause) status. If pressed while recording, the recording will divide into a new piece of material.
F5 A/B repeat
When A/B repeat is off, the first pressing of this button sets the A mark and causes the button to flash. When pressed again, it will
set the B mark and turn on the A/B repeat (loop) function. When the A/B repeat is looping, this button will steadily lit.
F6 CALL
The current position jumps to the locations where the playback was started (CALL).
* Hold down and press this to delete the marker located immediately before the current position.
F7 ALL VIEW
This calls up the popup to show statuses of all the R-1000 units connected to REAC A, REAC B and MIDI (ALL VIEW). Refer to “Check
all the R-1000 units connected to the V-Mixer” (p. 25).
* Press and hold to add a marker to the current position.
F8 CLOSE
This closes the R-1000 CONTROL popup.
10
Remote Controlling REC/PLAY
Remote Control the R-1000 Using the V-Mixer Buttons
Check [Use RECORDER sect buttons] in PREFERENCE to use the buttons in USB MEMORY RECORDER section for remote
controlling.
* The shapes or locations of buttons in USB MEMORY RECORDER section differ depending on the V-Mixer models.
fig.recroder-sec-buttons.eps
1
1.
2
3
4
5
|<<
Same as F1 of the function buttons. This makes the current position jump to the beginning of the current song. If the current
position is located at the beginning of the song, this switches to the previous song. Press and hold down this button to move the
current position backward (rewind).
* If [MARKER control] in PREFERENCE is checked, this makes the current position jump to the marker position immediately before the current
position.
2.
>>|
Same as F2 of the function buttons. This switches the current song to the next one. Press and hold this to move the current
position forward (fast forward).
* If [MARKER control] in PREFERENCE is checked, this makes the current position jump to the marker position immediately after the current
position.
3.
Start/stop
Same as F3 of the function buttons. This starts or stops the song playback. If you press this while the recording is paused, the
recording will start. This lights up during recording or playback.
4.
REC
Same as F4 of the function buttons. If you are in STOP mode, this button will set the R-1000 to REC standby (pause). It will blink
while in standby. Press it again to cancel the standby (pause) status. If pressed while recording, the recording will divide into a
new piece of material.
5.
DISP
This calls up the R-1000 CONTROL popup.
11
Remote Controlling the Track Status Setup
Call up the R-1000 SETUP popup
You can remote control the track status from the R-1000 SETUP popup.
1. Call up the R-1000 CONTROL popup
Refer to “Call up the R-1000 CONTROL popup” (p. 7) to call up the R-1000 CONTROL popup.
2. Check the connection and setup of the R-1000
Confirm that the R-1000 is connected to your [CONTROL TARGET] connector (REAC A, REAC B or MIDI) and that you have properly
setup the R-1000 to receive remote control. To learn more about setting up your R-1000 to receive remote control, download the
selected as [CONTROL TARGET] and setup to receive remote control is done. For the R-1000 setup for remote control, download
“R-1000 Application Guide” separately from the following Roland website.
http://www.rolandsystemsgroup.net/
3. Call up the R-1000 SETUP popup
Select the [SETUP] with the cursor and press [ENTER] button. The R-1000 SETUP popup will appear.
* If no R-1000 unit is connected to your V-Mixer, this operation cannot occur.
fig.call-R1000-setup.eps
12
Remote Controlling the Track Status Setup
R-1000 SETUP popup - Part Names and Functions
fig.setup-popup.eps
1
2
3
4
5
1.
Track name display
You can add names to tracks. Move cursor and press [ENTER] to open the name edit screen.
2.
REC status
Select with the cursor and press [ENTER] to toggle on or off. When on, it illuminates and arms the track for recording.
If a track has not been armed for recording, it will not record. Remember to use the input patchbay to assign REAC channels to tracks.
3.
PLAY status
Select with the cursor and press the [ENTER] to toggle on or off. When on, it illuminates and become a track available for playback.
* Tracks with no audio data cannot be activated for playback.
4.
Virtual Preamp setup
Select with the cursor and press the [ENTER] to toggle on or off. When on, it illuminates and indicates that the track has virtual
preamp gain control.
5.
ALL/CLR
Move cursor to [ALL] and press [ENTER] to select all tracks at once. Move cursor to [CLR] and press [ENTER] to cancel all the
selections at once.
About Function Buttons
Functions assigned to F1 - F5 and F8 are same as the R-1000 CONTROL popup.
fig.setup-function.eps
F6
F7
F6 Patchbay
This calls up the R-1000 PATCHBAY popup (p. 14).
F7 Song
This calls up the R-1000 SONG popup (p. 17).
13
Remote Controlling the Patchbay Setup
Call up the R-1000 PATCHBAY popup
1. Call up the R-1000 CONTROL popup
Using the steps described in “Call up the R-1000 CONTROL popup” (p. 7), call up the R-1000 CONTROL popup.
2. Call up the R-1000 SETUP popup
Select [SETUP] with cursor and press [ENTER] button. The R-1000 SETUP popup will appear.
3. Call up the R-1000 PATCHBAY popup
Press [F6] function button to select [Patchbay]. The R-1000 PATCHBAY popup will appear.
fig.call-patchbay-popup.eps
14
Remote Controlling the Patchbay Setup
R-1000 PATCHBAY popup - Part Names and Functions
fig.patchbay-popup.eps
1
2
3
4
You can use [F1] and [F2] function buttons to switch between INPUT (recording) patchbay and OUTPUT (playback) patchbay.
1.
CURRENT ASSIGN
• INPUT
• OUTPUT
This shows the input connector assigned to the recording track that is currently selected on the patchbay grid.
This shows the output connector assigned to the playback track that is currently selected on the patchbay grid.
2.
Device display
This shows the input/output device connected to the REAC port that is currently selected using the [F3] to [F6] function buttons.
3.
Active REAC port
This shows input/output devices are connected or not connected to the REAC ports (A-D) of the R-1000.
4.
Patchbay grid
Move cursor and press [ENTER] to add a patch mark to the grid. You can execute channel/track assignments for input/output as
described below.
• INPUT
• OUTPUT
You can assign input channels to recording tracks.
You can assign playback tracks to output channels.
* You can move the cursor to a gird area with no patch mark and press the [ENTER] to overwrite the old position.
The horizontal columns show the input/output connector numbers and the vertical columns show the track names.
15
Remote Controlling the Patchbay Setup
About Function Buttons
fig.function-button.eps
F1
F2
F3
F4
F5
F6
F7
F8
F1 INPUT (REC)
This switches to INPUT patchbay for recording.
F2 OUTPUT (PLAY)
This switches to OUTPUT patchbay for playback.
F3 - F6
Selects the input/output device connected to the REAC ports (A-D) of the R-1000 for patchbay setup.
F7 AUTOMAP
This calls up the function that automatically assigns the channels/tracks according to the connected input/output devices.
F8 CLOSE
This closes the R-1000 PATCHBAY popup.
About AUTOMAP function
Press [F7] function button in the R-1000 PATCHBAY popup to call up the screen below.
fig.automap.eps
Press [F8] function button to automatically patch channels to tracks according to the currently connected input/output devices.
16
Remote Controlling the Song Setup
Call up the R-1000 SONG popup
1. Call up the R-1000 SETUP popup
Using the steps described in “Call up the R-1000 SETUP popup” (p. 12), call up the R-1000 SETUP popup.
2. Call up the R-1000 SONG popup
Press [F7] function button to select [SONG]. The R-1000 SONG popup will appear.
fig.call-song-popup.eps
17
Remote Controlling the Song Setup
R-1000 SONG popup - Part Names and Functions
fig.song-popup.eps
1
2
1.
Project information
This shows the name, created date/time, sampling frequency and file size of the current project.
2.
Song list
This shows the list of songs contained in the current project. Name, length, created date/time, number of tracks and file size of
each song are displayed. The current song is displayed in green letters.
About Function Buttons
fig.song-function.eps
F1
F2
F3
F7
F8
F1 LOAD
This loads the song that is currently highlighted with the cursor.
F2 NAME EDIT
This allows you to re-name the song that is currently highlighted with the cursor on NAME EDIT screen.
F3 DELETE
This deletes the song that is currently highlighted with the cursor.
F7 SAVE
This saves the current settings as part of the project.
F8 CLOSE
This closes the R-1000 SONG popup.
18
Remote Controlling the Song Setup
Switching the song
1. Select a song to load
Select a song on the song list using cursor and press [F1] function button to select [LOAD].
fig.load-song.eps
2. Switch the song
The confirmation screen below appears. Press the [F8] function button to load the song currently highlighted with the cursor.
fig.load-confirm.eps
Select [LOAD w/ Sav] using [F5] function button to save the current song before switching.
19
Remote Controlling the Song Setup
Editing the song name
1. Select a song to edit name
Select a song on the song list using the cursor.
2. Load the song
Press [F1] function button to select [LOAD]. The selected song will be loaded.
3. Call up the screen to edit song name
Press [F2] function button to select [NAME EDIT]. The NAME EDIT screen will appear.
fig.name-edit.eps
4. Edit the song name
Edit the song name on NAME EDIT screen.
fig.name-edit-screen.eps
5. Close the screen
Press [F8] function button to select [OK]. The NAME EDIT will disappear and your edits of song name will be reflected.
20
Remote Controlling the Song Setup
Deleting the song
1. Select a song to delete
Select a song on the song list using the cursor.
2. Delete the song
Press [F3] function button to select [DELETE]. The confirmation screen below appears. Press [F8] function button to select
[DELETE].
fig.delete-confirm.eps
21
Remote Controlling the Song Setup
Call up the R-1000 MARKER popup
1. Call up the R-1000 CONTROL popup
Using the steps described in “Call up the R-1000 CONTROL popup” (p. 7), call up the R-1000 CONTROL popup.
2. Call up the R-1000 MARKER popup
Select [MARKER] with the cursor and press [ENTER] button. The R-1000 MARKER popup will appear.
fig.call-marker-popup.eps
22
Remote Controlling the Song Setup
R-1000 MARKER popup - Part Names and Functions
fig.marker-popup.eps
1
2
1.
Device and Time display
This shows same contents as PATCHBAY popup and CONTROL popup.
2.
Marker list
This shows the list of markers added to the current song. The information below is shown in this list.
• NO.
• NAME
• TIME
Number of the marker
Name of the marker. If no name is added, the TIME value is shown.
Position of the marker.
About Function Buttons
F1 through F4 and F8 function buttons are the same as R-1000 CONTROL popup.
fig.function-marker.eps
F5
F6
F7
F5 LOCATE TO
This makes current position jump to the marker location immediately before the current position.
F6 MARKER CLEAR
This deletes the marker immediately before the current position.
F7 MARKER SET
This adds a new marker to the current position.
You can add a new marker to the current position when the R-1000 CONTROL popup is opened. Hold down [SHIFT] button of the V-Mixer and
press [F7] function button to select [MARKER SET].
23
Remote Controlling the Song Setup
Editing the marker name
1. Select a marker to edit the name
Select [NAME] part of a marker on the marker list using the cursor.
fig.select-marker-name.eps
2. Call up the screen to edit the name
Press [ENTER] button to call up the screen to edit the name (NAME EDIT screen).
fig.marker-name-edit.eps
3. Edit the marker name
Edit the marker name on the NAME EDIT screen.
4. Close the NAME EDIT screen
Press [F8] function button to select [OK] and close the screen.
Changing the marker position
1. Select a marker to change position
Select [TIME] part of a marker on the marker list using the cursor.
2. Call up the screen to change position
Press [ENTER] button to call up the screen to change the marker position (TIME EDIT).
fig.marker-time-edit.eps
3. Change the position
Change the marker position on the TIME EDIT screen.
4. Close the TIME EDIT screen
Press [F8] function button to select [OK] and close the screen
24
Other Functions
Check all the R-1000 units connected to the V-Mixer
Call up the R-1000 CONTROL popup and press [F7] function button to select [ALL VIEW]. The screen below will appear and you
can check statuses of all the R-1000 units connected to your V-Mixer.
fig.all-view.eps
Remote Controlling the R-1000 from the User Buttons
You can assign functions to remote control the R-1000 to the user buttons (USER 1-8 and 9-16) of the V-Mixer.
1. Call up the setup screen
Call up the USER PREFERENCE screen of the V-Mixer.
2. Select a group of buttons
Use function buttons to select [1-8] or [9-16].
3. Select a button to assign
Select a button to assign a remote control function from [1] - [8] or from [9] - [16].
4. Select a connector where the R-1000 is connected
First, select [R-1000] in [FUNCTION] part. Then, select a connector of the V-Mixer where the R-1000 is connected in [PARAMETER 1]
part. You can select one from below.
• REAC A
• REAC B
• MIDI
5. Select a function to assign
Select a function to assign in [PARAMETER 2] part. The selected function will be assigned to the button you have selected on step
3. You can select one from below.
• REWIND
This makes the current position jump to the beginning of the current song. If the current position is located at the beginning of the song, this
switches to the previous song. Press and hold down this to move the current position backward (rewind).
• FORWARD
This switches the current song to the next one. Press and hold down this to move the current position forward (fast forward)
• PLAY/STOP
This starts or stops the song playback. If you press this while the recording is paused, the recording will start. This lights up during recording or
playback.
• REC
If you are in STOP mode, this button will set the R-1000 to REC standby (pause). It will blink while in standby. Press it again to cancel the standby
(pause) status. If pressed while recording, the recording will divide into a new piece of material.
• CALL
The current position jumps to the locations where the playback was started (CALL).
25
Other Functions
• A-B REPEAT
When A/B repeat is off, the first pressing of this button sets the A mark and causes the button to flash. When pressed again, it will set the B mark
and turn on the A/B repeat (loop) function. When the A/B repeat is looping, this button will steadily lit.
• MARKER PREV
This makes the current position jump to the marker position immediately before the current position.
• MARKER NEXT
This makes the current position jump to the marker position immediately after the current position.
• MARKER SET
This adds a marker to the current position.
• MARKER CLEAR
This deletes a marker immediately before the current position.
• R-1000 QUICKVIEW
You can assign a function to call up the R-1000 QUICKVIEW popup.
R-1000 QUICKVIEW popup
If you assign [R-1000 QUICKVIEW] to a user button, you can call up the popup below.
fig.quickview.eps
On this screen, you can remote control the basic functions like start/stop of recording or playback.
26