1
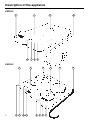
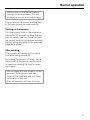
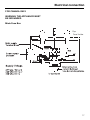
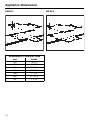
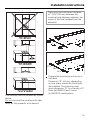
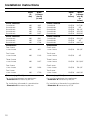
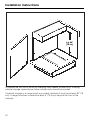
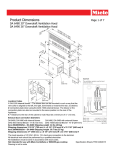
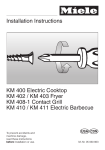
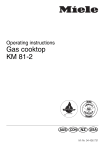
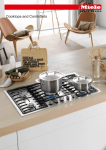
Operating instructions for
Electric cooktops
KM 82-2, KM 92-2
]ö
M.-Nr. 03 997 970
Description of the appliance
Description of the appliance
KM 82-2
1
2
6
7
3
4
6 5
KM 92-2
1
2
8 11
2
8 10
3
8 9 8 7
4
5
6
Description of the appliance
Description of the appliance
KM 82-2
b Control panel
c Small burner 1500 W - 5-3/4"
(14.5 cm) diameter
d Large burner 2000 W - 7-1/8"
Data plate
Because the data plate is no longer
visible once the appliance has been installed, a 2nd data plate is supplied. It
should be placed in the space provided on page 12 of these instructions.
(18 cm) diameter
e Power cord
f Front burner control
g Burner indicator lamps
h Rear burner control
KM 92-2
b Control panel
c Front large burner 2000 W - 7-1/8"
(18 cm) diameter
d Rear small burner 1500 W - 5-3/4"
Accessories
Special accessories are available from
your Miele Dealer or from the Miele
Parts Department.
Stainless steel cover EA 80 (optional)
A stainless steel cover is available for
the KM 82-2 electric cooktop.
For installation of this cover, a minimum
distance of 20" (510 mm) is required between the countertop and the bottom of
overhanging wall cabinets.
(14.5 cm) diameter
e Front small burner 1500 W - 5-3/4"
(14.5 cm) diameter
f Rear large burner 2000 W - 7-1/8"
(18 cm) diameter
g Power cord
h Front right burner control
i Burner indicator lamps
j Rear right burner control
k Front left burner control
l Rear left burner control
3
Contents
Contents
Description of the appliance . . . . . . . . . . . . . . . . . . . . . . . . . . . . . . . . . . . . . . . . . 2
Help protect our environment . . . . . . . . . . . . . . . . . . . . . . . . . . . . . . . . . . . . . . . . 5
Warning and Safety Instructions . . . . . . . . . . . . . . . . . . . . . . . . . . . . . . . . . . . . . 6
Before using for the first time . . . . . . . . . . . . . . . . . . . . . . . . . . . . . . . . . . . . . . . . 8
Cooktop controls . . . . . . . . . . . . . . . . . . . . . . . . . . . . . . . . . . . . . . . . . . . . . . . . . . 9
Burner description . . . . . . . . . . . . . . . . . . . . . . . . . . . . . . . . . . . . . . . . . . . . . . . . 10
Burner operation . . . . . . . . . . . . . . . . . . . . . . . . . . . . . . . . . . . . . . . . . . . . . . . . . 11
Cleaning and care . . . . . . . . . . . . . . . . . . . . . . . . . . . . . . . . . . . . . . . . . . . . . . . . 13
Problem solving guide. . . . . . . . . . . . . . . . . . . . . . . . . . . . . . . . . . . . . . . . . . . . . 14
After Sales Service. . . . . . . . . . . . . . . . . . . . . . . . . . . . . . . . . . . . . . . . . . . . . . . . 15
Electrical connection . . . . . . . . . . . . . . . . . . . . . . . . . . . . . . . . . . . . . . . . . . . . . . 16
Appliance dimensions . . . . . . . . . . . . . . . . . . . . . . . . . . . . . . . . . . . . . . . . . . . . . 18
Installation instructions. . . . . . . . . . . . . . . . . . . . . . . . . . . . . . . . . . . . . . . . . . . . 19
Contents
Help protect our environment
Disposal of packaging
The transport and protective packing is
mostly manufactured from the following
re-usable materials:
. . . Corrugated paper / cardboard mostly from recycled materials.
. . . Polyethylene foil (PE) partly from secondary raw materials.
Rather than throwing these materials
away, please take them to the nearest
recycling center for specific waste.
Disposal of your old machine
Old machines contain materials which
can be recycled. Please contact your
local recycling center or scrap merchant about potential recycling programs, before disposing of the appliance.
Read the notes on page 6 before disposing of the appliance.
5
Warning and Safety Instructions
Warning and Safety Instructions
Warning:
When using your cooktop, follow
basic safety precautions including
the following:
Read all instructions before using
the cooktop.
Use the cooktop only for its intended purpose.
Be sure your appliance is properly
installed and grounded by a qualified technician or electrician.
Before servicing, disconnect the
power supply by removing the fuse
or tripping the circuit breaker.
The electrical safety of this appliance can only be guaranteed
when continuity is complete between
the appliance and an effective grounding system. It is imperative that this
basic safety requirement is met. If there
is any doubt, have the electrical system
of the house checked by a qualified
electrician. The manufacturer cannot
be held responsible for damage
caused by the lack or inadequacy of
an effective grounding system.
Do not connect the appliance to
the main electrical supply using
an extension cord. Extension cords do
not guarantee the required safety of
the appliance.
Never use the cooktop to warm or
heat the room.
When using an electrical outlet
near the cooktop, make sure that
the cable of the appliance does not
come into contact with the burners of
the unit.
6
Do not allow children to operate or
play with or near the unit.
Store all toys away from the unit to
prevent injury to curious or playful
children.
Please remember that, in use, the
burners will become hot. Ensure
that children do not touch them.
Do not store items on the cooktop
when not in use.
Do not let cooking grease or other
flammable materials accumulate
on the cooktop.
Never leave the unit unattended
when cooking with oil or fat. Very
hot oil can cause a fire.
Allow sufficient time for the burners
to cool before touching or exposing surface areas to flammable materials.
If cracks or crevices appear in the
burners, immediately turn off the
cooktop and contact the Miele Service
Department or your local service dealer.
Avoid spilling liquids or food containing salt on a stainless steel
cooktop. Should this happen, wipe up
any spills immediately. Otherwise discoloration of the steel could occur.
Always cook pork thoroughly to ensure that, in the event of trichina,
all bacteria will be killed and the meat
is safe to eat.
Warning and Safety Instructions
Warning and Safety Instructions
Use pots and pans that are the
same size as the cooktop heating
elements.
When high settings are used, remain near the cooktop in case
splattering grease or liquid boil overs
cause smoke.
Only use dry potholders.
Only use cookware suitable for
range-top service. Unsuitable
cookware may break due to sudden
temperature changes.
Always position the handle of the
cookware toward the center of the
range to minimize burns, and spillage.
Before removing pots and pans,
be sure to turn the cooktop ”OFF“.
Always heat oil slowly, so it doesn’t
bubble over.
When frying foods, make sure that
the food is as dry as possible to
prevent moisture from causing hot oil to
bubble over.
When shallow or deep frying, do
not overfill the pan with oil.
Do not use water on grease fires.
Smother any fire or flame or use a
dry chemical or foam-type extinguisher.
Do not store items of interest to
children in cabinets above or behind the cooktop – children climbing on
the cooktop to reach items could be
seriously injured.
Do not use a steam-cleaner to
clean the cooktop.
The steam could penetrate electrical
components and cause a short circuit.
Save these instructions and review
them periodically.
Disposal of an old appliance
Before disposing of an old appliance, turn it off at the main
power connection and disconnect and
remove the appliance cord. This is intended to prevent the discarded appliance from becoming a hazard.
Text highlighted in boxes is of particular importance and should be
read in conjunction with the Warning and Safety instructions.
Wear proper apparel. Loose fitting
or hanging garments should never
be worn while using the appliance.
Do not attempt to repair or replace
any part of the appliance unless
specifically recommended in this manual. All other servicing should be refered to a qualified technician.
7
Before using for the first time
Before using for the first time
Read the ”Warning and Safety Instructions“ before using for the first
time.
Heat the burners for approx. 5 minutes
at the highest setting without a pot in
place, to harden the protective coating.
8
Cooktop controls
Cooktop controls
By using the individual burner control
knobs, temperatures can be freely selected.
The controls can be turned either clockwise or counter clockwise.
The indicator lamp for each burner
lights as soon as the respective control
knob is turned to a setting.
It will go out when the contol knob is
turned to the ”0“ position.
A resistance can be felt between settings 7 and 8 to indicate that the high
temperature range is being entered.
Recommended settings
Correct procedure:
Place the pot of food on the burner.
Select a high setting for boiling or
searing meat.
Once steam appears on the edge of
the lid, turn to a lower setting for continued cooking.
Reducing the temperature at the correct time . . .
. . . prevents food from overcooking.
. . . prevents food from burning.
. . . saves energy.
Setting
Melting butter, chocolate etc.
Dissolving gelatin
Preparing yogurt
1-2
Keeping food warm
Warming small quantities of food / liquid
Thickening sauces containing egg yolk or butter
Cooking milk pudding
Omelettes
1-3
Defrosting deep frozen food
Cooking rice, pasta
Steaming fruit, vegetables, fish
Cooking broths, soups
Braizing meat, fish, vegetables
Cooking dumplings, potatoes, soups
Preparing jams, jellies, stewed fruit
Frying chops, liver, sausage, fish, eggs
3-5
4-6
7 - 10
Frying pancakes, dropped biscuits and other liquid batters
Frying steaks
9 - 12
Deep frying (chips, fritters)
Boiling water
These figures are a guide. With deep pans, large quantities, or without lids, a higher setting is needed.
With small quantities, select a lower setting.
9
Burner description
Burner description
Safety thermostat
All burners are equipped with safety
thermostats that prevent them from
overheating.
The thermostats may trip
. . . if unsuitable cooking pots are used.
For example, pots with uneven bases
or which are too small.
. . . when burners are used without a
pot or pan.
10
Burner operation
Burner operation
Place a pan on the burner before
turning on the appliance. This will
protect the burner and save energy.
The surface of the burner and the base
of the pan should be clean and dry.
Turning on the burners
Turn the control knob to the maximum
setting for 1-2 minutes to allow the burners to rapidly heat up. Once hot, turn
the control knob to the desired cooking
setting, using the table on the previous
page as a guide.
After cooking
The burners will remain hot for some
time after being turned off.
By turning the burners off early, the residual heat of the burner can be used
to continue cooking the food or keeping it warm.
Do not place any wet objects on the
burners. If the burners get wet,
wipe off the moisture and turn them
on briefly so they dry.
This will prevent rust from forming.
11
Burner operation
The following tips are designed to enable you to
Pot size
. . . make the best use of energy when
using your cooktop.
. . . prevent food from boiling over and
burning onto the cooktop.
Saucepan bases
The diameter of the pot should be
slightly larger than the burner.
Burner
diameter
(in inches / cm)
suitable
pot diameter
(in inches / cm)
5-3/4 14.5
7-1/8 18.0
6-5/16 16
7-7/8 20
Pot lids
For optimum energy consumption during cooking, only pots with flat or
slightly concave bases should be
used. When the pot is hot, the base
should rest evenly on the burner.
When purchasing new pots and pans,
ensure that they are suitable for use on
this type of cooktop.
A lid on the pot will prevent heat from
being lost.
12
Cleaning and care
Cleaning and care
To prevent spills from burning on to the
cooktop, clean the burners and cooktop surface immediately in the event of
a spill.
Burners
Make sure no moisture or soil penetrates inside the burners. Wipe off any
spilt food with a damp cloth once the
burners have cooled. Use a plastic
scouring pad if necessary for stubborn
spills. The burners can be scoured, but
not the rim or cooktop surface.
Remove any residue from the burners
after cleaning.
To dry the burners turn them on for
a short time.
It is important that they are dry in
order to prevent rust from forming.
Occasional treatment with a thin film of
oil, or a special cleaner for solid burner
plates is recommended.
Burner trim
Do not use abrasive cleaners to
clean the trim. Clean the trim using
an appropriate metal or stainless
steel cleaner.
Cooktop surface
Avoid spilling liquids or foods containing salt onto the stainless steel
cooktop. Should this occur, wipe up
any spills immediately.
Otherwise discoloration of the steel
could occur.
Remove dust, oils and fats, food spills
or condensed water from pots and
pans immediately to prevent them from
drying on. Dried-on food residues are
easier to remove if they are first softened with hot water.
Clean the cooktop surface using hot
water and dishwashing liquid.
Do not use scouring agents or
pads, knives or hard brushes.
These will scratch the surface of the
cooktop.
Do not use cleaners containing
acids. A stainless steel cleaner can
be used on the cooktop surface.
Control panel / Control knobs
Do not use any scouring agents or
pads on the knobs or control panel.
Clean the cooktop controls and control
panel with hot water and dishwashing
liquid.
After cleaning, rub dry with a soft cloth.
13
Problem solving guide
Problem solving guide
Repairs to electrical appliances
should only be performed by a
trained technician. Unauthorized repairs could be dangerous.
Some minor problems, can be resolved
as follows:
What to do if . . .
. . . a resistance is felt between settings 7 and 8?
This is normal. The resistance is there
to indicate that the higher temperature
range has been entered.
14
. . . the burner does not get hot and
the burner indicator lamp does not
come on?
Check that the main circuit breaker
has not tripped.
If it has, call the Miele Service Department for assistance.
After Sales Service
After Sales Service
In the event of problems you cannot
correct yourself, please contact:
Your Miele Dealer
or
The Miele Service Department
The address of the nearest Service Department is given on the back page.
When contacting the Service Department, please quote the Model and Serial No. of the appliance. Both can be
found on the data plate.
Space for supplied data plate.
15
Electrical connection
Electrical connection
Electrical connection of the appliance should be made by a qualified electrician in accordance with
all local and national ordinances.
Note to the installer:
Please leave these instructions with
the consumer.
Power supply:
Please check the dataplate for
240 VAC; 60 Hz or
208 VAC; 60 Hz
Caution:
Disconnect the cooktop from the
main power supply before servicing
or installing. To reduce the risk of
electric shock, make sure that the
appliance is properly grounded
after installation.
Warning:
This appliance must be grounded.
For CDN only
The appliances are provided with 3 terminal leads: 1 black wire, 1 red wire
and 1 green wire which have to be connected to a separate overcurrent protection device (fusebox).
All hot wires (black and red) have to be
fused individually before connecting
them to the main power supply leads.
16
Use 15 Amp fuses for appliances
rated 240 VAC.
Connect black terminal wire to L1
(black) and red terminal wire to L 2
(red). The green terminal wire (ground)
has to be connected directly to the
equivalent colored power supply leads.
All connections must be done in a
proper way.
See also wiring diagram provided
with the appliance.
For USA only
The appliance is provided with a 3wire
cord.1 black wire (L 1), 1 red wire (L 2)
and 1 green wire (GND) which should
be connected to a dedicated line inside of an approved junction box. Connect the black wire to L 1, the red wire
to L 2 and the green wire to GND.
Also, see the circuit diagram provided with the appliance.
Electrical connection
Electrical connection
FOR CANADA ONLY
WARNING: THE APPLIANCE MUST
BE GROUNDED
Miele Fuse Box
Cap
Fuse Holder
17
Appliance dimensions
Appliance dimensions
KM 82-2
Measurement Conversion Table
mm
inches
490
19 5/16
265
10 7/16
560
22 1/16
510
20 1/16
288
11 3/8
580
22 13/16
55
2 3/16
18
KM 92-2
Installation instructions
Installation instructions
There must be a minimum distance
of 1-3/16" (30 mm) between the
combiset and adjacent cabinets, because of the heat radiated from the
elements.
1 3/16"
23/16˝
195/16˝
23/16˝
Prepare the countertop cut-out as illustrated.
Dimension ”B“ will vary depending
on how many combisets (cooktops)
are installed. The following chart
gives dimension ”B“ for a variety of 2
zone (ie KM 82-2) and 4 zone
(ie KM 92-2) combinations.
The cooktop may be installed as shown
above.
Do not surround the cooktop with cabinetry, as this presents a fire hazard.
19
Installation instructions
Istallation instructions
Depth
(in
mm)
Width
(= Dimension B)
(in mm)
490
490
490
490
490
265
558
851
1144
1437
2 zone Combiset
1 combiset
2 combisets
3 combisets
4 combisets
5 combisets
Width
(= Dimension B)
(in
inches)
19-5/16
19-5/16
19-5/16
19-5/16
19-5/16
10-7/16"
22"
33-1/2"
45-1/16"
56-9/16"
19-5/16
19-5/16
19-5/16
22-1/16"
45"
68-1/16"
2 zone Combiset
4 zone Combiset
1 combisets
2 combisets
3 combisets
Depth
(in
inches)
1 combiset
2 combisets
3 combisets
4 combisets
5 combisets
4 zone Combiset
490
490
490
560
1143
1728
Combination
1 combisets
2 combisets
3 combisets
Combination
One 2 zone
+ one 4 zone
490
851
One 2 zone
+ one 4 zone
19-5/16
33-1/2"
Two 2 zone
+ one 4 zone
490
1143
Two 2 zone
+ one 4 zone
19-5/16
45"
Three 2 zone
+ one 4 zone
490
1437
Three 2 zone
+ one 4 zone
19-5/16
56 -9/16"
One 2 zone
+ two 4 zone
490
1436
One 2 zone
+ two 4 zone
19-5/16
56-1/2"
Two 2 zone
+ two 4 zone
490
1729
Two 2 zone
+ two 4 zone
19-5/16
68-1/16"
Extractor (e.g. DA 8-2)
For installation between two appliances:
- Dimension B increases by 90 mm.
Extractor (e.g. DA 8-2)
For installation between two appliances:
- Dimension B increases by 3-9/16".
For installation at the end of a combination:
- Dimension B increases by 98 mm.
For installation at the end of a combination:
- Dimension B increases by 3-7/8"
20
Installation instructions
Installation instructions
Place the provided seal
edge of the cooktop.
loosen
f under the
tighten
b Appliance
c Tensioning screw
d Clamp
e Countertop
f Seal
Turn the tensioning screws c
counter clockwise until a resistance
is felt, then turn the clamps to the left.
Place the appliance in position, turn
the clamps and tighten the tensioning screw until the clamps press into
the countertop e.
Connect the appliance to the electrical supply.
When installing several Combiset units,
a stainless steel spacer bar must be
placed between the units. It is supplied
with its own installation instructions.
21
Installation instructions
Installation instructions
To reduce the risk fire or burns by reaching over heated surface units, locating
cabinet storage space above these surface units should be avoided.
If cabinet storage or a range hood is provided, distance A must be at least 30" (75
cm). A range hood has to extend at least 5" (12,5 cm) beyond the front of the
cabinets.
22
23
Alteration rights reserved / 22
CDN, USA - 1397