1
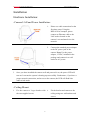
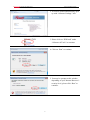
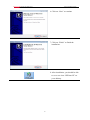
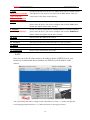
Wired Internet Camera RXS-3323
Wireless Internet Camera RXS-4324
Quick Installation Guide
Internet Camera RXS-3323/RXS-4324
Quick Installation Guide
Product Overview
Package Contents
Item
Descriptions
1. RXS-3323 or RXS-432 Camera
2. Manual and Software Package CD
3. Quick Installation Guide
4. Detachable Wireless LAN Antenna (optional, only
comes with Wireless Camera)
5. RJ 45 Cable
6. 12V/1A Power Adapter
7. Camera Mount Kit
Please contact your reseller, if any of the above items are missing.
2
Internet Camera RXS-3323/RXS-4324
Quick Installation Guide
System Requirements
z
Windows 2000, XP, Vista, or Windows 7.
z
At least 256 MB of memory (512MB recommended)
z
A wireless (802.11n or 802.11g) or Ethernet network.
z
Internet Explorer 6.x or higher, Firefox 2.0 or later/ Safari Internet Web Browser
z
VGA card resolution: 800 x 600 or above
z
CPU: 1.3GHz or above processor
Introduction of Hardware
- Front View
IR LEDs:
These LEDs are used for night vision during night or dark environment to
provide extra light source for the camera.
Lens and Focus Ring:
User can use this ring to make minor focus adjustment.
Power and Wireless
LED (Orange Color):
Indicates the power and wireless connection.
Microphone:
Built-in microphone for sound and voice reception.
LAN LED:
This LED is used to indicate whether DC power is on or not. In addition,
this LED will be flashing under Ethernet/LAN connection.
3
Internet Camera RXS-3323/RXS-4324
Quick Installation Guide
- Rear View
Audio Output Jack:
The Audio Output Jack allows the camera to output audio or alerting sound.
Connect with a 3.5Ø phone jack speaker or headphone (speaker or
headphone don’t come with camera)
Power Jack:
The input power is 12VDC which is provided by the power adapter included
in package
Note: Improper power adapter may damage the camera and result in
danger.
Antenna Connector:
User can attach the included antenna to this connector to connect to a
wireless 802.11b/g/n network. (optional, for Wireless Camera only)
LAN port:
The RJ45 LAN socket is for connections to 10/100Base-TX Fast Ethernet
cabling. Please use Category 5 or 6 “straight through” cable (doesn’t come
with camera) to connect to Ethernet network switch, hub, or router.
Note: Please use “cross-over” cable if you need to connect the camera to
computer directly
Factory Default Reset:
Reset the Camera back to Factory Default
4
Internet Camera RXS-3323/RXS-4324
Quick Installation Guide
Installation
Hardware Installation:
- Camera LAN and Power Installation:
1.
Please use cable connection for the
first time setup. Using the
RXS-4324 as example, please
connect an Ethernet cable to the
LAN socket located on the
camera’s rear and attach it to the
network.
2.
Connect the attached power adapter
to the DC power jack of the
camera. Note: Use the power
adapter, 12VDC, included in the
package and connect it to wall
outlet for AC power.
3.
Once you have installed the camera well and powered it on, the power LED will
turn on. It means the system is booting up successfully. Furthermore, if you have a
proper network connection, and access to the camera, the LED will flash blue
under wired mode.
- Ceiling Mount:
1.
Fix the camera to L-type bracket with 2.
the two supplied screws
5
Fix the bracket and camera to the
ceiling using two wall anchors and
screws
Internet Camera RXS-3323/RXS-4324
Quick Installation Guide
- Wall Mount:
1.
Fix the L-type bracket to the wall using 2.
two wall anchors and screws
Fix the camera to L-type bracket
with the two supplied screws
Software Installation:
When you installed the Camera on a LAN environment, there are two easy ways to
search your Cameras by IPWizard or UPnP discovery. First is the guide to install the
IPWizard II:
- IPWizard II Installation:
IPWizard II is a software designed to help you search and link to the Rosewill’s
Camera which connects under your network.
1. Please insert the CD into your
CD-Rom / DVD-Rom drive
6
Internet Camera RXS-3323/RXS-4324
Quick Installation Guide
2. A browser should automatically open
up with “Software Package” info.
3. Please click on “IPWizard” under
“Software & Tools” to continue
4. Click on “Run” to continue.
5. You may be prompt to this window
depending on your Internet Browser’s
security level, please click “Run” to
continue.
7
Internet Camera RXS-3323/RXS-4324
Quick Installation Guide
6. Click on “Next” to continue
7. Click on “Finish” to finish the
installation.
8. After installation, you should be able
to see a new icon “IPWizard II” on
your desktop
8
Internet Camera RXS-3323/RXS-4324
Quick Installation Guide
Connecting to the Camera
Using IPWizard II:
After the installation of the IPWizard II, double click on the icon,
you will see
this window popup as the basic management of the IPWizard II. Once it popup, the
wizard will perform an auto search to see if you have any camera in the Network.
The window below is an example of what this may look like:
1. Device Title
This part shows the Device name found in the network
2. IP address
Here shows the IP address of the found Camera
3. Port
Here shows the Port used of the found Camera
4. Minimize and Close
Window
The orange circle will minimize the window and the red circle will close
5. MAC
This shows the MAC address of your Camera
this window
Double Click on the above information bar will open up the Camera
management page in your default Web Browser.
6. Search
When launch the IPWizard II, a searching window will pop up. IPWizard II
is starting to search Network Cameras on the LAN. The existed devices will
be listed.
9
Internet Camera RXS-3323/RXS-4324
7. View
(One click to view the
video from the
IPWizardII directly)
8. LAN
Quick Installation Guide
If IPWizard II finds network devices, View button will be available. Please
select the device you want to view and click the View button. Then you
could see the video from camera directly.
In case you want to change the IP related parameters of wired interface,
please select the device you want to configure and click the LAN button.
Further description will be show at below.
9. Wireless
(For RXS-4324 only)
In case you want to change the IP related parameters of wireless interface,
please select the device you want to configure and click the WIRELESS
button. Further description will be show at below.
10. EXIT
This will close the IPWizard II window.
11. Model Name
This shows you the device model name.
12. Network
This tells you what your connection type is; wired or wireless.
13. DHCP
Here tells that whether your camera is under the DHCP IP or Static IP.
14. WiFi
This tells you what your connection type is; Ethernet only or wireless.
15. Connection
Shows if your connection is successful
- LAN:
Here you can set the IP of the camera to be either by Static or DHCP base on your
needs. It is recommended and by default to use DHCP as your IP address of the
camera.
You could modify the relative settings of the selected device. Click “<<” button will quit the
LAN setting procedure and click “>>” button will move to next page as below.
10
Internet Camera RXS-3323/RXS-4324
Quick Installation Guide
If you do not want to change username and/or password, then just click “Submit” button to
perform your setting accordingly. Click “<<” button will go back to previous page. If you like
to change username and/or password of the device, just click the check button. Then, you will
be able to change the username and password as below.
After type in the new username and password, click “Submit” button to perform your setting
accordingly. Click “<<” button will go back to previous page.
- Wireless:
Selecting WIRELESS will start the search for the SSID around your area.
11
Internet Camera RXS-3323/RXS-4324
Quick Installation Guide
Click on the SSID to select your wireless AP or router. We use WEP as an example here. Enter
your SSID’s WEP key, then click “>>”
Double check your WLAN setting (Default using DHCP IP as your wireless router
provides IP address for the Camera) then click “Submit”.
12
Internet Camera RXS-3323/RXS-4324
Quick Installation Guide
You should see the confirmation Status Window popup as below. Please select “OK”
to confirm these settings.
The IPWizard II will start to configure this camera with your updated information.
13
Internet Camera RXS-3323/RXS-4324
Quick Installation Guide
Once this step finished, IPWizard II will prompt you to unplug the Ethernet cable to activate
wireless access. Then IPWizard II will prompt you to test wireless setting or finish wireless
procedure as below.
Thank you for purchasing a quality Rosewill Product.
Please register your product at: www.rosewill.com for complete warranty
information and future support for your product.
14