1
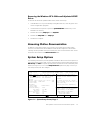
® 'HOO2SWL3OH[ ®*;DQG1; '2&80(17$7,21 83'$7( ZZZGHOOFRP ____________________ Information in this document is subject to change without notice. © 1998 Dell Computer Corporation. All rights reserved. Trademarks used in this text: Dell, the DELL logo, and OptiPlex are registered trademarks of Dell Computer Corporation; Microsoft, Windows, and Windows NT are registered trademarks of Microsoft Corporation; 3Com and EtherDisk are registered trademarks of 3Com Corporation; Intel, LANDesk, and Pentium are registered trademarks of Intel Corporation. Other trademarks and trade names may be used in this document to refer to either the entities claiming the marks and names or their products. Dell Computer Corporation disclaims any proprietary interest in trademarks and trade names other than its own. ____________________ Les informations de ce document sont sujettes à modification sans préavis. © 1998 Dell Computer Corporation. Tous droits réservés. Marques utilisées dans ce texte: Dell, le logo DELL et OptiPlex sont des marques déposées de Dell Computer Corporation; Microsoft, Windows, et Windows NT sont des marques déposées de Microsoft Corporation; 3Com et EtherDisk sont des marques déposées de 3Com Corporation; Intel, LANDesk et Pentium sont des marques déposées de Intel Corporation. D’autres marques et noms commerciaux peuvent être utilisés dans ce document pour faire référence aux entités se réclamant de ces marques et de ces noms ou à leurs produits. Dell Computer Corporation dénie tout intérêt propriétaire aux marques et aux noms commerciaux autres que les siens. ____________________ Irrtümer und technische Änderungen vorbehalten. © 1998 Dell Computer Corporation. Alle Rechte vorbehalten. Warenzeichen in diesem Text: Dell, das DELL logo und OptiPlex sind eingetragene Warenzeichen der Dell Computer Corporation; Microsoft, Windows und Windows NT sind eingetragene Warenzeichen der Microsoft Corporation; 3Com und EtherDisk sind eingetragene Warenzeichen der 3Com Corporation; Intel, LANDesk und Pentium sind eingetragene Warenzeichen der Intel Corporation. Alle anderen in dieser Dokumentation genannten Warenzeichen und Produktbezeichnungen sind Eigentum der entsprechenden Hersteller und Firmen. Die Dell Computer Corporation verzichtet auf alle Besitzrechte an Warenzeichen und Handelsbezeichnungen, die nicht ihr Eigentum sind. ____________________ La información en este documento podría cambiar sin previo aviso. © 1998 Dell Computer Corporation. Quedan reservados todos los derechos. Marcas comerciales usadas en este texto: Dell, el logotipo DELL y OptiPlex son marcas comerciales registradas de Dell Computer Corporation; Microsoft, Windows y Windows NT son marcas comerciales registradas de Microsoft Corporation; 3Com y EtherDisk son marcas comerciales registradas de 3Com Corporation; Intel, LANDesk and Pentium son marcas comerciales registradas de Intel Corporation. Otras marcas comerciales y nombres comerciales pueden utilizarse en este documento para referirse a las entidades que poseen las marcas y los nombres, o a sus productos. Dell Computer Corporation renuncia a cualquier interés de propiedad en las marcas comerciales y los nombres comerciales que no sean los suyos. August 1998 P/N 4485C Rev. A05 'HOO ® 2SWL3OH[ ® *;DQG1; 'RFXPHQWDWLRQ8SGDWH This document updates information contained in your Dell OptiPlex GX1 and NX1 system documentation. It describes the following features: Reinstallation of DirectX and video drivers Proper configuration of network drivers if you have a 3Com® PCI 3C905b Ethernet network interface controller (NIC) Reinstallation of the Microsoft® -updated Advanced Technology Attachment Packet Interface (ATAPI) driver for the Microsoft Windows NT ® 4.0 operating system New online documentation New System Setup options System board layout for new OptiPlex systems New microprocessor option 5HLQVWDOOLQJ'LUHFW;DQG9LGHR'ULYHUV If you ever need to reinstall the Microsoft Windows® 95 operating system, you should also reinstall the software drivers and utilities that came with your Dell system. This section specifically describes how to reinstall DirectX drivers and video drivers. Your online System User’s Guide or Network Administrator’s Guide describes how to install other types of drivers and utilities. DirectX is a group of technologies designed to enhance application programs that are rich in multimedia elements such as full-color graphics, video, 3D animation, and surround sound. The presence of DirectX drivers on your system also ensures accelerated-graphics port (AGP) support. To reinstall DirectX drivers and any other drivers and utilities that came with your system, you need a set of diskettes that contain the software. If your computer is not part of a centrally managed network, such as a network that connects computer workstations in an office environment, you should create a set of program diskettes using the Dell Program Diskette Maker. The program diskettes contain installation programs for the drivers and utilities needed by your system. To access the Program Dell OptiPlex GX1 and NX1 Documentation Update 1-1 Diskette Maker, click the Start button and point to Programs. Then point to Dell Accessories and click Program Diskette Maker. If your computer is part of a centrally managed network, check with your network administrator for information on reinstalling drivers and utilities. If you are a network administrator and you received the Network Administrator’s Kit, Dell provides drivers and utilities for Windows 95 on diskettes. Normally, you should install the drivers on the managing server and then use Intel® LANDesk® Configuration Manager to download and install the drivers on an OptiPlex GX1 Managed PC system or an OptiPlex NX1 Net PC system. See your online Network Administrator’s Guide for information on downloading and installing drivers over the network. To reinstall DirectX drivers locally on a system with a diskette drive, follow these steps: 1. If you have not done so already, create a program diskette set of drivers as described previously. Or, if you received the Network Administrator’s Kit, locate the diskettes containing drivers and utilities. 2. If you reinstalled Windows 95, make sure Universal Serial Bus (USB) support was reinstalled along with the operating system. USB support is enabled when Windows 95 is installed by Dell. However, if you need to reinstall the operating system, USB support should also be reinstalled. See your system’s Reference and Installation Guide or your online Network Administrator’s Guide for more information. 3. Save any work and close all application programs, because you will need to restart the computer at the end of this procedure to complete the installation. 4. Insert the DX5 Drivers Diskette 1 into the diskette drive. 5. Click the Start button and then click Run. 6. Type a:\setup.exe and click OK. 7. Follow the instructions on your screen, and insert the DX5 Drivers Diskette 2 when prompted. When the setup.exe program is complete, a message appears prompting you to run another program. 8. Click the Start button and then click Run. Type c:\windows\ dx5core.exe and click OK. 9. Follow the instructions on your screen to complete the DirectX drivers installation and restart the system when prompted. 10. After the system restarts, insert the video drivers diskette into the diskette drive. 11. Click the Start button and then click Run. 12. Type a:\setup.exe and click OK. 1-2 Dell OptiPlex GX1 and NX1 Documentation Update 13. Follow the instructions on your screen to reinstall the primary video drivers. When Windows 95 restarts, you can change the display resolution and color depth. See the operating system documentation for more information. NOTE: If you change the display resolution, you may need to adjust the refresh rate for optimum viewing. &RQILJXULQJD&RP3&,&E1,& The following subsections describe how to manually set the network frame type for an Internetwork Packet Exchange/Sequenced Packet Exchange (IPX/SPX)-compatible network protocol and which version of 3Com EtherDisk® XL drivers and utilities you should use. 6HWWLQJWKH1HWZRUN)UDPH7\SH If your system is connected to a network, verify the following network protocol settings: 1. Right-click the Network Neighborhood icon on the Windows desktop, and then select Properties from the pop-up menu. 2. Under the Configuration tab in the Network window, click IPX/SPXCompatible Protocol if it is not already highlighted. 3. Click the Properties button to open the IPX/SPX-Compatible Protocol Properties window. 4. Click the Advanced tab, and then select Frame Type from the Property list. 5. Select the appropriate frame type from the Value menu, according to your network requirements. 6. Follow the instructions on your screen to complete the configuration. 8VLQJ&RP(WKHU'LVN;/9HUVLRQ'LVNHWWHV The 3Com EtherDisk XL version 3.01 diskettes provided by Dell are compatible with the 3C905 family of NICs. If you purchased a 3Com 3C905-based NIC separately, do not attempt to use the 3Com EtherDisk XL diskettes that came with the NIC. Use only the 3Com EtherDisk XL version 3.01 diskettes that were provided by Dell. For more information on NIC drivers and utilities, see your system’s Reference and Installation Guide or your online Network Administrator’s Guide. 0LFURVRIW8SGDWHG$7$3,'ULYHU If you purchased Microsoft Windows NT 4.0 with your computer, your system is equipped with the Microsoft-updated ATAPI driver. Dell OptiPlex GX1 and NX1 Documentation Update 1-3 Dell has installed the Microsoft-updated ATAPI driver for your operating system, and it is operative when you receive your computer. No further installation or configuration is needed. NOTE: If Windows NT 4.0 is reinstalled, the Microsoft-updated ATAPI driver must also be reinstalled. The driver for Windows NT 4.0 has also been copied to your hard-disk drive in diskette-image form. If you need to reinstall or remove this driver, you can do so as described in the following subsections. 5HLQVWDOOLQJWKH:LQGRZV170LFURVRIW8SGDWHG $7$3,'ULYHU NOTE: To install the Microsoft-updated ATAPI driver for Windows NT 4.0, you must have a mouse connected to the system and Windows NT 4.0 must already be installed on the hard-disk drive connected to the primary enhanced integrated drive electronics (EIDE) channel. To reinstall the Microsoft-updated ATAPI driver for Windows NT 4.0, follow these steps: 1. If you have not already done so, use the Program Diskette Maker to make a diskette copy of the Dell Microsoft-updated ATAPI driver diskette image on your hard-disk drive. The Program Diskette Maker is available through the Dell Accessories program folder. For more information, refer to the online help provided in the Program Diskette Maker. 2. Start Windows NT. If you are already running Windows NT, close any open documents or application programs. 3. Insert the Microsoft-updated ATAPI driver diskette into drive A. 4. Click the Start button and click Run. Type a:\setup.bat in the Run window, and then click OK. A black screen quickly appears and disappears, indicating that the driver file has been loaded. Setup automatically saves the existing atapi.sys driver as atapi.000 and loads the new driver into the system32\drivers subdirectory in the Windows NT directory. 5. Remove the diskette from drive A. Then restart the system. NOTE: To enable or disable direct memory access (DMA) while using the Microsoftupdated ATAPI driver, run dmacheck.exe from \support\utils\i386 on the Microsoft Windows NT Service Pack 3 CD-ROM. 1-4 Dell OptiPlex GX1 and NX1 Documentation Update 5HPRYLQJWKH:LQGRZV170LFURVRIW8SGDWHG$7$3, 'ULYHU To remove the Microsoft-updated ATAPI driver, follow these steps: 1. Start Windows NT. If you are already running Windows NT, close any open documents or application programs. 2. Use Windows NT Explorer to open the system32\drivers subdirectory in the Windows NT directory. 3. Rename the existing atapi.sys file to atapi.bak. 4. Rename the atapi.000 file to atapi.sys. 5. Restart the computer. $FFHVVLQJ2QOLQH'RFXPHQWDWLRQ In addition to the online System User's Guide, your system also includes online versions of the Reference and Installation Guide and the Diagnostics and Troubleshooting Guide in portable document format (PDF) files on the hard-disk drive. These documents are located in the Dell Accessories folder. 6\VWHP6HWXS2SWLRQV The following subsections provide updated infromation about some of the options on the System Setup screen. Page 1 of the System Setup screen includes new fields for DAC Snoop and ACPI and reports primary drives and chassis intrusion differently than before (see Figure 1-1). Use of the Setup Password (reported on page 2 of the System Setup screen) has also changed. Page 1 of 2 Dell Computer Corporation (www.dell.com) System OptiPlex GX1 400MTbr Setup BIOS Version: XXX 13:17:02 Date: Mon April 1, 1998 This category sets the time in 24-hour format (hours:minutes: Diskette Drive A: 3.5 inch, 1.44 MB seconds) for the internal clock/ Diskette Drive B: Not Installed calendar. Drives: Primary Type Cyls Hds Pre LZ Sec Size To change the value in a field, Drive 0:Auto EIDE Drive 9216 enter a number or use the left- or Drive 1:None right-arrow key. Secondary Changes take effect immediately. Drive 0:Auto CD-ROM Device Drive 1:None Pentium® II Processor 400 MHz Reserved Memory: None Level 2 Cache: 512 KB Integrated CPU Speed: 400 MHz System Memory: 32 MB SDRAM Num Lock: On Video Memory: 4 MB SGRAM Chassis Intrusion: Enabled Service Tag: XXXXX DAC Snoop: On Asset Tag: XXXXX ACPI: On , change values Alt-P next Esc exit Alt-B reboot Tab,Shift-Tab change fields Time: )LJXUH6\VWHP6HWXS6FUHHQ3DJH Dell OptiPlex GX1 and NX1 Documentation Update 1-5 'ULYHV3ULPDU\DQG6HFRQGDU\ System Setup reports hard-disk drives in one of two ways: Newer hard-disk drives and all hard-disk drives over 8 gigabytes (GB) are reported as an EIDE Drive, without details on type, cylinders, heads, cylinder numbers, and sectors. See Figure 1-1 for an example. Older hard-disk drives are reported with full details about type, cylinders, heads, cylinder numbers, sectors, and size. NOTE: For all Dell-installed hard-disk drives, set the appropriate Drive option to Auto. Use one of the following options if you have an older EIDE hard-disk drive not shipped with the system from Dell and with less than 528 megabytes (MB) in capacity: A specific drive-type number Usr1 or Usr2 For each drive, you can choose the seven parameters as a group by drive-type number or you can enter the parameters individually from the keyboard. A drive-type number specifies the parameters of a hard-disk drive, based on a table recorded in the system’s basic input/output system (BIOS). NOTE: Operating systems that bypass the system BIOS may not obtain optimum hard-disk drive performance. If you choose the Usr1 or Usr2 option, you must supply the following parameters for the drive: Type is the drive-type number for the selected hard-disk drive (in this case, Usr1 or Usr2). Cyls is the number of logical cylinders. Hds indicates the number of logical heads in the drive. Pre (precompensation cylinder) is the cylinder number at which the electrical current for the drive head changes to compensate for differences in data density across the disk surface (this parameter has no effect for EIDE drives). Lz is the cylinder number that is used as the drive’s landing zone for the heads when the drive is not in use. Sec is the number of logical sectors per track. Size (automatically calculated by the system) indicates the number of millions of bytes of storage provided by the drive. &KDVVLV,QWUXVLRQ Chassis Intrusion displays the status of the system chassis intrusion monitor and can be set to Enabled, Enabled-Silent, or Disabled. The default is Enabled. 1-6 Dell OptiPlex GX1 and NX1 Documentation Update If the computer cover is removed while the intrusion monitor is set to Enabled, the setting changes to Detected, and the following message appears during the boot sequence at the next system start-up: Alert! Cover was previously removed. If the computer cover is removed while the intrusion monitor is set to EnabledSilent, the setting changes to Detected, but the alert message is not displayed during the boot sequence at the next system start-up. If the intrusion monitor is set to Disabled, no intrusion monitoring occurs and no messages are displayed. To reset the Detected setting, enter the System Setup program during the system’s power-on self-test (POST). At the Chassis Intrusion option, press any edit key to reset the setting, and then choose Enabled, Enabled-Silent, or Disabled. NOTE: When the setup password is enabled, the setup password is required to reset the Chassis Intrusion option. '$&6QRRS DAC Snoop lets you correct video problems that may occur when certain video expansion cards are used. The default is Off. If you are using a video expansion card and problems such as incorrect colors or blank windows occur, set DAC Snoop to On. $&3, This option controls the operation of the system’s Advanced Configuration and Power Interface (ACPI) feature. The default is On. When ACPI is set to On, momentarily pressing the power button places the system in a power-saving mode. To turn the system off completely, press the power button for more than four seconds. When ACPI is set to On, interrupt request (IRQ) line 9 is not available for use by an expansion card. When ACPI is set to Off, momentarily pressing the power button turns off the system completely. With this setting, IRQ9 is available for use by an expansion card. 2SHUDWLQJ:LWKD6HWXS3DVVZRUG(QDEOHG If Setup Password is set to Enabled, you must enter the correct setup password before you can modify the majority of the System Setup options. If you do not enter the correct password in three tries, the system lets you view, but not modify, the System Setup screen, with one exception: if Password Status is Unlocked, you may modify the system password. Dell OptiPlex GX1 and NX1 Documentation Update 1-7 6\VWHP%RDUGDQG&RQQHFWRUV New OptiPlex GX1 and NX1 systems contain the system board shown in Figure 1-2. telephony DIMM sockets (3) 3.3-V power input connector (DIMM_A–DIMM_C) connector (POWER_2) (TAPI) parallel/serial port 1 connectors (stacked) (PARALLEL/SERIAL1) mouse/keyboard connectors (stacked) (MOUSE/KYBD) battery socket (BATTERY) control panel connector (PANEL) chassis intrusion switch connector USB connectors (USB) (2) main power input connector (POWER_1) serial port 2 connector (SERIAL2) SEC cartridge connector (SLOT1) front of computer microprocessor fan connector (FAN) video-memory upgrade socket (VIDEO_UPGRADE) CD-in connector (CD-IN) primary EIDE interface connector (IDE1) (pin-1 corner) video connector (MONITOR) optional integrated NIC connector (ENET) microphone jack (MIC) secondary EIDE interface connector (IDE2) (pin-1 corner) diskette/tape drive interface connector (DSKT) (pin-1 corner) audio line-out jack (LINE-OUT) audio line-in jack (LINE-IN) ATI multimedia connector (AMC) riser board connector (RISER) system board jumpers )LJXUH6\VWHP%RDUG)HDWXUHV 0LFURSURFHVVRU2SWLRQ The OptiPlex GX1 and NX1 systems now offer the Intel ® Pentium® II microprocessor with an internal speed of 450 megahertz (MHz), an external speed of 100 MHz, and a 512-kilobyte (KB) level 2 (L2) cache. 1-8 Dell OptiPlex GX1 and NX1 Documentation Update 3ULQWHGLQWKH86$ ® ZZZGHOOFRP 31&5HY$