1
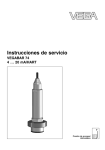
De sbr ozad or / Or i ll ad or de 9" ( 23cm )
9 " ( 2 3 c m ) S t r i n g Tr i m m e r
MANUAL DE INSTRUCCIONES
INSTRUCTION MANUAL
Cat. N° GL300
Español
English
ADVERTENCIA: LEASE ESTE INSTRUCTIVO ANTES DE USAR EL PRODUCTO.
WARNING: READ INSTRUCTION MANUAL BEFORE USING PRODUCT.
2
8
ESPAÑOL
DESBROZADOR/ORILLADOR DE 9” (23cm)
ADVERTENCIAS E INSTRUCCIONES
Para Reducir El Riesgo de Lesiones:
• Antes de cualquier uso, asegúrese que cualquier
persona que vaya a utilizar esta herramienta lea y
comprenda todas las instrucciones de seguridad y la
información contenida en este manual.
• Conserve estas instrucciones y repáselas con frecuencia antes de usar la herramienta e instruir a otras personas.
Precaución: Emplee la protección personal
y auditiva adecuada durante el uso de este
producto. Bajo ciertas condiciones y duración
de uso, el ruido producido por este producto
puede contribuir a la pérdida auditiva.
• ANTEOJOS DE SEGURIDAD — Emplee siempre
anteojos de seguridad cuando esté conectada la
unidad.
• GUARDA — No utilice esta herramienta sin la guarda
colocada en su posición.
• LÍNEA DE NYLON — Conserve cara, manos y pies
alejados de la línea giratoria en todo momento. No
se extienda más allá de la longitud indicada en este
manual. Emplee pantalones largos para protegerse
las piernas.
• CONSERVE ALEJADOS A LOS ESPECTADORES
— especialmente a los niños, a una distancia
segura del área de trabajo.
• EVITE EL ENCENDIDO ACCIDENTAL — No
empuje la unidad con el dedo en el interruptor si está
conectada.
• NO FUERCE LA HERRAMIENTA — a una velocidad mayor a la que corta con eficacia.
• EMPLEE LA HERRAMIENTA ADECUADA — No
utilice esta herramienta en tareas para las que no
fue diseñada.
• NO SALGA DE BALANCE — Conserve siempre
2
bien apoyados los pies así como el equilibrio.
• ADVERTENCIA — Para evitar el riesgo de choque
eléctrico, utilice solamente cordones de extensión
adecuados para intemperie. Conecte siempre las
extensiones a una línea protegida por un fusible o por
un interruptor de circuito.
• NO MALTRATE EL CABLE — No tire del cable para
desconectarlo de la toma de corriente. Consérvelo
alejado de objetos calientes, grasas y cantos afilados.
• CORDONES DE EXTENSIÓN — Para evitar que el
cordón eléctrico se desconecte al operar la unidad,
utilice el sujetador como se describe en este manual.
• DAÑOS A LA UNIDAD — Si golpea la unidad o
ésta se atasca con algún objeto, apáguela
inmediatamente, desconéctela y verifique si se
produjeron daños. Si los hay, haga reparar la unidad
antes de intentar volver a usarla. No la utilice si hay
alguna pieza rota.
• DAÑOS AL CABLE — Conserve alejado al cable de
la línea giratoria. Si daña el cordón eléctrico,
desconéctelo de la toma de corriente antes de mover
la unidad o examinar el daño. El cable dañado debe
reemplazarse antes de usar de nuevo la
herramienta.
• DESCONECTE LA HERRAMIENTA — Cuando no
la use, cuando cambie la línea de nylon o antes de
limpiar la unidad.
• VÍSTASE ADECUADAMENTE — No utilice la
herramienta si está descalzo o si calza sandalias
descubiertas. Use siempre calzado con suela de
goma.
• EVITE CONDICIONES AMBIENTALES
PELIGROSAS — No utilice herramientas eléctricas
en lugares húmedos o inundados. Siga todas las
instrucciones contenidas en este manual para el
funcionamiento adecuado de su herramienta.
• NO UTILICE LA CORTADORA DE CÉSPED BAJO
LA LLUVIA.
ESPAÑOL
• NO UTILICE herramientas eléctricas portátiles en
atmósferas gaseosas o explosivas. Los motores de
estas herramientas producen chispas que pueden
encender los gases.
• GUARDE LAS HERRAMIENTAS QUE NO
EMPLEE BAJO TECHO — Las herramientas que
no se emplean deben guardarse bajo techo en un
lugar seco y bajo llave, lejos del alcance de los
niños.
• LA LÍNEA GIRATORIA DESEMPEÑA UNA
FUNCIÓN DE CORTE — Tenga cuidado cuando
corte alrededor de cercas y plantas.
• UTILICE ÚNICAMENTE LA LÍNEA DE
REPUESTO RECOMENDADA — No utilice línea
más gruesa o de otro material, por ejemplo alambre de metal, línea para pescar o algún otro material similar.
UNA CARACTERÍSTICA IMPORTANTE
PARA EL CONSUMIDOR
herramienta. Si tiene dudas, utilice el calibre siguiente.
Mientras más pequeño sea el número del calibre,
mayor será éste.
Calibre mínimo para cordones de extensión
Volts
Longitud total del cordón en metros
120V~ 0-7,62 7,63-15,24 15,25-30,48 30,49-45,72
220V~ 0-15,24 15,25-30,48 30,49-60,96 60,97-91.44
Amperaje
Más
No más
de
de
Calibre del cordón
0
-
6
18
16
16
14
6
-
10
18
16
14
12
10
- 12
16
16
14
12
14
12
No Recomendado
12 -
16
Instrucciones de Ensamblaje
Su herramienta está DOBLEMENTE AISLADA y le
brinda protección añadida. Esto significa que se ha
fabricado de manera integral con dos “capas”
separadas de aislamiento eléctrico entre usted y el
sistema eléctrico que contiene.
1. Tome el cuerpo superior del mango e inserte en la
parte inferior.
Nota: EL DOBLE AISLAMIENTO no sustituye a las
precauciones normales de seguridad cuando se opera
esta herramienta. La finalidad de este sistema de
aislamiento es ofrecer a usted protección añadida
contra la lesión resultante de fallas en el aislamiento
eléctrico interno de la herramienta.
3. Coloque la guarda en la parte inferior, girando
hasta que ajuste en las ranuras y atore firmemente
con los dos tornillos.
Precaución: Cuando efectúe servicio a herramientas con doble aislamiento, UTILICE
PARTES DE REEMPLAZO IDÉNTICAS. Repare
o reemplace los cordones eléctricos dañados.
CABLES DE EXTENSION
Asegúrese que su cordón de extensión esté en buenas condiciones. Cuando emplee una extensión
asegúrese que tenga el calibre adecuado por seguridad y para evitar pérdidas de potencia y sobrecalentamiento. La tabla muestra el calibre correcto que
debe utilizarse de acuerdo con la longitud y el amperaje indicado en la placa de identificación de la
2. Mueva el botón de seguro hacia la izquierda y
presione hasta que pueda mover el botón de
seguro a la derecha. Atore firmemente.
4. La parte ancha de la guarda debe quedar hacia
adentro, del lado donde estan sus pies.
5. Remueva con cuidado la cobertura protectora de
la cuchilla antes de usar.
Nota: Esta herramienta esta diseñada para un
uso ligero. Se recomienda un tiempo de uso de 15 a
20 minutos máximo por vez. Cualquier aplicación
excesiva puede causar el deterioro de la herramienta.
Procedimiento de Desbrozado
Precaución: Revise el área que vaya a
arreglar y retire alambres, cordones u otros
objetos similares que pudieran atascar el
rotor o la línea. Sea particularmente cuidadoso con los alambres doblados que sobre3
ESPAÑOL
salgan al paso de la herramienta, como las púas
de la base de las mallas de alambre.Incline la
unidad ligeramente en relación con la superficie
que va a cortar. Baje la unidad lentamente sobre la
superficie que va a cortar. (Si la altura pasa de
20 cm, comience a cortar desde la punta.)
Balancee lentamente la unidad sobre la
superficie que va a cortar, conservándola a la
altura deseada.
además, de lo que corte y del sitio en que lo corte.
EJEMPLO: La línea se desgastará más pronto si se
trabaja contra un muro de mampostería, en
comparación con lo que sucede si se trabaja alrededor
de un árbol. Puede ocurrir que la línea se rompa si se
alimenta muy rápidamente la unidad, ocurre
atascadura con objetos extraños, se fatiga del material
o se intentan cortar hierbas muy gruesas, pues se
excedería la capacidad de la herramienta.
1. Desconecte la herramienta de la corriente eléctrica.
2. Presione el botón de seguro del mango superior
hacia la izquierda y remueva jalando del mango.
3. Gire el mango e inserte nuevamente en el cuerpo
inferior.
4. Mueva el botón de seguro hacia la izquierda y
presione hasta que pueda mover el botón de
seguro a la derecha. Atore firmemente.
Nota: La tendencia de la línea a romperse aumenta
conforme es más fría la temperatura ambiental.
NO SE UTILICE CUANDO LA TEMPERATURA ES
INFERIOR A 10 ºC (50 ºF).
4. Para mejores resultados, alargue la línea conforme
se vaya desgastando, como se indica en
“Procedimientos de alimentación de la línea.”
Ajuste de Altura Telescópica
5. Desconecte periódicamente la unidad y quite el
césped y otros desperdicios que se hayan
acumulado en el interior de la cubierta de la tapa
de contacto.
1. Desconecte la herramienta de la corriente eléctrica.
Procedimientos de alimentación de la línea
2. Gire en sentido contrario a las manecillas del reloj la
perilla localizada en el cuerpo inferior y jale el cuerpo
superior hasta ajustar la altura que más le acomode.
Para aumentar la longitud de la línea, aplique un ligero
golpe a la tapa de contacto contra el césped mientras
la cortadora está funcionando. Este procedimiento
alimentará automáticamente la línea a su longitud
correcta. Se debe hacer un movimiento firme, pero con
suavidad, en el momento de golpear la tapa de contacto. Es necesario inclinar ligeramente la unidad a fin de
prevenir que la guarda toque la tierra. Esta operación
se puede repetir tantas veces como sean necesarias.
Si la herramienta falla en el momento de alimentar la
línea, desconéctela y limpie la tapa de contacto.
5. Sujete la unidad por el mango y quedará lista la
posición para orillado.
3. Gire en sentido a las manecillas del reloj la perilla y
atore firmemente.
Técnicas de corte y notas sobre el funcionamiento
Se requiere una técnica adecuada para obtener máximo rendimiento y facilidad en el manejo.
IMPORTANTE — Para obtener la mejor acción de
corte cerca de muros y cercas, y en céspedes muy
crecidos, mueva con lentitud la herramienta de modo
que el césped se corte CON LA PUNTA de la línea de
nylon.
1. Evite hacer funcionar al orillador con el rotor en
contacto con la tierra.
2. Corte solamente cuando el césped o la hierba estén
secos.
3. La duración de la línea de nylon depende de que
siga usted las técnicas de corte descritas y,
4
Instalación del carrete y recuperación de
segmentos de línea rotos dentro del carrete.
1. Desconecte la herramienta. Oprima las lengüetas de
liberación de la tapa del cuerpo de carrete y saque
tirando en línea recta.
2. Retire el carrete vacío.
3. Retire cualquier desecho o pasto de la tapa y cuerpo de carrete.
4. Tome el carrete nuevo y colóquelo en el eje de la
ESPAÑOL
tapa del cuerpo. Presione y gire ligeramente hasta
que el carrete se asiente.
5. Desatore uno de los extremos de la línea y guíelo a
través del otro orificio.
7. Alinee las lengüetas de liberación de la tapa con las
entradas del cuerpo del carrete.
8. Introduzca la tapa en el cuerpo del carrete y atore
firmemente.
9. Si la línea de corte sobresale la cuchilla de corte,
corte la línea de manera que quede a la altura de la
cuchilla.
Mantenimiento - Desconecte el cordón eléctrico
en el orillador
Tenga Cuidado al dar Mantenimiento a la Unidad
1. Conserve limpias las tomas de aire para evitar el
sobrecalentamiento, que dañaría la unidad. Para
efectuar esta limpieza, utilice un trapo o un cepillo
seco para quitar césped, savia y otros desperdicios.
2. Las partes de plástico se pueden limpiar con un
trapo humedecido con agua caliente y jabón suave.
Evite el uso de detergentes, agentes limpiadores y
solventes que pudieran contener elementos que
dañen el plástico. No rocíe agua sobre la cortadora.
3. Se han empleado baleros autolubricantes en la
fabricación de su herramienta; por tanto, no se
requiere lubricarla periódicamente. Sin embargo, se
recomienda que después de dos o tres temporadas
de uso, lleve o mande la cortadora a un Centro de
Servicio Autorizado Black & Decker, u otra estación
de servicio autorizada, para que le efectúen limpieza
profunda, inspección y relubricación. Si la herramienta se utiliza con propósitos profesionales, el
procedimiento citado anteriormente se debe realizar
cuando termine cada temporada de trabajo.
4. Si la cortadora falla, desconecte primero el cordón
eléctrico de la toma de corriente, y a continuación
desenchúfelo de la cortadora. Asegúrese que la
extensión no se encuentre dañada, que los fusibles
no se hayan fundido y que los interruptores de circuito no estén accionados. Si después de revisar lo
anterior la unidad sigue sin funcionar, llévela o
envíela a su Centro de Servicio B&D local o a una
estación de servicio autorizada. No intente repararla
usted mismo.
Importante
Para garantizar la SEGURIDAD y la CONFIABILIDAD
del producto, las reparaciones, el mantenimiento y los
ajustes (incluyendo inspección y cambio de carbones)
deben ser realizados por centros de servicio
autorizados u otras organizaciones de servicio
calificadas, que siempre utilicen partes de repuesto
idénticas.
Accesorios
La línea de repuesto está a su disposición (con costo
extra) con su distribuidor local, o en los centros de
servicio Black & Decker. Se incluye una lista de centros
de servicio con su herramienta.
Los accesorios recomendados para su herramienta se
muestran en este manual. El empleo de cualquier otro
accesorio o dispositivo puede se peligroso.
No. Cat. RS300 Carrete de repuesto con 6.09 m (10 ft)
de línea de nylon.
No. Cat. 82-611, 453 g (1 lb) de línea de nylon de 1.6
mm (0.065”) de diámetro.
Precaución: Únicamente utilice los accesorios recomendados para su orillador. El
empleo de cualquier otro dispositivo o accesorio puede ser peligroso. Use únicamente
línea de nylon monofilamento de 1.6 mm
(0.065”) de diámetro.
Información de Servicio
Black & Decker ofrece una red completa de centros
de servicio propiedad de la compañía y franquiciados.
Todos los centros de servicio Black & Decker cuentan
con personal capacitado para proporcionar el servicio
a herramientas más eficiente y confiable.
Siempre que necesite consejo técnico, reparaciones o
partes de repuesto genuinas, comuníquese con el
centro Black & Decker más cercano a usted.
Especificaciones
120V~ 60Hz
300W
2,5 A
220V~ 50Hz
300W
1,4 A
o
10.000 rev/min
n 10.000 rev/min
5
ESPAÑOL
Solamente para propósito de Argentina:
Black & Decker Argentina S.A.
Pacheco Trade Center
Colectora Este de Ruta Panamericana
Km. 32.0 El Talar de Pacheco
Partido de Tigre
Buenos Aires (B1618FBQ)
República de Argentina
No. de Importador: 1146/66
Solamente para propósito de Chile:
Importado por: Black & Decker de Chile, S.A.
Av. Pdte. Eduardo Frei M. 6001-67 Conchalí
Santiago de Chile
Tel. (56-2) 687 1700
Solamente para propósitos de Colombia
Importado por: Black & Decker
de Colombia, S.A.
Carrera 85D # 51-65, Bodega 23
Complejo Logístico San Cayetano
Bogota - Colombia
Tel. 744-7100
Solamente para propósito de México:
Importado por: Black & Decker S.A. de C.V.
Bosques de Cidros, Acceso Radiatas No. 42
3a. Sección de Bosques de las Lomas
Delegación Cuajimalpa,
05120, México D.F.
Tel. (52) 555-326-7100
R.F.C.: BDE810626-1W7
Black & Decker del Perú S.A.
Av. Enrique Meiggs 227.
Pque. Industrial - Callao
Teléfono: (511) 452-5577
RUC 20266596805
Impreso en China
6
ENGLISH
9”(23cm) STRING TRIMMER GL300
IMPORTANT SAFETY WARNINGS AND
INSTRUCTIONS
To Reduce Risk of Injury:
• Before any use, be sure everyone using this tool
reads and understands all safety instructions and
other
information contained in this manual.
• Save these instructions and review frequently prior to
use and in instructing others.
Warning: When using an electric appliance,
basic safety precautions should always be
followed to reduce risk of fire, electric shock,
and personal injury, including the following.
Caution: Wear appropriate personal hearing
protection during use. Under some conditions
and duration of use, noise from this product
may contribute to hearing loss.
READ ALL INSTRUCTIONS
Safety Instructions For All Tools
• SAFETY SPECTACLES OR GOGGLES — Wear at
all times when trimming.
• GUARD — Do not use trimmer without guard attached.
• NYLON LINE — Keep face, hands and feet clear of
rotating nylon line at all times. Do not extend beyond
length specified in this manual. Wear long pants to
protect your legs.
• KEEP ALL BY-STANDERS AWAY — at a safe
distance from work area, especially children.
• AVOID ACCIDENTAL STARTING — don’t carry
plugged-in tool with finger on trigger.
• DO NOT FORCE THE TOOL — at a rate faster
than the rate at which it is able to cut effectively.
• USE THE RIGHT TOOL — Do not use this tool for
any job except that for which it is intended.
• DON’T OVERREACH— Keep proper footing and
balance at all times.
• WARNING — To prevent electric shock hazard, use
only with an extension cord suitable for outdoor use.
Always connect extension cords to a fused line or
one protected by a circuit breaker.
•DON’T ABUSE CORD — Don’t yank cord from
receptacle. Keep cord from heat, oil and sharp edges.
• EXTENSION CORDS — to prevent disconnection of
extension cord during operation, use extension cord
retainer as described in this manual.
• DAMAGE TO UNIT — If you strike or become
entangled with a foreign object, stop trimmer
immediately, unplug, check for damage and have
any damage repaired before further operation is
attempted. Do not operate with a broken hub or
spool.
• DAMAGE TO CORD — Keep power cord away
from rotating line. If you damage the extension cord,
unplug it at the electrical outlet before moving the
trimmer or examining the damage. If there is damage
to the extension cord, replace cord before further
use.
• DISCONNECT TOOL — When not in use, when
replacing line, or prior to cleaning hub.
• DRESS PROPERLY — Don’t operate the tool when
barefoot or wearing open sandals. Always wear
substantial footwear. Use of rubber gloves and
substantial rubber soled footwear is recommended
when working outdoors.
• AVOID DANGEROUS ENVIRONMENTAL
CONDITIONS — Do not use electric tools in damp or
wet locations. Follow all instructions in this instruction
manual for proper operation of your trimmer.
• DON’T USE THE TRIMMER IN THE RAIN.
• DO NOT OPERATE portable electric tools in
gaseous or explosive atmospheres. Motors in these
tools normally spark, and the sparks might ignite
fumes.
• STORE IDLE TOOLS INDOORS — When not in
use, tools should be stored indoors in dry, locked-up
placed—out of reach of children.
7
ENGLISH
• THE ROTATING LINE PERFORMS A CUTTING
FUNCTION — Use care when trimming around
screens and desirable plantings.
Ampere Rating
More
Not more
Than
Than
0-6
18
16
16
14
6 - 10
18
16
14
12
DOUBLE INSULATION
10 - 12
16
16
14
12
AN IMPORTANT CONSUMER FEATURE
12 - 16
14
12
Not Recommended
Your tool is double insulated to give you added safety.
This means that it is constructed throughout with two
separate “layers” of electrical insulation or one double
thickness of insulation between you and the tool’s
electrical system.
Assembling Instructions
• USE ONLY RECOMMENDED REPLACEMENT
LINE — Do not use heavier line or other line
materials, eg. metal wire, fishing line or similar
materials.
Note: Double insulation does not take the place of
normal safety precautions when operating this tool.
The insulation system is for added protection against
injury resulting from a possible electrical insulation
failure within the tool.
Caution: When servicing double insulated
tools, USE ONLY IDENTICAL REPLACEMENT PARTS. Replace or repair damaged
cords.
EXTENSION CORDS
Make sure your extension cord is in good condition.
When using an extension cord, be sure to use one heavy
enough to carry the current your product will draw. An
undersized cord will cause a drop in line voltage resulting
in loss of power and overheating. The following table
shows the correct size to use depending on cord length
and nameplate ampere rating. If in doubt, use the next
heavier gage. The smaller the gage number, the heavier
the cord.
American Wire Gage
1. Take the upper body and insert into the lower body.
2. Move the lock on button of the upper body to
the left and push down until being able to move
the lock on button to the right. Fit tight.
3. Set the guard in the lower body, turning until
choke the grooves and fit tightly with the two
screws.
4. The wide section of the guard has to be inside,
in the side of your feet.
5. Carefully remove the protective cover of the
blade before using.
Note: This tool is intended for light applications. It is
recommended to use it from 15 to 20 minutes
maximum per time. Any excessive use could cause
damage in the tool.
Edging Procedure
Caution: Inspect area to be trimmed for any
wire, cord, or string-like matter which could
become entangled in the rotating line or
spool. Be particularly careful to avoid any wire
which might be bent outwardly into the path
of the tool, such as barbs at the base of a
chain link fence.
Minimum Gage for Cord Sets
1. Unplug the extension cord at trimmer.
Volts
2. Push the lock button on the upper body to the left
and pull out the handle.
Total Length of Cord in Feet
120V~
0-25
26-50
51-100
220V~
0-50
51-100
101-200 201-300
8
101-150
3. Rotate the trimmer handle and insert in this position
on the lower body.
ENGLISH
4. Move the lock on button to the left and push down
until being able to move the lock on button to the
right. Fit tight.
5.Hold the unit from the handle and the edging
position will be set.
EXAMPLE: Line will wear faster when run against a
foundation wall as compared to trimming around a tree.
Some line breakage will occur from feeding unit too
fast, from entanglement with foreign matter, from normal line fatigue, and from attempting to cut thick, stalky
weeds in excess of unit’s capability.
Telescoping Height Adjustment
1. Unplug the extension cord at trimmer.
2. Rotate counterclockwise the knob located on the
lower body to release and pull up the upper body to
adjust the telescoping shaft until suit your height
comfortably.
Note: As the weather becomes cooler, the tendency
for the nylon line to break becomes greater.
DO NOT USE UNIT WHEN TEMPERATURE IS
BELOW 50° F
4. For best performance, as the line wears, lengthen as
indicated in Line Feeding Procedure.
3. Rotate clockwise the knob and fit tight.
Line Feeding Procedure
In order to feed a length of cutting line, strike the bump
cap on the lawn while the trimmer is running. This will
automatically feed a new length of line and trim it to the
correct length. A firm but gentle motion should be used
to strike the bump cap. The unit should be angled
slightly forward to prevent the guard from contacting the
ground. This process may be repeated as often as
necessary. If unit fails to feed, unplug extension cord at
trimmer and clean out the bump cap.
Trimming Technique and Performance Notes
Tilt trimmer at a slight angle from the ground.
Lower to grass or weeds you intend to cut. (If they are
over 20cm (8") high, start cutting at top.)
Slowly swing unit into and out of area being cut,
holding the unit off the ground at desired cutting
height.
IMPORTANT: for the best cutting action against walls,
fences and in high grass, move trimmer slowly so
grass is cut WITH THE TIP of the high speed nylon
line.
1. Avoid running trimmer with hub in contact with
ground.
2. Trim only when grass and weeds are dry.
3. The life of your nylon line is dependent upon following the above trimming techniques, as well as what
is being cut, and where the cutting is being done.
5. Periodically unplug extension cord at trimmer
and remove the accumulation of grass or cutting
debris from the inside of the bump cap shroud.1.
Unplug the extension cord at trimmer.
Spool Replacement and Recovery of Line Broken Off
Inside Spool
1. Unplug the tool. Remove cap by pushing the two
tabs in a nd up, then lift off. (It is not necessary to
push both tabs in at the same time).
2. Remove any debris and grass buildup that may be
inside the cap and on the inside of the hole in the
cap.
3. Remove spool by aligning he notch on the edge of
the spol with the eyelet in the hub and wipe any
dirt off the ribs on the shaft.
4. Unwind about 3” of line from the spool and hold it in one
of the two notches. Make sure spring is in place on the
hub.
6. Holding the line in the gap, insert the end through
the eyelet in the hub and slip the spool into the
hub. If the spool does not slip into the hub easily,
press gently and pull straight out on the cutting line
that protrudes through the eyelet.
7. Install cap by pushing both snap legs into the hub
at once. Make sure that both legs are snapped in
one place. Pull line out by hand until tight.
8. The line should extend out no further than the
guard. You are now ready to resume trimming.
9
ENGLISH
9. The cutoff blade will automatically-trim excess line
to the proper length.
Maintenance- Unplug Extension Cord at Trimmer
Maintain Tool With Care
Keep the air intake slots clean to avoid overheating
which will damage trimmer. For this cleaning, use a dry
brush or cloth to remove grass, sap or other debris.
2. Plastic parts may be cleaned by using a mild soap
and a rag dampened with hot water. Avoid all other
types of detergents, cleaners or solvents which
might contain chemicals that could seriously damage
the plastic. Do not spray the trimmer with water.
3. Self lubricating bearings are used in the tool and
periodic relubrication is not required. However, it is
recommended that after two or three seasons of
use, you take or send the trimmer to a Black &
Decker service center or authorized service station
(see TOOLS, ELECTRIC in yellow pages) for a
thorough cleaning, inspection and relubrication. If
the tool is being used professionally, the above
should be accomplished after each trimming
season.
4. If trimmer fails to operate, disconnect extension
cord from power source first, then from trimmer.
Make sure extension cord is undamaged and that
house fuses are not blown or circuit breakers
tripped. If trimmer still fails to operate, take or
send it to your local B&D service center or
authorized service station for repair. Do not
attempt to repair it yourself.
Important
To assure product SAFETY and RELIABILITY, repairs,
maintenance and adjustment (including brush
inspection and replacement) should be performed by
authorized service centers or other qualified service
organizations, always using identical replacement
parts.
Accessories
Replacement line is available from your local dealer, or a
Black & Decker service center.
10
Recommended accessories for your trimmer are shown
in this manual. The use of any other accessory or
attachment might be hazardous.
RS300 Replacement Spool with 10 feet of Nylon Line.
Caution: Use only recommended accessories with your string trimmer. The use of
any other attachment or accessory might be
hazardous. Use only specially treated. .065”
diameter nylon line.
This product is not intended for commercial use.
Printed in China
10/01/07