1
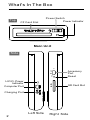
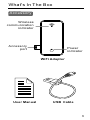
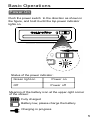
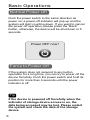
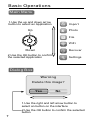
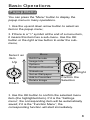
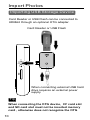
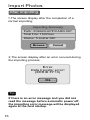
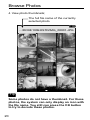
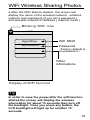
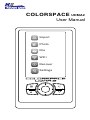
COLORSPACE UDMA2
User Manual
Import
Photo
File
WiFi
Recover
Settings
Vertieb Deutschland
HS Imaging GmbH
Alte Landstraße 26
51647 Gummersbach
[email protected]
Telefon (02263) 90 231 41
www.hs-imaging.de
Telefax (02263) 90 231 46
FCC STATEMENT
1.This device complies with Part 15 of the FCC Rules.
Operation is subject to the following two conditions:
(1) This device may not cause harmful interference.
(2) This device must accept any interference received,
including interference that may cause undesired
operation.
2.Changes or modifications not expressly approved by the
party responsible for compliance could void the user's
authority to operate the equipment.
NOTE: This equipment has been tested and found to
comply with the limits for a Class B digital device, pursuant
to Part 15 of the FCC Rules. These limits are designed to
provide reasonable protection against harmful interference
in a residential installation.
This equipment generates uses and can radiate radio
frequency energy and, if not installed and used in
accordance with ths instructions, may cause harmful
interference to radio communications. However, there is
no guarantee that interference will not occur in a particular
installation. If this equipment does cause harmful
interference to radio or television reception, which can be
determined by turning the equipment off and on, the user
is encouraged to try to correct the interference by one or
more of the following measures:
Reorient or relocate the receiving antenna.
Increase the separation between the equipment and
receiver.
Connect the equipment into an outlet on a circuit
different from that to which the receiver is connected.
Consult the dealer or an experienced radio/TV
technician for help.
RF warning statement:
The device has been evaluated to meet general RF
exposure requirement. The device can be used in portable
exposure condition without restrication.
Sanho Manufacturer's Limited Warranty
Sanho warrants to the end user, that this product, excluding
content and or software supplied with or on the product, will
be free from material defects in manufacture, will conform to
Sanho's published product specifications and be fit for normal
use during the Warranty Period specified below commencing
on the date of purchase provided that the product is legally
placed on the market.
To make a warranty claim please contact Sanho at the
telephone number below or [email protected] within
the Warranty Period and provide proof of purchase (showing
date and place of purchase and name of the reseller) and
product name, type and number. You may return the product
after first obtaining a Return Material Authorization number
and following any other guidelines listed. For further
information see www.hypershop.com. Sanho may at its
option repair this product or provide you with an equivalent
product; and if unable to repair or replace the product, will
refund the purchase price. Sanho will not be liable for indirect
or consequential damage (including loss of data), or for
damage caused by improper use (including use in an
incompatible device and use not in accordance with the
instructions), or by improper installation, unprofessional
repair, modification or accident. This constitutes Sanho's
entire liability which will never exceed the price you paid for
it, plus the necessary costs you made for the warranty claim.
Sanho products must not be used in applications where
failure could threaten injury or life, such as life support
systems. National, state and local laws may grant you other
rights that are not affected by this warranty.
Warranty Period: 1 Year
Sanho Corporation
47456 Fremont Blvd.
Fremont, CA 94538, U.S.A.
Tel: +1-408-737-7878
Additional terms and conditions can be found at
www.hypershop.com
Usage of this product constitute acceptance of these terms
and conditions.
Safety Operating Instructions
Do not use the product in a humid environment and
do not operate the product with wet hands. If any
liquid entered the product, please remove the
battery and power off the product immediately and
send the products back to the distributor for repair.
Never try to use a product that was eroded by liquid,
as it may result in battery short circuit. Some
batteries may cause a fire when short-circuited.
Do not place this product near the strong magnetic
objects; otherwise it may cause data loss.
Do not insert non-compatible memory card or
foreign objects into the slots or the DC charging port
forcibly.
If you detected funny smell, severe heat or smoke
with the main device or the charger while charging
the battery in the device, please cut off the power
supply and remove the battery immediately. Be
careful not to be scalded when removing the battery.
When using a non-original charging adapter, please
make sure its output standard complies with the
power standard of this product.
The battery may be slighted heated while charging;
please place this product at a cooling place for
charging.
Please power off the product before opening the
back cover.
Do not plug in/out the hard drive while power is on.
Catalogue I
What's In The Box
Basic Operations
1. Charging Battery
2. Power On
3.Power Off
4. Main Menu and Dialog Box
5. Popup Menu
1
4
5
6
7
8
Import Photos
1. Importing Memory Card
2.Importing USB Storage Device
3.Starting Importing
4.Importing Partial Contents
5.Saving to Another Location
6.Improve Importing Speed
7.During Importing
8.After Importing
9.Finding the Imported Folder
9
10
11
12
13
14
15
16
17
Browse Photos
1. Browse Folder and Thumbnail
2.ChangingThumbnails Size
3.Changing Display Mode
4.Set Sorting Mode
5.Viewing Photos Full-Screen
6.Rotating a Photo
7.Displaying Histogram and EXIF
8. Zooming and Roaming a Photo
9. Decoding the RAW Data
6. Adjust the Dynamic Range of RAW Image
18
21
22
23
24
25
26
27
28
29
Catalogue II
File Manager
1.Basic Operation of File Manager
2.Creating New Folder
3.Selecting Multiple Files
4.Paste The Selected Files Into A Folder
5.Sync Folder to External USB Storage
30
31
32
33
34
35
Recover Photos
36
WiFi Wireless Sharing Photos
1.Turn On The WiFi Adapter
2.Connecting iPad To UDMA2
3.Using iPad To Access UDMA2
4.Connecting UDMA2 To Wireless Router
5.Accessing UDMA2 In MacOS
6.Accessing UDMA2 In Windows
39
42
43
44
47
48
USB Connection to PC
49
Settings
1. Check the Hard Drive S.M.A.R.T. Info
2. Upgrading the Firmware
3. Formating Hard Disk
4. Restore Factory Settings
50
51
53
54
Specifications
55
01 What's In The Box
正面
Front
Main Unit
Import
Photo
File
WiFi
Recover
LCD
Settings
Menu
Zoom In
Zoom Out
Back
OK
Navigator
1
What's In The Box
Top CF Card Slot
正面
Power Switch
Power Indicator
Main Unit
Reset
E x t.
2
正面
Side
SD
H.D.D. Power
Indicator
Computer Port
Accessory
Port
Reset
SD Card Slot
Charging Port
2
Left Side
Right Side
What's In The Box
Accessory
正面
Wireless
communication
indicator
Accessory
port
Power
indicator
WiFi Adapter
User Manual
USB Cable
3
02 Basic Operations
Charging Battery
Power the device off and connect it to a wall socket
with the provided AC power adapter.
Meaning of the battery icon displayed on the
screen:
Charging in progress
Fully Charged
Tip
The screen backlight will automatically turn off
during Charging progress,you can light up the
backlight by press any key .
4
Basic Operations
Power On
Push the power switch to the direction as shown in
the figure, and hold it until the top power indicator
lights on.
Status of the power indicator:
Green light on
Power on
Off
Power off
Meaning of the battery icon at the upper-right corner
of the screen:
Fully charged
Battery low, please charge the battery
Charging in progress
5
Basic Operations
Normal Power Off
Push the power switch to the same direction as
power on; a power-off indicator will pop up and the
system will start counting down. If you want to cancel
the power-off operation, please press the “Back”
button, otherwise, the device will be shut down in 5
seconds.
Power OFF now?
Force to Power Off
If the system does not respond to any button
operation for a long time, you can try to power off the
device forcefully. Push the power switch and hold its
position for more than 6 seconds until the power
indicator is off.
Tip
If the device is powered off forcefully when the
indicator of storage device access is on, the
data being accessed may be lost. Please restart
the system and check the data of the storage
device.
6
Basic Operations
Main Menu
1.Use the up and down arrow
button to select an Application
Import
Up
Photo
File
WiFi
Down
Recover
2.Use the OK button to confirm
the selected Application
Settings
Dialog Box
Warning
Delete this image?
Yes
No
1.Use the right and left arrow button to
select an button on the interface
2.Use the OK button to confirm the selected
button
7
Basic Operations
Popup Menu
You can press the “Menu” button to display the
popup menu in many operations.
1.Use the up and down arrow button to select an
item in the popup menu;
2.If there is a ">" symbol at the end of a menu item,
it means this item has a sub-menu. Use the OK
button or the right arrow button to enter the submenu;
Select an
item
Up
Menu
RAW Decode
Image Info
Options
Rotation Direction
Slideshow
Set as Wallpaper
Add to Favorites
Delete Image
Right
Confirm the
Selection
Down
3.Use the OK button to confirm the selected menu
item (the highlighted item). If it is the “Settings
menu”, the corresponding item will be automatically
saved; if it is the “Function Menu”, the
corresponding function will start immediately.
8
Import Photos
04
Importing Memory Card
Please do not insert the CF card and SD card at the
same time, otherwise the device unable to identify
any memory card .
SD
Reset
Ext.
2
CF Card
SD Card
9
Import Photos
Importing USB Storage Device
Card Reader or USB Flash can be connected to
UDMA2 through an optional OTG adapter.
SD
Reset
Ext .
2
Card Reader or USB Flash
When connecting external USB hard
drive requires an external power
supply.
Tip
When connecting the OTG device, CF card slot
and SD card slot must not be inserted memory
card , otherwise does not recognize the OTG
10
Import Photos
Starting Importing
1.Select 'Import' in the desktop main menu, and then
press the OK button.
Import
2.The system will start scanning the
inserted memory card and calculate
the hard drive space;
Photo
File
WiFi
Import
Storage Device contains 1.2GB
/C/Backup has 86GB free
Disable Preview
Recover
Settings
High Speed
Import
More
3.If not need to change the import options , select
'Import' and then press the OK button to immediately
start to import photos ;
Tip It may take a few seconds to more than 10
seconds to calculate the hard drive space
depending on the hard drive capacity.
Please wait patiently.
4. If you want to change the importing mode, please
select 'More' and press the OK button. You can then
set the importing mode.(Continued on next page)。
11
Import Photos
Importing Partial Contents
1.Select 'Change Source', and then press the OK
button or the right arrow button to enter the submenu;
Settings
Change Source
Change Target
Visual Importing
2.Select 'Select Folder' ,Press the OK button.
Change Source
CF Card
Select Folder
Differences of the importing modes :
Import from
CF card
Import all files in the memory card to
the built-in memory
Import from a Select one folder from the memory
card, and then import the files in this
folder
folder to the built-in memory
12
Import Photos
Saving to Another Location
1.Select 'Change Target', and then press the OK
button or the right arrow button to enter the submenu;
Settings
Change Source
Change Target
Visual Importing
2.Select a folder from the pop-up dialog box, and then
press the OK button.
/C
BACKUP
FAVORITE
New Folder
My Photos
My Videos
My Documents
RECOVER
Tip
You can only choose the first level folder in the
root directory as the storage location.
13
Import Photos
Improve Importing Speed
1.Select 'Visual Importing' and the press the
OK button or the right arrow button to enter the
submenu;
Settings
Change Source
Change Target
Visual Importing
2.Select 'Off',and press the OK button.
It will not display the preview during importing
process,therefore the importing speed will be
improved by 10% .
Visual Importing
On
Off
14
Import Photos
During Importing
During importing process, the LCD screen will
display the current progress of the import photos .
Transferring...
IMG_9875.JPG
26.9MB/s 15 files
Progress bar
Name of the file being imported,
copying speed and total number of files
Preview of the photos being imported
Tip
During the importing process, you can press the
Back button to cancel the importing. As the
system is in a state of high-speed operation, it
may not respond to your command timely. Please
hold the Back button until the confirmation
window is popped up.
15
Import Photos
After Importing
1.The screen display after the completion of a
normal importing;
Importing Summary
Path: /C/BACKUPP/CARD.007
Total File: 150 Files
Status: Transfer OK!
Browse
Cancel
2.The screen display after an error occured during
the importing process;
Error
Data transfer error!
(ERRID:FF13)
Ok
Tip
If there is an error message and you did not
read the message before automatic power off,
the importing error message will be displayed
again at the next startup.
16
Import Photos
Find the Impo rted Folder
The naming convention of the imported folder is:
“/BACKUP/CARD.###", where "###" is the integer
001, 002 ... incrementing automatically; the folder
with the largest number is the latest imported folder.
/C/BACKUP/CARD.001
CARD.001
CARD.002
CARD.003
CARD.004
CARD.005
CARD.006
CARD.007
CARD.008
CARD.009
CARD.010
CARD.011
CARD.012
17
04 Browse Photos
Browse Folder and Thumbnail
1.Select "Photo" in the desktop main menu, and then
press the OK button to open the photo browser;
Import
Photo
File
WiFi
2.Select a storage device, and then
press the OK button;
Recover
Settings
/C/BACKUP/CARD.001
Local Di...(C:)
CF Card (G:)
My Favorites
My Backup...
Tip
You can adjust the icon or thumbnail size by
pressing the zoom in and zoom out button after
enter the Photo Browser.
18
Browse Photos
3.Select a folder containing photos, and then press
the OK button;
/C/BACKUP/CARD.001
CARD.001
CARD.002
CARD.003
CARD.004
CARD.005
CARD.006
CARD.007
CARD.008
CARD.009
CARD.010
CARD.011
CARD.012
Tip
The white triangle at the edge of the screen
indicates that there are more contents.You can
press the corresponding arrow button
according to the direction of the white triangle to
view more contents.
19
Browse Photos
4.View photo thumbnails;
The full file name of the currently
selected photo
.../DCIM/100EOS7D/IMG_00001.JPG
Tip
Some photos do not have a thumbnail. For these
photos, the system can only display an icon with
the file name. You still can press the OK button
to try to decode these photos.
20
Browse Photos
Changing Thumbnails Size
You can adjust the thumbnail size by pressing
the zoom in and zoom out button.
Larger size
thumbnails
Smaller size
thumbnails
21
Browse Photos
Changing Display Mode
In the photo browser , press the Menu key to enable
the popup menu , select 'Change mode' , press OK ,
you can switch between two display modes ;
Menu
Sort By ...
Property
Delete
Change Mode
Select Multi-files ...
Exit
UDMA2 supports two different display modes,you
can switch between two display modes ;
Display Mode 1
Thumbnails
Only
22
Display Mode 2
Large picture
+
Thumbnails
Browse Photos
Set Sorting Mode
1.Press the Menu button to display popup menu;
2.Select 'Sort', and then press the OK button or the
right arrow button to enter the submenu;
Menu
Sort By ...
Property
Delete
Change Mode
Select Multi-files ...
Exit
Sort By ...
Sort By name +
Sort By name Sort By time +
Sort By time Sort By size +
Sort By size -
3.Select a sorting mode and press the OK
button.
Tip
If you rearrange the photos in descending order
according to the date of creation, the most
recent photos will be displayed on the top.
23
Browse Photos
Viewing Photos Full-Screen
1. In the thumbnail browsing mode, you will be able
to browse the photo in full-screen mode after
selecting one photo and pressing the OK button.
2.when the white arrow appears at the right side of
screen,it means the next photo is ready for
browsing,you can press the right arrow button to
open the next image immediately.
24
Browse Photos
Rotating a Photo
Press the OK button to rotate the photo by 90
degrees.
Tip
The photo rotation result will not be written into
the storage device.
You can change the direction of photo rotation
according to your habit.
1. Press the Menu button to enable the popup
menu;
2.Select the "Rotation Direction" submenu;
3.Select "Clockwise" or "Counte-rclockwise".
25
Browse Photos
Displaying Histogram and EXIF
1.Press the Menu button to enable the popup menu;
2.Select "Picture Information", and then press the
OK button or the right arrow button to enter the
submenu;
3.Select "Histogram" or "EXIF Information”, and then
press the OK button or the right arrow button to enter
the submenu;
4. Select "Enter" or "Exit", and then press the OK
button to save the settings.
EXIF
Information
R、G、B and
Brightness
Histogram
Tip You can display or hide the histogram and
EXIF information by pressing the up and
down arrow button.
26
Browse Photos
Zooming and Roaming a Photo
1.In Full-screen mode, you can progressively zoom
in/out a photo by pressing the zoom in or zoom out
button. If the resolution of the photo is large enough,
the system can provide 6 zooming levels:
25%,33%,50%,66%,100%,150%.
Red color means the system
is decoding now.
Green color means the full
range of the photo decoding is
completed.
2.When the photo is displayed in an enlarged mode,
you can use the arrow buttons to move the
displayed area.
27
Browse Photos
Decoding the RAW Data
Only if the RAW picture contains the RAW data from
the camera sensor, UDMA2 will have the ability to
decode the RAW data.
1. While browsing a single RAW picture, press the
Menu button to enable the popup menu;
2.Select 'Decode RAW Data', and then press the OK
button or the right arrow button to enter the submenu;
3.Select 'Decoding Mode', and then press the OK
button or the right arrow button to enter the submenu;
4. Select 'Decode the True RAW Data', and then
press the OK button to start the actual decoding.
Menu
RAW Decode
Image Info
Options
RAW Decode
Rotation Direction
Decoder Mode
Slideshow
Adjust RAW Expos...
Set as Wallpaper
Decoder Mode
Add to Favorites
Preview Decode
Delete Image
True RAW Decode
The decoding result of the true RAW data
Tip is a picture without the post-processing
effects such as denoising, so you can
view the very original picture.
28
Browse Photos
Adjust the Dynamic Range
and Brightness of RAW Image
As the colors of the RAW data use 10bit/12bit/14bit,
so it has a large dynamic range for adjustment.
1.After the completion of the RAW data decoding,
press the Menu button to enable the function menu;
2.Select "Decode RAW Data”, and then press the OK
button or the right arrow button to enter the
submenu;
3.Select “RAW Brightness Control”, and then press
the OK button;
4.Press the left (<) and right (>) arrow button to
adjust the brightness; press the up (Λ) and down
(V) arrow button to adjust the dynamic range; press
the OK button to restore the original value; and press
the Back button to exit the brightness control.
Before adjustment
After adjustment
29
04 File Manager
1.Select 'File' in the desktop main menu,and press
the OK button.
Import
Photo
File
WiFi
Recover
Settings
2.Select a storage device,press OK button;
/
Local Disk(C:)
CF Card (G:)
My Favorites
My Backup Files
Multipe
30
Paste
Delete
Select all
File Manager
Basic Operation of File Manager
1,Use the up and down arrow button to select a file
or folder;
2,Use the left and right arrow button to select an
function;
/
IMG_9874.JPG
2007-06-30 12:07:08
Select File
Up
IMG_9875.JPG
2007-06-30 12:07:12
IMG_9875.JPG
2007-06-30 12:08:10
IMG_9875.JPG
2007-06-30 12:17:03
IMG_9875.JPG
2007-06-30 12:17:34
IMG_9875.JPG
2007-06-30 12:36:15
Down
IMG_9875.JPG
2007-06-30 12:37:56
Multipe
Paste
Delete
Select all
Select Function
Left
Right
Tip
Use left and right arrow button to enter function
selection,if you have not select any function,you
can press the back button to return to the file
selection.
31
File Manager
Creating New Folder
1.Press the Menu button to enable the popup
menu,Select “Creat Folder” and press the OK
button.
2.Input new folder name,use the arrow buttons to
select the characters or the required operations on
the virtual keyboard, and then press the OK button
Menu
Sort By ...
Multipe
Create Folder
Property
Synchronized to Input Folder Name
Select all
Exit file manager
3.After entering the full new folder name, select
<Enter> and press the OK button;
32
File Manager
Selecting Multiple Files
Use the arrow buttons to select files,then press
OK button can enter the Multiple mode
automatically.At this moment , the right side of the
screen appears "tick" icon(s),As long as you choose
any file,the top of the screen will appear "plus"icon.
Plus icon
/
IMG_9874.JPG
2007-06-30 12:07:08
IMG_9875.JPG
2007-06-30 12:07:12
Tick off icon
to select
IMG_9875.JPG
2007-06-30 12:08:10
IMG_9875.JPG
2007-06-30 12:17:03
IMG_9875.JPG
2007-06-30 12:17:34
IMG_9875.JPG
2007-06-30 12:36:15
IMG_9875.JPG
2007-06-30 12:37:56
Multipe
Paste
Delete
Select all
Tip
The appearance of the 'Plus' icon means there
are files have been copied to the clipboard.
33
File Manager
Paste the Selected Files Into A Folder
1.After file selection is finished,press the exit button
to exit from the current folder;
2.Choose another folder, and then press the right
arrow key to select the 'Paste' function, press the
OK button;
Right
3.In next dialog box, select "Yes", press the OK
button to start copying;
Warning
Are you sure to copy 3
files into '/C/123abc' ?
Yes
No
4.After all files were transferred, a message window
will be displayed.
34
File Manager
Sync Folder to External USB Stroage
1,Connect external USB storage device to UDMA2
via an optional OTG adapter.
2, Select a folder and press Menu button. In popup
menu, select 'Synchronizing to' function.
3, UDMA2 connects to external USB storage device
and open folder selector window. Please choice one
folder as sync target.
4, After you confirm it again, UDMA2 starts to
synchronize local folder to external folder.
Tip
OTG Adapter is an optional accessory. It does
not include in standard package.
If a local file existed in external folder, this file
will be skipped.
35
06 Recover Photos
The Recover function can recover photos that are
accidentally deleted from a memory card.
1.Instert the memory card that you want to restore
into the corresponding slot;
SD
Reset
Ext.
2
CF Card
SD Card
Tip Once you found that the photos on a
memory card were accidentally deleted,
please immediately stop using this
memory card and use the CF card and SD
card of this device to perform restoration.
Otherwise it will not be able to restore the
photos.
36
Recover Photos
2.Select 'Restore' in the desktop main menu;
Import
Photo
File
WiFi
Recover
Settings
3.During the restoration process, you can interrupt
the operation by pressing the Back button.
Searching...
190 Files 7.5MB/s
Progress bar
The total number of files and speed
Preview of the photo being restored
37
Recover Photos
4. The restored photos are saved in the
'/C/RECOVER' folder. Every restoring operation will
create a new folder named "###" and the restored
photos will be saved in this folder (where "###" is an
integer, incrementing automatically).
You can recover deleted photos in the following
formats::
Camera brands
Photo Format
CANON
CR2/TIF/CRW
NIKON
NEF
PENTAX
DNG/PEF
SAMSUNG
PEF
RICOH
DNG
SONY
SR2/ARW
OLYMPUS
CRF
PANASONIC
RAW
MAMIYA
MEF
Tip
Please visit www.hyperdrive.com for the details
of the latest list of supported formats.
38
07 WiFi Wireless Sharing Photos
Turn On The WiFi Adapter
The UDMA2 has WiFi wireless sharing feature . By a
wireless adapter , you can make the Tablet PC, the
PC and smart phone wirelessly share photos in
UDMA2.
SD
R e set
Ext.
2
1.Connect the WiFi adapter to the accessory port
ofUDMA2.
WiFi Wireless Adapter
39
WiFi Wireless Sharing Photos
2.Select 'WiFi' in the desktop menu,press the OK
button;
Import
Photo
File
WiFi
Recover
Settings
3.After the wireless networking is started, the green
power light and the blue wireless communication
light on the wireless adapter will be lit.
(Blue)WiFi Indicator
(Green)Power Indicator
40
WiFi Wireless Sharing Photos
4.After the WiFi feature started , the screen will
display the name of the wireless network , wireless
network login password (if you set a password ),
and wireless network IP address ( Internet mode ) .
Blinking WiFi icon
WiFi
HyperDrive
Wifi SSID
MyPassword
Password
(Factory default is
no password )
Other
informations
Display of WiFi function
Tip
In order to save the power,after the wifi function
started,the screen will display the wireless
information for about 15 seconds,then turn off
the backlight. Once you press any button, the
LCD backlight will light up for another 15
seconds.
41
WiFi Wireless Sharing Photos
Connecting iPad to UDMA2
1.Go to 'Settings' in your WiFi device
(e.g. iPad)
2.Select 'HyperDrive' from the list of WiFi networks;
HyperDrive
HyperDrive
3.After about 10 seconds the connection is
successfully, then the wireless icon will be displayed
in the status bar on the iPad.
Tip If you set up a wireless network password,
you need to input the correct password at the
first connection to UDMA2.
42
WiFi Wireless Sharing Photos
Using iPad To Access UDMA2
1.Select the 'Safari' of WiFi device
(e.g. iPad)
2.Enter the IP address of UDMA2 in the URL address
bar of Safari;
http://192.168.0.1
All Disks
Partition Drivers
Contents
Settings
3.The contents of UDMA2 will be displayed in the
Safari Browser. Use your finger to click on the folder
icon or photo icon can open a folder or a photo.
Tip
If you use the iPad to access UDMA2 ,please use
the Safari browser as possible . Using other
browsers may not be able to display the full user
interface.
43
WiFi Wireless Sharing Photos
Connecting UDMA2 to Wireless Router
The UDMA2 can connect to a specified wireless
router , Tablet PC via the wireless router can access
both the Internet and UDMA2 . This working mode
called the 'Infra' mode . In this mode , the PC can
also simply share photos in the UDMA2.
Wireless Router
Tablet PC
UDMA2
Tip
The default network mode of UDMA2 is 'Ad-hoc'
mode , in order to switch to the 'Infra' mode , please
turn on your wireless router first, until the wireless
router is working properly, then power on
theUDMA2. If the UDMA2 is powered on prior to the
wireless router , the UDMA2 will not find the
wireless router !
44
WiFi Wireless Sharing Photos
1,Using iPad to access UDMA2. Click on
enter the setting function;
icon to
2,Click 'Join known networks' on the setup interface
to make it to be 'On' state.
SANHO-WIFI-3
3,Select a wireless router you want to connect .
4,Input the password of the wireless network on the
following page, then click 'Done' to save the
password.
Tip
The password being successfully saved does not
mean the password is correct. As UDMA2 can only
verify the password after restart, so even if the
current password is wrong, there will be no
indication or warning!
45
WiFi Wireless Sharing Photos
5.Please restart the UDMA2 after the password of the
wireless router was saved.
6.After the UDMA2 restart the 'Wi-Fi' function, it will
try to use the last saved password to connect to the
specified wireless router. If the connection is
successful, the LCD screen will display the wireless
router SSID and IP address of the UDMA2 assigned
by the wireless router.
Blinking wireless icon
WiFi
SANHO-WIFI-3
192.168.0.120
SSID of Wireless
Router
IP address of
UDMA2
Tip
If the entered password of wireless router is
wrong, or the wireless router is beyond the
working scope,UDMA2 will return to 'Ad-hoc'
mode.
46
WiFi Wireless Sharing Photos
Accessing UDMA2 in Mac OS
1.Select 'Go'-'Connect to Server' from the menu of
'Finder' program in the MacOS;
2.Enter the IP address of the UDMA2 in the address
bar of server.
smb://192.168.0.120
3. Later , MacOS operating system will require user
authentication, select the identity of the 'Guests' and
click 'Connect' to complete the operation.
47
WiFi Wireless Sharing Photos
Accessing UDMA2 in Windows
1.Open the 'My Computer' icon in the Windows;
My Computer
2,Enter the IP address of the UDMA2 in the address
bar in "My Computer" Window;
NOTE!Add two backslash before IP address!
\\192.168.0.120
3.After enter the IP address,use the mouse to click
on the 'Go' button or press the computer's Enter
key, and the name of UDMA2 will be displayed in
the window.
HyperDrive (192.168.0.120)
\\192.168.0.120
HyperDrive
4.Click on the name of the 'HyperDrive', you can
access the contents of UDMA2.
48
08
USB Connection to PC
1.In the Power Off state ,use a USB cable to
connect the UDMA2 to a personal computer's USB
port ;
Please make sure to use only
the USB cable included in the
product package.
Left Side
Tip
The UDMA2 can not connect a PC in the power
on state or charging state.
49
09 Settings
Check the Hard Drive S.M.A.R.T. Info
1.Select 'Settings' in the desktop main menu, and
then press the OK button;
2.Select 'HDD' - 'S.M.A.R.T. Info' and press the OK
button;
S.M.A.R.T. Info
PowerOnHour
651
RetractCount
41d
LUCycleCount
2760
Temperature
33
Gsense
11f8
RawErr
9d6
SeekErr
0
ReAllocCnt
0
HungupCnt
0
UDMAErr
f2
Ok
Tip
The full name of S.M.A.R.T is “SelfMonitoring, Analysis and Reporting
Technology”. It is mainly for detecting and
recording the predictable mechanical
failures of the hard drive, and it can also
issue a warning before the occurrence of
such failures to protect the hard drive data
from loss.
50
Settings
Upgrade the Firmware
Tip
If it's fail to update firmware, your UDMA2 maybe
malfunction.
1.Please download the latest software upgrading
package from www.hyperdrive.com;
2.Connect to the computer via USB cable (see 'USB
Connection to PC'), and then copy the downloaded
SPF file into the built-in memory of UDMA2.
3.Select 'Settings' in the desktop main menu, and
then press the OK button;
4.Select 'Firmware' > 'Firmware Update' and then
press the OK;
Menu
LCD
Language
Memory card
HDD
Firmware
Format HDD
Power Setting
Reset
Firmware
Version
Firmware Update
51
Settings
5.Select the SPF file from the file list window;
/C
BACKUP
FAVORITE
RECOVER
SYSTEM
System Volume Inform
MX3START.SFP
6.Select 'Yes' in the warning dialog box and press
the OK button to start upgrading;
7.After the upgrading is completed, press any key to
power off the device. The new software will be applied
after the next startup.
Tip
Upgrading the software when the power is not
enough will result in malfunction; please plug in
the external power supply to prevent upgrading
failure.
52
Settings
Format Hard Disk
1. Select 'Settings' in the desktop main menu, and
then press the OK button;
2.Select 'Format HDD', and then press the OK
button;
3.Select the number of partitions, and then press
the OK button;
Format HDD
One Partition
Two Partitions
Cancel
4.Select "Yes" on the first warning;
5.Select "Yes" on the second warning;
Warning
Are you sure you want
to format?
Yes
No
Warning
All data and images will
be erased during
formatting, are you
sure?
Yes
No
6.Wait until the formatting is completed;
Tip
The formatting operation will delete all images
and data; please make a backup before the
operation.
53
Settings
Restore Factory Settings
1.Select 'Settings' in the desktop main menu and
select 'Reset'; then press the OK button;
2.Select 'Ok' in the confirmation window, and then
press the OK button.
Menu
LCD
Language
Memory card
HDD
Firmware
Format HDD
Power Setting
Reset
Warning
Overwrite settings,
continue?
Ok
Cancel
Tip
'Restore Factory Settings' will reset all settings
to the factory values, but it will not delete the
files in the UDMA2 HDD.
54
Specifications
Memory Card Slot
CompactFlash Type I
SD/MMC/SDHC/SDXC
USB Port
USB2.0 Device 480MBps
Hard Drive Port
SATA 2.5-inch,9.5mm thickness
Accessary Port
USB2.0 Host 480MBps
Charging Port
DC 5V/2A
LCD
3.5" TFT 320x480 Color LCD
Buttons
9 function buttons/1 power button
1 reset button
Build-in Battery
2600mAh rechargeable Li-on battery
Battery Life
Importing photos up to 120 minutes
Playing photos up to 180 minutes
Wireless Adapter
WiFi 802.11b/g/n standard
Support Ad-hoc and Infra modes
Dimensions
76mmx138mmx26mm
55
HS Imaging GmbH
Alte Landstraße 26
51647 Gummersbach
[email protected]
Telefon (02263) 90 231 41
www.hs-imaging.de
Telefax (02263) 90 231 46
HS Imaging GmbH
Alte Landstraße 26
51647 Gummersbach
[email protected]
Telefon (02263) 90 231 41
www.hs-imaging.de
Telefax (02263) 90 231 46
COLORSPACE UDMA2
User Manual English V1.0
Copyright 2012 Sanho Corporation