1
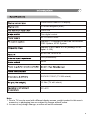
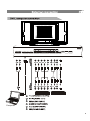
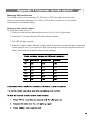
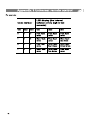
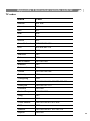
VSC-37V3
CAUTION
RISK OF ELECTRIC SHOCK
DO NOT OPEN
This symbol indicates that this product incorporates
double insulation between hazardous mains voltage
and user accessible parts.
When servicing use only identical replacement parts.
Caution: To reduce the risk of electric shock, do not remove cover (or back). No user
serviceable parts inside. Refer servicing to qualified service personnel.
This symbol indicates important
instructions accompanying the
product.
This symbol indicates "dangerous
voltage" inside the product that
presents a risk of electric shock or
personal injury.
WARNING
To reduce the risk of fire or electric shock, do not expose this product to rain or
moisture.
The apparatus must not be exposed to dripping or splashing. Objects filled with
liquids, such as vases or drinking glasses, must never be placed on the apparatus.
IMPORTANT SAFETY INSTRUCTIONS
1.
2.
3.
4.
5.
6.
7.
Read these instructions.
Keep these instructions.
Heed all warnings.
Follow all instructions.
Do not use this apparatus near water.
Clean only with dry cloth.
Do not block any ventilation openings. Install in accordance with the manufacturer's
instructions.
8. Do not install near any heat sources such as radiators, heat registers, stoves, or
other apparatus (including amplifiers) that produce heat.
9. Do not defeat the safety purpose of the polarized or grounding-type plug. A polarized
plug has two blades with one wider than the other. A grounding type plug has two
blades and a third grounding prong. The wide blade or the third prong is provided for
your safety. If the provided plug does not fit into your outlet, consult an electrician for
replacement of the obsolete outlet.
10. Protect the power cord from being walked on or pinched particularly at plugs,
convenience receptacles, and the point where they exit from theapparatus.
11. Only use attachments/accessories specified by the manufacturer.
i
12. Use only with the cart, stand, tripod, bracket, or table specified
by the manufacturer, or sold with the apparatus. When a cart is
used, use caution when moving the cart/apparatus combination
to avoid injury from tip-over.
13. Unplug this apparatus during lightning storms or when unused
for long periods of time.
14. Refer all servicing to qualified service personnel.
Servicing is required when the apparatus has been damaged in any way, such as
power-supply cord or plug is damaged, liquid has been spilled or objects have fallen
into the apparatus, the apparatus has been exposed to rain or moisture, does not
operate normally, or has been dropped.
15. If an outside antenna or cable system is connected to the product, be sure the
antenna or cable system is grounded so as to provide some protection against
voltage surges and built-up static charges. Section 810 of the National Electrical
Code, ANSI/NFPA No. 70-1984 (Section 54 of Canadian Electrical Code, Part 1)
provides information with respect to proper grounding of the mast and supporting
structure, grounding of the lead-in wire to an antenna-discharge unit, size of
grounding conductors, location of antenna-discharge unit, connection to grounding
electrode. See following example.
ANTENNA
LEAD IN
WIRE
ANTENNA
DISCHARGE UNINT
(NEC SECTION 810-21)
ELECTRIC
SERVICE
EQUIPMENT
NEC-NATIONAL ELECTRICALCODE
GROUNDING CONDUCTORS
(NEC SECTION 810-21)
GROUND CLAMPS
POWER SERVICE GROUNDING
ELECTRODE SYSTEM
(NEC ART 250 PART H)
16. Mains plug is used as the disconnect device. It shall remain readily operable and
should not be obstructed during intended use.
This apparatus shall be connected to a mains socket outlet with a protective earthing
connection.
ii
Welcome you to purchase VISCO LCD TV
Welcome you to high quality image world VISCO colour LCD TV brings you. We sincerely hope
VISCO TV brings you the brand new visual and audio enjoyment.
This operating instructions can help you operate this TV set easily.
Read this manual before operating the unit for being familiar with its features and keep it for future
reference.
Introduction
Features
Specifications
External connection
Antenna/cable connection
Stand and wall mounted
DVD, computer connection
General Description
Overview of front and right panel
Overview of back panel
Supporting Signals
Overview of remote control
Basic operation
Turning the TV On and Off
Language setup
Source setup
Audio Channel List
Audio Type List
Aspect ratio setup
Auto search
Channels List
Channels Selection
Volume adjustment and Mute setup
PIP Audio
Audio picture displaying
PIP-POS Setup
Current channel Information
Password inputting
EPG menu
Menu system introduction
Video
Video Setup
PC Setup
Audio
Audio Setup
SPDIF Out
TV Channel
Auto Search
Manual Search
Channel Edit
Information
Closed Caption
1
3
4
5
5
6
7
8
8
9
11
12
12
13
13
14
14
15
15
16
16
16
16
17
17
18
19
19
20
20
20
21
21
21
22
22
23
25
CCD Mode
Analog Caption
Digital Caption
Style
Time setup
Current Time
Auto Turn-Off
Sleep Timer
Time Zone
DayLight Saving
System Setup
OSD Setup
Password
MPAA Rating
TV Rating
C.E.Rating
C.F. Rating
OPEN V-CHIP
Troubleshooting
Picture defects and the reason
Package accessories
Appendix 1 TV Rating setup rule
Appendix 2 PIP function
Appendix 3 Universal remote control
25
25
26
26
27
27
28
28
29
29
30
30
31
32
32
33
33
34
35
36
36
37
39
40
Notes:
If you are using the television first time, please read the basic operation before operating.
Manufactured under license from Dolby Laboratories.
"Dolby" and the double-D symbol are trademarks of Dolby Laboratories.
2
!
!
!
!
!
!
!
!
!
!
!
TV adopts 37 " TFT LCD display screen
HDTV Compatible(480i, 480p,720p, 1080i)
Support American TV Standard 8VSB/Free 64/256QAM,NTSC System, ATSC System
Connect to computer directly to realize TV/monitor combo.
Zero X radiation complies to green environment protection requirement
Soft picture and no harm to your eyes
Ultra-thin and ultra-light features to realize wall mounted
16:9 wide screen(480i,480p,720p,1080i)
Dual channel operation (PIP/PBP)
Dual Channel Inverse Color Space Conversion (ICSC) for both Main Picture and PIP/PBP channels.
Temporal and spatial Digital Noise Reduction image processing for both MP and PIP/PBP picture
channels
! Color edge enhancement improves the chroma transient such that the chroma edge looks sharper
than the original signal
! Pixel-based motion and edge adaptive deinterlacing
! Advanced Chroma Processing for both MP and PIP/PBP channels supporting green color stretch
and blue color stretch
! True 1080i deinterlacing and processing
! Closed captioning/TEXT services/V-CHIP
! SAP/STEREO/MONO; BTSC.
! Equalizer
! ESS (Extended Spatial Stereo)
! support HDMI/DVI input
! support SPDIF ouput
! Off timer: Set the timer for the TV to turn off at the preset time automatically.
Input terminals used for external equipment connection
One ANTENNA jack
One CABLE jack
One S-VIDEO input
One computer RGB/PC input
Two YPbPr inputs
Four AUDIO inputs
One HDMI input
One AV input
One AV output
One AUDIO output
One SPDIF output
Note:
1. If input the DVI signal by HDMI jack, you must input the audio of DVI by the audio way of RGB/PC.
2. The AV output and Audio output are depending on the main picture. But if the main picture is
YPbPr/VGA/HDMI/DTV, the AV output is no signal.
3. If inputting signal is DTV, the SPDIF will switch to DTV. If inputting signal is HDMI, the SPDIF will
switch to HDMI. SPDIF is set to disable when input other signal.
3
Colour active matrix LCD display
37 inches diagonal (max.)
1366X768
Fine digital control
AC 110-240V 60Hz
American TV Standard 8VSB/Free 64/256QAM,
NTSC System, ATSC System
Antenna: 2~69; Cable: 2~135 (Analog: 2-125,
Digital: 2-135)
NTSC3.58, NTSC4.43
75W (Unbalance)
2X5W
200W
42.8"X25.3"X9.8” (TV With stand)
66.1Ibs (TV with stand)
0oC-40oC
Note:
1. Due to TV may be used with different display screen, weight marked in this user's
manual or in packaging box are subject to change without notice.
2. In case of any design change, a notice will not be released.
4
Antenna/cable connection
Antenna input impedance of this unit is 75W. VHF/UHF 75W coaxial cable can be
connected to the cable jack directly,
Cable input
5
AC INPUT
IN
R -AUDIO- L
IN
RGB/PC
IN
HDMI
IN
OUT
OUT
Pr
R
-AUDIO-L
VIDEO
Pb
Pr
COMPONENT 1 IN
R
-AUDIO-L
IN
VIDEO
IN
COMPONENT 2 IN
R
-AUDIO- L
Y
R
-AUDIO- L
IN
Y
Pb
S-VIDEO SPDIF
IN
IN
ANTENNA
IN
CABLE
Computer
6
General Description
IR remote sensor
Power indicator
INP
UT
/EN
TE
R
ME
NU
CH
CH
VO
L
VO
L
7
1. ON/OFF
Press this key to turn TV on or off.
2. Power indicator
Green: In power on mode.
Yellow: In standby mode.
3. IR remote sensor
Point remote control at this sensor to
conduct remote control.
4. VOLv/w
Press these two buttons to increase or
decrease the volume, and they are also
used for menu selection.
5. CHr/s
Press these two buttons to select channel
or select menu.
6. Menu
Press this key to display OSD menu or
exit from current menu to previous menu.
7.
Press this button to enter standby mode
under normal play, and press this button
to enter normal play mode under standby
mode.
8. INPUT/ENTER
Press this button to display the selectable
signal source for source.
In OSD menu, use this key to confirm and
enter into next submenu.
General Description
AC INPUT
IN
R -AUDIO- L
IN
RGB/PC
IN
HDMI
IN
RGB/PC RGB/PC input
AUDIO input
-AUDIO- L
Y
R
-AUDIO- L
IN
Y
Component
AUDIO input
HDMI input
OUT
OUT
Pr
R
-AUDIO-L
VIDEO
Pb
Pr
COMPONENT 1 IN
R
-AUDIO-L
IN
VIDEO
IN
COMPONENT 2 IN
R
Pb
Component
signal input
S-VIDEO SPDIF
IN
VIDEO
output/input
IN
ANTENNA
IN
CABLE
SPDIF
S-VIDEO input
Antenna input
AC input
AUDIO output/input
Supporting signals
Source
Antenna
Cable
Mode
8VSB
Free 64/256QAM
Source
Component
NTSC 3.58
CVBS
NTSC 4.43
NTSC 3.58
HDMI
Resolution
480i
480p
720p
1080i
480p
720p
1080i
Vertical Frequency
60Hz
60Hz
50/60Hz
50/60Hz
60Hz
50/60Hz
50/60Hz
S-Video
NTSC 4.43
Source
PC/VGA
PC/HDMI
Resolution
720x400
VGA
640x480
Vertical Frequency
70Hz
60Hz
75Hz
60Hz
SVGA 800X600
75Hz
60Hz
XGA 1024X768
75Hz
60Hz
SXGA 1280X1024
8
General Description
1
3
5
7
9
INPUT
SLEEP
ASPECT
ACTIVE
VIDEO
INFO.
PICTURE
SAP
MTS
ACTIVE
AUDIO
2
4
6
8
10
11
14
16
13
15
17
18
19
20
21
21
21
12
21
22
24
26
28
30
29
32
34
35
9
LIST
ALL
LIST
AUDIO
PAGE UP
FAV
PAGE
DOWN
CCD
EPG
PIP
POSITION
SWAP
FREEZE
PIP
23
25
27
29
31
33
29
29
36
1. LED:
2. POWER:
3. SLEEP:
Press any button, the led will light.
Turns your TV on or off.
Sets the sleep timer. Press the key
repeatedly to select sleep time.
4. ASPECT:
Changes the aspect ratio.
5. INPUT:
Selects input source.
6. ACTIVE VIDEO: Switch the operating target
between MP and PIP/PBP.
7. PICTURE:
Selects picture mode.
8. SAP/MTS:
Selects SAP/MTS.
9. INFO:
Displays the channel information.
10. ACTIVE AUDIO:Toggles current audio between MP
audio and PIP/PBP audio.
11. 0~9:
Digital keys.
12. :
Uses to enter a program number
for multiple program channels.
13. PRE.CH:
Returns to the previous channel.
14. DVD:
Switches the remote control to
DVD mode.
15. VCR:
Switches the remote control to
VCR mode.
16. TV:
Switches the remote control to TV
mode.
17. MUTE:
Mutes the sound.
18. VOLr/s:
Changes your TV's volume.
19. CHr/s:
Changes channels.
20. OK:
Validation key.
21. Arrow buttons: Use to move cursor up/down/left/
right for menus in TV mode.
22. MENU:
Displays the main menu.
23. EXIT:
Exit the menu.
24. FAV:
Selects favorite channels.
25. LIST ALL:
Displays all channel lists.
26. PAGE UP:
Turns to previous page.
27. LIST AUDIO:
Displays Audio channel lists.
28. CCD:
Displays captions during closedcaption source.
29. Arrow buttons: Use to move cursor up/down/left/
right for menus in DVD mode.
30. PAGE DOWN: Turns to next page.
General Description
31. EPG:
32. FREEZE:
33. OK:
34. PIP POSITION:
35. PIP:
36. SWAP:
Displays EPG.
Pause the image, press again to return to normal screen.
Validation key for DVD mode.
Selects the position for PIP window.
PIP/PBP on or off.
Toggles between PIP and MP.
Install your remote control batteries
Universal remote control operation please refer to Appendix 3.
10
How to turn the TV on or off
INPUT
SLEEP
ASPECT
ACTIVE
VIDEO
INFO.
PICTURE
SAP
MTS
ACTIVE
AUDIO
1. Insert AC power plug into the wall outlet, then turn
on the AC power switch.
2. If the screen does not turn on, please press
POWER button on the remote control or button
on the right panel of LCD TV.
3. One LOGO will be displayed on the screen after
turning on TV 6 seconds, normal picture will be
displayed on the screen after 18 seconds. If no
signal input, "No Signal" will be displayed on the
screen.
4. If you need to turn off the TV temporarily, just
press POWER button on the remote control or
button on the right panel and your TV will switch
to standby mode.
5. If you want to turn TV off completely, you should
turn off the AC power switch or unplug the power
cord.
6. After turning TV off, you should turn on TV again
at least 20 seconds later.
Status indication lamp
Green: In power on mode.
Yellow: In standby mode.
Auto power off
LIST
ALL
LIST
AUDIO
PAGE UP
FAV
PAGE
DOWN
CCD
EPG
PIP
POSITION
SWAP
1. If there is no signal detected in TV Mode for 5
minutes, the TV will go to standby.
2. If there is no signal detected in VGA Mode for 5
minutes, the TV will go to standby.
FREEZE
PIP
Memory before turning TV off
The settings of picture and the preset channels will
be memorized at turning off the unit.
When being started up again, the unit will work
according to the mode set before being turned off.
11
Menu operation
Language setup
1. Press MENU key to enter main menu, use p/q arrow key to select System Setup, then
press OK or ukey to enter System Setup submenu. Use p/q key to select OSD Setup,
press OK or ukey to enter OSD Setup submenu.
2. USE p/q arrow key to choose Select Menu Language, there are three options for you
to select: English, Spanish and French. Press t/u key to move the cursor to the option
you desired and press OK key to confirm.
Video
OSD Setup
Audio
Password
Select OSD Timeout
30 Sec
10 Sec
TV Channel
MPAA Rating
Closed Caption
TV Rating
Time Setup
CE Rating
System Setup
CF Rating
60 Sec
Select Menu Language
espanol
English
Select OSD Transparency
?
: MOVE,
: SELECT,
Low
Normal
: PREVIOUS,
MENU: EXIT
High
Source Setup
There are separate source lists for main source and PIP source, if you are setting main picture,
the title of the menu is "Select Main Source", if you are setting PIP, the title of the menu is "Select
PIP Source".
1. Main source selection
Press INPUT key on the remote control to enter Select MAIN Source submenu. There are eight
options for you to select: ANTENNA, CABLE, COMPOSITE, S-VIDEO, COMPONENT1,
COMPONENT2, PC VGA and HDMI.
Select MAIN Source
ANTENNA
COMPOSITE
S_VIDEO
COMPONENT1
COMPONENT2
PC VGA
HDMI
Up/Down: Move Cursor,
OK: Change MAIN Source
Use p/q arrow keys to move the cursor to the source you desired and press OK key to confirm.
12
Menu operation
2. PIP source selection
Press PIP key on the remote control first, then press INPUT key on the remote control to enter
Select PIP Source submenu. There are eight options for you to select: ANTENNA, CABLE,
COMPOSITE, S-VIDEO, COMPONENT1, COMPONENT2, PC VGA and HDMI.
Select PIP Source
Use p/q arrow key to move the cursor to the source you desired and
ANTENNA
COMPOSITE
press OK key to confirm.
S_VIDEO
COMPONENT1
Notes: 1. If the source can't be selected in current status, the source will
COMPONENT2
be displayed in gray.
PC VGA
HDMI
2. Only when you select Antenna + Cable in Auto Search submenu,
Cable option will be displayed in this menu.
Up/Down: Move Cursor,
3. PIP function please refer to Appendix 2.
OK: Change MAIN Source
Audio Channel List
Audio Channels List
Press LIST AUDIO key on the remote control to display the Audio
Channels List, use p/q key to move the cursor to the audio type
you desired and press OK key to confirm.
Up/Down: Move Cursor,
OK: Change MAIN Source
Audio Type List
The following table lists the alternative audio modes and the default
setting of every audio mode, you can select the audio mode you
desired with the SAP/MTS key on the remote control.
13
Analog Audio Mode
Mono
Input signal
Options
Default
Stereo + SAP
Stereo
Stereo/SAP/Mono
Stereo
Stereo/Mono
Stereo
SAP
SAP/Mono
Mono
Mono
Mono
Mono
Digital programs including
multiple audio channels
Digital programs only with
one audio channel.
Audio1, Audio 2,...
Depend on current program
Only 1 Audio
Depend on current program
Menu operation
Aspect ratio setup
Press ASPECT key on the remote control to enter Scaling submenu, there are four options for you to
select: Auto, 4:3, 16:9, Zoom. Usep/q arrow key to move the cursor to the option you desired and
press OK key to confirm.
If Scaling is not set to Auto, you should select Scaling mode depending on current program aspect
ratio.
Scaling
Auto
4:3
16:9
Zoom
Auto Search
1. Press MENU key on the remote control to enter the main menu, use p/q key to select TV
Channel and press OK or u key to enter TV Channel submenu. Press p/q key to move the
cursor to Auto Search, then press OK or u key to enter Auto Search submenu, the following OSD
will be displayed on the screen.
Video
Auto Search
Audio
Manual Search
TV Channel
Channel Edit
Closed Caption
Info
Source
Antenna
Cable
Antenna + Cable
STD
Ok
HRC
IRC
Cancel
Time Setup
Cable Tuner: Search physical channel 6, 0 found.
System Setup
?
: MOVE,
ENTER: SELECT,
EXIT: PREVIOUS,
2. Use p/q key to move the cursor to Source, there are three options for you to select: Antenna,
Cable and Antenna+ Cable, press p/q key to move the cursor to the source you need, press OK
key to confirm. If you have selected Cable or Antenna+Cable, three options will be displayed
under Antenna+Cable: STD, HRC and IRC. Press arrow keys to move the cursor to the option you
desired, then press OK key to confirm.
3. Use p/q key to move the cursor to OK option, then press OK key on the remote control to start
searching. If you want to stop searching, just press EXIT key or move the cursor to Cancel option
and press OK.
14
Menu operation
Channels List
1. All Channel List
Press LIST ALL key on the remote control to display All Channels List menu. Use p/q arrow key
to move the cursor to the program you need, and press OK key to confirm. If there are more than
one page in the list, you can press PAGE DOWN or PAGE UP keys to turn to next page or previous
All Channels List
page.
38.11 ATSC-11
Up/Down: Move Cursor,
OK: Change MAIN Channel
2. Fav List
Press FAV key on the remote control to display Fav List, In Favorite Channels List, if the channel is
audio channel, the icon will displays in front of channel number. Press p/q arrow keys to move
the cursor to the program you need, and press OK key to confirm.
Notes: If the source can't be selected, the source will be displayed in gray.
All Channels List menu is separately for main picture and PIP.
Favorite Channels List
All Channels List
Up/Down: Move Cursor,
OK: Change MAIN Channel
Channels selection
There are four ways to select channel:
1. Using 0~9,DOT and ENTER keys on the remote control to select channel directly.
2. Using CHr/s key on the remote control or on your TV to select channel.
3. Press PRE.CH key to turn to previous channel, press it again to return to current channel.
Note: PRE.CH is not activated if no channel has been changed after TV turning on.
4. Select channels from All Channels List or Favorite Channels List.
Notes: When you use 0~9, and ENTER keys to select channel directly, the first three number are
for main program number, the last three number are for minor program number. For example,
If you press 4, 5, 6, 7, 8, 9, Main Picture displays 456.789; press 4,5,6,7,8 and Main Picture
displays 456.78; press 4,5, 6, , 7, 8 and Main Picture displays 456.78..
MAIN
456.789
15
Menu operation
Volume adjustment and Mute setup
Volume adjustment
Press VOLv/w key on the remote control or on the TV to display Volume menu, adjust the volume
of TV between 0 to 100 by using VOLv/w key:
( To increase the volume, press VOL w key;
( To decrease the volume, press VOLv key;
Volume
22
Mute
Press MUTE key on the remote control to display MUTE icon on the left bottom of the screen, and the
volume of TV will be turned off, press MUTE key again to turn on the volume.
Mute can be canceled by using one of the methods below:
( Mute will be canceled if you press MUTE button again.
( Mute will be canceled if you press VOL w key.
PIP Audio
During PIP displaying, press ACTIVE AUDIO key on the remote control to display the menu which
indicating current audio is from either MP or PIP/PBP, then you can use this key to toggle between
MP and PIP/PBP.
PIP Audio
Audio picture displaying
If the program you are receiving is audio program, TV will insert one pictures into Video automatically,
and display it on the screen.
PIP-POS setup
Press PIP POSITION key on the remote control to quickly switch the position for PIP window, there are
five positions can be selected as follows.
Using the PIP POSITION key
Main frame
PIP frame
Press PIP POSITION to quickly select the position for PIP window.
16
Menu operation
Note:
( Many but not all adjustments and settings can be applied to the PIP window when the PIP window
is selected.
Current channel information
Press INFO key on the remote control to display the following OSD, the indications of items in this
OSD are listed in the following table.
1
3
38.10
ATSC-10
ATV
DTV
MP
No Event
09:09 AM
16:9
1920*1080 i
US TV None
6
2
8
7
Video or S_Video
Dumm y
1 ChannelNo
Channel No
5
4
"Video" or "
S_Video"
YPbPr1
YPbPr2
"Component1" "Component2"
9
VGA
HDMI
"VGA"
"HDMI"
2
Program name
3
Ma in Picture: MP ; PIP;PBP
4
Displays current accident name only in DTV mo de
5
Time
6
ASPECT info and resolution of original signal
7
Icon of Fav/Lock/Skip
8
Displays level informa tion TV detected
9
Flag of signal intensity of digital signal. If the intensity below the critical value, the flag
is red. On the critical value, the flag is yellow. Upon the critical value, the flag is green.
Blank
Password inputting
The television is no password at factory status, so there are not any operation which need password.
But if the password has been set, you must input correct password in following conditions.
1. Enter "System Setup_ _Password" menu;
2. Enter "System Setup_ _MPAA" menu;
3. Enter "System Setup_ _TV Rating" menu;
17
Menu operation
4. Enter "System Setup_ _C.F. Rating" menu;
5. Enter "System Setup_ _C.E. Rating" menu;
6. Enter "TV Channel_ _Channel Edit" menu;
7. Enter "TV Channel_ _Auto Search" menu;
8. Enter "TV Channel_ _Manual Search" menu.
There are two ways to input password:
1. Input the password directly by using digital keys on the remote control.
2. Input the password with keys on the right panel.
Use VOLv/w key on the right panel to move cursor to the position you desired. Input digit by
pressing CHr/s key on the right panel to change digit from 0 to 9 circularly at the current position.
For example, the cursor now is at the first digit position of password input. Press CHr key one time
and 0 will be displayed on the screen, press CHr key second time, 1 will be displayed on the
screen, in the same way, you can increase the digit by pressing CHr key repeatedly. Also you can
press CHs key to decrease the digit. At last, press ENTER on the right panel to confirm.
If the password you have inputted is correct, you can enter into the next operation. Otherwise you
have to return to previous status before inputting.
Please input password:
____
EPG menu
Press EPG key to enter EPG menu, the first line displays current channel number (38.11), channel
name (ATSC-11), event title (US TV None) and current time.
The second line displays all programs which will be displayed in this channel, press p/q key to
select the program you desired, then press OK key to enter this program to watch.
EPG information for every channel will be displayed in ABSTRACT column.
38.11
ATSC-11
38.10
START
20:00
Dec 14, 2005, 09:10
US TV None
38.11
38.12
END
EVENT TITLE
08:00
ABSTRACT
: MOVE,
: TO EVENT ,
ENTER: TUNE,
EPG: CLOSE EPG
18
Menu system introduction
Video
Video Setup
Video
Video Setup
Audio
PC Setup
MAIN Mode
Standard
TV Channel
Closed Caption
Dynamic
Soft
Custom
Contrast
Brightness
Saturation
Hue
Sharpness
DNR
50
50
50
0
50
Off
Auto
Low
Mid
High
Time Setup
Color Temp
System Setup
?
: MOVE,
Cool
Blue Screen
: SELECT,
: PREVIOUS,
Warm
Standard
On
Off
MENU: EXIT
Press MENU key to display the main menu on the screen, usep/q key to select Video option, then
press OK or u key to enter Video submenu. Use p/q key to select Video Setup option, then press
OK or u key to enter Video Setup submenu.
1. PICTURE mode setting
1) Use p/q key to move the cursor to Main Mode option to set the mode of main picture, if you
are setting mode of PIP, the title will be PIP Mode. Use t/u key to select one picture mode from
four modes: Standard, Dynamic, Soft and Custom, then press OK key to confirm.
2) Only when the Picture Mode is custom, you can set the value depending on your favorite. Use
p/q key to move the cursor to the position which you want to adjust. Press t/u key to enter
related option submenu.
Contrast
60
3) Use t/u key to adjust the value. If you want to return to Video Setup menu, press p/q/OK key.
2. DNR setting
Use p/q keys to move the cursor to DNR option. There are five options following DNR. Use t/u
key to select the mode you desired, and press OK key to confirm.
3. Color Temp setting
Use p/q keys to move the cursor to Color Temp option. There are three options following Color
Temp. Use t/u key to select the option you desired, and press OK key to confirm.
4. Blue Screen On/Off
Use p/q keys to move the cursor to Blue Screen option. Use t/u key to select On or Off, press
OK key to confirm.
Tips:
1. Contrast, Brightness, Saturation, Hue and Sharpness, Color Temperature settings are not global,
i.e. Values will be stored separately for all base band inputs plus NTSC, ATSC and QAM RF
sources.
2. LCD color temperature parallel table
Warm
Standard
Cool
6500K
7500K
9300K
19
Menu system introduction
Video
PC Setup
Video
Video Setup
Audio
PC Setup
TV Channel
H. size
50
H. Position
50
50
V Position
Phase
Closed Caption
11
Time Setup
Auto Adjust
Default
System Setup
?
: MOVE,
: SELECT,
: PREVIOUS,
MENU: EXIT
Press MENU key to display the main menu on the screen, usep/q key to select Video option, then
press OK or u key to enter Video submenu. Use p/q key to select PC Setup option, then press OK
or u key to enter PC Setup submenu.
1. VGA setting
Use p/q key to move the cursor to the position you desired to set, press t/u key to adjust the
value.
2. Default and auto adjustment
Use p/q key to move the cursor to Default or Auto Adjust option, then press OK key to confirm.
Note: 1. When you use H.size item to adjust picture size, picture will be adjusted align to the left of
the screen.
2. H.size, H.Position, V Position are not available if Scaling is set to 4:3 or zoom.
3. If there are unexpected problems happened when you adjust the items, you can use "Auto
Config" to resume the original settings.
Audio
Audio Setup
Video
Audio Setup
Volume
Balance
Audio
SPDIF Out
Equalizer Mode
Pop
Live
TV Channel
Time Setup
System Setup
: MOVE,
: SELECT,
: PREVIOUS,
Rock
Custom
30
30
30
30
30
30
30
120Hz
30
200Hz
500Hz
1200Hz
3000Hz
7500Hz
12KHz
Closed Caption
?
17
0
MENU: EXIT
Press MENU key to display the main menu on the screen, use to select Audio option, then
press OK or u key to enter Audio submenu. Use p/q key to select Audio Setup option, then press
OK or u key to enter Audio Setup submenu.
1. Volume adjustment
Press p/q key to move the cursor to the Volume option, press t or u key to decrease or increase
the volume of your TV.
2. Balance adjustment
Press p/q key to move the cursor to the Balance option, press t or u key to adjust the balance.
Default value of Balance is "0".
3. Equalizer Mode
Press p/q key to move the cursor to the Equalizer Mode option, then use t or u key to select
20
Menu system introduction
Audio
one mode from following four modes: Live, Pop, Rock and Custom, press OK key to confirm. Only
when you select Custom mode, you can adjust the setting of a certain band. Usep/q key to move
cursor to the position you desired, then press t/u key to adjust the setting.
SPDIF Out
Video
Audio setup
Audio
SPDIF Out
TV Channel
Dolby Digital
PCM
Closed Caption
Time Setup
System Setup
?
: MOVE,
: SELECT,
: PREVIOUS,
MENU: EXIT
Press MENU key to enter main menu, use p/q key to select Audio, then press OK or u key to enter
Audio submenu, use p/q key to select SPDIF Out, press OK or u key to enter SPDIF Out submenu.
1. SPDIF Out mode
There are two modes for you to select: Dolby Digital and PCM, use t/u key to move the cursor to
the mode you desired, then press OK key to confirm.
TV Channel
Auto Search
Video
Auto Search
Audio
Manual Search
TV Channel
Channel Edit
Closed Caption
Info
Source
Antenna
Cable
Antenna + Cable
STD
Ok
HRC
IRC
Cancel
Time Setup
Cable Tuner: Search physical channel 6, 0 found.
System Setup
?
: MOVE,
ENTER: SELECT,
EXIT: PREVIOUS,
Press MENU key on the remote control to enter the main menu, use p/q key to select TV Channel,
then press OK or u key to enter TV Channel submenu, use p/q key to select Auto Search, then
press OK or u key to enter Auto Search submenu.
1. Auto Search
1) Use p/q key to move the cursor to Source option, there are three options for you to select:
Antenna, Cable and Antenna + Cable, press p/q key to move the cursor to the Source you
desired, then press OK key to confirm. If you have selected Cable or Antenna + Cable, three
options (STD, HRC and IRC) will display under Antenna + Cable. Press p/q/t/u key to move
the cursor to the option you desired, then press OK key to confirm.
21
Menu system introduction
TV Channel
Use p/q key to move the cursor to OK option, then press OK key on the remote control to start
auto searching. If you want to stop searching, just press EXIT key on the remote control or move
the cursor to Cancel option by pressing p/q key on the remote control, then press OK key.
Notes: Searching process and related information will be displayed at the bottom of Source submenu.
2)
Manual Search
Video
Auto Search
Audio
Manual Search
TV Channel
Channel Edit
Closed Caption
Info
RF Select
Antenna
Channel No.
Frequency
0MHz
Ok
Time Setup
System Setup
?
: SELECT,
: MOVE,
: PREVIOUS,
MENU: EXIT
Press MENU key on the remote control to enter the main menu, use p/q key to select TV Channel,
then press OK or u key to enter TV Channel submenu, use p/q key to select Manual Search, then
press OK or u key to enter Manual Search submenu.
1.Manual Search
1) Use p/q key to move the cursor to Channel No. option, input channel number with digital keys
on the remote control. If channel number you input is wrong, press t key to clear the wrong
number.
2) Use p/q key to move the cursor to OK option, then frequency of this channel number will be
displayed after Frequency option. If you select Cable for RF Select, then frequency is for CableSTD.
3) Press OK key to start searching, you can press EXIT key to stop searching.
Note: Related information will be displayed on the bottom of this submenu during searching or if
searching is ended.
Channel Edit
Video
Auto Search
Audio
Manual Search
TV Channel
Channel Edit
Closed Caption
Info
Ch Num Name
ATSC-_ _ _
38.10
38.11
ATSC-_ _ _
ATSC-_ _ _
38.12
Fav
Lock
Skip
Time Setup
System Setup
?
: MOVE,
ENTER: SELECT,
Page: 1/1
EXIT: PREVIOUS,
MENU: EXIT
22
Menu system introduction
TV Channel
Press MENU key on the remote control to enter the main menu, use p/q key to select TV Channel,
then press OK or u key to enter TV Channel submenu, use p/q key to select Channel Edit, then
press OK or u key to enter Channel Edit submenu.
1. Fav/Lock/Skip setup
Use p/q/t/u key to move the cursor to any grid in the table. When the cursor in Fav/Lock/Skip
rows, press OK key to insert the channel to Fav/Lock/Skip lists. An icon symbolized that the
channel has been added to Fav/Lock/Skip lists will be displayed. In the same way, you can remove
the channel from the Fav/Lock/Skip lists by pressing OK key again, then this icon will be canceled.
2. Program arrangement
Use p/q/t/u key to move the cursor to CH-Num/Name row, press OK key to select whole line.
Use p/q key to move the cursor to the position you desired, press OK to change channel position.
Notes:
1. If the channel is audio program, an icon will be displayed in front of CH-Num.
2. If a program has been added to SKIP list, the program won't be displayed in channel list. When you
select program with CHr/s key, this program will be directly jumped. but you can select the
program by using digital keys on the remote control.
3. If a program has been marked lock icon in Channel Edit submenu, you must input password when
you select the program.
1) If you select a program and the program has been locked, the information prompted is: "The
Program was locked, input password. If the program has been rating block, the information
prompted is "The Program was block, input password."
2) If the password you input is correct, you can enter into this program to watch.
3) If the password input is wrong, the password input menu will be disappeared, and the information
prompted is "Wrong Password, Press OK key to input again." Press OK key to
return to step 1), press other keys to display the menu depending on your operation. If you press
EXIT key to cancel the input, the password input menu will be disappeared, and display the
information "Press OK key to input again." If you press OK key, then return to step 1);
4) If you have not input the password in one minute after the password input menu displaying, the
message "Wrong Password, Press OK key to input again." will display. The time lasts one minute.
If you have not input anything, screen will turn to standby status.
5) If you want to lock one program, you should set the password in Password submenu firstly.
Information
Video
Auto Search
Audio
Manual Search
TV Channel
Channel Edit
Closed Caption
Info
Program No
Program Name
Time Setup
System Setup
?
23
: MOVE,
: SELECT,
: PREVIOUS,
MENU: EXIT
Menu system introduction
TV Channel
Press MENU key to enter the main menu, use p/q key to select TV Channel option, press OK or
u key to enter TV Channel submenu. Then use p/q key to select Info option, press OK or u key to
enter Info submenu.
1. Use p/q key to move the cursor to Program No option, input the channel number by directly
pressing digital keys on the remote control.
You can change the name of analog program, press p/q key to move the cursor to Program
Name input frame, and input characters by using digital keys on the remote control. The followings
are the parallel table between digital keys and characters.
Use t/u key to move the cursor right or left.
Use 0~9 number keys to input characters.
Use INFO. to toggle between LOWERCASE and UPPERCASE.
Use PRE.CH key to delete a character.
After you finish inputting, you may use ENTER to confirm and return. The maximum length of
program is 8 characters.
Button
Character List
Character List while pressing DSP/CAPS
0
0*#()
0*#()
1
1 -.!
1 -.!
2
2abc@
2ABC @
3
3def#
3DEF#
4
4ghi$
4GHI$
5
5jkl%
5JKL%
6
6mno^
6MNO^
7
7pqrs
7PQRS
8
8 t u v&
8TUV&
9
9wxyz
9WXYZ
Note:
Every digit key includes several characters, so you must press the digital key repeatedly to
display the character you need.
24
Menu system introduction
Closed Caption
CCD Mode
Video
Close Caption Mode
CCD Mode
Audio
Analog Caption
TV Channel
Digital Caption
Closed Caption
Style
ON
OFF
Time Setup
On When Mute
System Setup
?
: MOVE,
: SELECT,
: PREVIOUS,
MENU: EXIT
Press MENU key on the remote control to enter the main menu, use p/q key to select Closed
Caption, then press OK or u key to enter Closed Caption submenu, use p/q key to select CCD
Mode, then press OK or u key to enter CCD Mode submenu.
1. Close Caption Mode
There are three options for you to select: ON, OFF, On When Mute. Move the cursor to the mode
you desired, and press OK key to confirm.
Note: If you select On When Mute mode, CCD will turn on when audio mute and turn off when
cancel audio mute.
Analog Caption
Video
Service
CCD Mode
Audio
Analog Caption
TV Channel
Digital Caption
Closed Caption
Style
CC1
TEXT1
CC2
TEXT2
CC3
TEXT3
CC4
TEXT4
Time Setup
System Setup
?
: MOVE,
: SELECT,
: PREVIOUS,
MENU: EXIT
Press MENU key on the remote control to enter the main menu, use p/q key to select Closed
Caption option, then press OK or u key to enter Closed Caption submenu, use p/q key to select
Analog Caption, then press OK or u key to enter Analog Caption submenu.
1. Analog Caption Service
There are eight services for you to select: CC1, CC2, CC3, CC4, TEXT1, TEXT2, TEXT3 and
TEXT4. Use p/q/t/u key to move the cursor to the service you desired, press OK key to confirm.
25
Menu system introduction
Closed Caption
Digital Captions
Video
Service
CCD Mode
Audio
Analog Caption
TV Channel
Digital Caption
Closed Caption
Style
Service1
Service4
Service2
Service5
Service3
Service6
Time Setup
System Setup
?
: MOVE,
: SELECT,
: PREVIOUS,
MENU: EXIT
Press MENU key on the remote control to enter the main menu, use p/q key to select Closed
Caption, then press OK or u key to enter Closed Caption submenu, use p/q key to select Digital
Captions, then press OK or u key to enter Digital Captions submenu.
1. Digital Caption Service
There are six options for you to select: Service1, Service2, Service3, Service4, Service5 and
Service 6. Using p/q/t/u arrow buttons to move the cursor to the mode you desired, and press
OK key to confirm.
Style
Style
Default
Size
Font
Default
Analog Caption
TV Channel
Digital Caption
Text Color
Text Opacity
Default
Default
Default
Closed Caption
Style
BG Color
BG Opacity
Default
Default
Video
Audio
CCD Mode
Time Setup
PREVIEW
Close Caption
System Setup
?
: MOVE,
: SELECT,
: PREVIOUS,
MENU: EXIT
Press MENU key on the remote control to enter the main menu, use p/q key to select Closed
Caption option, then press OK or u key to enter Closed Caption submenu, use p/q key to select
Style, then press OK or u key to enter Style submenu.
1. Style setup
1) Make sure cursor on Style option, then press t/u/OK key to select the Style mode you need.
There are ten modes can be selected: Custom, Default, Style1, Style2, Style3, Style4, Style5,
Style6, Style7, and Style 8. If you select one style mode, following options will be displayed the
specific configuration of this style: Size, Font, Text Color, Text Opacity, BG Color, BG Opacity.
The specific configuration of every style lists as below.
Default: Default, Default, Default, Default, Default, Default
Style1: Small, Font2, White, Transparent, Blue, Solid
Style2: Normal, Font3, Yellow, Transparent, Black, Solid
26
Menu system introduction
Closed Caption
Style3: Large, Font4, Cyan, Flashing, Magenta, Transparent
Style4: Normal, Font5, Yellow, Translucent, Black, Solid
Style5: Normal, Font6, Yellow, Translucent, Black, Solid
Style6: Normal, Font7, Yellow, Translucent, Black, Solid
Style7: Normal, Font8, Yellow, Translucent, Black, Solid
Style8: Default, Font2, Default, Flashing, Default, Translucent
2) Only when the CCD Style is Custom, you can use p/q key to move the cursor to Size, Font,
Text Color, Text Opacity, BG Color or BG Opacity, and use t/u or OK key to set them. Setting
you can select list as below.
Size: Small, Normal, Large, Default.
Font: Font1, Font2, Font 3, Font4, Font5, Font6, Font7, Font 8, Default.
Text Color: White, Black, Red, Green, Blue, Yellow, Magenta, Cyan, Default.
Text Opacity: Transparent, Translucent, Solid, Flashing, Default.
BG Color: White, Black, Red, Green, Blue, Yellow, Magenta, Cyan, Default.
BG Opacity: Translucent, Transparent, Solid, Flashing, Default.
Notes: When you set above options, the PREVIEW window will give the preview of current setting
immediately.
Time Setup
Current Time
Video
Current Time
Audio
Auto Turn-Off
Mode
Manual
Auto
Input date/time
TV Channel
Sleep Timer
Closed Caption
Time Zone
Time Setup
Daylight Saving
1999
05 / 27
08 15 PM
System Setup
?
: MOVE,
: SELECT,
: PREVIOUS,
MENU: EXIT
Press MENU key on the remote control to enter the main menu, use p/q key to select Time Setup,
then press OK or u key to enter Time Setup submenu, use p/q key to select Current Time, then
press OK or u key to enter Current Time submenu.
1. Time Mode
Use p/q key to move the cursor to Mode option, then press t/u key to move the cursor to the
option you desired, press OK key to confirm. Only when the mode is Custom, you can set detail
time and date.
2. Input date/time
Press t/u key to move the cursor to Input date/time option, then use p/q key to select time and
date. For AM/PM option, you can select AM or PM by pressing p/q key to toggle between AM
and PM.
27
Menu system introduction
Time Setup
Notes: When set time and date, you can't input characters by pressing digital keys on the remote
control, you can press p/q key to change the digit.
( Press p key to increase the digit.
( Press q key to decrease the digit.
Auto Turn-Off
Mode
Video
Current Time
Audio
Auto Turn-Off
TV Channel
Sleep Timer
Closed Caption
Time Zone
Time Setup
Daylight Saving
Off
Once
Daily
Setting turn-off time
00 : 00 AM
System Setup
?
: MOVE,
: SELECT,
: PREVIOUS,
MENU: EXIT
Press MENU key on the remote control to enter the main menu, use p/q key to select Time Setup,
then press OK or u key to enter Time Setup submenu, use p/q key to select Auto Turn-Off, then
press OK or u key to enter Auto Turn-Off submenu.
1. Mode
Use p/q key to move the cursor to Mode option, there are three options for you to select, use
p/q key to select the mode you desired, then press OK key to confirm.
2. Setting turn-off time
When the mode has been set in Once or Daily mode, you must set auto turn-off time. The way is
same as Input date/time.
Notes:
1. When setting time, you can't input characters by pressing digital keys on the remote control, you
can press p/q key to change the digit.
2. Default setting of Mode is Off.
Sleep Timer
Sleep Time
Video
Current Time
Audio
Auto Turn-Off
TV Channel
Sleep Timer
30 Min
Closed Caption
Time Zone
60 Min
Time Setup
Daylight Saving
Off
15 Min
90 Min
120 Min
System Setup
?
: MOVE,
: SELECT,
: PREVIOUS,
MENU: EXIT
28
Menu system introduction
Time Setup
Press MENU key on the remote control to enter the main menu, use p/q key to select Time Setup,
then press OK or u key to enter Time Setup submenu, use p/q key to select Sleep Timer, then
press OK or u key to enter Sleep Timer submenu.
1. Sleep Time
There are six options for you to select, use p/q key to move the cursor to the option you desired,
press OK key to confirm.
Note: The default setting is Off. As soon as the sleep time has been set, the message "Sleep Timer,
Auto turn off" will be displayed when the remained time is only one minute, then the TV will auto
turn to standby status at the preset time.
Time Zone
Setting Time Zone
Video
Current Time
Audio
Auto Turn-Off
TV Channel
Sleep Timer
Closed Caption
Time Zone
Time Setup
Daylight Saving
Atlantic
Easten
Central
Mountain
Alaska
Pacific
Hawaii
Samoa
Newfoundland
System Setup
?
: MOVE,
: SELECT,
: PREVIOUS,
MENU: EXIT
Press MENU key on the remote control to enter the main menu, use p/q key to select Time Setup,
then press OK or u key to enter Time Setup submenu, use p/q key to select Time Zone, then
press OK or u key to enter Time Zone submenu.
1. Setting Time Zone
There are nine options for you to select, use p/q key to move the cursor to the time zone you
desired, press OK key to confirm.
DayLight Saving
Option
Video
Current Time
Audio
Auto Turn-Off
TV Channel
Sleep Timer
Closed Caption
Time Zone
Time Setup
Daylight Saving
Auto
System Setup
?
29
: MOVE,
: SELECT,
: PREVIOUS,
MENU: EXIT
Off
Menu system introduction
Time Setup
Press MENU key on the remote control to enter the main menu, use p/q key to select Time Setup,
then press OK or u key to enter Time Setup submenu, use p/q key to select DayLight Saving, then
press OK or u key to enter DayLight Saving submenu.
1. DayLight Saving setting
Use t/u key to move the cursor to Auto or Off option, then press OK key to confirm.
System Setup
OSD Setup
Video
OSD Setup
Password
Audio
Select OSD Timeout
10 Sec
TV Rating
Closed Caption
CE Rating
English
CF Rating
System Setup
?
: MOVE,
60 Sec
Select Menu Language
TV Channel
Time Setup
30 Sec
MPAA Rating
E/I Rating
Espanol
Select OSD Transparency
Low
Normal
: PREVIOUS,
MENU: EXIT
High
TV Smarts
: SELECT,
Press MENU key on the remote control to enter the main menu, use p/q key to select System
Setup, then press OK or u key to enter System Setup submenu, use p/q key to select OSD Setup,
then press OK or u key to enter OSD Setup submenu.
1. Select OSD Timeout
Use p/q key to move the cursor to select OSD Timeout option, there are 10Scond, 30Second
and60Second options you can select. Use t/u key to move the cursor to the option you desired,
press OK key to confirm.
2. Select Menu Language
Use p/q key to move the cursor to select Menu Language option, there are English, Spanish and
French options you can select. Use t/u key to move the cursor to the option you desired, press
OK key to confirm.
3. Select OSD transparency
Use p/q key to move the cursor to select OSD transparency option, there are Low, Normal and
High options you can select. Use t/u key to move the cursor to the option you desired, press
OK key to confirm.
30
Menu system introduction
System Setup
Password
Video
OSD Setup
Password
Enter Password
MPAA Rating
Confirm Password
TV Channel
TV Rating
Password
Closed Caption
CE Rating
Audio
CF Rating
Time Setup
System Setup
?
: MOVE,
Default Settings
____
____
On
Off
Clear Password
E/I Rating
TV Smarts
: SELECT,
: PREVIOUS,
MENU: EXIT
Press MENU key on the remote control to enter the main menu, use p/q key to select System
Setup, then press OK or u key to enter System Setup submenu, use p/q key to select Password,
then press OK or u key to enter Password submenu.
1. Password setting
Use p/q key to move the cursor to enter Password option, then input password with digital keys
on the remote control. After password inputting, cursor will auto skip to Confirm Password option,
input password again. If two passwords are same, the message "Password saved successful" will
display at the bottom of submenu. If you make wrong operation, use tkey to erase wrong
inputting characters. If your password saved successful, you need to input password with digital
keys before entering Password submenu.
2. At first, you must input password before entering the Password submenu, if the password you input
is correct, you can change password in Password submenu, the way is same as Password setup,
The default password is 2580.
3. Lock System
Use p/q key to move the cursor to Password option, select On or Off option and press OK key to
confirm. If a program or a rating has been locked, you must input password before you select the
program or the rating.
4. Clear Password
Move the cursor to Clear Password, press OK key to confirm, then the password you have set is
cleared and the message "Clear Password successful" will be displayed at the bottom of the sub
menu.
5. Default Settings
Use p/q key to move the cursor to Default Settings option, press OK key to confirm, then the
system turns to factory status.
Notes: As soon as password has been set, you must input correct password before entering the sub
menu.
31
Menu system introduction
System Setup
MPAA Rating
Video
Audio
TV Channel
Closed Caption
OSD Setup
Password
NR
MPAA Rating
G
TV Rating
PG
CE Rating
PG-13
R
CF Rating
Time Setup
System Setup
?
: MOVE,
NC-17
E/I Rating
X
TV Smarts
: SELECT,
: PREVIOUS,
MENU: EXIT
Press MENU key on the remote control to enter the main menu, use p/q key to select System
Setup, then press OK or u key to enter System Setup submenu, use p/q key to select MPAA Rating,
then press OK or u key to enter MPAA Rating submenu.
1. MPAA Rating
Use p/q key to move the cursor to select the option you desired, press OK key to lock the option.
Notes: 1. If you have set the password, you must input correct password before entering the submenu.
2. You should set the password before using V-CHIP function.
TV Rating
Video
Audio
TV Channel
Closed Caption
All
OSD Setup
Password
TV-Y
MPAA Rating
TV-Y7
TV Rating
TV-G
CE Rating
FV
D
L
S
V
TV-PG
CF Rating
Time Setup
System Setup
?
: MOVE,
E/I Rating
TV Smarts
: SELECT,
TV-14
TV-MA
: PREVIOUS,
MENU: EXIT
Press MENU key on the remote control to enter the main menu, use p/q key to select System
Setup, then press OK or u key to enter System Setup submenu, use p/q key to select TV Rating,
then press OK or u key to enter TV Rating submenu.
1. TV Rating
Use p/q key to move the cursor to select the option you desired, press OK key to lock the option.
The setting rule please refer to Appendix 1.
Notes: 1. If you have set the password, you must input correct password before entering the submenu.
2. You should set the password before using V-CHIP function.
32
Menu system introduction
System Setup
C.E. Rating
OSD Setup
Video
C
Password
Audio
C8+
MPAA Rating
TV Channel
TV Rating
Closed Caption
CE Rating
G
PG
14+
CF Rating
Time Setup
System Setup
?
: MOVE,
18+
E/I Rating
Block All
TV Smarts
: SELECT,
: PREVIOUS,
MENU: EXIT
Press MENU key on the remote control to enter the main menu, use p/q key to select System
Setup, then press OK or u key to enter System Setup submenu, use p/q key to select CE Rating,
then press OK or u key to enter CE Rating submenu.
1. CE Rating
Use p/q key to move the cursor to select the option you desired, press OK key to lock or unlock
the option.
2. Block All
Usep/q key to move the cursor to Block All option, press OK key to confirm. All options in the sub
menu will be locked. If you unlock any option in the submenu, the Block All option will auto turn to
unselected.
Notes:1.If you have set the password, you must input correct password before entering the submenu.
2.You should set the password before using V-CHIP function.
C.F. Rating
Video
OSD Setup
G
Password
Audio
13 ans+
TV Channel
TV Rating
Closed Caption
CE Rating
16 ans+
CF Rating
18 ans+
E/I Rating
Block All
Time Setup
System Setup
?
8 ans+
MPAA Rating
: MOVE,
TV Smarts
: SELECT,
: PREVIOUS,
MENU: EXIT
Press MENU key on the remote control to enter the main menu, use p/q key to select System
Setup, then press OK or u key to enter System Setup submenu, use p/q key to select CF Rating,
then press OK or u key to enter CF Rating submenu.
1. CF Rating
Use p/q key to move the cursor to select the option you desired, press OK key to lock or unlock
the option.
2. Block All
Usep/q key to move the cursor to Block All option, press OK key to confirm. All options in the sub
menu will be locked. If you unlock any option in the submenu, the Block All option will auto turn to
unselected.
Notes:1. If you have set the password, you must input correct password before entering the submenu.
2.You should set the password before using V-CHIP function.
33
Menu system introduction
System Setup
OPEN V-CHIP
Video
OSD Setup
E/I
Password
Audio
MPAA Rating
E/1-3
TV Channel
TV Rating
E/1-7
Closed Caption
CE Rating
E/1-10
CF Rating
E/1-13
Time Setup
System Setup
?
: MOVE,
E/I Rating
TV Smarts
: SELECT,
: PREVIOUS,
MENU: EXIT
Press MENU key on the remote control to enter the main menu, use p/q key to select System
Setup, then press OK or u key to enter System Setup submenu, use p/q key to select OPEN
V-CHIP related items, then press OK or u key to enter the related submenu.
1. OPEN V-CHIP function
Use p/q key to move the cursor to select the option you desired, press OK key to lock or unlock
the option.
Notes:1.If you have set the password, you must input correct password before entering the
submenu.
2.You should set the password before using V-CHIP function.
3. OPEN V-CHIP will detect the related item from digital TV signal and display them on this
menu. For example: E/I Rating, TV Smarts. If OPEN V-CHIP function is not available for
current TV signal, these two items will be blank.
34
8
35
Picture defects and the reason
A user's manual,power cord and a remote control.
36
Appendix 1 TV Rating setup rule
If TV-Y is locked ,then lock TV-Y,TV-Y7,TV-Y7-FV .
If TV-Y is unlocked ,then unlock TV-Y.
If TV-Y7 is locked ,then lock TV-Y7,TV-Y7-FV
If TV-Y7 is unlocked ,then unlock TV-Y7,TV-Y7-FV
If TV-Y7-FV is locked ,then lock TV-Y7-FV
If TV-Y7-FV is unlocked ,then unlock TV-Y,TV-Y7,TV-Y7-FV
If TV-G is locked ,then lock TV-G,
TV-PG,TV-PG-D,TV-PG-L,TV-PG-S,TV-PG-V
TV-14,TV-14-D, TV-14-L, TV-14-S,TV-14-V
TV-MA, TV-MA-L,TV-MA-S,TV-MA-V.
If TV-G is unlocked ,then unlock TV-G
If TV-PG is locked ,then lock TV-PG,TV-PG-D,TV-PG-L,TV-PG-S,TV-PG-V
TV-14,TV-14-D,TV-14-L, TV-14-S,TV-14-V
TV-MA, TV-MA-L,TV-MA-S,TV-MA-V.
If TV-PG is unlocked ,then unlock TV-G
TV-PG,TV-PG-D,TV-PG-L,TV-PG-S,TV-PG-V
If TV-14 is locked ,then lock TV-14,TV-14-D,TV-14-L,TV-14-S,TV-14-V
TV-MA, TV-MA-L,TV-MA-S,TV-MA-V.
If TV-14 is unlocked ,then unlock TV-G
TV-PG,TV-PG-D,TV-PG-L,TV-PG-S,TV-PG-V
TV-14,TV-14-D,TV-14-L,TV-14-S,TV-14-V
If TV-MA is locked ,then lock TV-MA, TV-MA-L,TV-MA-S,TV-MA-V.
If TV-MA is unlocked ,then unlock TV-G
TV-PG,TV-PG-D,TV-PG-L,TV-PG-S,TV-PG-V
TV-14,TV-14-D,TV-14-L,TV-14-S,TV-14-V
TV-MA, TV-MA-L,TV-MA-S,TV-MA-V.
If TV-PG-D is locked ,then lock TV-PG-D
TV-14-D
If TV-PG-D is unlocked ,then unlock TV-G
TV-PG TV-PG-D
If TV-PG-L is locked ,then lock TV-PG-L
TV-14-L
TV-MA-L
If TV-PG-L is unlocked ,then unlock TV-G
TV-PG,TV-PG-L
If TV-PG-S is locked ,then lock TV-PG-S
TV-14-S TV-MA-S
If TV-PG-S is unlocked ,then unlock TV-G
TV-PG,TV-PG-S
If TV-PG-V is locked ,then lock TV-PG-V
TV-14-V TV-MA-V
If TV-PG-S is unlocked ,then unlock TV-G
TV-PG,TV-PG-V
If TV-14-D is locked ,then lock TV-14-D
If TV-14-D is unlocked ,then unlock TV-G
TV-PG TV-PG-D
TV-14 TV-14-D
If TV-14-L is locked ,then lock TV-14-L
TV-MA-L
If TV-14-L is unlocked ,then unlock TV-G
TV-PG TV-PG-L
TV-14 TV-14-L
37
Appendix 1 TV Rating setup rule
If TV-14-S is locked ,then lock TV-14-S
TV-MA-S
If TV-14-S is unlocked ,then unlock TV-G
TV-PG TV-PG-S
TV-14 TV-14-S
If TV-14-V is locked ,then lock TV-14-V
TV-MA-V
If TV-14-V is unlocked ,then unlock TV-G
TV-PG TV-PG-V
TV-14 TV-14-V
If TV-MA-L is locked ,then lock TV-MA-L
If TV-14-L is unlocked ,then unlock TV-G
TV-PG TV-PG-L
TV-14 TV-14-L
TV-MA TV-MA-L
If TV-MA-S is locked ,then lock TV-MA-S
If TV-14-S is unlocked ,then unlock TV-G
TV-PG TV-PG-S
TV-14 TV-14-S
TV-MA TV-MA-S
If TV-MA-V is locked ,then lock TV-MA-V
If TV-14-V is unlocked ,then unlock TV-G
TV-PG TV-PG-V
TV-14 TV-14-V
TV-MA TV-MA-V
38
Appendix 2 PIP function
MP/PIP
Analog
TV
Digital
TV
Composite
S-VIDEO
Analog
TV
X
X
X
X
X
Digital
TV
X
X
P
P
Composite
X
P
X
S-VIDEO
X
Component1
X
Component2
X
P
P
P
PC VGA
X
HDMI
P
39
Component1 Component2
PC VGA
HDMI
X
X
P
P
P
X
X
X
X
X
X
X
X
X
X
X
X
X
X
X
X
X
X
X
X
X
P
P
P
P
X
X
X
X
X
X
X
X
P
P
P
X
X
P
Managing different devices
This remote control unit can manage a TV, DVD and or VCR. No matter what device the
remote is controlling by pressing the TV, DVD or VCR for about 2 seconds. You can set the
current device to the desired setting.
Setting up the remote control
To set up the remote control: TV
1. Find your code from the Manufacturers list on Pg. 42. (it's a 3 digit code)
2. Press the "TV" button until the LED shuts off and release.
3. The LED will light up again.
4. Enter the 3 digit number. After the 3 digit number is stored the remote will flash 3 times and
will be ready to use. (if you type the 3 digit code wrong or exceed the 3 digits the LED will
flash 8 times and will go back to the previous settings).
Appendix 3 Universal remote control
TV codes
Brand
Code
Admiral
001 094
Adventura
095
Aiko
011
Akai
002
Alleron
032
Amtron
027
Anam National
027 107 108 128
AOC
003 004 005 110
Apex
146
Audiovox
027
Belcor
003
Bell & Howell
001 062 092
Bradford
027
Brokwood
003
Candle
003 005 006 095
Celebrity
002
Changhong
146
Citizen
003 005 006 011 027 076 095 096
Colortyme
003 005 007 113
Concerto
003 005
Contec/Cony
008 009 027
Craig
027
Crown
027
Curtis Mathes
000 003 005 010 076 092
CXC
027
Daewoo
003 004 005 011 012 106 115
Daytron
003 005
42
Appendix 3 Universal remote control
TV codes
43
Brand
Code
Dimensia
000
Dixi
144
Dumont
003 088
Electroband
002 003 005 013 014 015 128
Emerson
003 005 008 016 017 018 019 020 021
022 023 024 025 026 027 028 029 030
031 032 092 096 097 119 129
Envision
003 005
Fisher
033 034 035 092 098
Fujitsu
032
Funai
027 032
Futuretec
027
GE
000 003 005 015 036 037 038 066 093
099 121 128
Gibralter
003 088
Goldstar
003 004 005 008 013 014 039 040 041
090 144
Grundy
027 032
Hallmark
003 005
Harvard
027
Hitachi
003 005 008 009 042 043 097 111 112
Hitachi Pay TV
132
IMA
027
Infinity
044 145
Janeil
095
JBL
044 145
JCB
002
JC Penney
000 003 004 005 006 015 036 037 041
045 046 053 066 076 099 114
Appendix 3 Universal remote control
TV codes
Brand
Code
Jensen
003 005
JVC
008 009 037 043 047 048 091 100
Kawasho
002 003 005
Kenwood
003 005 013 014
Kloss Novabeam
049 050 095 101
VISCO
135 (domestic) 136 137 138 139 140
141 142 143 147 (exports)
KTV
027 051 096
Loewe
044
Logik
062 125
Luxman
003 005
LXI
000 005 033 044 052 053 054 092 099
145
M. Wards
125 126 127
Magnavox
003 005 006 013 044 049 050 055 056
057 063 067 101 102 126 145
Majestic
062
Marantz
003 005 044 058 144 145
Megatron
005 042
Memorex
001 005 061 062 092 125
MGA
003 004 005 013 014 015 035 059 061
Midland
037 088 099
Minutz
036
Mitsubishi
003 004 005 013 014 015 035 059 060
061 142
Montgomery Ward 062
Motorola
094 128
MTC
003 004 005 076
Multitech
027
44
Appendix 3 Universal remote control
TV codes
45
Brand
Code
NAD
005 052 053 103
NEC
003 004 005 014 064 113 128 136 137
Nikko
005 011
NTC
011
Onwa
027
Optimus
103
Optonica
071 094
Orion
024 119
Panasonic
037 044 122 124 128 145
Philco
003 004 005 006 008 013 044 049 050
055 057 063 101 102 126 128
Philips
003 006 008 013 044 049 050 055 056
065 066 067 128 143 144 145
Pilot
003
Pioneer
003 005 068 069 097 103 123
Portland
003 004 005 011
Price Club
076
Prism
037
Proscan
000 099
Proton
003 005 008 070 104
Pulser
003 088
Quasar
037 051 122 128
Radio Shack
000 003 005 008 027 033 071 092
RCA
000 003 004 005 013 072 073 074 099
106 115 116 128 132 133
Realistic
003 005 008 027 033 071 092
Runco
088
Sampo
003 005
Appendix 3 Universal remote control
TV codes
Brand
Code
Samsung
003 004 005 008 010 012 013 014 075
076 114 117 134 144
Sansui
119
Sanyo
003 033 034 059 077 092 098 140 141
SBR
144
Schneider
144
Scotch
005
Scott
003 005 008 016 024 027 032
Sears
003 005 009 013 014 032 033 034 035
048 052 053 078 079 092 098 099 105
Sharp
003 005 008 019 071 080 081 082 083
087 094
Shogun
003
Signature
001 062 125
Simpson
006
Sony
002 118 127 131
Soundesign
003 005 006 027 032
Squareview
105
SSS
003 027
Starlite
027
Supre-Macy
095
Supreme
002
Sylvania
003 005 006 013 044 049 050 055 056
057 063 067 084 101 102 126 145
Symphonic
027 105 129
Tandy
094
Tatung
097 128
Technics
037
46
Appendix 3 Universal remote control
TV codes
47
Brand
Code
Techwood
003 005 037
Teknika
003 004 005 006 008 009 011 027 032
056 061 062 076 125
Tera
104
TMK
003 005
Toshiba
033 052 053 076 078 092 114 138 139
Universal
036 066
Victor
048 100
Vidtech
003 004 005
Viking
095
Wards
001 003 004 005 016 032 036 044 055
056 062 063 066 067 071 085 086 102
129
Yamaha
004 005 013 014 049 050
Zenith
003 062 088 089 109 120 125 130
Appendix 3 Universal remote control
VCR codes
Brand
Code
Admiral
252
Adventura
264
Aiko
265
Aiwa
201 264
Akai
238 239 240 253 254
Amstrad
201
Asha
257
Audio Dynamics
255
Audiovox
258
Beaumark
257
Broksonic
256 263
Bush
200
Calix
258
Candle
257 258 259 260
Capeheart
237
Carver
216
CCE
215 265
Citizen
257 258 259 260 265
Colt
215
Craig
215 257 258 261
Curtis Mathes
241 251 257 260 262
Cybernex
257
Daewoo
237 259 263 264 265
Daytron
237
DBX
255
Dynatech
201 264
48
Appendix 3 Universal remote control
VCR codes
49
Brand
Code
Electrohome
258 266
Electrophonic
258
Emerson
201 203 204 218 240 242 247 256 258
262 263 264 266 267 268 269
Fisher
201 205 206 207 208 209 243 261
Fuji
244
Funai
264
Garrard
264
GE
210 223 241 251 257
Goldstar
211
Goodmans
200
Harwood
215
Hinari
200
Hi-Q
261
Hitachi
201 212 213 235 238
JC Penney
214 235 243 255
Jensen
212 238
JVC
238 245 255
Kenwood
238 245 255 260
KLH
215
VISCO
273
Lloyd
201
Logik
200 215
M. Wards
200 201
Magnavox
216 217 271
Marantz
216 255 260
Memorex
201 252 261
Appendix 3 Universal remote control
VCR codes
Brand
Code
MGA
218 240 266
Midland
210
Minolta
212 235
Mitsubishi
212 218 219 220 234 240 245 266
Montgomery Ward 221 252
Motorola
252
MTC
201
Multitech
200 201 210 215 260
NEC
222 238 245 255
Optimus
252
Optonica
229
Panasonic
236 272
Pentax
212 235 260
Perdio
201
Philco
216 217
Philips
216 229
Pioneer
212 223 224 245 255
Portland
237 260
Proscan
223 251
Protec
215
Radio Shack
206 207 229 252 261 266
RCA
212 223 225 226 235 241 251 253 270
Realistic
201 206 207 229 252 261 266
Ricoh
246 248
Samsung
210 239 254 259 269
Sanky
252
50
Appendix 3 Universal remote control
VCR codes
51
Brand
Code
Sansui
227 238 245
Sanyo
261
Schneider
200
Scott
218 228 256 259 263 268
Sears
205 206 207 208 212 235 243 261
Sharp
229 266
Shintom
200
Singer
246
Sony
230 244 248 249 250
STS
235
Sylvania
201 216 217 218
Symphonic
201
Tandy
201
Tashiko
201
Tatung
238
Teac
201 226
Technics
236
Teknika
201 202 231
TMK
204 262
Toshiba
206 208 218 228 259
Vector Research
259
Video Concepts
240
Wards
229 232 233 235 266
Zenith
244 246 249 250
Appendix 3 Universal remote control
CD codes
Brand
Code
ADC
414 415
Aiwa
416
Akai
417
Denon
418
Dynatech
400
Emerson
401
Fisher
402 419 420
JVC
403 421
Kenwood
404 422 423
Luxman
424
Magnavox
428
Marantz
406
NEC
405
Onkyo
407
Panasonic
408
Philips
426
Pioneer
409
RCA
410
Samsung
427
Sony
425
Technics
411
Yamaha
412 413
52
Appendix 3 Universal remote control
DVD codes
Brand
Code
Aiwa
511
Hitachi
512
JVC
505 513
VISCO
507 508 509 514 515 527
Magnavox
504
Mitsubishi (DD3000, DD2000) 503
53
NEC
508 509
Panasonic
516
Philips
504 517 518 519
Pioneer
502 506
Proscan
510
RCA
510
Sanyo
520
Sony (DVPS7700,
DVPS500D, DVPS300)
501 521 522
Toshiba (SD3108)
500 523 524 526
Zenith
525
Appendix 3 Universal remote control
Cable codes
Brand
Code
ABC
607 608 609 610
Archer
611 612
Century
612
Citizen
612
Colour Voice
613 614
Comtronic
615
Eastern
616
Garrard
612
Hytex
607
Jasco
612
Jerrold
605 609 610 617 618
VISCO
628
Magnavox
619
Movie Time
620
NSC
620
Oak
600 607 621
Panasonic
601 606
Philips
612 613 614 619 622 623 624
Pioneer
602 603 625 626
Regency
616
Samsung
615 626
Scientific Atlantic
603 604 627
Signal
615
SL Marx
615
Starcom
610
Stargate
615
Teleview
615
54
Appendix 3 Universal remote control
Cable codes
55
Brand
Code
Tocom
608 617
TV86
620
Unika
612
United Artists
607
Universal
611 612
Viewstar
619 620
Zenith
603
Appendix 3 Universal remote control
Satellite codes
Brand
Code
Alphastar
719
Chaparral
700 701
Cheyenne
701
Dishnet
718
Drake
702 703
Echostar Dish
727
GE
713 720 721
General Instruments
704 705 706
Hitachi
723 724
Hughes Network
717 728
JVC
722
Magnavox
725
Philips
725
Primestar
716
Proscan
713 720 721
RCA
713 720 721
Realistic
707
Sierra I
701
Sierra II
701
Sierra III
701
Sony
714
STS1
708
STS2
709
STS3
710
STS4
711
Toshiba
712 715
Uniden
726
56