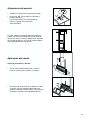
1
FRIGORIFICOCONGELADOR
FRIDGE-FREEZER
ZJB 9476 X
LIBRO DE INSTRUCCIONES
INSTRUCTION BOOKLET
2223 188-36
ADVERTENCIASY CONSEJOS IMPORTANTES
Es muy importante conservar este libro de instrucciones junto al aparato por si fuera necesario
consultarlo. Si el aparato se vendiese o transfiriese a otra persona, acuérdese de entregarlo junto con
él para que el nuevo propietario conozca el funcionamiento de la máquina y sus advertencias.
En caso de que este aparato, dotado de cierre magnético, sustituya uno con cierre automático,
aconsejamos que la cerradura de este último quede inservible, antes de deshacerse de él. Así se
evitará que los niños, jugando, puedan quedarse encerrados dentro, con grave peligro de sus vidas.
Estas advertencias han sido redactadas para su seguridad y para la seguridad de los demás. Le
rogamos, por lo tanto, leerlas atentamente antes de instalar y utilizar el aparato.
Seguridad
•
•
•
•
•
•
•
•
•
•
2
Desenchufar el aparato antes de efectuar
cualquier operación de limpieza y mantenimiento
(como la sustitución de la bombilla de iluminación
en los aparatos que la poseen).
Este aparato no está pensado para ser utilizado
por personas (incluidos los niños) con
capacidades físicas, sensoriales o mentales
reducidas, o que no tengan experiencia y
conocimiento, a menos que una persona
responsable de su seguridad les supervise o les
ofrezca instrucción en el uso del aparato.
Los niños deben ser supervisados para
asegurarse de que no jueguen con el aparato.
Es peligroso modificar o intentar modificar las
características de este aparato.
Quitar siempre el enchufe de la toma de corriente
antes de efectuar cualquier operación de limpieza o
manutención (como la substitución de la bombilla en
aquellos aparatos que la tienen).
No consumir nunca los cubitos de hielo recién
sacados del congelador ya que podrían provocar
quemaduras.
Estos aparatos son pesados. Tener cuidado en
los desplazamientos.
Este aparato contiene hidrocarburos en el circuito
refrigerante; por lo tanto el mantenimiento y la
recarga deben ser efetuados exclusivamente por
personal autorizado de la empresa.
Este aparato no contiene en el circuito
refrigerante y en el aislamiento, gases
refrigerantes nocivos para el ozono. El
aparato no debe ser eliminado junto con los
deshechos urbanos y chatarras. Se debe
evitar el daño del circiuto refrigerante, sobre
todo en la parte posterior cerca del
intercambiador.
Las informaciones sobre los centros de
recepción son suministradas por las
autoridades municipales.
Prestar la máxima atención durante las
operaciones de desplazamiento para no dañar
las partes del circuito refrigerante a fin de
evitar las posibles salidas de líquido.
El aparato no debe ser colocado cerca de
•
•
•
termosifones o cocinas a gas.
Evitar la exposición prolongada del aparato a
los rayos solares.
La parte posterior del aparato debe recibir
una circulación de aire suficiente y se debe
evitar cualquier daño al circuito refrigerante.
Solamente para los congeladores (excluidos
los empotrados): su mejor ubicación es el
sótano.
Asistencia
•
•
•
Cualquier modificación que eventualmente fuese
necesaria a la instalación eléctrica doméstica
para poder instalar el aparato tiene que ser
realizada sólo por personal competente.
Para eventuales intervenciones dirigirse a un
Centro de Asistencia Técnica autorizado y exigir
las piezas de repuesto originales.
En caso de necesitar reparaciones no intentar
hacerlas personalmente. Las reparaciones
efectuadas por personas no competentes pueden
provocar daños. Ponerse en contacto con el
Centro de Asistencia más cercano y emplear sólo
repuestos originales.
Uso
•
•
Los frigoríficos y/o congeladores domésticos
están destinados sólo a la conservación y/o
congelación de alimentos.
Las mejores prestaciones se obtienen con
temperaturas ambiente comprendidas entre
+18°C y +43°C (Clase T); +18°C y +38°C (Clase
ST); +16°C y +32°C (Clase N); +10°C y +32°C
(Clase SN); la clase de pertenencia está indicada
en la placa matrícula situada en la cámara al lado
del cajón verduras.
Atención: en caso de temperaturas ambiente
diferentes de las indicadas para la clase climática
a la cual pertenece este producto, es preciso
observar las indicaciones siguientes: cuando la
temperatura ambiente desciende por debajo del
valor mínimo puede suceder que la temperatura
de conservación en el vano congelador no esté
garantizada; por lo tanto, se aconseja que se
consuman a lo más pronto los alimentos
presentes en su interior.
•
Los productos que hayan sido descongelados no
se tienen que volver a congelar.
•
Seguir atentamente las indicaciones del
fabricante para la conservación y/o congelación
de los alimentos.
•
En todos los aparatos de refrigeración y congelación
existen superficies que se cubren con escarcha.
Según el modelo, la escarcha puede ser eliminada
automáticamente (desescarche automático) o
manualmente. No intentar nunca quitar la escarcha
con un objeto puntiagudo ya que se podría dañar
irremediablemente el evaporador. Utilizar para ello
sólo el rascador de plástico que se suministra con el
aparato. Por el mismo motivo no despegar nunca las
cubetas del hielo con un cuchillo o cualquier otro
objeto puntiagudo.
•
No colocar en el compartimiento de la baja
temperatura (congelador o conservador) bebidas
gaseosas que podrían explotar.
Instalación
•
•
El aparato se calienta considerablemente en la
proximidad del condensador y del compresor, por lo
tanto hay que verificar que el aire pueda circular
libremente alrededor del mismo. Una ventilación
insuficiente puede causar un mal funcionamiento y
daños al aparato. Seguir cuidadosamente las
instrucciones que se dan para la instalación.
Por motivos de seguridad la ventilación debe ser
efectuada como se indica en la respectiva figura.
Atención: mantener las aperturas para la
ventilación libres de cualquier obstáculo.
Una vez instalado el aparato verificar que no esté
apoyado sobre el cable de alimentación.
Importante: en caso de que el cable de
alimentación se dañe, deberá ser sustituido con
un cable especial. Ambos cables pueden ser
solicitados al fabricante o al Servicio de
asistencia.
•
Si el aparato es transportado en forma horizontal
es posible que el aceite contenido en el
compresor pase al circuito refrigerante. Esperar
por lo menos dos horas antes de poner en
marcha el aparato para dar tiempo a que el
aceite regrese al compresor.
Protección del
ambiente
Este aparato no contiene en el circuito refrigerante y en el aislamiento, gases refrigerantes
nocivos para el ozono. El aparato no debe ser
eliminado junto con los deshechos urbanos y
chatarras. Se debe evitar el dano del circinto
refrigerante, sobre todo en la parte posterior
cerca del intercambiador. Las informaciones
sobre los centros de recepciõn son
suministradas por las autoridades municipales;
Los materiales usados en este aparato marcados
con el simbolo
son reciclables.
Desguace de aparatos viejos
El símbolo
en el producto o en su embalaje indica
que este producto no se puede tratar como
desperdicios normales del hogar. Este producto se
debe entregar al punto de recolección de equipos
eléctricos y electrónicos para reciclaje. Al asegurarse
de que este producto se deseche correctamente,
usted ayudará a evitar posibles consecuencias
negativas para el ambiente y la salud pública, lo cual
podría ocurrir si este producto no se manipula de
forma adecuada. Para obtener información más
detallada sobre el reciclaje de este producto, póngase
en contacto con la administración de su ciudad, con su
servicio de desechos del hogar o con la tienda donde
compró el producto.
ADVERTENCIAS IMPORTANTES
1
Alojamiento del aparato
•
Introducir el aparato en el espacio del mueble.
•
Hacer girar 180° la escuadra para obtener la
posición exacta (2).
La posición inicial (1) es la de expedición.
•
Fijario a la pared con la escuadra
correspondiente.
2
3
INDICE
Advertencias y consejos importantes . . . . . . . . . . . . . . . . . . . . . . . . . . . . . . . . . . . . . . . . . . . . . . . .2
Uso - Limpieza de las partes internas - Panel de mandos del congelador . . . . . . . . . . . . . . . . . . . . . . . .5
Uso - Puesta en marcha - Regulación de la temperatura - Congelación de los alimentos frescos . . . . . .
Conservación de los alimentos congelados - Cubitos de hielo - Descongelación . . . . . . . . . . . . . . . . . .
de los alimentos congelado . . . . . . . . . . . . . . . . . . . . . . . . . . . . . . . . . . . . . . . . . . . . . . . . . . . . . . . . . .6
Uso - Compartimento congelador - Consejos para congelación . . . . . . . . . . . . . . . . . . . . . . . . . . . . . .7
Uso - Panel de mandos del frigorífico - Puesta en marcha - Regulación de la temperatura . . . . . . . . . . .8
Uso - Compartimento frigorífico . . . . . . . . . . . . . . . . . . . . . . . . . . . . . . . . . . . . . . . . . . . . . . . . . . . . . . .9
Manutención - Limpieza periódica - Desescarche - Làmpara de iluminaciòn . . . . . . . . . . . . . . . . . .10
Anomalias de funcionamiento - Datos técnicos . . . . . . . . . . . . . . . . . . . . . . . . . . . . . . . . . . . . . . .11
Instalación - Colocación - Conexión elétrica . . . . . . . . . . . . . . . . . . . . . . . . . . . . . . . . . . . . . . . . . . . .12
Colocación - Regulatión de la altura - Montaje de los maneles laterales . . . . . . . . . . . . . . . . . . . . . .13
Colocación - Alineamiento de las puertas . . . . . . . . . . . . . . . . . . . . . . . . . . . . . . . . . . . . . . . . . . . . . .14
Colocación - Alojamineto del aparato - Aplicacón del zócolo . . . . . . . . . . . . . . . . . . . . . . . . . . . . . . .15
4
USO
Limpieza de las partes internas
Antes del empleo limpiar todas las partes internas
con agua tibia y jabón neutro, a fin de eliminar el
característico olor de nuevo y secarlas luego
cuidadosamente.
No emplear detergentes o polvos
abrasivos que podrían dañar las superficies.
Panel de mandos del congelador
A B
C
D
E
F G
H I
A - Lámpara chivato ENCENDIDO/APAGADO
B - Botón ENCENDIDO/APAGADO del
compartimiento congelador
E - Botón para la regulación de la temperatura
(más fría)
F - Lámpara chivato de alarma
C - Botón para la regulación de la temperatura
(más caliente)
G - Botón de desactivación de la alarma
D - Indicador de la temperatura del congelador
I-
A.
B.
Lámpara chivato
ENCENDIDO/APAGADO
Botón ENCENDIDO/APAGADO
ENCENDIDO:
APAGADO:
Apretar el botón (B). La lámpara
chivato (A) se enciende.
Mantener apretado el botón (B)
hasta que se apagan la lámpara
chivato (A) y el indicador de
temperatura.
C - E.Botones para la regulación de
la temperatura
Es posible programar la temperatura entre -15°C y 24°C.
Apretando el botón (C o E), en el indicador (D)
parpadea la temperatura programada. Es posible
modificar la temperatura programada sólo cuando el
indicador parpadea. Para programar una temperatura
más caliente apretar el botón (C), para programar
una temperatura más fría apretar el botón (E). El
indicador sigue mostrando, por unos segundos, la
temperatura recién seleccionada y luego indica de
nuevo la temperatura corriente dentro del
compartimiento.
La temperatura programada es alcanzada dentro de
las 24 h.
H - Lámpara chivato Auto freeze
Botón de la función Auto freeze
Atención!
Durante el periodo de estabilización, a la primera
puesta en marcha, la temperatura mostrada puede no
corresponderse con la temperatura programada.
Durante este periodo es posible que la temperatura
mostrada sea más baja que la temperatura
programada.
D. Indicador de temperatura
Durante el funcionamiento normal indica la temperatura
media dentro del compartimiento congelador.
Atención!
Es normal tener una diferencia entre la temperatura
mostrada y la programada. En particular cuando:
- recientemente se ha modificado la temperatura
programada.
- la puerta ha quedado abierta por mucho tiempo.
- se han puesto en el frigorífico alimentos calientes.
F.
Lámpara chivato de alarma
5
G. Botón de desactivación de la
alarma
Un aumento anómalo de la temperatura del
compartimiento congelador (por es. corte de energía
eléctrica) es indicado por el parpadeo de la lámpara
chivato (F) y por una señala acústica.
Cuando se restablecen las condiciones normales la
señala acústica se apaga mientras que sigue
parpadeando la lámpara chivato de alarma.
Apretando el botón de la alarma (G) en el indicador (D)
es mostrada, por unos segundos, la temperatura más
caliente alcanzada en el compartimiento.
H. Lámpara chivato Auto freeze
I. Botón función Auto freeze
Para congelar alimentos frescos se debe activar la
función Auto freeze. Apretar el botón (I). Se enciende
la lámpara chivato (H). Cuando se acciona esta tecla se
muestra en el display el mensaje SP
Si se desea interrumpir la función de la congelación
rápida, apretar de nuevo el botón (I), de lo contrario la
función se apaga automáticamente. Se apaga la
lámpara chivato (H).
Atención!
Cuándo se debe utilizar la función Auto freeze:
unas 6
Introducción de pequeñas cantidades de
horas antes alimentos frescos (aproximadamente 5 kg)
unas 24
Introducción de la cantidad máxima de
horas antes alimentos frescos (ver la placa de datos)
no sirve
Introducción de alimentos congelados
no sirve
Introducción de pequeñas cantidades de
alimentos frescos diarios hasta 2 kg
Conservación de los alimentos
sobrecongelados
Al poner en servicio el aparato o después de un
periodo de inactividad, poner los alimentos en el
aparato después de haberlo dejado en marcha
durante por lo menos dos horas con la función Auto
freeze, seguidamente desactivar dicha función.
Importante
Puesta en servicio y regulación de
la temperatura
En caso de interrupción de corriente, no abrir
absolutamente la puerta del compartimento
congelador. Los alimentos no se deterioran si la
interrupción es breve ( un aumento de la
temperatura de los ultracongelados reduce el
perìodo de conversación) y el compartimento
congelador está lleno, de lo contrario se
aconseja consumirlos a la mayor brevedad.
•
Cubitos de hielo
•
Enchufar la clavija en la toma de corriente. Apretar el
botón (B). El compartimiento congelador está en
marcha. El compartimiento congelador está
programado para una temperatura de -18°C. Se
alcanza dicha temperatura en unas horas.
Tan pronto se enciende el compartimiento frigorífico
en el indicador (D) es mostrada la temperatura
corriente en el compartimiento congelador, parpadea
la lámpara chivato de alarma (F) y se activa la señala
acústica.
•
el botón de alarma (G).
•
Se apaga la señal acústica, mientras que sigue
parpadeando la lámpara chivato de alarma (F) hasta
cuando se alcanza la temperatura programada.
Congelación de los alimentos
frescos
El compartimiento
es apto para congelar
alimentos frescos y conservar por mucho tiempo
alimentos congelados y sobrecongelados.
Para congelar los alimentos frescos activar la
función Auto freeze por lo menos 24 horas antes.
Poner los alimentos a congelar en la sección
superior ya que es el sitio más frío.
6
El congelador lleva dos cubetas para la producción
de hielo. Llene esta cubeta con agua inasta les 3/4
partes y colóquela en los compartimientos de
congelación. No utilice nunca instrumentos
metálicos para despegar les cubetas del
congelador.
Descongelación de los alimentos
congelados
Antes de utilizar los alimentos congelados, se pueden
descongelar en el frigorífico o a temperatura
ambiente, depende del tiempo disponibile para la
operación. Los alimentos congelados pueden
cocinarse directamente sin tener que descongelarlos;
en este caso, naturalmente, el tiempo de cocción
necesario será algo más largo que el habitual.
Compartimento congelador
•
Si la congelación de los alimentos se hace
inmediatamente después de la instalación o una
larga interrupción, oprimir el botón (I)y dejar
funcionar el aparato vacío durante 4 horas como
mínimo, antes de introducir los alimentos.
Si el congelador ya funciona con algunos
alimentos en su interior, oprimir el botón (I)
24 horas antes del inicio de la congelación.
•
El piloto de alarma tiene la misión de indicar
cuando la temperatura en el interior del vano del
congelador ha ascendido a un valor tal que no se
garantiza una buena conservación de los
alimentos conservados. Cuando se pone en
marche el aparato o después de introducir una
cantidad de alimentos a congelar, este piloto
permanece encendido hasta que la temperatura
no alcanza el valor para una segura conservación
de los alimentos.
•
Los productos a congelar se colocan en el vano
de congelación rápida y una vez congelados se
distribuyen en los cestos.
•
El poder de congelación es de 13 kg max/24
horas. No congelar más cantidad de una vez.
Consejos utiles para la
congelación
Los productos a congelar deben ser frescos y estar
bien límpios.
•
Los paquetes deben hacerse pensando en el
consumo familiar de forma que se consuman de
una sóla vez.
•
Los paquetes pequeños facilitan la congelación
rápida y uniforme.
•
Los alimentos descongelados no se pueden
volver a congelar.
•
Los alimentos magros se conservan mejor y por
más tiempo que los grasos. La sal reduce el
tiempo de conservación.
•
Envolver los alimentos en bolsas u hojas de
aluminio o polietileno para uso alimentario,
adheriéndolos y cerrándolos herméticamente.
•
Pegar una etiqueta sobre cada paquete
indicando el contenido y la fecha de preparación.
•
No introducir en el congelador alimentos
calientes, botellas o recipientes con bebidas
gaseosas (pue-den explotar).
•
No cubrir completamente los recipientes con
tapa.
•
No introducir nuevos alimentos ni abrir les
puertas durante el proceso de congelación.
•
No meter nunca productos a congeiar en
contacto con otros ya congelados, ya que
aumentará la temperatura de estos últimos.
7
Panel de mandos del frigorífico
J K
L
M
N
O P
J.
Lámpara chivato ENCENDIDO/APAGADO
M
Indicador de la temperatura del frigorífico
K
Botón
ENCENDIDO/APAGADO
compartimiento frigorífico
del
N
Botón para la regulación de la temperatura del
frigorífico (más fría)
L
Botón para la regulación de la temperatura del
frigorífico (más caliente)
O
Lámpara chivato Auto fresh
P
Botón de la función Auto fresh
J.
K.
Lámpara chivato
ENCENDIDO/APAGADO
Botón ENCENDIDO/APAGADO
Atención!
Es normal tener una diferencia entre la temperatura
mostrada y la programada. En particular cuando:
ENCENDIDO: Apretar el botón (B). La lámpara
chivato (A) se enciende.
-
recientemente se ha modificado la temperatura
programada.
APAGADO:
-
la puerta ha quedado abierta por mucho tiempo.
-
se han puesto en el frigorífico alimentos
calientes.
Mantener apretado el botón (B)
hasta que se apagan la lámpara
chivato (A) y el indicador de
temperatura.
L - N.Botones para la regulación
de la temperatura
O. Lámpara chivato Auto Fresh
Es posible programar la temperatura entre +2°C y +8°C.
Apretando el botón (L o N), en el indicador (M) parpadea
la temperatura programada. Es posible modificar la
temperatura programada sólo cuando el indicador
parpadea. Para programar una temperatura más caliente
apretar el botón (L), para programar una temperatura
más fría apretar el botón (N). El indicador sigue
mostrando, por unos segundos, la temperatura recién
seleccionada y luego indica de nuevo la temperatura
corriente dentro del compartimiento.
La temperatura programada es alcanzada dentro de las
24 h.
P. Botón función Auto Fresh
Atención!
Durante el periodo de estabilización, a la primera puesta
en marcha, la temperatura mostrada puede no
corresponderse con la temperatura programada.
Durante este periodo es posible que la temperatura
mostrada sea más baja que la temperatura programada.
M. Indicador de temperatura
Durante el funcionamiento normal indica la temperatura
media dentro del compartimiento frigorífico.
8
Con la función Auto fresh se programa el frigorífico para
sus máximas prestaciones. Dicha función está
aconsejada cuando en el frigorífico se ponen grandes
cantidades de alimentos.
Apretar el botón de la función Auto fresh (P). Se
enciende la lámpara chivato (O) Auto fresh. La
temperatura interna baja hasta +2°C.
Al cabo de aproximadamente 6 horas, la función Auto
fresh se desactiva automáticamente.
Puesta en servicio y regulación de
la temperatura
Enchufar la clavija en la toma de corriente. Apretar el
botón (K). Se enciende el compartimiento frigorífico.
El compartimiento frigorífico está programado para una
temperatura de +5°C. Se alcanza dicha temperatura en
unas horas.
Compartimento frigorífico
Para una correcta apertura y cierre de las puertas
del frigorífico se aconseja actuar simultáneamente
sobre las dos puertas (como mostrado en la figura).
•
No introducir en el frigorífico ni alimentos ni
bebidas calientes, dejarlas enfriar antes a
temperatura ambiente.
• Cubrir los alimentos, en particular los de olor
pronunciado y los aromáticos.
• Disponer los alimentos de forma que el aire
pueda circular libremente entre ellos.
La posición del termostato se puede cambiar para
compensar la variación de la temperatura interna
debida a:
• Frecuencia de apertura de les puertas.
• Diferencia de temperatura ambiente.
• Cantidad de alimentos conservados.
Para una mejor utilización del espacio, les bandejas
anteriores pueden ser colocadas sobre la
posteriores.
Para obtener, el desescarchado automático del
frigorífico es necesario que el compresor tenga
periodos de pausa. Si el fondo del compartimento se
recubre de demasiada escarcha, apretar los botón
(L) para la regulación de la temperatura hasta
conseguir que el compresor tenga les pausas.
9
MANTENIMIENTO
Antes de efectuar cualquier operación de
mantenimiento, incluso les citadas en este
capítulo, desenchufe el aparato de la red de
alimentación eléctrica.
Atención
Este aparato contiene hidrocarburos en el circuito
refrigerante; por lo tanto el mantenimiento y la
recarga deben ser efectuados exclusivamente por
personal autorizado por la empresa.
Limpieza del interior
Limpiar el interior del aparato y los accesorios con
agua templada y bicarbonato sódico (una cucharada
para 4 litros de agua).
Aclarar y secar cuidadosamente. Los cajones de la
zona congelador pueden atraerse para permitir su
lavado. Para secar los cajones tirar hacia huera, y
cuando lleguen al tope, levantarlos y sacarlos de les
guías. Para montarlos se tran de introducir en les
guías y manteniéndolos inclinados, desplazarlos
hacia dentro.
Desescarche
La escarcha del evaporador del compartimento
refrigerante se elimina automáticamente a cada
interrupcion del motocompresor. El agua de la
escarcha derretida, mediante un canal adecuado, se
recoge en un pequeño depósito colocado en la parte
posterior sobre el motocompresor del aparato, de
donde evapora.
Se recomienda limpiar periódicamente el agujero
de desagüe del agua de desescarche, situado en
la parte central del canal en el compartimiento
refrigerante, utilizando el «limpiador» adecuado
que se encuentra en el agujero, para evitar que el
agua de desescarche caiga sobre los alimentos.
D037
Atención
Se recomienda no utilizar utensilios metálicos
para quitar la escarcha a fin de evitar graves
daños al aparato.
No usar dispositivo mecánico alguno u otro
medio artificial para acelerar el processo de
desescarche excepto los recomendados.
Sustitución de les lámpara
Compartimento frigorifico:
Se efectúa sacando el plafón. Emplear lámparas de
15 W máximo.
10
D051
ANOMALIAS DE FUNCIONAMIENTO
Si algo no funciona, antes de llamar al SERVICIO
TECNICO, comprobar que se han seguido todas les
indicaciones dadas en este libro.
Los compresores no funcionan.
• Corte de corriente.
•
Interruptor general ON/OFF en posición «OFF».
La iluminación interior no funciona.
• Lámpara floja o fundida.
Agua en el compartimento frigorífico.
• Desagüe obstruído.
El rendimiento no es el óptimo.
Apertura frecuente de les puertas, una gran cantidad
de alimentos se ha introducido de una sóla vez.
• Aireación insuficiente.
Para que el SERVICIO TECNICO pueda atenderle
adecuadamente es preciso que cuando llame facilite
la siguiente información sobre su aparato.
Modelo (Mod.)
Número del producto (Prod. No.)
Número de fabricación (Ser. No.) que están en el
certificado de garantía o en la tarjeta matricula que
se ve sacando el cajón derecho.
DATOS TÉCNICOS
Capacidad neta del frigorífico en litros
Capacidad neta del congelador en litros
338
96
Consumo energético en kWh/día
1,140
Consumo energético en kWh/año
416
Capacidad de congelación en kg/día
13
Tiempo de aumento de la temperatura de –18°C a –9°C por hora
14
Los datos técnicos se indican en la placa-matrícula situada sobre el lado izquierdo interno del aparato.
11
INSTALACIÓN
En el caso que este aparato, dotado de cierre
magnético, sustitaya uno con cierre automático,
aconsejamos inutilizar la cerradura de este último,
antes de deshacerse de él. Así se evitará que los
niños, jugando, puedan quedarse encerrados dentro,
con grave peligro para sus vidas.
instalación de tierra, conforme a las leyes en vigor,
consultando para ello con un técnico especializado.
Colocación
- 87/308 CEE del 2/6/87 relativa a la supresión de
interferencias radio.
- 73/23 CEE 19/02/73 (Baja tensión) y
modificaciones sucesivas;
- 89/336 CEE 03/05/89 (Compatibilidad
electromagnética) y modificaciones sucesivas.
Situar el aparato lejos de fuentes de calor, como:
radiadores, estufas, exposición directa a los rayos
del sol, etc.
Conexión eléctrica
Antes de enchufar el aparato, asegurarse de que la
tensión y la frecuencia indicadas en la tarjeta
matrícula, correspondan a las de la instalación
doméstica. Se admite una oscilación de 6% sobre la
tensión nominal.
Para el funcionamiento a tensiones distintas, habrá
que utilizar un autotransformador de potencia
adecuada. Asegurarse de que la toma de corriente y
el enchufe sean compatibles entre sí sin tener que
interponer reducciones ladrones o adaptadores
varios. Si fuera necesario, cambiar la toma de la
instalación de la casa con una adapta.
Es indispensable conectar el aparato a una toma
de tierra eficaz.
Para ello el enchufe del cable de alimentación está
dotado de un adecuado contacto. Si la toma de
corriente de la instalación doméstica no estuviera
conectada a tierra, conectar el aparato a una
12
El fabricante declina toda responsabilidad en el
caso que esta norma no sea respetada.
Este aparato es conforme a las siguientes
Directivas Comunitarias:
Atención
Se debe poder desenchufar el aparato; por lo tanto
una vez efectuada la instalación es necesario que el
enchufe no quede escondido
COLOCACION
Regulación de la altura
El aparato ofrece la posibilidad de regular la altura
para permitir la alineación con los otros muebles de
la cocina de 820 mm a 870 mm.
820
870
820
Antes de introducir el aparato entre los muebles
regular ia altura de les ruedas posteriores y de les
patas. Las ruedas salen de fábrica posicionadas a
820 mm. Para alinear al aparato a la medica de 870
mm levantarlo, actuando sobre les cuatro patas con
la flave apropiada, desmontar les ruedas y fjarlas en
la posición más baja.
870
CANTO
POSTERIOR
Montaje de los paneles laterales
•
Fijar les escuadras sobre los paneles en les
posiciones indicadas en la figura.
La cota de 260* mm está prevista para un zócalo
de 100 mm de altura debajo del panel. Para otras
dimensiones de zócalo, la cote 260* mm se
deberá aumentar de consecuencia.
CANTO
ANTERIOR
PANEL LATERAL
DERECHO
15
820
17,5
CARA
INTERNA
15
280
64
539
541 30
•
Apoyar los paneles en el aparato.
•
Fijar las escuadras posteriores teniendo en
cuenta el espesor de los paneles (ancho máx. del
mueble 900 mm).
•
Para una correcta alineación controlar que la
distancia entre el aparato y el mueble sea de
45 mm.
•
Fijar los paneles en la parte anterior.
•
Controlar la alineación de las puertas, tras aflojar
las tuercas y los tornillos de fijación, mediante las
ranuras.
•
Apretar los tornillos de bloqueo ya previstos.
1015
260*
13
Alineamiento de las puertas
(si necesario)
•
Cerrar la puerta y controlar que el panel quede a
la altura deseada; en caso contrario, quitar la
tapa de la brida y ajustarla mediante los tornillos
de regulación.
•
Utilizar los mismos tornillos de ajuste para
efectuar la alineación vertical de las propias
puertas
=
10
•
Comprobar la alineación horizontal de las puertas
y eventualmente corregir su posición
desplazándolas a lo largo de las ranuras.
•
Abrir la puerta.
Regular la planituz entre los paneles mediante la
brida y la escuadra inferior.
•
Tras alinear las puertas, apretar las tuercas de la
brida y los tornillos de la brida pequeña inferior.
•
Por último, poner la tapa de la brida.
14
=
Alojamiento del aparato
•
Introducir el aparato en el espacio del mueble.
•
Hacer girar 180° la escuadra para obtener la
posición exacta (2).
La posición inicial (1) es la de expedición.
•
Fijario a la pared con la escuadra
correspondiente.
1
2
50
50
La parte superior del aparato debe estar libre para
permitir una buena circulación del aire. Si sobre el
mismo se instala un armario, deberá estar separado
de la pared de 50 mm y en la parte superior deberá
estar separado del techo de 50 mm.
25
820
870
Aplicación del zócalo
Altura de alineación h= 820 mm
170
220
•
Con una altura del zócalo de 140 a 170 mm
hacer un escote como se indica en la figura.
90
0
140
30 190
100
•
Con zócalo de altura superior a 100 mm e inferior
a 140 mm cortar el compensador estético en
dotación y montarlo entre el zócalo y la parrilla de
ventilación, fijándolo a presión debajo de ésta.
140
190
15
•
Con zócalo de 100 mm montar el compensador
estético completo regulable en profundidad.
Altura de alineación h= 870 mm
•
Con altura del zócalo de 190 a 220 mm hacer un
escote como se indica en la figura.
•
Con zócalo de altura superior a 150 mm e inferior
a 190 mm cortar el compensador estético en
dotación al aparato y montarlo entre el zócalo y la
parrilla de ventilación.
30
100
•
Con zóbalo de 150 mm, montar el compensador
estético regulable en profundidad.
•
Si el aparato se coloca en la cocina, al final de la
disposición colocar la pata E para enganchar el
zócalo.
16
E
100
150
WARNINGS
It is most important that this instruction book should be retained with the appliance for future
reference. Should the appliance be sold or transferred to another owner, or should you move house
and leave the appliance, always ensure that the book is supplied with the appliance in order that the
new owner can be acquainted with the functioning of the appliance and the relevant warnings.
If this appliance featuring magnetic door seals is to replace an older appliance having a spring lock
(latch) on the door or lid, be sure to make that spring lock unusable before you discard the old
appliance. This will prevent it from becoming a death-trap for a child.
These warnings are provided in the interest of safety. You must read them carefully before installing or
using the appliance.
General Safety
•
This appliance is not intended for use by persons
(including children) with reduced physical,
sensory or mental capabilities, or lack of
experience and knowledge, unless they have
been given supervision or instruction concerning
use of the appliance by a person responsible for
their safety.
Children should be supervised to ensure that
they do not play with the appliance.
•
It is dangerous to alter the specifications or
modify this product in any way.
•
Before any cleaning or maintenance work is carried
out, be sure to switch off and unplug the appliance.
•
This appliance is heavy. Care should be taken
when moving it
•
Ice lollies can cause frost burns if consumed
straight from the appliance.
•
Take utmost care when handling your
appliance so as not to cause any damages to
the cooling unit with consequent possible
fluid leakages.
•
Under no circumstances should you attempt to
repair the appliance yourself. Repairs carried out
by inexperienced persons may cause injury or
more serious malfunctioning. Refer to your local
Service Centre, and always insist on genuine
spare parts.
•
This appliance contains hydrocarbons in its
cooling unit; maintenance and recharging must
therefore only be carried out by authorized
technicians.
Use
•
The domestic refrigerators and freezers are
designed to be used specifically for the storage of
edible foodstuffs only.
•
Best performance is obtained with ambient
temperature between +18°C and +43°C (class T);
+18°C and +38°C (class ST); +16°C and +32°C
(class N); +10°C and +32°C (class SN). The class
of your appliance is shown on its rating plate.
Warning: when the ambient temperature is not
included within the range indicated for the class
of this appliance, the following instructions must
be observed: when the ambient temperature
drops below the minimum level, the storage
temperature in the freezer compartment cannot
be guaranteed; therefore it is advisable to use the
food stored as soon as possible.
•
The appliance must not be located close to
radiators or gas cookers.
•
Avoid prolonged exposure of the appliance to
direct sunlight.
•
There must be adequate ventilation round the
back of the appliance and any damage to the
refrigerant circuit must be avoided.
•
•
For freezers only (except built-in models): an
ideal location is the cellar or basement.
Frozen food must not be re-frozen once it has
been thawed out.
•
•
Do not use other electrical appliances (such
as ice cream makers) inside of refrigerating
appliances.
Manufacturers’ storage recommendations should
be strictly adhered to. Refer to relevant
instructions.
•
The inner lining of the appliance consists of
channels through which the refrigerant passes. If
these should be punctured this would damage the
appliance beyond repair and cause food loss. DO
NOT USE SHARP INSTRUMENTS to scrape off
frost or ice. Frost may be removed by using the
scraper provided. Under no circumstances should
solid ice be forced off the liner. Solid ice should be
allowed to thaw when defrosting the appliance.
Service/Repair
•
Any electrical work required to install this
appliance should be carried out by a qualified
electrician or competent person
•
This product should be serviced by an authorized
Service Centre, and only genuine spare parts
should be used.
17
•
Do not place carbonated or fizzy drinks in the
freezer as it creates pressure on the container,
which may cause it to explode, resulting in
damage to the appliance.
Attention: keep ventilation openings clear of
obstruction.
This appliance does not contain gasses which
could damage the ozone layer, in either its
refrigerant circuit or insulation materials. The
appliance shall not be discarded together with
the urban refuse and rubbish. Avoid damaging
the cooling unit, especially at the rear near the
heat exchanger. Information on your local
disposal sites may be obtained from municipal
authorities. The materials used on this appliance
marked by the symbol
are recyclable.
Care must be taken to ensure that the appliance
does not stand on the electrical supply cable.
Disposal of old Appliances
Installation
•
•
Environment Protection
During normal operation, the condenser and
compressor at the back of the appliance heat up
considerably. For safety reasons, minimum
ventilation must be as shown in the instructions.
Important: if the supply cord is damaged, it must
be replaced by a special cord or assembly available from the manufacturer or its service agent.
•
If the appliance is transported horizontally, it is
possible that the oil contained in the compressor
flows in the refrigerant circuit. It is advisable to
wait at least two hours before connecting the
appliance to allow the oil to flow back in the
compressor.
•
There are working parts in this product which
heat up. Always ensure that there is adequate
ventilation as a failure to do this will result in
component failure and possible food loss. See
installation instructions.
•
Parts which heat up should not be exposed.
Wherever possible the back of the product should
be against a wall.
The symbol
on the product or on its packaging
indicates that this product may not be treated as
household waste. Instead it shall be handed over to
the applicable collection point for the recycling of
electrical and electronic equipment. By ensuring this
product is disposed of correctly, you will help prevent
potential negative consequences for the environment
and human health, which could otherwise be caused
by inappropriate waste handling of this product. For
more detailed information about recycling of this
product, please contact your local city office, your
household waste disposal service or the shop where
you purchased the product.
IMPORTANT SAFETY INFORMATION
Building the appliance in
•
Fit the appliance into the recess.
•
Rotate the bracket of 180° in order to obtain the
right position ( 2).
The position (1) is on the delivery.
•
Fix it to a solid wall with the appropriate bracket.
18
1
2
CONTENTS
Warnings . . . . . . . . . . . . . . . . . . . . . . . . . . . . . . . . . . . . . . . . . . . . . . . . . . . . . . . . . . . . . . . . . . . . . . . . . . .17
Use - Cleaning the interior - Use of the freezer - Control panel . . . . . . . . . . . . . . . . . . . . . . . . . . . . . . . . . . . . . .20
Use - Operation - Freezing fresh food - Storage of frozen food - Thawing - Ice-cube production - . . . . . . . . . . .21
Use - Freezer Compartment - Useful hints for freezing . . . . . . . . . . . . . . . . . . . . . . . . . . . . . . . . . . . . . . . . . . .22
Use - Use of the refrigerator - Control panel - Operation . . . . . . . . . . . . . . . . . . . . . . . . . . . . . . . . . . . . . . . . . . .23
Use - Refrigerator Compartment . . . . . . . . . . . . . . . . . . . . . . . . . . . . . . . . . . . . . . . . . . . . . . . . . . . . . . . . . . . . .24
Maintenance - Periodic cleaning - Defrosting - Interior light . . . . . . . . . . . . . . . . . . . . . . . . . . . . . . . . . . . . .25
Troubleshooting - Technical information - . . . . . . . . . . . . . . . . . . . . . . . . . . . . . . . . . . . . . . . . . . . . . . . .26
Installation - Location - Electrical connection . . . . . . . . . . . . . . . . . . . . . . . . . . . . . . . . . . . . . . . . . . . . . . . .27
Positioning - Height adjustment - Fitting the side panels . . . . . . . . . . . . . . . . . . . . . . . . . . . . . . . . . . . . . .28
Positioning - Adjustment panels . . . . . . . . . . . . . . . . . . . . . . . . . . . . . . . . . . . . . . . . . . . . . . . . . . . . . . . . . .29
Positioning - Building the appliance in - Fitting the plinth . . . . . . . . . . . . . . . . . . . . . . . . . . . . . . . . . . . . . .30
OPERATION
Cleaning the interior
Do not use detergents or abrasive
powders, as these will damage the finish.
Before using the appliance for the first time, wash
the interior and all internal accessories with lukewarm water and some neutral soap so as to remove
the typical smell of a brand-new product, then dry
thoroughly.
Use of the freezer
Control panel
A B
C
D
E
F G
H I
A
ON/OFF light
B
Freezer button ON/OFF
C
Temperature setting button (warmest)
D
Temperature indicator
E
Temperature setting button (coldest)
F
Alarm reset light
G
Alarm reset button
H
Auto Freeze light
I
Auto Freeze button
A. Light ON/OFF
B. Button ON/OFF
ON:
Press the button (B). The pilot light (A)
switches on.
OFF: Keep press the button (B) until the pilot light (A)
and the temperature indicator switched off.
Attention!
During the stability period by the first starting the
temperature displayed can not correspond to the
setting temperature.
D. Temperature indicator
During normal functioning the indicator shows the
temperature inside the freezer.
C - E. Temperature setting buttons
The temperature can be adjusted between -15°C
and -24°C.
By pressing the button (C or E), the current
temperature setting flashes on the indicator. It is
possible to modify the setting temperature only with
flashed indicator. To set a warmer temperature, press
button (C). To set a colder temperature, press button
(E). The indicator display the newly selected
temperature for a few seconds and then shows again
the inside compartment temperature.
The newly selected-temperature must be reached
after 24 hours.
20
Attention!
Difference between the temperature displayed and
temperature setting is normal. Especially when:
-
a new setting has recently been selected
-
the door has been left open for a long time
-
warm food has been placed in the compartment.
F. Alarm reset light
Warning!
G. Alarm reset button
When use the “Auto freeze” function:
In the event of an abnormal temperature rise inside
the freezer (e.g. power cut) warning light (F) will start
to flash and a buzzer will sound.
After the temperature has returned to normal, the
warning light (F) will continue to flash, although the
buzzer has stopped.
When the alarm button (G) is pressed, the warmest
temperature reached in the compartment flashes on
the indicator (D).
If the power has been off for a long time, frozen food
should be consumed as quickly as possible, or
cooked and then re-frozen.
H. Auto Freeze pilot light
I. Auto Freeze button
To freeze fresh foods, the “Auto freeze” function must
be actived. Press the auto freeze button (I).The
relevant pilot light (H) switches on. When this function
is on, SP is shown on the dispay .
The function can be deactived at any time, by
pressing the button (I), otherwise it automatically
switched off. With deactived functionth pilot light (H)
switches off.
Operation
Insert the plug in the power socket. Press the button
ON/OFF (B). The freezer is switched on.
The freezer is pre-set to run at -18°C. this
temperature will be reached in a few hours.
As soon as the appliance is switched on the
temperature indicator (D) shows the current
temperature inside the freezer, the alarm reset light
(F) flashes and a buzzer sounds. Press the alarm
reset button (G). The buzzer stops and the alarm
light (F) continues to flash until the setting
temperature is reached.
Freezing fresh food
To freeze fresh food, press the Auto freeze button (I)
at least 24 hours before.
about 6 hrs Introducing small quantities of fresh food
before
(about 5 kg)
about 24 hrs Introducing the maximum quantity of food
before
(see rating plate)
not needed Introducing frozen food
not needed
Introducing small quantities of fresh food
daily 2 kg maximum
Storage of frozen food
When first starting-up or after a period out of use,
before putting the products in the compartment let
the appliance run for at least two hours on the Auto
freeze setting, then push again the Auto Freeze
button.
Important
In the event of accidental defrosting, for example
due to a power failure, if the power has been off
for longer that the value shown in the technical
characteristics chart under “rising time”, the
defrosted food must be consumed quickly or
cooked immediately and then refrozen (after
cooling).
Thawing
Deep-frozen or frozen food, prior to being used, can
be thawed in the refrigerator compartment or at
room temperature, depending on the time available
for this operation.
Small pieces may even be cooked still frozen, directly
from the freezer: in this case, cooking will take longer.
Ice-cube production
This appliance is equipped with one or more trays
for the production of ice-cubes. Fill these trays with
water, then put them in the freezer compartment.
Do not use metallic instruments to remove the
trays from the freezer.
Place the food to be frozen in the fast freeze
compartment. The maximum quantity of food which
can be frozen in 24 hrs. is shown on the rating plate.
21
Freezer compartment
•
If food is to be frozen immediately after having
installed the appliance or after a prolonged period
out of use, push the button (I) and allow the
appliance to run for at least 4 hours before
placing the food in it.
If the freezer is already operating, with food inside
it, push the button (I) 24 hours before loading
food to be frozen.
•
The alarm light indicates when the temperature
inside the freezer compartment has risen to a
point at which safe storage of frozen foods can no
longer be guaranteed. When the appliance is first
started up, or after having loaded a quantity of
food to be frozen, this warning light will stay or
until a safe storage temperature has been
reached.
•
Products to be frozen should be placed in the fast
freeze compartment and, once frozen, moved to
the storage baskets.
•
The maximum freezing capacity is 13 kg in 24
hours. Do not freeze more than one quantity at a
time.
Useful hints for freezing
•
Products to be frozen should be fresh and clean.
•
Pack foods in suitable family portions which can
be used up all at once.
•
Small packs allow fast and uniform freezing.
•
Lean foods keep better and longer than fatty
foods. Salt reduces the storage life of food.
•
Wrap foods closely in aluminium foil or plastic
bags or film, and make sure they are properly
sealed.
•
Attach a label to each pack, indicating the
contents and the date on which it was prepared.
•
Never place hot foods, bottles or containers with
fizy drinks in the freezer (they could explode).
•
Do not fill containers with lids right to the brim.
•
Do not add more food or open the doors during
the freezing process.
•
Never place food to be frozen in contact with
already frozen food, as this would increase the
temperature of the latter.
22
Use of the refrigerator
Control Panel
J K
L
M
N
O P
J
ON/OFF light
N
Temperature setting button (coldest)
K
Fridge button ON/OFF
O
Auto fresh light
L
Temperature setting button (warmest)
P
Auto fresh button
M
Temperature indicator
J. Light ON/OFF
K. Button ON/OFF
ON:
Press the button (K). The pilot light (J)
switches on.
OFF: Keep press the button (K) until the pilot light (J)
and the temperautre indicator switched off.
Attention!
Difference between the temperature displayed and
temperature setting is normal. Especially when:
- a new setting has recently been selected
- the door has been left open for a long time
- warm food has been placed in the compartment
L - N. Temperature setting buttons
O. Auto fresh pilot light
The temperature can be adjusted between +2°C and
+8°C.
P. Auto fresh button
By pressing the button (L or N), the current
temperature setting flashes on the indicator. It is
possible to modify the setting temperature only with
flashed indicator. To set a warmer temperature, press
button (L). To set a colder temperature, press button
(N). The indicator display the newly selected
temperature for a few seconds and then shows again
the inside compartment temperature.
The maximum performance is obtained by setting
the Auto fresh function. It’s recommended when
loading large quantities of food.
The newly selected-temperature must be reached
after 24 hours.
Press the Auto fresh button (P).The relevant pilot
light (O) switches on.
The internal temperature goes down to +2°C.
After about 6 hours the Auto fresh function switches
off automatically.
Operation
Attention!
During the stability period by the first starting the
temperature displayed can not correspond to the
setting temperature. During this time it is possible
that the temperature displayed is lower than the
setting temperature.
Insert the plug in the power socket. Press the button
ON/OFF (K). The fridge is switched on.
The fridge is pre-set to run at +5°C. This temperature
will be reached in a few hours.
M. Temperature indicator
During normal functioning the indicator shows the
temperature inside the fridge.
23
Refrigerator compartment
For proper opening and closing, it is advisable to act
on both doors simultaneously (as shown in the
figure).
•
Do not place hot food or drinks in the refrigerator;
wait until they trave cooled to room temperature.
•
Always cover foods, especially those which are
strong-smelling or aromatic.
•
Place foods so that air can circuiate freely round
them.
The temperature selected may be adjusted to
compensate for temperature variations due to:
•
The frequency with which the doors are opened.
•
Difference in ambient temperature.
•
Quantity of food being stored.
To make the best use of available space, the front
half-shelves may be stacked on top of the rear
halfshelves.
To achieve automatic defrosting of the refrigerator,
the compressor must cut out from time to time. If the
bottom of the compartment becomes covered with
too much frost, push the warmer temperature button
(L) until the compressor starts to cut out periodically.
24
MAINTENANCE
Before carrying out any maintenance operations,
including those described in this book, unplug
the appliance from the mains supply.
Warning
This appliance contains hydrocarbons in its cooling
unit; maintenance and recharging must therefore
only be carried out by authorized technicians.
Periodic cleaning
Clean the inside of the appliance and the accessories with a solution of lukewarm water and bicarbonate of soda (one tablespoonful of soda to 4 litres
of water). Rinse and dry thoroughly.
The freezer compartment drawers can be removed
for washing. To remove the drawers, pull them out
until they reach the stop, then lift and withdraw them
from the guides. To refit the drawers, engage them in
the guides then, keeping them tilted, push them
inwards.
Defrosting
To achieve automatic defrosting of the refrigerator,
the compressor must cut out from time to time. If the
bottom of the compartment becomes covered with
too much frost,select the temperature towards a
warmer setting until the compressor starts to cut out
periodically.
It is important to periodically clean the defrost water
drain hole in the middle of the refrigerator
compartment channel to prevent the water
overflowing and dripping onto the food inside. Use
the special cleaner provided, which you will find
already inserted into the drain hole.
D037
Important:
Never use sharp metal tools to scrape off frost
from the evaporator as you could damage it.
Do not use a maechanical device or any artificial
means to speed up the thawing process other
than those recommended by the manufacturer.
Interior light
Refrigerator compartment
Remove the cover. Use bulbs of 15 W max.
D051
25
TROUBLESHOOTING
If something is not working properly, make sure that
all the instructions in this book trave been followed
before calling the SERVICECENTRE.
The compressore are not working
•
Power cut or power supply problem.
•
Mains On/Off switch in position “0”.
The interior lights are not working
•
Bulb loose or blown.
Water in the refrigerator compartment
•
Drain hole blocked.
Poor performance
•
Frequent opening of doors, large quantity of food
placed in appliance all at the seme time.
•
Inadequate ventilation.
To help the SERVICE CENTRE provide you with fast
efficient cervice, please quote the following details
when calling
Model (Mod.)
Product number (Prod. No.)
Serial number (Ser. No.)
which can be found on the guarantee certificate or
on the rating plate, visible in the position shown by
the arrow (see Fig.) after having removed the righthand drawer.
TECHNICAL INFORMATION
Net Fridge Capacity lt.
Net Freezer Capacity lt.
338
96
Energy Consumption kWh/24h
1,140
Energy Consumption kWh/year
416
Freezing Capacity 24h
13
Rising time
14
The technical infomation are situated in the rating plate on the internal left side of the appliance .
26
INSTALLATION
If this appliance featuring magnetic door seals is
to replace an older appliance having a spring
lock (latch) on the door or lid, be sure to make
that spring lock unusable before you discard the
old appliance. This will prevent it from becoming
a death-trap for a child.
Location
The appliance should be installed well away from
sources of heat such as radiators, boilers, direct
sunlight etc.
For buiding into the kitchen units follow the special
“Building-in” instructions given.
Electrical connection
Before plugging in, ensure that the voltage and
frequency shown on the serial number plate
correspond to your domestic power supply. Voltage
can vary by ±6% of the rated voltage.
For operation with different voltages, a suitably sized
auto-transformer must be used.
The appliance must be earthed.
The power supply cable plug is provided with a
contact for this purpose.
If the domestic power supply socket is not earthed,
connect the appliance to a separate earth in
compliance with current regulations, consulting a
specialist technician.
The Manufacturer declines all responsibility if
the above safety precautions are not observed.
This appliance complies with the following
E.E.C. Directives:
- 87/308 EEC of 2/6/87 relative to radio interference
suppression.
- 73/23 EEC of 19.2.73 (Low Voltage Directive) and
subsequent modifications;
- 89/336 EEC of 3.5.89 (Electromagnetic
Compatibility Directive) and subsequent
modifications.
Important
It must be possible to disconnect the appliance from
the mains power supply; the plug must therefore be
easily accessible after installation
27
POSITIONING
Height adjustment
The height of the appliance is adjustable from 820 to
870 mm to fine up with existing kitchen units.
820
870
Before installing the appliance between unite, adjust
the height of the feet and rear wheels. The wheels
are factory set for a height of 820 mm. To align the
appliance to a height of 870 mm, raise it by adjusting
the feet with a spanner, then remove the wheels and
refit them in the lowest position.
820
870
Fitting the side panels
•
Fit the brackets onto the panels in the positions
shown in the diagram. The dimension of 260* mm
is allowed for fitting a 100 mm plinth below the
panel. For different plinth sizes, increase the
dimension of 260* mm accordingly.
REAR
EDGE
FRONT
EDGE
RIGHT HAND
SIDE PANEL
15
820
17,5
INSIDE
FACE
15
280
1015
64
539
541 30
•
Rest the panels against the appliance.
•
Fit the rear brackets, taking into account the
thickness of the panels (maximum width of unit
900 mm).
•
For a correct alignment make sure that the
distance between the appliance and the cabinet
is of 45 mm.
•
Secure the panels at the front.
•
Check the alignment of the doors, loosening the
fixing nuts and screws and by means of the slots.
•
Tighten the clamp screw on the bottom hinges of
the doors.
28
260*
Adjustment panels (if necessary)
•
Close the door and check that the small door is
positioned at the required height, removing the
bracket cover and operating the adjustment
screws if necessary.
•
Use the same adjustment screws to align the
doors vertically.
=
•
Check horizontal alignment of the outer door
panels and, if necessary, correct their position by
moving them along the slots.
•
Open the door.
Adjust the levelness of the small doors by means
of the bracket and small bottom bracket.
•
After aligning the doors, fix the nuts of the bracket
and the screws of the small bottom bracket.
•
Then refit the bracket cover.
10
=
29
Building the appliance in
•
Fit the appliance into the recess.
•
Rotate the bracket of 180° in order to obtain the
right position ( 2).
The position (1) is on the delivery.
•
Fix it to the wali with the appropriate bracket.
•
The top of the appliance must be kept ciear to
allow better air circulation. If a wall unit is fitted
above the appliance, there must be a gap of 50
mm between this unit and the wall and it must be
at least 50 mm below the ceiling.
1
2
50
50
25
Fitting the plinth
Alignment height of 820 mm
820
870
•
If using a 140 to 170 mm plinth, make a cut-out
as shown.
170
220
90
0
140
30 190
100
•
30
If using a plinth higher than 100 mm but less than
140 mm, cut the height compensation strip
supplied with the appliance to the required depth
and fit it between the plinth and the ventilation
griile, pressing it into position below this grille.
140
190
•
If using a 100 mm plinth, fit the complete height
compensation strip.
Alignment height of 870 mm
•
If using a 190 to 220 mm plinth, make a shown.
•
If using a plinth higher than 150 mm but less than
190 mm, cut the height compensation strip
supplied with the appliance to the required depth
and fit it between the plinth and the ventilation
grille.
•
If using a 150 mm plinth, fit the complete height
compensation strip.
•
If the appliance is installed at the end of a row of
units, insert foot E to hold the plinth in place.
30
100
100
150
E
31
www.Electrolux.com
ww.zanussi.com.es